Canvas
WdCanvas
Basic Capabilities Description
- The basic properties of canvas provide two types, 2d and webgl, to choose from.
- Under different canvas types, each provides a set of example templates for user reference.
Extended Scenarios Description
Example: How to Set Up Page Watermark
The expected effect is as follows:
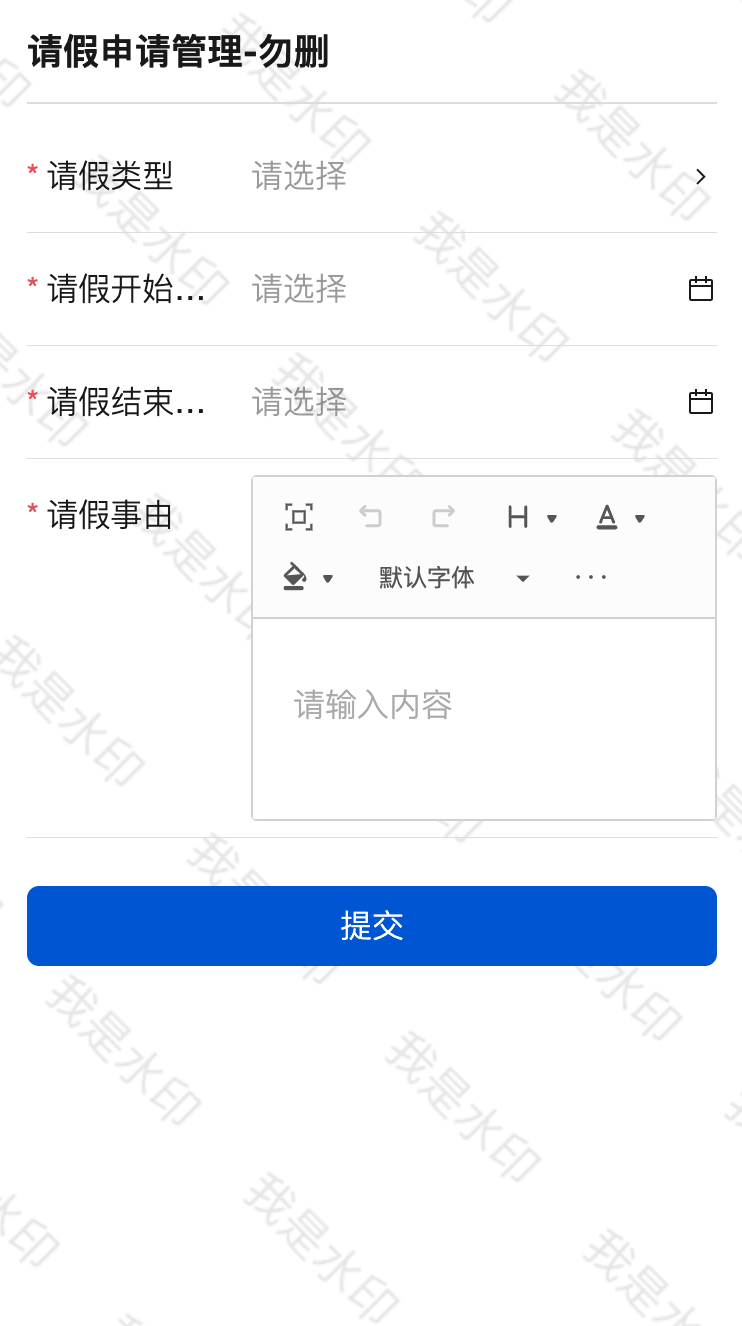
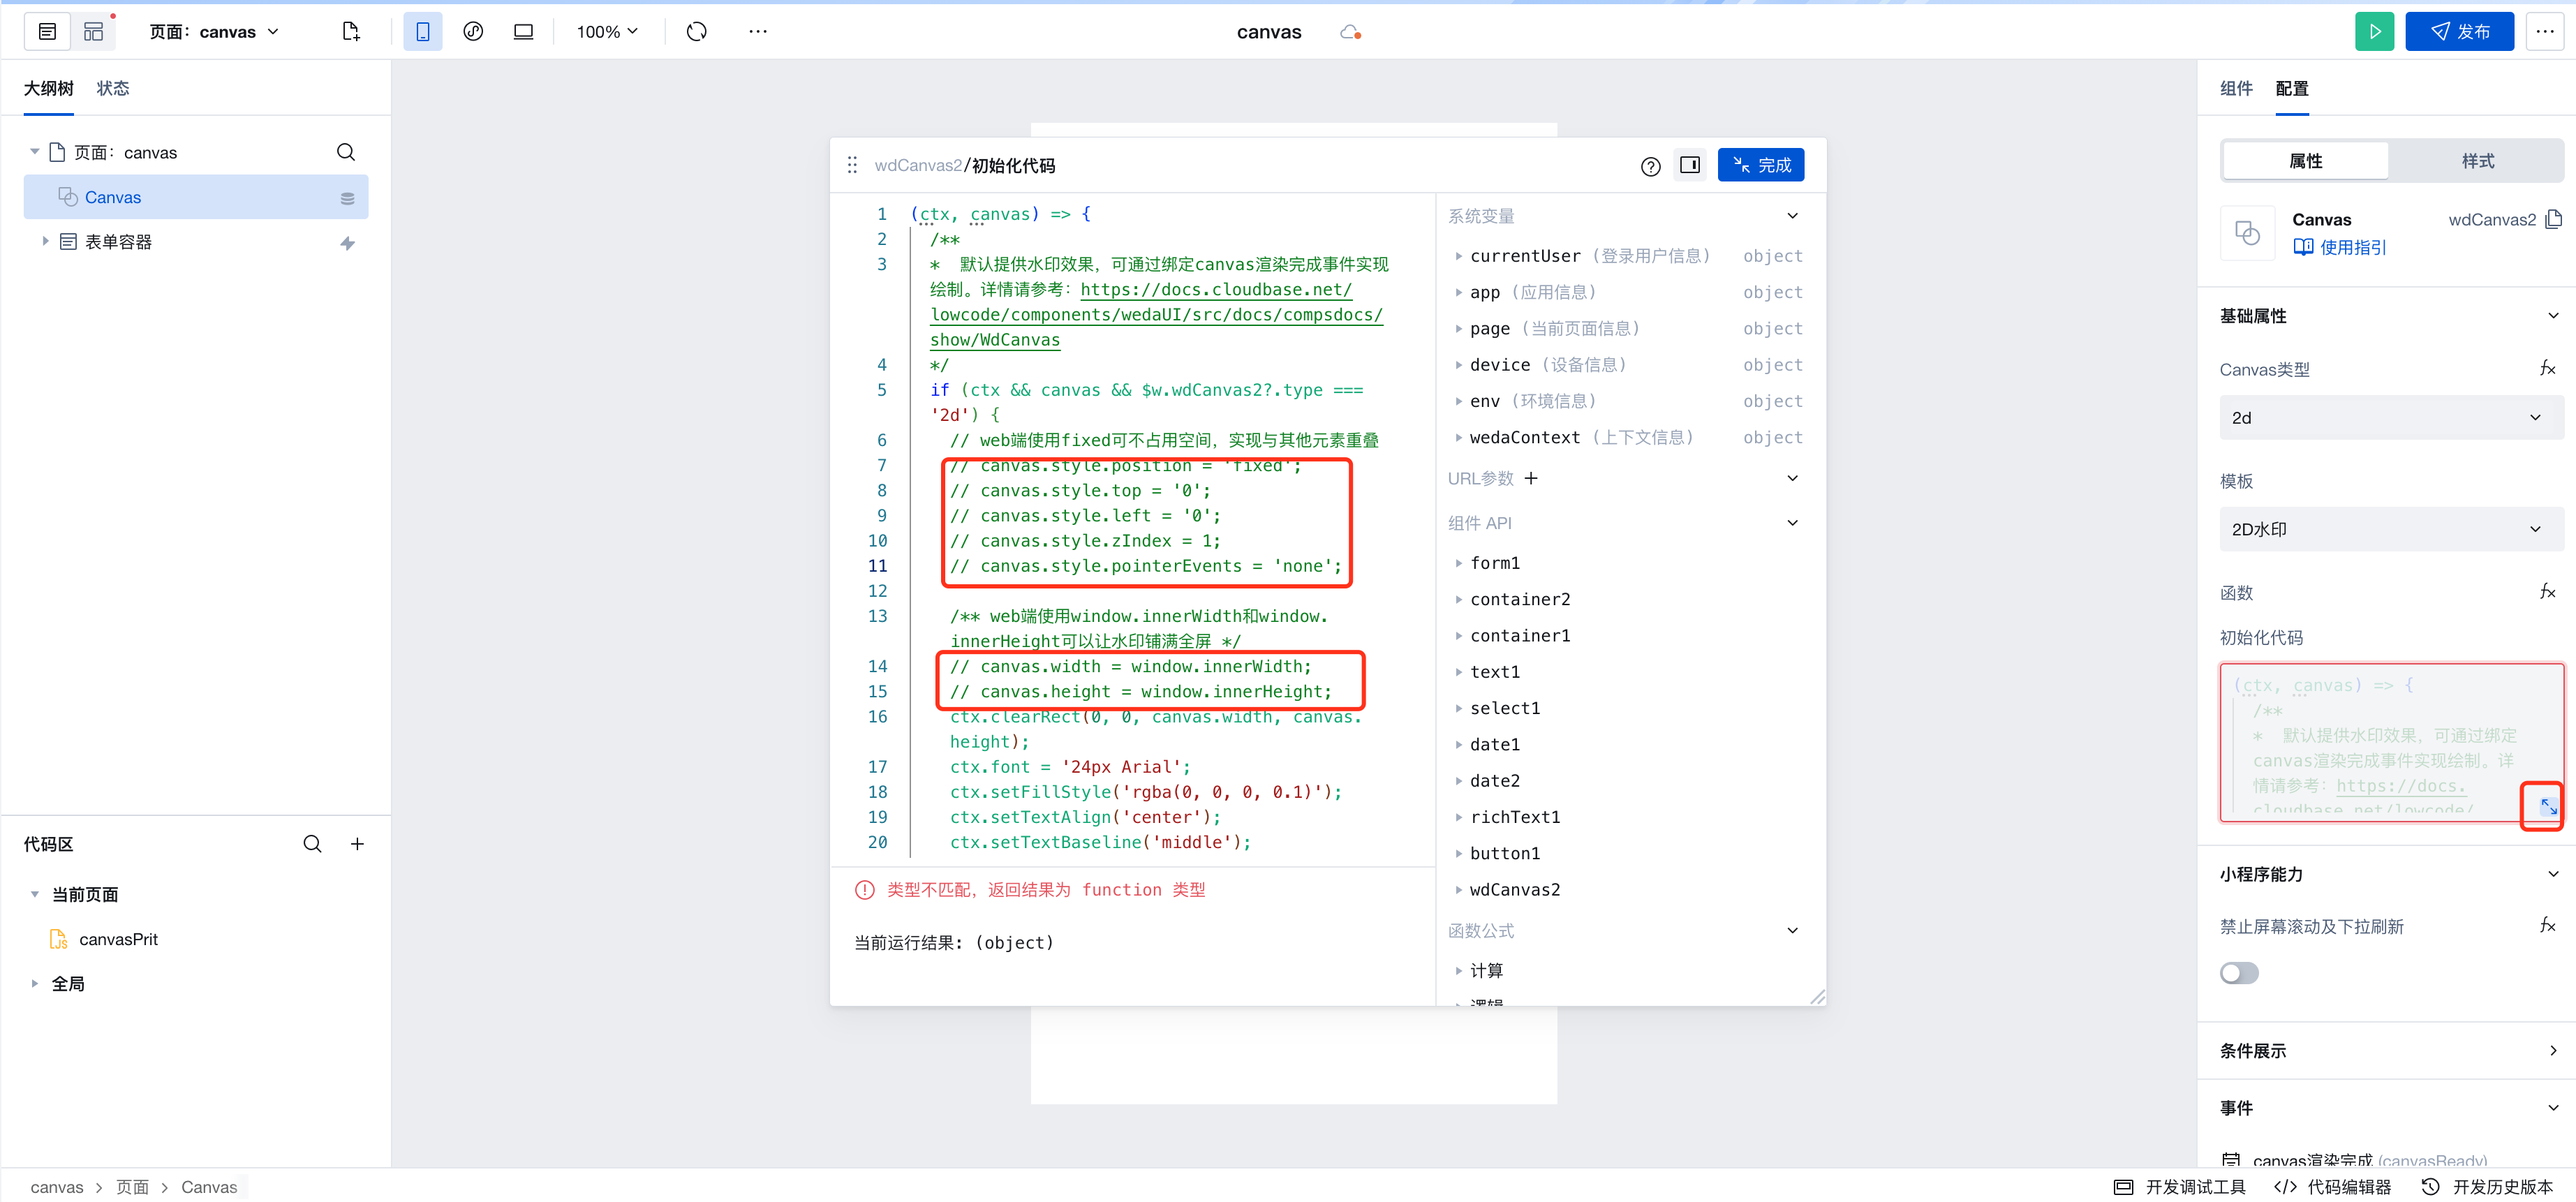
Configuration Method 1
Add a canvas component, which by default renders a 2D watermark effect. To achieve this, uncomment the relevant code in the initialization code.
Configuration Method 2
Add a canvas component and implement event binding via canvas rendering using a js method. For the js method, refer to the following:
export default function({event, data}) {
// Obtain the canvas instance
const canvas = $w.wdCanvas2.canvasInstance;
// obtain the canvas context
const ctx = $w.wdCanvas2.canvasCtx;
if (ctx && canvas && $w.wdCanvas2?.type === '2d') {
    // On the web side, using fixed positioning avoids occupying space and enables overlapping with other elements.
    canvas.style.position = 'fixed';
    canvas.style.top = '0';
    canvas.style.left = '0';
    canvas.style.zIndex = 1;
    canvas.style.pointerEvents = 'none';

    /** Using window.innerWidth and window.innerHeight on the web side allows the watermark to cover the entire screen. */
    canvas.width = window.innerWidth;
    canvas.height = window.innerHeight;
    /** On the Mini Program side, if you want to achieve the above effect, you can directly set the style of the canvas component. */
    ctx.clearRect(0, 0, canvas.width, canvas.height);
    ctx.font = '24px Arial';
    ctx.setFillStyle('rgba(0, 0, 0, 0.1)');
    ctx.setTextAlign('center');
    ctx.setTextBaseline('middle');
    ctx.rotate(Math.PI / 180 * 45);

    for (let x = 0; x < canvas.width * 2; x += 140) {
      for (let y = -canvas.height; y < canvas.height; y += 100) {
        ctx.fillText('I am a watermark', x, y);
      }
    }
    ctx.draw(true);
  }
}
Note: The canvas component is implemented based on the standard Web and Mini Program canvas APIs. Therefore, you can use standard APIs to manipulate the canvas component. The platform supports obtaining the canvas instance via $w.componentID.canvasInstance and the canvas context via w.componentID.canvasCtx.
Note: Due to platform differences between Web and Mini Program platforms, certain APIs may require adaptation. When using these APIs, ensure compliance with best practices for each respective platform.
Application Scenarios Description
Handwritten Signature
Note: In canvas applications, handwritten signatures are a common usage scenario. To implement this feature with cross-platform compatibility across three ends using the canvas component, the following operations are required:`
Define variables and functions for the page containing the canvas
| Name | Type | Default Value | Description |
|---|---|---|---|
| canvasRect | Object | Stores the canvas element information on touch/click (top, left, clientX, clientY, etc.) | |
| isMouseDown | Boolean | false | Whether touch or mouse down is active |
| canvasClear | Function | See description below | Clears the canvas |
| canvasReady | Function | See description below | Initializes the canvas when rendering is complete |
| canvasSave | Function | See description below | Converts the canvas content to an image |
| mousedown | Function | See description below | Finger touch start or mouse down |
| mousemove | Function | See description below | Finger touch move or mouse move |
| mouseup | Function | See description below | Finger touch end or mouse up |
- canvasClear function
export default function ({ event, data }) {
  $w.canvas1.canvasCtx.clearRect(
    0,
    0,
    $w.canvas1.canvasInstance.width,
    $w.canvas1.canvasInstance.height
  );

  $w.canvas1.canvasCtx.setFillStyle("white");
  $w.canvas1.canvasCtx.fillRect(
    0,
    0,
    $w.canvas1.canvasInstance.width,
    $w.canvas1.canvasInstance.height
  );
  $w.canvas1.canvasCtx.draw();
}
- canvasReady function
export default function ({ event, data }) {
  $w.canvas1.canvasCtx.setFillStyle("white");
  $w.canvas1.canvasCtx.fillRect(
    0,
    0,
    $w.canvas1.canvasInstance.width,
    $w.canvas1.canvasInstance.height
  );
  $w.canvas1.canvasCtx.draw();

  if (!$w.wedaContext.platforms.includes("MP")) return;
  const { pixelRatio: dpr } = wx.getSystemInfoSync() || {};

  if (!dpr) return;
  $w.canvas1.canvasCtx.scale(dpr, dpr);
}
- canvasSave function
export default function ({ event, data }) {
  if ($w.wedaContext.platforms.includes("MP")) {
    $w.canvas1.canvasCtx.draw(
      true,
      wx.canvasToTempFilePath({
        quality: 1,
        canvas: $w.canvas1.canvasInstance,
        async success(res) {
          console.log("image: ", res.tempFilePath);
          $w.utils.showToast({ title: "Image generated successfully" });
          // If cloud storage is required, execute the following code. For file storage details, see https://docs.cloudbase.net/api-reference/webv3/storage#upload
          // const cloud = await $w.cloud.getCloudInstance();
          // const upload = await cloud.uploadFile({
          //   cloudPath: 'test.png',
          //   filePath: res.tempFilePath,
          // })
        },
        fail: (e) => {
          console.log("fail", e);
          $w.utils.showToast({ title: `Image generation failed: ${e}` });
        },
      })
    );
  } else {
    try {
      const dataUrl = $w.canvas1.canvasInstance.toDataURL();
      console.log("image: ", dataUrl);
      $w.utils.showToast({ title: "Image generated successfully" });
    } catch (e) {
      console.log("fail", e);
      $w.utils.showToast({ title: `Image generation failed: ${e}` });
    }
  }
}
- mousedown function
export default async function ({ event, data }) {
  event.detail?.e?.preventDefault?.();
  const touches =
    event.changedTouches?.[0] ||
    event.detail?.e?.changedTouches?.[0] ||
    event.detail?.e ||
    {};
  const { clientX, clientY } = touches;
  const { left, top } = await $w.canvas1.canvasInstance.getCanvasRectInfo();
  $page.dataset.state.canvasRect = { left, top };
  const x = clientX - left;
  const y = clientY - top;

  $w.page.dataset.state.isMouseDown = true;
  $w.canvas1.canvasCtx.beginPath();
  $w.canvas1.canvasCtx.moveTo(x, y);
}
- mousemove function
export default function ({ event, data }) {
  if ($w.page.dataset.state.isMouseDown) {
    event.detail?.e?.preventDefault?.();
    const touches =
      event.changedTouches?.[0] ||
      event.detail?.e?.changedTouches?.[0] ||
      event.detail?.e ||
      {};
    const { clientX, clientY } = touches;
    const { left, top } = $page.dataset.state.canvasRect;
    const x = clientX - left;
    const y = clientY - top;

    $w.canvas1.canvasCtx.lineTo(x, y);
    $w.canvas1.canvasCtx.stroke();
  }
}
- mouseup function
export default function ({ event, data }) {
  $w.page.dataset.state.isMouseDown = false;
  $w.canvas1.canvasCtx.closePath();
}
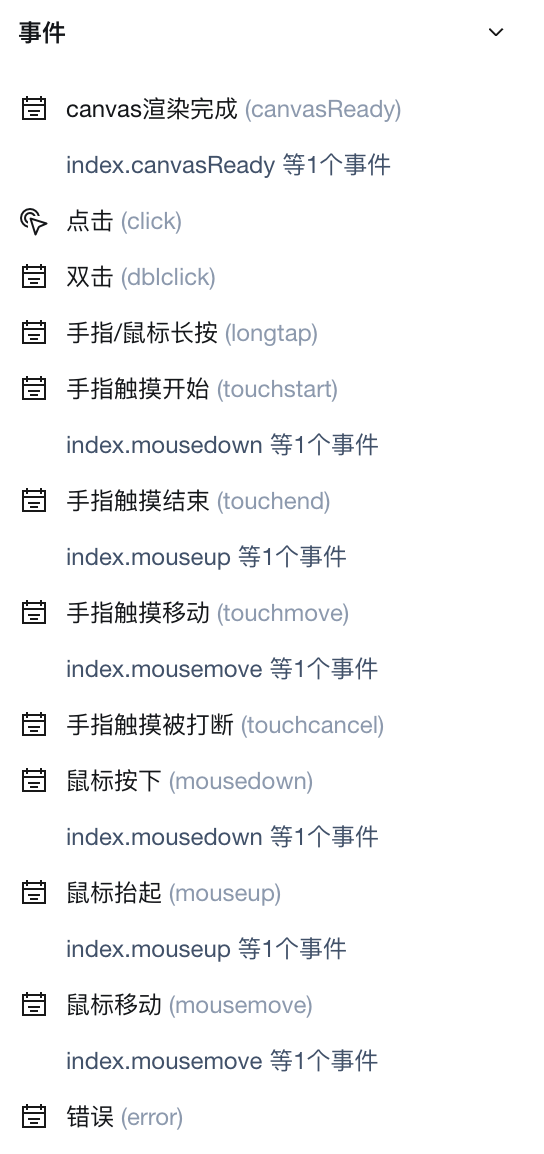
Bind canvas Events
Property Description
External properties received by the component
Property Name | Property Identifier | Type | Description |
|---|
| Forbid screen scrolling and pull-down refresh | disableScroll | boolean | When moving in Canvas with a gesture event bound, forbid screen scroll and pull-down refresh Example: false |
| Canvas type | type | string | Canvas type Example: "2d" |
| Template | template | string | Designate a Canvas template Example: "2d" |
| function | code | object |
Event Description
Events exposed by the component. You can listen to component events to trigger external actions
Event Name | Event Code | Event Output Parameters event.detail | Applicable Scenarios | Description |
|---|
| canvas rendering done | canvasReady | object
| Mobile,PC,Mini Program | Trigger when the selected data changes, output the selected node data |
| click | click | object
| PC | - |
| double-click | dblclick | object
| PC | - |
| finger/mouse long press | longtap | Mobile,PC,Mini Program | Long press with finger/mouse for 500ms to trigger, then move after the long press event to avoid triggering screen scroll | |
| Finger touch start | touchstart | Mobile,Mini Program | Finger touch action start | |
| Touch End | touchend | Mobile,Mini Program | Finger touch action complete | |
| Finger touch and move | touchmove | Mobile,Mini Program | Finger touch and move | |
| Finger touch interrupted | touchcancel | Mini Program | Finger touch action interrupted, such as call reminder or pop-up | |
| mouse press | mousedown | object
| PC | - |
| Mouse up | mouseup | object
| PC | - |
| mouse movement | mousemove | object
| PC | - |
| error | error | Mobile,PC,Mini Program | When an error occurs, trigger an error event |
Properties API
Through the Property API, you can access the internal state and property values of components. You can access internal values using$w.componentId.propertyName, such as $w.input1.value. For details, please refer to Property API
Read-only Property Name | Property Identifier | Type | Description |
|---|
| Canvas type | type | string | Canvas type |
| function | code | object | |
| Forbid screen scrolling and pull-down refresh | disableScroll | boolean | When moving in Canvas with a gesture event bound, forbid screen scroll and pull-down refresh |
| Canvas instance | canvasInstance | object | Get the canvas element reference |
| Canvas context | canvasCtx | object | The object returned by the getContext() method provides methods and properties for plotting on canvas. |
Method API
NoneStyle API
Through the Style API, you can override the styles of internal elements in components to achieve customization. For example, in the low-code editor, you can write styles for all button components using #wd-page-root .wd-btn, and control individual component styles with :scope. For detailed instructions, please refer toStyle API
Name | Class Name | Description and Examples |
|---|
| root element | .wd-canvas | canvas component root element |
| PC-side canvas component root element | .wd-pc-canvas | Write style for PC canvas |
| H5 canvas component root element | .wd-h5-canvas | Write style for H5 canvas |
| Mini Program canvas Component Root Element | .wd-mp-canvas | Can write styles for canvas in the mini program |