GitHub Copilot
GitHub Copilot is an AI programming assistant launched by GitHub. It is deeply integrated into mainstream editors such as VS Code and JetBrains, providing capabilities including code completion, chat-based conversation, and Agent functionality.
Prerequisites
- You have activated a TCB environment and obtained the environment ID
cloudBaseEnvID - Enable the required model in the AI console
- Obtain the
Base URLandAPI Keyin the AI console

Configuration Steps
GitHub Copilot provides both an IDE plugin and a CLI tool.
- IDE Plugin
- Copilot CLI
Taking VS Code as an example
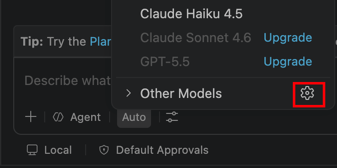
- In the model list of the dialog box, click the settings icon to open the Language Models panel.
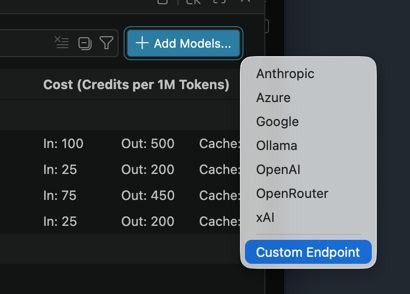
- Click the Add Models button.

- Select Custom Endpoint from the menu.
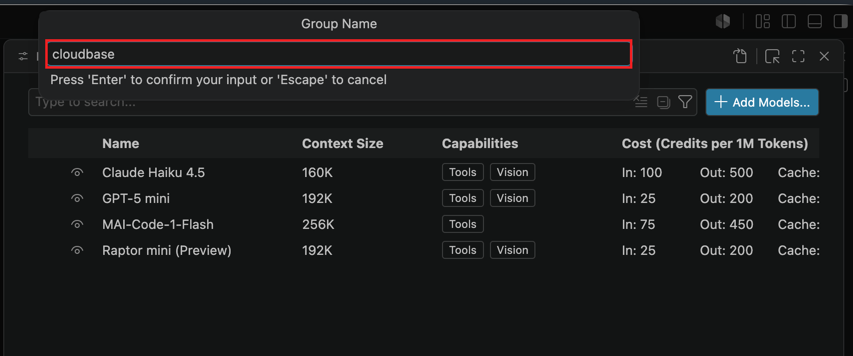
- An interactive pop-up window appears. Enter the Group Name (model group name), using
cloudbaseas an example here.
- Enter the API Key, which you obtain from the AI console.

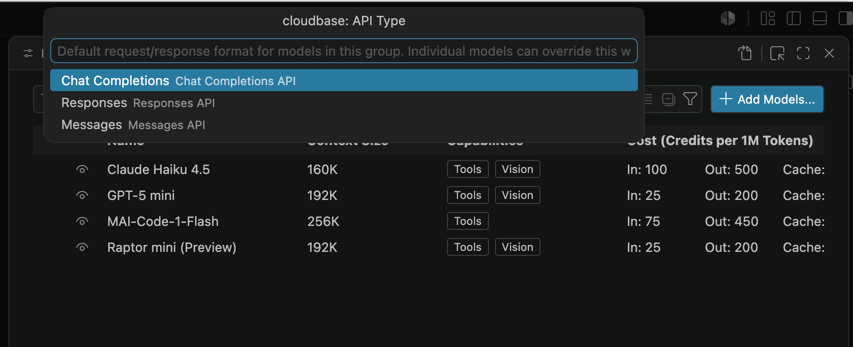
- Select the Chat Completions protocol.
- After pressing Enter, the model configuration file opens automatically, and you can edit the fields in
models.
The meanings of each field are as follows:
| Field to Enter | Explanation |
|---|---|
| url | The Base URL for the large model, which is obtained in the AI console. |
| id | The large model ID. Copy the identifier of an enabled large model from the model list in the AI console and enter it here. |
| name | The display name of the large model, which can be filled in arbitrarily. |
[
	{
		"name": "cloudbase",
		"vendor": "customendpoint",
		"apiKey": "${input:chat.lm.secret.-6bd4af55}",
		"apiType": "chat-completions",
		"models": [
			{
				"id": "hy3",
				"name": "hy3",
				"url": "https://{{cloudBaseEnvID}}.api.tcloudbasegateway.com/v1/ai/cloudbase",
				"toolCalling": true,
				"vision": true,
				"maxInputTokens": 128000,
				"maxOutputTokens": 16000
			}
		]
	}
]
The apiKey field is automatically generated by Copilot and does not require manual modification. Fields such as toolCalling, vision, maxInputTokens, and maxOutputTokens can be adjusted as needed based on the capabilities of the model you are using.
- After completing the configuration, expand Other Models in the model list within the dialog box, select the custom model you created, and then you can start a conversation.
GitHub Copilot CLI is an AI programming assistant that runs in the terminal and supports configuring custom models via environment variables.
Using a custom model (BYOK) with Copilot CLI requires the model to support Tool Calling and Streaming. For optimal results, it is recommended to use a model with a context window of at least 128k tokens.
Configuring the Large Model via CLI
Configuration Field Mapping Table
| Environment Variable | Required | Description |
|---|---|---|
| COPILOT_PROVIDER_BASE_URL | Yes | The Base URL for the large model, which is obtained in the AI console. |
| COPILOT_PROVIDER_API_KEY | Yes | The API Key for calling the large model, which is obtained in the AI console. |
| COPILOT_MODEL | Yes | The large model ID. Copy the identifier of an enabled large model from the model list in the AI console and enter it here. |
| COPILOT_PROVIDER_TYPE | No | The provider type. CloudBase AI is compatible with the OpenAI protocol, so you can use the default value openai. |
- Set the environment variables.
Mac/Linux (valid for the current terminal window)
export COPILOT_PROVIDER_BASE_URL="https://{{cloudBaseEnvID}}.api.tcloudbasegateway.com/v1/ai/cloudbase"
export COPILOT_PROVIDER_API_KEY="eyJhbGciOiJSUzI1N..."
export COPILOT_MODEL="hy3"
Windows CMD (valid for the current terminal window)
set COPILOT_PROVIDER_BASE_URL=https://{{cloudBaseEnvID}}.api.tcloudbasegateway.com/v1/ai/cloudbase
set COPILOT_PROVIDER_API_KEY=eyJhbGciOiJSUzI1N...
set COPILOT_MODEL=hy3
Windows PowerShell (valid for the current terminal window)
$env:COPILOT_PROVIDER_BASE_URL = "https://{{cloudBaseEnvID}}.api.tcloudbasegateway.com/v1/ai/cloudbase"
$env:COPILOT_PROVIDER_API_KEY = "eyJhbGciOiJSUzI1N..."
$env:COPILOT_MODEL = "hy3"
- Start up Copilot CLI
copilot
The environment variables above take effect temporarily and become invalid after you close the terminal. To make them permanent, you can write the environment variables into a Shell configuration file, such as ~/.zshrc or ~/.bashrc.