Initialization

@cloudbase/js-sdk is a cross-platform JavaScript SDK that lets you use JavaScript to access CloudBase services and resources across Web browsers, Node.js servers (Cloud Functions, CloudRun, self-hosted servers, etc.), WeChat Mini Programs, React Native, and more.
The @cloudbase/js-sdk latest version is v3. This version is fully compatible with v2 and aligns with the HTTP API. Since v3.1, the Node.js adapter is built-in — no need to install @cloudbase/node-sdk separately.
If you need to use v2, refer to the v2 documentation.
Quick Start
Get started with CloudBase in just 3 steps:
- Web
- Node.js
npm install @cloudbase/js-sdk -S
import cloudbase from "@cloudbase/js-sdk";

const app = cloudbase.init({
  env: "your-env-id", // Replace with your environment ID
  accessKey: "your-publishable-key", // Replace with your Publishable Key
});

// Start using CloudBase features
const db = app.database();
const result = await db.collection("todos").get();
Go to CloudBase Platform / API Key Configuration to generate one. Publishable Key is the recommended auth method for Web — no extra login steps needed.
npm install @cloudbase/js-sdk -S
const cloudbase = require("@cloudbase/js-sdk");

const app = cloudbase.init({
  env: "your-env-id", // Replace with your environment ID
});

// In Cloud Functions/CloudRun, the SDK reads auth info from env vars automatically
const db = app.database();
const result = await db.collection("todos").get();
In Cloud Functions or CloudRun environments, the SDK automatically reads auth info from environment variables — no manual key configuration needed.
Some server-side features depend on the following optional packages — install as needed:
| Package | Purpose | When to Install |
|---|---|---|
@cloudbase/signature-nodejs | Request signing (TC3-HMAC-SHA256) | When using secretId / secretKey auth |
jsonwebtoken | Custom login ticket signing | When calling auth.createTicket |
ws | WebSocket connections | When using realtime data push |
# Install as needed
npm install @cloudbase/signature-nodejs jsonwebtoken ws
Installing the SDK
- Package Manager
- Node.js Server
- CDN Full Import
- CDN On-demand Import
# npm
npm install @cloudbase/js-sdk -S

# yarn
yarn add @cloudbase/js-sdk
Full import:
import cloudbase from "@cloudbase/js-sdk";

const app = cloudbase.init({
  env: "your-env-id",
  region: "ap-shanghai", // Defaults to Shanghai region if not specified
});
On-demand import (reduce bundle size):
// Core (required)
import cloudbase from "@cloudbase/js-sdk/app";
// Auth module
import { registerAuth } from "@cloudbase/js-sdk/auth";
// Database module
import { registerDatabase } from "@cloudbase/js-sdk/database";
// Cloud Functions module
import { registerFunctions } from "@cloudbase/js-sdk/functions";
// Cloud Storage module
import { registerStorage } from "@cloudbase/js-sdk/storage";
// Data Model module
import { registerModel } from "@cloudbase/js-sdk/model";
// Realtime module (requires database module to be registered first)
import { registerRealtime } from "@cloudbase/js-sdk/realtime";
// AI module
import { registerAi } from "@cloudbase/js-sdk/ai";
// CloudRun module
import { registerCloudrun } from "@cloudbase/js-sdk/cloudrun";
// MySQL module
import { registerMysql } from "@cloudbase/js-sdk/mysql";

// Register required modules
registerAuth(cloudbase);
registerDatabase(cloudbase);
// ... other modules as needed

const app = cloudbase.init({
  env: "your-env-id",
  region: "ap-shanghai",
});

// Use corresponding features
const auth = app.auth;
const db = app.database();
| Module Name | Package Name | Registration Function |
|---|---|---|
| Core | @cloudbase/js-sdk/app | - |
| Auth | @cloudbase/js-sdk/auth | registerAuth |
| Database | @cloudbase/js-sdk/database | registerDatabase |
| Cloud Functions | @cloudbase/js-sdk/functions | registerFunctions |
| Cloud Storage | @cloudbase/js-sdk/storage | registerStorage |
| Data Model | @cloudbase/js-sdk/model | registerModel |
| Realtime | @cloudbase/js-sdk/realtime | registerRealtime |
| AI | @cloudbase/js-sdk/ai | registerAi |
| CloudRun | @cloudbase/js-sdk/cloudrun | registerCloudrun |
| MySQL | @cloudbase/js-sdk/mysql | registerMysql |
- The core module
@cloudbase/js-sdk/appis required - The realtime module depends on the database module; register database first
- On-demand import can effectively reduce the final bundle size; recommended for production
Since v3.1, @cloudbase/js-sdk has a built-in Node.js adapter. It can be used directly in Node.js environments (Cloud Functions, CloudRun, self-hosted servers, etc.), Node version >= 18.0 required.
# npm
npm install @cloudbase/js-sdk -S

# yarn
yarn add @cloudbase/js-sdk
Some server-side features depend on optional packages — install as needed:
| Package | Purpose | When to Install |
|---|---|---|
@cloudbase/signature-nodejs | Request signing (TC3-HMAC-SHA256) | When using secretId / secretKey auth |
jsonwebtoken | Custom login ticket signing | When calling auth.createTicket |
ws | WebSocket connection | When using realtime data push |
# Install as needed
npm install @cloudbase/signature-nodejs jsonwebtoken ws
Initialize SDK
const cloudbase = require("@cloudbase/js-sdk");

const app = cloudbase.init({
  env: "your-env-id", // Replace with your environment ID
});
3.x.x indicates the latest version. You can pin it to a fixed version number.
<script src="https://static.cloudbase.net/cloudbase-js-sdk/3.0.1/cloudbase.full.js"></script>
<script>
  const app = cloudbase.init({
    env: "your-env-id", // Replace with your environment ID
    region: "ap-shanghai", // Defaults to Shanghai region if not specified
  });
</script>
3.x.x indicates the latest version. You can pin it to a fixed version number.
<!-- Core -->
<script src="https://static.cloudbase.net/cloudbase-js-sdk/3.0.1/cloudbase.js"></script>
<!-- Auth module -->
<script src="https://static.cloudbase.net/cloudbase-js-sdk/3.0.1/cloudbase.auth.js"></script>
<!-- Database module -->
<script src="https://static.cloudbase.net/cloudbase-js-sdk/3.0.1/cloudbase.database.js"></script>
<!-- Data model module -->
<script src="https://static.cloudbase.net/cloudbase-js-sdk/3.0.1/cloudbase.model.js"></script>
<!-- Cloud Function module -->
<script src="https://static.cloudbase.net/cloudbase-js-sdk/3.0.1/cloudbase.functions.js"></script>
<!-- Cloud Storage module -->
<script src="https://static.cloudbase.net/cloudbase-js-sdk/3.0.1/cloudbase.storage.js"></script>
<!-- Realtime module — must be imported after the database module -->
<script src="https://static.cloudbase.net/cloudbase-js-sdk/3.0.1/cloudbase.realtime.js"></script>
<!-- AI module -->
<script src="https://static.cloudbase.net/cloudbase-js-sdk/3.0.1/cloudbase.ai.js"></script>
<script>
  // Register feature modules
  registerAuth(cloudbase);
  registerDatabase(cloudbase);
  registerModel(cloudbase);
  registerFunctions(cloudbase);
  registerStorage(cloudbase);
  registerRealtime(cloudbase);
  registerAi(cloudbase);

  const app = cloudbase.init({
    env: "your-env-id", // Replace with your environment ID
    region: "ap-shanghai", // Defaults to Shanghai region if not specified
  });
</script>
Feature modules must be imported after the core module, and the auth module must always be included.
For the latest version number, visit NPM.
Initialization Parameters
Common Parameters
| Field | Type | Required | Default | Description |
|---|---|---|---|---|
env | string | Yes | - | TCB environment ID. Defaults to current env ID in Cloud Functions |
region | string | No | ap-shanghai | Region: ap-shanghai (default), ap-guangzhou, ap-singapore |
lang | string | No | zh-CN | Language: zh-CN (default), en-US |
accessKey | string | No | - | CloudBase API Key / Publishable Key for authentication |
timeout | number | No | See notes below | Request timeout (ms) |
The region of the current environment must match the region value specified during initialization.
The default value of timeout varies by runtime environment:
- Web / Mini Program and other non-Node.js environments: Defaults to
15000(15 seconds). - Node.js environments (Cloud Functions, CloudBase Run, self-hosted servers, etc.): Defaults to no timeout (unlimited), to accommodate potentially long-running requests on the server side. If you need to limit the timeout, explicitly pass the
timeoutparameter.
Regardless of the environment, explicitly passing timeout takes precedence (maximum allowed value: 10 minutes).
Node.js-specific Parameters
The following parameters are only effective in Node.js environments.
| Field | Type | Required | Description |
|---|---|---|---|
secretId | string | No | Tencent Cloud API key pair. Generate at Tencent Cloud Console / API Key Management. Can also be configured via TENCENTCLOUD_SECRETID env var |
secretKey | string | No | Tencent Cloud API key pair. Can also be configured via TENCENTCLOUD_SECRETKEY env var |
credentials | object | No | Custom login private key containing private_key, private_key_id, env_id, used for createTicket to issue login credentials. Download from CloudBase Platform / Auth / Login Methods under "Custom Login" |
context | object | No | The context parameter from the CloudRun entry function, used for signature-free calls |
SYMBOL_CURRENT_ENV
cloudbase.SYMBOL_CURRENT_ENV;
Use this field during initialization to specify using the current Cloud Function or CloudRun environment. Only effective in Cloud Function or CloudRun environments.
In Cloud Functions or CloudRun, if init({}) is called without an env parameter, it defaults to the current environment ID instead of the CloudBase default environment. To use the default environment, specify init({env: tcb.SYMBOL_DEFAULT_ENV}).
import cloudbase from "@cloudbase/js-sdk";

// Initialize with the current Cloud Function's environment
const app = cloudbase.init({ env: cloudbase.SYMBOL_CURRENT_ENV });

exports.main = async (event, context) => {
  // Business logic
};
Login Authentication
After initialization, you need to complete authentication before using CloudBase features. Web and Node.js use different auth methods:
Web Login
The Web SDK uses client-side user permissions, supporting the following login methods:
| Method | Use Case | Login Interaction Required |
|---|---|---|
| Publishable Key | Public resource access | ❌ No login needed |
| Anonymous Login | Use without registration | ❌ No login needed |
| Account Login | User identity required | ✅ Required |
- Publishable Key (Recommended)
- Anonymous Login
- Account Login
Publishable Key can be safely exposed in the browser for requesting publicly accessible resources — no extra login steps needed. For more details, refer to the documentation.
How to get: Go to CloudBase Platform / API Key Configuration to generate one.
const app = cloudbase.init({
  env: "your-env-id",
  accessKey: "your-publishable-key", // Fill in the generated Publishable Key
});

// No extra login needed — start using directly
const db = app.database();
A Publishable Key can only be generated once. It is permanently valid and cannot be deleted. Keep it safe.
For details, see Anonymous Login.
const app = cloudbase.init({
  env: "your-env-id",
});

const { data, error } = await app.auth.signInAnonymously();
For details, see Account Login.
const app = cloudbase.init({
  env: "your-env-id",
});

const { data, error } = await app.auth.signInWithPassword({
  username: "your username",
  password: "your password",
});
Node.js Authentication
The server supports multiple auth methods for accessing CloudBase resources (choose one).
| Auth Method | Description | Use Case |
|---|---|---|
| Default (Cloud Function/CloudRun env) | No parameters needed; auto-reads credentials from env vars | Cloud Functions, CloudRun |
| API Key | Configure server API Key in CLOUDBASE_APIKEY env var; SDK reads it auto | Self-hosted servers |
| Publishable Key | Pass accessKey in init; uses anonymous role | Public resource access |
secretId + secretKey | Explicitly pass Tencent Cloud API key pair in init | Self-hosted servers |
context | CloudRun scenario; signature-free call via entry function context param | CloudRun |
- Cloud Function (Default Auth)
- CloudRun
- Publishable Key
- secretId + secretKey
- API Key
In Cloud Function environments, the SDK automatically reads auth info from environment variables. These are temporary access credentials — no manual configuration needed.
const cloudbase = require("@cloudbase/js-sdk");

const app = cloudbase.init({
  env: "your-env-id",
});

exports.main = async (event, context) => {
  // Use CloudBase features directly
};
In CloudRun environments, pass the context parameter for signature-free calls.
💡 Note: If
contextis passed without anenvparameter, theenvIDfromcontextwill be used as the environment ID.
const cloudbase = require("@cloudbase/js-sdk");

exports.main = async (event, context) => {
  const app = cloudbase.init({
    context,
  });
  // Use CloudBase features
};
For details about Publishable Key, refer to the documentation.
- Permissions: Anonymous user permissions
- Validity: Permanently valid
- How to get: Via CloudBase Platform / ApiKey Management
const cloudbase = require("@cloudbase/js-sdk");

const app = cloudbase.init({
  env: "your-env-id",
  accessKey: "your-publishable-key",
});
Generate a key pair at Tencent Cloud Console / API Key Management.
const cloudbase = require("@cloudbase/js-sdk");

const app = cloudbase.init({
  env: "your-env-id",
  secretId: "your-secretId",
  secretKey: "your-secretKey",
});
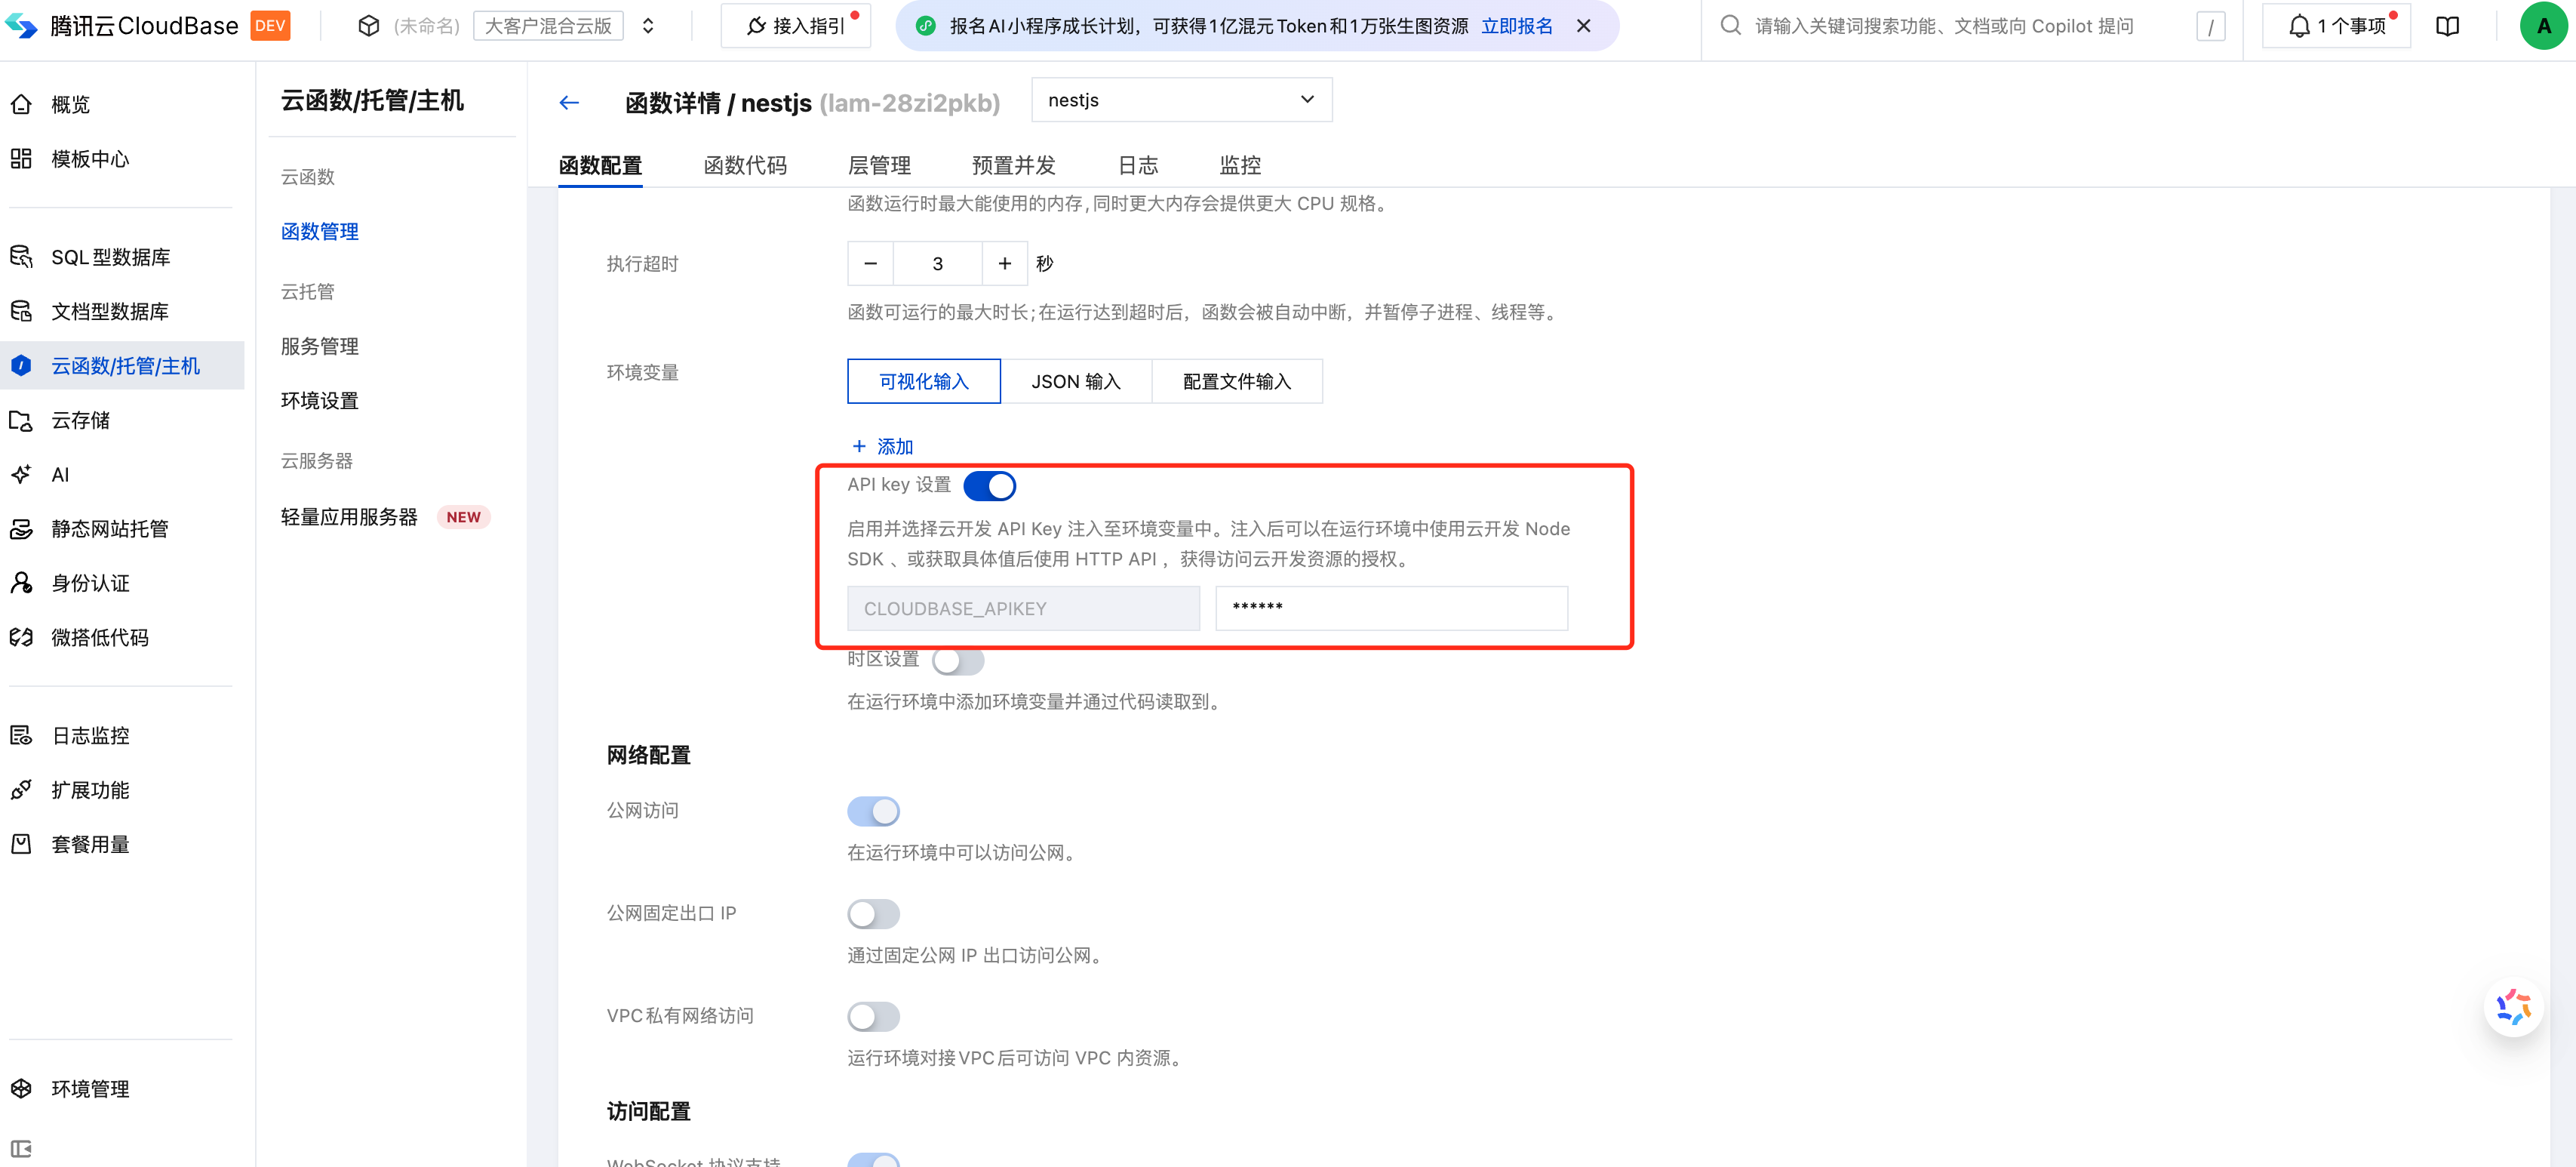
Configure via the CLOUDBASE_APIKEY environment variable. In Cloud Functions, enable API Key settings and add CLOUDBASE_APIKEY — the SDK reads it automatically.
const cloudbase = require("@cloudbase/js-sdk");

// No explicit passing needed — SDK reads from env var automatically
const app = cloudbase.init({
  env: "your-env-id",
});
When the server does not use API Key or Publishable Key, it defaults to admin permissions. Otherwise, the API signatures, parameters, and return values are identical to the client side.