WeDa Private Deployment Cloud Run Getting Started Guide
This document will guide you through creating a Go containerized application from scratch and deploying it to the cloud hosting service in WeDa private deployment environment.
Prerequisites
Before getting started, please ensure the following conditions are met:
- WeDa Environment: Enterprise plan activated and WeDa low-code private deployment cluster version completed
- Image Registry: Container image server with network connectivity to cloud hosting (for storing built images)
- Resource Configuration: Ensure the environment has sufficient resources to support containerized service operation
- Development Environment: Golang and Docker installed locally
Step 1: Create Basic Application
1.1 Initialize Project
Create project directory and navigate to it:
mkdir helloworld
cd helloworld
Initialize Go module:
go mod init helloworld
1.2 Write Application Code
Create main.go file in the project root directory with the following code:
package main

import (
    "fmt"
    "log"
    "net/http"
)

func main() {
    http.HandleFunc("/api/post", func(w http.ResponseWriter, r *http.Request) {
        if r.Method != http.MethodPost {
            http.Error(w, "Method not allowed", http.StatusMethodNotAllowed)
            return
        }
        handler(w, r)
    })

    port := "8089"
    log.Printf("Server starting on port %s", port)
    if err := http.ListenAndServe(":"+port, nil); err != nil {
        log.Fatal(err)
    }
}

func handler(w http.ResponseWriter, r *http.Request) {
    w.Header().Set("Content-Type", "application/json")
    fmt.Fprintf(w, "{\"message\": \"Hello WeDa!\"}\n")
}
This code creates a basic web server that listens on port 8089 and provides a POST endpoint /api/post. You can extend more functionality as needed. For detailed information, please refer to Golang Web development documentation.
Step 2: Application Containerization
2.1 Create Dockerfile
Create Dockerfile file in the project root directory:
# Use official Golang image as build environment
FROM golang:1.21-alpine as builder
# Set working directory
WORKDIR /app
# Copy go.mod and go.sum (if exists)
COPY go.* ./
# Download dependencies
RUN go mod download
# Copy source code
COPY . .
# Build binary file
RUN CGO_ENABLED=0 GOOS=linux go build -mod=readonly -ldflags="-s -w" -v -o server
# Use lightweight base image as runtime environment
FROM alpine:latest
# Install necessary tools and timezone data
RUN apk add --no-cache tzdata ca-certificates && \
cp /usr/share/zoneinfo/Asia/Shanghai /etc/localtime && \
echo "Asia/Shanghai" > /etc/timezone && \
apk del tzdata
# Set working directory
WORKDIR /app
# Copy binary file from build stage
COPY /app/server /app/server
# Expose port
EXPOSE 8089
# Start application
CMD ["/app/server"]
2.2 Create .dockerignore File
Create .dockerignore file to exclude unnecessary files:
vendor/
README.md
.gcloudignore
.gitignore
.git/
*.log
Step 3: Local Build and Test (Optional)
If Docker is installed in your local environment, you can build and test locally first.
3.1 Build Image
Execute the following command to build Docker image:
docker build -t helloworld-go .
3.2 Verify Build Result
After successful build, run the following command to view the image:
docker images
You should see output similar to the following:
REPOSITORY      TAG       IMAGE ID      CREATED         SIZE
helloworld-go   latest    6948f1ebee94  8 seconds ago   15MB
3.3 Local Runtime Test
Start container for testing:
docker run -p 8089:8089 helloworld-go
Test the interface in another terminal window:
curl -X POST 'http://127.0.0.1:8089/api/post'
You should see the following response:
{"message": "Hello WeDa!"}
After successful local testing, you can upload the image to the container image registry to prepare for subsequent deployment.
Step 4: Upload Image to Container Image Registry
4.1 Tag Image
Add registry tag to the image:
# Tag image format: docker tag <local_image_name> <registry_address>/<namespace>/<image_name>:<tag>
docker tag helloworld-go my-registry.tencentcloudcr.com/mysoftware/helloworld-go:v0.0.1
my-registry.tencentcloudcr.com: Container image service address (example)mysoftware: Container namespace (please replace with your actual namespace)helloworld-go:v0.0.1: Image name and version tag
4.2 Login to Image Registry
# Login to container image service
docker login -u <username> -p <password> my-registry.tencentcloudcr.com
4.3 Push Image
# Push image to registry
docker push my-registry.tencentcloudcr.com/mysoftware/helloworld-go:v0.0.1
After successful push, you can see the uploaded image in the container image service console.
Step 5: Deploy to WeDa Cloud Run
5.1 Enter Deployment Interface
- Login to WeDa low-code private deployment cluster version management backend
- Select Cloud Run → Deploy via Container Image
- Complete deployment configuration according to interface prompts
5.2 Configure Deployment Parameters
In the deployment interface, you need to configure the following key parameters:
- Image Address: Enter the complete image address pushed in the previous step
- Port Configuration: Set container port to 8089
- Resource Configuration: Configure CPU and memory according to actual needs
- Environment Variables: Add environment variables if needed
Please ensure network connectivity between the image registry and WeDa cloud hosting environment, as well as sufficient resources to support service operation.
Step 6: Call Service via APIs Connector
6.1 Get Service Access Address
After service deployment is complete, the system will assign an internal access address for your service, typically in the format:
http://<service_name>-private:8089
For example: http://helloworld-private:8089
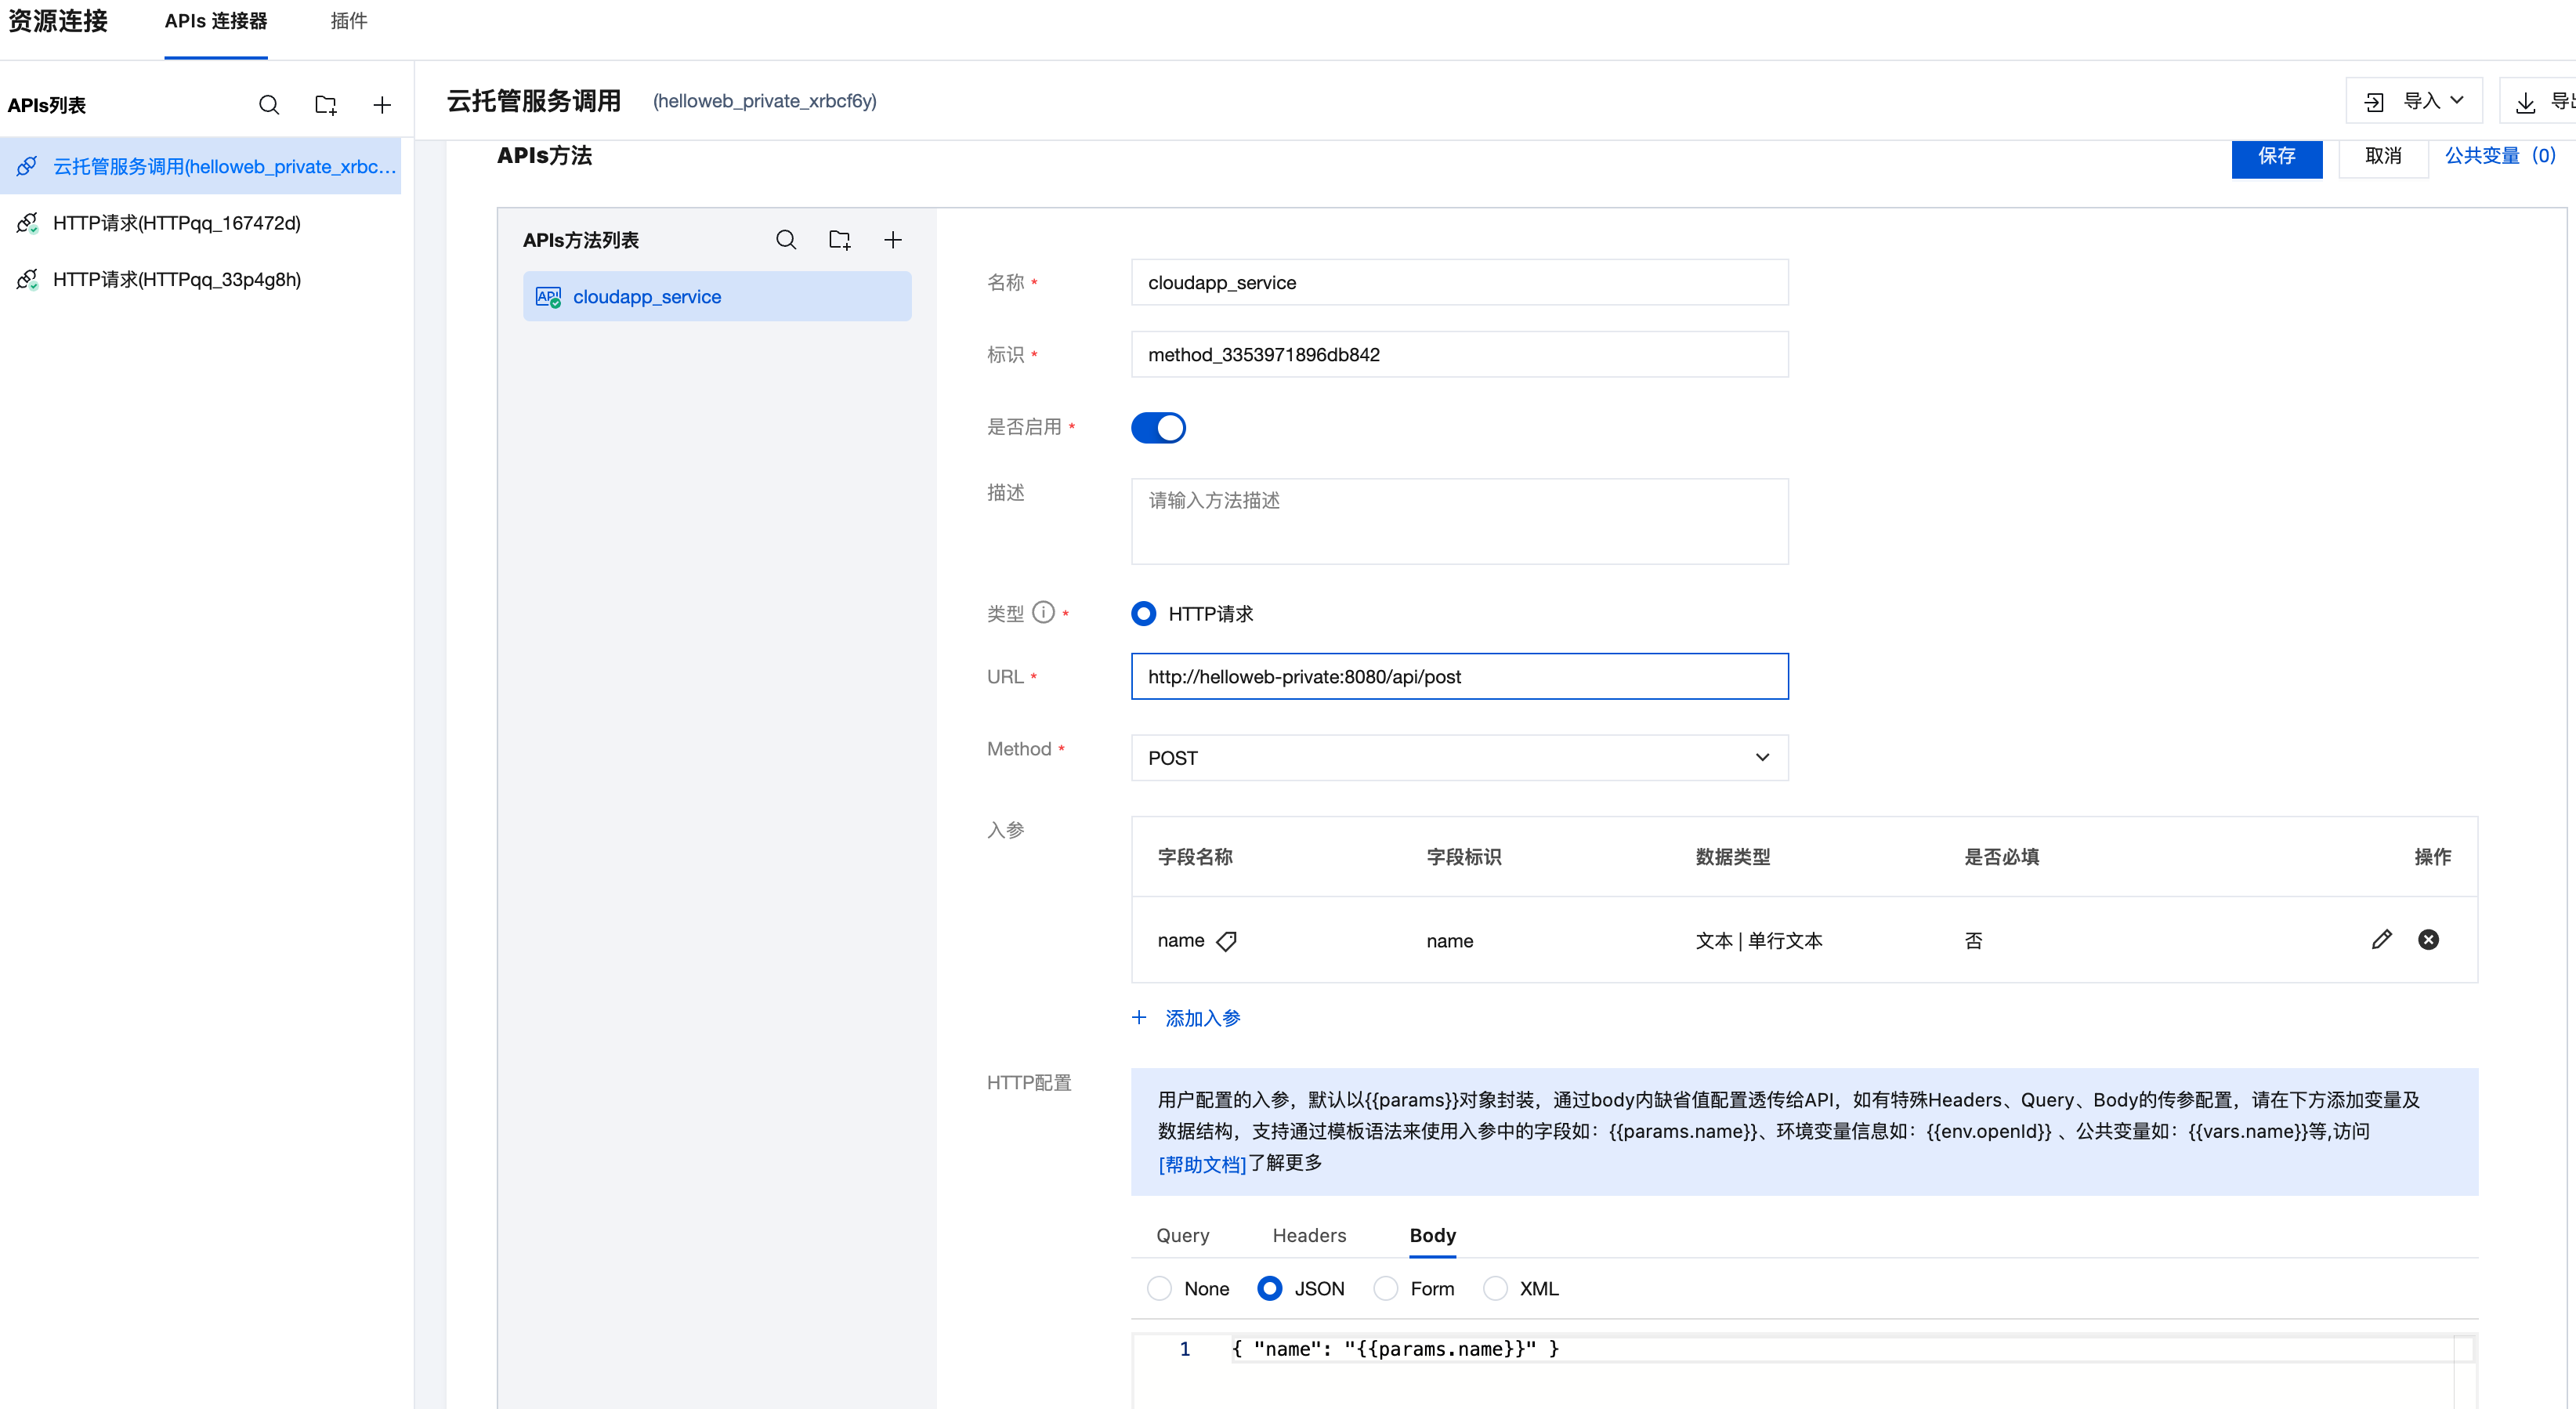
6.2 Configure APIs Connector
- Login to WeDa low-code platform
- Navigate to Extensions → Resource Links → APIs Connector
- Select Custom APIs → HTTP Request
- Configure interface information:
- Request Method: POST
- URL:
http://helloworld-private:8089/api/post - Request Headers:
Content-Type: application/json
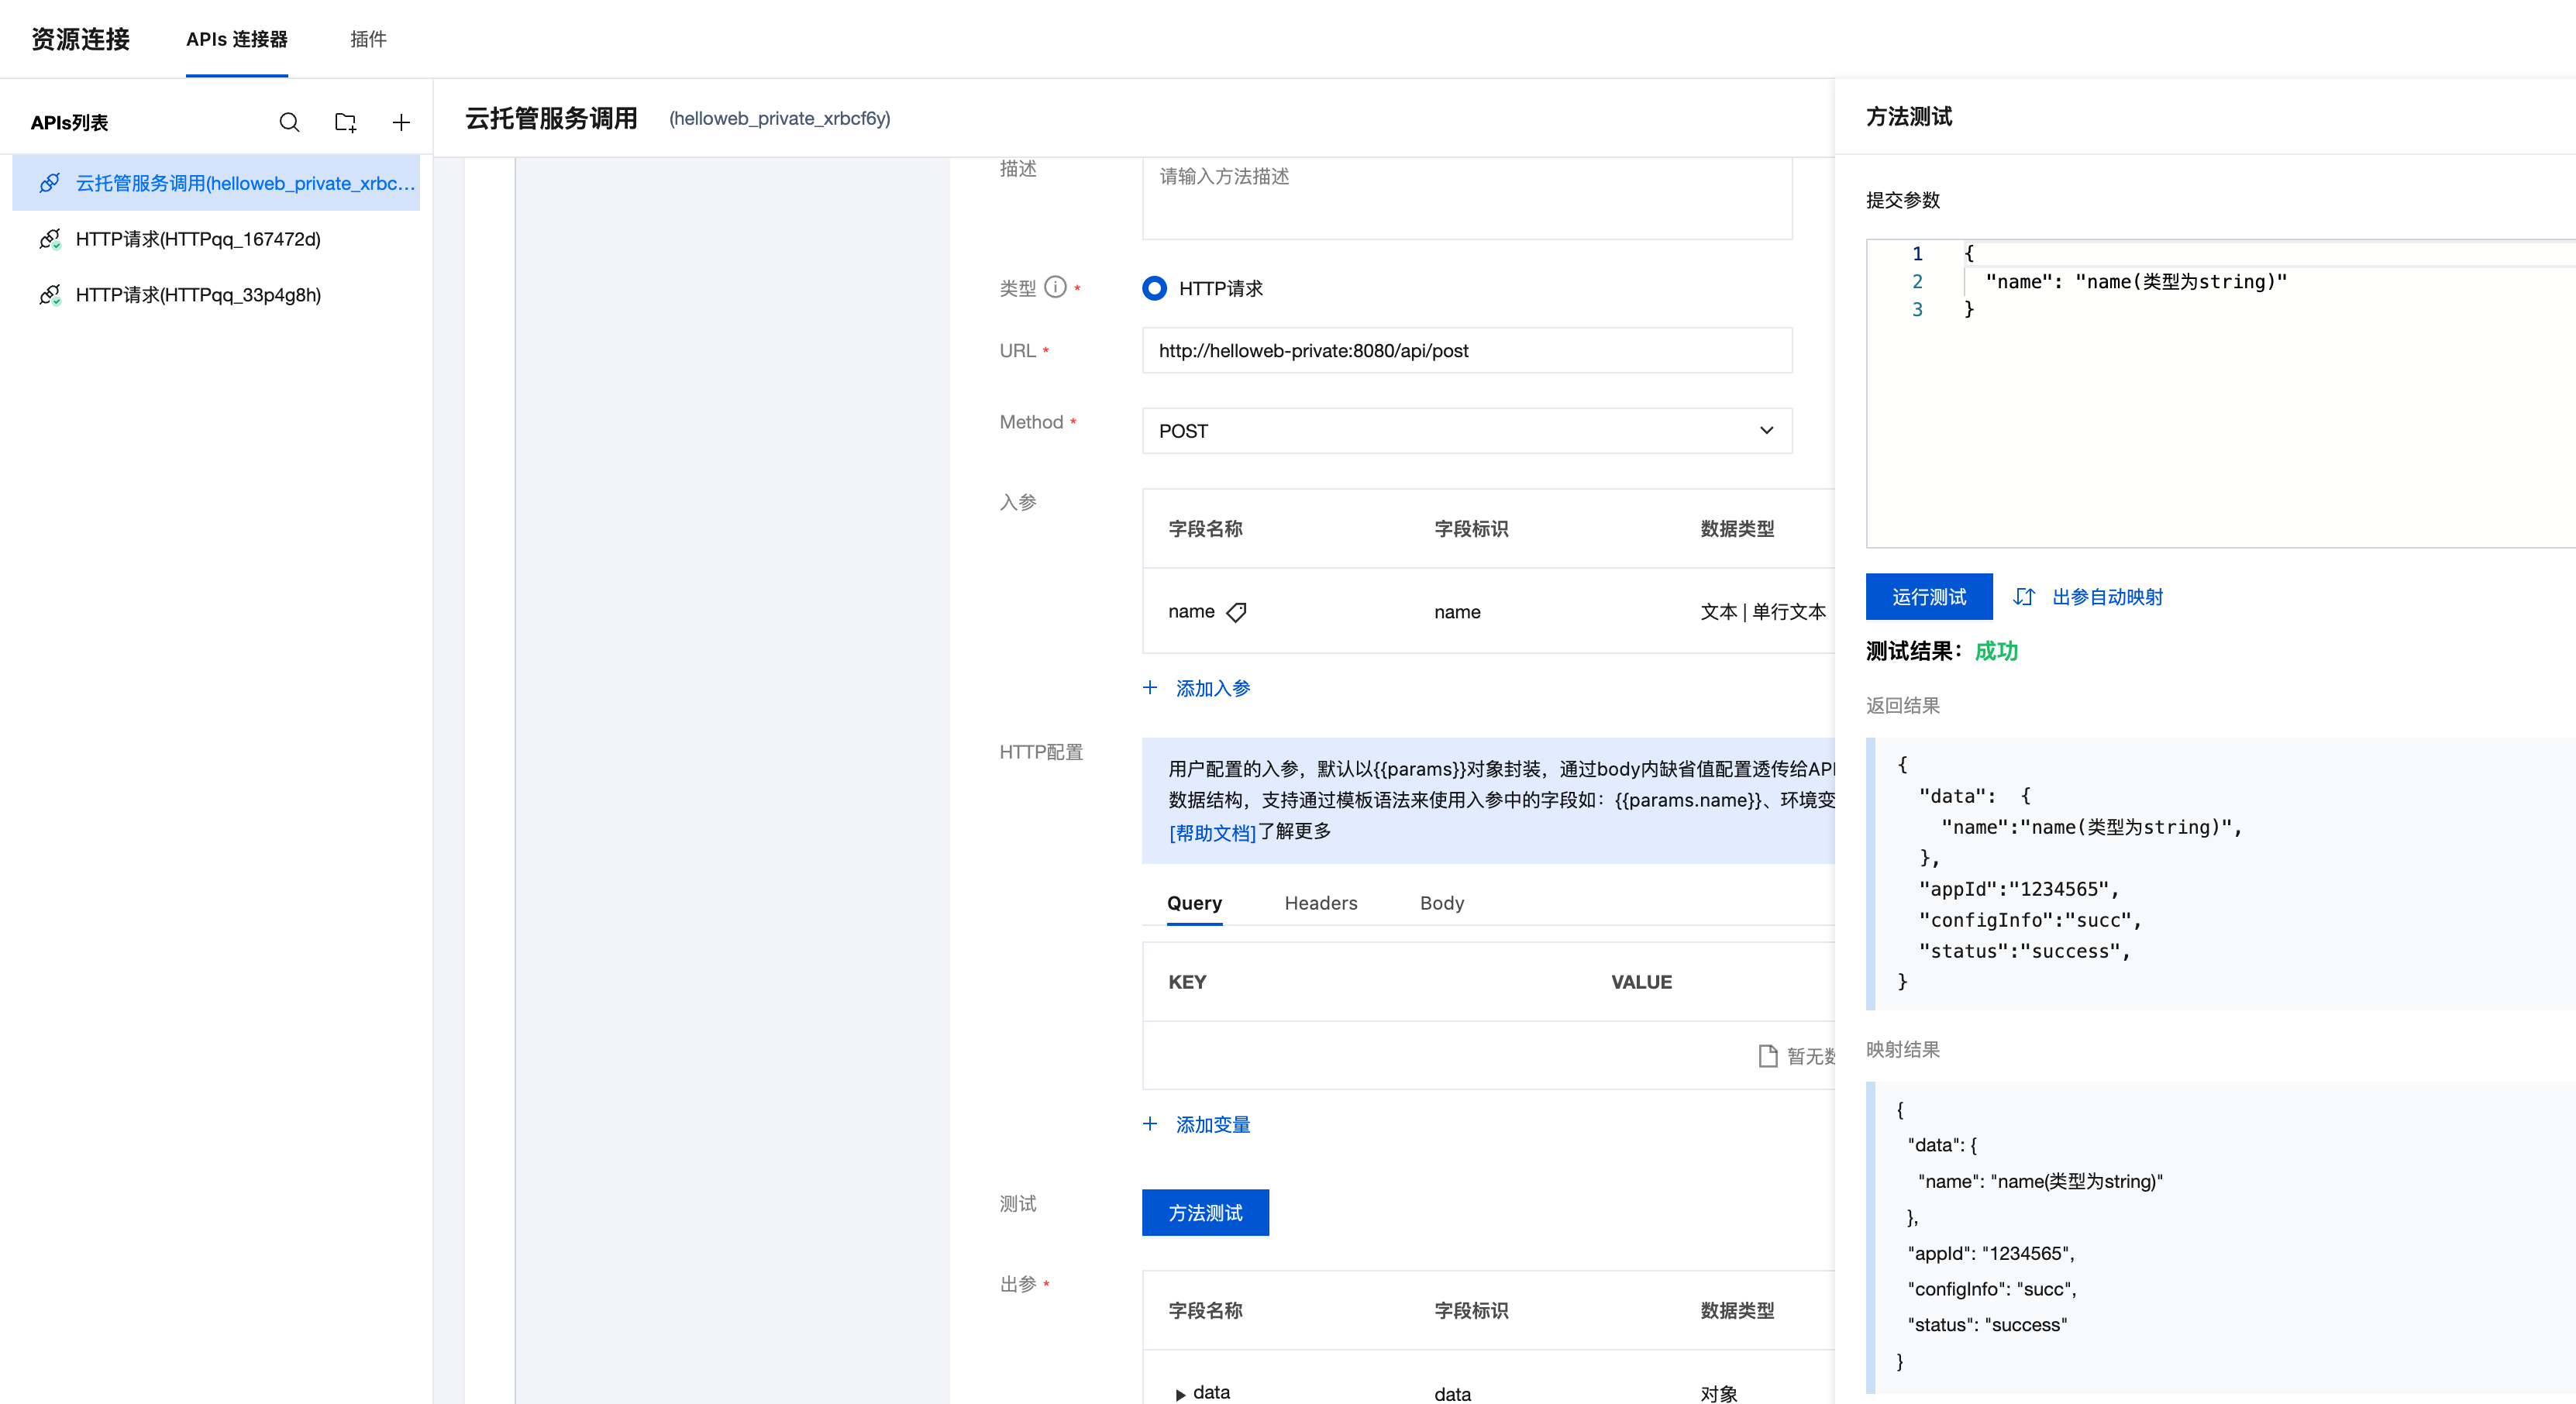
6.3 Test Interface Call
After configuration is complete, you can test the interface call in the APIs connector to verify if the service is working properly.
Summary
Through the above steps, you have successfully:
- ✅ Created a Go Web application
- ✅ Containerized the application and built the image
- ✅ Uploaded the image to container image registry
- ✅ Deployed to WeDa cloud hosting service
- ✅ Called the service via APIs connector
Now you can use this custom backend service in the WeDa low-code platform to provide more powerful functionality support for your applications.
- You can add database connections, logging, and other features
- It's recommended to configure health check endpoints
- You can add more API endpoints based on business requirements
- Consider adding monitoring and alerting mechanisms