Custom S3 Object Storage Bucket Configuration Guide
This document describes how to configure and use custom S3 object storage services in WeDa private deployment.
Storage Bucket and Configuration Parameter Mapping (S3/MinIO Universal):
defaultBucket: lowcode-static- For storing static resourcescloudStorageBucket: lowcode-storage- For storing application dataciSourceBucket: lowcode-ci- For storing CI/CD related files
Regardless of using Tencent Cloud COS, AWS S3, MinIO, or other S3 protocol-compatible object storage services, you need to create the above three storage buckets and use the corresponding parameter names in the configuration file.
MinIO object storage started with Docker does not have high availability and is not recommended for production file storage. The platform strongly recommends connecting to user-owned external object storage services.
1. S3 Object Storage Configuration
This guide uses Tencent Cloud Object Storage COS as an example for configuration demonstration. Other cloud vendors' object storage services that support standard S3 interface protocols are also supported. Please adjust the specific configuration according to actual conditions.
Storage bucket names can be customized according to actual needs
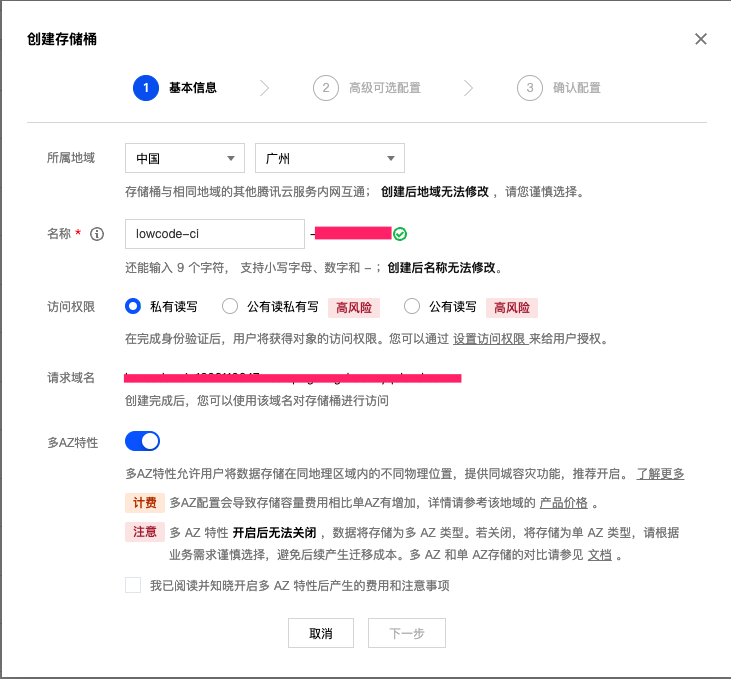
1.1 Create lowcode-static Storage Bucket
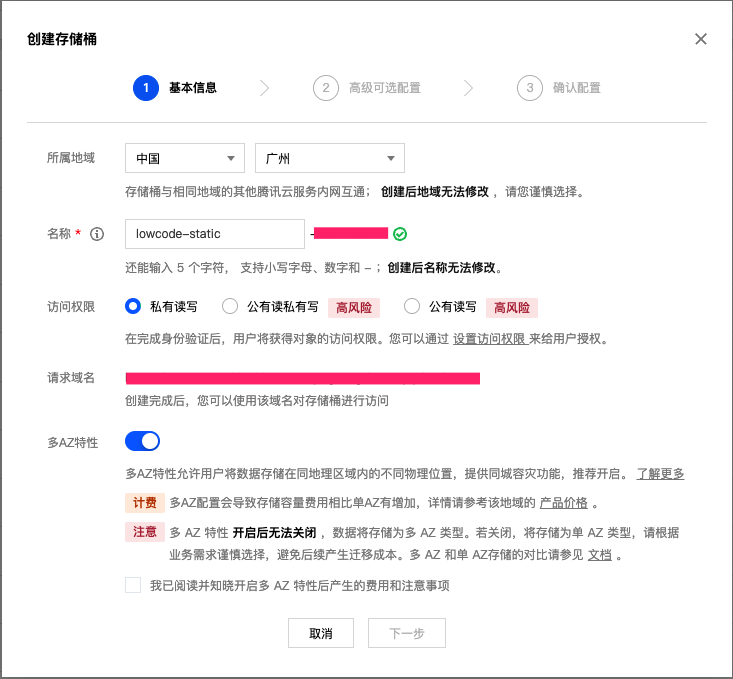
Configuration Steps:
-
Create Storage Bucket
- Click "Next" to complete bucket creation
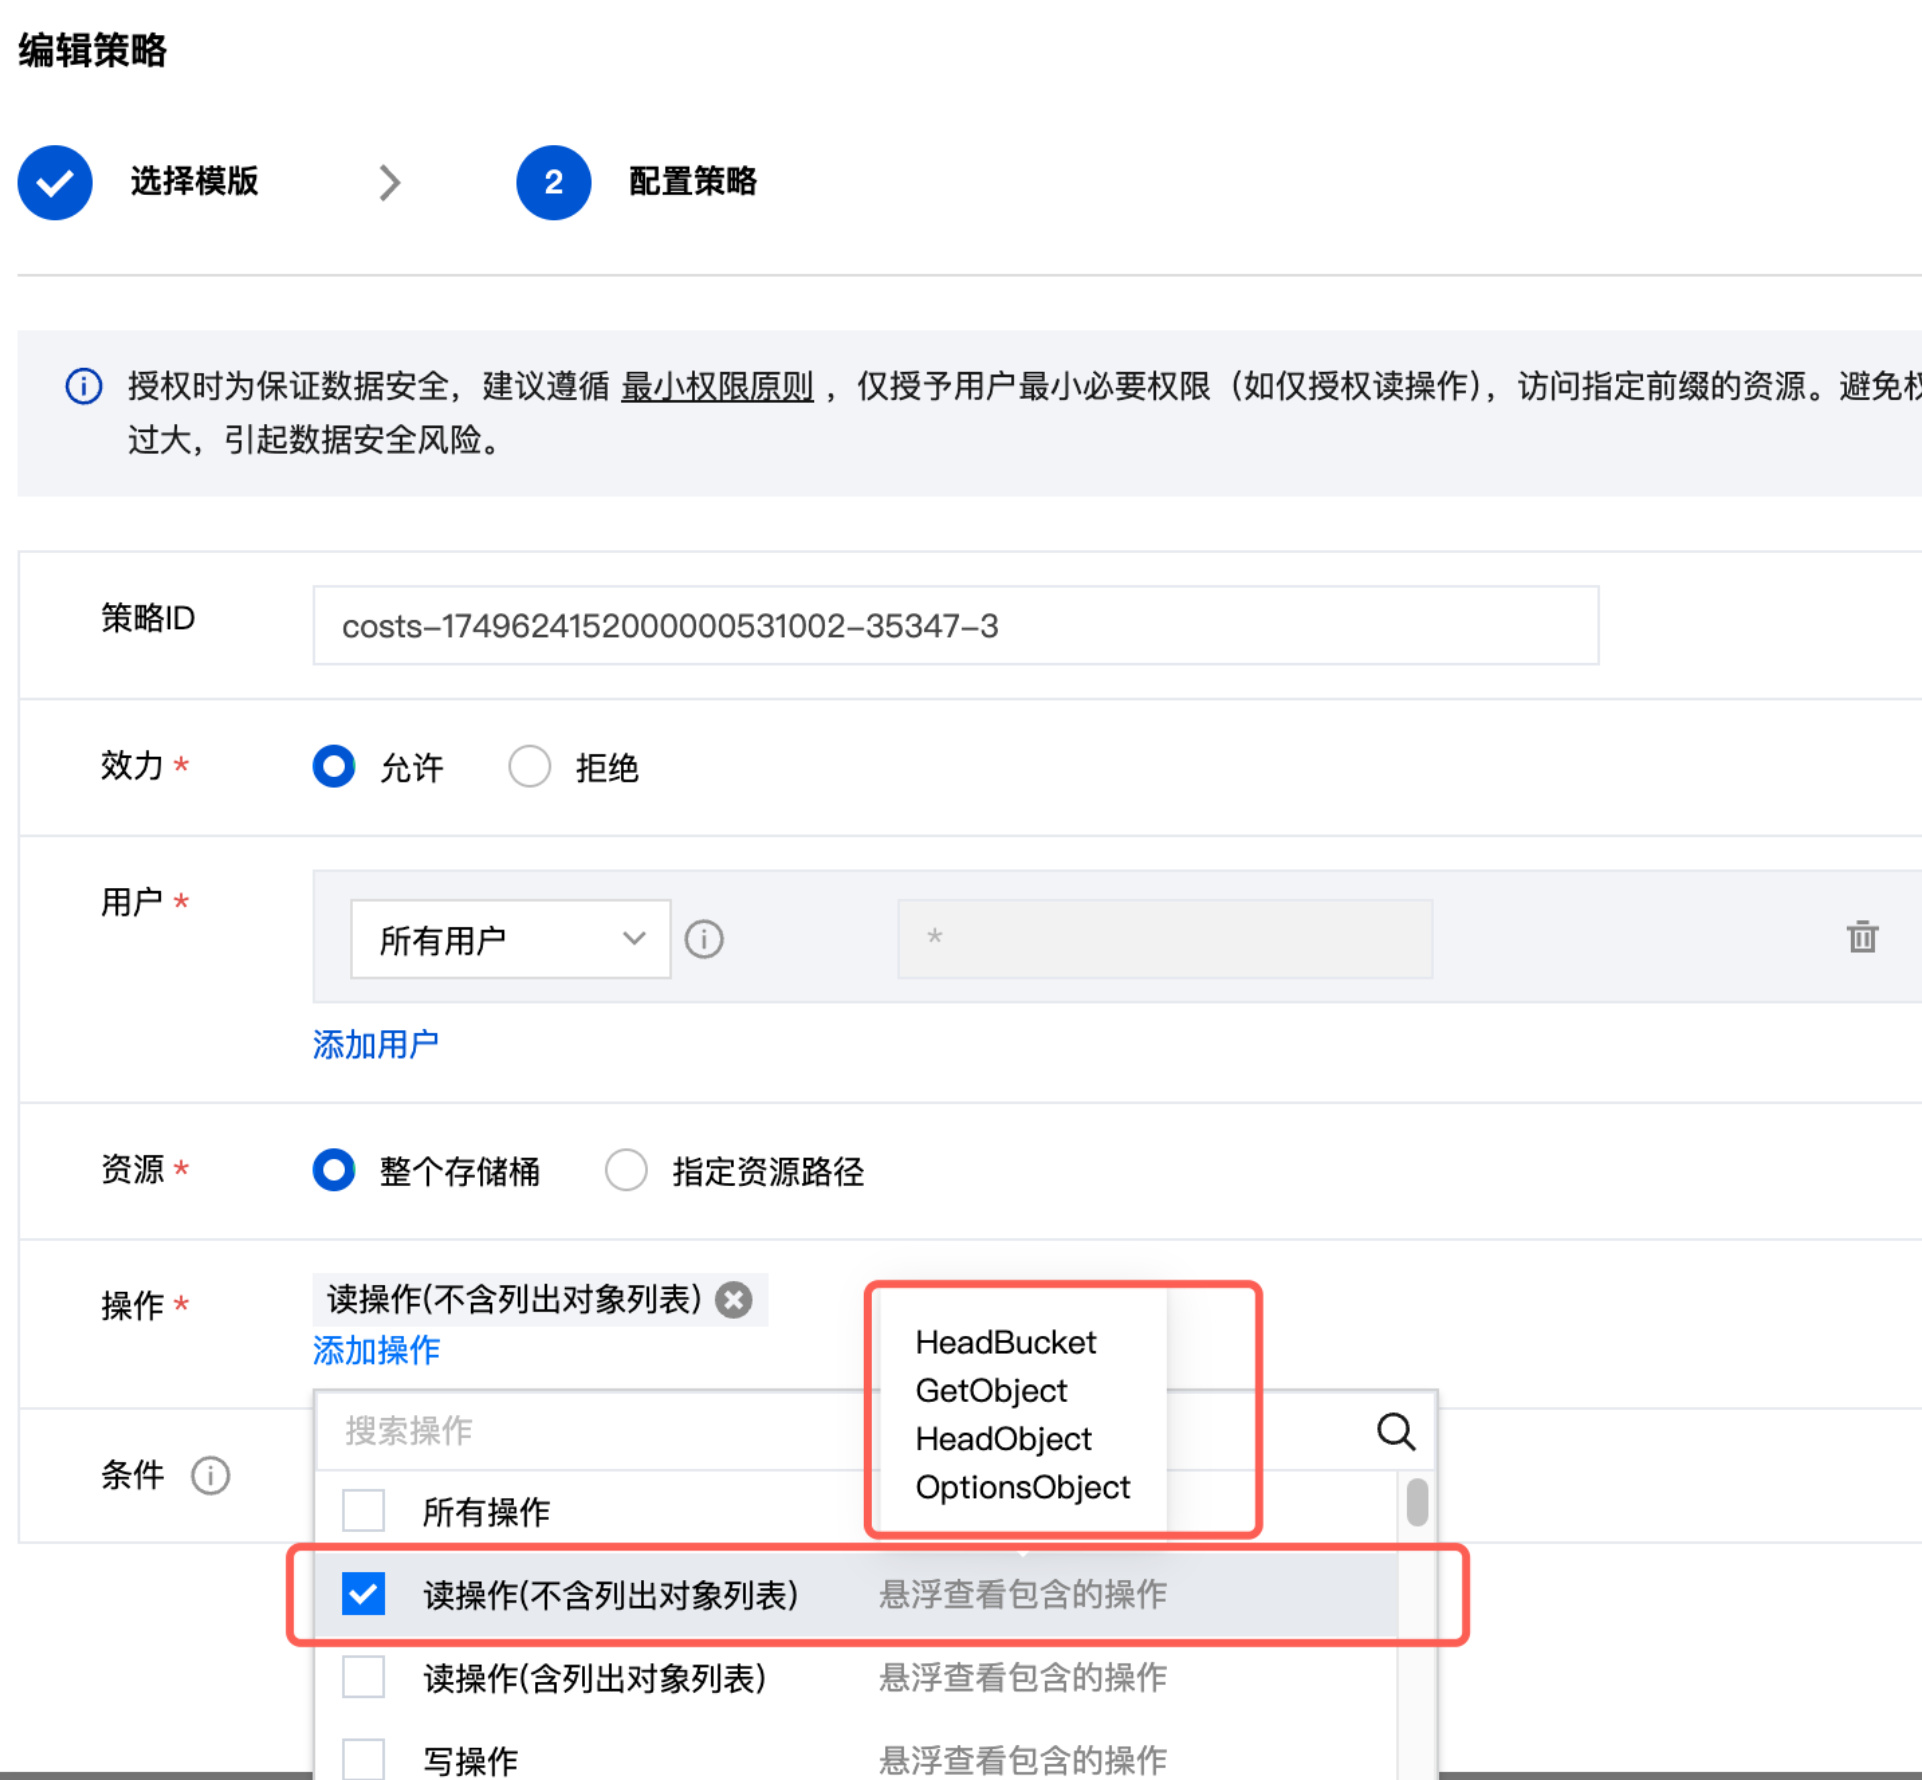
-
Configure Permission Policy
- Navigate to: Bucket List → Select Bucket → Permission Management → Policy Permissions → Add Permission
-
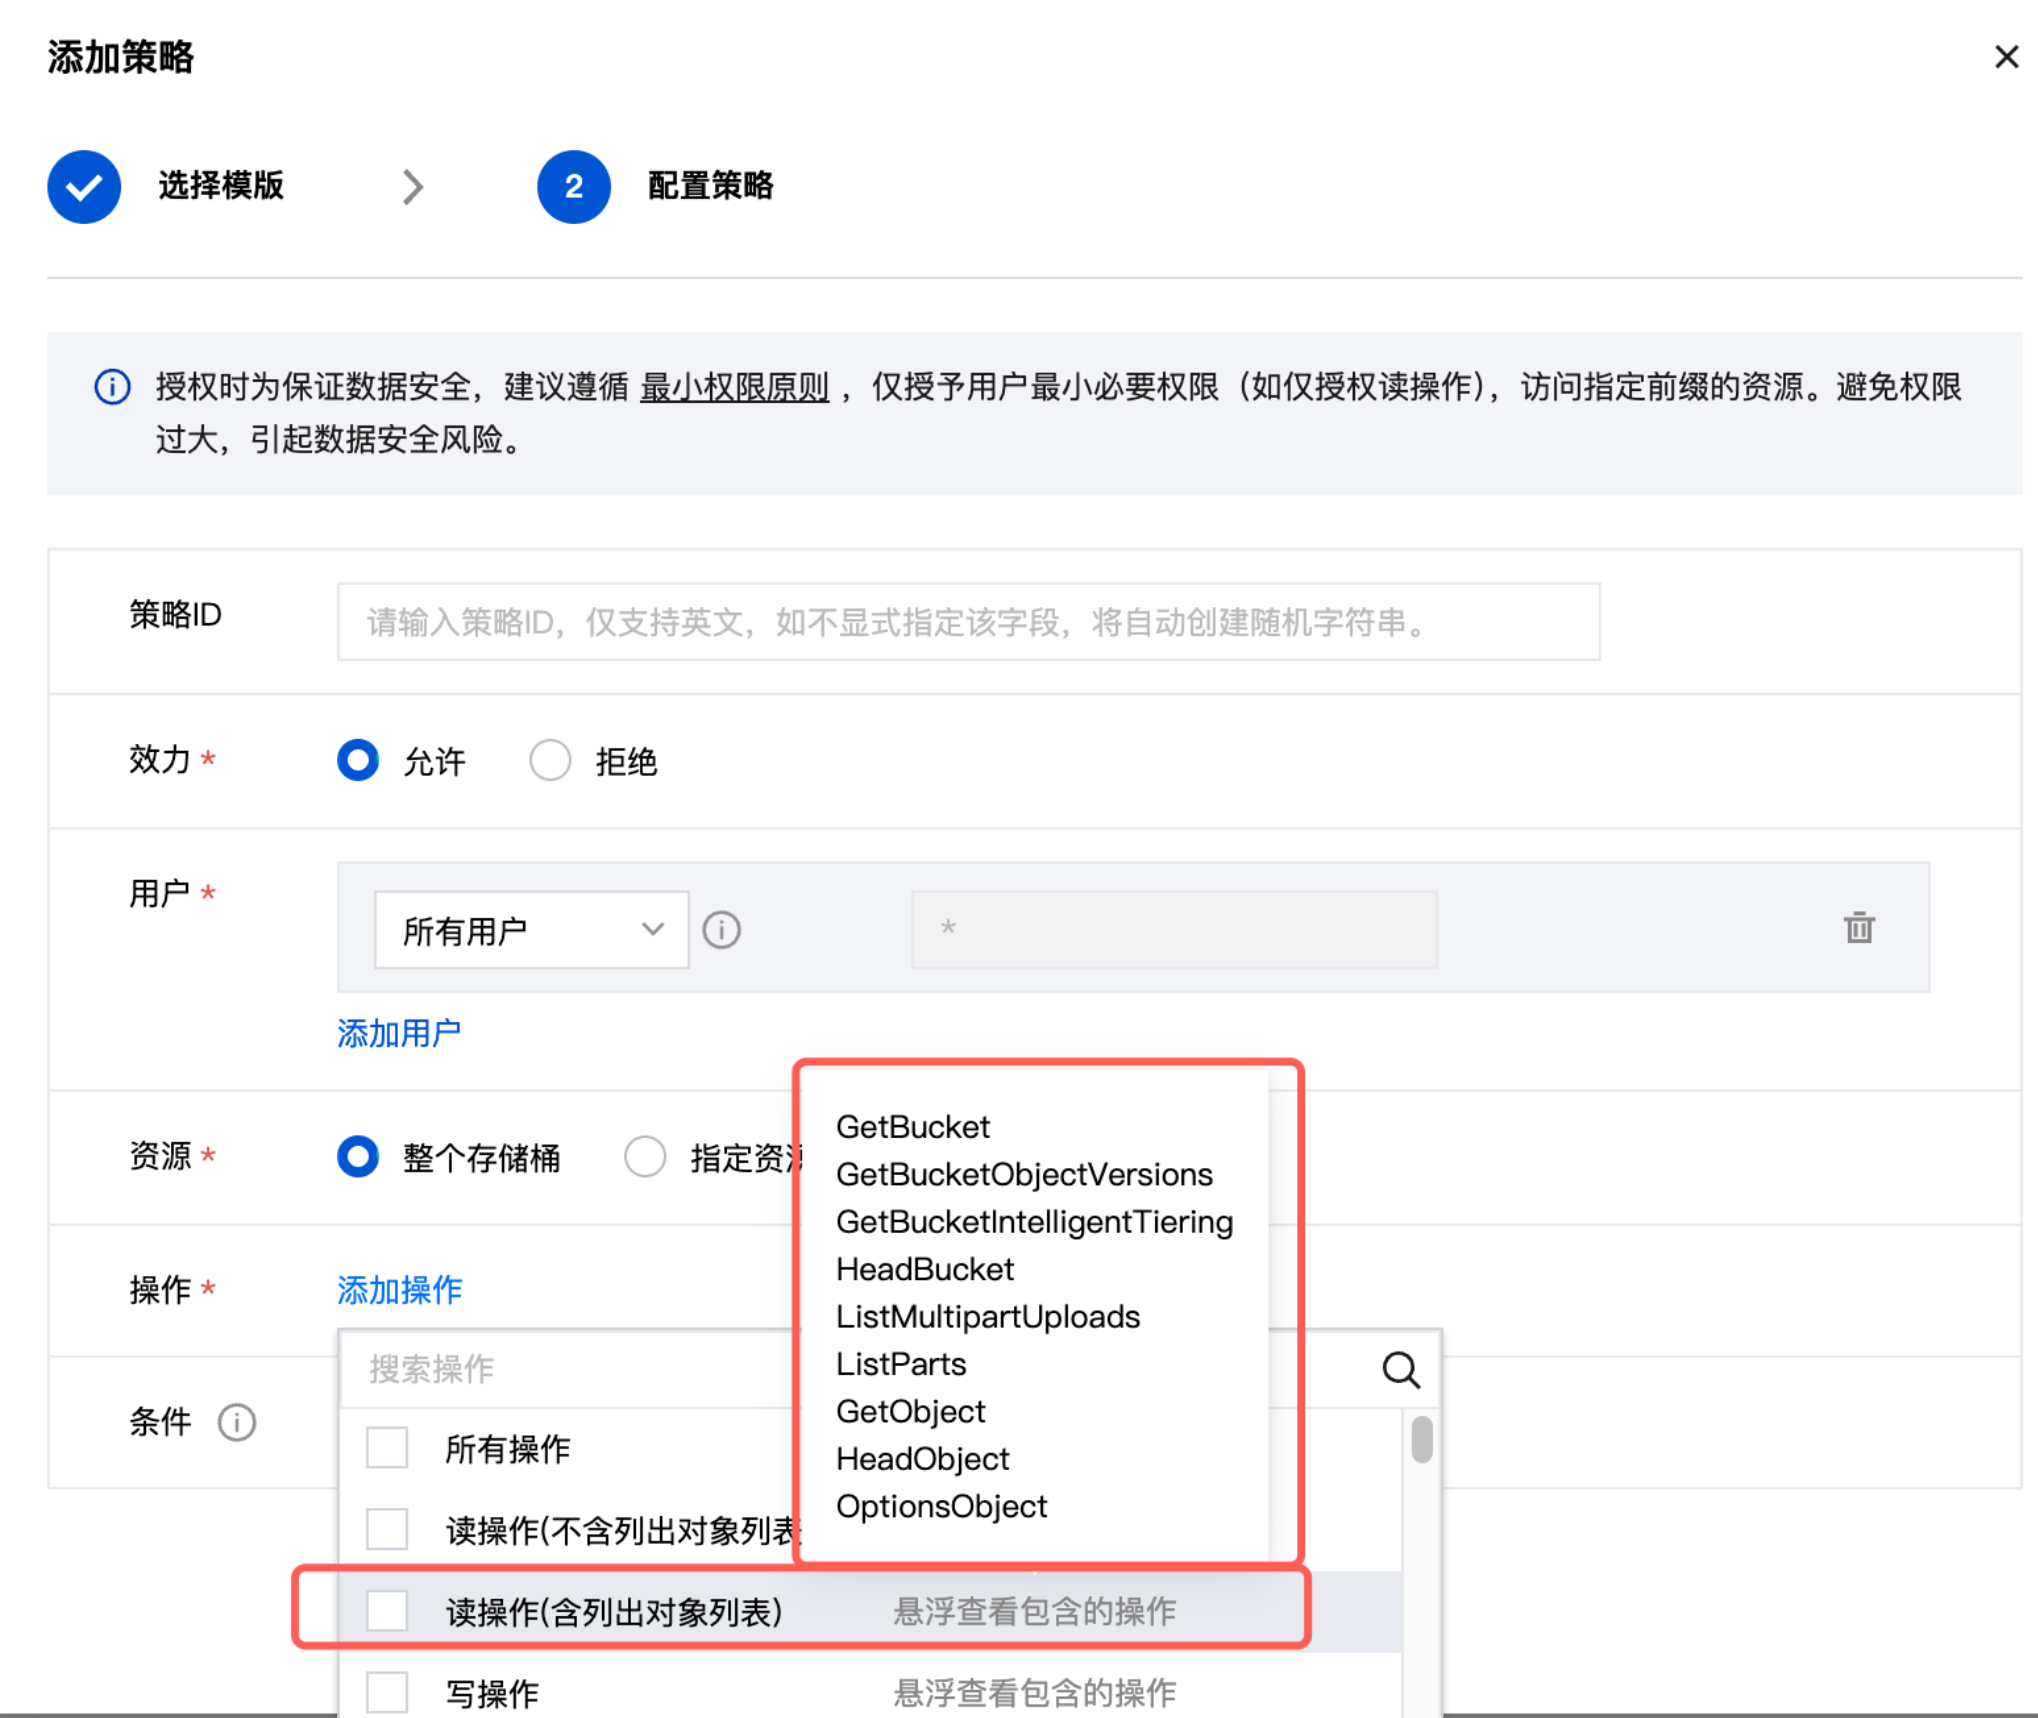
Add Policy Configuration
 TCS Platform Special Configuration
For CSP object storage services on TCS platform, configure the policy according to the following diagram:
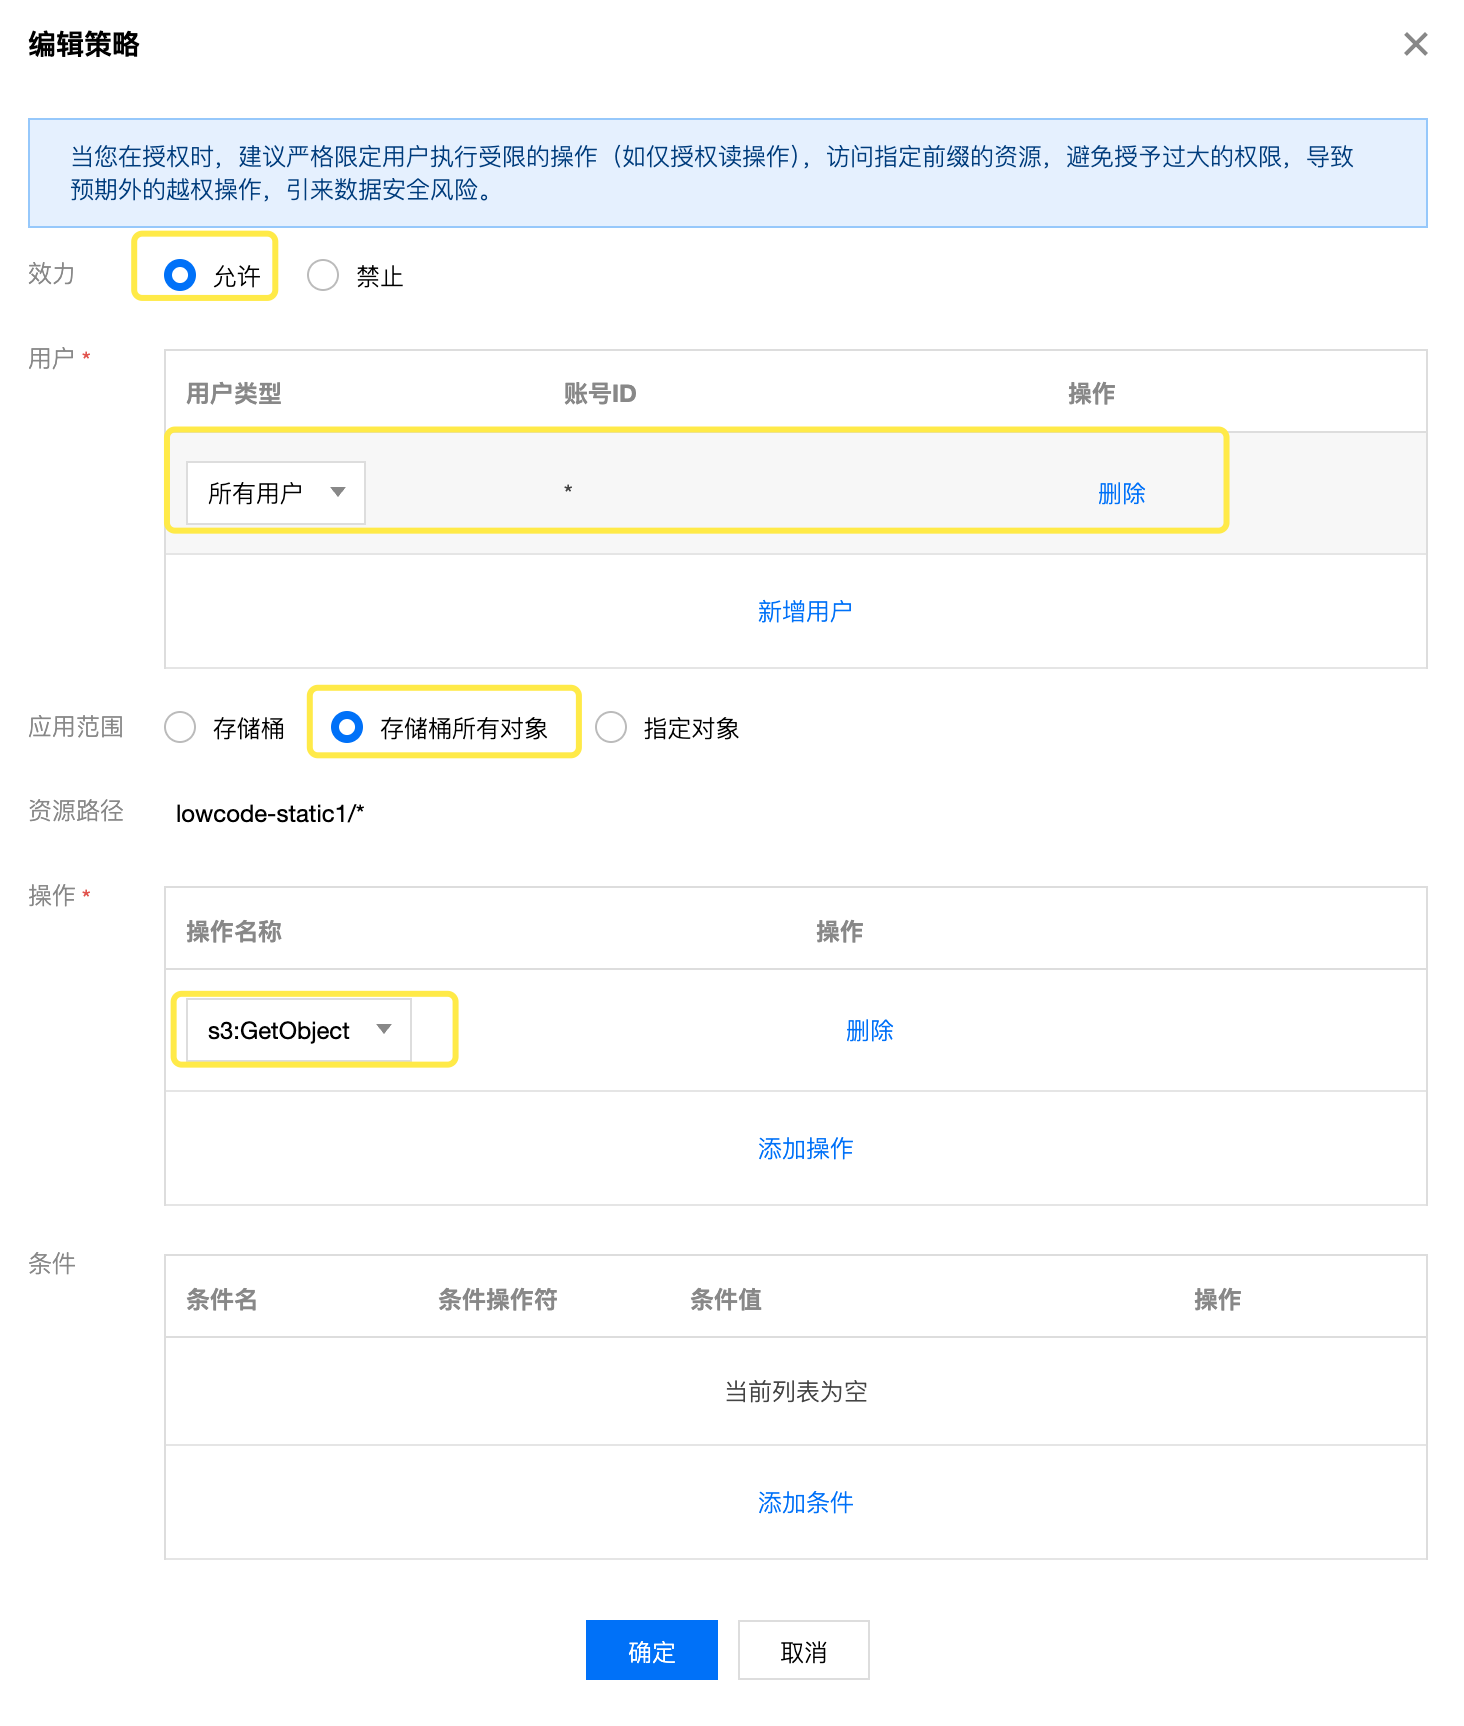
-
Complete Configuration
- Click "Complete" to save the configuration
1.2 Create lowcode-storage Storage Bucket
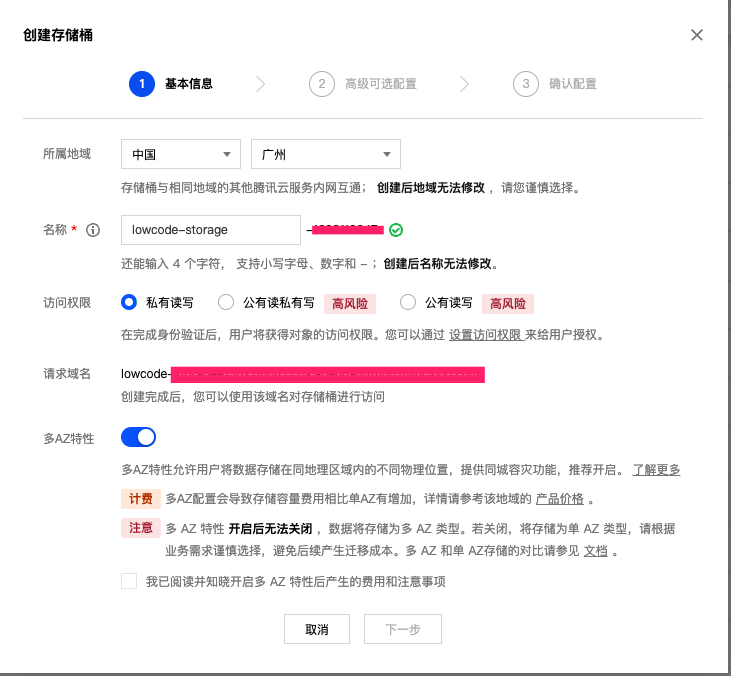
Configuration Steps:
-
Set Permission Policy
- Navigate to: Bucket List → Select Bucket → Permission Management → Policy Permissions → Add Permission
-
Add Policy
1.3 Create lowcode-ci Storage Bucket
This storage bucket does not need to set read-only policy
2. MinIO Object Storage Configuration
MinIO is a high-performance distributed object storage service compatible with Amazon S3 API. This section describes how to configure MinIO object storage service.
MinIO object storage started with Docker does not have high availability and is not recommended for production file storage. Production environments should use MinIO cluster mode or cloud vendor object storage services.
2.1 Create Storage Buckets
Create the following three storage buckets in MinIO:
lowcode-static: For storing static resourceslowcode-storage: For storing application datalowcode-ci: For storing CI/CD related files
2.2 Configure Storage Bucket Permissions
lowcode-static Bucket Permission Configuration
Set public read permissions for the lowcode-static storage bucket to allow anonymous users to access static resources.
Permission Policy Configuration Interface:
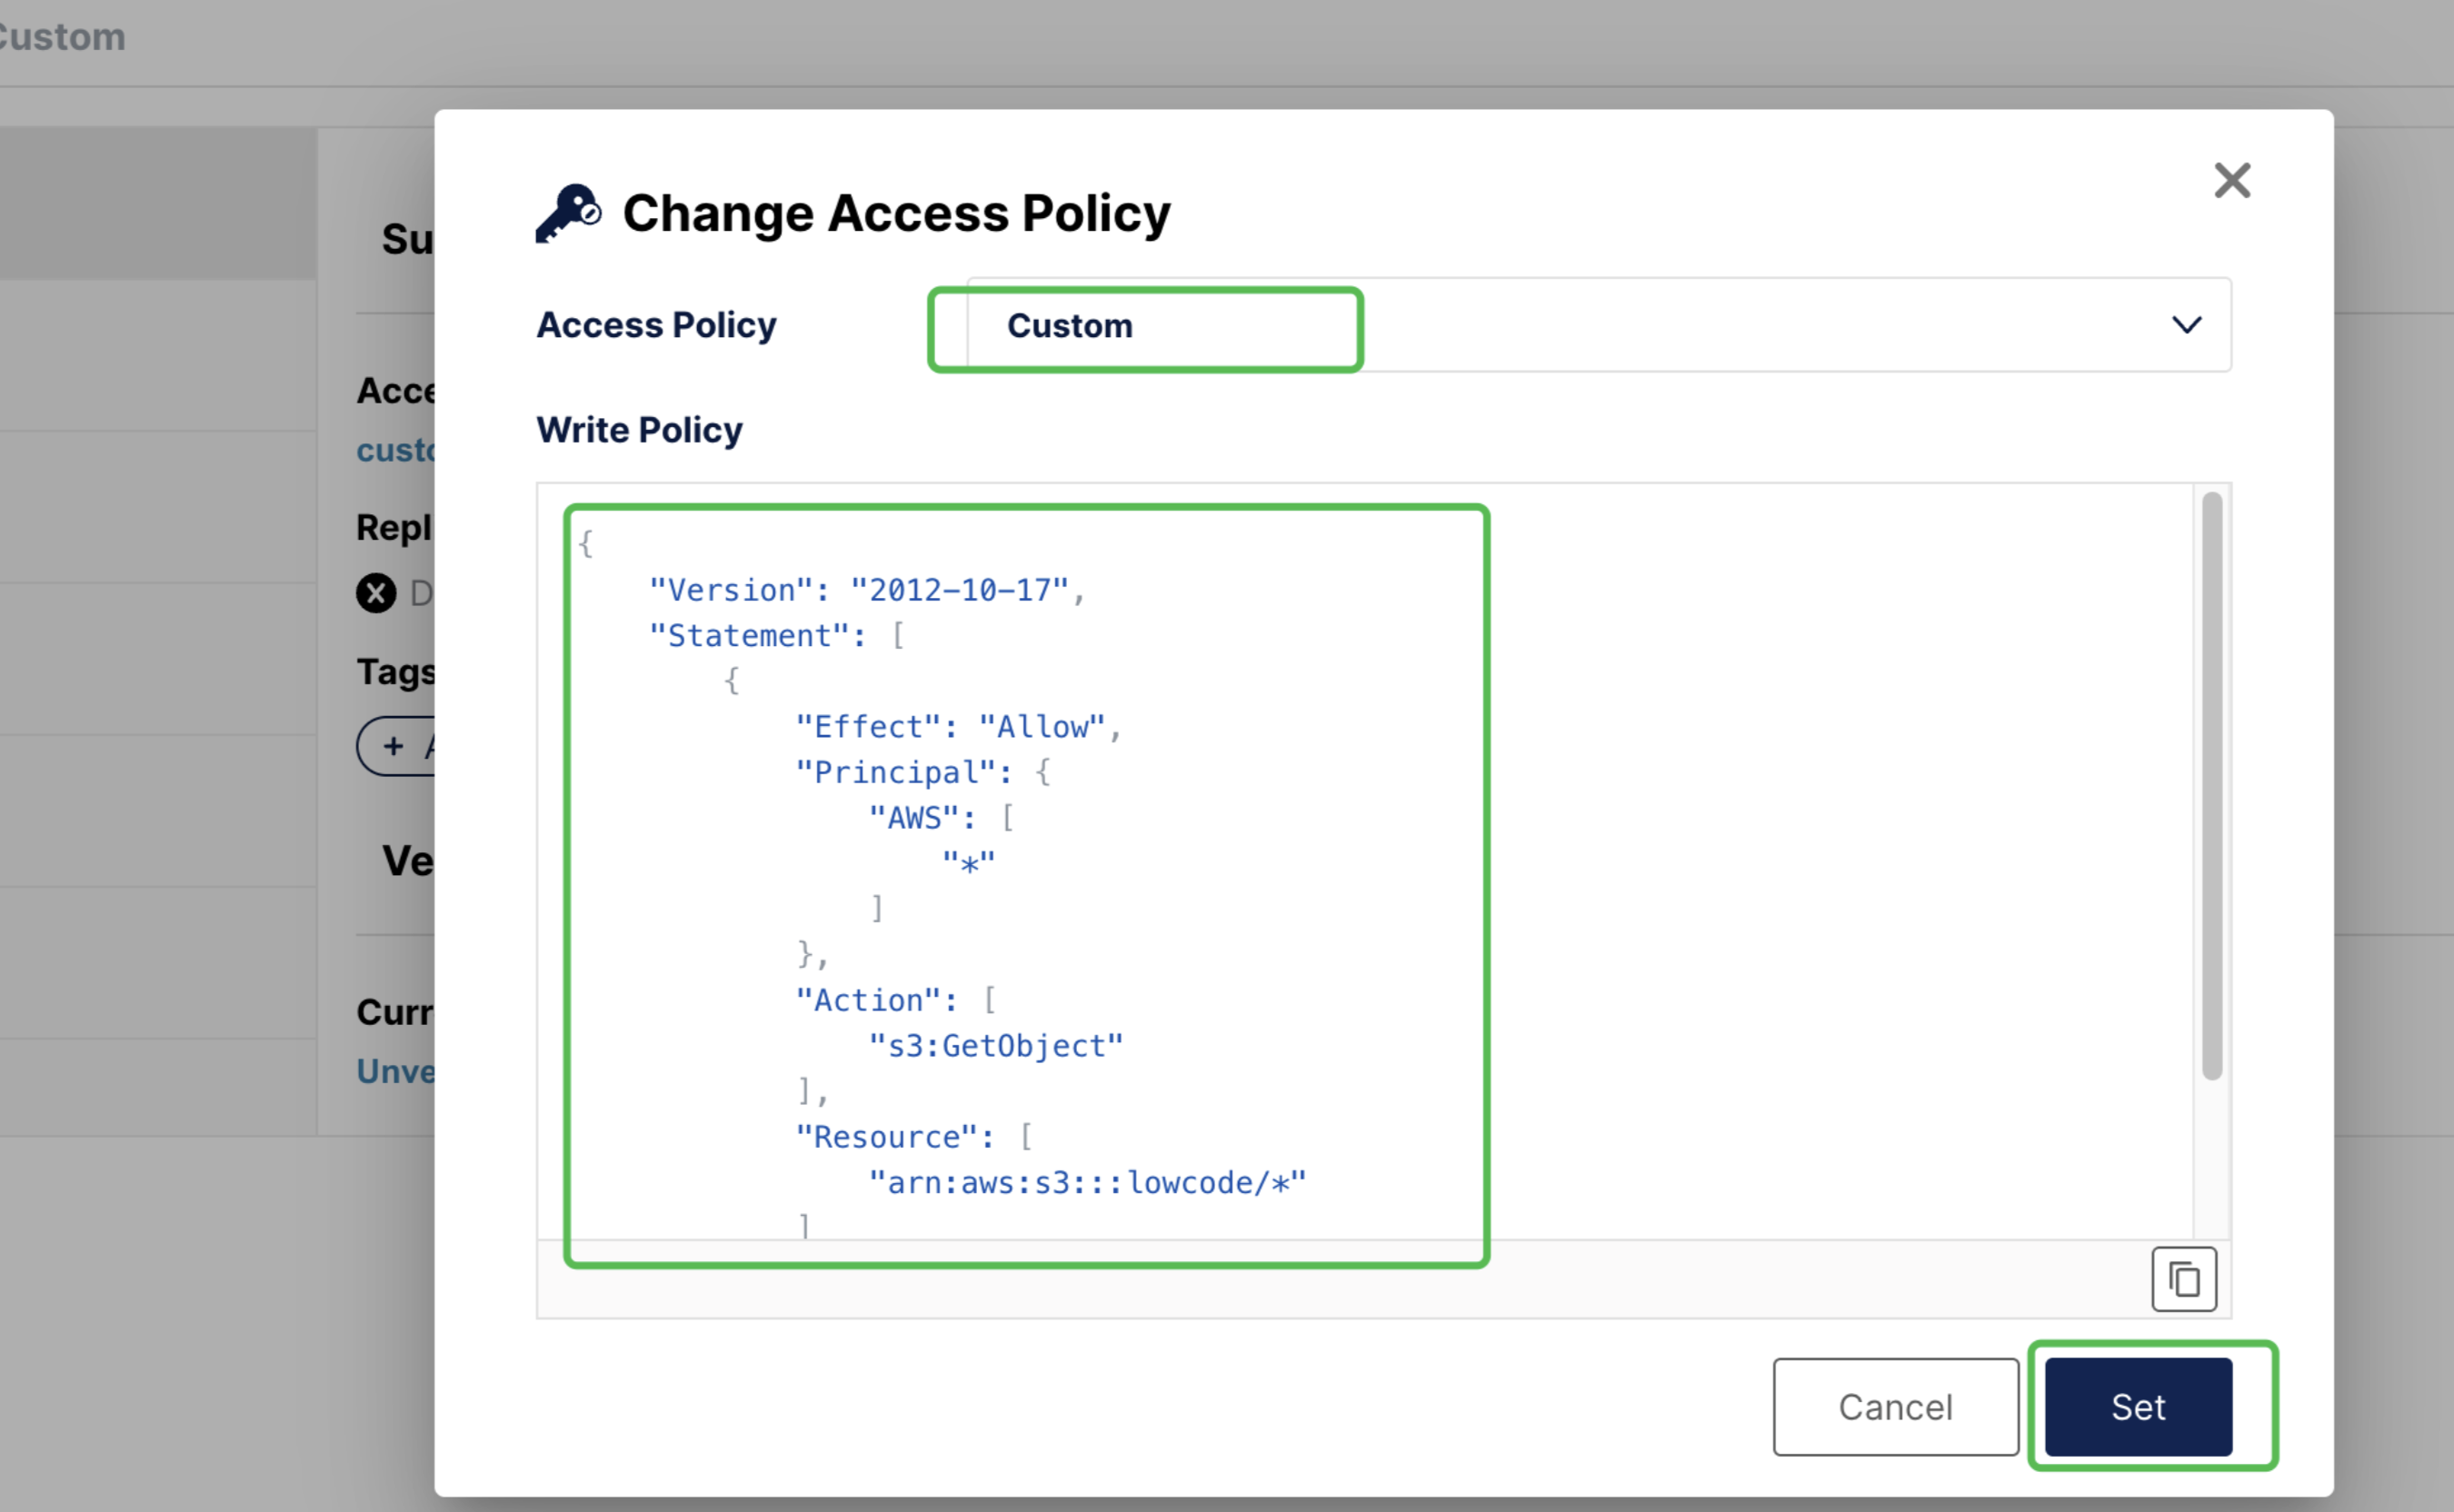
Permission Policy JSON Configuration:
{
    "Version": "2012-10-17",
    "Statement": [
        {
            "Effect": "Allow",
            "Principal": {
                "AWS": [
                    "*"
                ]
            },
            "Action": [
                "s3:GetObject"
            ],
            "Resource": [
                "arn:aws:s3:::lowcode-static/*"
            ]
        }
    ]
}
lowcode-ci Bucket Permission Configuration
Set the same public read permissions for the lowcode-ci storage bucket as lowcode-static.
Permission Policy JSON Configuration:
{
    "Version": "2012-10-17",
    "Statement": [
        {
            "Effect": "Allow",
            "Principal": {
                "AWS": [
                    "*"
                ]
            },
            "Action": [
                "s3:GetObject"
            ],
            "Resource": [
                "arn:aws:s3:::lowcode-ci/lcp/*"
            ]
        }
    ]
}
- This policy allows all users (
"AWS": ["*"]) to performs3:GetObjectoperations on all objects in thelowcode-staticstorage bucket - This ensures that static resources can be publicly accessed, meeting the resource loading requirements of web applications
- The
lowcode-cistorage bucket needs to set the same public read permissions aslowcode-static - Only the
lowcode-storagestorage bucket does not need to set public read permissions
2.3 MinIO Configuration Parameters
Use the following MinIO configuration parameters in the configuration file:
customS3:
  enabled: true
  endpoint: your-minio-server.com  # MinIO server address
  port: 9000                       # MinIO port (default 9000)
  scheme: http                     # Protocol (http or https)
  accessKey: "your-access-key"     # MinIO Access Key
  secretKey: "your-secret-key"     # MinIO Secret Key

  # Storage bucket configuration
  defaultBucket: lowcode-static
  cloudStorageBucket: lowcode-storage
  ciSourceBucket: lowcode-ci

  pathStyle: true                  # MinIO uses path-style access
  region: us-east-1               # MinIO default region
- MinIO uses
pathStyle: trueby default, which is different from cloud vendor S3 services - Ensure MinIO server network connectivity and firewall configuration
- Access Key and Secret Key need to have complete read and write permissions for storage buckets
3. Standalone Version Configuration and Installation
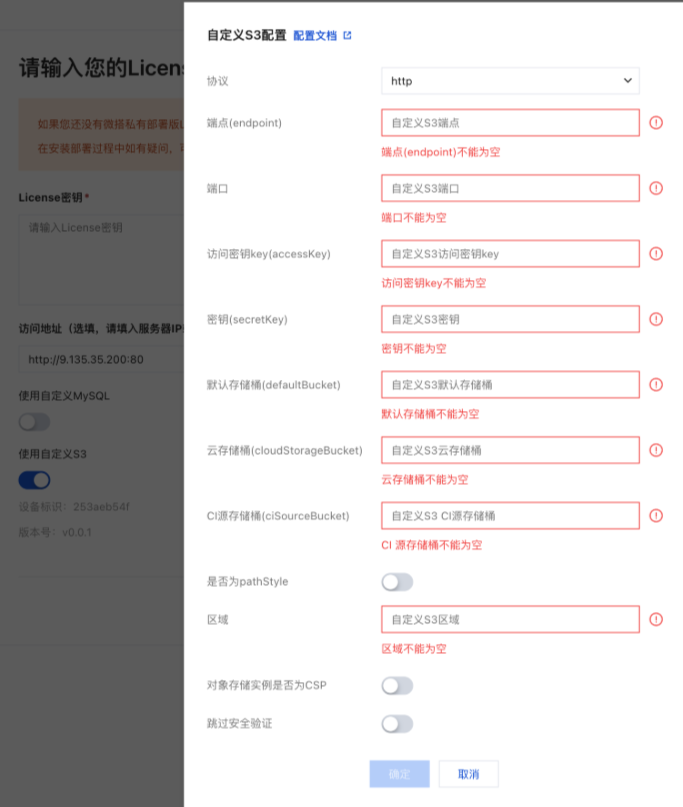
3.1 Visual Deployment Method
Standalone version supports configuring external S3 middleware through visual interface
Operation Steps:
- Access the installer page in browser:
http://<Server IP>:38080 - Enable external S3 middleware configuration on the configuration page
3.2 Script Deployment Method
Add the following S3 configuration in the config.yaml file:
customS3:
  enabled: true
  endpoint: cos.ap-guangzhou.myqcloud.com
  port: 443
  scheme: https
  accessKey: ""  # Fill in your AccessKey
  secretKey: ""  # Fill in your SecretKey

  # Storage bucket configuration (must match the bucket names created earlier)
  defaultBucket: lowcode-static-{appid}      # Corresponds to bucket created in step 1.1
  cloudStorageBucket: lowcode-storage-{appid}  # Corresponds to bucket created in step 1.2
  ciSourceBucket: lowcode-ci-{appid}         # Corresponds to bucket created in step 1.3

  pathStyle: false
  region: ap-guangzhou  # Adjust according to actual region
- Ensure that
accessKeyandsecretKeyhave read and write permissions for the corresponding storage buckets - Storage bucket names must exactly match the bucket names created earlier
- The region must match the actual region where the storage buckets are located
3.3 Installation and Deployment
After configuration is complete, refer to Private Deployment Process for deployment.
4. Cluster Version Configuration and Installation
4.1 Add Configuration Information
Edit the config.yaml file in the cluster installation directory:
If there is no config.yaml file, please run the command ./wedaCli init first to generate this file
s3:
  endpoint: cos.ap-guangzhou.myqcloud.com
  port: 443
  scheme: https
  accessKey:  # Fill in your AccessKey
  secretKey:  # Fill in your SecretKey
  insecureSkipVerify: true

  # Storage bucket configuration (must match the bucket names created earlier)
  defaultBucket: lowcode-static-{appid}      # Corresponds to bucket created in step 1.1
  cloudStorageBucket: lowcode-storage-{appid}  # Corresponds to bucket created in step 1.2
  ciSource: lowcode-ci-{appid}               # Corresponds to bucket created in step 1.3

  region: ap-guangzhou  # Adjust according to actual region
  pathStyle: false
- Ensure that all cluster nodes can access the configured S3 storage service
- Verify network connectivity and access permissions
- Storage bucket names must exactly match the bucket names created earlier
4.2 Installation and Deployment
After configuration is complete, run the following command for deployment:
# Start cluster deployment
./wedaCli up
Configuration Checklist
After completing the configuration, please confirm the following items:
- ✅ Created three required storage buckets (static, storage, ci)
- ✅ lowcode-static storage bucket has configured correct permission policy
- ✅ AccessKey and SecretKey have sufficient permissions
- ✅ Network connectivity is normal (firewall, security group configuration)
- ✅ Region configuration matches the actual region of storage buckets
- ✅ Storage bucket names are correctly filled in the configuration file
Troubleshooting
If you encounter configuration issues, please check:
- Permission Issues: Confirm that AccessKey has read and write permissions for storage buckets
- Network Issues: Check network connectivity from server to S3 service
- Configuration Issues: Verify the accuracy of configuration information such as storage bucket names and regions
- Log Review: Troubleshoot specific error information through system logs