Practical Tutorial on Login Methods
CloudBase provides a cross-platform login authentication feature, enabling you to build a user system, including anonymous login, email login, WeChat authorized login, custom login, username and password login, and mobile SMS verification code login.
Prerequisites
Activate an environment and select pay-as-you-go as the billing mode.
Login Authentication Methods
CloudBase provides the following login authentication methods for different user scenarios:
| Login Type | Scenario |
|---|---|
| Unauthenticated | After allowing unauthenticated access, users can access the application without logging in. |
| Anonymous Login | Users log in to CloudBase with a temporary anonymous identity without registration. |
| Email Login | Users log in using their own email + password. |
| WeChat Authorization Login |
|
| Custom Login | Developers can fully take over the login process, such as integrating with their own account systems and customizing login logic, etc. |
| Username and Password Login | Users log in using their own username and password. |
| SMS Verification Code Login | Users log in using their own phone number and verification code. |
Login Type
Not Logged In
- Log in to the Cloud Development CloudBase Console, and in the Login Authorization section, enable the Unauthenticated Access option.
- Go to the Environment > Security Configuration page and click Add Domain.
- Set up custom security rules to allow unauthenticated access.
- Initialize the SDK and initiate the call. For more details, please refer to Usage Process.
Anonymous Login
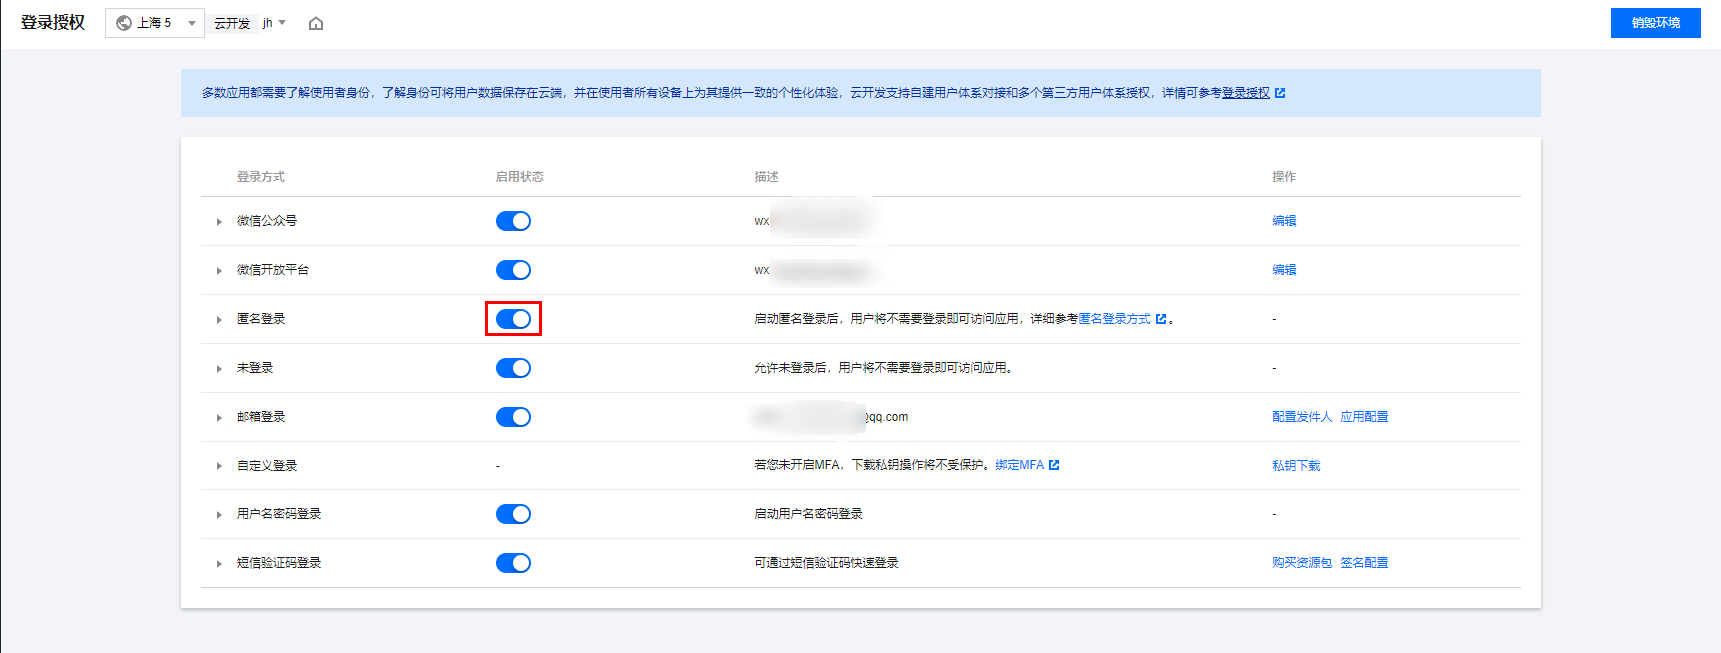
- Log in to the Cloud Development CloudBase Console, and on the Login Authorization page, enable the Anonymous Login option to activate anonymous login.
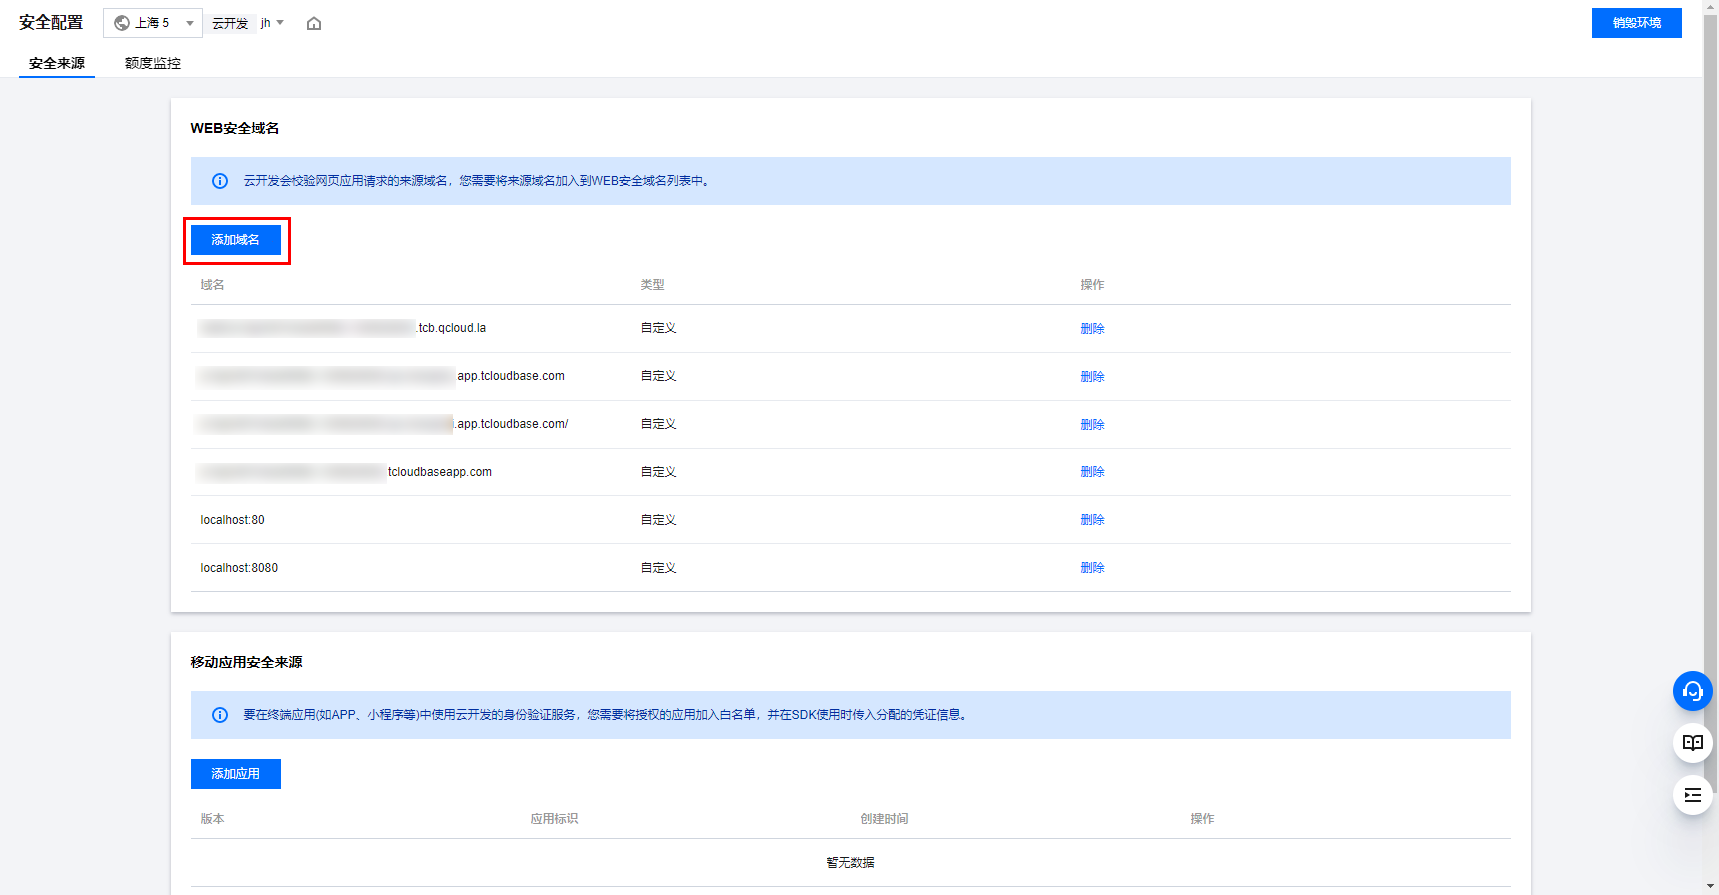
- Go to the Environment > Security Configuration page and click Add Domain.
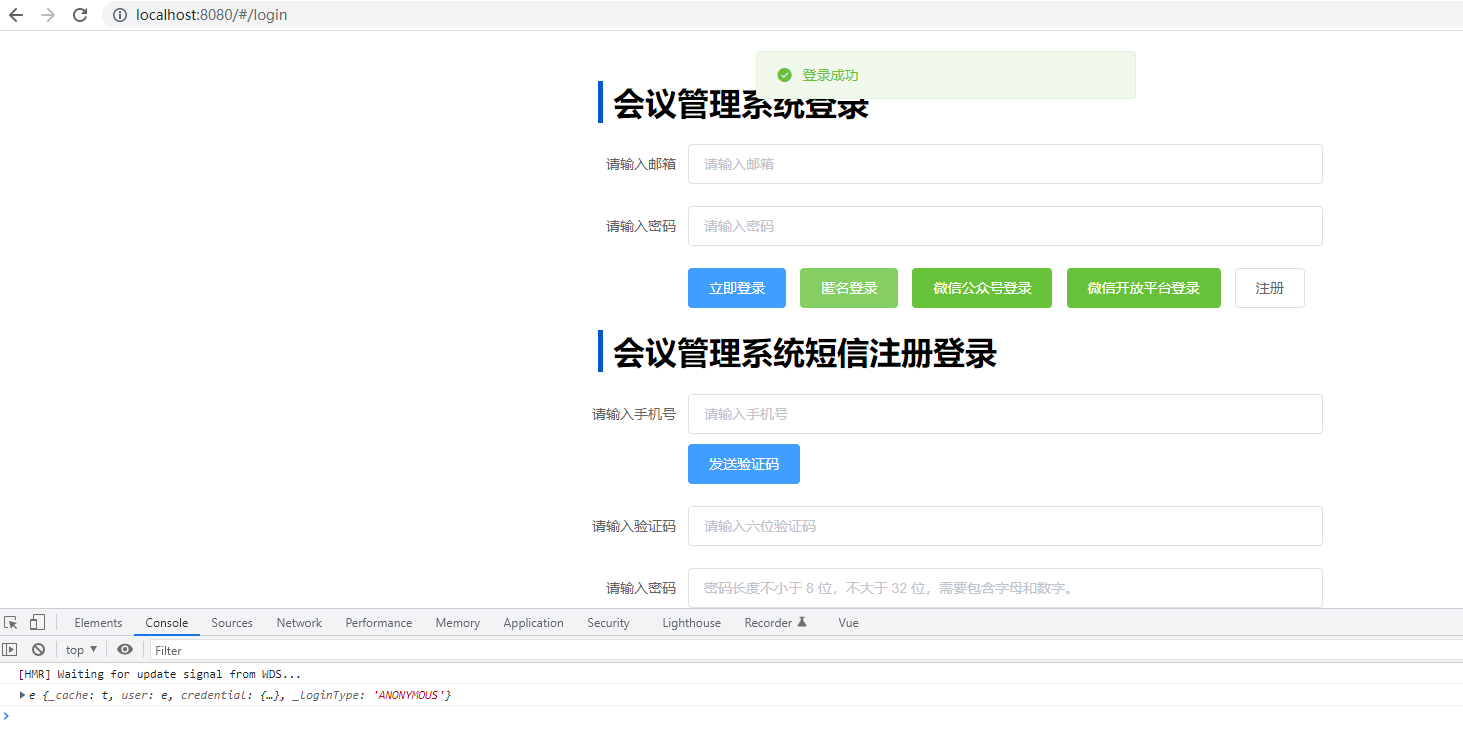
- Develop the login process.
- Login Code
- vue Implementation
- mian.js
import cloudbase from '@cloudbase/js-sdk';

const app = cloudbase.init({
  env: 'xxxx-yyy';  // This is the Environment ID
});

const auth = app.auth();

async function login(){
  await auth.anonymousAuthProvider().signIn();
  // When anonymous login succeeds, the isAnonymous field in the login status is detected as true.
  const loginState = await auth.getLoginState();
  console.log(loginState.isAnonymousAuth); // true
}

login();
<template>
  <div class="block">
    <h1 class="title">Conference Management System Login</h1>
    <el-form ref="form" :model="form" label-width="120px">
      <el-form-item>
        <el-button type="success" @click="onasy">Anonymous Login</el-button>
      </el-form-item>
    </el-form>
  </div>
</template>
<script>
  import cloudbase from "@cloudbase/js-sdk";
  const app = cloudbase.init({
    env: "xxxx-yyy", // This is the Environment ID
  });

  export default {
    name: "login",
    data() {
      return {};
    },
    methods: {
      onasy() {
        const app = this.$cloudbase;
        app
          .auth({
            persistence: "session",
          })
          .anonymousAuthProvider()
          .signIn()
          .then((res) => {
            console.log(res);
            this.$message({
              message: "Login successful",
              type: "success",
            });
          })
          .catch((err) => {
            console.log(err);
            this.$message({
              message: "Please check the input" + err,
              type: "warning",
            });
          });
      },
    },
  };
</script>

<style scoped>
  .block {
    width: 40%;
    margin: 50px auto;
  }
  .title {
    margin-left: 30px;
    border-left: 5px solid rgb(3, 89, 202);
    padding-left: 10px;
  }
</style>
// The Vue build version to load with the `import` command
// (runtime-only or standalone) has been set in webpack.base.conf with an alias.
import Vue from "vue";
import App from "./App";
import VueRouter from "vue-router";
import router from "./router";
import ElementUI from "element-ui";
import "element-ui/lib/theme-chalk/index.css";
import Cloudbase from "@cloudbase/vue-provider";

Vue.use(Cloudbase, {
  env: "xxxx-yyy", // This is the Environment ID
});
Vue.use(VueRouter);
Vue.use(ElementUI);
Vue.config.productionTip = false;
import cloudbase from "@cloudbase/js-sdk";

const app = cloudbase.init({
  env: "xxxx-yyy", // This is the Environment ID
});
/* eslint-disable no-new */
new Vue({
  el: "#app",
  router,
  render: (h) => h(App),
});
Email Login
- Go to the Cloud Development CloudBase Console, and on the Login Authorization settings page, enable Email Login.
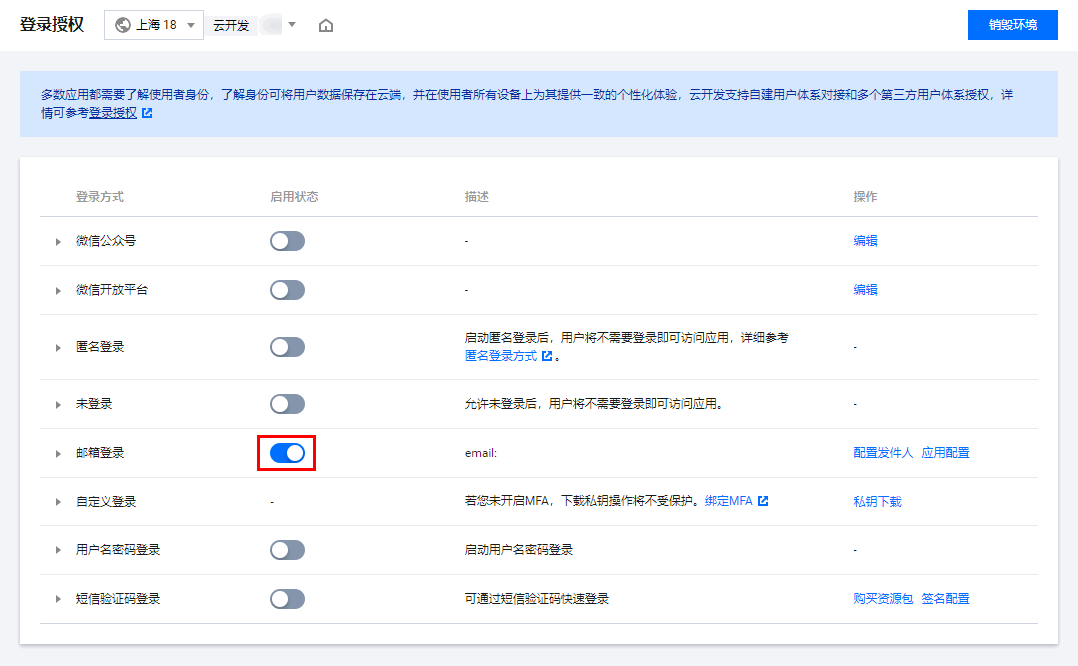
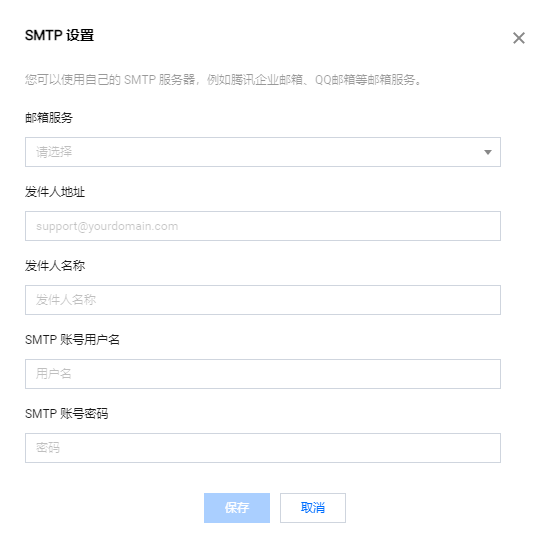
- Click Configure Sender, and fill in your email's SMTP Account Information.
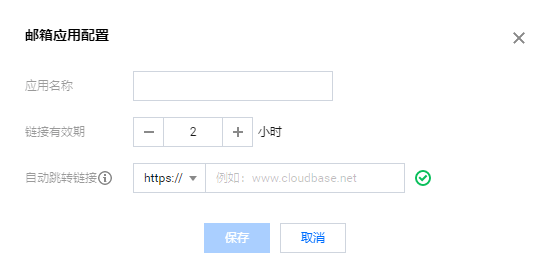
- Click Application Configuration, and set your Application Name and Auto Redirect Link.
- After the configuration is successful, you will receive a test email.

- Sample code is as shown below:
- Initialize SDK
- Register Account with Email
- Login to CloudBase with Email and Password
- vue Implementation Code
import cloudbase from "@cloudbase/js-sdk";

const app = cloudbase.init({
  env: "your-env-id",
});
app
  .auth()
  .signUpWithEmailAndPassword(email, password)
  .then(() => {
    // Verification email sent successfully
  });
app
  .auth()
  .signInWithEmailAndPassword(email, password)
  .then((loginState) => {
    // Login successful
  });
<template>
  <div class="block">
    <h1 class="title">Conference Management System Login</h1>
    <el-form ref="form" :model="form" label-width="120px">
      <el-form-item label="Email">
        <el-input v-model="form.email" placeholder="Email"></el-input>
      </el-form-item>
      <el-form-item label="Password">
        <el-input
          placeholder="Password"
          v-model="form.password"
          show-password
        ></el-input>
      </el-form-item>
      <el-form-item>
        <el-button type="primary" @click="onSubmit">Login Now</el-button>
        <el-button @click="onRegister">Register</el-button>
      </el-form-item>
    </el-form>
  </div>
</template>
<script>
  import cloudbase from "@cloudbase/js-sdk";
  const app = cloudbase.init({
    env: "your-env-id",
  });

  export default {
    name: "login",
    data() {
      return {
        form: {
          email: "",
          password: "",
        },
      };
    },
    methods: {
      onSubmit() {
        const app = this.$cloudbase;
        app
          .auth()
          .signInWithEmailAndPassword(this.form.email, this.form.password)
          .then((loginState) => {
            console.log(loginState);
            this.$message({
              message: "Login successful",
              type: "success",
            });
          })
          .catch((err) => {
            console.log(err);
            this.$message({
              message: Please check the input
              type: "warning",
            });
          });
      },
      onRegister() {
        const app = this.$cloudbase;
        app
          .auth()
          .signUpWithEmailAndPassword(this.form.email, this.form.password)
          .then((res) => {
            this.$message({
              message: "Registration successful",
              type: "success",
            });
          })
          .catch((err) => {
            console.log(err);
            this.$message({
              message: Please check the input
              type: "warning",
            });
          });
      },
    },
  };
</script>

<style scoped>
  .block {
    width: 40%;
    margin: 50px auto;
  }
  .title {
    margin-left: 30px;
    border-left: 5px solid rgb(3, 89, 202);
    padding-left: 10px;
  }
</style>
WeChat Official Account Login
Prerequisites
- On the Register Official Account page, a Service Account has been successfully registered ("Subscription Accounts" do not have access to the "Webpage Authorization" interface).
- Log in to the newly registered Service Account, go to Settings > Basic Information > WeChat Authentication section, and complete WeChat authentication.
- Complete adding the webpage authorization domain for the official account.
- Go to the Development > Basic Configuration page to obtain the AppId and AppSecret of the Service Account.
Procedures
- Log in to the CloudBase Console, and in Login Authorization, click to enable WeChat Official Account login authorization.
- Click the Enable button and then enter the corresponding AppId and AppSecret.
- Go to the Environment > Security Configuration page and click Add Security Domain.
- Sample code is as shown below:
- Initialize SDK
- Login Code
- vue Implementation
import cloudbase from "@cloudbase/js-sdk";

const app = cloudbase.init({
  env: "your-env-id",
});
const auth = app.auth();
const provider = auth.weixinAuthProvider({ appid: "...", scope: "xxxx" });
async function login() {
  // 1. It is recommended to first check whether you are already logged in before logging in.
  const loginState = await auth.getLoginState();
  if (!loginState) {
    // 2. Call the WeChat login API
    provider.getRedirectResult().then((loginState) => {
      if (loginState) {
        // Login successful, login state already exists locally
      } else {
        // Not logged in, trigger WeChat login
        provider.signInWithRedirect();
      }
    });
  }
}
login();
<template>
  <div class="block">
    <h1 class="title">Conference Management System Login</h1>
    <el-form ref="form" :model="form" label-width="120px">
      <el-form-item>
        <el-button type="success" @click="onWechat">WeChat Official Account Login</el-button>
      </el-form-item>
    </el-form>
  </div>
</template>
<script>
import cloudbase from "@cloudbase/js-sdk";
const app = cloudbase.init({
  env: "your-env-id"
});

export default {
  name: "login",
  data() {
    return {
    };
  },
  methods: {
    onWechat(){
      const app = this.$cloudbase;
      const auth = app.auth();
      const provider = auth.weixinAuthProvider({
        appid: "your-wx-id",
        scope: "snsapi_userinfo",
      });
      async function login() {
        // 1. It is recommended to first check whether you are already logged in before logging in.
        const loginState = await auth.getLoginState();
        if (!loginState) {
          // 2. Call the WeChat login API
          provider.getRedirectResult().then((loginState) => {
            if (loginState) {
              // Login successful, login state already exists locally
            } else {
              // Not logged in, trigger WeChat login
              provider.signInWithRedirect();
            }
          });
        }
      }
      login();
    },
  },
};
</script>

<style scoped>
.block {
  width: 40%;
  margin: 50px auto;
}
.title {
  margin-left: 30px;
  border-left: 5px solid rgb(3, 89, 202);
  padding-left: 10px;
}
WeChat Open Platform Login
Prerequisites
- Complete the registration on WeChat Open Platform.
- Log in to the newly registered WeChat Open Platform, go to Account Center > Developer Qualification Certification page to complete the application for WeChat authentication.
- Successfully create a web application on the WeChat Open Platform.
- Obtain the AppId and AppSecret of the WeChat Open Platform web application.
Procedures
- Log in to the CloudBase Console, and in Login Authorization, click to enable WeChat Open Platform login authorization.
- Click the Enable button and then enter the corresponding AppId and AppSecret.
- Add the Cloud Development SDK to your Web application.
<script src="//static.cloudbase.net/cloudbase-js-sdk/1.6.0/cloudbase.full.js"></script>

<script>
  const app = cloudbase.init({
    // Your environment id
    env: "your-env-id",
  });
</script>
Copy the code snippet below and paste it at the bottom of your HTML code, before other script tags.
- Login Code
- vue Implementation
const auth = app.auth();
const provider = auth.weixinAuthProvider({ appid: "...", scope: "xxxx" });
async function login() {
  // 1. It is recommended to first check whether you are already logged in before logging in.
  const loginState = await auth.getLoginState();
  if (!loginState) {
    // 2. Call the WeChat login API
    provider.getRedirectResult().then((loginState) => {
      if (loginState) {
        // Login successful, login state already exists locally
      } else {
        // Not logged in, trigger WeChat login
        provider.signInWithRedirect();
      }
    });
  }
}
login();
<template>
  <div class="block">
    <h1 class="title">Conference Management System Login</h1>
    <el-form ref="form" :model="form" label-width="120px">
      <el-form-item>
        <el-button type="success" @click="onWechatopen"
          >WeChat Open Platform Login</el-button
        >
      </el-form-item>
    </el-form>
  </div>
</template>
<script>
  import cloudbase from "@cloudbase/js-sdk";
  const app = cloudbase.init({
    env: "your-env-id",
  });

  export default {
    name: "login",
    data() {
      return {};
    },
    methods: {
      onWechatopen() {
        const app = this.$cloudbase;
        const auth = app.auth();
        const provider = auth.weixinAuthProvider({
          appid: "your-wx-id",
          scope: "snsapi_login",
        });
        async function login() {
          // 1. It is recommended to first check whether you are already logged in before logging in.
          const loginState = await auth.getLoginState();
          if (!loginState) {
            // 2. Call the WeChat login API
            provider
              .getRedirectResult()
              .then((loginState) => {
                if (loginState) {
                  // Login successful, login state already exists locally
                } else {
                  // Not logged in, trigger WeChat login
                  provider.signInWithRedirect();
                }
              })
              .catch((err) => {
                console.log(err);
              });
          }
        }
        login();
      },
    },
  };
</script>

<style scoped>
  .block {
    width: 40%;
    margin: 50px auto;
  }
  .title {
    margin-left: 30px;
    border-left: 5px solid rgb(3, 89, 202);
    padding-left: 10px;
  }
</style>
Custom Login
Custom login is applicable to scenarios where developers have full control over authentication and maintain their own account system.
- Log in to the Cloud Development CloudBase Console, on the Login Authorization page, in the Custom Login section, click Private Key Download to obtain the custom login private key.
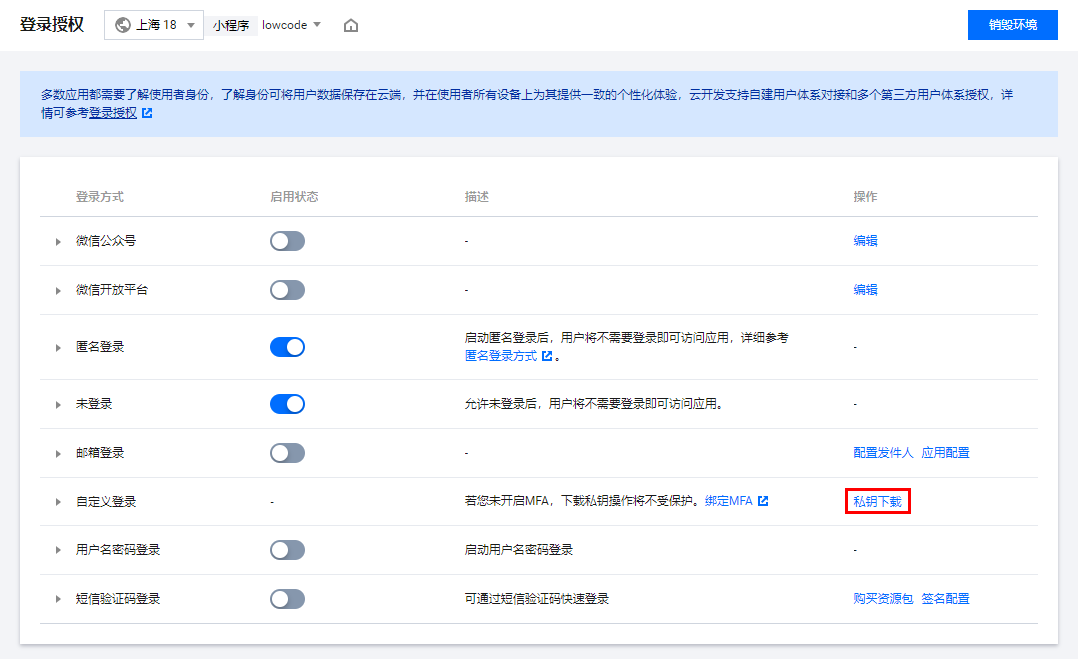
The private key is a file containing JSON data. Please save the downloaded or copied private key file to your server or cloud function, assuming the path is /path/to/your/tcb_custom_login.json.
- The private key file is a critical credential that proves administrator identity. Please keep it secure and avoid leakage.
- Each time a private key file is generated, it will cause the previously generated private key file to expire after 2 hours.
- Call the CloudBase server-side SDK, pass the custom login private key during initialization, then sign out a Ticket and return it to the client side.
const cloudbase = require("@cloudbase/node-sdk");
// 1. Initialize SDK.
const app = cloudbase.init({
    env: "your-env-id",
    // Pass the custom login private key credentials:
    require("/path/to/your/tcb_custom_login.json")
});
// 2. Developer-defined unique user identifier.
const customUserId = "your-customUserId";
// 3. Create a ticket.
const ticket = app.auth().createTicket(customUserId);
// 4. Return the ticket to the client return ticket;
Developers can also write a cloud function to generate a Ticket and set up an HTTP access service for it. Then the client can obtain the Ticket via HTTP requests. For details, see Accessing Cloud Functions via HTTP.
- After obtaining the Ticket, the client-side application can use it to log in to CloudBase by calling the
auth.signInWithTicket()method provided by the client-side SDK.
import cloudbase from "@cloudbase/js-sdk";
const app = cloudbase.init({ env: "your-env-id" });
const auth = app.auth();
async function login() {
  // 1. It is recommended to check whether you are already logged in before logging in.
  const loginState = await auth.getLoginState();
  if (!loginState) {
    // 2. Request the developer's service API to obtain the ticket.
    const ticket = await fetch("...");
    // 3. Log in to CloudBase
    await auth.customAuthProvider().signIn(ticket);
  }
}
login();
The overall process is as follows:

Username-Password Login
- Log in to the Cloud Development CloudBase Console, and in the Login Authorization, click to enable Username-Password Login.
- Initialize the SDK.
import cloudbase from "@cloudbase/js-sdk";

const app = cloudbase.init({
  env: "your-env-id",
});
- Log in using other methods.
Before binding a username, users must first log in using other methods such as email login or WeChat Official Account login, but excluding anonymous login.
The following uses Email Login as an example:
const auth = app.auth();
await auth.signInWithEmailAndPassword(email, password); // Email Login
- Bind username.
const auth = app.auth();
if (!(await auth.isUsernameRegistered(username))) {
  // Check if the username has been bound
  await auth.currentUser.updateUsername(username); // Bind username
}
- Sample code is as shown below:
- Initialize SDK
- Log in to CloudBase with Username and Password
- vue Implementation
import cloudbase from "@cloudbase/js-sdk";

const app = cloudbase.init({
  env: "your-env-id",
});
const auth = app.auth();
const loginState = await auth.signInWithUsernameAndPassword(username, password); // Username and Password Login
<template>
  <div class="block">
    <h1 class="title">Conference Management System Login</h1>
    <el-form ref="form" :model="form" label-width="120px">
      <el-form-item label="Email">
        <el-input v-model="form.email" placeholder="Email"></el-input>
      </el-form-item>
      <el-form-item label="Password">
        <el-input
          placeholder="Password"
          v-model="form.password"
          show-password
        ></el-input>
      </el-form-item>
      <el-form-item>
        <el-button type="primary" @click="onSubmit">Login Now</el-button>
      </el-form-item>
    </el-form>
    <h1 class="title">Username Binding Process</h1>
    <el-form ref="form" :model="form2" label-width="120px">
      <el-form-item label="Username">
        <el-input
          v-model="form2.username"
          placeholder="Username"
        ></el-input>
      </el-form-item>
      <el-form-item>
        <el-button type="primary" @click="onSubmit1">Login Now</el-button>
      </el-form-item>
    </el-form>
  </div>
</template>
<script>
  import cloudbase from "@cloudbase/js-sdk";
  const app = cloudbase.init({
    env: "your-env-id",
  });

  export default {
    name: "login",
    data() {
      return {
        form: {
          email: "",
          password: "",
        },
        form1: {
          phone: "",
          yz: "",
          password: "",
        },
        form2: {
          email: "",
          password: "",
          username: "",
        },
      };
    },
    methods: {
      onSubmit() {
        const app = this.$cloudbase;
        app
          .auth()
          .signInWithEmailAndPassword(this.form.email, this.form.password)
          .then((loginState) => {
            console.log(loginState);
            this.$message({
              message: "Login successful",
              type: "success",
            });
          })
          .catch((err) => {
            console.log(err);
            this.$message({
              message: Please check the input
              type: "warning",
            });
          });
      },
      onSubmit1() {
        const auth1 = this.$cloudbase.auth();
        if (auth1.hasLoginState()) {
          console.log("Already logged in");
          console.log(auth1);
          if (!auth1.isUsernameRegistered(this.form2.username)) {
            // Check if the username has been bound
            console.log("Not bound");
            auth1.currentUser.updateUsername(this.form2.username); // Bind username
          } else {
            console.log("Bound");
          }
        } else {
          Bound
        }
      },
    },
  };
</script>

<style scoped>
  .block {
    width: 40%;
    margin: 50px auto;
  }
  .title {
    margin-left: 30px;
    border-left: 5px solid rgb(3, 89, 202);
    padding-left: 10px;
  }
</style>
SMS Verification Code Login
- Log in to the Cloud Development CloudBase Console, and in the Login Authorization, click to enable SMS Verification Code Login.
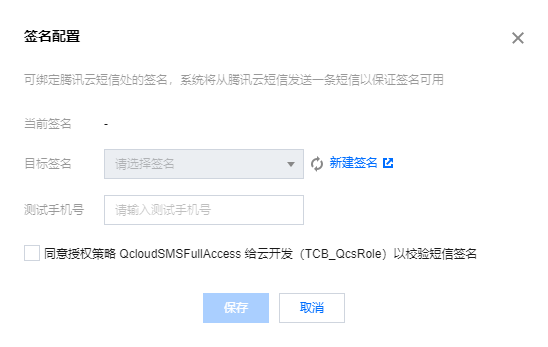
- Click Signature Configuration under the operation bar, enter the corresponding parameters, and then click Save.
- Initialize the SDK.
import cloudbase from "@cloudbase/js-sdk";

const app = cloudbase.init({
  env: "your-env-id",
});
- To register an account using a mobile phone number, the user first needs to enter their mobile phone number and then call the SDK's send SMS verification code interface.
// Send the verification code
app
  .auth()
  .sendPhoneCode("Mobile phone number")
  .then((res) => {
    console.log("Verification code sent successfully");
  });

// Verification code + password registration
app
  .auth()
  .signUpWithPhoneCode("Mobile phone number", "Six-digit verification code", "Custom password")
  .then((res) => {
    console.log("Sign up successful");
  });
- The login methods for mobile password and SMS verification code are as follows:
- SMS Verification Code Login
- Mobile Password Login
app
  .auth()
  .signInWithPhoneCodeOrPassword({
    phoneNumber: "Phone Number",
    phoneCode: "Verification Code",
  })
  .then((res) => {
    // Login successful
  });
app
  .auth()
  .signInWithPhoneCodeOrPassword({
    phoneNumber: "Phone Number",
    password: "Password",
  })
  .then((res) => {
    // Login successful
  });