Hands-on Store Mini Program Development Guide
Overview
This article uses a store mini program development project as an example to introduce the preparatory work during WeChat Mini Program development, the creation process of the mini program, the functionality of each file in the directory, and the cloud development features used during development, such as cloud storage, databases, and cloud functions.
The source code materials involved in this tutorial example have been properly authorized.
Preparation
- Register for Tencent Cloud.
- Mini Program with Cloud Development enabled. For details, please refer to Quick Start for WeChat Mini Program.
Operation Process
The specific operation process can be divided into the following 4 steps. For more details, please refer to the example.
Project Directory
| File | Description |
|---|---|
| Configuration File .json | |
| Template File .wxml | Commonly used page template files such as `index.wxml`, similar to HTML, utilize a tag-based language to design interface components and event systems, thereby constructing the page structure. |
| Style File .wxss | |
| Logic File .js | Logic files are used to implement the business logic features of pages, such as data acquisition, determination, page prompts, and other functionalities, all of which are implemented by writing methods in the logic files. |
Environment Configuration
This article primarily focuses on explaining the project configuration files app.json and app.js. For more details on project configuration file code, refer to app.json Configuration and app.js Configuration.
Step 1: Create Pages Required for the Project
First, conduct requirements analysis:
- A store requires at least one home page to display available products to users.
- A product detail page is used to present information about a single product.
- A shopping cart is used to hold desired items for users.
Therefore, we need to configure the content in the pages section of the Mini Program project configuration file app.json. After inputting the corresponding paths, the developer tools will generate the page files at those paths.
"pages":[
"pages/index/index",
"pages/cart/cart",
"pages/detail/detail"
],
Step 2: Configure the Store's Navigation Bar
After generating the pages in Step 1, you need to add them to the navigation bar for user convenience. In app.json, add a tabBar property. Since the store consists of two main sections: the home page and shopping cart, add two buttons in the list property of the tabBar, configuring their page paths, titles, and icons.
"tabBar": {
"selectedColor": "#f00",
"list": [
{
"pagePath": "pages/index/index",
"text": "Home",
"iconPath": "./SweetDumplingSauce/1.jpeg",
"selectedIconPath": "./SweetDumplingSauce/3.jpeg"
},
{
"pagePath": "pages/cart/cart",
"text": "Shopping Cart",
"iconPath": "./SweetDumplingSauce/2.jpeg",
"selectedIconPath": "./SweetDumplingSauce/4.jpeg"
}
]
}
The following figure shows the effect.

Step 3: Configure the CloudBase environment
Go to the WeChat DevTools > Cloud Development Console page and copy the Environment ID.

Call the API in
app.jsand pass the environment ID from the Cloud Development Console towx.cloud.init, enabling the project to access data and resources in the console.
// app.js
App({
  onLaunch: function () {
    wx.cloud.init({
      env: "xxxxx", // Enter your environment ID
    });
  },
  globalData: {
    userInfo: null,
  },
});
Step 4: Create a database
Store the mall's products in a database to facilitate product display on subsequent pages.
Go to the WeChat Developer Tools > Cloud Development Console > Database page. Create three collections: carts, goods, and orders.
Go to the goods collection, click Add Record to add some initial information. The attributes for each data record are as follows:
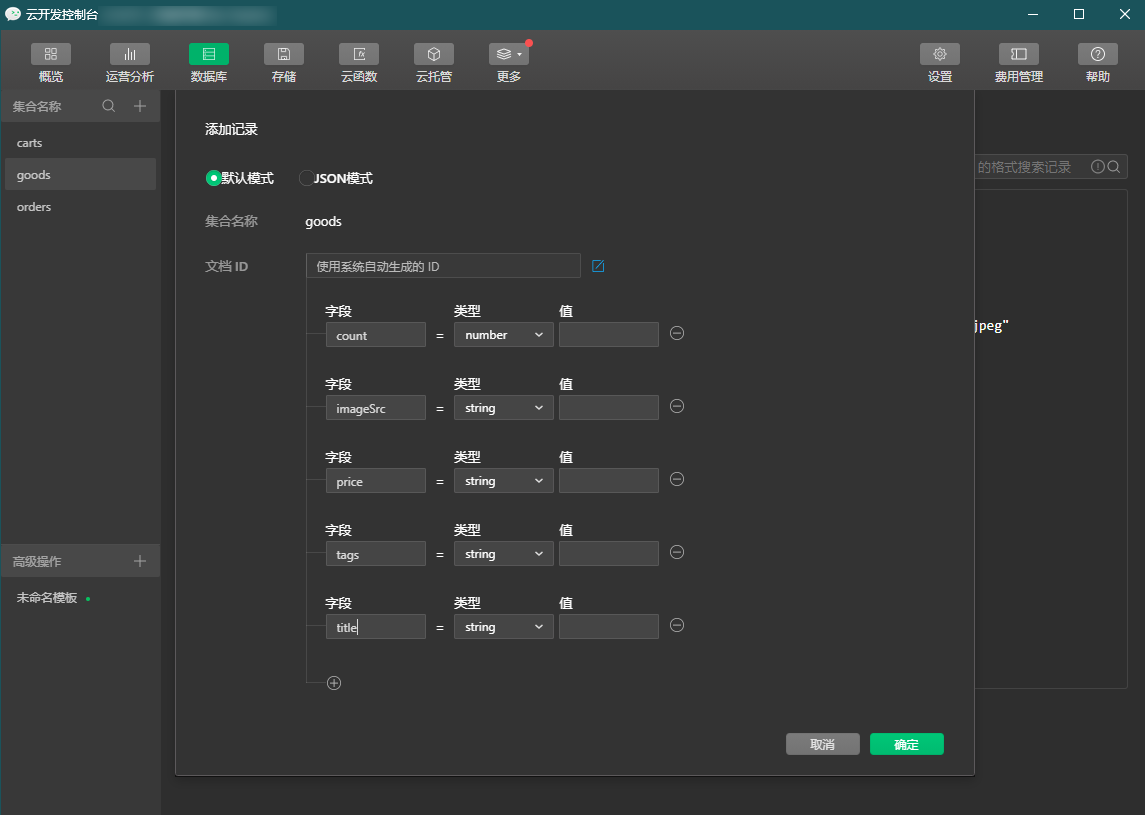
- count: Product quantity.
- imageSrc: Product image, obtained from cloud storage.
- price: Product price.
- tags: Product category tags.
- title: Product name.
Product images need to be imported into cloud storage first to generate the image location, facilitating the invocation of image data during development.
Step 5: Import images to cloud storage
Go to the WeChat Developer Tools > Cloud Development Console > Storage page.
Click New Folder and name it goods.
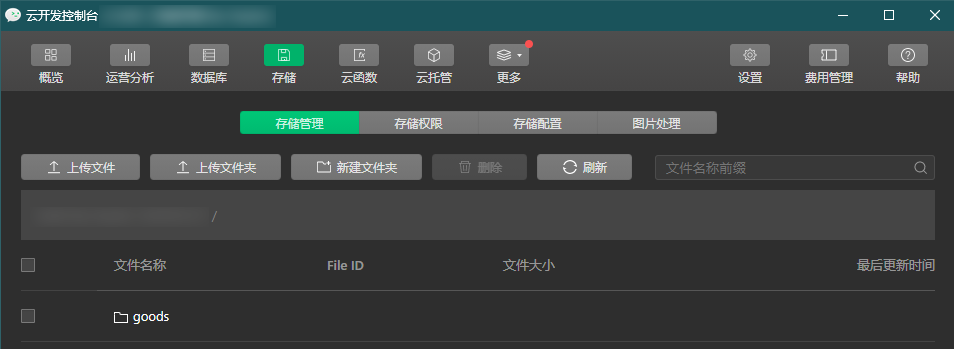
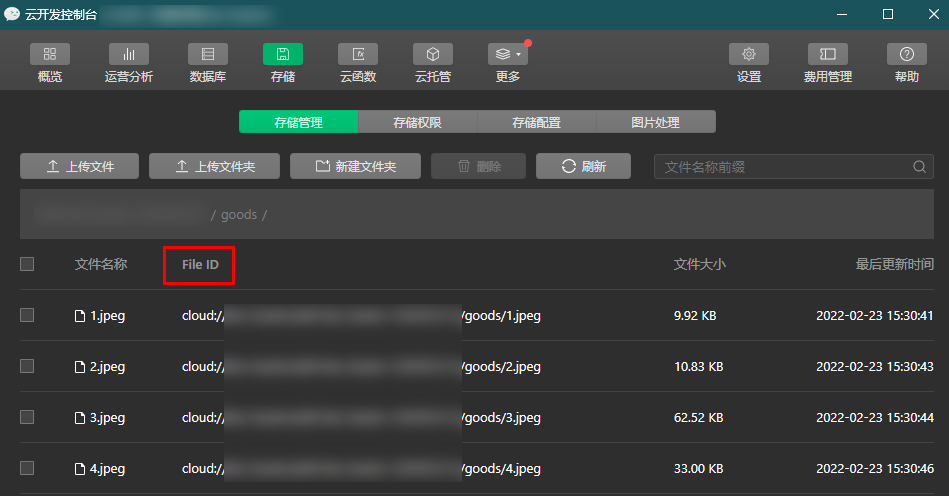
Go to the goods folder, click Upload File, and upload the required images. These files can be referenced in the project using FileID.
Step 6: Create cloud function
Create a folder named cloudfunction for cloud functions in the directory, then set the cloudfunctionRoot property value to "cloudfunction/" in project.config.json.
When the files in the cloudfunction directory turn green, it indicates that the cloud function initialization is complete. Right-click the folder and select New Node.js Cloud Function to create a cloud function. The result is as shown below:

Building the Store Homepage
This article primarily focuses on the explanation of the store homepage files index.js and index.wxml. For more details on project configuration file code, refer to index.js Configuration and Frontend Page index.wxml.
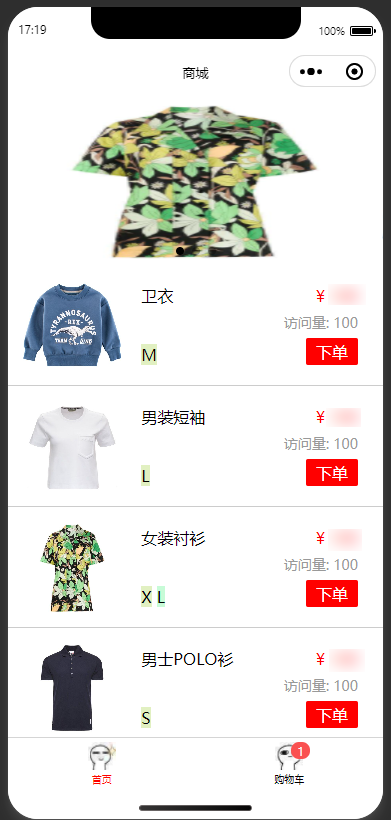
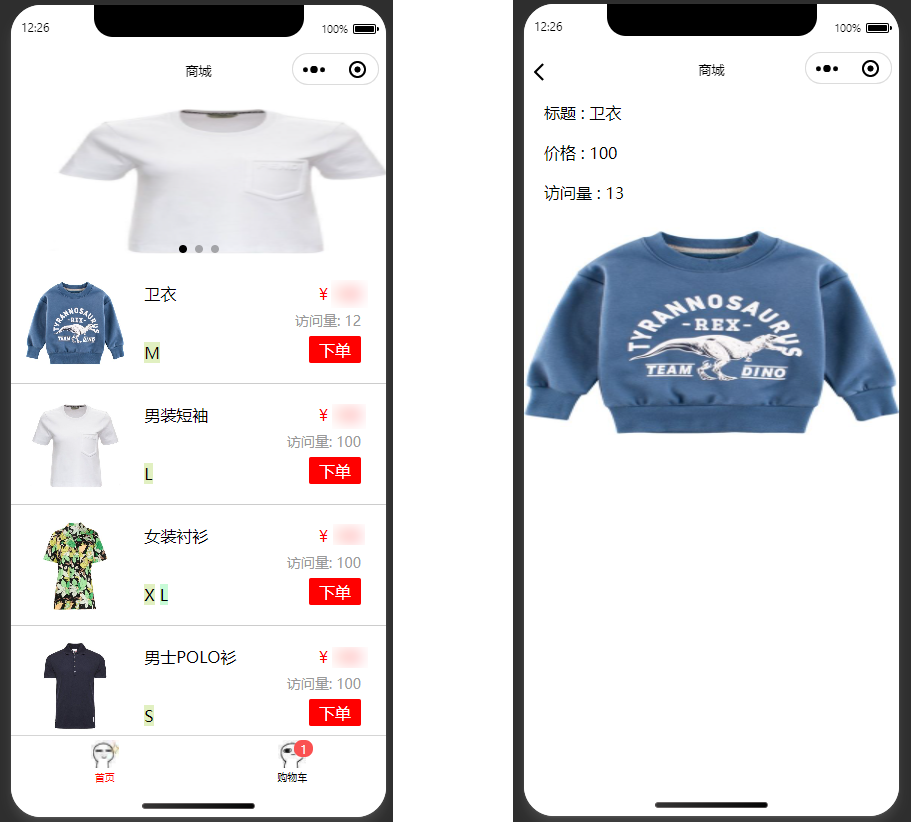
The preview of the store homepage is as shown below:
Step 1: Access the Cloud Database
In the index.js file of the store page, call wx.cloud.database().collection() to obtain a reference to the product database in the current cloud development environment.
// Obtain the database
const db = wx.cloud.database()
// Obtain the collection
const goods_col = db.collection('goods')
const carts_col = db.collection('carts')
When accessing database data, errors frequently occur, or when changing data in the console, errors persistently occur. This is generally a permission issue with the cloud database. By setting all permissions of the database to true through custom rule permissions, such errors can be resolved.
Step 2: Load Product List Data
In the index.js file of the homepage, write the logic for loading the product data list, set the loading animation to be hidden, and specify the number of products to display at once in the list. Access good_col to read product data.
  // Load list data
  async loadListData(){
    const LIMIT = 5
    let{_page,goods}=this.data//0

    /*wx.showLoading({// Loading
      title: 'Loading...',
    })*/
    await ml_showLoading

    let res = await goods_col.limit(LIMIT).skip(_page * LIMIT).get()

    //wx.hideLoading()// Hide loading
    await ml_hideLoading
    // Manually stop pull-to-refresh
    wx.stopPullDownRefresh()

    console.log('List data', res.data)
    this.setData({
      goods :[...goods,...res.data],//追加,与之前数据拼接: goods :[...goods,...res.data],// Append, concatenate with previous data
      _page: ++_page,
      hasmore : res.data.length === LIMIT
    })
  },
Code Explanation
- res: Variable that stores the return value of querying the product database.
- limit(): Limits the number of products displayed at a time.
- LIMIT: The initial value is 5.
- _page: Initial value is 0, and it will be incremented by one iteratively.
- _page*LIMIT: Indicates skipping a number of elements from the database to start fetching data.
- setData(): Concatenates the product data retrieved each time.
Step 3: Set Up Pull-up Event for Product Data Loading
First, limit the number of data items retrieved at a time in the data loading function, which can be defined as accessing five product information entries from the cloud each time. When loading new data, call wx.showLoading() to display a loading prompt. After loading completes, to enhance user experience, add an onReachBottom() event handler that invokes the product data loading function.
  onReachBottom(){
    // No more data to refresh.
    if(!this.data.hasmore)
    {
      /*wx.showToast({
        title: 'No more data',
        icon : "none"
      })*/
      ml_showToast('No more data')
      return console.log('No more data')
    }
    console.log('Pull to refresh')
    this.loadListData()
  },
数据加载函数中由于一次加载只有五条信息,所以需要在数据加载函数的末尾,将之前加载的数据与本次函数调用加载的数据,用 setData 进行一个拼接,保障用户在下滑时还可以看到前面的商品数据。
Step 4: Configure Product Loading Completion Prompt
- Set a bool variable with an initial value of true. In the data loading function, determine whether the data obtained from the database is less than the limited number of data to be retrieved. If it is less, it indicates that the data in the database has been fully loaded, and change the value of the bool variable to false; otherwise, it has not been fully loaded.
- Then, in the pull-up event handler function, set a listener at the beginning. When it detects that the bool variable is false, call wx.showToast() to indicate no more data is available to load, and directly return from the pull-up loading function.
Since wx.showToast() can be used in multiple places, encapsulate it so that it can be directly imported and called on the required pages.
Step 5: Set Up Pull-down Event to Refresh the Page
- Use the onPullDownRefresh() event handler function to reset all values to their initial state and re-invoke the latest data loading function. In the data loading function, manually stop the pull-down refresh by calling wx.stopPullDownRefresh().
  //Pull to refresh
  onPullDownRefresh(){
    this.setData({
      goods : [],
      _page :0,
      hasmore :true
    })
    this.loadListData()
    console.log('Pull to refresh')
  },
- Before this, you also need to configure in index.json by setting "enablePullDownRefresh" to true by default; then change the background loading dots (default white) to gray.
{
  "usingComponents": {},
  "enablePullDownRefresh" : true,
  "backgroundTextStyle" : "dark"
}
Step 6: Register the Place Order Click Event
Set the catchtap attribute on the order button of the mall homepage to implement the add-to-cart function.
bindtap attribute cannot be used here because using bindtap will bubble up and go to the product details page when clicked; catchtap, however, will not redirect, but directly trigger the function to add the product to the shopping cart, then pass the product data from the order clicked on the homepage to the shopping cart page.
The implementation of the add to cart feature also needs to determine whether the product to be ordered already exists in the shopping cart. Using the ID passed from the order on the homepage, obtain data in the shopping cart database:
- If the data is obtained successfully, it indicates that the product is already in the shopping cart. Call update() to increment the num by one, and invoke the encapsulated wx.showToast() to prompt that the product has already been added.
- If the data fails to be obtained, it indicates that the product has not been added to the shopping cart. You need to add the product data to the shopping cart database by calling add() to include the product data. The data attributes include:
- _id: Product ID
- imageSrc: Product image
- price: Product price
- title: Product name
After a successful addition, call the previously encapsulated wx.showToast() to prompt successful addition. The code implementation is as follows:
Add to Cart
async addCart(e){
    // Obtain the product
    let { item }=e.currentTarget.dataset
    console.log('item' ,item)
    // Check if the product is in the shopping cart
    try{
        let res =await carts_col.doc(item._id).get()
        console.log('has value', res)
        // has value
        await carts_col.doc(item._id).update({
            data:{
                num: db.command.inc(1)
            }
        })
    }
    catch(err){
        console.log('no value')
        // Add the product to the shopping cart
        await carts_col.add({
            data :{
                _id :item._id,
                imageSrc : item.imageSrc,
                price : item.price,
                title : item.title,
                num :1
            }
        })
    }
  this.setTabBar()
  await ml_showSuccess('Order placed successfully')
}
Step 7: Change the value at the top right corner of the navigation bar
On the home page, when placing an order, call the wx.setTabBarBadge() method. The index property specifies the shopping cart page, and text specifies the value (string type). Obtain data from the shopping cart database and use the forEach() function to sum the num values of all products in the shopping cart database. If the cumulative num result is 0, directly return the function. If not zero, assign the result to text (explicitly converted to string type). Invoke the onTabItemTap() click event handler function. When the shopping cart is clicked, call the wx.setTabBarBadge() method and set text to an empty string, thereby hiding the value at the top right corner.
  // Update the value at the top right corner of the tabBar
  async setTabBar(){
    let total=0
    let res=await carts_col.get()

    res.data.forEach(v => {
      total += v.num
    })
    if(total === 0) return
    //console.log('123333333333')
    wx.setTabBarBadge({
      index: 1,
      text: total + '',//convert to string
    })
  }
Build the Details Page
This article primarily focuses on explaining the detail page detail.js. For more details on the detail page code, refer to detail.js configuration and frontend page detail.wxml.
Step 1: Set up redirection
Use the navigator navigation component in index.wxml to navigate to the product details page.
<navigator hover-class='hcls' class='goods' url="/pages/detail/detail?id={{item._id}}">
Step 2: Obtain Clicked Product Information
Based on the product ID passed to the details page, obtain the detailed product information from the product database by calling wx.cloud.database().collection(), then call doc() to filter products by the passed ID.
const db = wx.cloud.database()
const goods_col = db.collection('goods')
Page({
  data : {
    detail : {}
  },
  onLoad(options){
    let { id } =options
    console.log('id',id)
    this.loadDetailData(id)
  },
  // Load data details
  async loadDetailData(id){
    // Obtain the database product
    let ins = goods_col.doc(id)
    // Accumulated
    await ins.update({
      data: {
        count : db.command.inc(1)
        //log('123')
      }
    })
    // Obtain
    let res =await ins.get()
    // Assign
    this.setData({
      detail : res.data
    })
  }
})
Step 3: Modify Product Traffic
Filter out the product by the ID passed from the home page, then call update to modify the value of count so that it increments by one each time it is accessed.
    // Accumulated
    await ins.update({
      data: {
        count : db.command.inc(1)
        //log('123')
      }
    })
The following figure shows the effect.
Building a Shopping Cart
This article primarily focuses on the shopping cart cart.js. For more details on the shopping cart code, refer to cart.js Configuration and Frontend Page cart.wxml.
Step 1: Load Shopping Cart List
Call the wx.cloud.database().collection() method to access the cloud shopping cart database and display the data.
  async loadCartsData(){
    let res = await carts_col.get()
    console.log('carts' , res)
    this.setData({
      carts : res.data
    })
    this.setCart(res.data)//Count total
  },
Step 2: Set Total Price and Quantity of Goods
Pass the shopping cart data from the load shopping cart database function to the function that calculates the total price and total quantity of goods. Call the forEach() method to calculate the total price and total quantity of goods. The total price is obtained by traversing the elements in the shopping cart database and summing the product of each item's quantity and its unit price. The total quantity is obtained by summing the quantities of each item in the shopping cart database. Finally, use setData() to set the total price and total number of goods displayed on the shopping cart page.
  //Count total
  setCart(carts){
    let totalCount=0
    let totalPrice=0

    carts.forEach(v =>{
      totalCount += v.num
      totalPrice += v.num*v.price
    })

    this.setData({
      totalCount,
      totalPrice,
    })
  },
Step 3: Modify Product Quantity
By clicking the plus/minus buttons on the shopping cart page, the bindtap attribute triggers corresponding functions to add to cart or decrease cart items, passing the ID of the clicked product. In the function, filter the product in the shopping cart database by ID, then call the update() method to increment or decrement the num value of the specified product.
  // Increment
  async addCount(e){
    // Obtain id
    let id = e.currentTarget.dataset.id
    // Modify num value
    let res =await carts_col.doc(id).update({
      data:{
        num :db.command.inc(1)
      }
    })
    this.loadCartsData()
    await ml_showSuccess('Added successfully')
  },
  // Delete product
  async deleteCount(e){
    // Obtain product id
    let id = e.currentTarget.dataset.id
    // Modify num value
    let res =await carts_col.doc(id).update({
      data:{
        num :db.command.inc(-1)
      }
    })
    console.log('res ----',res)
    console.log('id-------',e.currentTarget.dataset.num)
    await ml_showSuccess('Deleted successfully')
    let num=await carts_col.doc(id).num
    console.log('the value of num', num)
    if( num === 0 )
    {
      console.log('product quantity is 0')
    }
    this.loadCartsData()
  },
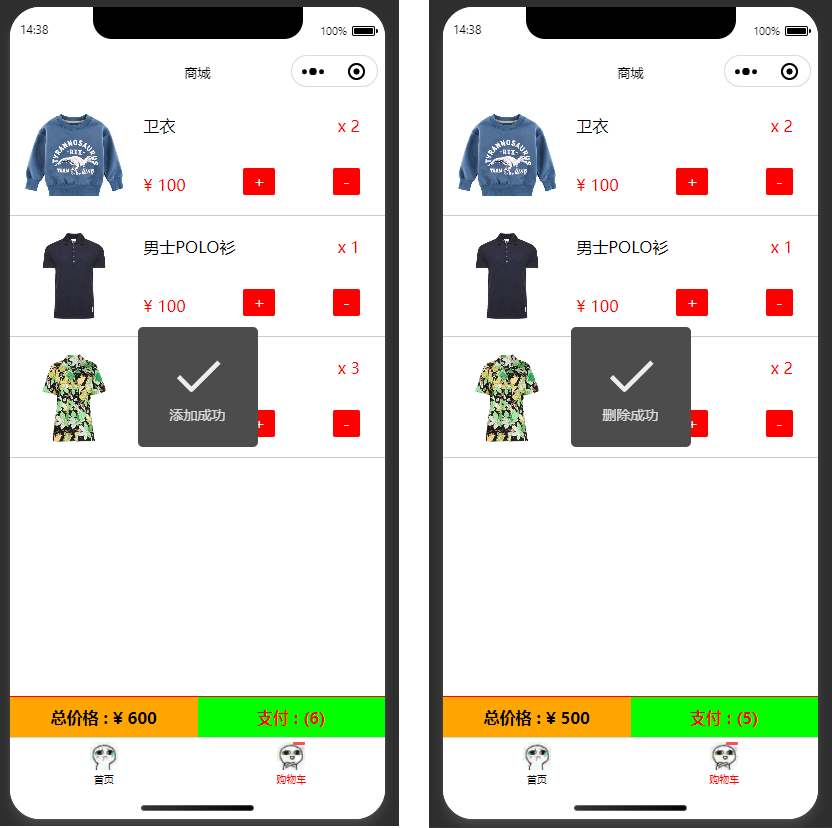
Effect as shown in the figure:
 At this point, all features of the mini program have been implemented. For more details, please refer to the sample code.