Reservation and Ordering Mini Program Development
Overview
This article introduces how to use cloud development capabilities to quickly build a reservation and ordering system.
The source code materials involved in this example tutorial have all been properly authorized.
Preparations
Enabled CloudBase for the mini program. For details, see Quick Start for Mini Program Side.
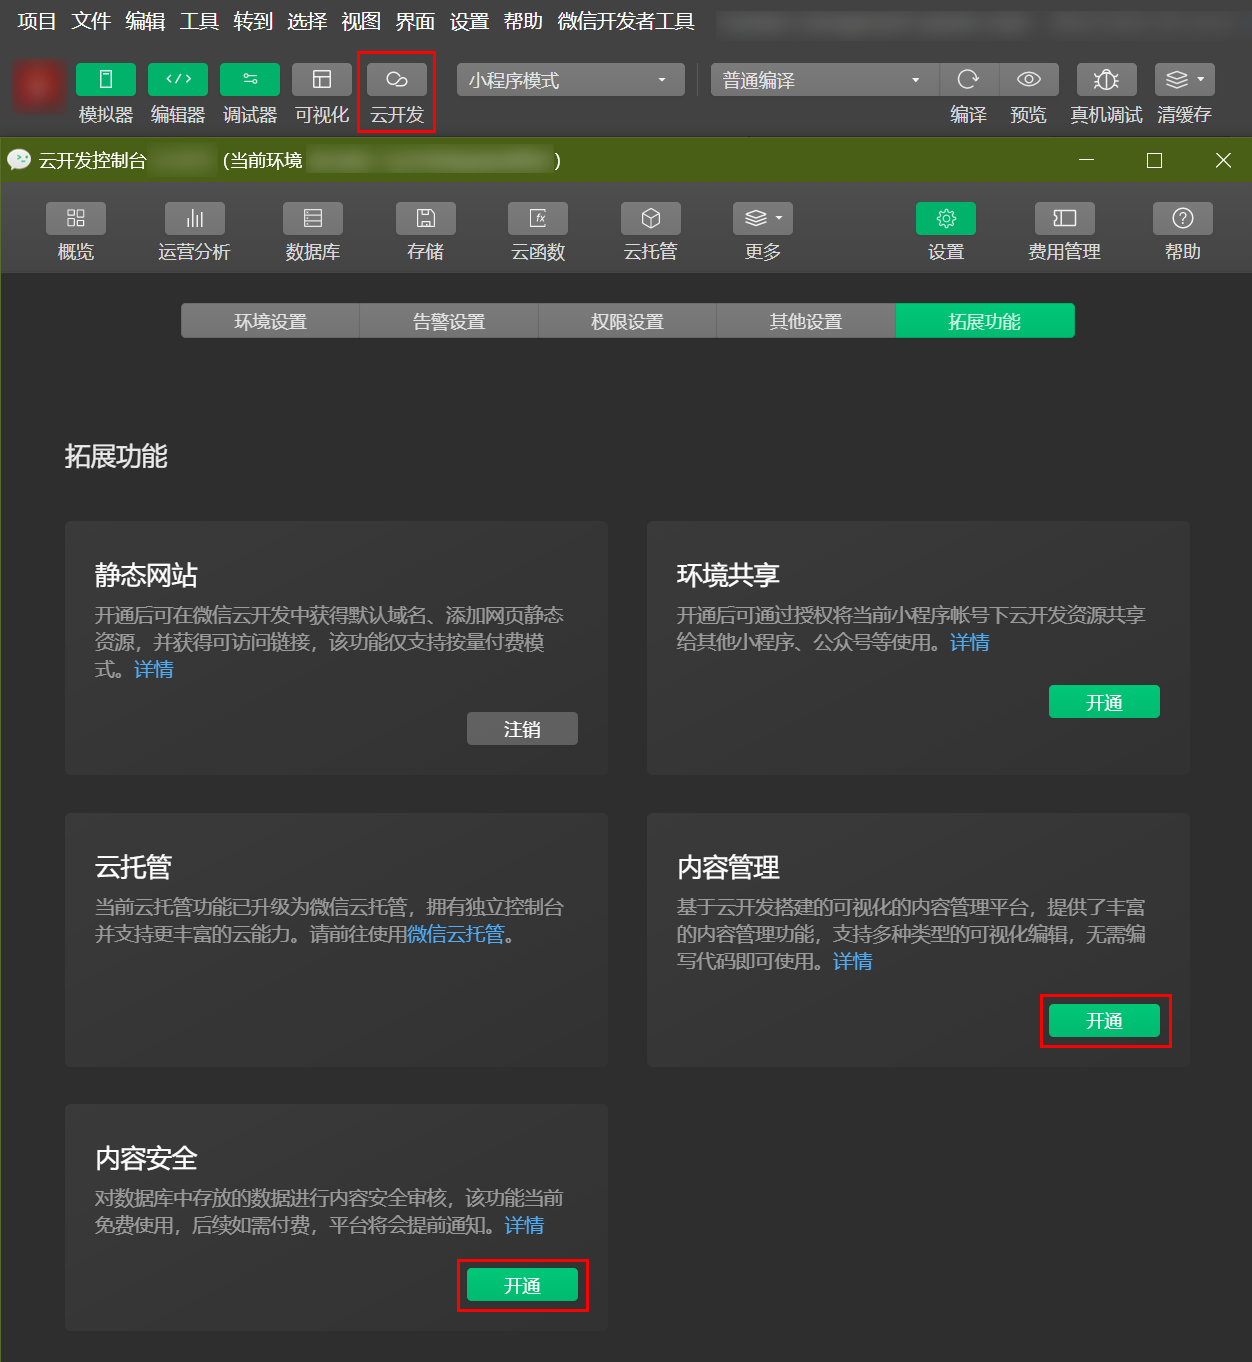
Go to the CloudBase Console > Settings > Extensions page, and click to enable Content Management and Content Security.
Operation Procedure
The specific operation procedure can be divided into the following 6 steps. For more details, refer to the sample code.
- Set up carousel and announcement
- Set up popular section on home page
- Set up my page
- Set up guide page
- Set up store page
- Set up order page
Step 1: Set Up Carousel and Announcement
This article primarily focuses on the homepage index page, CloudBase Content Management, and CloudBase Database. For more index code details, refer to the index page.
Step 1: Activate Content Management
- First, go to the CloudBase console > Content Management page, click Enable, and set up an account and password. The creation of Content Management may take some time, please wait patiently.

- After successful creation, return to the Content Management page. Click Access Address to access the Content Management Platform.
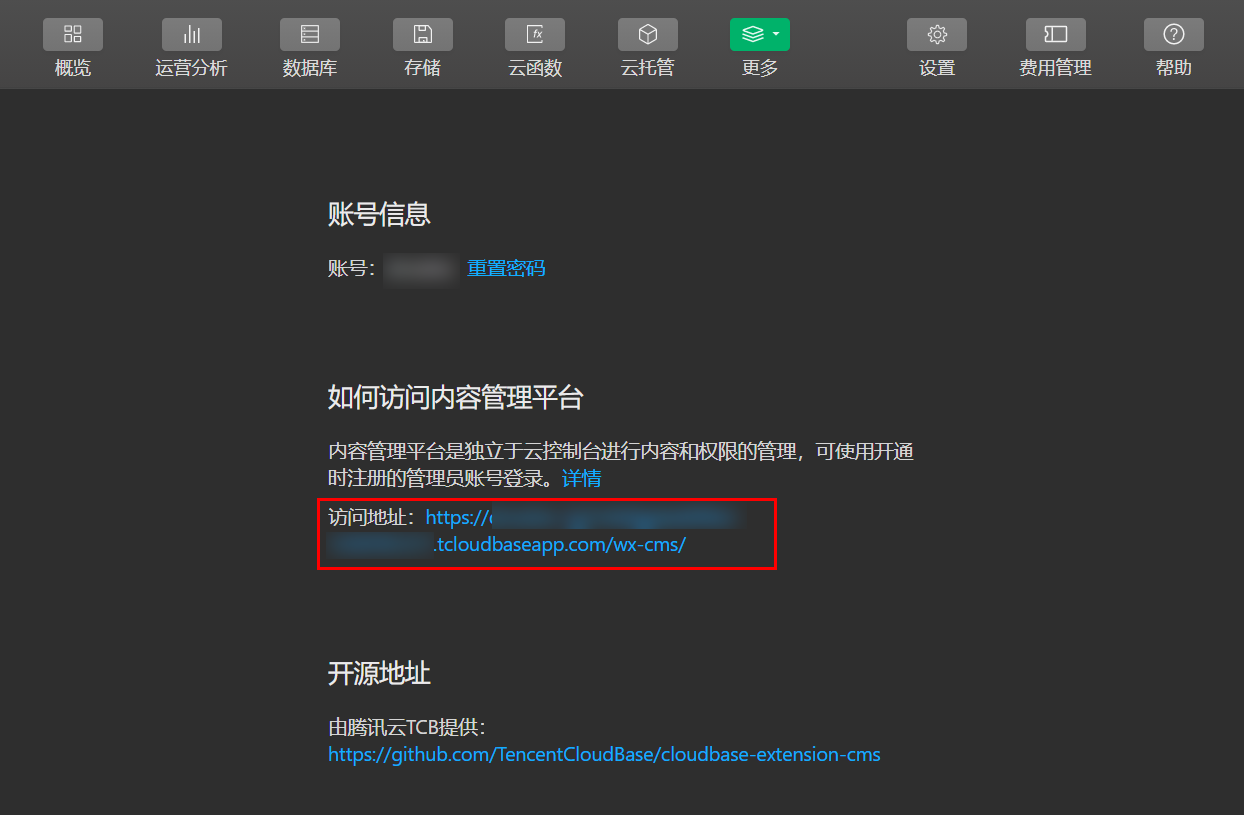
- Enter your login account and password to access the Content Management (CMS) backend. Click Create New Project - here we name it Reservation and Ordering Management System.

Step 2: Set Up Carousel
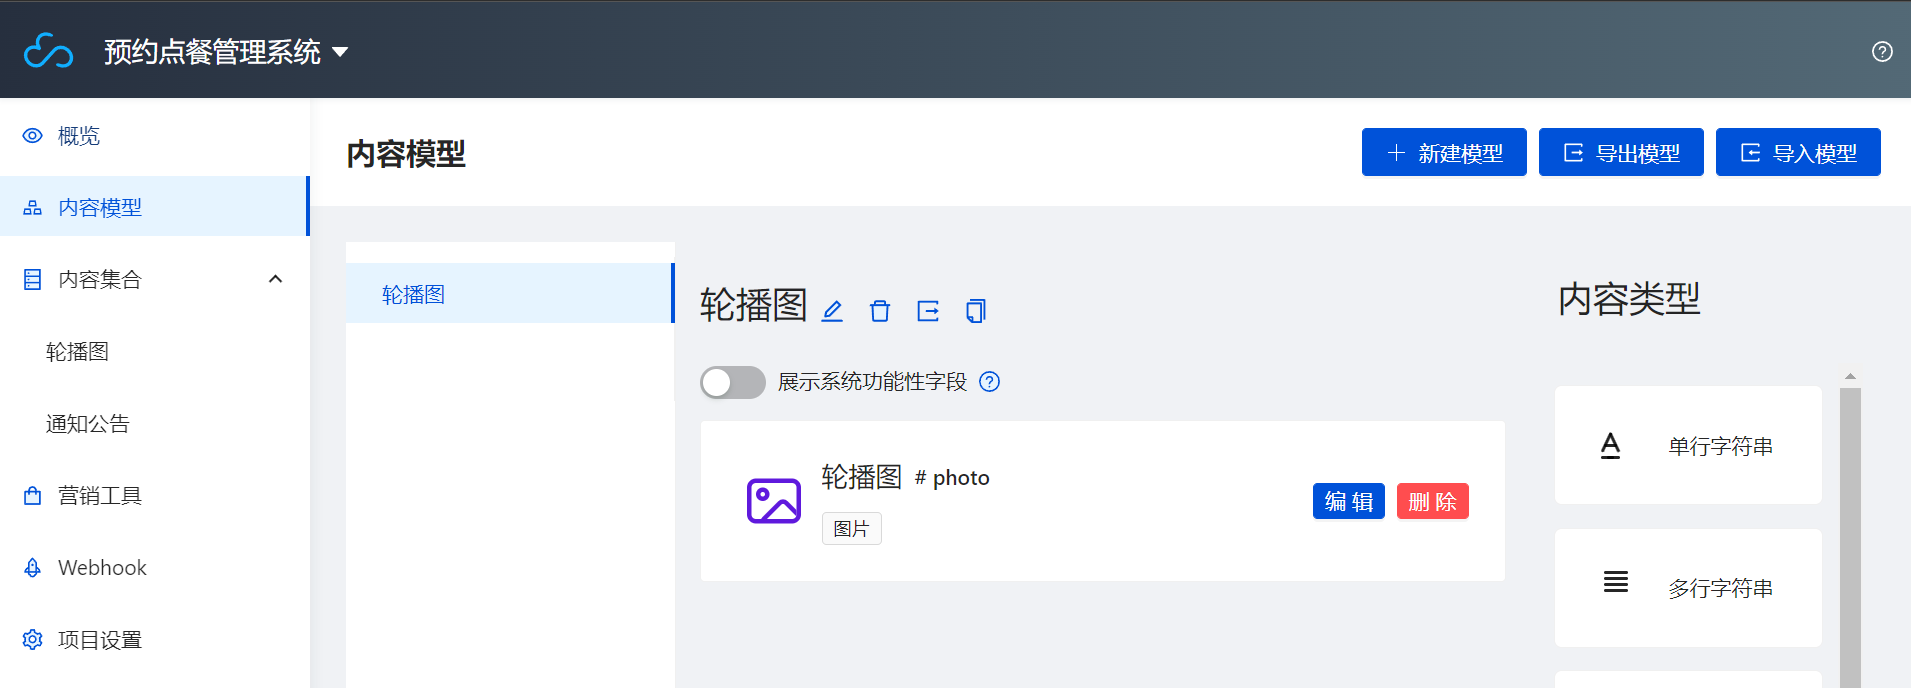
- Go to the newly created Reservation and Ordering Management System, navigate to the Content Model page, click New Model. Set the Display Name as Carousel and Database Name as banner. After configuration, click Create.
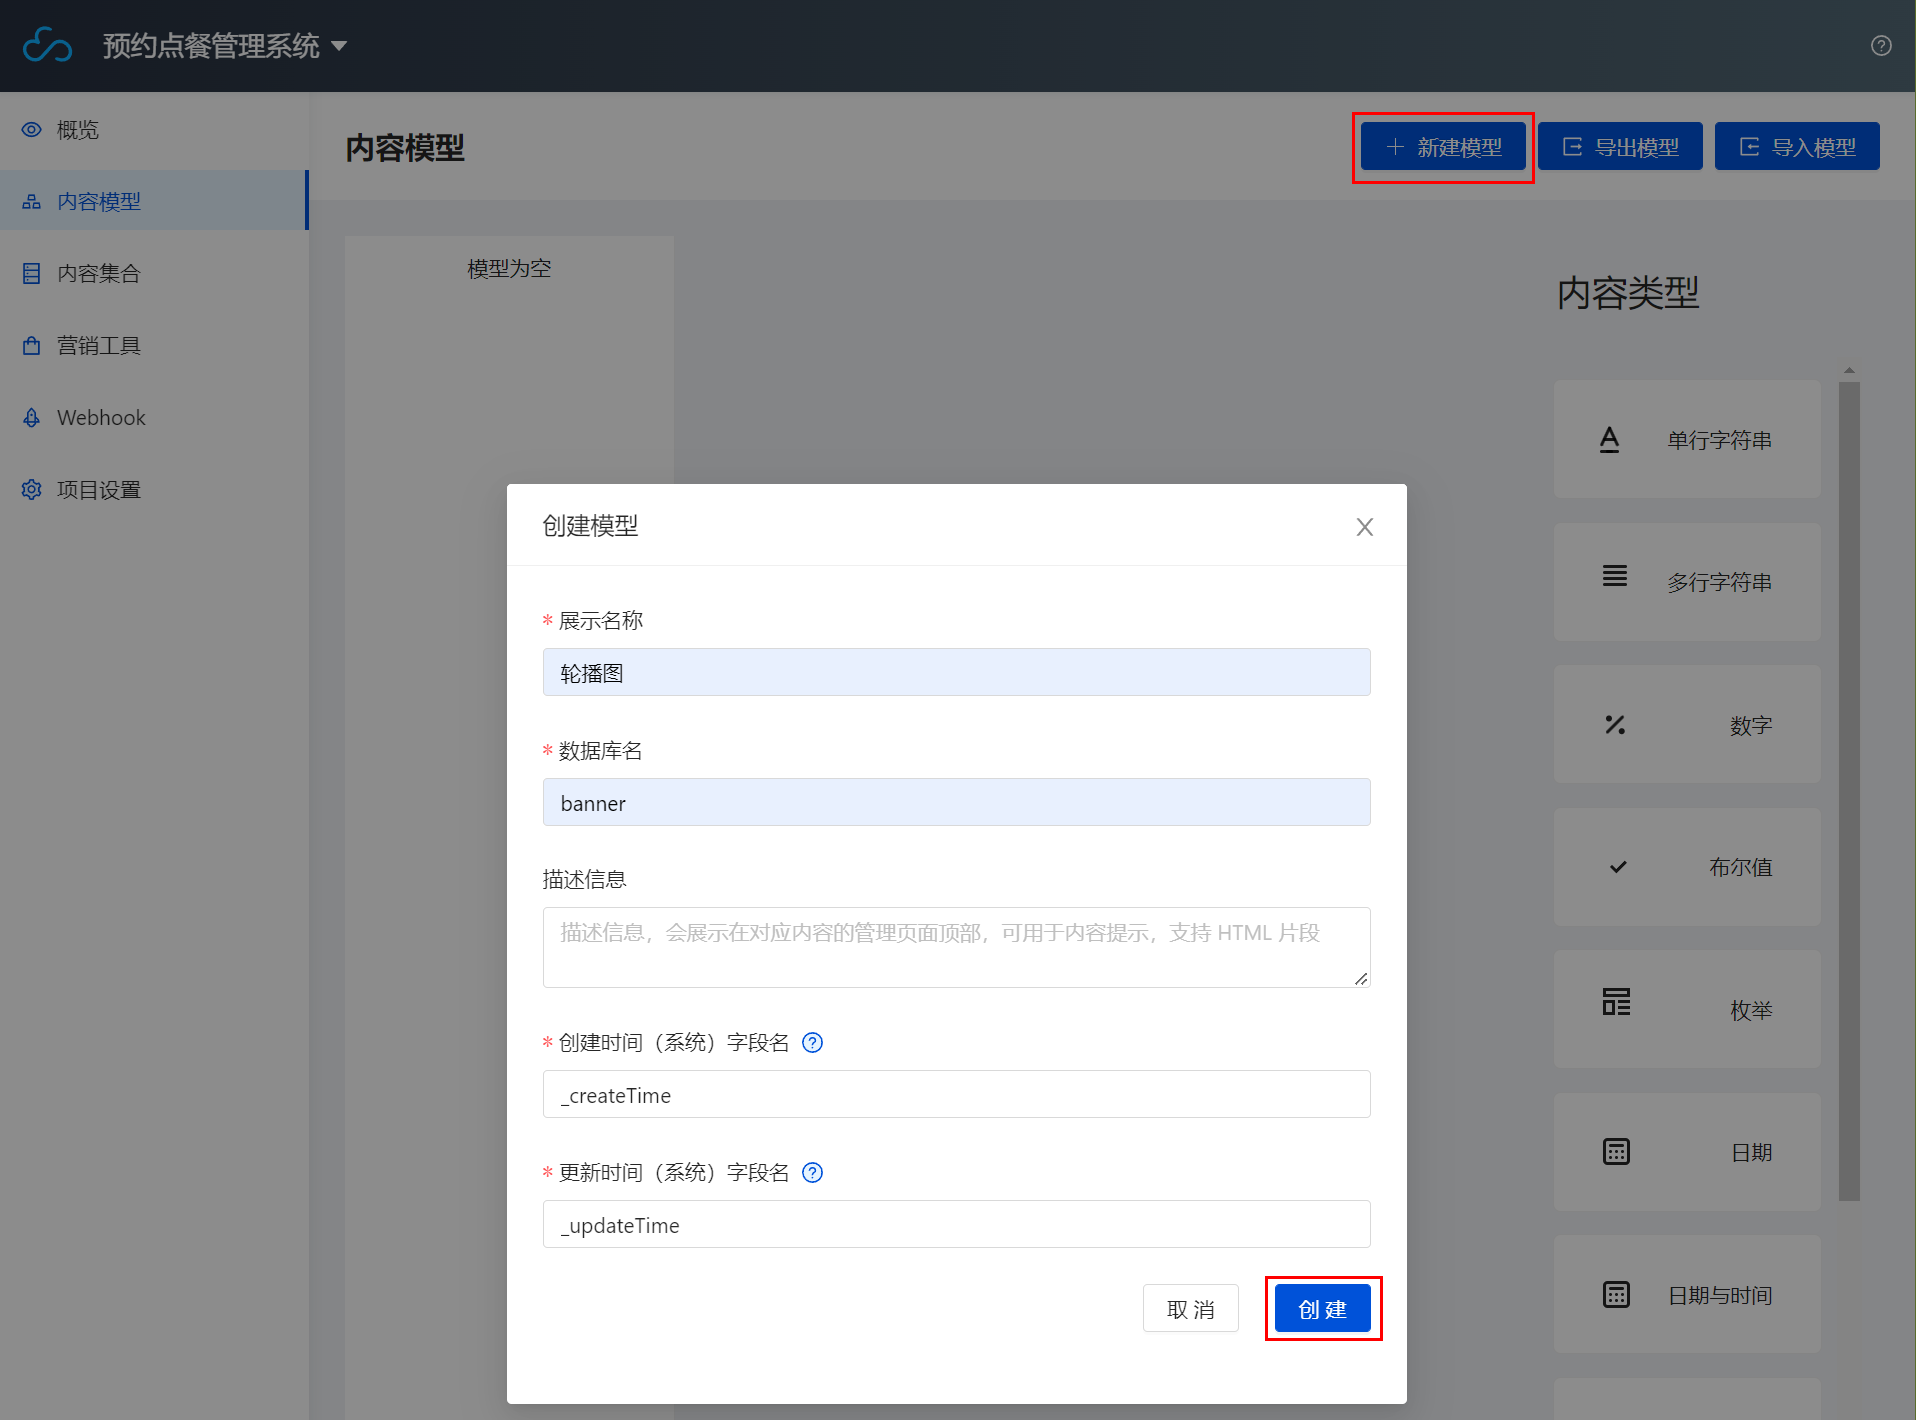
Changing the database name will automatically rename the original database. Please proceed with caution.
- Click Content Type > Image on the right to enter the Add Image Field page, set the Display Name to Carousel Image, and the Database Field Name to photo.
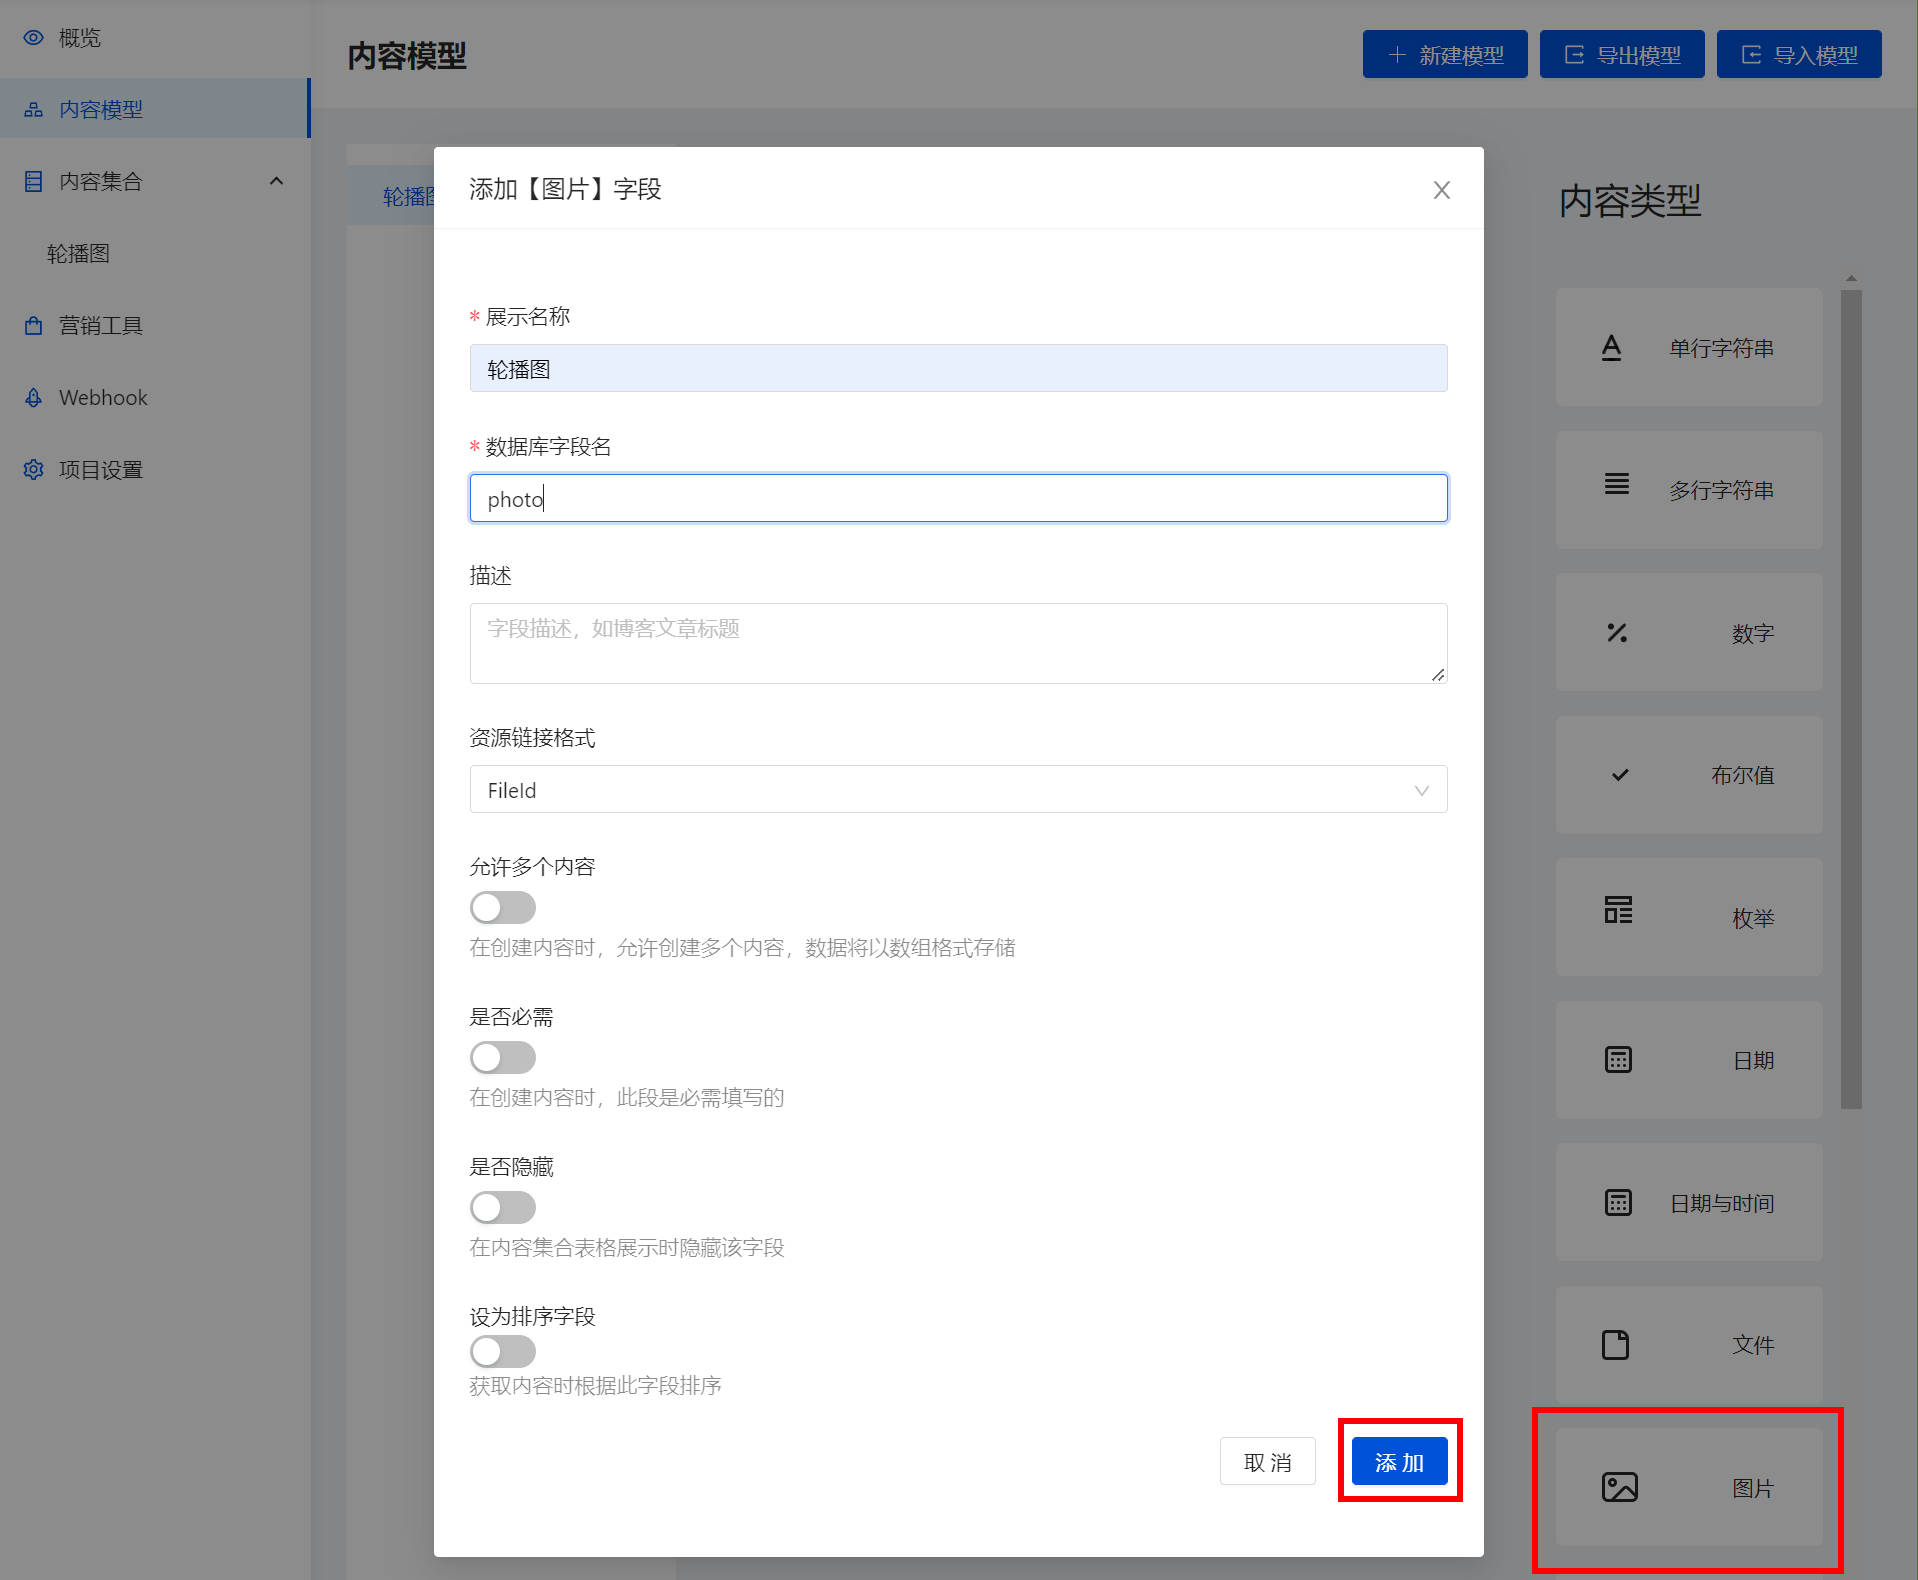
Click Add to complete the creation of the content model.
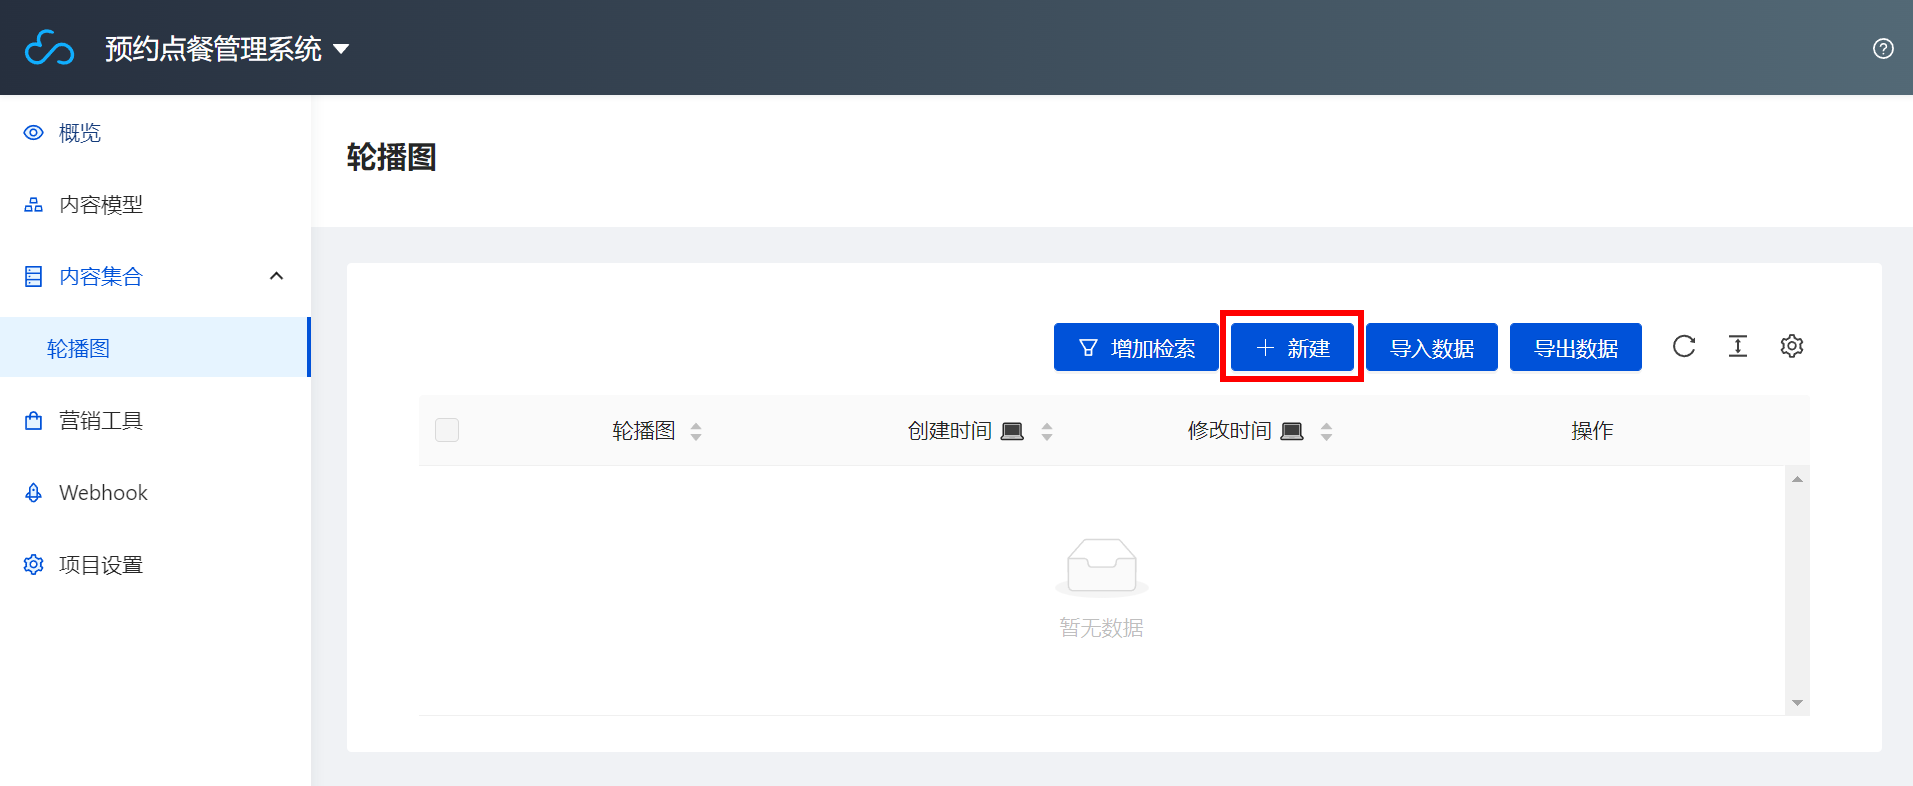
- Go to the Content Collection > Carousel page and click New.
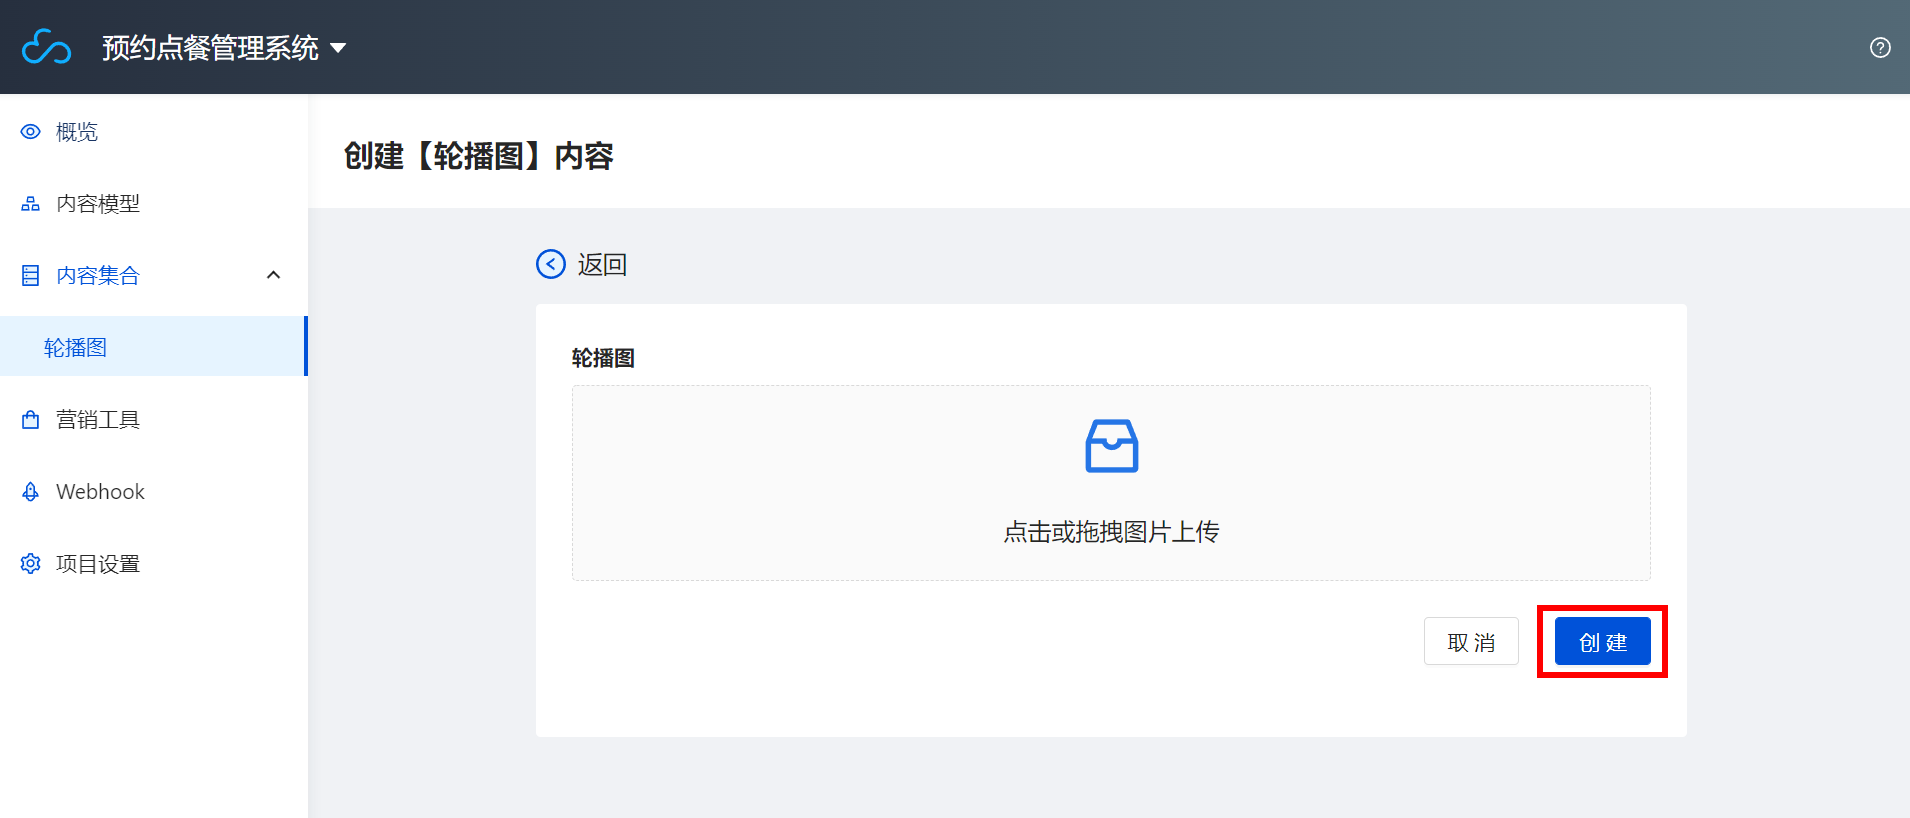
Drag the image and click Create to complete the upload of the carousel image, thus completing the creation of the content model for the carousel.
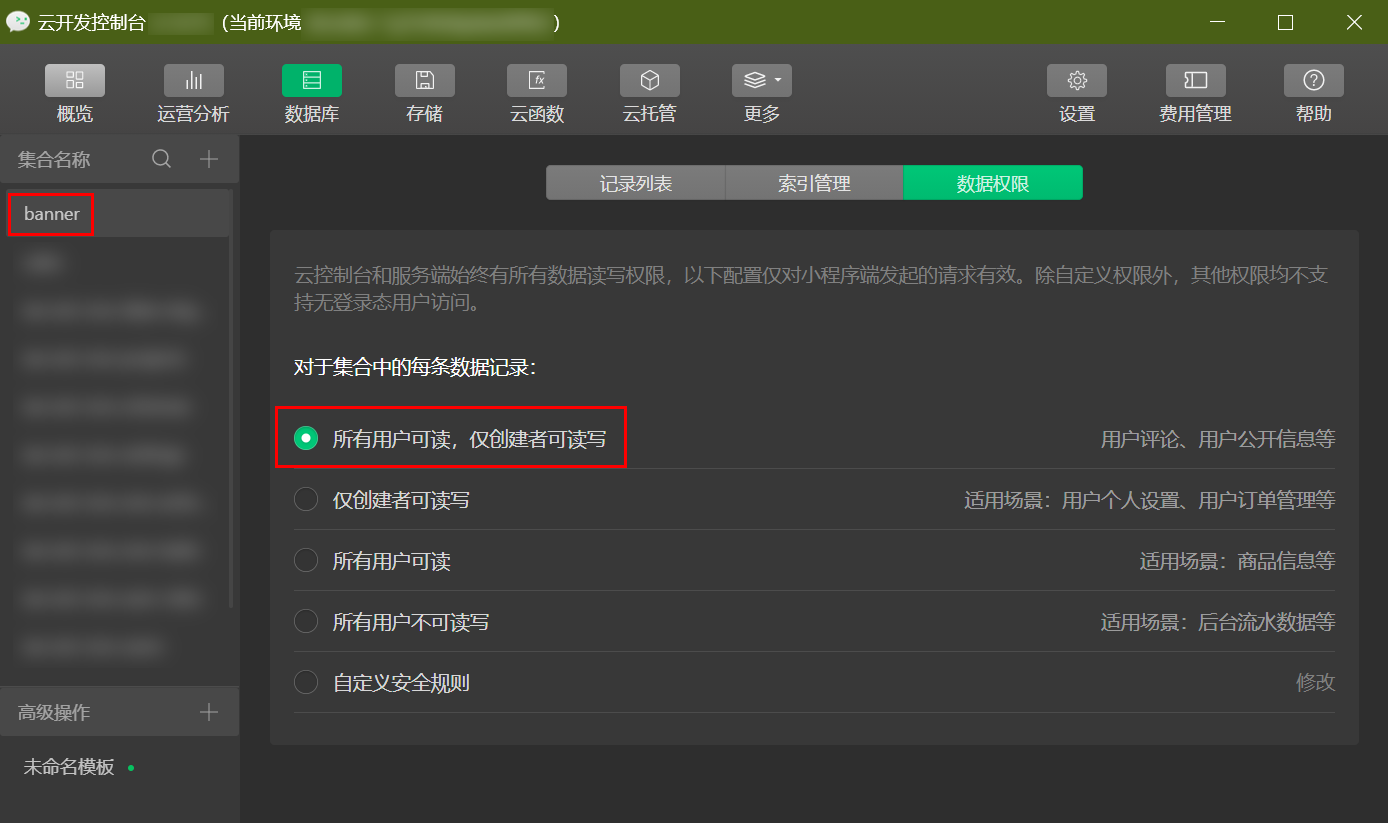
- After the above operations, a banner database and the imported image data will be generated in the CloudBase Console. Go to the CloudBase Console > Database > banner > Data Permissions page, and change the database permission to Readable by all users, writable only by the creator, so that all users can view the data.
Next, start building the carousel in pages/index. Refer to the swiper documentation to help bind data, then use wx:for for list binding.
The env parameter can be obtained in WeChat Developer Tools > Cloud Development Console.
// pages/index/index.js
wx.cloud.init({
  env: "Your Environment ID",
  traceUser: true,
});
const db = wx.cloud.database();
Page({
  /**
   * Initial data of the page
   */
  data: {
    mgList: "",
  },
  /**
   * Lifecycle function--Listening for page load
   */
  onLoad: function (options) {
    // Here, when the page first loads, it retrieves data from the banner database and stores them in mgList.
    db.collection("banner").get({
      success: (res) => {
        console.log(res);
        this.setData({
          mgList: res.data,
        });
      },
    });
  },
});
- Use the
wx:forcontrol attribute on a component to bind an array, then repeatedly render the component using the data from each item in the array. - The default variable name for the index of the current array item is
index, and the variable name for the current array item isitem* - Use
wx:for-itemto specify the variable name for the current element of the array.
- Bind the mgList data using the following code.
- index.wxml
- index.wxss
<!--pages/index/index.wxml-->
<view class="banner">
  <swiper class="swip_main" indicator-dots autoplay interval="6000" circular>
    <block wx:for="{{mgList}}">
      <swiper-item>
        <image src="{{item.photo}}" style="width: 100%;height: 100%;" mode="scaleToFill"></image>
      </swiper-item>
    </block>
  </swiper>
</view>
/* pages/index/index.wxss */
.banner {
  width: 100%;
  height: 350rpx;
}
.swip_main {
  width: 100%;
  height: 100%;
}
After saving, running, and compiling, you can see the carousel.
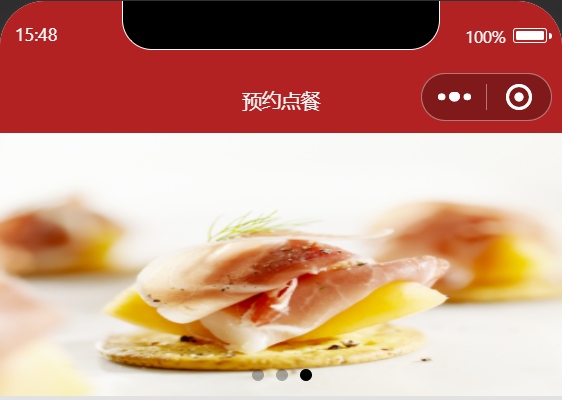
If the carousel fails to load after running the compilation, click Details in the upper right corner of WeChat Developer Tools, navigate to the Local Settings page, and try switching the Debugging Base Library to a lower version.
Step 3: Announcement Setup
- Refer to Step 2 to create the Announcement content model.
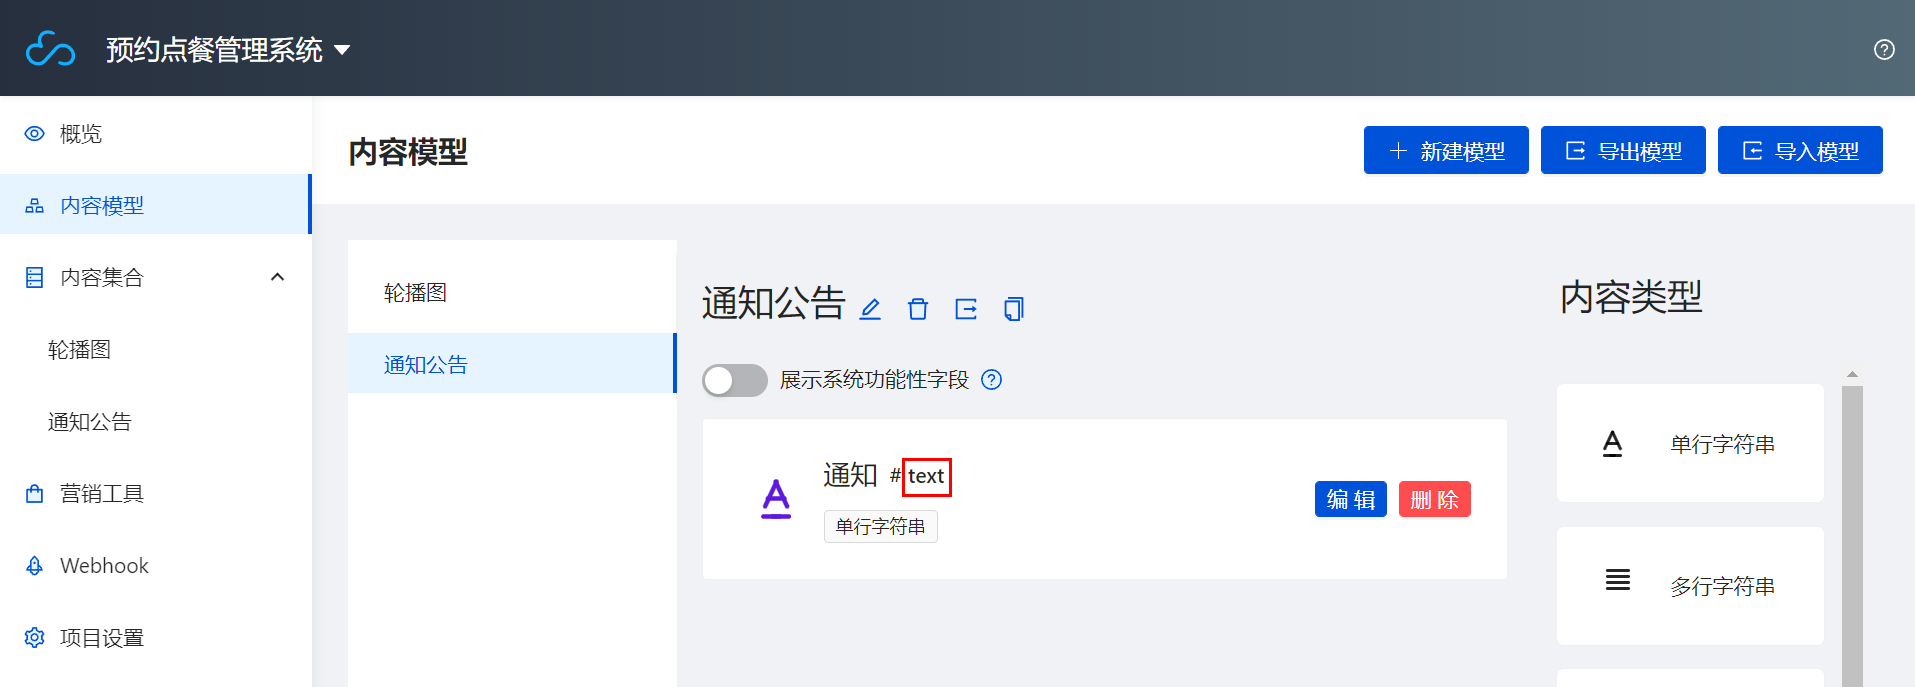
- Set the database name for the Announcement content model to tz. For the newly added Content Type > Single-line string, set the database field name to text.
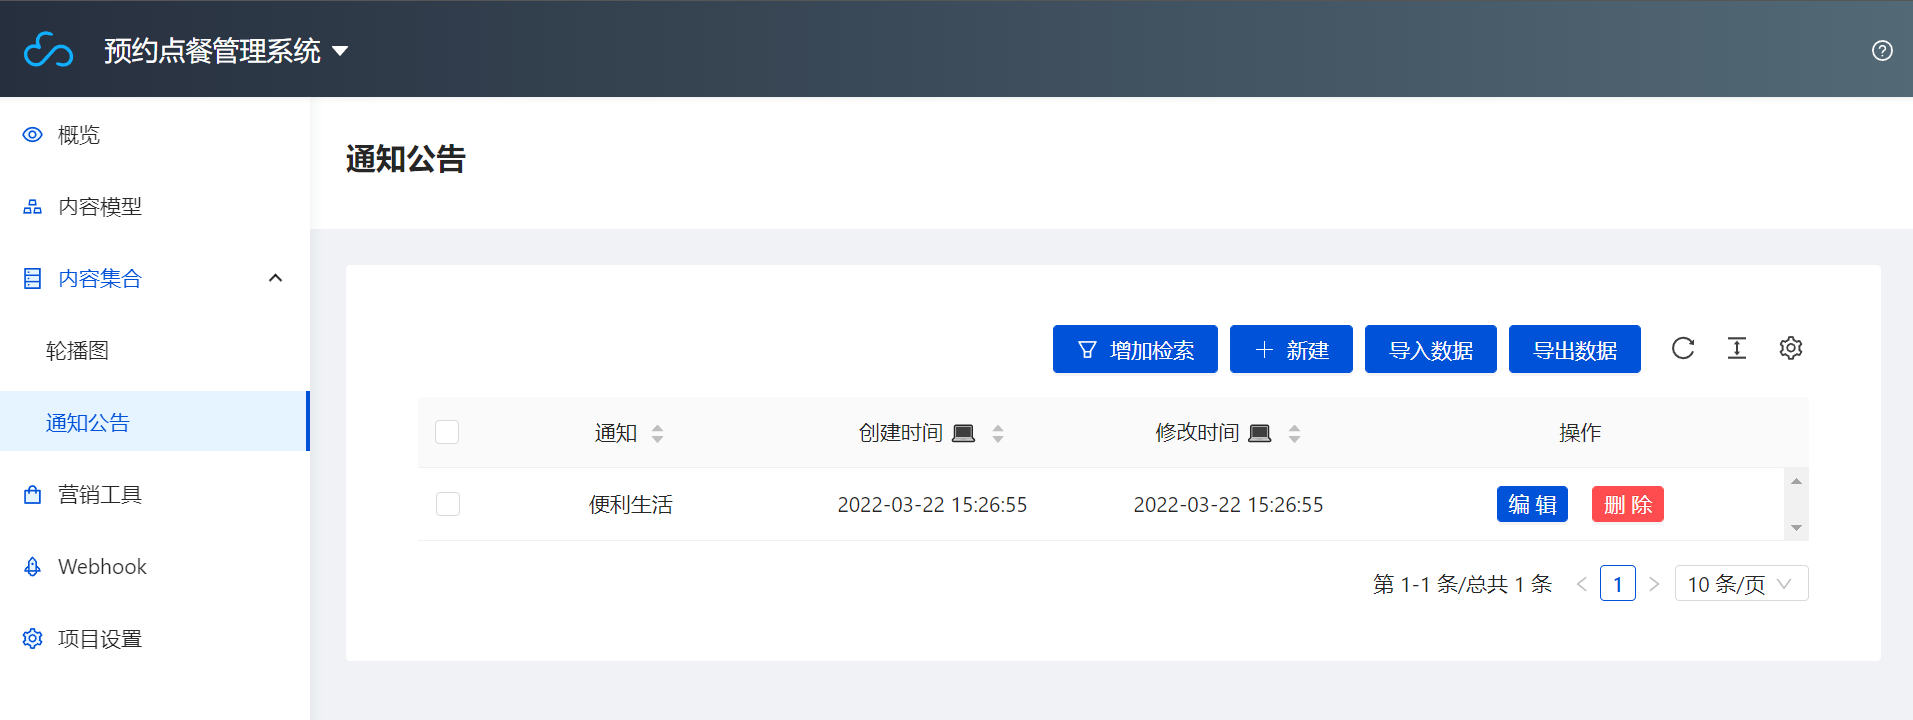
- Go to Content Collection > Announcement and click New to create an announcement.
- Bind the mgList data using the following code.
- index.wxml
- index.wxss
- index.js
<!-- pages/index/index.wxml -->
<!--Carousel-->
<view class="banner">
  <swiper class="swip_main" indicator-dots autoplay interval="6000" circular>
    <block wx:for="{{mgList}}">
      <swiper-item>
        <image src="{{item.photo}}" style="width: 100%;height: 100%;" mode="scaleToFill"></image>
      </swiper-item>
    </block>
  </swiper>
</view>
<!--Notice Bar-->
<view class="tz">
    <view class="tz_zp">
      <image src="../../images/font-ui/zggg.png"></image>
    </view>
    <swiper class="swiper-news-top" vertical="true" autoplay="ture" circular="ture" interval="3000">
      <block wx:for="{{msgList}}">
        <navigator url="" open-type="navigate">
          <swiper-item>
            <view class="swiper_item">{{item.text}}</view>
          </swiper-item>
        </navigator>
      </block>
    </swiper>
</view>
/* pages/index/index.wxss */
.banner {
  width: 100%;
  height: 350rpx;
}
.swip_main {
  width: 100%;
  height: 100%;
}
.tz {
  width: 100%;
  height: 100rpx;
  background-color: rgb(224, 222, 213);
}
.tz_zp {
  width: 80rpx;
  height: 80rpx;
  margin-top: 10rpx;
  margin-left: 40rpx;
  float: left;
}
.tz_zp image {
  width: 100%;
  height: 100%;
}
.swiper-news-top {
  width: 600rpx;
  height: 80rpx;
  float: right;
  margin-top: 10rpx;
  margin-right: 30rpx;
}
.swiper_item {
  font-size: 28rpx;
  font-weight: 700;
  line-height: 80rpx;
  overflow: hidden;
  text-overflow: ellipsis;
  white-space: nowrap;
  letter-spacing: 2px;
  text-align: center;
}
// pages/index/index.js
wx.cloud.init({
  env: 'Your Environment ID',
  traceUser: true,
})
const db=wx.cloud.database()
Page({

  /**
   * Initial data of the page
   */
  data: {
    mgList:'',
    msgList:''
  },

  /**
   * Lifecycle function--Listening for page load
   */
  onLoad: function (options) {
    db.collection("banner").get({
      success:res=>{
        console.log(res)
        this.setData({
          mgList:res.data
        })
      }
    })
    db.collection("tz").get({
      success:res=>{
        console.log(res)
        this.setData({
          msgList:res.data
        })
      }
    })
  },
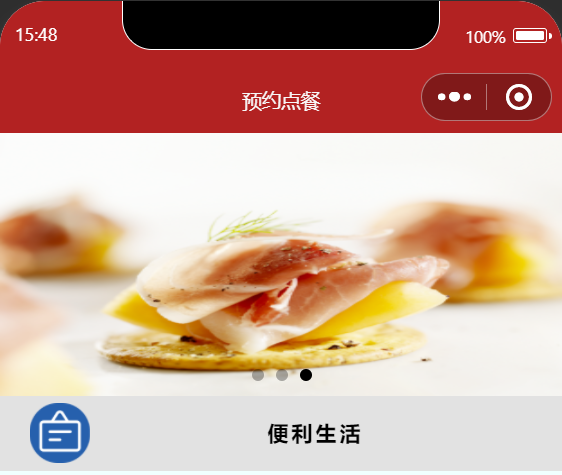
Save, run, and compile.
Step 2: Set Up Popular Section on Home Page
This article primarily focuses on the homepage index page and the configuration file app.json. For more index code details, refer to the index page and the configuration file app.json.
Step 1: Set Up the Bottom Navigation Bar
- Configure the corresponding pages in the pages array of app.json.
- Then, in the app.json file, configure the bottom navigation bar by setting the tabBar.
- app.json - pages
- app.json - tabBar
"pages": [
  "pages/index/index",
  "pages/my/my",
  "pages/dp/dp",
  "pages/gltl/gltl",
  "pages/grxx/grxx",
  "pages/xgxx/xgxx",
  "pages/gywm/gywm",
  "pages/buzx/buzx",
  "pages/glxq/glxq",
  "pages/xpl/xpl",
  "pages/fbgl/fbgl",
  "pages/xdym/xdym",
  "pages/jqqt/jqqd",
  "pages/dingdan/dingdan",
  "pages/xd/xd",
  "pages/gwx/gwx",
  "pages/ddgl/ddgl",
  "pages/qccg/qccg",
  "pages/sjgl/sjgl",
  "pages/fbpl/fbpl"
],
"tabBar": {
  "color": "#a9b7b7",
  "selectedColor": "#11cd6e",
  "borderStyle": "black",
  "list": [
    {
      "pagePath": "pages/index/index",
      "iconPath": "images/font-ui/shouye.png",
      "selectedIconPath": "images/font-ui/shouye.png",
      "text": "Home"
    },
    {
      "pagePath": "pages/dp/dp",
      "iconPath": "images/font-ui/dianpu.png",
      "selectedIconPath": "images/font-ui/dianpu.png",
      "text": "Store"
    },
    {
      "pagePath": "pages/dingdan/dingdan",
      "iconPath": "images/font-ui/dingdan.png",
      "selectedIconPath": "images/font-ui/dingdan.png",
      "text": "Order"
    },
    {
      "pagePath": "pages/gltl/gltl",
      "iconPath": "images/font-ui/gonglve.png",
      "selectedIconPath": "images/font-ui/gonglve.png",
      "text": "Guide"
    },
    {
      "pagePath": "pages/my/my",
      "iconPath": "images/font-ui/wode.png",
      "selectedIconPath": "images/font-ui/wode.png",
      "text": "Me"
    }
  ]
},

Step 2: Set Up the Middle Navigation Bar
- Enter the home page index directory and develop the front-end home page navigation bar using index.wxml and index.wxss.
- index.wxml
- index.wxss
<!-- pages/index/ -->
<view class="banner">
  <swiper class="swip_main" indicator-dots autoplay interval="6000" circular>
    <block wx:for="{{mglist}}">
      <swiper-item >
        <image style="width: 100%;height: 100%;" mode="scaleToFill" src="{{item.photo}}"></image>
      </swiper-item>
    </block>
  </swiper>
</view>
<view class="tz">
  <view class="tz_zp">
    <image src="../../images/font-ui/zggg.png"></image>
  </view>
  <swiper class="swiper-news-top" vertical="true" autoplay="true" circular="true" interval="3000">
    <block wx:for="{{msgList}}" >
      <navigator url="" open-type="navigate">
        <swiper-item>
          <view class="swiper_item" >{{item.text}}</view>
        </swiper-item>
      </navigator>
    </block>
  </swiper>
</view>
<view class="nav">
  <view class="nav-banner"  bindtap='showlist'>
    <view class="nav-banner-img">
      <image src="../../images/font-ui/bigmosque.png"></image>
    </view>
    <view class="nav-banner-text">East Area Canteen</view>
  </view>
  <view class="nav-banner" bindtap='showzd'>
    <view class="nav-banner-img">
      <image src="../../images/font-ui/bigschool.png"></image>
    </view>
    <view class="nav-banner-text">West Area Canteen</view>
  </view>
  <view class="nav-banner" bindtap='showwd'>
    <view class="nav-banner-img">
      <image src="../../images/font-ui/moderncity.png"></image>
    </view>
    <view class="nav-banner-text">Daily Deals</view>
  </view>
  <view class="nav-banner" bindtap='showwd'>
    <view class="nav-banner-img">
      <image src="../../images/font-ui/store.png"></image>
    </view>
    <view class="nav-banner-text">South Lake Canteen</view>
  </view>
  <view class="nav-banner"  bindtap='showtk'>
    <view class="nav-banner-img">
      <image src="../../images/font-ui/temple.png"></image>
    </view>
    <view class="nav-banner-text">Food Sharing</view>
  </view>
</view>
.nav {
  width: 100%;
  height: 150rpx;
}
.nav-banner {
  height: 100%;
  width: 20%;
  background-color: azure;
  float: left;
}
.nav-banner-img {
  width: 100%;
  height: 75%;
}
.nav-banner-img image {
  width: 70%;
  height: 80%;
  padding: 10% 15%;
}
.nav-banner-text {
  text-align: center;
  margin-top: -10rpx;
  font-size: 26rpx;
}
- Go to the index.js page, use wx.navigateTo(Object object) to navigate to a specific page within the app. Add a click event to the navigation bar so that when the user clicks, it navigates to a "Coming Soon" page.
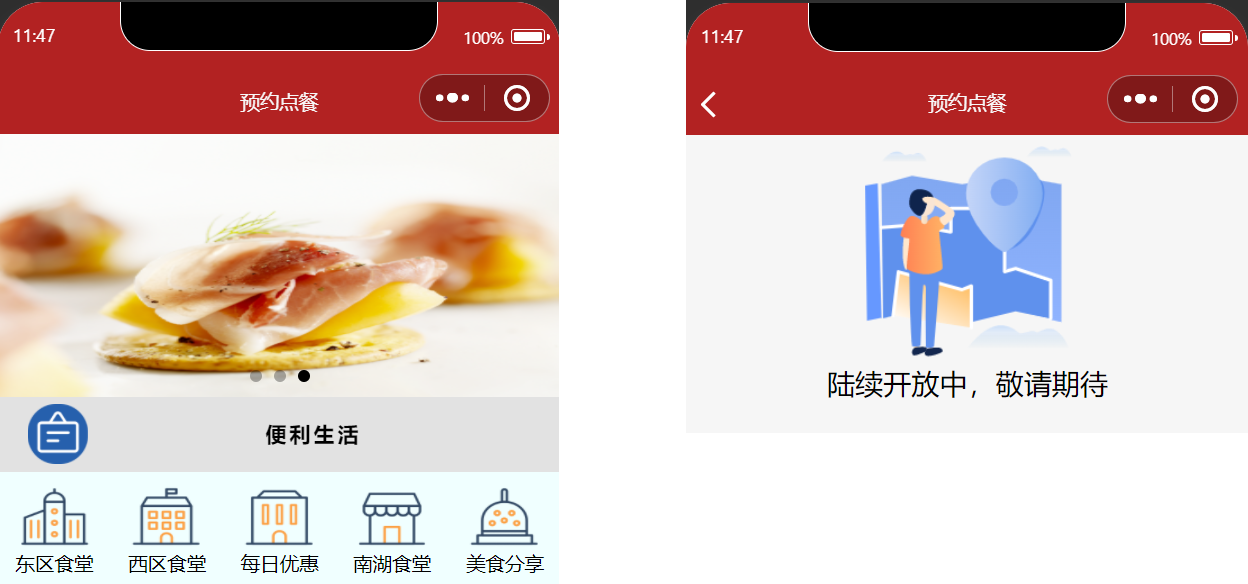
// index.js
showwd:function(){
wx.navigateTo({
  url: '../jqqd/jqqd',
})
},
showtk:function(){
wx.switchTab({
  url: '../gltl/gltl'
})
},
Keep the current page and navigate to a page within the app. You can use wx.navigateBack to return to the original page. The page stack in Mini Programs can hold up to ten layers.
Step 3: Set Up Popular Food Section on Home Page
- Go to the CMS Content Management Console, create a new Food List content model, and set the database name to mslb.
- Go to the newly created Food List page and configure the content collection as follows:
| Content Type | Display Name | Database Field Name |
|---|---|---|
| Image | Attachment Photo | src |
| Single-line string | Name | name |
| Single-line string | Description | jj |
| Single-line string | Address | dz |
| Single-line string | btn1 | btn1 |
| Single-line string | btn2 | btn2 |
| Single-line string | btn3 | btn3 |
For more detailed operations on CMS content management, refer to Building a Carousel.
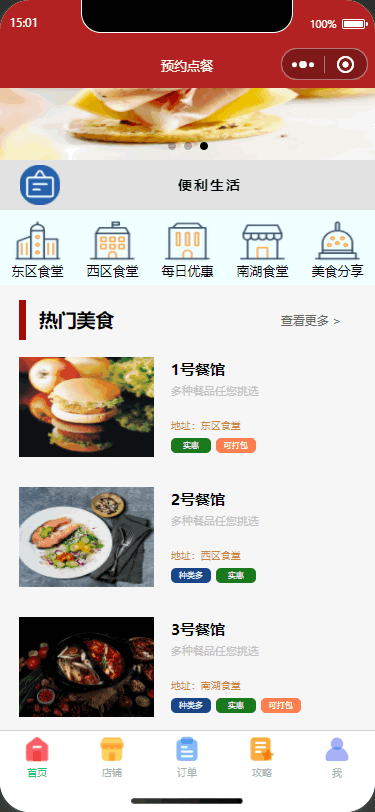
- Go to the index.wxml page and use the list rendering (wx:for) to display the list.
<view class="rmbs">
  <view class="rmbs-title">
    <view class="rmbs-title-text">Popular Cuisine</view>
    <view class="rmbs-title-more" bindtap='showlist'>View More ></view>
  </view>
  <view class="rmbs-list" wx:for="{{rmbs}}" wx:for-item="item" wx:key="_id"  bindtap='showbs' id="{{item._id}}" wx:if="{{index<10}}">
    <view class="rmbs-list-photo">
      <image src="{{item.src}}"></image>
    </view>
    <view class="rmbs-list-text">
      <view class="rmbs-list-text-tit1">{{item.name}}</view>
      <view class="rmbs-list-text-jj">{{item.jj}}</view>
      <view class="rmbs-list-text-tit2">Address: {{item.zd}}</view>
      <view class="rmbs-list-text-tit3">
        <view class="rmbs-list-text-btn" style="background-color: rgb(26, 69, 134);">{{item.btn1}}</view>
        <view class="rmbs-list-text-btn" style="background-color: rgb(24, 122, 29);">{{item.btn2}}</view>
        <view class="rmbs-list-text-btn" style="background-color: coral;">{{item.btn3}}</view>
        <view class="rmbs-list-text-btn">{{item.btn4}}</view>
      </view>
    </view>
  </view>
</view>
Here we find that sometimes the item.btn1 button is displayed even when empty. We can improve this by using wx:if conditional rendering: add a condition to not display the button when it is empty.
<view class="rmbs-list-text-btn" style="background-color: rgb(26, 69, 134);" wx:if="{{item.btn1!=''}}">{{item.btn1}}</view>
<view class="rmbs-list-text-btn" style="background-color: rgb(24, 122, 29);" wx:if="{{item.btn2!=''}}">{{item.btn2}}</view>
<view class="rmbs-list-text-btn" style="background-color: coral;" wx:if="{{item.btn3!=''}}">{{item.btn3}}</view>
The final result is as follows:
Step 3: Set Up My Page
This article primarily focuses on the my page and Cloud Functions. For more code details, refer to the my page.
Step 1: Configure the cloud function
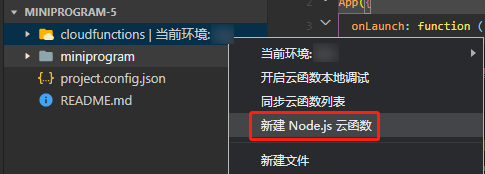
- Right-click the current environment folder, click New Node.js Cloud Function, and name the file open.
- Under the open cloud function, write code to retrieve the openid in the index.js file.
// Cloud Function entry file
const cloud = require("wx-server-sdk");

cloud.init();

// Cloud function entry function
exports.main = async (event, context) => {
  const wxContext = cloud.getWXContext();

  return {
    event,
    openid: wxContext.OPENID,
    appid: wxContext.APPID,
    unionid: wxContext.UNIONID,
  };
};
When invoking cloud functions from the Mini Program side, developers can use the getWXContext method provided by wx-server-sdk to obtain the context of each call (appid, openid, etc.). This allows obtaining inherently trusted user login states (openid) without maintaining complex authentication mechanisms.
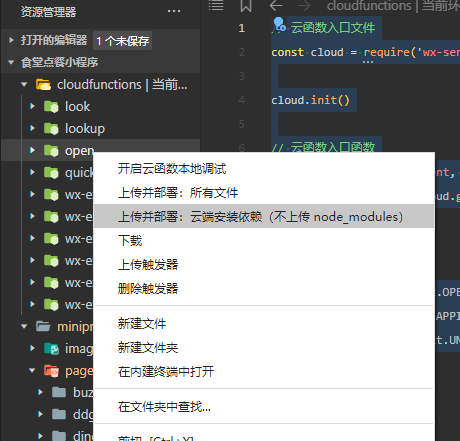
- Then right-click the open folder and click Upload and Deploy: Cloud-based Dependency Installation to complete the cloud function deployment.
Step 2: Set Up the Login Authorization Function
- Open app.js to initialize cloud development.
// app.js
App({
  onLaunch: function () {
    if (!wx.cloud) {
      console.error(
        "Please use base library version 2.2.3 or above to use cloud capabilities"
      );
    } else {
      wx.cloud.init({
        // env parameter description:
        // The env parameter determines which cloud environment's resources subsequent cloud development calls (wx.cloud.xxx) initiated by the Mini Program will be directed to by default.
        // Please enter the environment ID here. The environment ID can be viewed in the cloud console.
        // If not filled, the default environment (the first created environment) will be used
        env: "Environment ID",
        traceUser: true,
      });
    }

    this.globalData = {};
  },
  globalData: {
    userid: "",
  },
});
- Open my.js to write the page code for the "My" section. Here we create a click event: when the user clicks the button bound to the
getUserInfoevent, we call to get the user information.getopenidis the method to obtain the user's openid via cloud functions. This value is stored in app.js, allowing direct access from other pages.
const app = getApp();
Page({
  /**
   * Initial data of the page
   */
  data: {
    username: "",
    openid: "",
  },
  /**
   * Lifecycle function--Listening for page load
   */
  onLoad: function (options) {},
  getUserInfo(e) {
    console.log(e);
    this.setData({
      username: e.detail.userInfo.nickName,
    });
  },
  getopenid() {
    var that = this;
    wx.cloud.callFunction({
      name: "open",
      success: (res) => {
        var usid = res.result.openid;
        console.log(usid);
        this.setData({
          openid: res.result.openid,
        });
        getApp().globalData.userid = res.result.openid;
      },
      fail(res) {
        console.log("Failed to get", res);
      },
    });
  },
});
- Open the my.wxml file and add login status checking code. We can determine: if openid is not obtained, prompt the user to log in; if the obtained openid is empty, display the authorization login section.
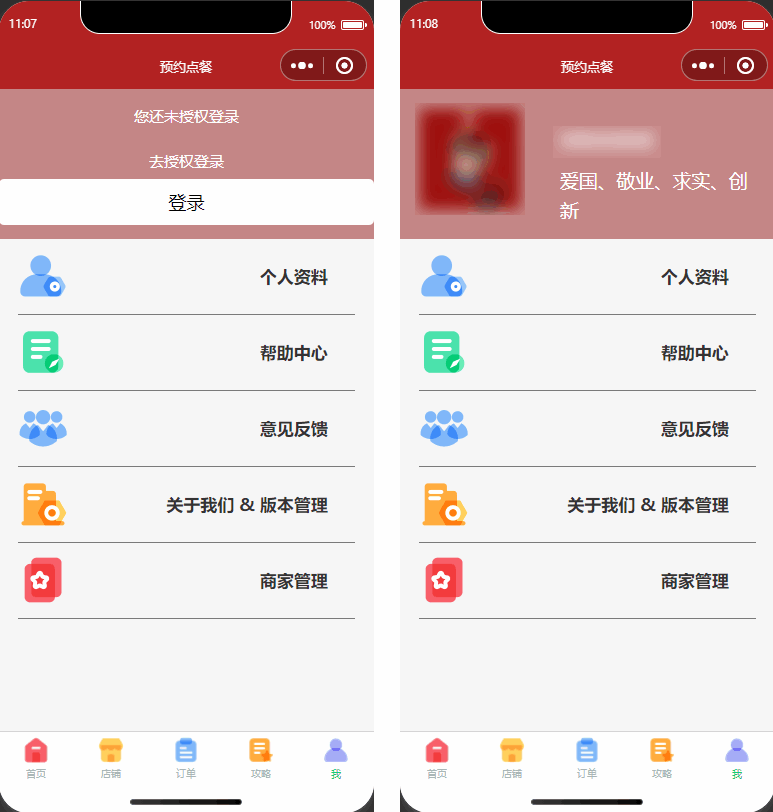
<view class="topbanner"  wx:if="{{openid!=''}}">
  <view class="toplogo">
    <open-data type="userAvatarUrl"></open-data>
  </view>
  <view class="toptext">
  <open-data type="userNickName" lang="zh_CN" class="user-name"></open-data>
  <view class="user-name2">Patriotism, Dedication, Truth-seeking, Innovation</view>
  </view>
</view>
<view class="topbanner" wx:if="{{openid==''}}">
  <view class="topban1">You have not authorized login</view>
  <view class="topban1">Go to Authorize Login</view>
  <button bindtap="getopenid" type="default">Log in</button>
</view>
Step 4: Set up guide page
This article primarily focuses on the guide page. For more code details, refer to the Guide List, Guide Details, Post Comment, and Post Guide.
Step 1: Set up guide display page
- Go to the CMS Content Management Console, create a new guide content model, and set the database name to glpj.
- Go to the newly created guide page and configure the content collection as follows:
Content Type Display Name Database Field Name Image Photo photo Single-line string Title title Date and Time Time time Single-line string Author user Number Page Views lll Rich Text Description xq
For more detailed operations on CMS content management, refer to Building a Carousel.
- Here we still use wx:for to render the list, bind a click event to it for redirection, and pass the current article ID.
- gltl.wxml
- gltl.js
<!--pages/gltl/gltl.wxml-->
<view class="banner">
  <image src="https://6363-ccntst-8gsp6zkw250f8e38-1305928500.tcb.qcloud.la/cloudbase-cms/upload/2021-11-25/5hbujycykft9vg9g82xcsw0f6z34v8o5_.jpg"></image>
</view>
<view class="miin_baer">
  <view class="title_pl">
    <view class="pl_bt">Guide Comments</view>
    <view class="qpl" id="{{rmbs._id}}" bindtap='showtl'>Publish</view>
    </view>
  <view class="mian_box"  wx:for="{{rmbs}}" wx:for-item="item" wx:key="_id"  bindtap='showbs' id="{{item._id}}">
    <view class="min_box_img">
      <image src="{{item.phpto}}"></image>
    </view>
    <view class="mian_text">
      <view class="miam_text_title">
        {{item.title}}
      </view>
      <view class="mian_user">
        <view class="user_logo">
          <image src="../../images/font-ui/nstx.png"></image>
        </view>
        <view class="user_name">
          {{item.user}}
        </view>
        <view class="taolun">
          <image src="../../images/font-ui/pinglun-08.png"></image>
        </view>
        <view class="liulanl">
          <view class="lll_zp">
            <image src="../../images/font-ui/liulan.png"></image>
          </view>
          <view class="lll_sz">
            {{item.lll}}+
          </view>
        </view>
      </view>
    </view>
  </view>
</view>
// pages/gltl/gltl.js
wx.cloud.init({
  env: "Environment ID",
  traceUser: true,
});
const db = wx.cloud.database();
Page({
  /**
   * Initial data of the page
   */
  data: {
    rmbs: "",
  },

  /**
   * Lifecycle function--Listening for page load
   */
  onLoad: function (options) {
    db.collection("glpj")
      .get()
      .then((res) => {
        console.log(res);
        this.setData({
          rmbs: res.data,
        });
      });
  },
  showbs: function (e) {
    console.log(e.currentTarget.id);
    wx.navigateTo({
      url: "/pages/glxq/glxq?list_id=" + e.currentTarget.id,
    });
  },
  showtl: function (e) {
    wx.navigateTo({
      url: "/pages/fbpl/fbpl",
    });
  },
});
Step 2: Set up guide details and comment publishing feature
- Go to the CMS Content Management Console, create a new guide comment content model, and set the database name to glplgl.
- Go to the newly created Guide Comments page and configure the content collection as follows:
| Content Type | Display Name | Database Field Name |
|---|---|---|
| Single-line string | User | user |
| Single-line string | Text | text |
| Single-line string | User Name | username |
| Date and Time | data | data |
| Single-line string | plwz | plwz |
For more detailed operations on CMS content management, refer to Building a Carousel.
- Guide Details The page logic and frontend code are as follows:
- glxq.js
- glxq.wxml
// pages/glxq/glxq.js
wx.cloud.init({
  env: "Environment ID",
  traceUser: true,
});
const db = wx.cloud.database();
Page({
  /**
   * Initial data of the page
   */
  data: {
    list_id: "",
    rmb: "",
  },

  /**
   * Lifecycle function--Listening for page load
   */
  onLoad: function (options) {
    this.setData({
      list_id: options.list_id,
    });
    console.log(this.data.list_id),
      /**/
      db
        .collection("glpj")
        .doc(this.data.list_id)
        .get()
        .then((res) => {
          console.log(res);
          this.setData({
            rmbs: res.data,
          });
        });
    const _ = db.command;
    db.collection("glpj")
      .doc(this.data.list_id)
      .update({
        data: {
          lll: _.inc(1),
        },
      });
    db.collection("glplgl")
      .where({ plwz: this.data.list_id })
      .get()
      .then((res) => {
        console.log(res);
        this.setData({
          rmb: res.data,
        });
      });
  },

  /**
   * Lifecycle function--Listening for initial page rendering completion
   */
  onReady: function () {},

  /**
   * Lifecycle function--Listening for page display
   */
  onShow: function () {},
  showbs: function (e) {
    console.log(e.currentTarget.id);
    wx.navigateTo({
      url: "/pages/xpl/xpl?list_id=" + e.currentTarget.id,
    });
  },
});
<!--pages/glxq/glxq.wxml-->
<view class="zpq" id="{{item._id}}">
  <image src="{{rmbs.phpto}}"></image>
</view>
<view class="dd">
  <rich-text class="rich" nodes="{{rmbs.xq}}"></rich-text>
</view>
<view class="fbsj">
  Published: {{rmbs.time}}
</view>
<view class="lll">
  <view class="liulanl">
    <view class="lll_zp">
      <image src="../../images/font-ui/liulan.png"></image>
    </view>
    <view class="lll_sz">
      {{rmbs.lll}}+
    </view>
  </view>
</view>
<view class="pl">
  <view class="title_pl">
    <view class="pl_bt">Comments</view>
    <view class="qpl" id="{{rmbs._id}}" bindtap='showbs'>Go to comments</view>
    </view>
  <view class="pl_box" wx:for="{{rmb}}" wx:for-item="item" wx:key="_id"  >
    <view class="pl_xxl" >
      <view class="pl_tx">
        <image src="../../images/font-ui/nstx.png"></image>
      </view>
      <view class="pl_xx_us">
        <view class="pl_xx_user">
          {{item.username}}
        </view>
        <view class="pl_xx_time">
          {{item.data}}
        </view>
      </view>
      <view class="dz">
        <image src="../../images/font-ui/dzz.png"></image>
      </view>
    </view>
    <view class="plxx_xq">
        {{item.text}}
    </view>
  </view>
</view>
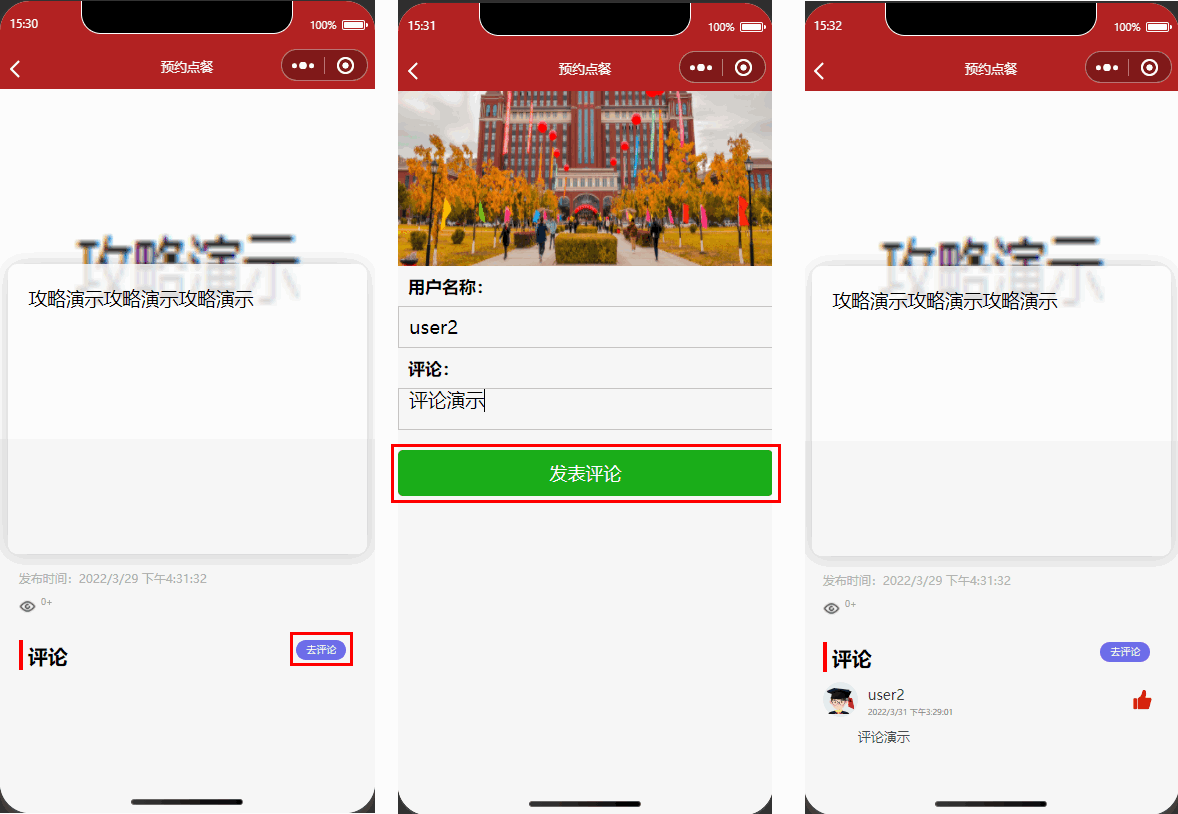
- On the corresponding Guide Details page, when clicking Go to comments, we need to obtain the user's openid and the article ID for the current comment to be published. The logic and frontend code for Go to comments are as follows:
- xpl.js
- xpl.wxml
// pages/xpl/xpl.js
wx.cloud.init({
  env: "Environment ID",
  traceUser: true,
});
const db = wx.cloud.database();
var myDate = new Date();
Page({
  /**
   * Initial data of the page
   */
  data: {
    list_id: "",
    userid: "",
  },

  /**
   * Lifecycle function--Listening for page load
   */
  onLoad: function (options) {
    this.setData({
      list_id: options.list_id,
    });
    console.log(this.data.list_id);
    const app = getApp();
    var userid = app.globalData.userid;
    this.setData({
      userid: userid,
    });
  },
  showsq: function () {
    wx.switchTab({
      url: "../my/my",
    });
  },
  /**
   * Lifecycle function--Listening for initial page rendering completion
   */
  onReady: function () {},
  btnSub(res) {
    if (res.detail.value.text != "" && res.detail.value.username != "") {
      var { text, username } = res.detail.value;
      db.collection("glplgl")
        .add({
          data: {
            user: this.data.userid,
            text: text,
            plwz: this.data.list_id,
            username: username,
            data: myDate.toLocaleString(),
            _createTime: Date.parse(new Date()),
          },
        })
        .then((res) => {
          wx.showToast({
            title: "Success",
            icon: "success",
            duration: 2000,
          });
        });
    } else {
      wx.showToast({
        title: "Please fill in the information",
        icon: "error",
        duration: 2000,
      });
    }
  },
});
<!--pages/xpl/xpl.wxml-->
<view class="banner">
  <!----><image src="https://6363-ccntst-8gsp6zkw250f8e38-1305928500.tcb.qcloud.la/cloudbase-cms/upload/2021-11-25/5hbujycykft9vg9g82xcsw0f6z34v8o5_.jpg"></image>
</view>
<view class="wdl_ban" wx:if="{{userid==''}}">
  <view class="wdl">
    <image src="../../images/font-ui/wdl.png"></image>
  </view>
  <view class="text_main">You have not authorized login, please authorize login!</view>
  <button size="mini" type="primary" bindtap='showsq' class="btn_sq">Go to Authorization</button>
</view>
<view class="xpl" wx:if="{{userid!=''}}">
  <form bindsubmit="btnSub">
    <view class="top-s">
      <view class="top-text">User name:</view>
      <view class="weui-cell__bd">
        <input class="weui-input" name="username" placeholder="Enter name" />
      </view>
    </view>
    <view class="top-s">
      <view class="top-text">Comments:</view>
      <view class="weui-cell__bd">
        <textarea bindblur="bindTextAreaBlur" name="text" class="weui-text" auto-height placeholder="Auto height" />
      </view>
    </view>
    <button style="margin: 0 aout;margin-top:40rpx;margin-bottom:40rpx;" type="primary" formType="submit">Post Comment</button>
  </form>
</view>
For content security, WeChat Cloud Development provides content security capabilities that allow setting content security rules for information stored in Cloud Development databases, automatically performing content moderation, and handling violating content. For details, see Content Security.
- The final result is as follows:
Step 3: Set up guide publishing feature
- Go to the app.json page and add the weui framework.
{
  "useExtendedLib": {
    "weui": true
  }
}
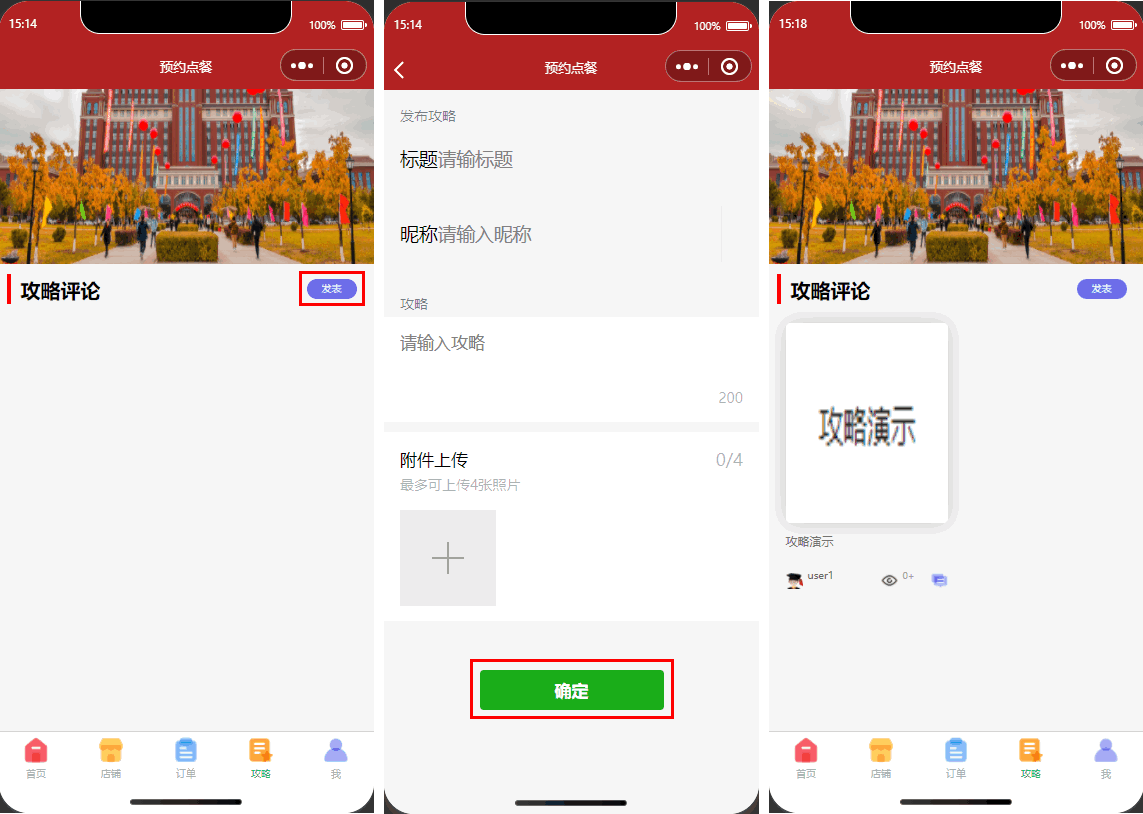
- Then go to the fbpl.json page to import the weui framework again and call it in fbpl.wxml. Relevant code is as follows:
- fbpl.json
- fbpl.wxml
- fbpl.js
{
  "usingComponents": {
    "mp-uploader": "weui-miniprogram/uploader/uploader",
    "mp-cells": "weui-miniprogram/cells/cells",
    "mp-cell": "weui-miniprogram/cell/cell",
    "mp-form-page": "weui-miniprogram/form-page/form-page",
    "mp-form": "weui-miniprogram/form/form",
    "mp-toptips": "weui-miniprogram/toptips/toptips",
    "mp-checkbox-group": "weui-miniprogram/checkbox-group/checkbox-group",
    "mp-half-screen-dialog": "weui-miniprogram/half-screen-dialog/half-screen-dialog"
  }
}
<view wx:if="{{userid!=''}}">
  <view class="weui-cells__title">Publish Guide</view>
  <mp-cell prop="name" title="Title" ext-class="">
    <input bindinput="formInputChange" data-field="name" class="weui-input" placeholder="Enter title" />
  </mp-cell>
  <mp-cell prop="mobile" title="Nickname" ext-class=" ">
    <input bindinput="formInputChange" data-field="mobile" class="weui-input" placeholder="Enter nickname" />
    <view slot="footer" class="weui-vcode-btn"></view>
  </mp-cell>
  <view class="weui-cells__title">Guide</view>
  <view class="weui-cells weui-cells_after-title">
    <view class="weui-cell">
      <view class="weui-cell__bd">
        <textarea class="weui-textarea" bindinput="formwtInputChange" placeholder="Enter guide" name="wt" style="height: 3.3em" />
        <view class="weui-textarea-counter">200</view>
      </view>
    </view>
  </view>
  <view class="page">
    <view class="page__bd">
      <mp-cells>
        <mp-cell>
          <mp-uploader bindfail="uploadError" bindsuccess="uploadSuccess" select="{{selectFile}}" upload="{{uplaodFile}}" files="{{files}}" max-count="4" title="Attachment Upload" tips="Up to 4 photos can be uploaded"></mp-uploader>
        </mp-cell>
      </mp-cells>
    </view>
  </view>
  <view class="weui-btn-area">
    <button class="weui-btn" type="primary" formType="submit" bindtap="submitForm">Confirm</button>
  </view>
</view>
// pages/fbpl/fbpl.js
wx.cloud.init({
  env: "Your Environment ID",
  traceUser: true,
});
const db = wx.cloud.database();
Page({
  /**
   * Page Initial Data
   */
  data: {
    userid: "",
    files: [],
  },

  /**
     * Lifecycle function -- Listens for page load
     Here, the openid is in app.js
     */
  onLoad: function (options) {
    const app = getApp();
    var userid = app.globalData.userid;
    this.setData({
      userid: userid,
    });
    wx.cloud.init({
      traceUser: true,
    });

    this.setData({
      selectFile: this.selectFile.bind(this),
      uplaodFile: this.uplaodFile.bind(this),
    });
  },
  formInputChange(e) {
    const { field } = e.currentTarget.dataset;
    this.setData({
      [`formData.${field}`]: e.detail.value,
    });
  },
  formplInputChange(e) {
    console.log(e);
    this.setData({
      palce: e.detail.value,
    });
  },
  formwtInputChange(e) {
    console.log(e);
    this.setData({
      wt: e.detail.value,
    });
  },
  submitForm(e) {
    this.setData({
      name: this.data.formData.name,
      phone: this.data.formData.mobile,
      tsbm: this.data.tsbmun,
    });
    if (this.data.wt.length > 10 && this.data.openid != "") {
      db.collection("glpj").add({
        // The data field represents the JSON data to be added
        data: {
          title: this.data.name,
          user: this.data.mobile,
          xq: this.data.wt,
          phpto: this.data.files,
          userid: this.data.openid,
          time: Date.parse(new Date()),
          _createTime: Date.parse(new Date()),
          lll: 0,
        },
      });
      wx.reLaunch({
        url: "../gltl/gltl",
        success: (res) => {
          wx.showToast({
            title: "Complete",
            success: (res) => {
              wx.navigateTo({
                url: "../index/index",
              });
            },
          });
        },
      });
    } else {
      wx.showToast({
        title: "Description",
        icon: "error",
        duration: 2000,
      });
    }
  },
  /**
   * Lifecycle function -- Listens for page display
   */
  showsq: function () {
    wx.switchTab({
      url: "../my/my",
    });
  },
  chooseImage: function (e) {
    var that = this;
    wx.chooseImage({
      sizeType: ["original", "compressed"], // Specifies whether to use the original image, compressed image, or both. Default includes both.
      sourceType: ["album", "camera"], // Specifies whether the source is album, camera, or both. Default includes both.
      success: function (res) {
        // Returns the list of local file paths of the selected photos. tempFilePath can be used as the src attribute of an img tag to display the image
        that.setData({
          files: that.data.files.concat(res.tempFilePaths),
        });
      },
    });
  },
  previewImage: function (e) {
    wx.previewImage({
      current: e.currentTarget.id, // The http link of the currently displayed image
      urls: this.data.files, // List of image http links to be previewed
    });
  },
  selectFile(files) {
    console.log("files", files);
    // Returning false can prevent a specific file upload
  },
  uplaodFile(files) {
    console.log("upload files", files);
    console.log("upload files", files);
    // File upload function that returns a promise
    return new Promise((resolve, reject) => {
      const tempFilePaths = files.tempFilePaths;
      // Upload return value
      const that = this;
      const object = {};
      for (var i = 0; i < tempFilePaths.length; i++) {
        let filePath = "",
          cloudPath = "";
        filePath = tempFilePaths[i];
        // Upload images
        // It is recommended to sort cloudPath by time and traversal index to avoid duplicate file names
        cloudPath =
          "blog-title-image-" +
          new Date().getTime() +
          "-" +
          i +
          filePath.match(/\.[^.]+?$/)[0];

        console.log(filePath);
        console.log(cloudPath);
        const upload_task = wx.cloud.uploadFile({
          filePath,
          cloudPath,
          success: function (res) {
            console.log(res);
            // There may be multiple 200+ return codes indicating success.
            if (
              res.statusCode === 200 ||
              res.statusCode === 204 ||
              res.statusCode === 205
            ) {
              const url = res.fileID;
              that.data.files.push(url);
              if (that.data.files.length === tempFilePaths.length) {
                object.urls = that.data.files;
                resolve(object); // This checks if the last image has been uploaded and returns accordingly.
              }
            } else {
              reject("error");
            }
          },
          fail: function (err) {
            console.log(err);
          },
          conplete: () => {},
        });
      }
    });
    // File upload function that returns a promise
  },
  uploadError(e) {
    console.log("upload error", e.detail);
  },
  uploadSuccess(e) {
    console.log("upload success", e.detail);
  },
});
- The final result is as follows:
Step 5: Set up store page
This article primarily focuses on the store page. For more code details, refer to the Store and Merchant.
Step 1: Set up store page
- Go to the CMS Content Management Console, create a new store content model, and set the database name to dp.
- Go to the newly created store page and configure the content collection as follows:
| Content Type | Display Name | Database Field Name |
|---|---|---|
| Single-line string | Store Name | name |
| Single-line string | Store Location | dpdd |
| Date and Time | Time | time |
| Boolean | Open | sfyy |
| Image | Store Photo | dpzp |
| Single-line string | Description | jj |
For more detailed operations on CMS content management, refer to Building a Carousel.
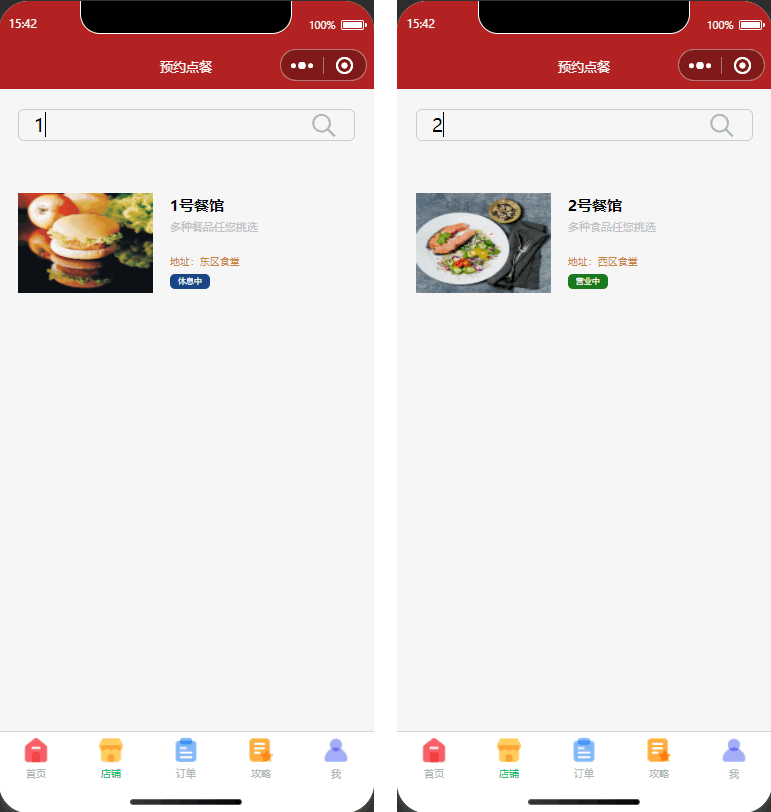
- Then display it in the mini program.
- dp.wxml
- dp.js
<!--pages/dp/dp.wxml-->
<view class='search'>
  <input type='text' placeholder='Enter search content' bindinput='input' bindconfirm='confirm' />
  <icon type='search' class='icons'></icon>
</view>
<view class="rmbs">
  <view class="rmbs-list" wx:for="{{list}}" wx:for-item="item" wx:key="_id"  bindtap='showbs' id="{{item._id}}" wx:if="{{item.show}}">
    <view class="rmbs-list-photo">
      <image src="{{item.dpzp}}"></image>
    </view>
    <view class="rmbs-list-text">
      <view class="rmbs-list-text-tit1">{{item.name}}</view>
      <view class="rmbs-list-text-jj">{{item.jj}}</view>
      <view class="rmbs-list-text-tit2">Address: {{item.dpdd}}</view>
      <view class="rmbs-list-text-tit3">
        <view class="rmbs-list-text-btn" style="background-color: rgb(24, 122, 29);" wx:if="{{item.sfyy!=false}}">Open</view>
        <view class="rmbs-list-text-btn" style="background-color: rgb(26, 69, 134);" wx:else>Closed</view>
      </view>
    </view>
  </view>
</view>
// pages/dp/dp.js
wx.cloud.init({
  env: "ccntst-8gsp6zkw250f8e38",
  traceUser: true,
});
const db = wx.cloud.database();
Page({
  /**
   * Initial data of the page
   */
  data: {
    rmbs: "",
    list: [],
    list_id: "",
  },
  bindPickerChange: function (e) {
    console.log("picker selection changed, carrying value: ", e.detail.value);
    this.setData({
      index: e.detail.value,
    });
  },
  bindPickerChange1: function (e) {
    console.log("picker selection changed, carrying value: ", e.detail.value);
    this.setData({
      index1: e.detail.value,
    });
  },
  input(e) {
    console.log(e);
    this.search(e.detail.value);
  },
  // Triggered when the Done button is clicked
  confirm(e) {
    this.search(e.detail.value);
  },
  search(key) {
    var that = this;
    // Asynchronously fetches the content of the specified key from the local cache
    var list = wx.getStorage({
      key: "list",
      // Retrieve stored data from Storage
      success: function (res) {
        // console.log(res)
        if (key == "") {
          // Display all when user has no input
          that.setData({
            list: res.data,
          });
          return;
        }
        var arr = []; // Temporary array for storing matched arrays
        for (let i in res.data) {
          res.data[i].show = false; // All data hidden
          if (res.data[i].name.indexOf(key) >= 0) {
            res.data[i].show = true; // Display matched data
            arr.push(res.data[i]);
          }
        }
        if (arr.length == 0) {
          that.setData({
            list: [
              {
                show: true,
                name: "No related data!",
              },
            ],
          });
        } else {
          that.setData({
            list: arr,
          });
        }
      },
    });
  },
  bindPickerChange2: function (e) {
    console.log("picker selection changed, carrying value: ", e.detail.value);
    this.setData({
      index1: e.detail.value,
    });
  },
  /**
   * Lifecycle function--Listening for page load
   */
  onLoad: function (options) {
    this.setData({
      list_id: options.list_id,
    });
    console.log(this.data.list_id),
      db
        .collection("dp")
        .get()
        .then((res) => {
          wx.setStorage({
            key: "list",
            data: res.data,
          });
          this.setData({
            list: res.data,
          });
        });
  },
  showbs: function (e) {
    console.log(e.currentTarget.id);
    wx.navigateTo({
      url: "/pages/fbgl/fbgl?list_id=" + e.currentTarget.id,
    });
  },
});
- The effect is as follows:
Step 2: Build Product Page
- Go to the CMS Content Management Console, create a new product content model, and set the database name to sp.
- Go to the newly created product page and configure the content collection as follows:
Among them, for the merchant's associated content, select store, and for the display field, select store name.Content Type Display Name Database Field Name Single-line string Name name Number Price jg Number Sales Volume xl Single-line string Ingredients pl Image Photo zp Association Merchant sj
For more detailed operations on CMS content management, refer to Building a Carousel.
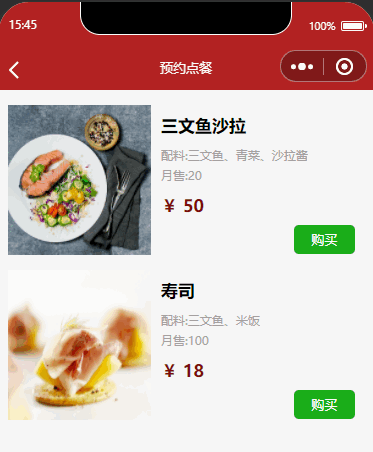
- When a user clicks on a merchant and navigates to the product page, we still need to pass the merchant ID.
- fbgl.wxml
- fbgl.js
<!--pages/fbgl/fbgl.wxml-->
<view class="wdl_ban" wx:if="{{userid==''}}">
    <view class="wdl">
        <image src="../../images/font-ui/wdl.png"></image>
    </view>
    <view class="text_main">You have not authorized login, please authorize login!</view>
    <button size="mini" type="primary" bindtap='showsq' class="btn_sq">Go to Authorization</button>
</view>
<view class="contmian" wx:if="{{userid!=''}}">
    <view class="mian_box"  wx:for="{{rmb}}" wx:for-item="item" wx:key="_id"  bindtap='showbs' >
        <view class="main_box_left">
            <image src="{{item.zp}}" class="zszp"></image>
        </view>
        <view class="main_box_right">
            <view class="tit_zs">{{item.name}}</view>
            <view class="pl">Ingredients:{{item.pl}}</view>
            <view class="pl">Monthly Sales:{{item.xl}}</view>
            <view class="jg">¥ {{item.jg}}</view>
            <button size="mini" type="primary" bindtap="addCart" id="{{item._id}}" class="btn_9">Buy</button>
        </view>
    </view>
</view>
// pages/fbgl/fbgl.js
wx.cloud.init({
  env: "ccntst-8gsp6zkw250f8e38",
  traceUser: true,
});
const db = wx.cloud.database();
var myDate = new Date();
Page({
  /**
   * Page Initial Data
   */
  data: {
    userid: "",
    list_id: "",
    rmb: "",
  },

  /**
   * Lifecycle function -- Listens for page load
   */
  onLoad: function (options) {
    this.setData({
      list_id: options.list_id,
    });
    console.log(this.data.list_id);
    const app = getApp();
    var userid = app.globalData.userid;
    this.setData({
      userid: userid,
    });
    db.collection("sp")
      .where({ sj: this.data.list_id })
      .get()
      .then((res) => {
        console.log(res);
        this.setData({
          rmb: res.data,
        });
      });
  },
  showsq: function () {
    wx.switchTab({
      url: "../my/my",
    });
  },
});
- The effect is as follows:
Step 3: Build Order Placement Function
- Go to the CMS Content Management Console, create a new order content model, and set the database name to dd.
- Go to the newly created order page and configure the content collection as follows:
Among them, for the product's associated content, select store, and for the display field, select store name.Content Type Display Name Database Field Name Single-line string userid userid Association Product sp Single-line string Time time Boolean Place Order xd Boolean Pickup qccg Single-line string Pickup Time qcsj
For more detailed operations on CMS content management, refer to Building a Carousel.
- Next, go to the fbgl.js page to configure the order placement event.
 addCart(res) {
  console.log(res)
  const _=db.command
  db.collection('sp').doc(res.currentTarget.id).update({
    data:{
      xl:_.inc(1)
    }
  })
  db.collection("sp").get().then(res=>{
    console.log(res)
    this.setData({
      rmb:res.data
    })
  })
  db.collection("dd").add({
    data: {
      userid: this.data.userid,
      sp: res.currentTarget.id,
      _createTime: Date.parse(new Date()),
      time: myDate.toLocaleString(),
      xd:0,
      qccg:0,
    }
  }).then(res => {
    wx.showToast({
      title: 'Added Successfully',
      icon: 'success',
      duration: 2000
    })
  })
},
We can understand that user orders need to include information such as user openid, products, time, etc.
We use the add method to insert data into the database and create new records. If the passed record object lacks an _id field, the backend automatically generates an _id. If an _id is specified, it must not conflict with existing records.
Step 6: Set Up Order Page
This article primarily focuses on the order page. For more code details, refer to the Order and Order Management.
Step 1: Set Up the Cloud Function look
- Right-click the current environment folder, click New Node.js Cloud Function, and name the file look.

- In the look cloud function, write the aggregation pipeline join query code in the index.js file.
// Cloud Function entry file
const cloud = require("wx-server-sdk");

cloud.init({
  env: "Environment ID",
});
const db = cloud.database();
// Cloud function entry function
exports.main = async (event, context) => {
  var text = event.userid;
  return await db
    .collection("dd")
    .aggregate()
    .lookup({
      from: "sp",
      localField: "sp",
      foreignField: "_id",
      as: "bookList",
    })
    .end();
};
Performs a left outer join with a specified collection in the same database. For each input record in this stage, lookup adds an array field containing matching records from the joined collection. lookup then outputs the joined results to the next stage.
Here we use a join table query with the Aggregate.lookup(object: Object): Aggregate method.
lookup({
  from: <name of the collection to join>,
  localField: <The field in the input record for equality matching>,
  foreignField: <The field in the joined collection for equality matching>,
  as: <output array field name>
})
| Parameter Field | Description |
|---|---|
| from | The name of another collection to join |
| let | Optional. Specifies variables that can be used in the pipeline. The value of variables can reference fields from input records, e.g., let: userName: '$name' means using the input record's name field as the userName variable value. Input record fields cannot be accessed directly in the pipeline; they must be defined via let before access. Access is achieved in the expr operator using $$variable_name syntax, e.g., $$userName. |
| pipeline | Optional. Specifies variables that can be used in the pipeline. The value of variables can reference fields from input records, e.g., let: userName: '$name' means using the input record's name field as the userName variable value. Input record fields cannot be accessed directly in the pipeline; they must be defined via let before access. Access is achieved in the expr operator using $$variable_name syntax, e.g., $$userName. |
| as | Specifies the field name to store the list of matched records from the join. This array contains matched records from the from collection. If the input record already has this field, it will be overwritten. |
The operation is equivalent to the following pseudo-SQL statement:
SELECT *, <output array field>
FROM collection
WHERE <output array field> IN (SELECT <documents as determined from the pipeline>
FROM <collection to join>
WHERE <pipeline> );
Step 2: Set Up the Cloud Function lookup
- Right-click the current environment folder, click New Node.js Cloud Function, and name the file lookup.

- Since the _id in the products matches the sp in the orders, write the following code in the index.js file under the lookup cloud function to associate the two tables.
// Cloud Function entry file
const cloud = require("wx-server-sdk");

cloud.init({
  env: "Environment ID",
});
const db = cloud.database();
// Cloud function entry function
exports.main = async (event, context) => {
  var text = event.userid;
  return await db
    .collection("dd")
    .aggregate()
    .lookup({
      from: "sp",
      localField: "sp",
      foreignField: "_id",
      as: "bookList",
    })
    .end();
};
- Then, on the dingdan.js page, we pass the openid to the cloud function look.
onLoad: function (options) {
  const app = getApp()
  var userid = app.globalData.userid
  this.setData({
    userid: userid,
  })
  wx.cloud.callFunction({
    name: 'lookup',
    data: {
      userid: app.globalData.userid
    },
    complete: res => {
      console.log(res.result.list)
      this.setData({
        rmb: res.result.list
      })
    }
  })
},
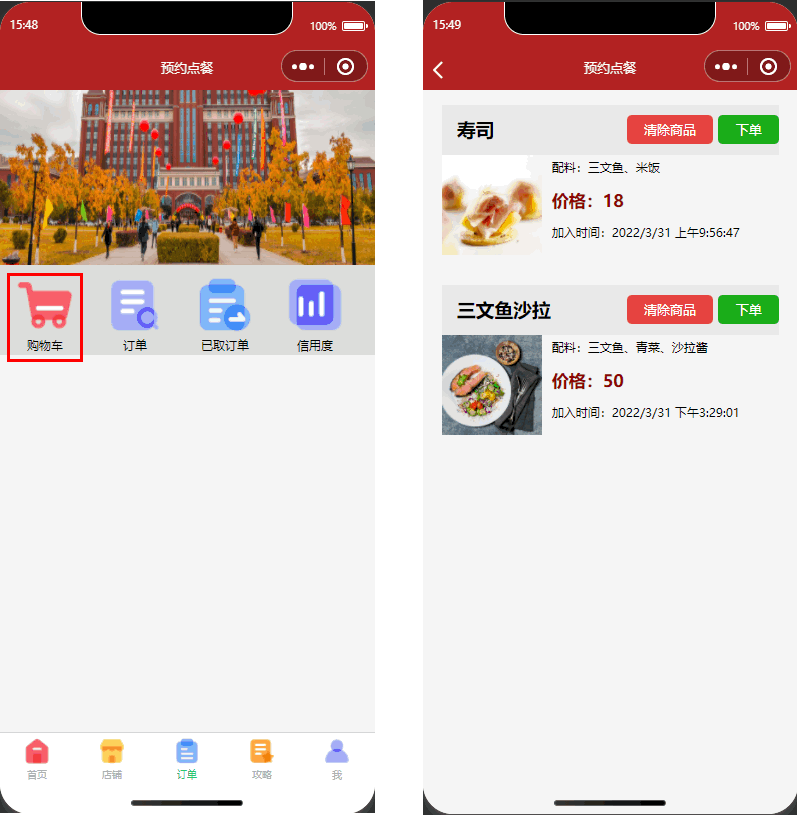
Step 3: Set Up the Shopping Cart Page
- Next, we will set up the shopping cart page.
- dingdan.wxml
- dingdan.js
<!--pages/dingdan/dingdan.wxml-->
<view class="qsy" wx:if="{{openid!=''&&rmb==''}}">
    <view class="mydd">
        <image src="../../images/font-ui/zwjl.png"></image>
    </view>
    <view class="text_wydd">No orders yet, go place an order now!</view>
</view>
<view class="qsy" wx:if="{{openid==''}}">
    <view class="wdl">
        <image src="../../images/font-ui/wdl.png"></image>
    </view>
    <view class="text_main">You have not authorized login, please authorize login!</view>
    <button bindtap="getopenid" size="default" class="btn_sq" type="primary">Log in</button>
</view>
<view wx:if="{{openid!=''&&rmb!=''}}" class="text_main1" wx:for="{{rmb}}" wx:for-item="item" wx:key="_id" bindtap='showbs' id="{{item._id}}" wx:if="{{openid==item.userid&&item.xd==0}}">
    <view class="main_gwc">
        <view class="title">
            <view class="sjmc_1">
                {{item.bookList[0].name}}
            </view>
            <button size="mini" type="primary" class="sp_btn" id="{{item._id}}" bindtap="binxd">Place Order</button>
            <button size="mini" type="warn" class="sp_btn" id="{{item._id}}" bindtap="binqc">Clear Items</button>
        </view>
        <view class="zp_sp">
            <image src='{{item.bookList[0].zp}}'></image>
        </view>
        <view class="zp_nrl">
            <view class="title_zpnrl">
                Ingredients:{{item.bookList[0].pl}}
            </view>
            <view class="title_zpnrl1">
                Price:{{item.bookList[0].jg}}
            </view>
            <view class="title_zpnrl">
                Added: {{item.time}}
            </view>
        </view>
    </view>
</view>
// pages/dingdan/dingdan.js
wx.cloud.init({
  env: "Environment ID",
  traceUser: true,
});
const db = wx.cloud.database();
const app = getApp();
Page({
  /**
   * Initial data of the page
   */
  data: {
    msgList: "",
    userid: "",
    username: "",
    openid: "",
    rmb: "",
  },
  showsq: function () {
    wx.switchTab({
      url: "../my/my",
    });
  },
  /**
   * Lifecycle function--Listening for page load
   */
  onLoad: function (options) {
    const app = getApp();
    var userid = app.globalData.userid;
    this.setData({
      openid: userid,
    });
    wx.cloud.callFunction({
      name: "lookup",
      data: {
        userid: app.globalData.userid,
      },
      complete: (res) => {
        console.log(res.result.list);
        this.setData({
          rmb: res.result.list,
        });
      },
    });
  },
  binqc: function (e) {
    console.log(e.currentTarget.id);
    db.collection("dd")
      .doc(e.currentTarget.id)
      .remove({
        success: function (res) {},
      });
    wx.cloud.callFunction({
      name: "lookup",
      data: {
        userid: app.globalData.userid,
      },
      complete: (res) => {
        console.log(res.result.list);
        this.setData({
          rmb: res.result.list,
        });
      },
    });
  },
  binxd: function (e) {
    db.collection("dd")
      .doc(e.currentTarget.id)
      .update({
        // Pass in the data that requires partial updating
        data: {
          // Indicates setting the done field to true. When a user places an order, we change the xd status to 1.
          xd: 1,
        },
        success: function (res) {
          wx.showToast({
            title: "Order Placed Successfully",
            icon: "success",
            duration: 2000,
          });
        },
      });
    wx.cloud.callFunction({
      name: "lookup",
      data: {
        userid: app.globalData.userid,
      },
      complete: (res) => {
        console.log(res.result.list);
        this.setData({
          rmb: res.result.list,
        });
      },
    });
  },
  xd: function (e) {
    wx.navigateTo({
      url: "/pages/xd/xd",
    });
  },
  sxxxx(e) {
    wx.cloud.callFunction({
      name: "lookup",
      data: {
        userid: app.globalData.userid,
      },
      complete: (res) => {
        console.log(res.result.list);
        this.setData({
          rmb: res.result.list,
        });
      },
    });
  },
});
- The following figure shows the effect:
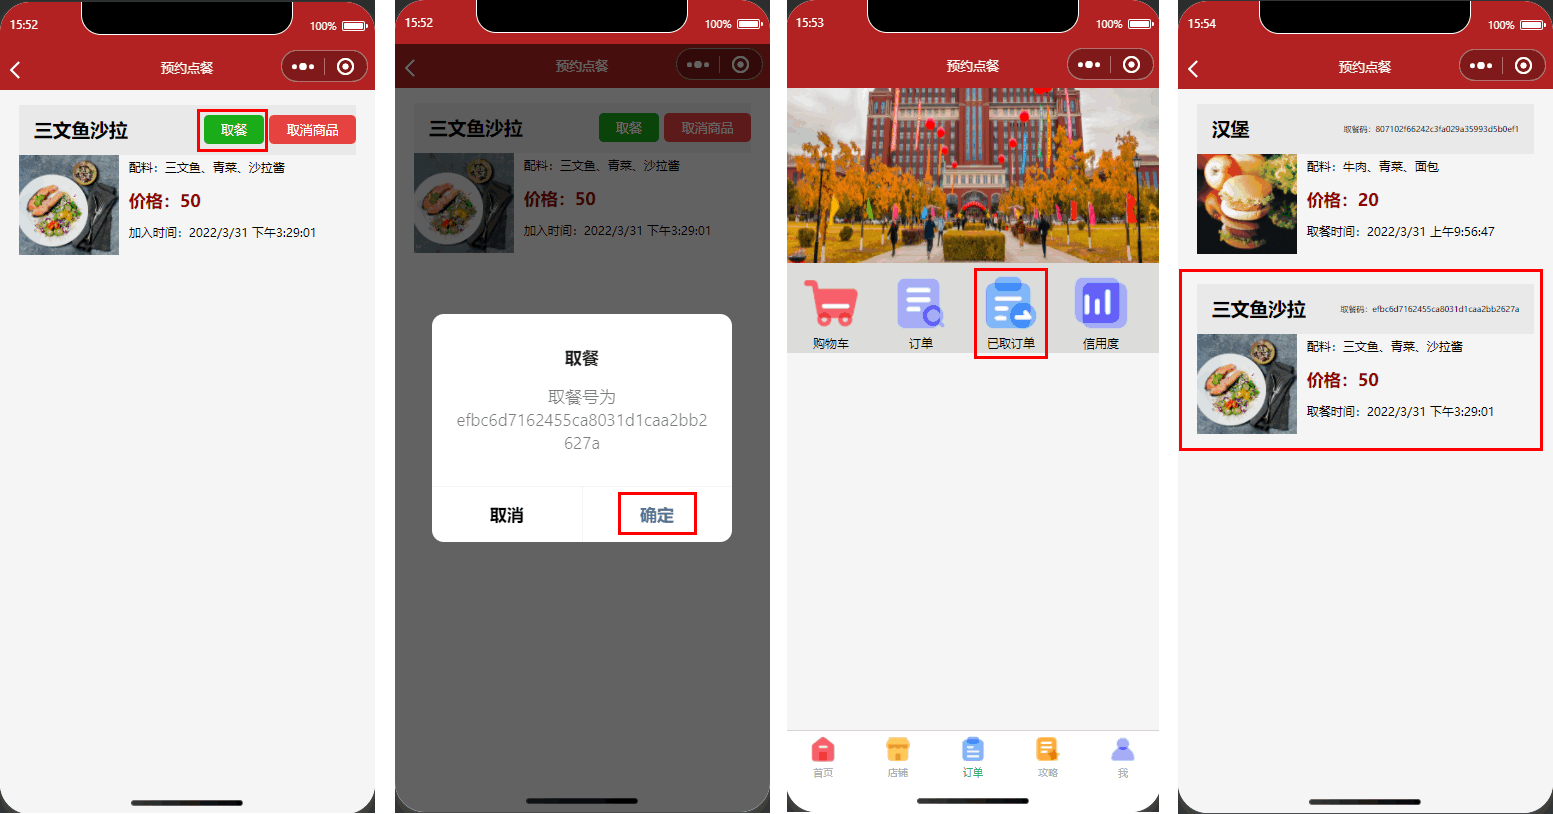
Step 4: Build Meal Pickup Function
- Go to the ddgl.js page and add the following methods to implement the meal pickup and cancel item functionality.
binqc: function (e) {
    wx.showModal({
      title: 'Prompt',
      content: 'Are you sure you want to cancel the order? This will affect your credibility.',
      success(res) {
        if (res.confirm) {
          console.log('Confirm')
          console.log(e.currentTarget.id)
          db.collection('dd').doc(e.currentTarget.id).remove({
            success: function (res) {
              wx.navigateTo({
                url: '/pages/index/index',
              })
            }
          })
        } else if (res.cancel) {
          console.log('Cancel')
        }
      }
    })

  },
  binxd: function (e) {
    wx.showModal({
      title: 'Meal Pickup',
      content: 'Meal Pickup Number: ' + e.currentTarget.id,
      success(res) {
        if (res.confirm) {
          db.collection('dd').doc(e.currentTarget.id).update({
            // Pass in the data that requires partial updating
            data: {
              // Indicates setting the done field to true
              qccg: 1,
              qcsj: myDate.toLocaleString(),
            },
            success: res => {
              wx.showToast({
                title: 'Meal Pickup Successful',
                icon: 'success',
                duration: 2000
              })
            }

          })
        } else if (res.cancel) {
          console.log('User clicked cancel')
        }
      }
    })
  },
- The final result is as follows:
At this point, all features of the mini program have been implemented. For more details, refer to the sample code.