Custom Domain
CloudBase HTTP access service provides automatically generated domains by default. You can also bind custom domains to the CloudBase HTTP access service.
Default domain is recommended for testing environments only. For production environments, it's recommended to bind custom domains to ensure business security and stability.
Prerequisites
Before starting to configure custom domains, please ensure the following preparations are complete:
- Domain Filing: Prepare custom domain and complete ICP filing. For details, refer to ICP Filing Page. For cloud resources required for filing, refer to Filing Cloud Resources
- SSL Certificate: Prepare SSL certificate, which can be uploaded in SSL Certificate Console
Add Custom Domain
- Go to CloudBase Console/HTTP Access Service
- Click "Add Domain"
- Fill in custom domain and configure SSL certificate
- Select CDN type

In addition to managing domains centrally in the HTTP access service, you can also add a custom domain directly from the detail page of a specific cloud function / cloud run / static hosting application. The two entry points are equivalent — all added domains are listed and managed in the HTTP access service.
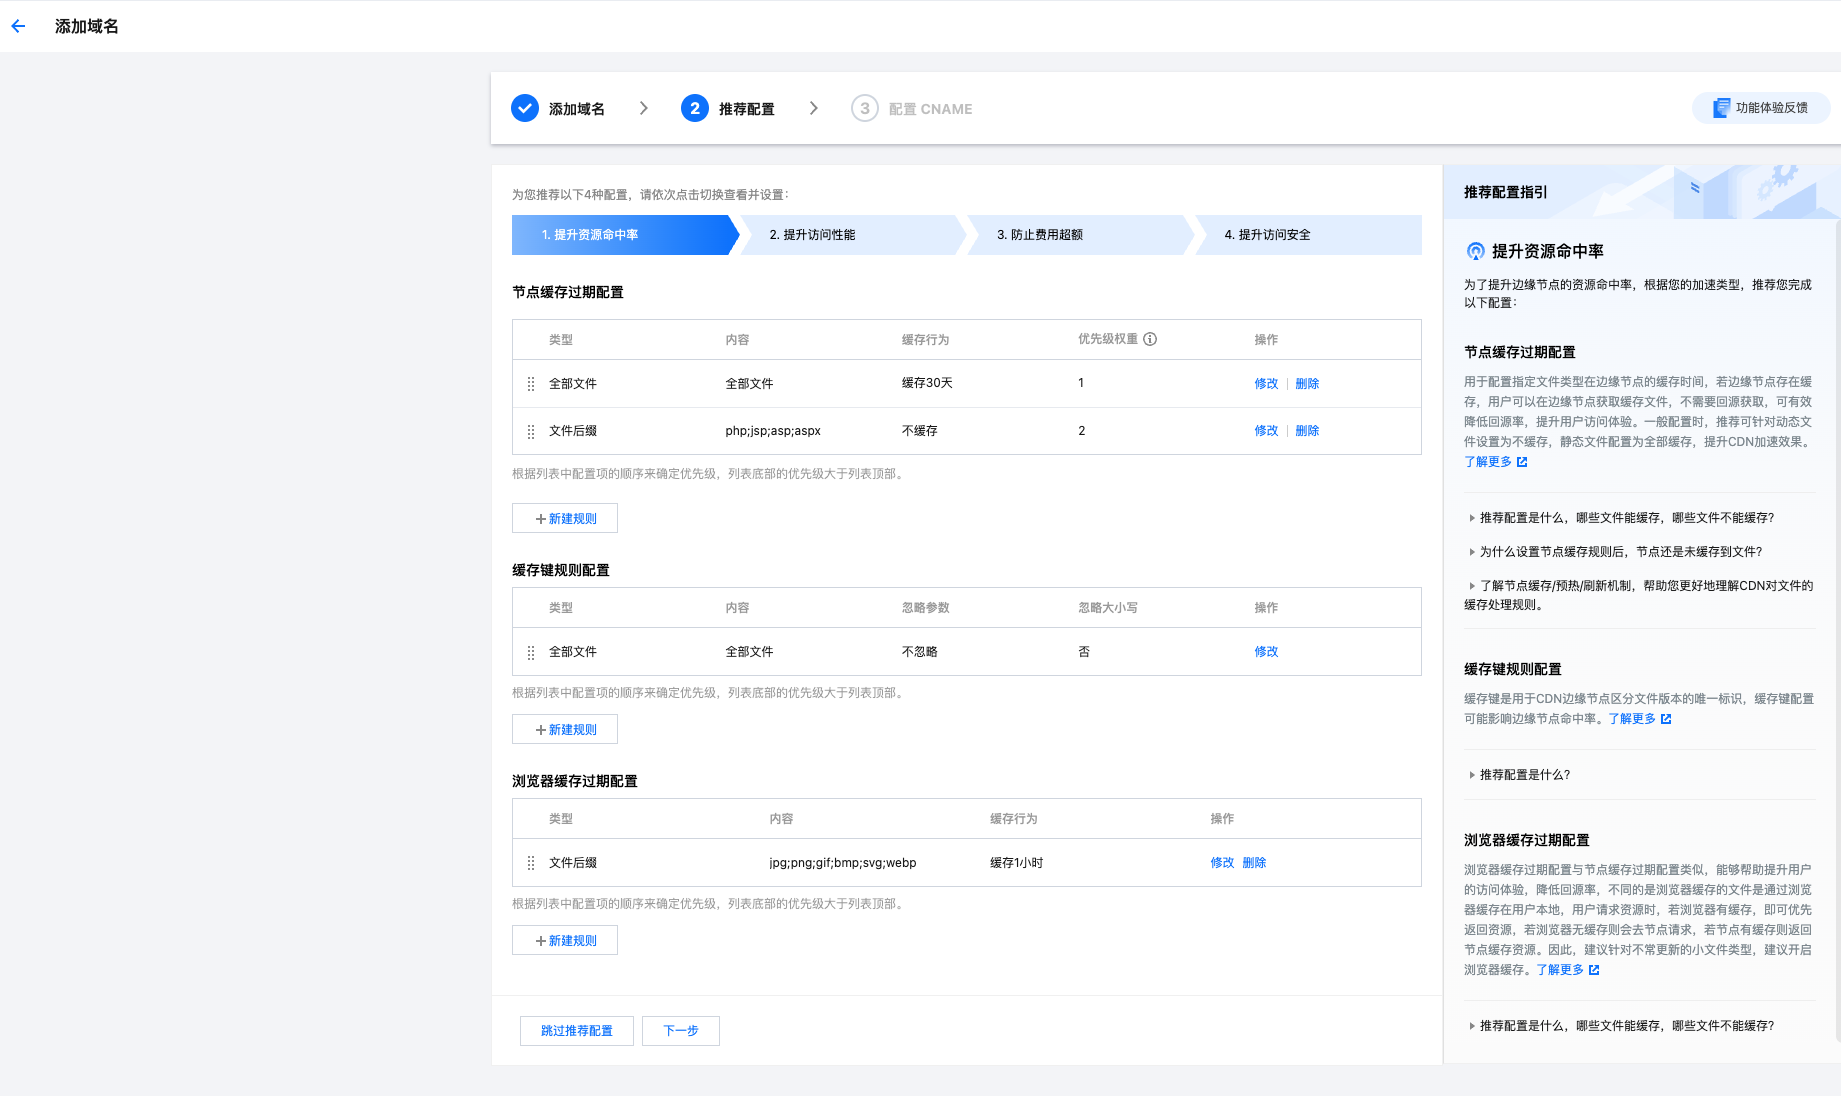
CDN Type Selection
When creating a custom domain, you can choose from the following three CDN types:
- No CDN: Suitable for cloud run or cloud function services that don't require CDN
- CloudBase CDN: Suitable for static hosting or custom applications, the system will automatically configure CDN acceleration service for you
- Custom CDN: When CloudBase CDN cannot meet your needs, you can use Custom CDN to accelerate your services
This CDN is used for HTTP associated resource calls. If you want to add CDN for cloud storage, please refer to Cloud Storage Custom CDN
CloudBase CDN Configuration Process
Step 1: Add Custom Domain in CloudBase Console
Add custom domain in CloudBase Console/HTTP Access Service and select CloudBase CDN
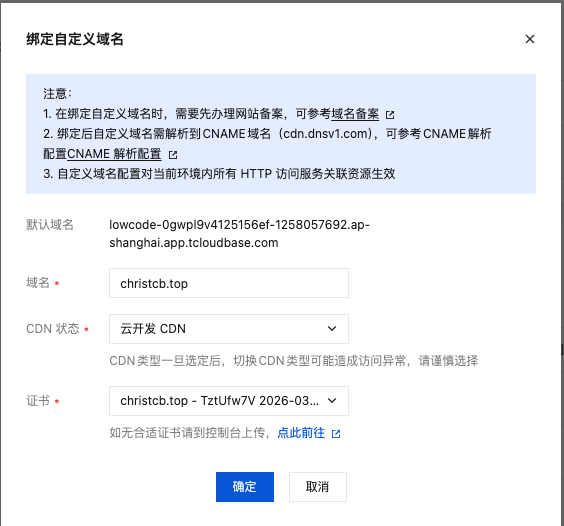
Step 2: Wait for Domain Association to Complete
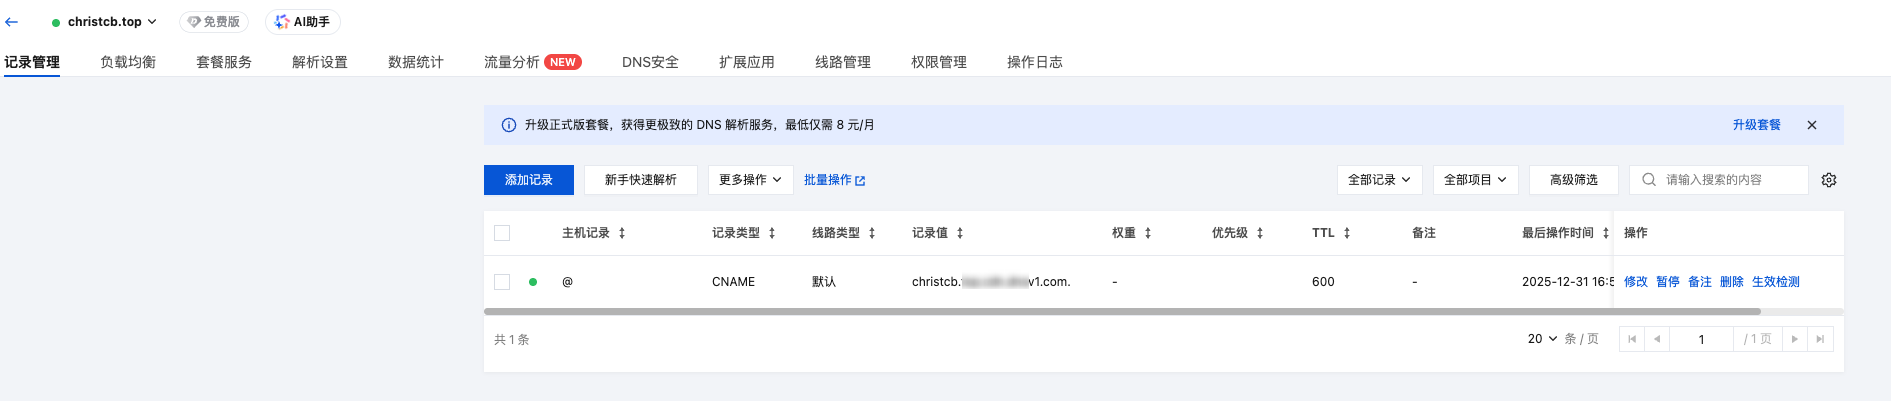
After adding custom domain in CloudBase console, you need to wait for domain association to complete. It usually takes 3-5 minutes. After successful domain association, copy the CNAME value.

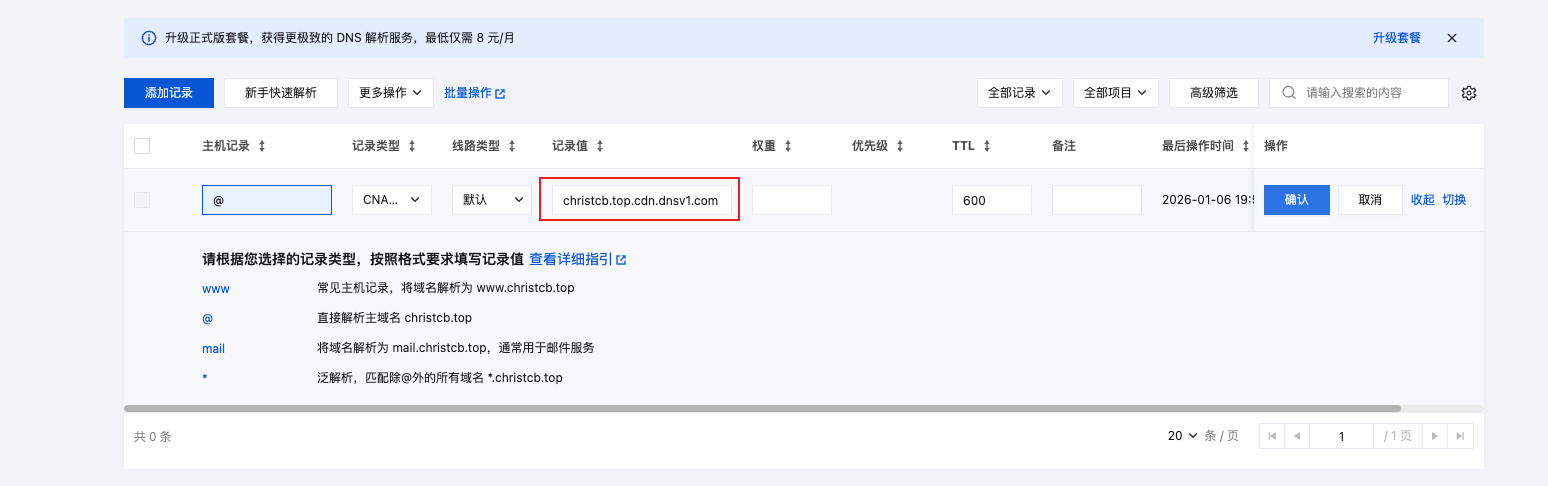
Step 3: Go to DNS Console and Add CNAME Resolution
Using the CNAME value copied in step 2, go to your domain DNS service provider to add CNAME record. Request will be routed to CDN only after adding CNAME record and the domain will take effect. Go to DNS Console to add domain resolution record.
Step 4: Complete CloudBase CDN Access
Return to CloudBase console and check custom domain access status

If custom domain access status is not updated, you can refresh the page and check again.
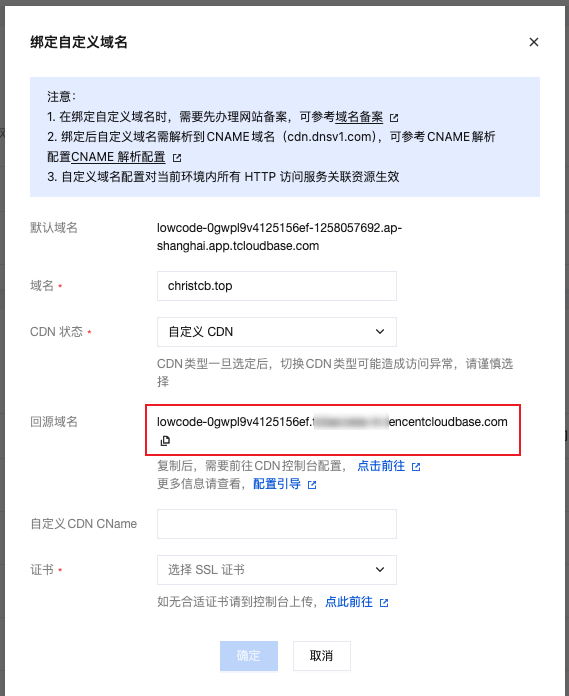
Custom CDN Configuration Process
CDN Access
Step 1: Add Custom Domain in CloudBase Console
Add custom domain in CloudBase Console/HTTP Access Service, select Custom CDN, and copy the origin domain
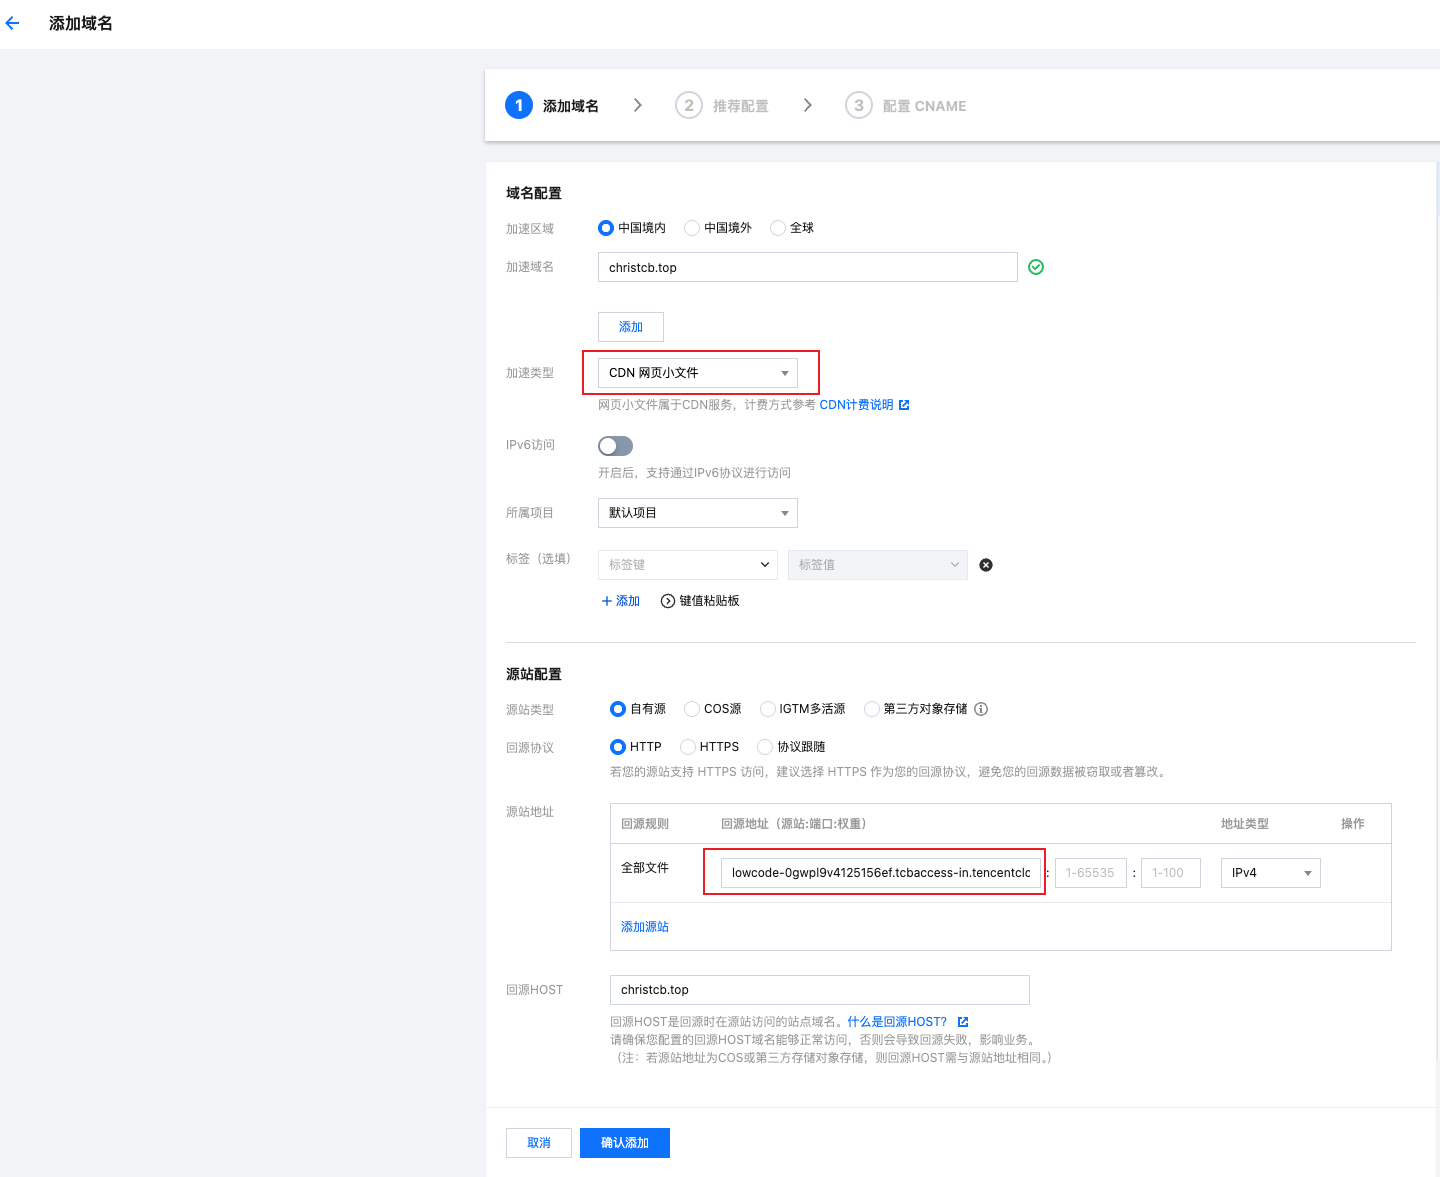
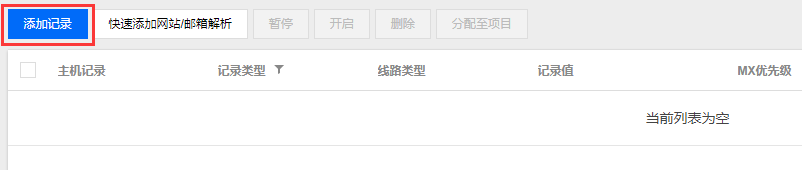
Step 2: Add CDN Domain
Go to CDN Console and click "Add Domain".

Step 3: CDN Domain Configuration
1. Configure Origin Domain: Add domain configuration, paste the origin domain copied in step 1 into the origin domain address.
Please independently select acceleration region and acceleration type based on business type.
2. Fill in Recommended Configuration: Improve acceleration performance.
If no additional configuration is needed, this step can be skipped.
3. Add CNAME Resolution: Copy the CNAME value in CDN console, go to DNS console to add CNAME type resolution.
DNS resolution needs to be added in the corresponding domain service provider console as CNAME resolution record.
4. Complete Configuration: Complete custom CDN configuration

Step 4: Verify CDN Domain Access
After adding CNAME record, it usually takes 5-30 minutes for DNS resolution to take effect. Return to CloudBase console to check custom CDN access status. You can check whether domain resolution has taken effect using the following command:
nslookup Your Custom Domain
If the result shows the CNAME domain provided by CloudBase, then the resolution has taken effect.
WAF Access
The WAF (Web Application Firewall) access flow is similar to custom CDN access. The key difference is: after configuring the origin server in the WAF console, you need to fill the WAF-assigned CNAME back to the CloudBase console, and then add a CNAME record at your DNS service provider.
Step 1: Add Custom Domain in CloudBase Console
Add custom domain in HTTP access service, select Custom CDN, and copy the origin domain.
Step 2: Add WAF Domain
Go to the Web Application Firewall console and click "Add Domain" in the "Access Management" section.

Step 3: Configure WAF Origin Server
Click "Edit" in the newly added domain row, set the "Origin Address" type to "Domain", and paste the CloudBase origin domain copied in Step 1 into the origin address field.
Origin domain example: xxxxxx-1234567890.ap-shanghai.service.tcloudbase.com, please refer to the value shown in the console.

Step 4: Get WAF CNAME and Fill Back to CloudBase
- In the WAF domain list, copy the CNAME value from the "CNAME" column.

- Return to HTTP access service, paste the WAF-assigned CNAME value into the "CNAME" field of the corresponding domain and save.

Step 5: Add CNAME Resolution in DNS Console
Point your domain's CNAME to the WAF-assigned CNAME value. Go to DNS Console to add a CNAME record.
DNS resolution needs to be added in your domain's actual DNS service provider console as a CNAME record. For Tencent Cloud DNS, refer to the "Tencent Cloud DNS Setup Method" section at the end of this document.
Step 6: Verify WAF Domain Access
After adding the CNAME record, it usually takes 5-30 minutes for DNS resolution to take effect. Return to the CloudBase console to check the WAF domain access status. You can check whether domain resolution has taken effect using the following command:
nslookup Your Custom Domain
If the result shows the WAF-assigned CNAME domain, then the resolution has taken effect.
Domain Ownership Verification
To confirm that you actually own the domain, you can choose any of the following methods for domain ownership verification:
Method 1: Configure Domain CNAME Resolution Record
Set your domain's CNAME to the domain provided in CloudBase console.
For example, if your domain is foo.com, you can set the domain's CNAME record to foo.com.cdn.dnsv1.com.
Method 2: Configure Domain TXT Resolution Record
Set your domain's TXT resolution record to the CloudBase environment ID it belongs to.
For example, if your domain is foo.com and environment ID is bar-12345, you can set the TXT record of foo.com to bar-12345.
Method 3: Configure Specific Subdomain TXT Resolution Record
Set the TXT resolution record of your domain's specific subdomain _cloudbase-challenge to the CloudBase environment ID it belongs to.
For example, if your domain is foo.com and environment ID is bar-12345, you can set the TXT record of _cloudbase-challenge.foo.com to bar-12345.
Tencent Cloud DNS Setup Method
If your DNS service provider is Tencent Cloud, you can add CNAME records following these steps:
1. Enter Domain ResolutionLog in to Domain Service Console, find the target domain in the domain list, and click "Resolution" in the operation column.
 2. Add Resolution Record
On the resolution page, click "Add Record".
 3. Configure Resolution Record
Configure resolution record parameters:
- Host Record: Fill in domain prefix (e.g.:
@) - Record Type: Select
CNAME - Record Value: Fill in CNAME value
- Click "Save" to complete configuration
There are priority differences between different record types for domain resolution. When the host record is the same, different record types on the same line cannot coexist, otherwise conflicts will be prompted. CNAME records conflict with any record type except CNAME records, and other records need to be deleted before configuration. For details, please refer to Why does it prompt "record conflict" when adding resolution records.
Usage Restrictions
- Each CloudBase environment can bind up to 5 custom domains
- Custom domains must have completed ICP filing
- Domain resolution takes time to take effect, please be patient