Visual Development (WeDa) Advanced Guide
Introduction
This article will explain the advanced content of visual development (WeDa) in the cloud development platform, aimed at helping you more comprehensively master its core capabilities. If you are not yet familiar with visual development (WeDa), it is recommended to first read the Quick Start to solidify the foundation.
Additionally, you should also be familiar with the following fundamentals:
- Basic JavaScript Concepts: including data types, ES6 syntax, etc.
If you are not familiar with ES6 syntax, you can leverage AI tools to assist with script writing.
Application Development Mindset Guide
Application Development Architecture Guide
Example: Restaurant Operation
We can use the operation of a restaurant as an analogy for application development architecture to facilitate understanding:
The restaurant operation process consists of the following three steps:
-
Dining table (used for placing food)
-
Chef (used for processing food)
-
Kitchen ingredient inventory (used for storing raw materials)
These components are connected by waiters, who deliver the processed food to the dining tables.
By dividing these three components, we can clearly understand the relationships between them.
- Customers need to place orders through waiters at the table to have the chef prepare food, and then receive the food through waiters.
As shown below:

Application Development Architecture
Next, we apply the restaurant analogy to the application development architecture:
| Analogy | Module | WeDa Corresponding Function |
|---|---|---|
| Dining Table | View Layer | The webpage layout you see |
| Chef | Invocation Layer | $w, APIs, cloud functions |
| Ingredient Inventory | Data Layer | Database |

Summary:
- View Layer is the interface with which users directly interact (e.g., the dining table)
- Data Layer is the repository for storing information (e.g., ingredients in the kitchen)
- Invocation Layer is the intelligent processor connecting the two, like a chef processing ingredients and returning them to the user
Application Development Process Guide
How do you put an elephant into a refrigerator?
This is a classic analogy used to explain how complex tasks are completed step by step. The same applies to application development, where we need to break down the task into several simple steps:
First, you need to have an elephant and a refrigerator. Next, you need to:
- Open the refrigerator door
- Put the elephant in
- Close the refrigerator door
In this example, we first clarify the step-by-step logic before considering the specific implementation of each step. The same applies to application development: first define the requirements, then implement them progressively.
How to display the blog list from the database on the page?
We recommend designing the Data Layer first, then the View Layer, and finally the Invocation Layer to retrieve data or process data further.
Therefore, we can proceed with the following steps:
-
Design the blog data model (design the data layer)
-
Add a new data list in the page (design the view layer)
-
Retrieve data via methods such as query (design the invocation layer)
WeDa Architecture
WeDa has added the query data query and direct configuration of data sources via data container components methods in the traditional development route, enabling the view layer to quickly retrieve data.
Next, we will integrate the general development architecture into the WeDa architecture.

-
We can directly invoke the data of the data model via model configuration in the
visualization pagefor display -
You can create a
querydata query in thevisualization pageand display the queried data -
If the requirements are complex and not simple CRUD operations, you can call the
Invocation Layerin thevisualization page, use theInvocation Layerto call theData Layer, perform secondary processing on the returned data, and then return it to thevisualization page.
The difference between frontend invocation and backend invocation
-
$w is a frontend API with built-in methods and system variables that can directly manipulate data models.
-
APIs and cloud functions are services running on the backend, which can manipulate data models through coding and also integrate with external API data.
Complete Architecture
Next, let's look at the complete architecture diagram of visual development (WeDa). Through this diagram, you can more clearly understand the architecture of WeDa and the invocation relationships between its modules

The connecting lines between all modules in the diagram indicate the invocation relationships between them.
Page and Data Flow
-
Componentis the smallest atomic unit of page composition. You need to build pages by combining components. -
Data container componentscan configure adata sourcetoautomatically generateform components that match the data source and automatically bind the data. -
If the data operations go beyond simple CRUD on the data model, you can configure
page methodsto callAPIs/cloud functionsviasdkto fetch data, then store it inpage/global variablesfor subsequent use anywhere on the page.
Style
-
You can quickly modify page styles through
component style configuration,theme, etc. -
If the style configuration is insufficient, you can write style sheets using
Component CSSto achieve atomic-level style customization. -
You can also define
Global CSSfor global style customization.
Third-party Integration
- You can integrate with
external system authentication sourcesthrough several methods provided bySSOto achieve functions such as login, registration, and permission verification.
Platform Capabilities
The following introduces some platform capabilities in Visual Development (WeDa).
Data Model
Data Model is the data module in cloud development, which comes with built-in data models and external database integration.
Specific documentation: Data Model
$w
Cloud Development Platform uses $w as the global namespace. All capabilities of the WeDa front-end runtime can be accessed through this namespace.
Therefore, global data can be accessed via $w in expressions and js scripts.
Specific documentation: $w Reference
Global Variables/Methods
Global Variables can be understood as a box placed alongside the page, where you can store variables and methods and use them anywhere on the page. The variables and methods in this box are called global variables and global methods.
Global variables are used to maintain a property value in the global scope, which can be accessed and modified anywhere. For example:
- Define a variable
formTypeto control the state of a form (such as edit, add, read-only) - Configure the click event of
A buttonto changeformTypetoeditwhen clicked. - Configure the click event of
B buttonto changeformTypetoreadwhen clicked.
In this way, different buttons can change the form's properties by controlling the same variable.
This allows different buttons to change the form's properties by controlling the same variable.
Similarly, global methods defined in the global scope can be invoked anywhere.
Expression (single-line js statement)
In application development, the values of many properties are not fixed but change dynamically based on specific conditions or data. These dynamic properties are typically implemented using JS expressions. The following are some common application scenarios:
- Data Transformation and Calculation:
- Performing operations such as accumulation and filtering on data to generate dynamic results
- Example: Calculate the sum of a field, or filter data based on conditions
- Data Query:
- Dynamically retrieve required data from the data model
- Example: Query relevant records based on keywords entered by the user
- Field Dependency:
- The display or hiding of a field depends on the value of another field.
- Example: When the user selects "Married", display the "Spouse Name" field.
In the cloud development platform, all locations supporting expressions are identified by an fx marker or {{ }} placeholder.
Expressions can access global variables, methods, page state information, component information, etc., defined in the current page.
When the expression box is displayed, you can find all variables on the right and click to autofill them.
Expressions are suitable for single-line JS processing scripts. If the data processing scenario is complex, it is recommended to create new JS methods in the page and then call these JS methods from expressions for data processing.
Example: Dynamically Calculate the Total Amount of Goods
Suppose you have a product list and need to dynamically calculate the total amount of all products. This can be easily achieved through expressions:
$w.queryProduct.data.records.reduce((total, item) => total + item.price, 0);
$w.queryProductis a data source query method newly created in the page.- The
reducemethod iterates through each order and accumulates the value of theamountfield intototal. - Then bind this expression to the component for display.
If you are unfamiliar with the reduce method, you can always ask AI for assistance.
Example Questions:
Write a JS expression to accumulate the data in the price field of $w.queryProduct.data.records.
Event System
Event handling is key to implementing interactive features in the Cloud Development Platform. You can configure various events for components (such as click, input, load success, etc.) and execute corresponding logic when events are triggered.
Events provide many shortcut methods, such as invoking data model methods, opening pages, calling component methods, and more.
For specific reference, see the article: Event System
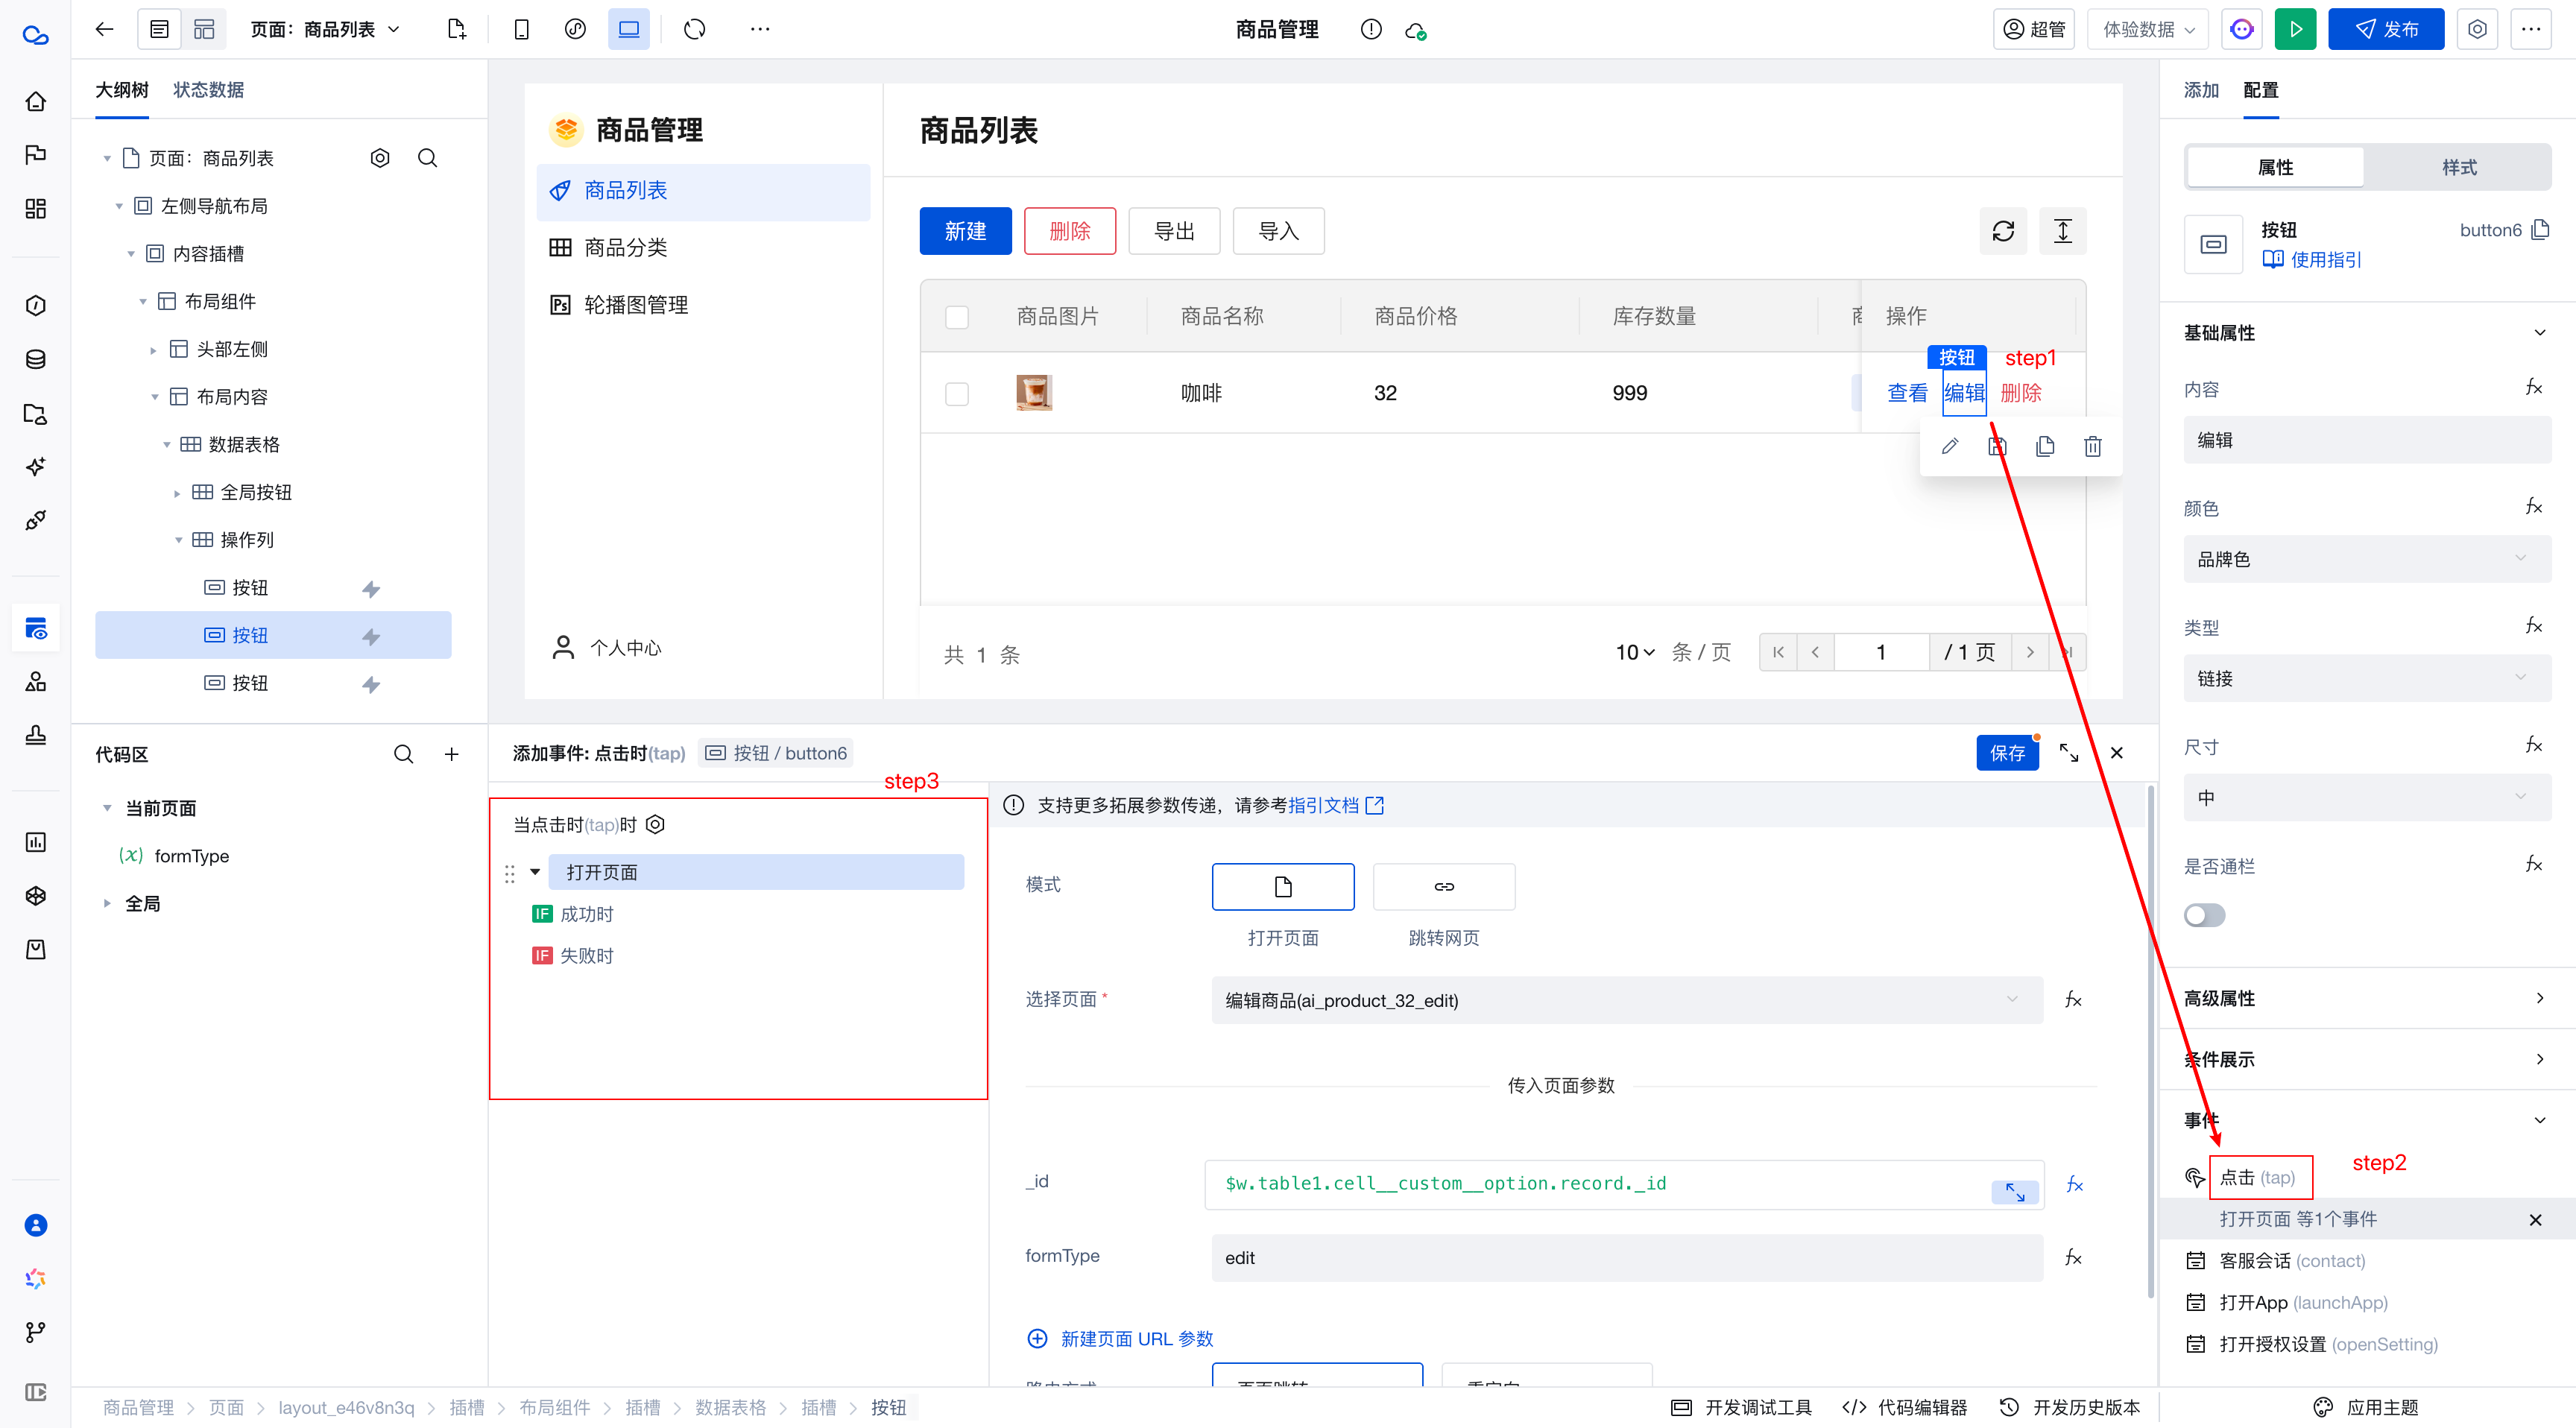
Example
When the edit button is clicked, the edit page opens. The implementation is as follows:
-
Configure a click event for the edit button.
-
Select the open page method and configure the page to open.
Slots
A slot is a placeholder that can hold different content based on different scenarios, making components more flexible.
For example:
Suppose you have a "card" component containing a heading and a description. But you want the middle section of the card to display different content—such as images, buttons, or text—depending on the scenario. In this case, you can define a slot in the card component. When using this card component, you can insert images, buttons, or text into this slot as needed.
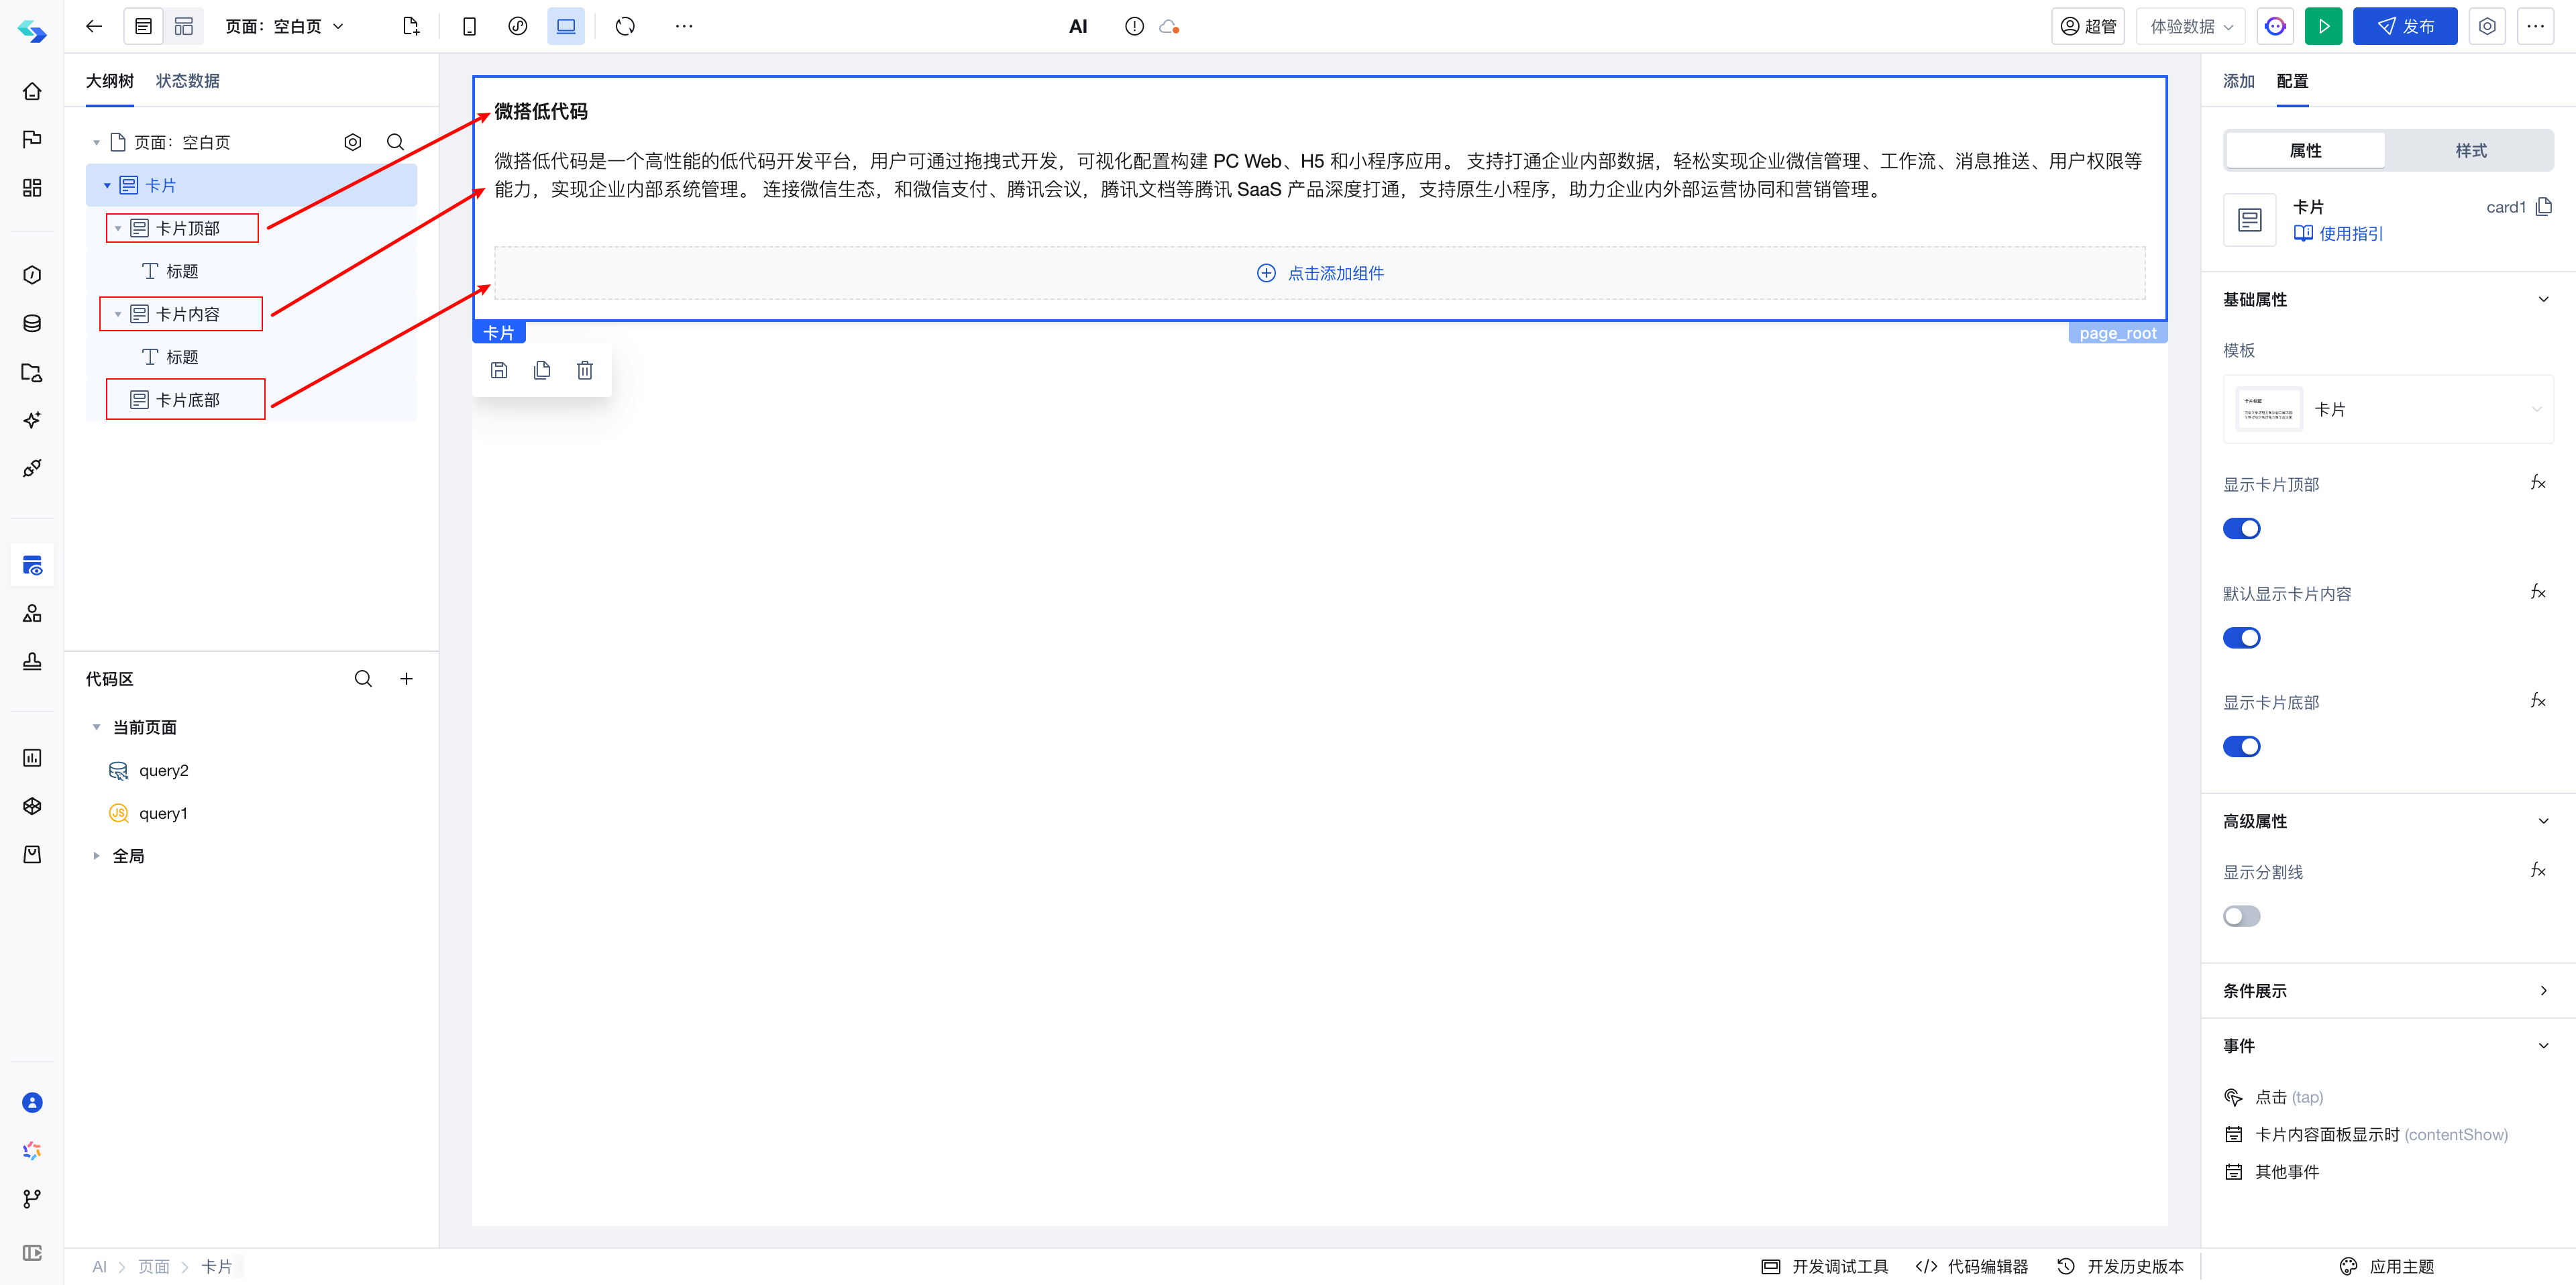
Example 1
The following page contains a card component with three slots: card top, card content, and card bottom.
The card component comes with its own styles, positioning the three slots in different locations. You only need to focus on the content within the slots, where any components can be placed.
Example 2
The data table has global button and operation column slots that allow you to place other components above the list or in the operation column.
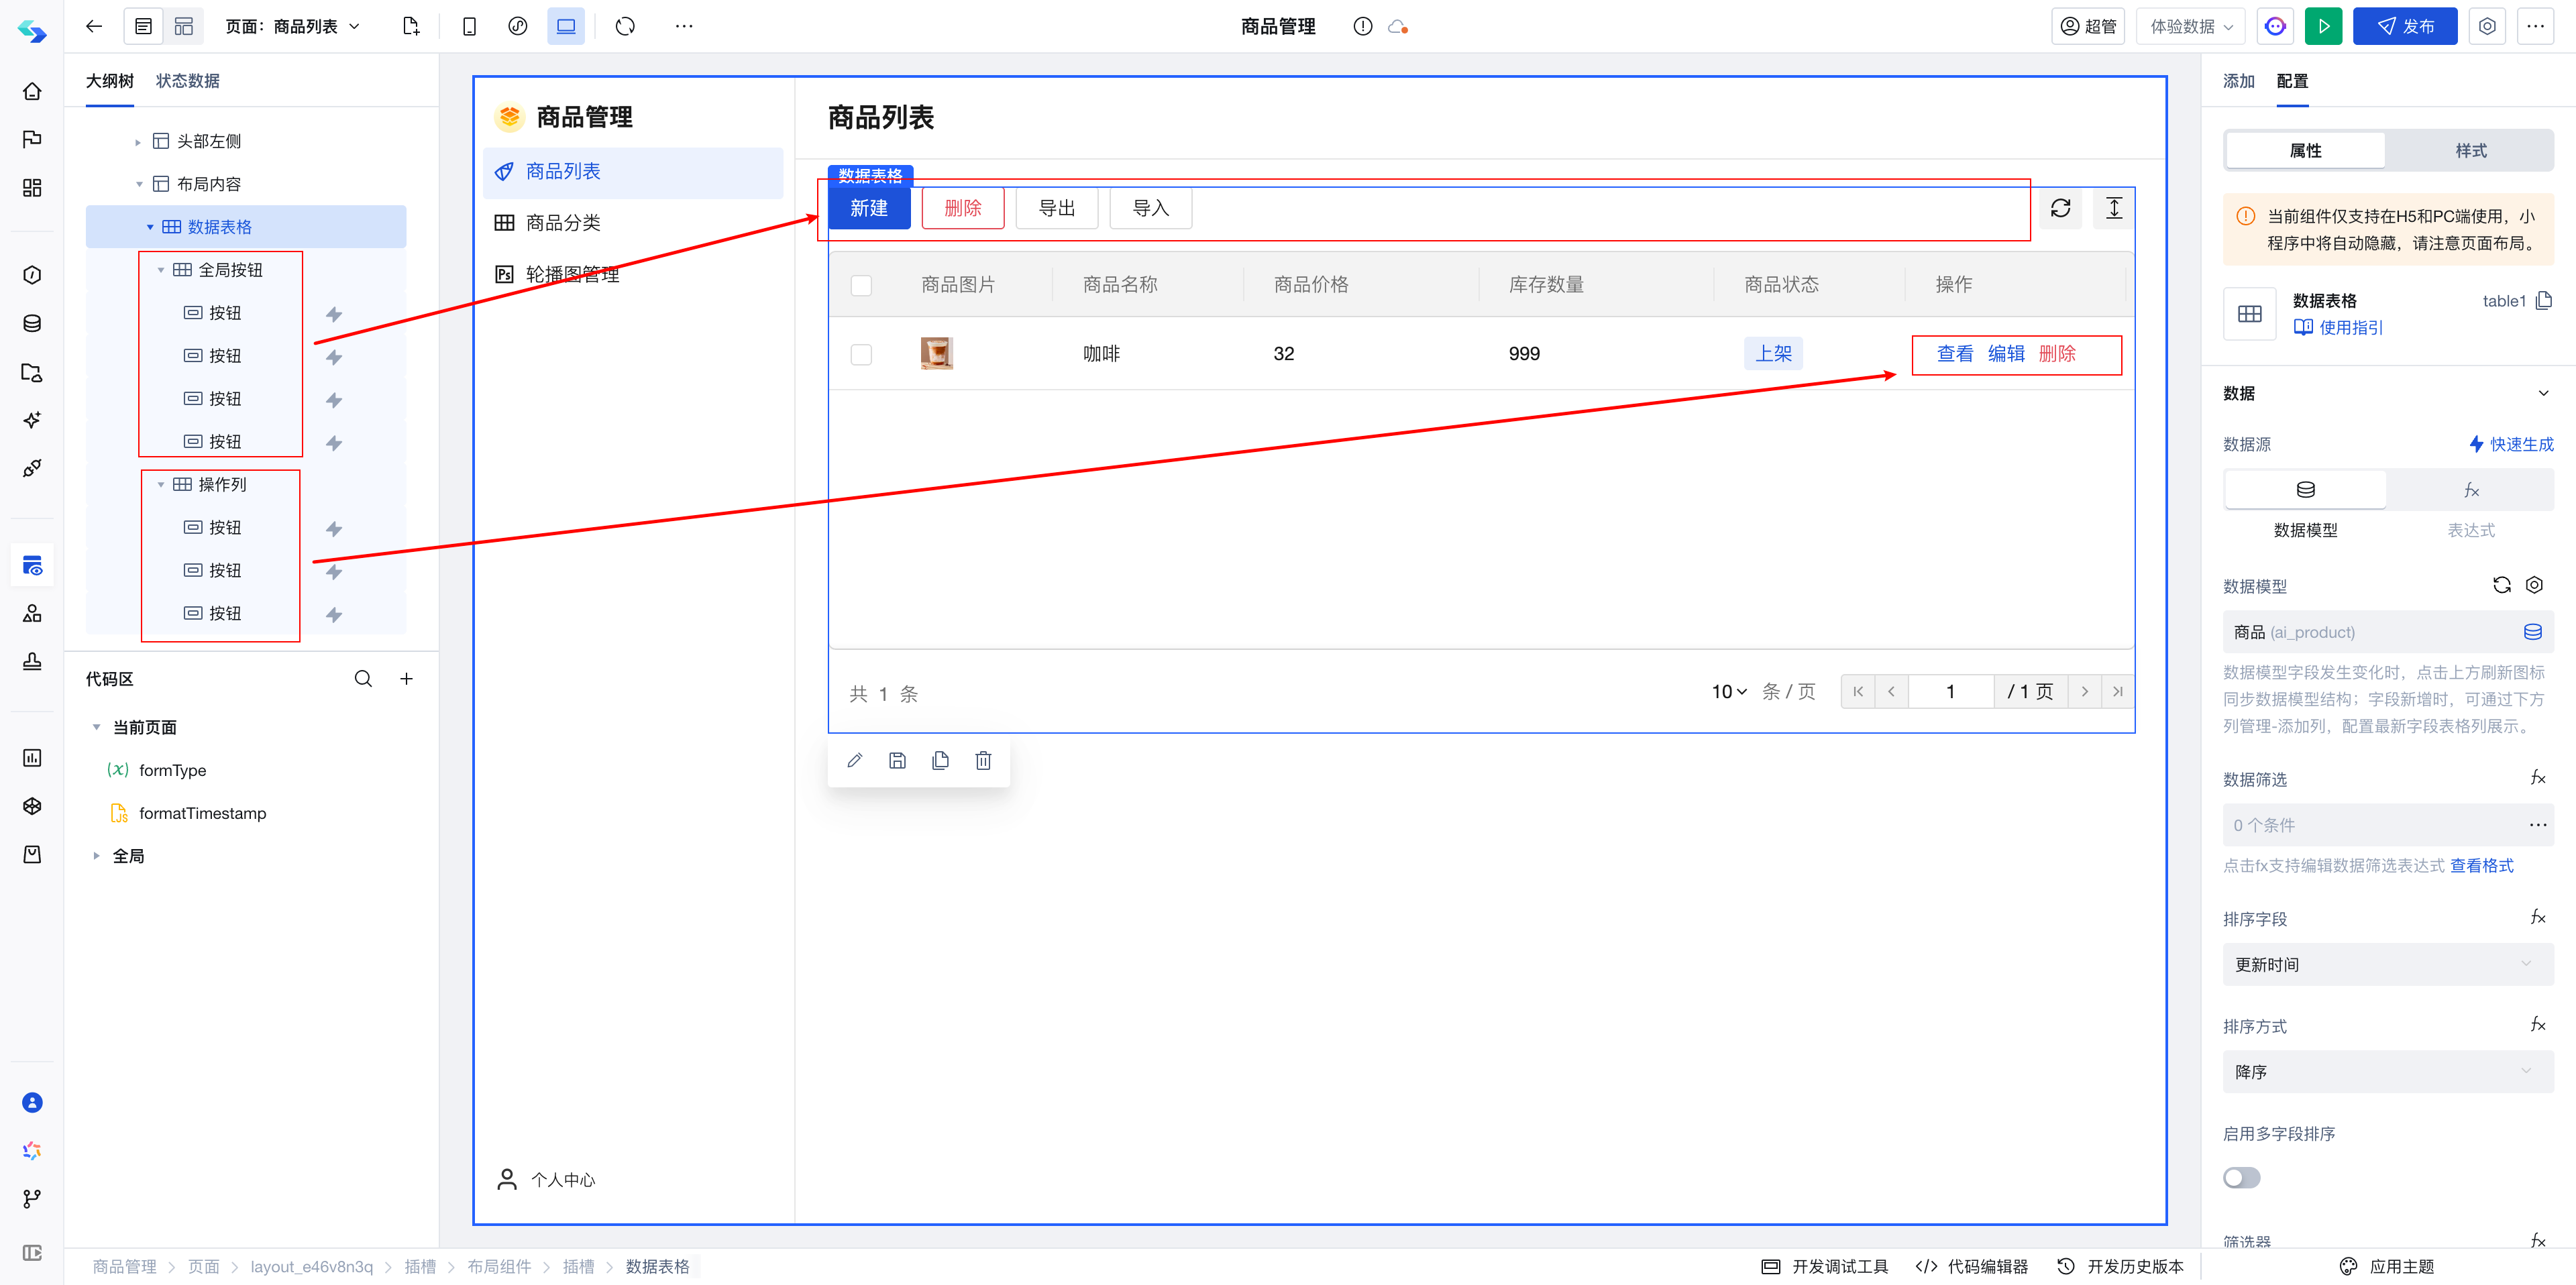
Data tables also support custom column slots, allowing customization of the display format for each column. For details, refer to the Data Table Documentation.
Demo
Now that you have learned about the application development process and the capabilities offered by cloud development, we will next demonstrate our end-to-end development process through a practical case.
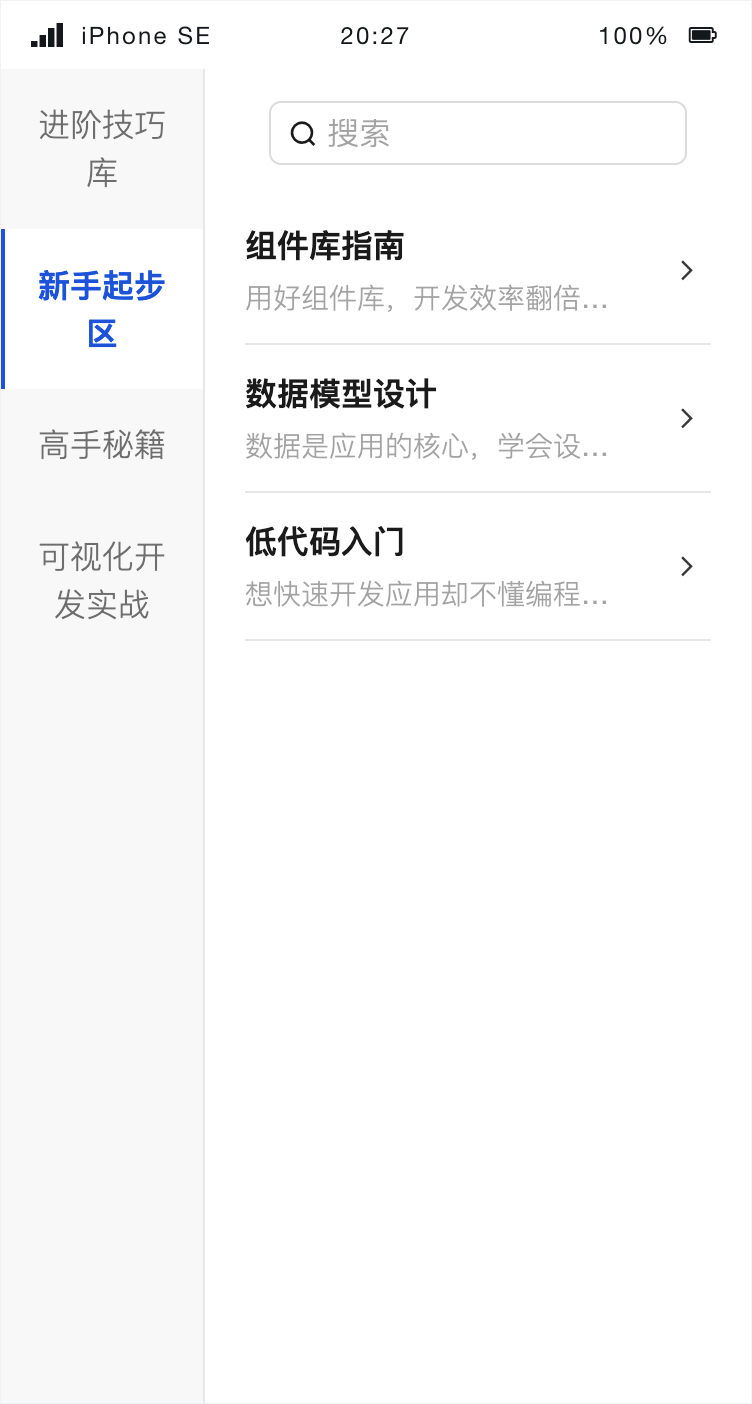
Feature Description: Blog Display List
- The left side displays the category list.
- The right side displays the search box and the blog list under the corresponding category.
- Clicking on a category in the list switches the right side to display the blog list under the corresponding category.
- Filter out the corresponding blogs based on keywords entered by the user.
1. Outline the development process
First, we need to break down our requirements.
1. Organize the Data Layer
Both categories and blog lists are dynamically added, so these two types of data need to be stored in the database.
2. Organize the View Layer
As shown in the figure above, the page uses side tabs, data list, and input components.
- Since the data format of blog categories is inconsistent with that required by
side tabs, data conversion is necessary and can be implemented using expressions. - The data list can directly configure the data source to display data model data.
- When switching categories, to filter the blog list on the right, configure the query condition for the data list as
Category equals the currently selected item in the side tabs Search boxfilters the blog list with the query conditionTitle contains the input content of the search box
3. Organize the Logic Layer
- Since the structure of category data in the database is inconsistent with that required by the side tabs, data conversion is necessary and can be implemented using expressions.
2. Hands-on Steps
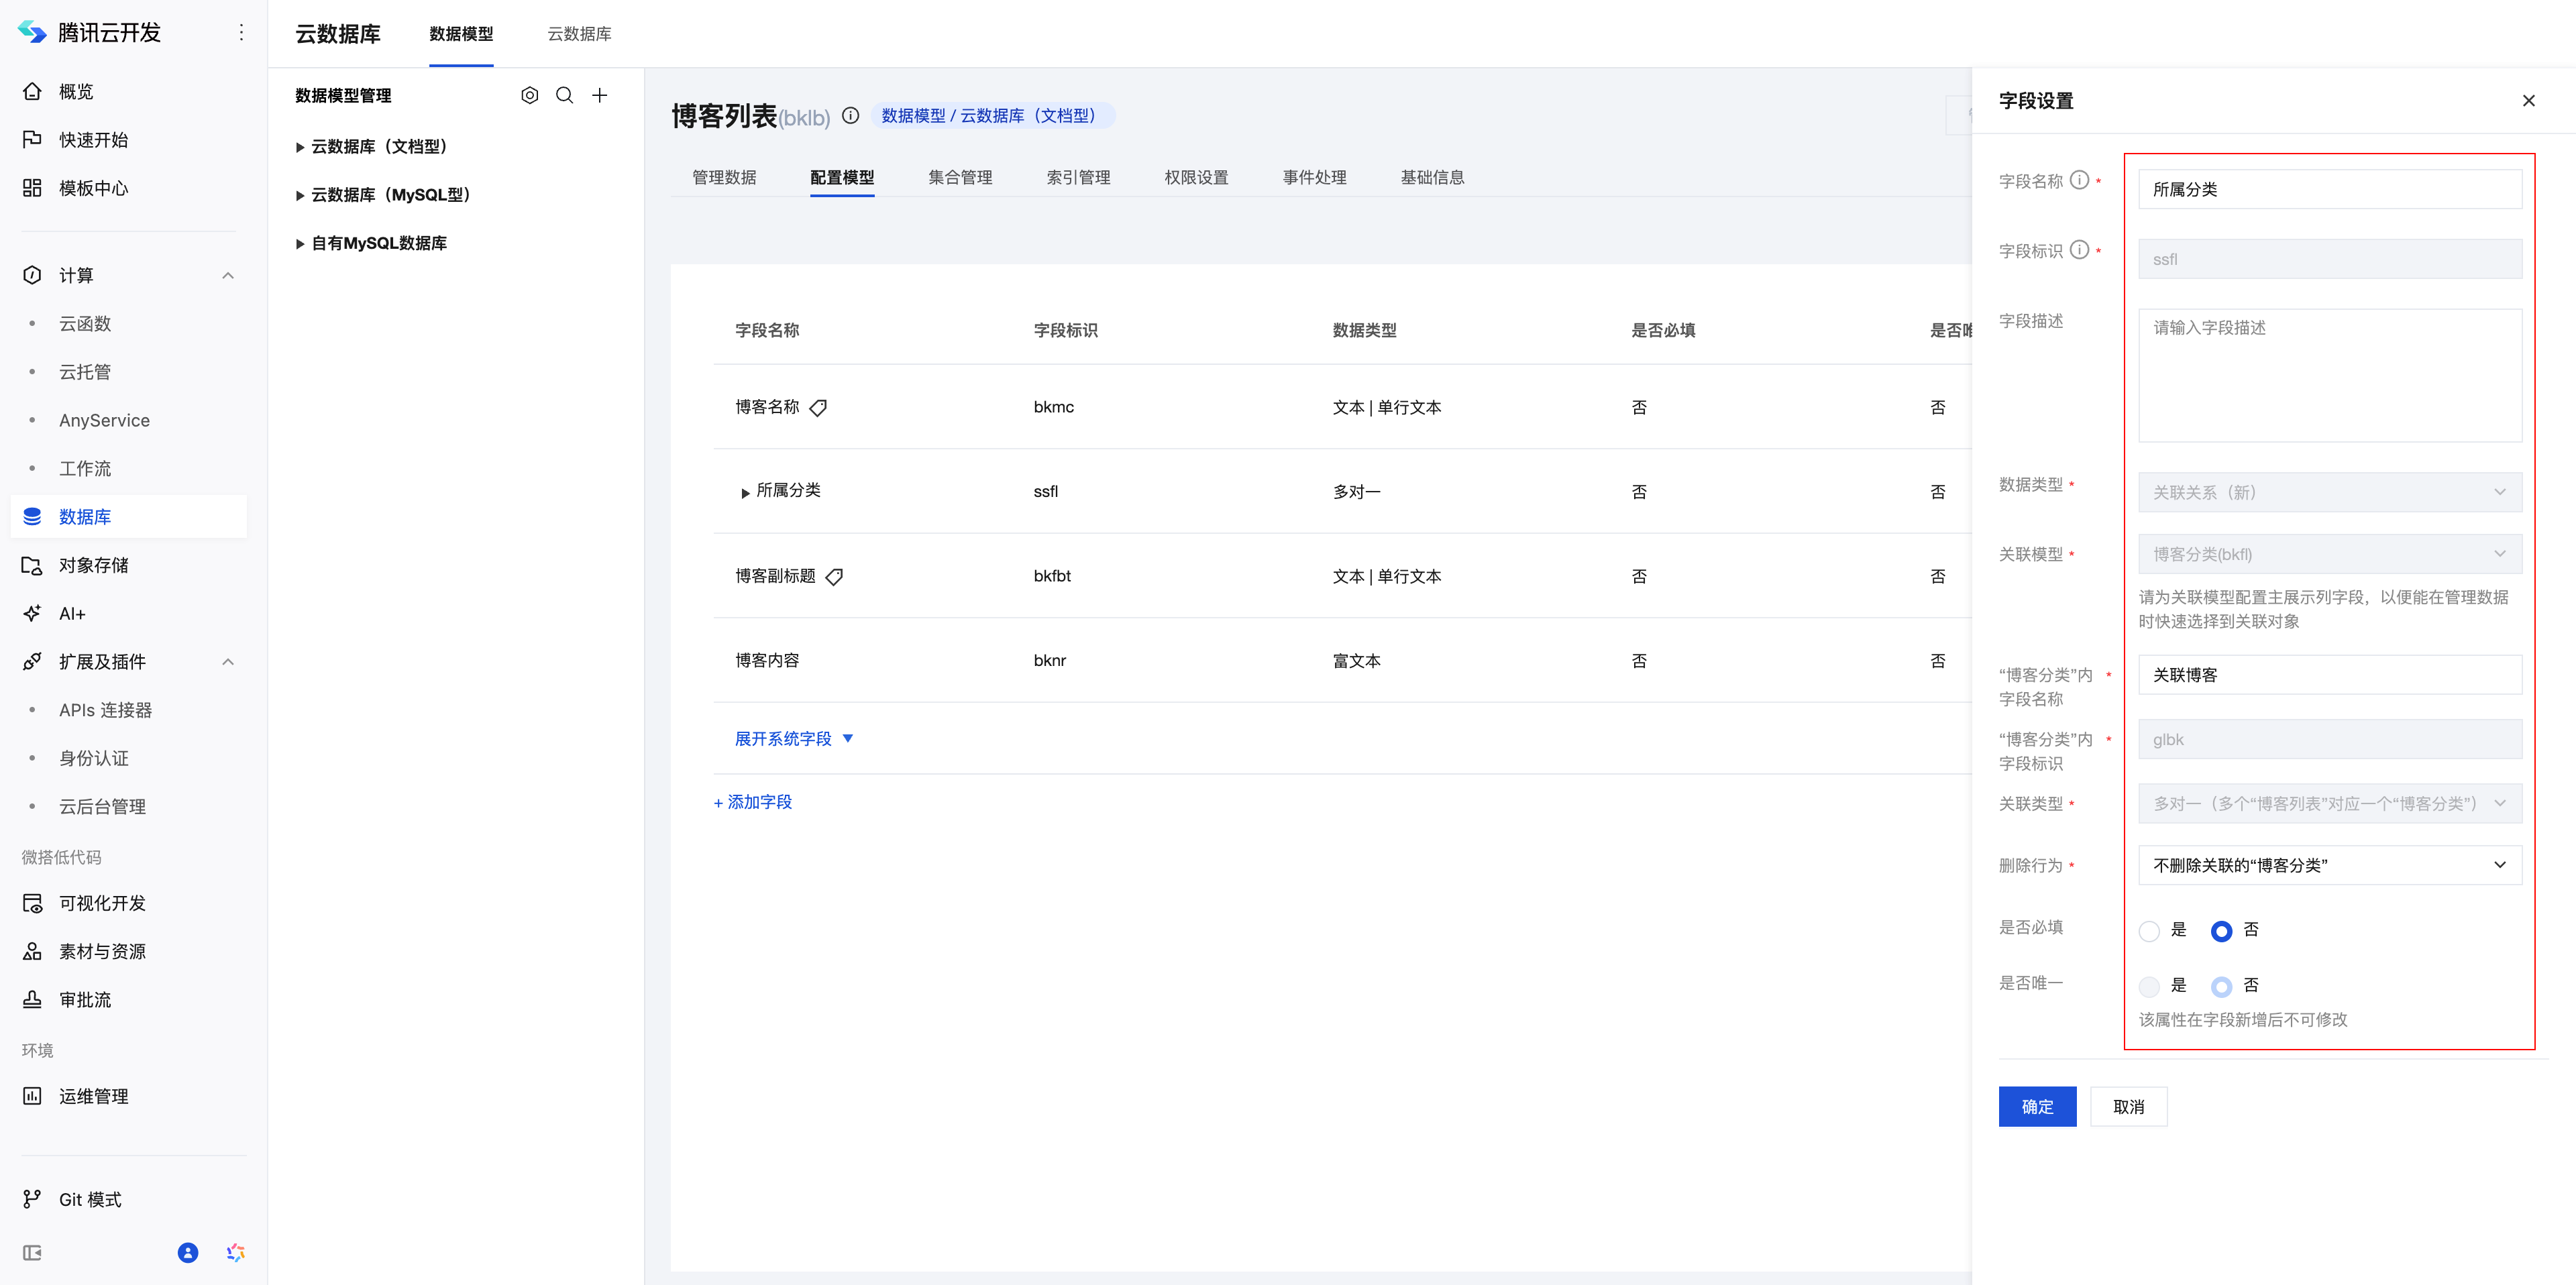
Step 1: Create a data table
We need to create category tables and blog tables.
Here we choose to use associations to link the two tables.
Category Table
| Field Name | Field Type |
|---|---|
| Category Name | Text |
| Related Blog | Relationship |
Blog Table
| Field Name | Field Type |
|---|---|
| Blog Name | Text |
| Blog Subtitle | Text |
| Category | Relationship |
| Blog Content | Rich Text |
When only two tables have a certain relationship, we can use the relationship to associate data. Relevant documentation link: Relationship Documentation
When multiple tables have interrelationships and frequent multi-table joins are required, it is recommended not to use relationships. Instead, store associated data using array/text types and retrieve related data through cloud functions, APIs, or similar methods.
Relationship
- In the Blog Table, create a new field named Category to store association information with the Category Table.
- In the Category Table, create a new field named Related Blogs to store association information with the Blog Table.
- By using these two fields, you can read associated Category Table data from the Blog Table, and vice versa.
Step 2: Configure page
In the Visual Low-Code module, create a new application and edit the page.
Here we add three components to the page, as shown in the figure:
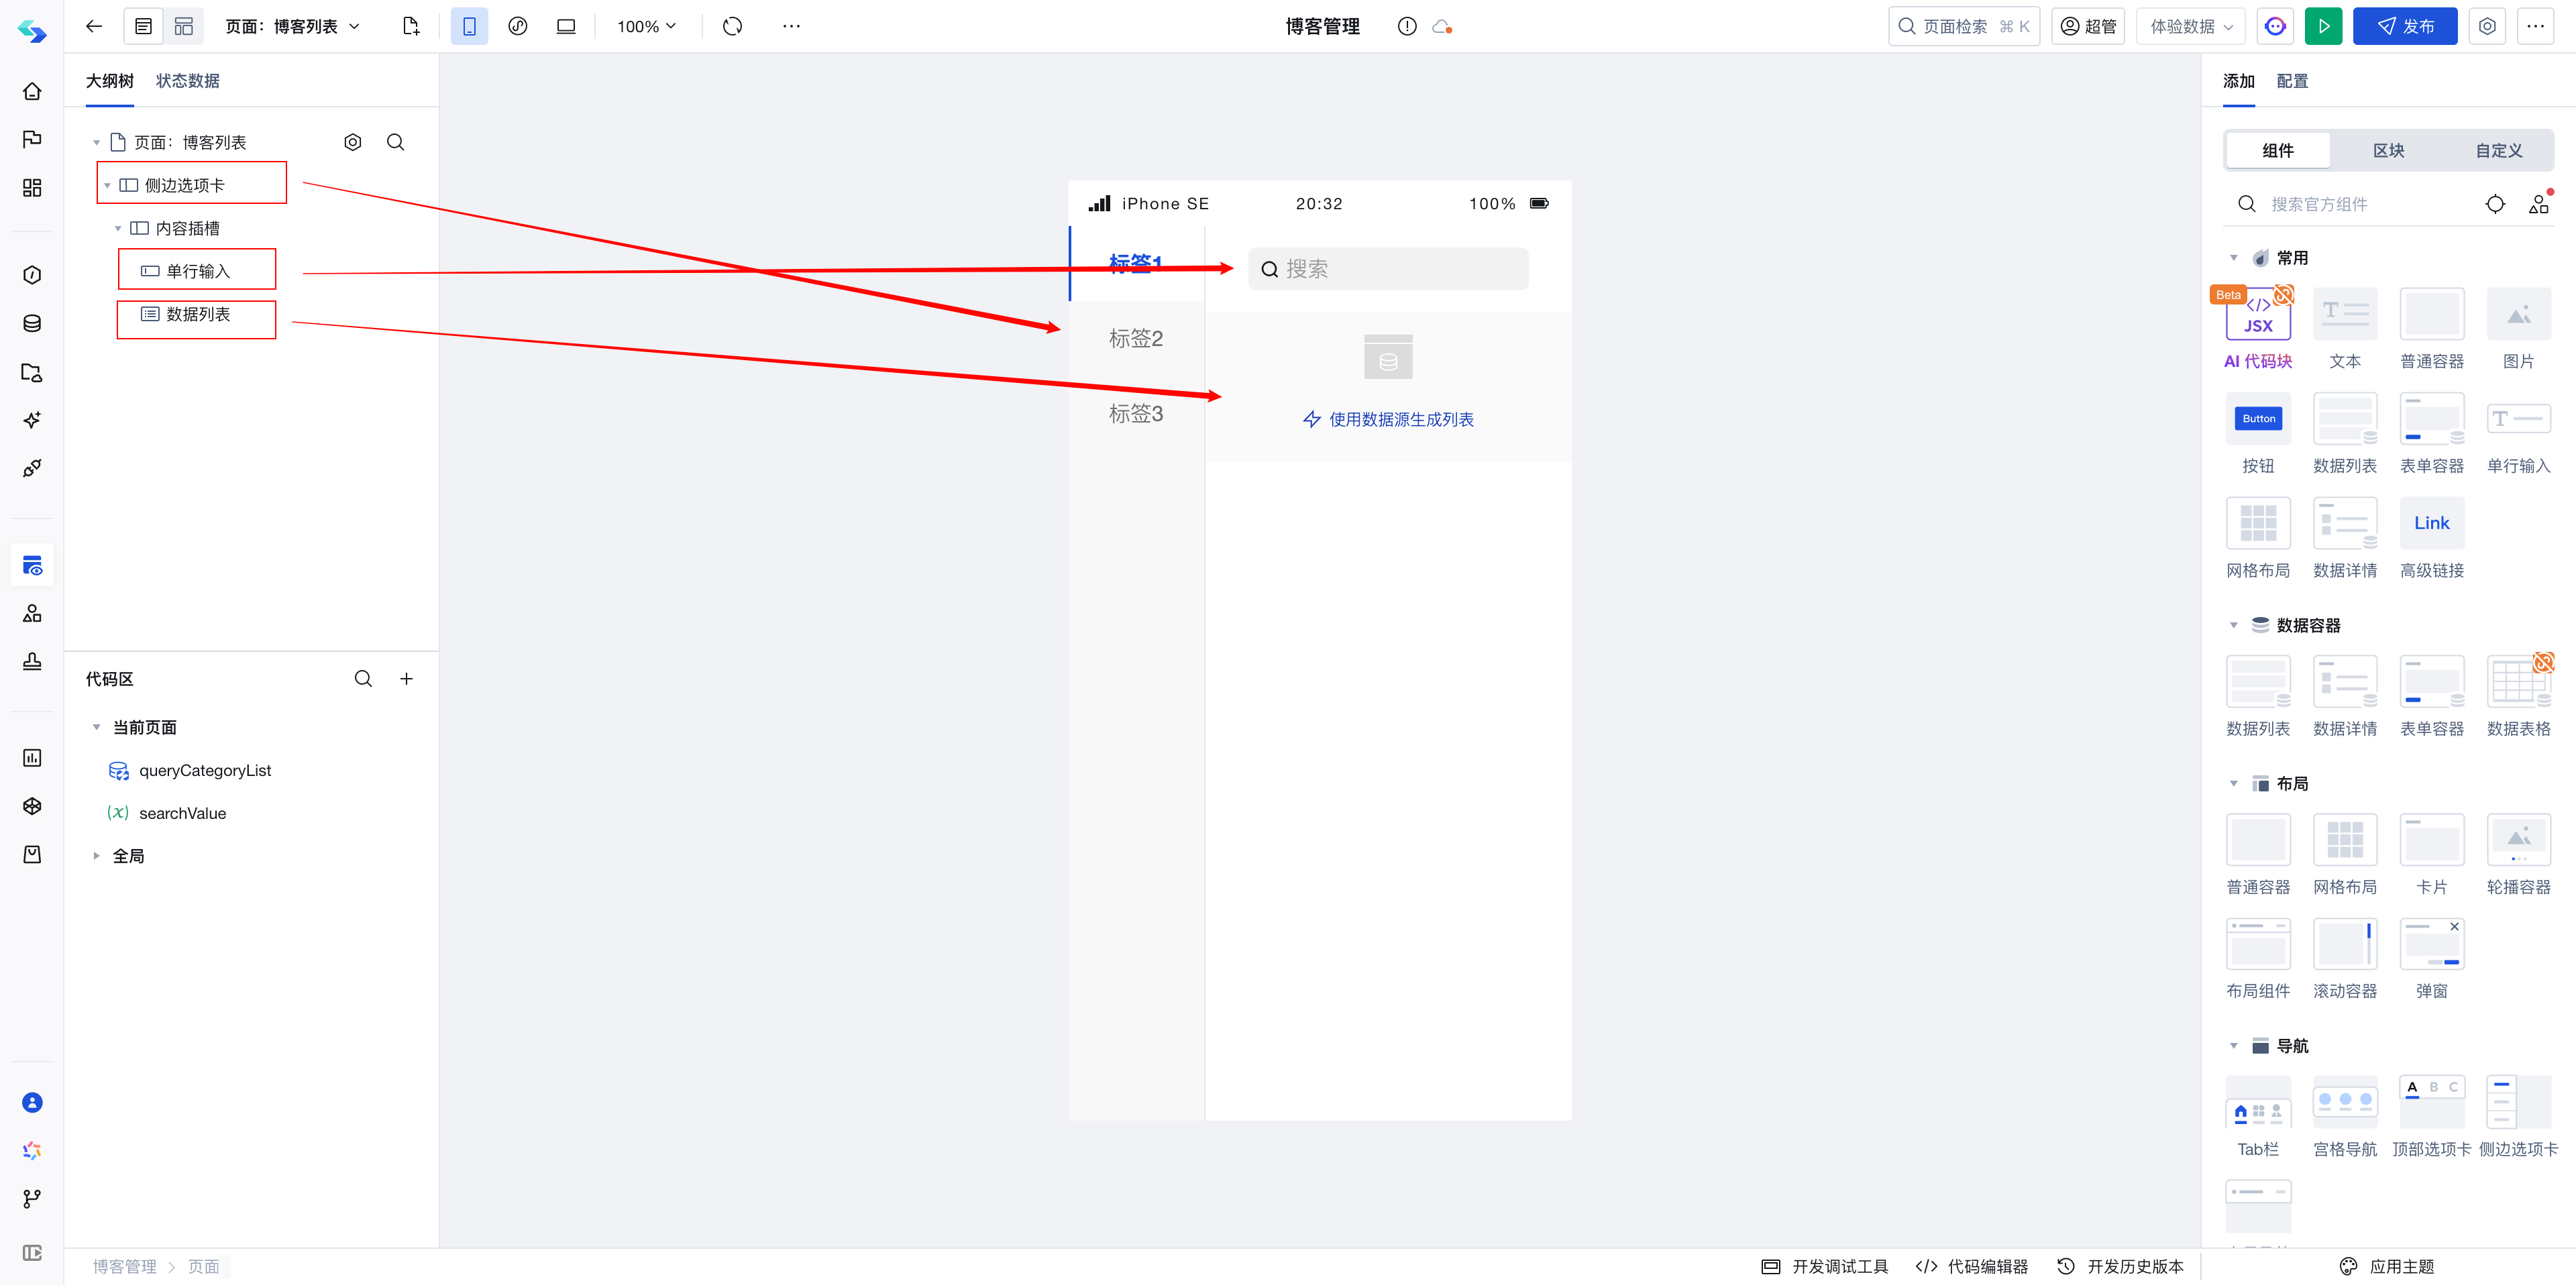
Step 3: Bind blog category data to the side tabs
Since the data format of blog categories is inconsistent with that required by the side tabs, we need to first query the data, then use js expressions to convert it into the format required by the side tabs, and finally bind it to the side tabs. The steps are as follows:
- Create a new
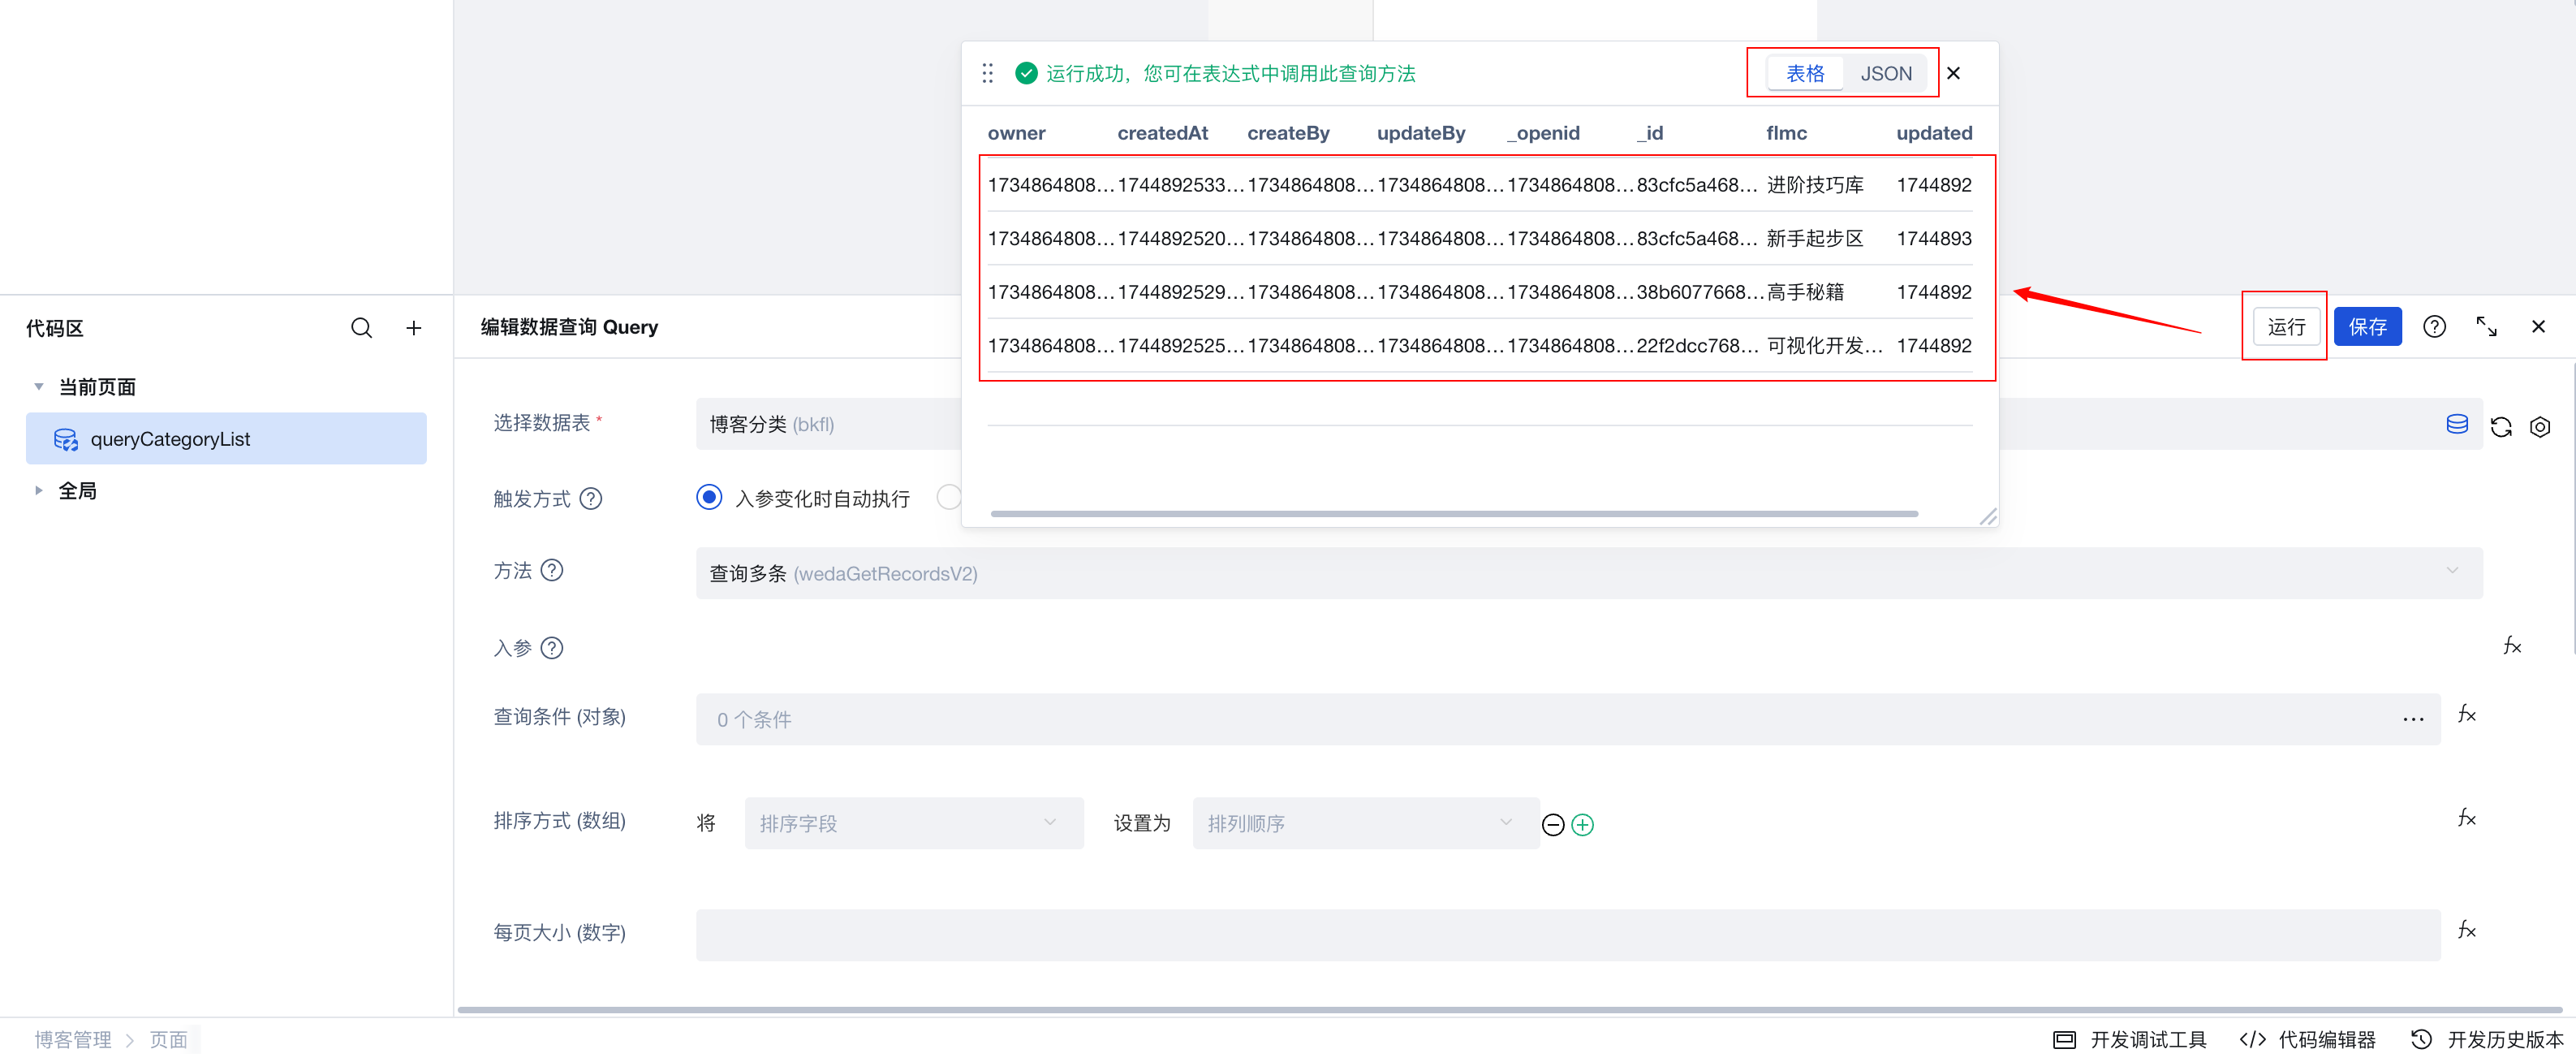
built-in data table queryin the page, namedqueryCategoryList, to query the category list.
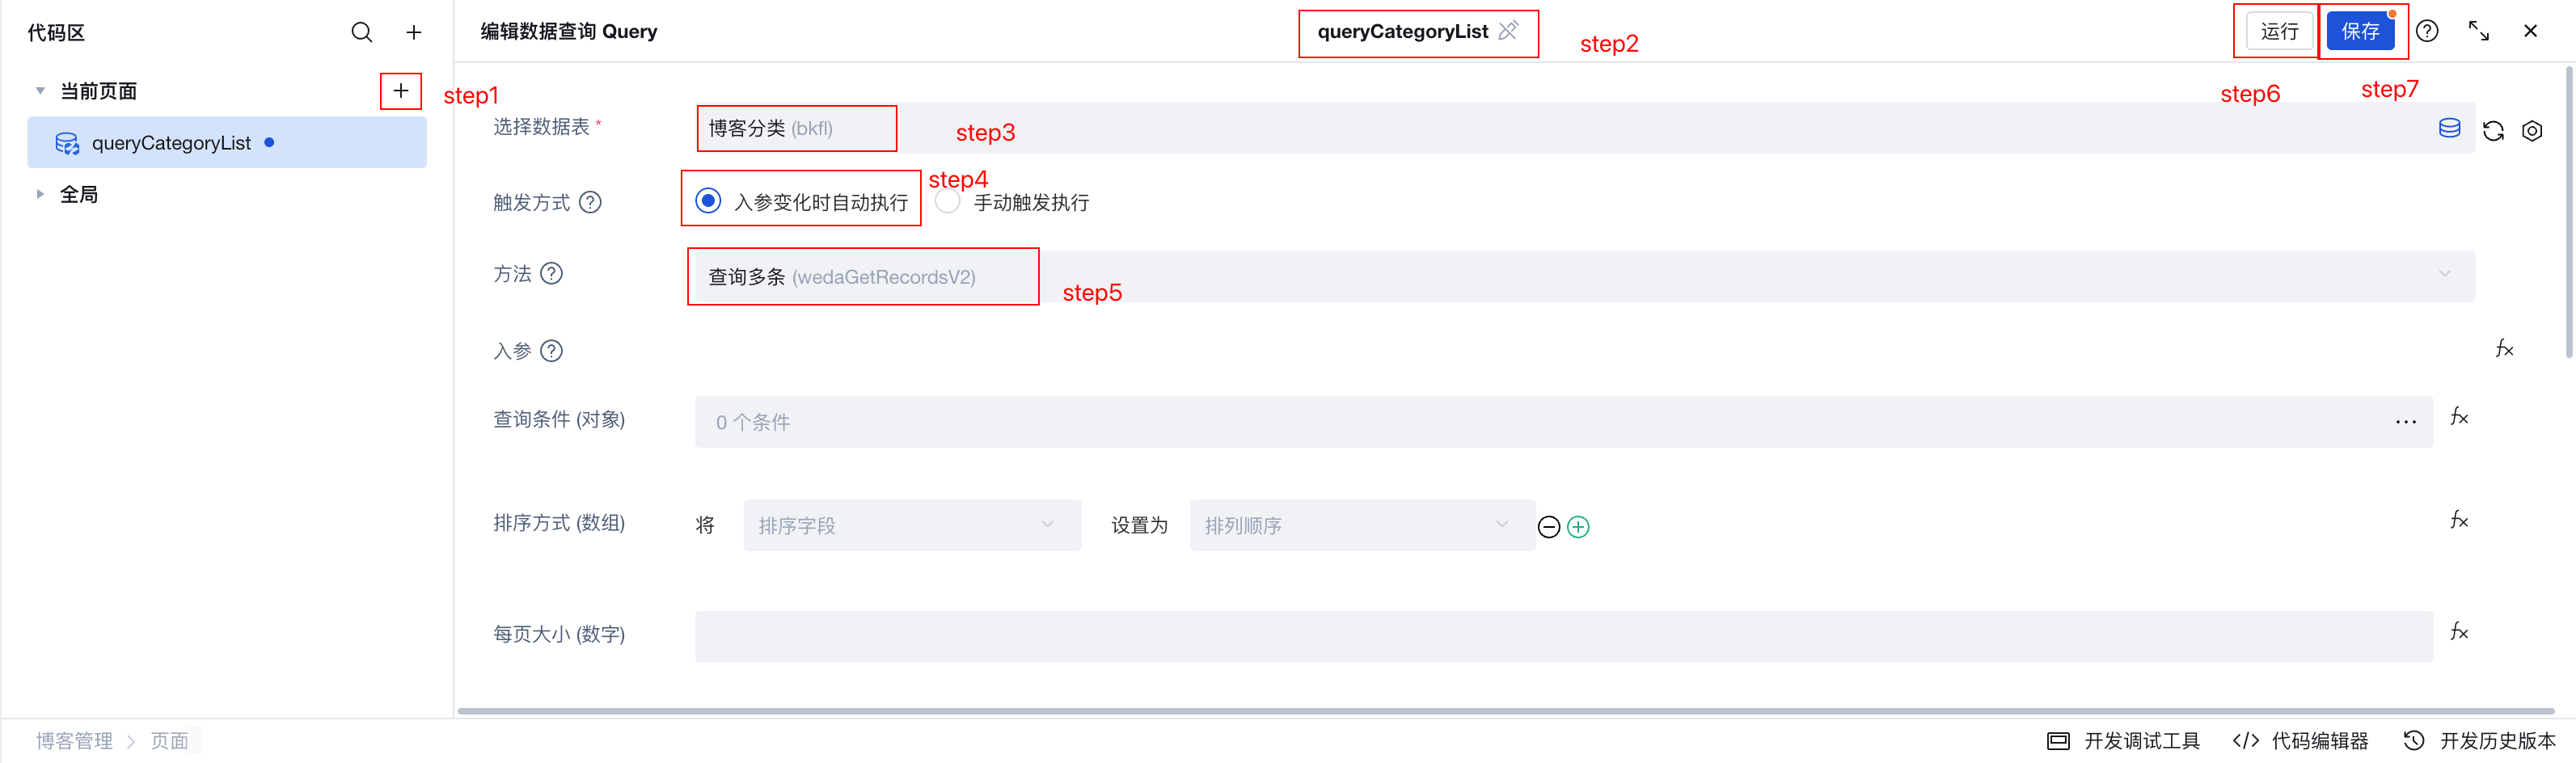
- Click Run to view the query results and ensure the data is displayed correctly.
- Bind the return value of
queryCategoryListto thetabs component.
Switch the tab data to expression mode, ensuring the data structure contains label and value fields.
label: Label display contentvalue: The value corresponding to the label; the value obtained when the label is selected is this value.
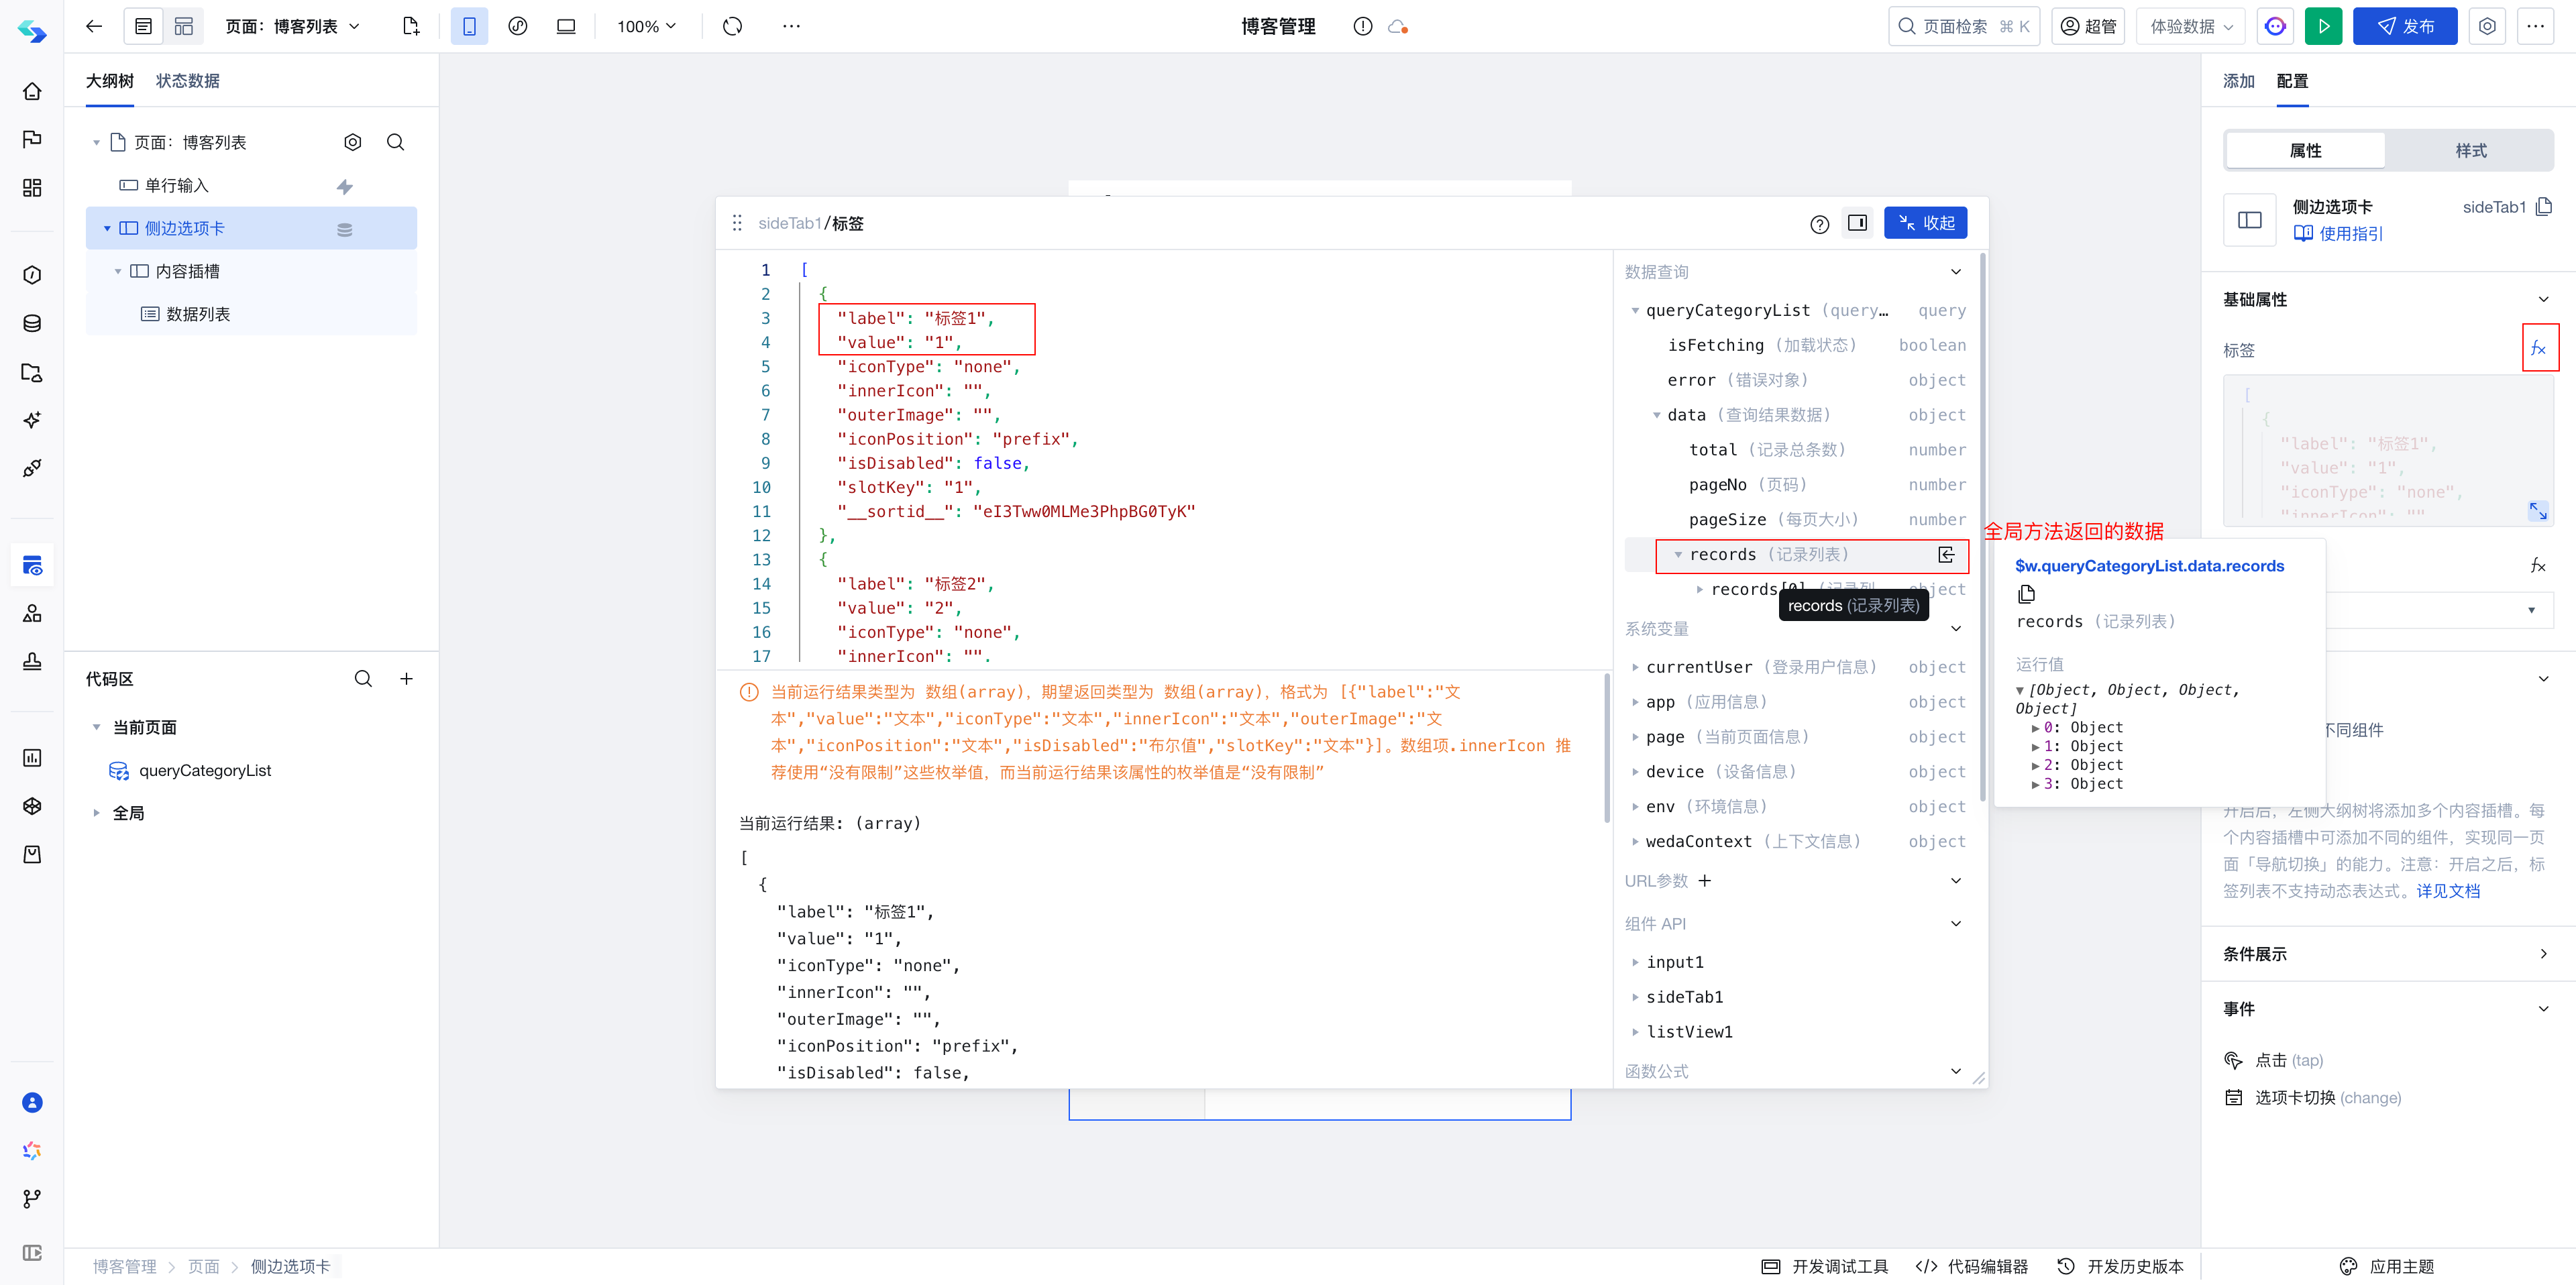
Therefore, we need to use the flmc field in the return value of queryCategoryList as the label, and _id as the value.
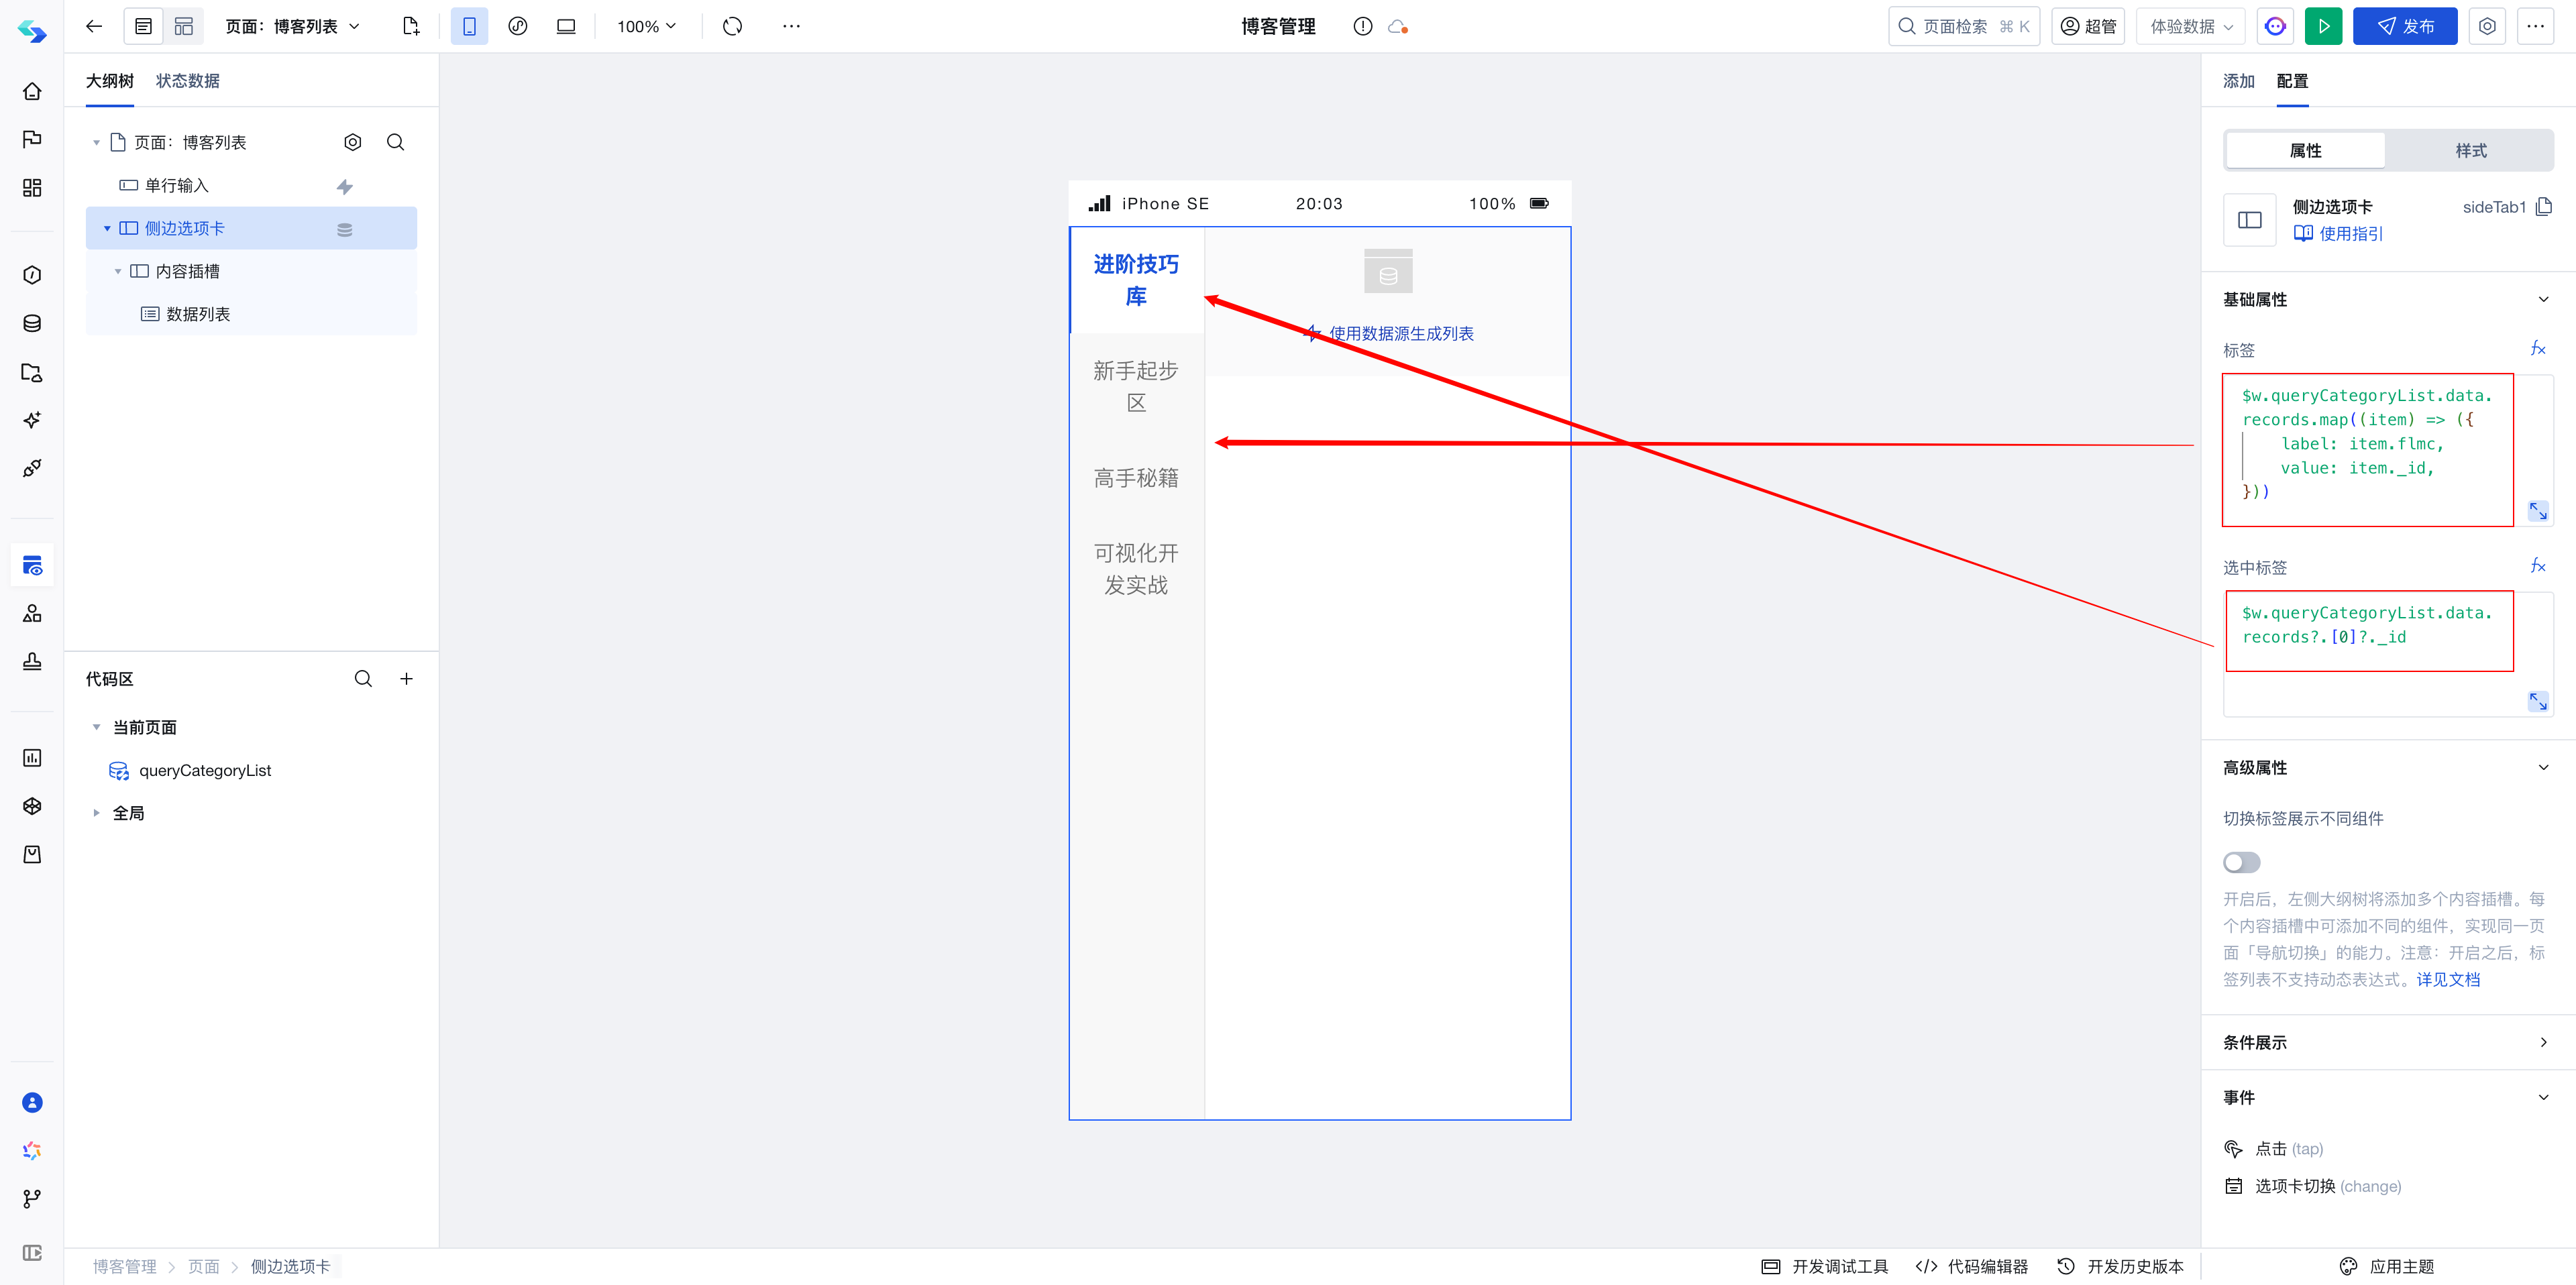
The following script can be used to convert the return data of queryCategoryList into the format [{label: xxx,value: xxx}].
$w.queryCategoryList.data.records.map((item) => ({
    label: item.flmc,
    value: item._id,
}));
If you are unfamiliar with the map method, you can always ask AI for assistance.
Example Questions:
Write a JS expression to convert the data in $w.queryCategoryList.data.records into the format [{label: xxx, value: xxx}], where the flmc field of the source data serves as label and the _id field as value.
queryCategoryList before binding it to the tabs component.You can understand it as: if A's clothes are to be worn by B, it must first be confirmed whether B can wear them and if the size fits.
The return value structure of the queryCategoryListmethod does not match the required data structure of thetabs component`.
Therefore, it is necessary to process the return value of queryCategoryList into the data structure required by the tabs component using the "trimming" method.
- Set the default selected label to the first data item:
// The _id value of the first item in $w.queryCategoryList.data.records
$w.queryCategoryList.data.records?.[0]?._id;
- After completion, the tabs component should display category data properly.
Step 4: Bind the blog list
- Add a
data listcomponent in the slot of theside tabsand bind its data source to theblog list.

Currently, all data is displayed. We expect that when a different category is selected, only the blog data under that category will be shown.
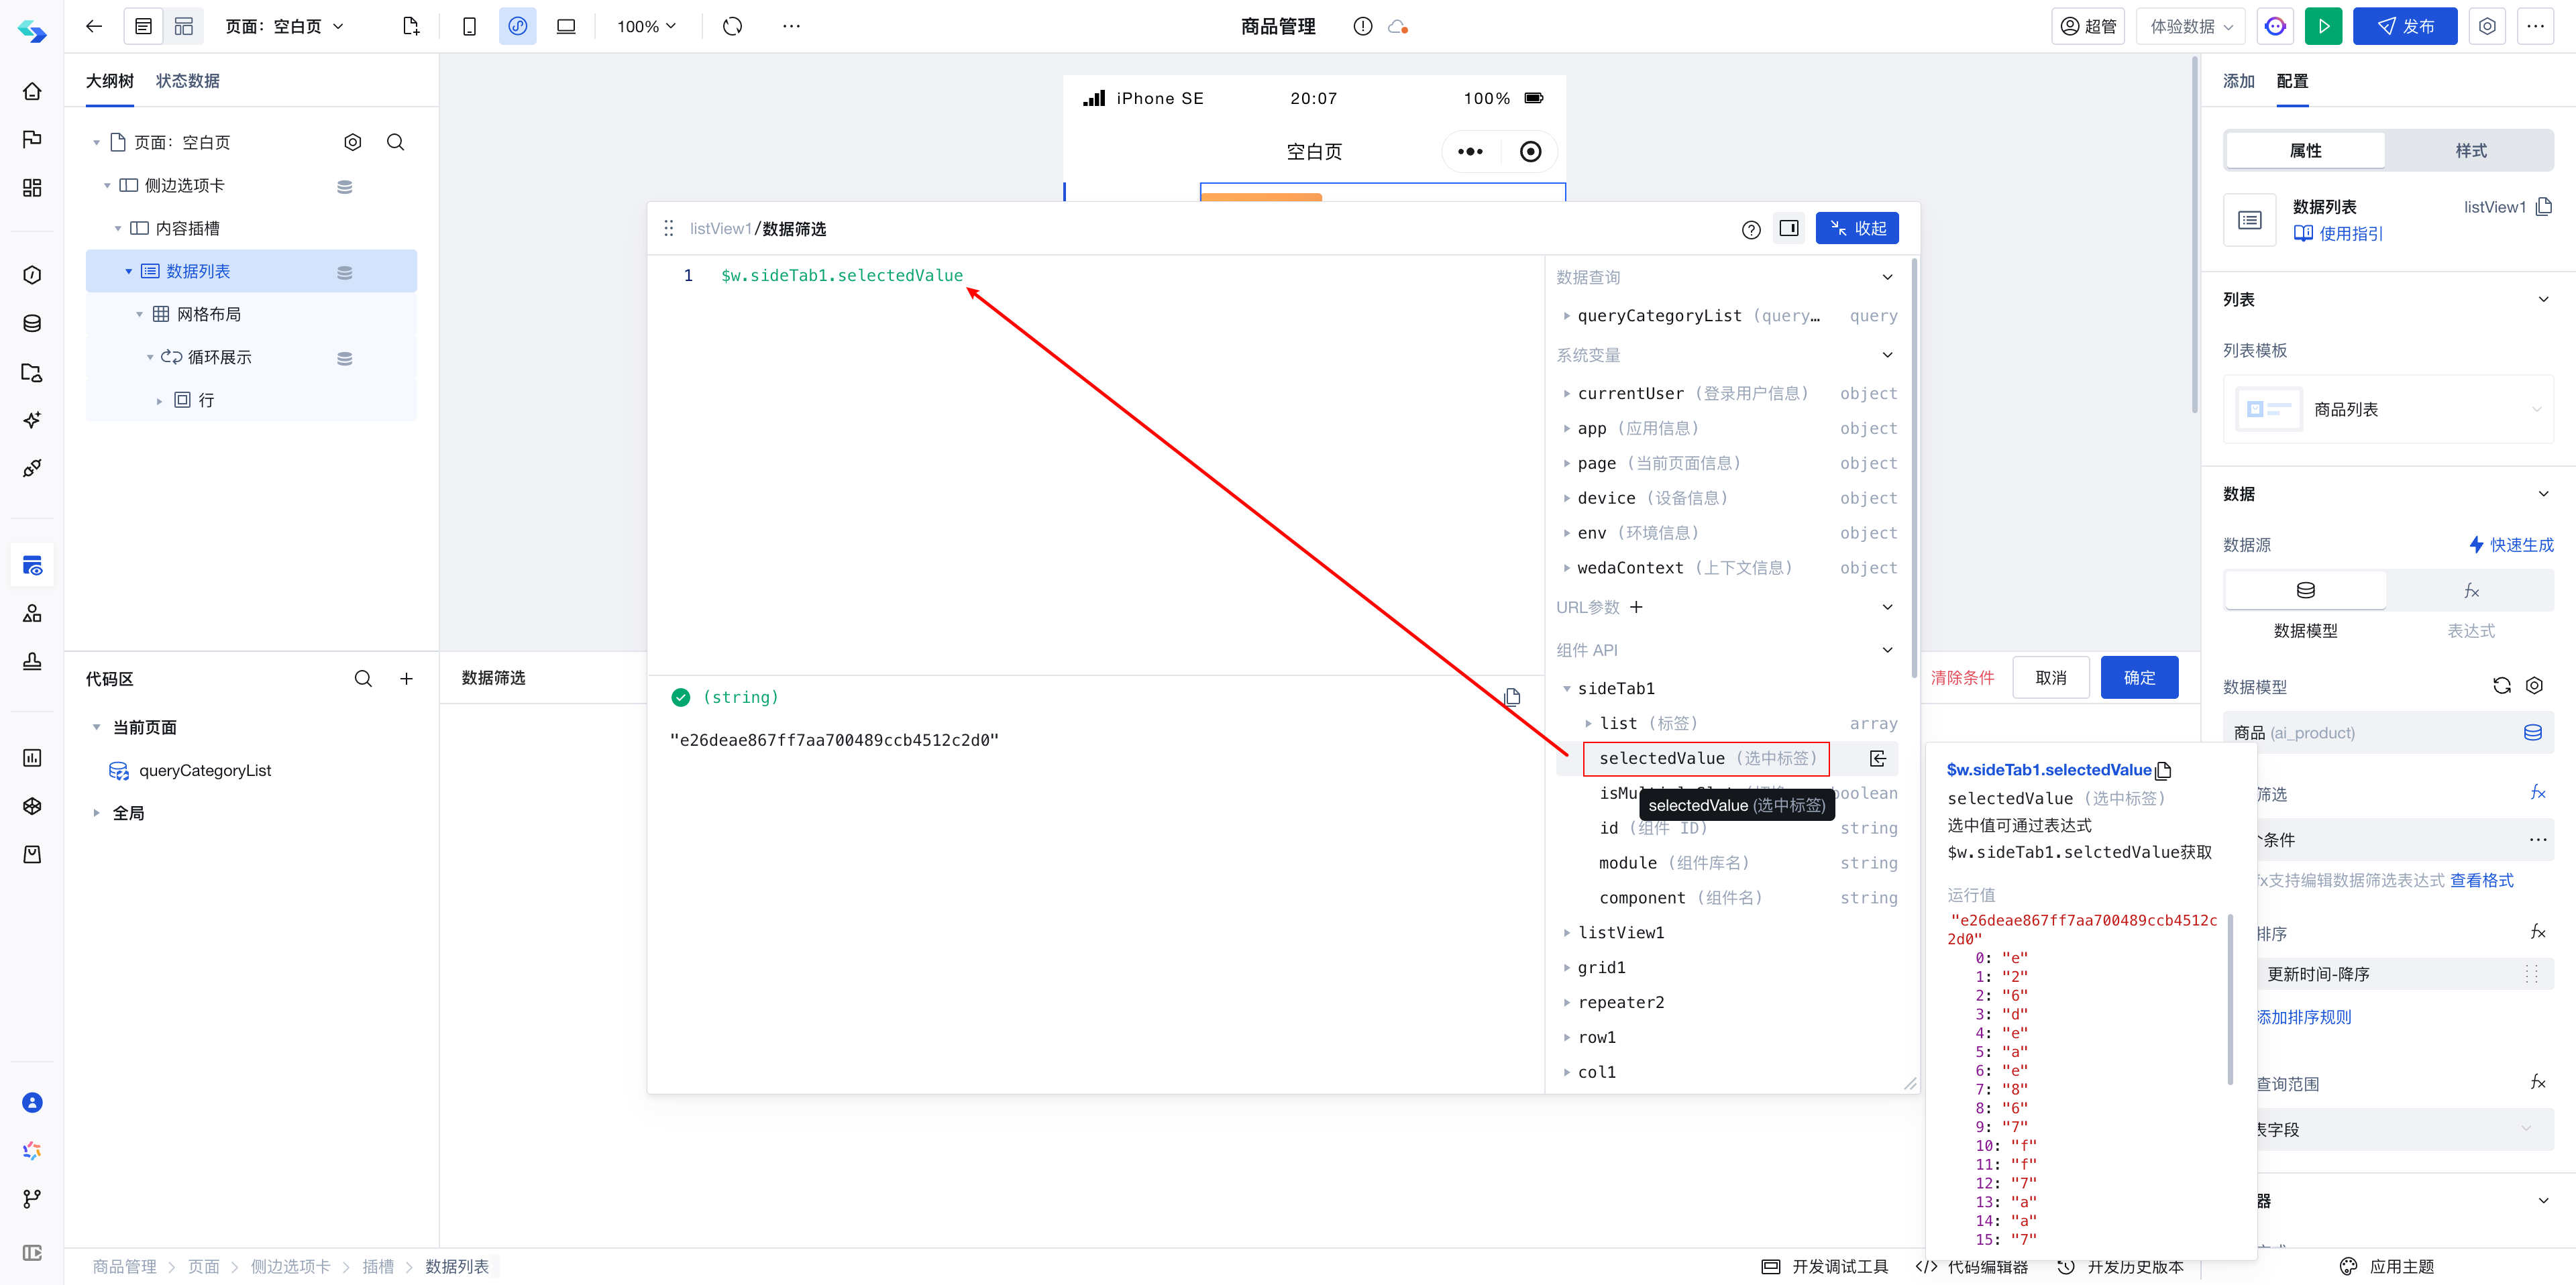
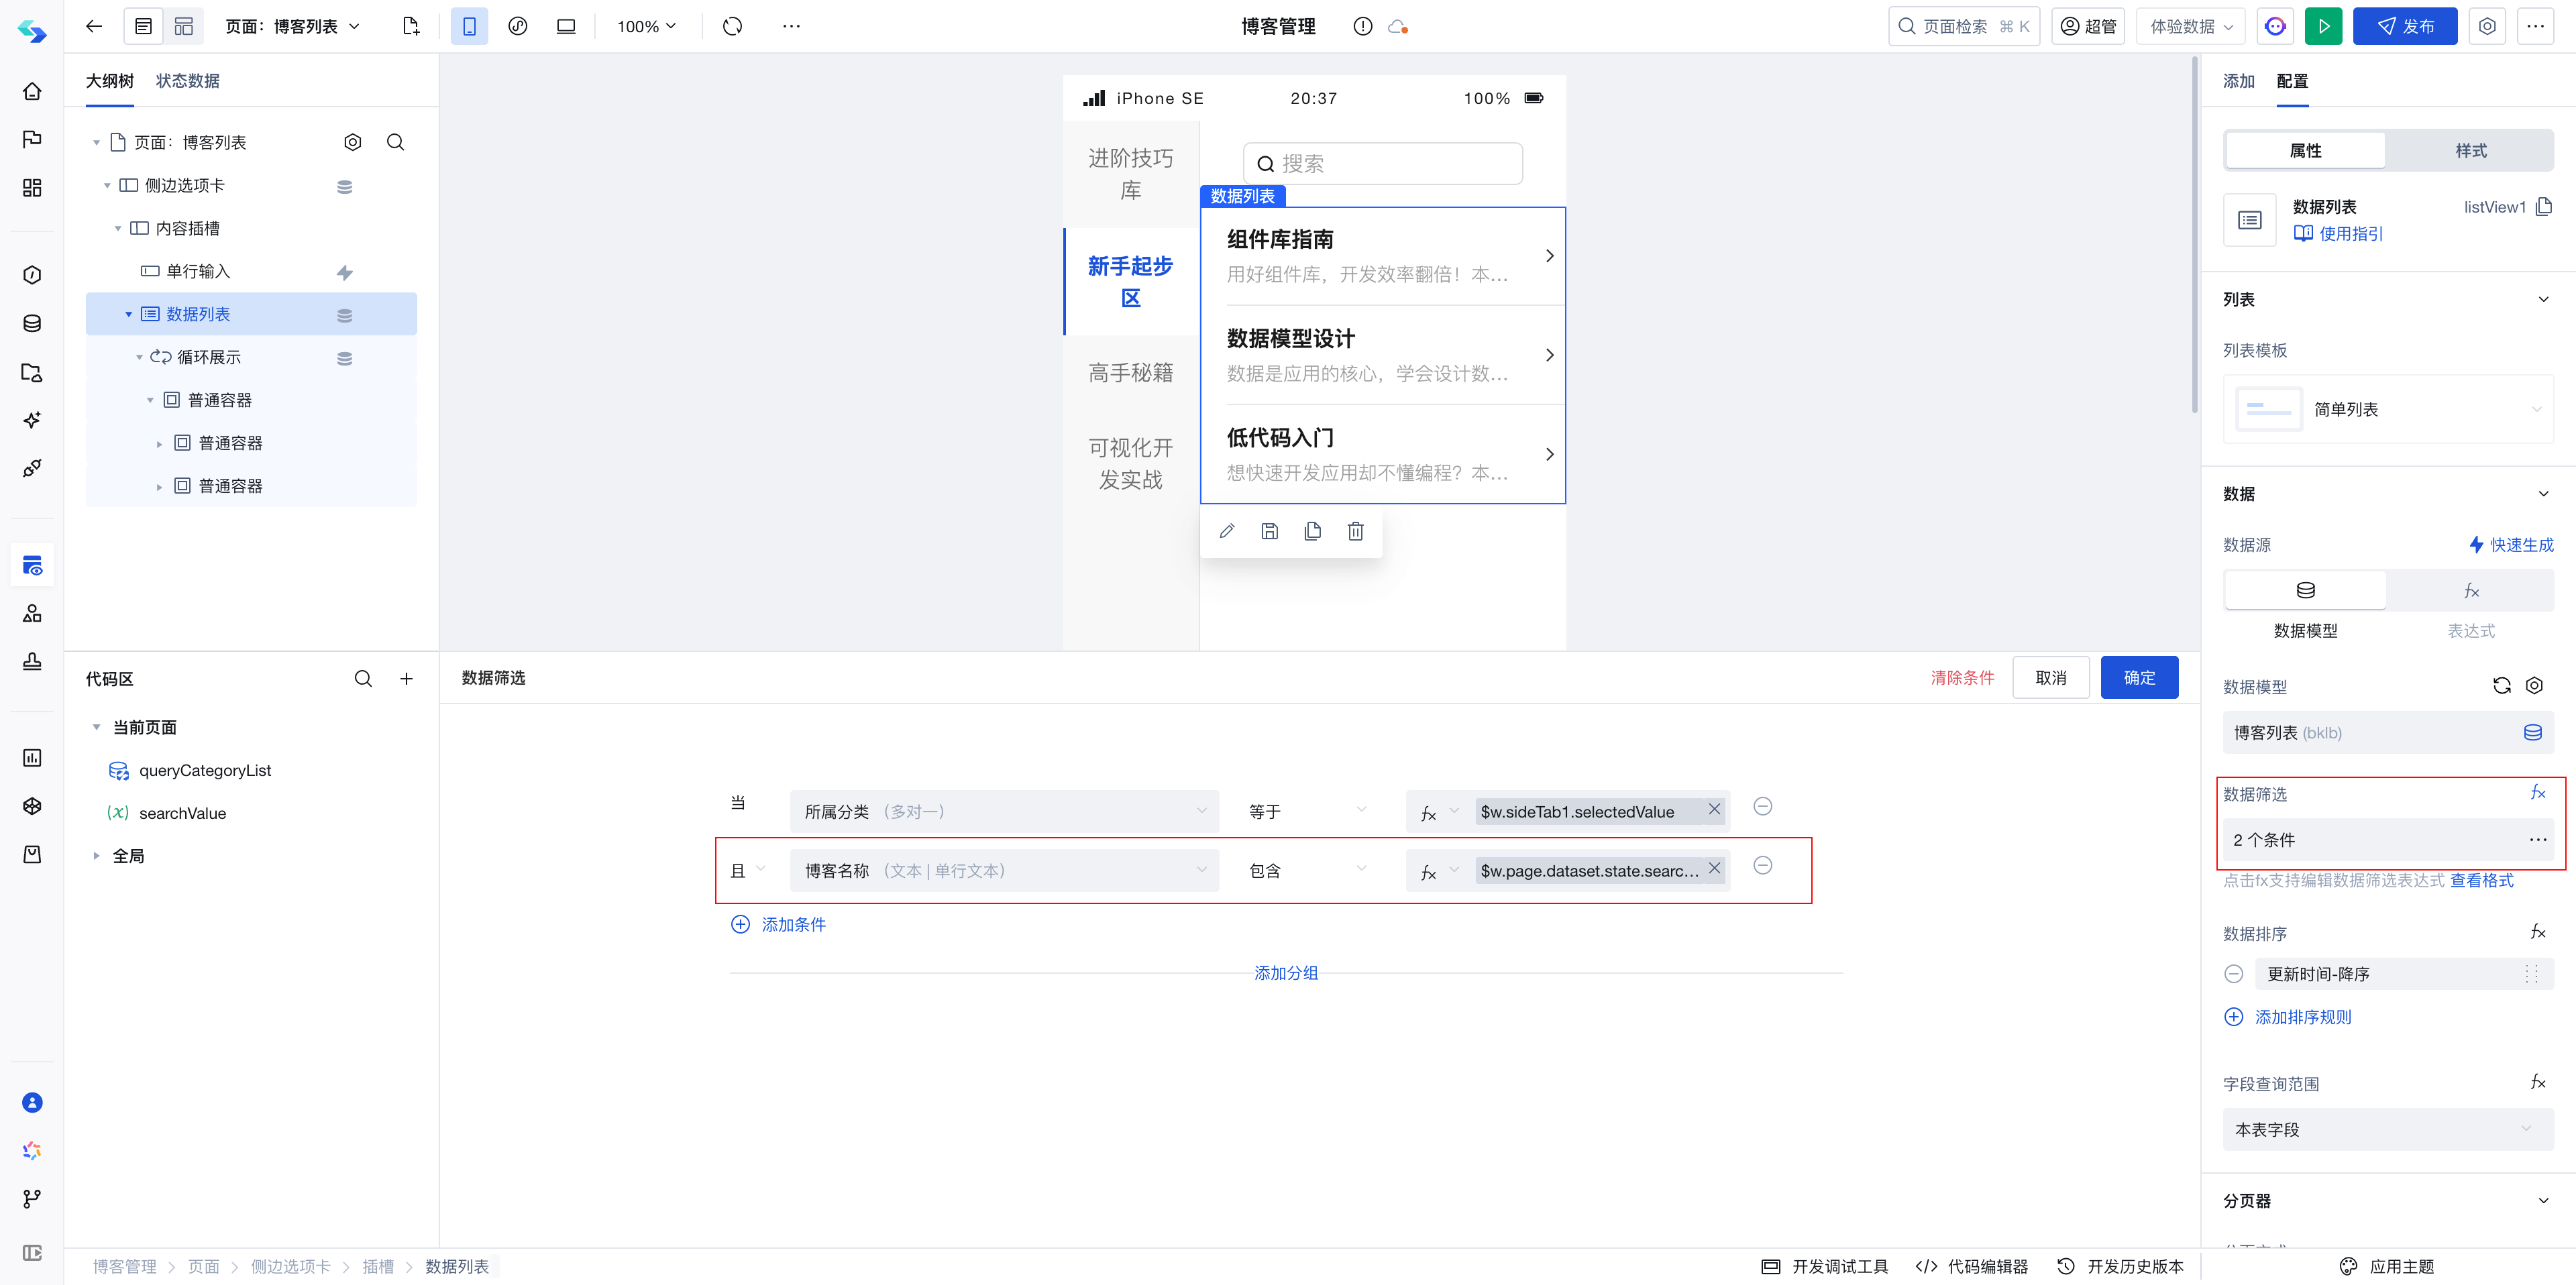
- Set the data filter condition as:
Categoryequalsthe selected item's value of the tabs component.
The value of the selected item in the tabs component is obtained via the following expression:
$w.sideTab1.selectedValue;
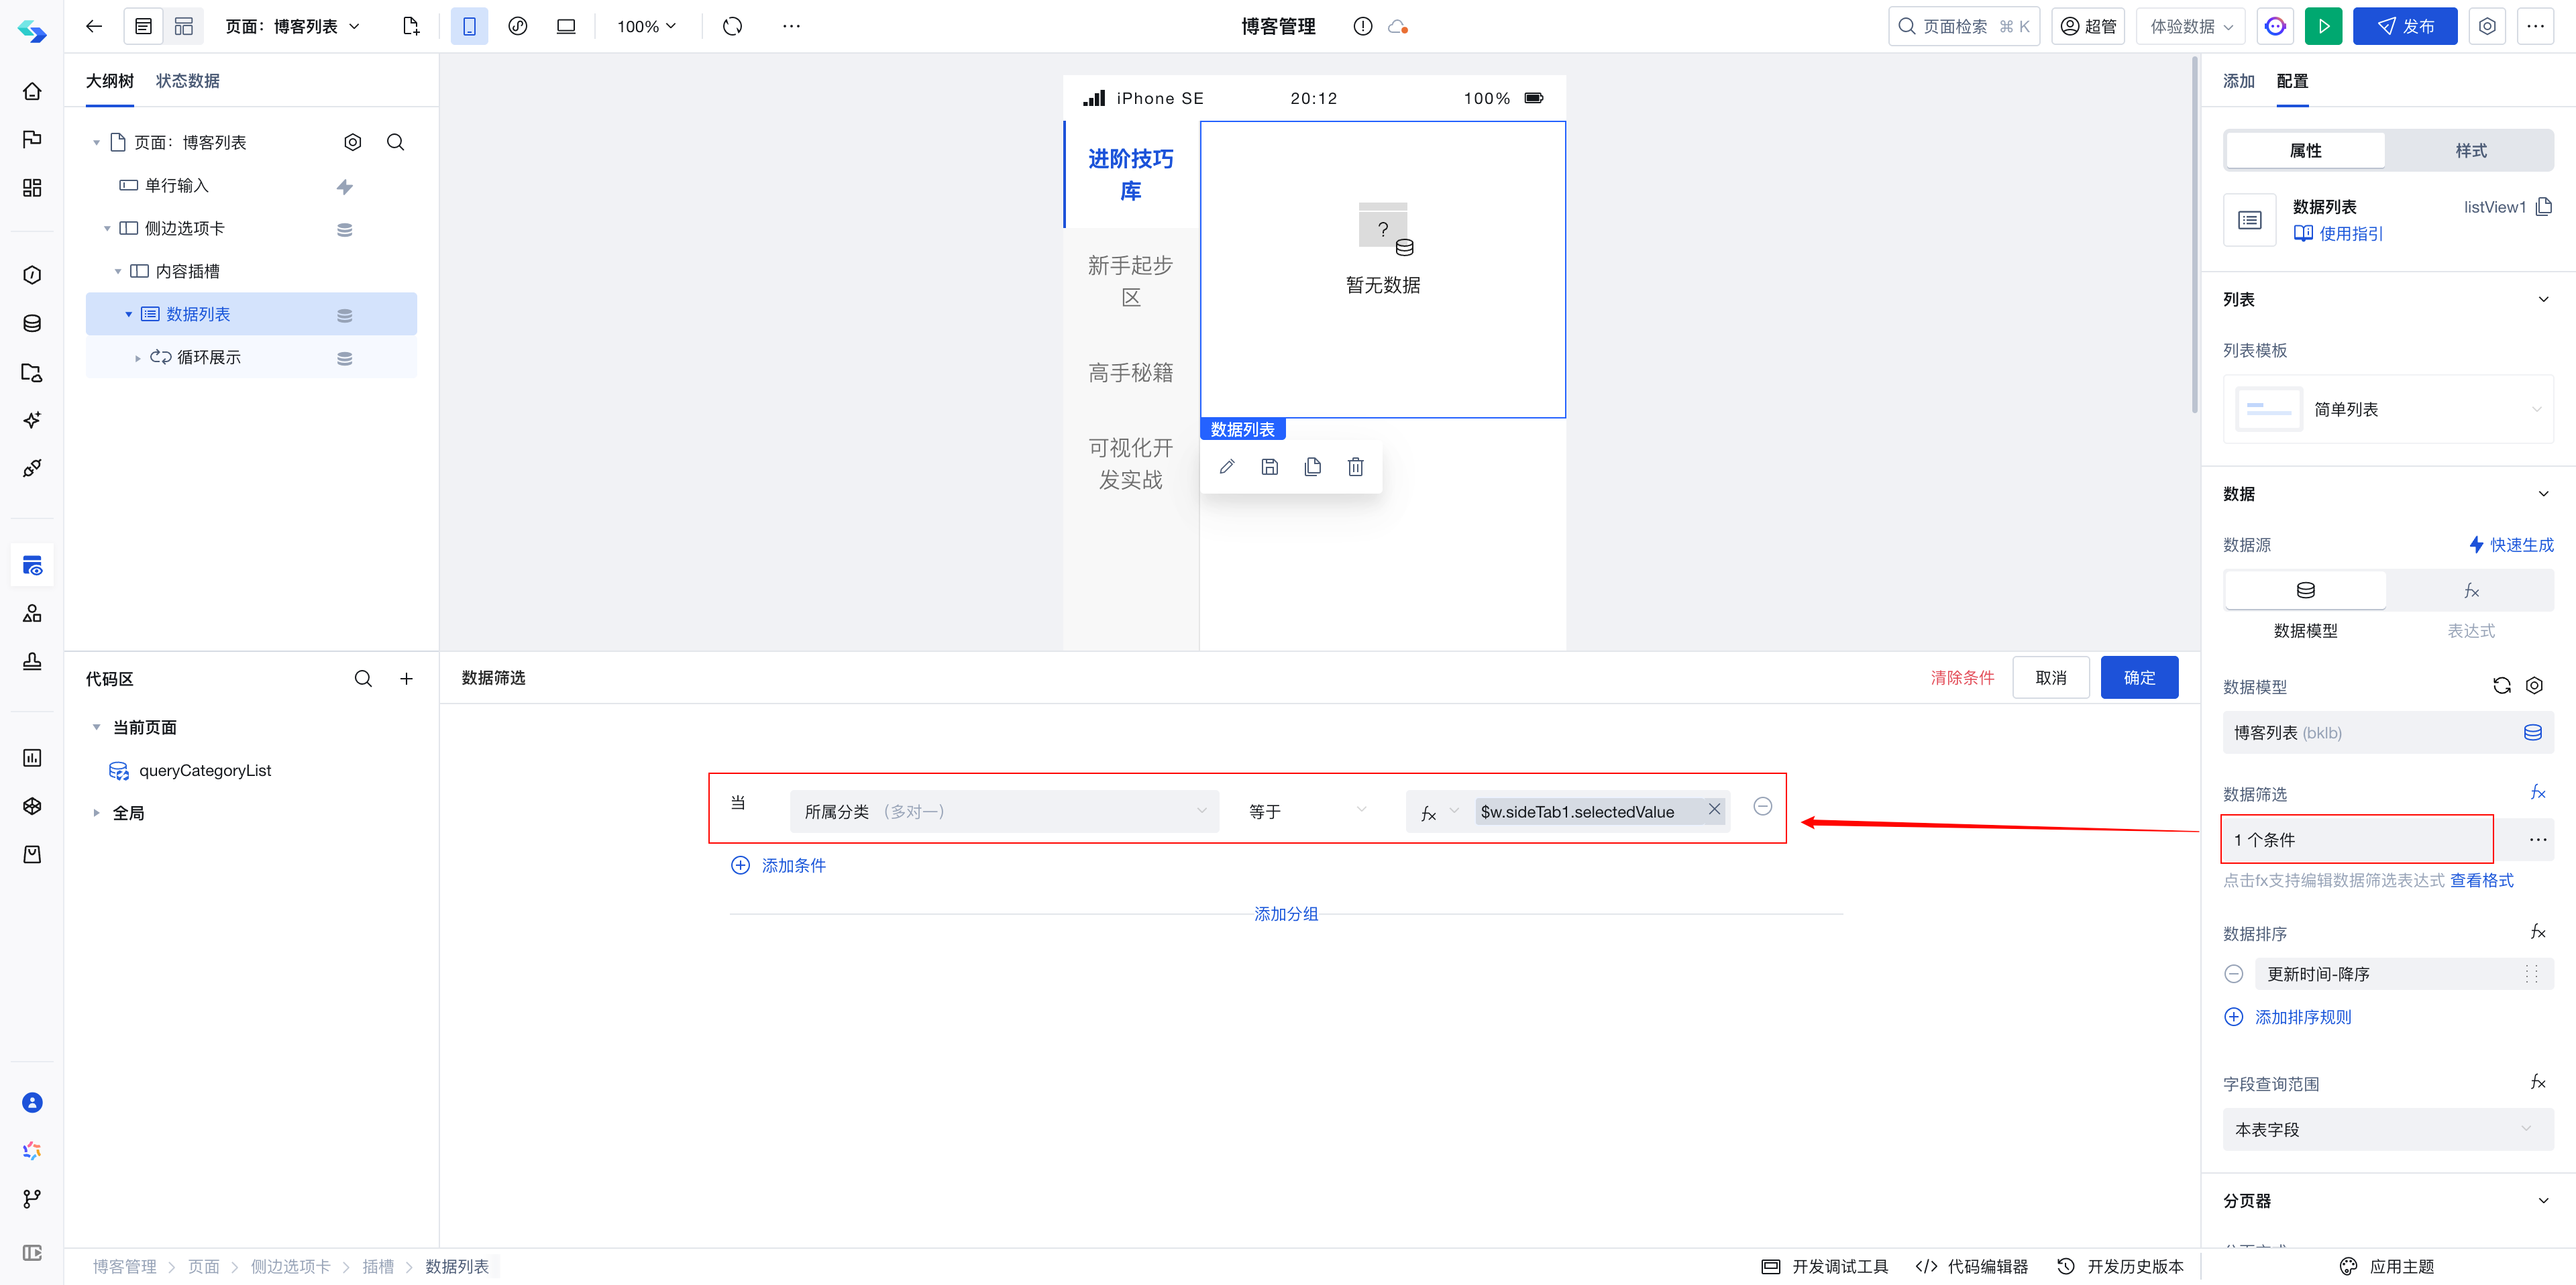
- At this point, when switching category tabs, the blog list filter conditions change according to the selected tab value, thus automatically refreshing.
Step 5: Search blogs in the search box
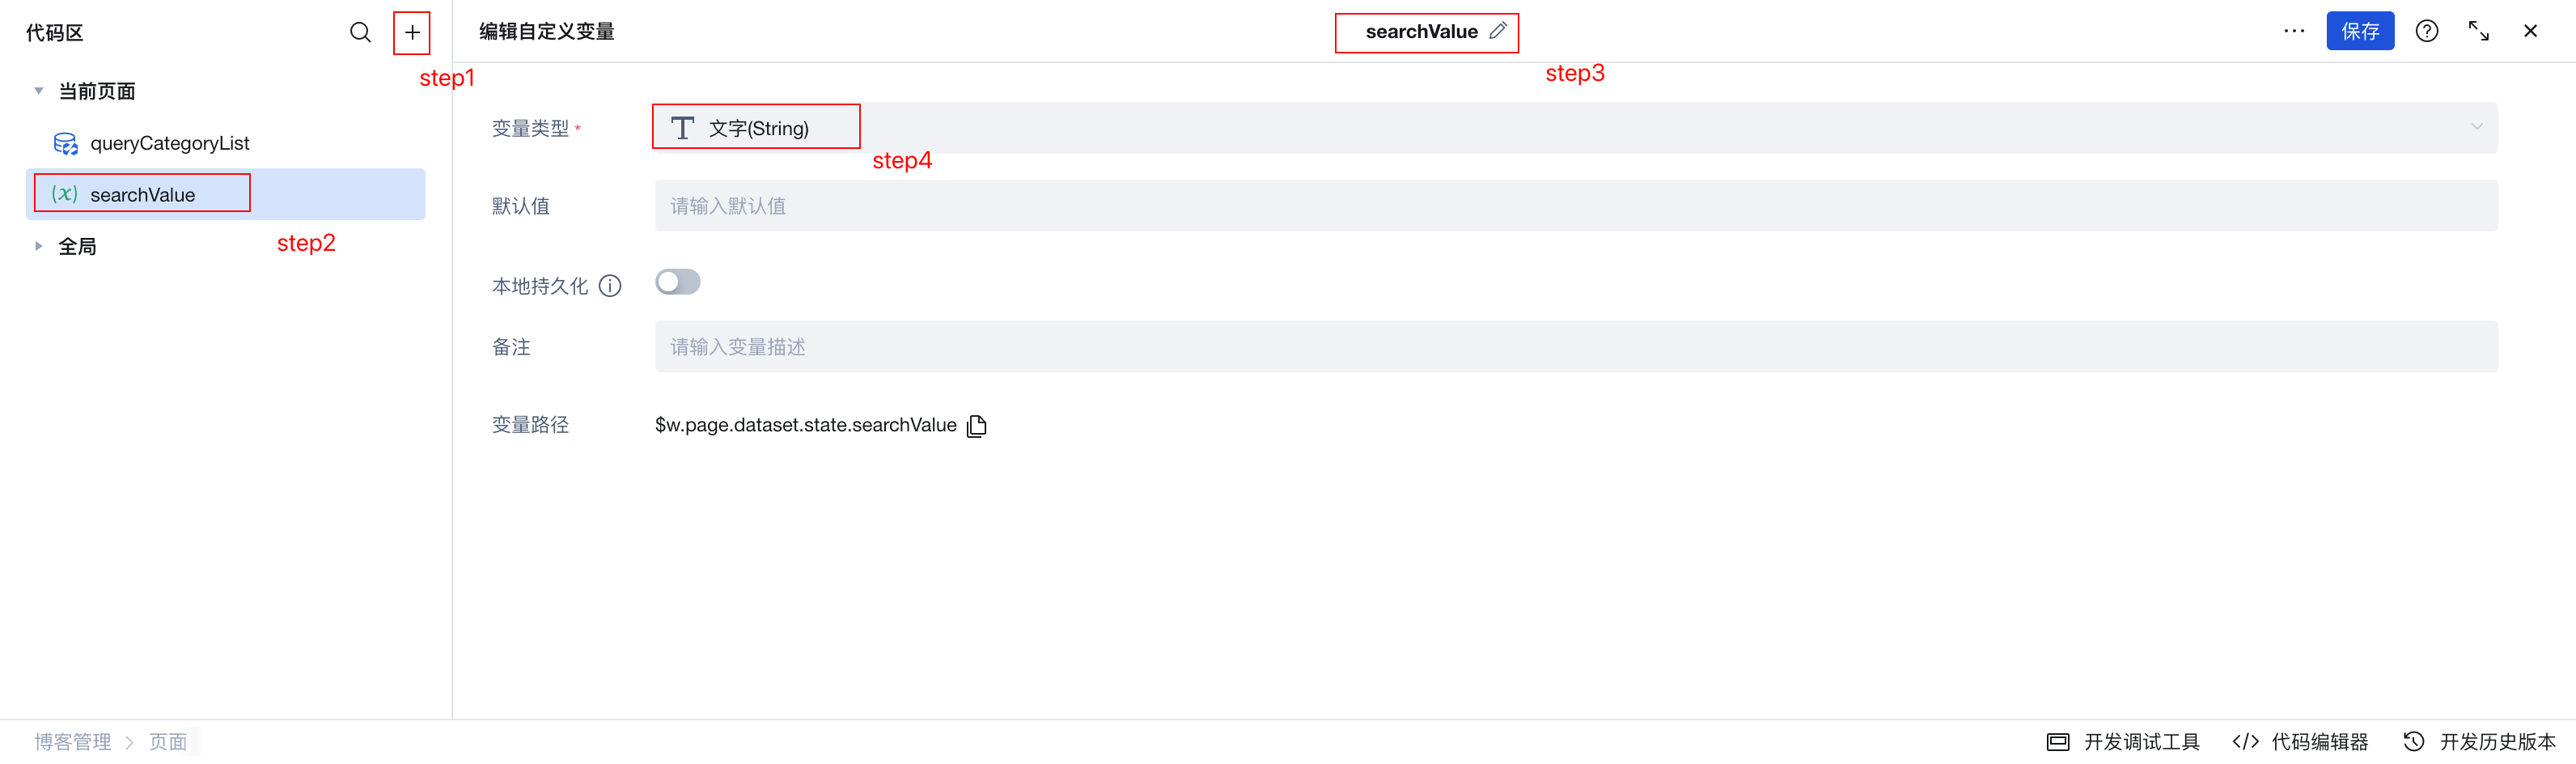
When the Enter key is pressed in the search box, the left-side category list must be hidden and the blog list must be filtered. To implement this, save the search box's value to a global variable during its Enter event. The left-side category list is then hidden when the global variable has a value, and displayed when it is empty.
- Create a global variable
searchValueto store the value of the search box.
- In the
Enter eventof the search box, save its value.
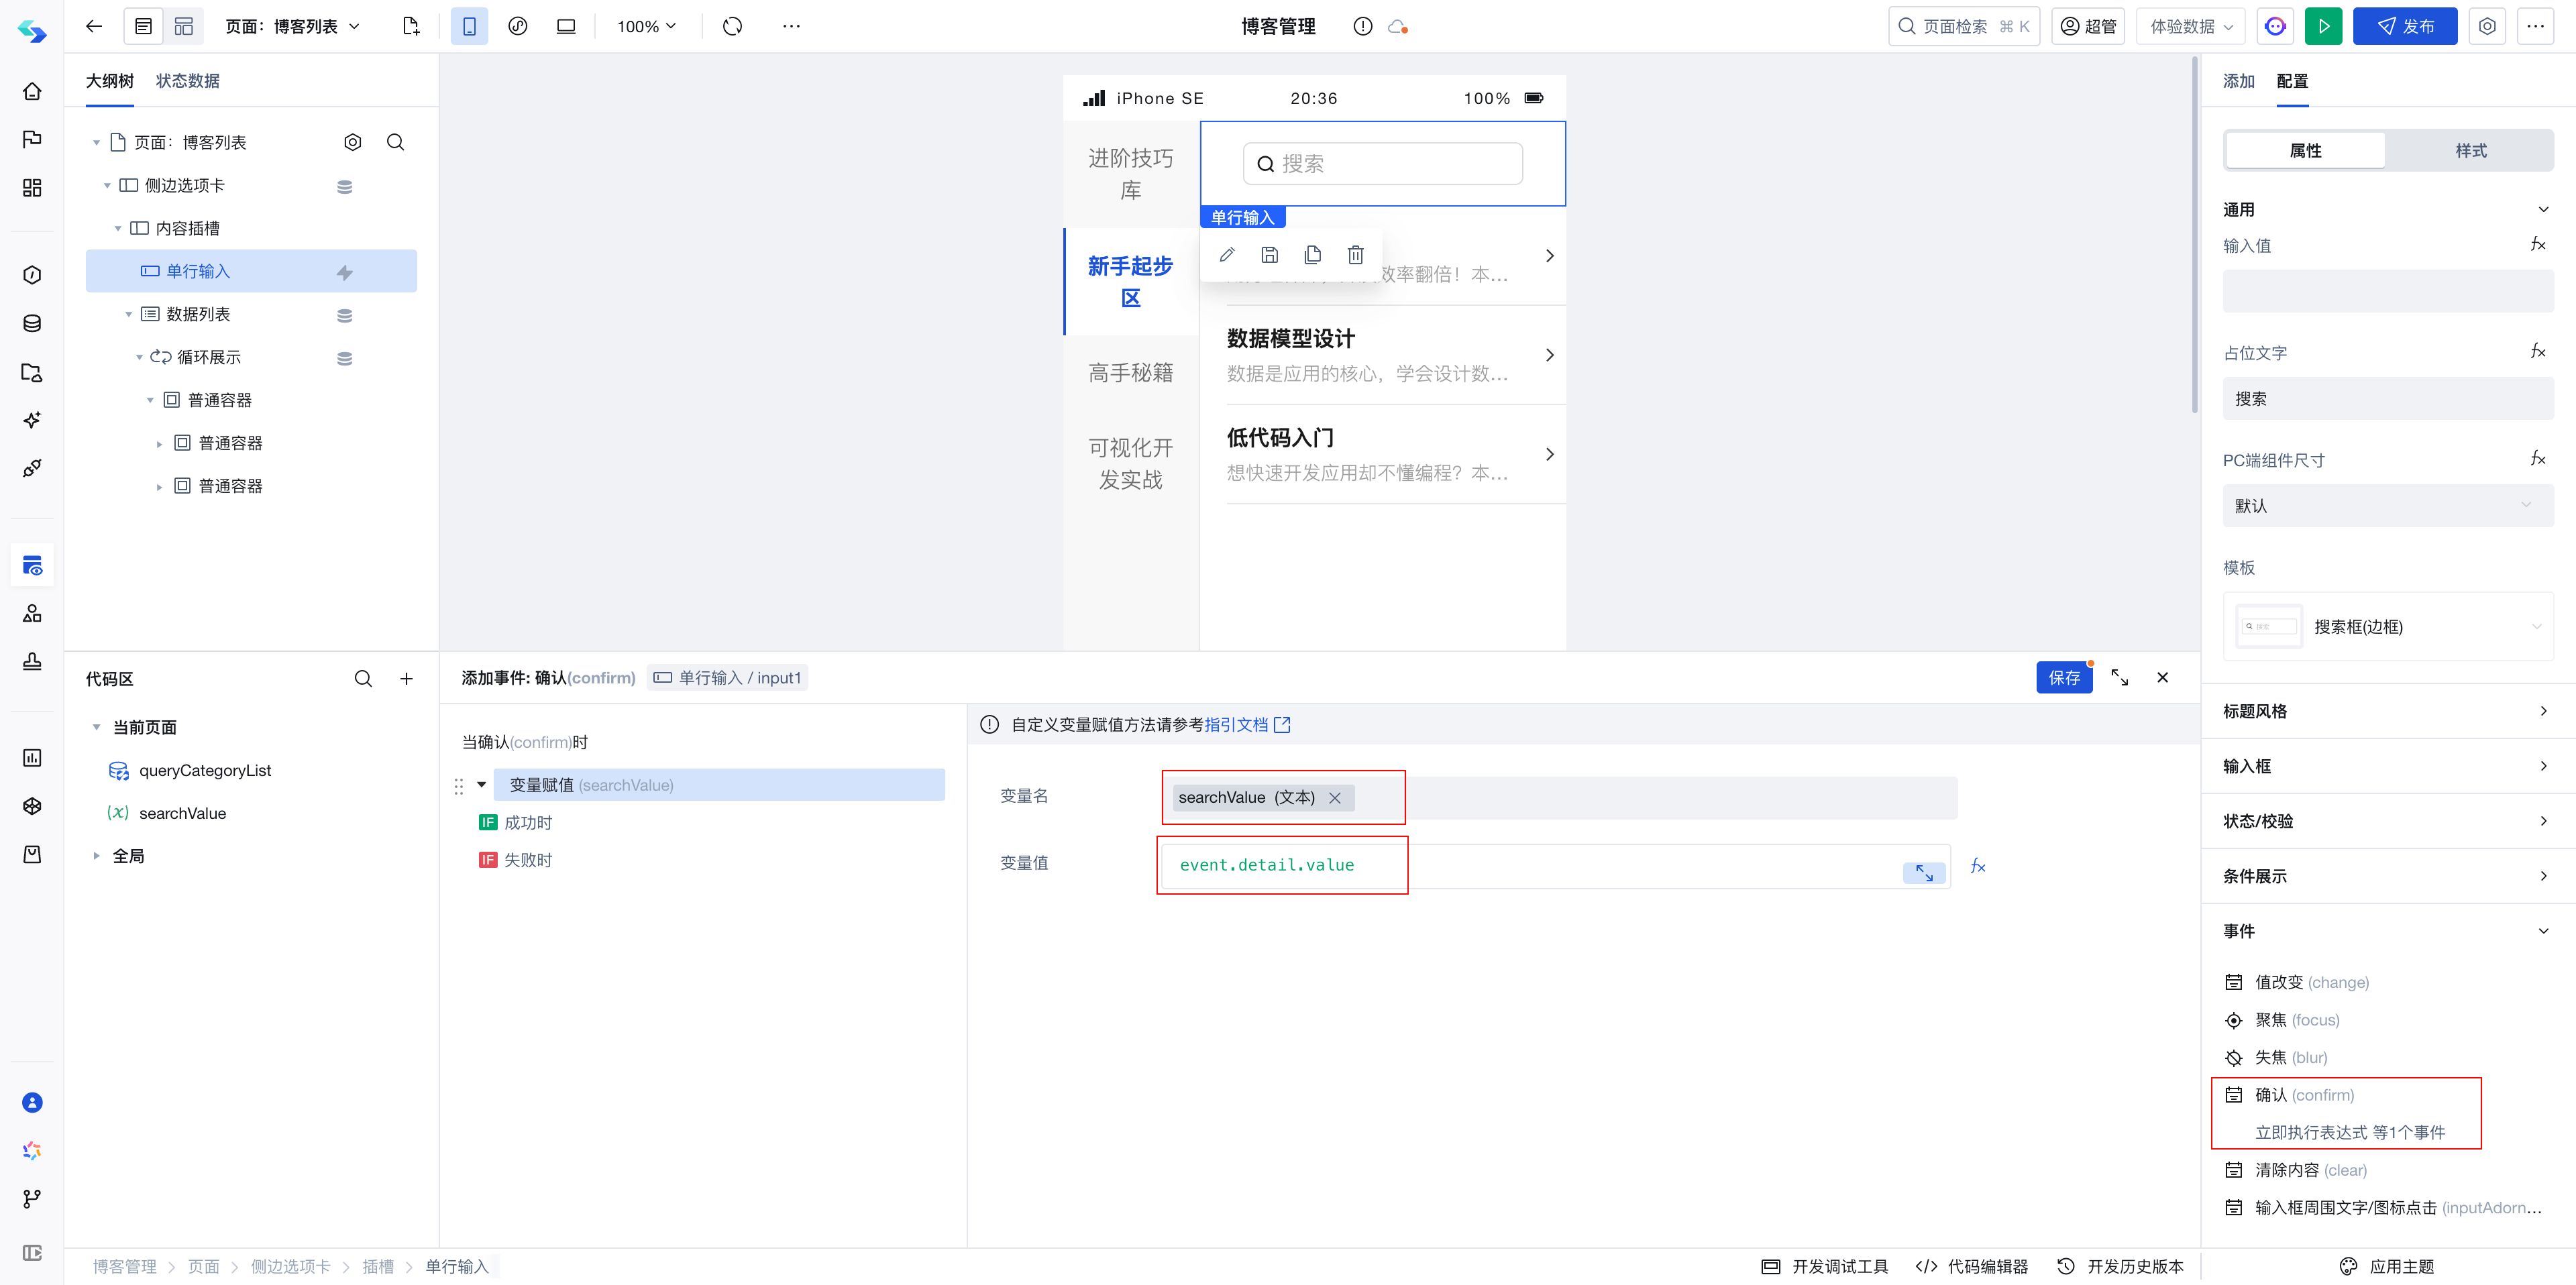
- Bind the value of
searchValueto the query conditions of theblog list.
The entire requirement development is now complete, having implemented category switching and blog search.
Summary
This article introduces how to organize and break down application development processes, and provides an overview of platform capabilities.
Now you can apply the same approach to create similar modules like Categorized Data Management, for example:
- Product Category Management
- Order Management
- User Management
- ...