From Zero to scrm Customer Management in 1 Day
Requirements Research
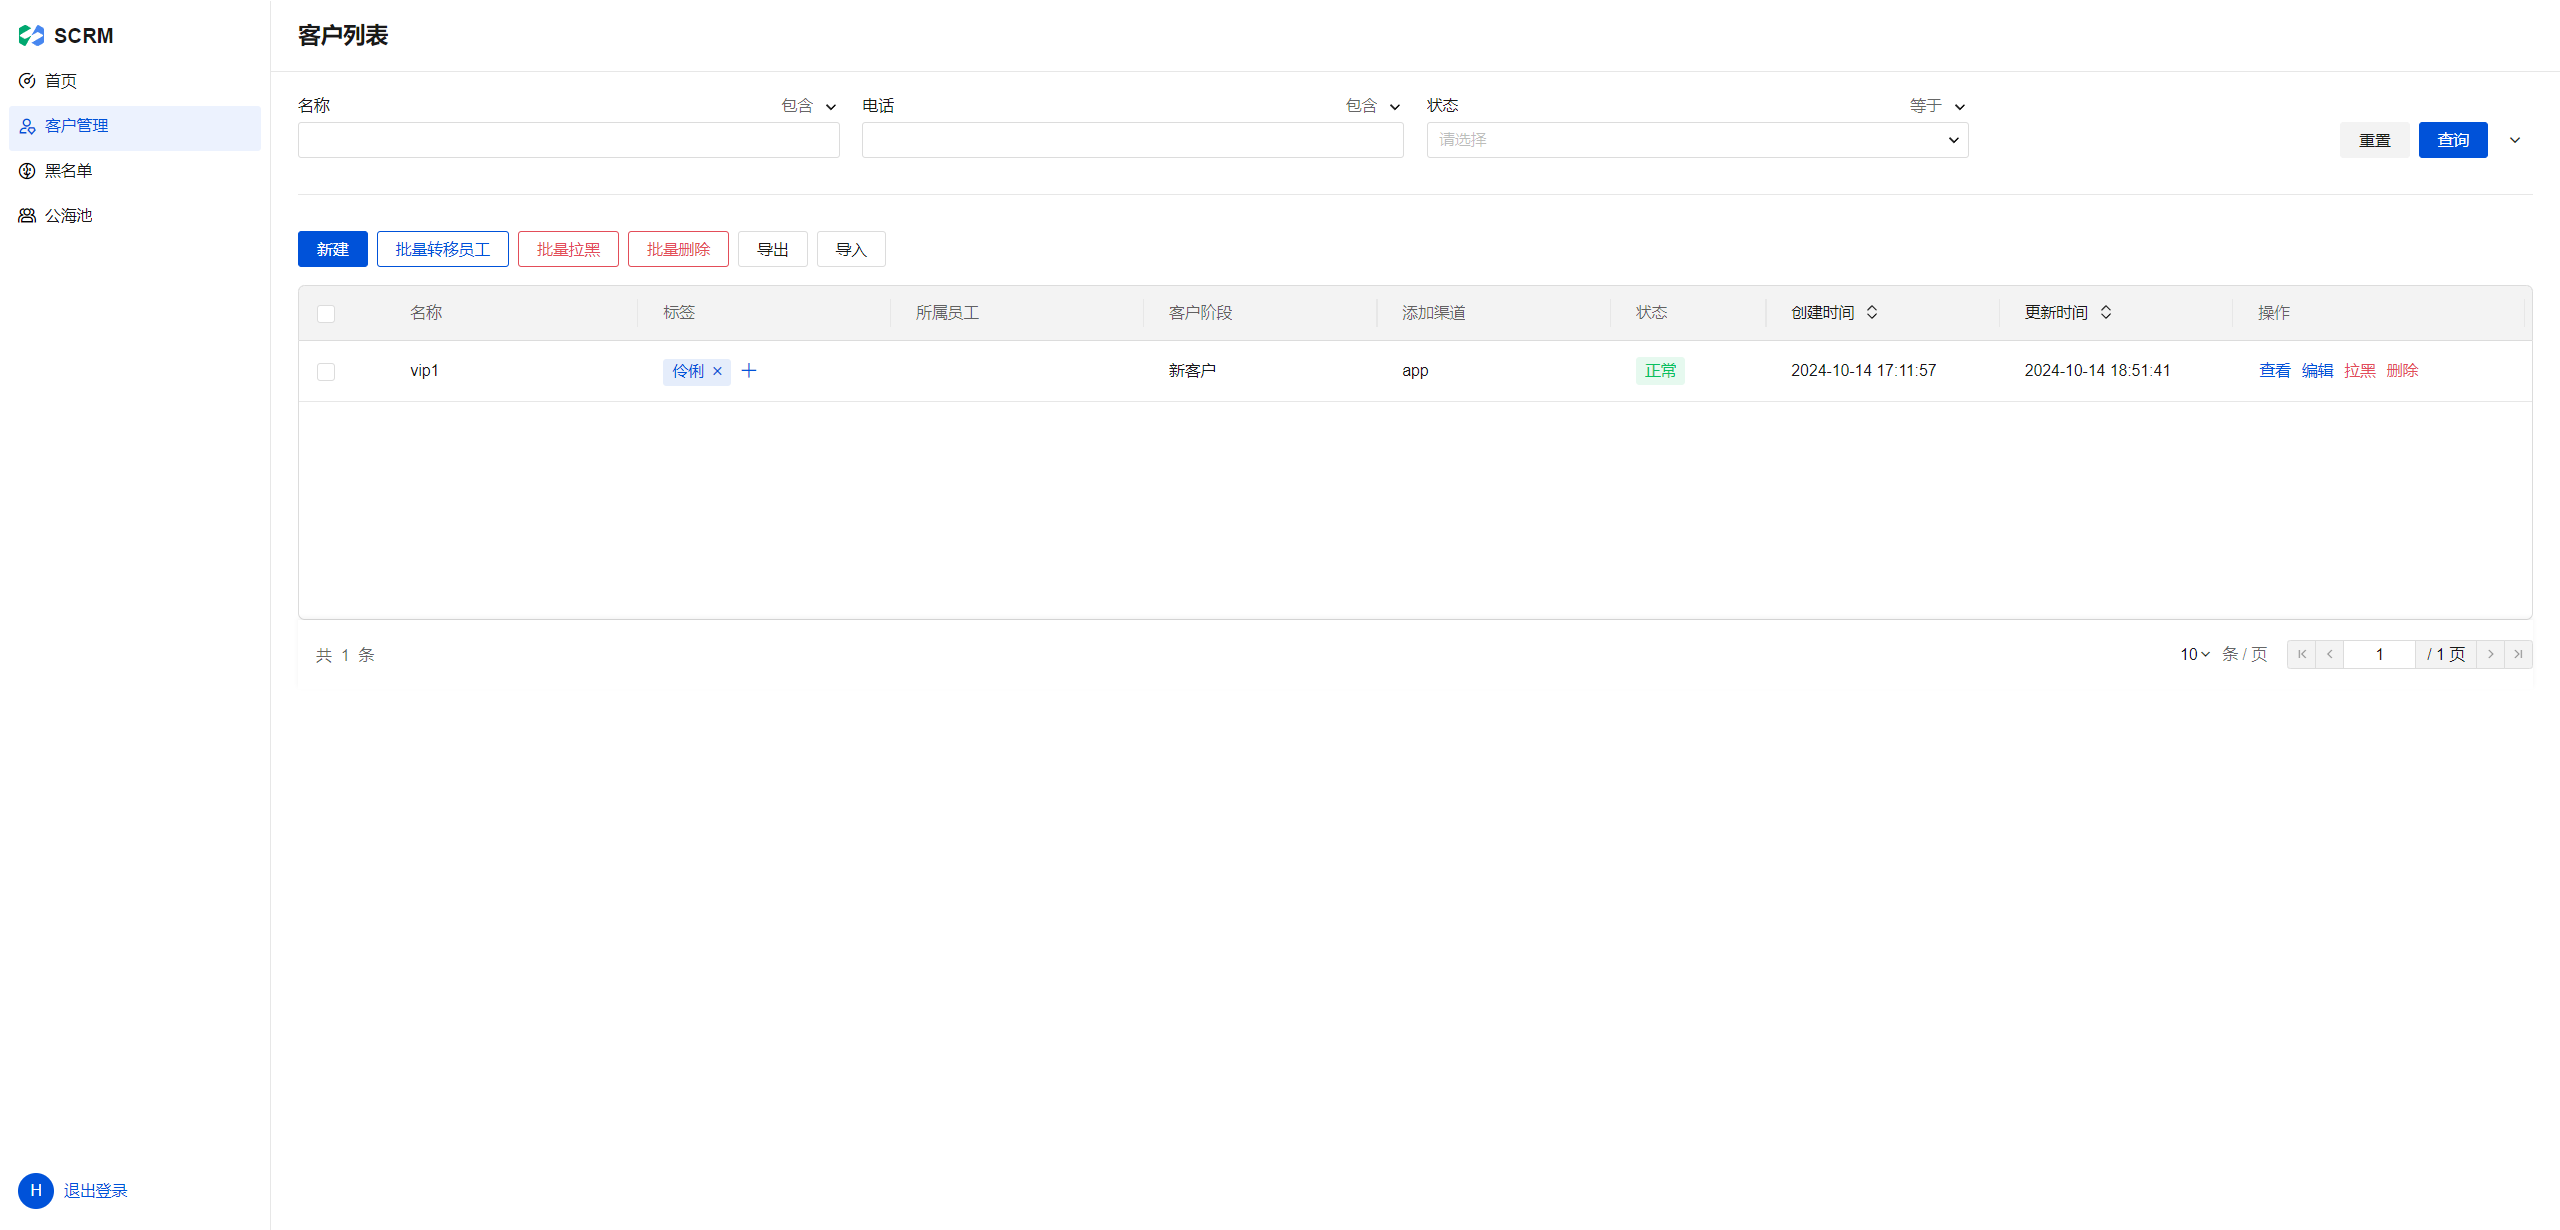
The expected feature page is as shown below:


The Customer Management System is primarily used for managing and analyzing customer information. The system should support the following core features:
- Customer Information Management: Add, edit, delete, and query customer information
- Customer Status Tracking: Record all interactions with customers, including phone calls, emails, meetings, etc.
- Customer Statistics and Analysis: Display customer information in charts
- Batch Customer Transfer: Batch transfer customers to other employees.
- Dynamic Tag Addition: Quickly add tags for classification
- Blocklist: Add to the blocklist
- Public Pool Customer Display: Display unassigned public pool customers
- Permission Management: Control access to data and features based on user permission levels
Requirements Analysis
Based on the above requirements research, we conduct architecture design and technology selection.
Data Architecture
The following two data tables are required to store customer information and status update records respectively.
tips:
Enum: select one from multiple fixed values, where the data source can be fixed or derived from dictionary items.
Boolean: Yes and No options
Customer Information Table
| Field | Code | Type | Remarks |
|---|---|---|---|
| Name | mc | Text | - |
| Gender | xb | Enum | Male/Female |
| Phone | dh | Text (Phone) | - |
| yx | Text (Email) | - | |
| Customer Stage | khjd | Enum | New User/Initial Communication/Prospective Customer/Non-prospective Customer |
| Addition Channel | tjqd | Enum | app/WeChat Mini Program |
| Assigned Employee | ssyg | Text | - |
| Tag | bq | Text | - |
| Status | zt | Enum | Normal (Recently contacted)/Inactive (Long time no contact)/Churn (Deleted) |
| Customer Type | khlx | Enum | Individual/Company |
| Remark | bz | Text | - |
| Enterprise Name | qymc | Text | - |
| Enterprise Address | qydz | Text (Enterprise Address) | - |
| Whether Blocklisted | sflh | Boolean | Yes/No |
| Block Time | lhsj | DateTime | - |
| Block Reason | lhyy | Text | - |
| Block Operator | lhczr | Text | - |
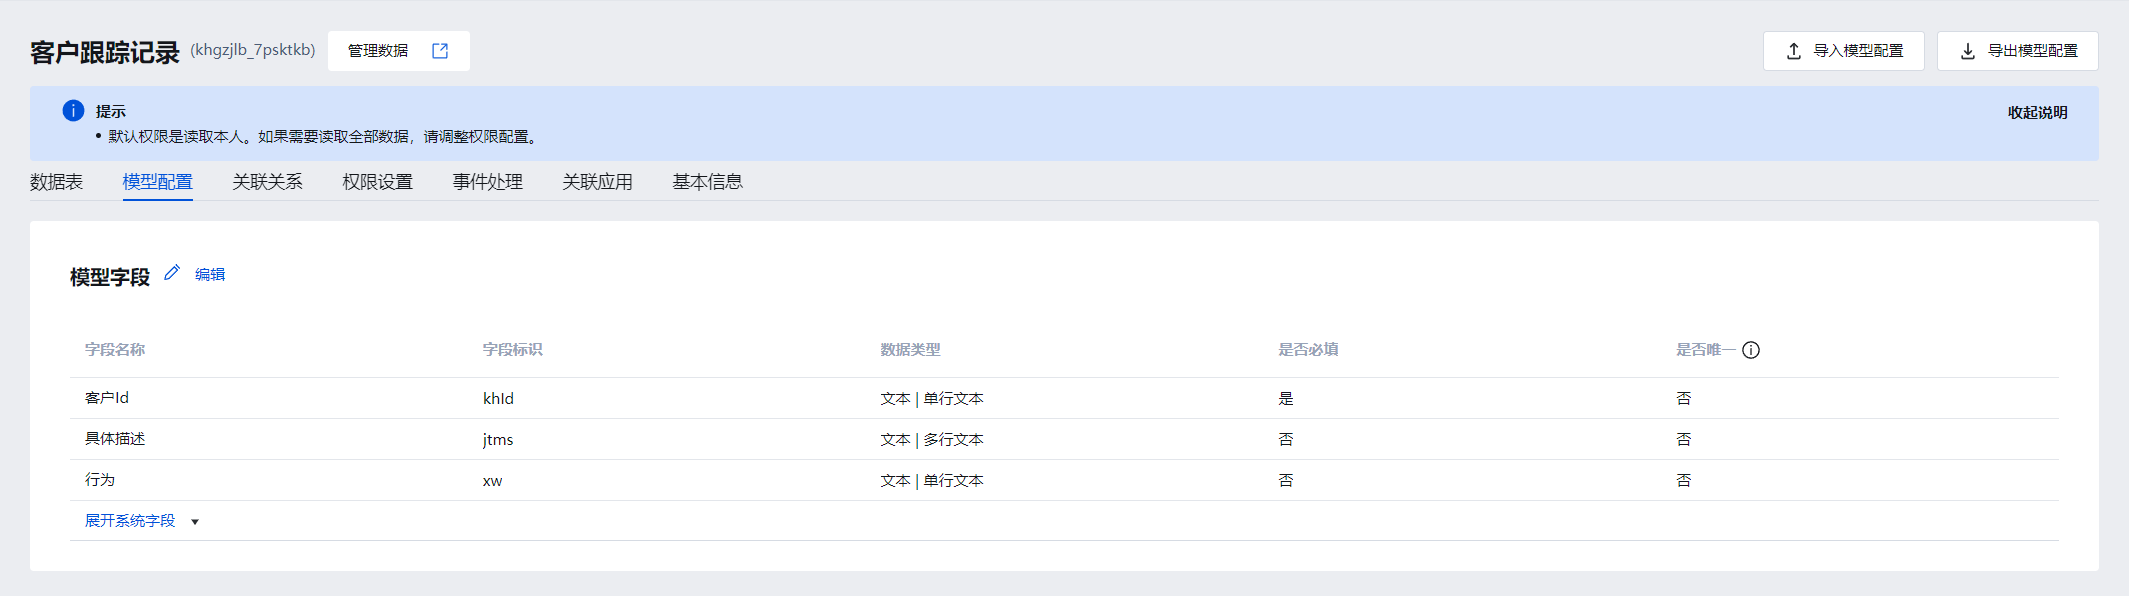
Customer Follow-up Record Table
| Field | Code | Type | Remarks |
|---|---|---|---|
| Customer ID | khId | Text | - |
| Behavior | xw | Text | Add to blocklist/Remove from blocklist, etc. |
| Specific Description | jtms | Text | - |
Front-end Architecture
Features such as customer information management, customer status tracking, batch transfer of customers, and adding tags to customers should be placed in the same module for operation.
Therefore, the front-end is divided into the following 4 modules:
-
Customer List
The list displays customer information, with filter conditions beingIs Blacklisted: falseandAssigned Employee: not empty.
Add, Edit, View, Delete, Transfer, Add Tags, Add to Blocklist, Import, Export -
Customer Statistics
The charts display information such as the total number of customers, number of newly added customers today, number of public customer pool, blocklist count, total customer trend, new customer trend, customer status distribution, customer stage distribution, and other information. -
Blocklist
The list displays information of blacklisted customers, with the filter condition beingIs Blacklisted: true.
View, Edit, Remove, Delete, Import, Export -
Public Pool
The list displays customer information not assigned to any employee, with filter conditions beingIs Blacklisted: falseandAssigned Employee: empty.
View, Claim, Transfer, Delete, Import, Export
Technology Selection
Customer management scenarios are highly variable and cannot be standardized, as each user will have corresponding custom development scenarios.
Therefore, we choose to use WeDa visual development to quickly build the system.
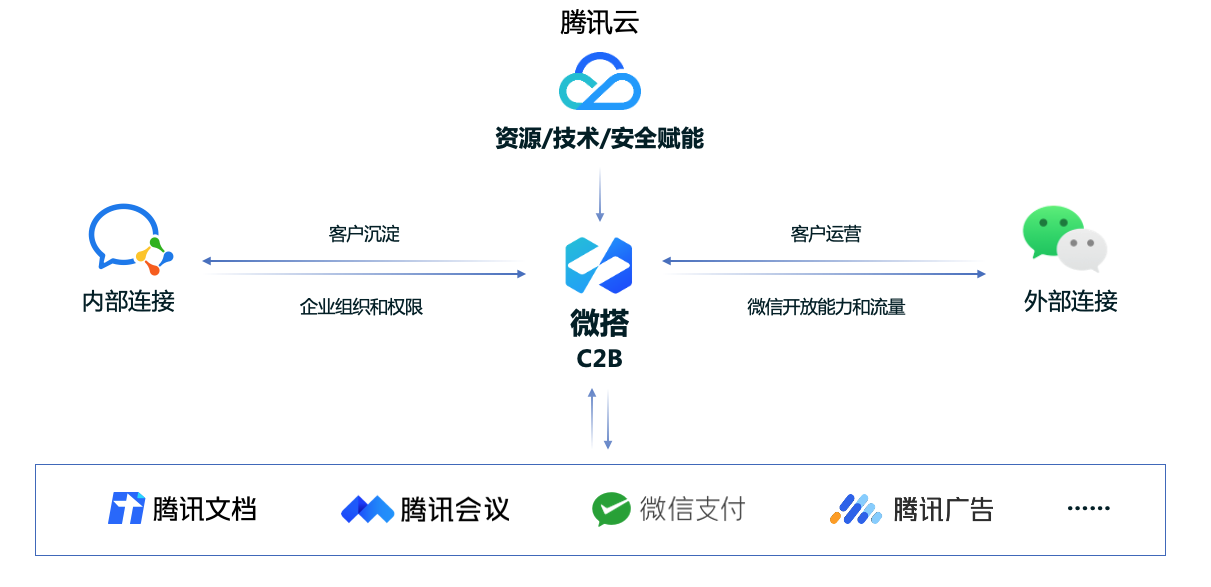
WeDa is a high-performance low-code development platform for cloud development, supporting rapid creation of data sources and application scenarios. It natively integrates with the Tencent SaaS ecosystem, enabling seamless connection to the WeChat ecosystem and WeCom capabilities, while supporting integration with large AI models to perfectly combine products with AI.
Requirements Development
Below introduces developing with WeDa
Go to WeDa
WeDa is available in public cloud and private cloud editions.
Public Cloud: Build pages through the official WeDa platform. Applications can be published via the WeDa platform or deployed locally after packaging.
Private Cloud: Deploy the WeDa platform on local servers for development and publishing (currently lacks some features compared to the public cloud edition).
The following introduces the methods to go to the editor for both editions.
Public Cloud Development
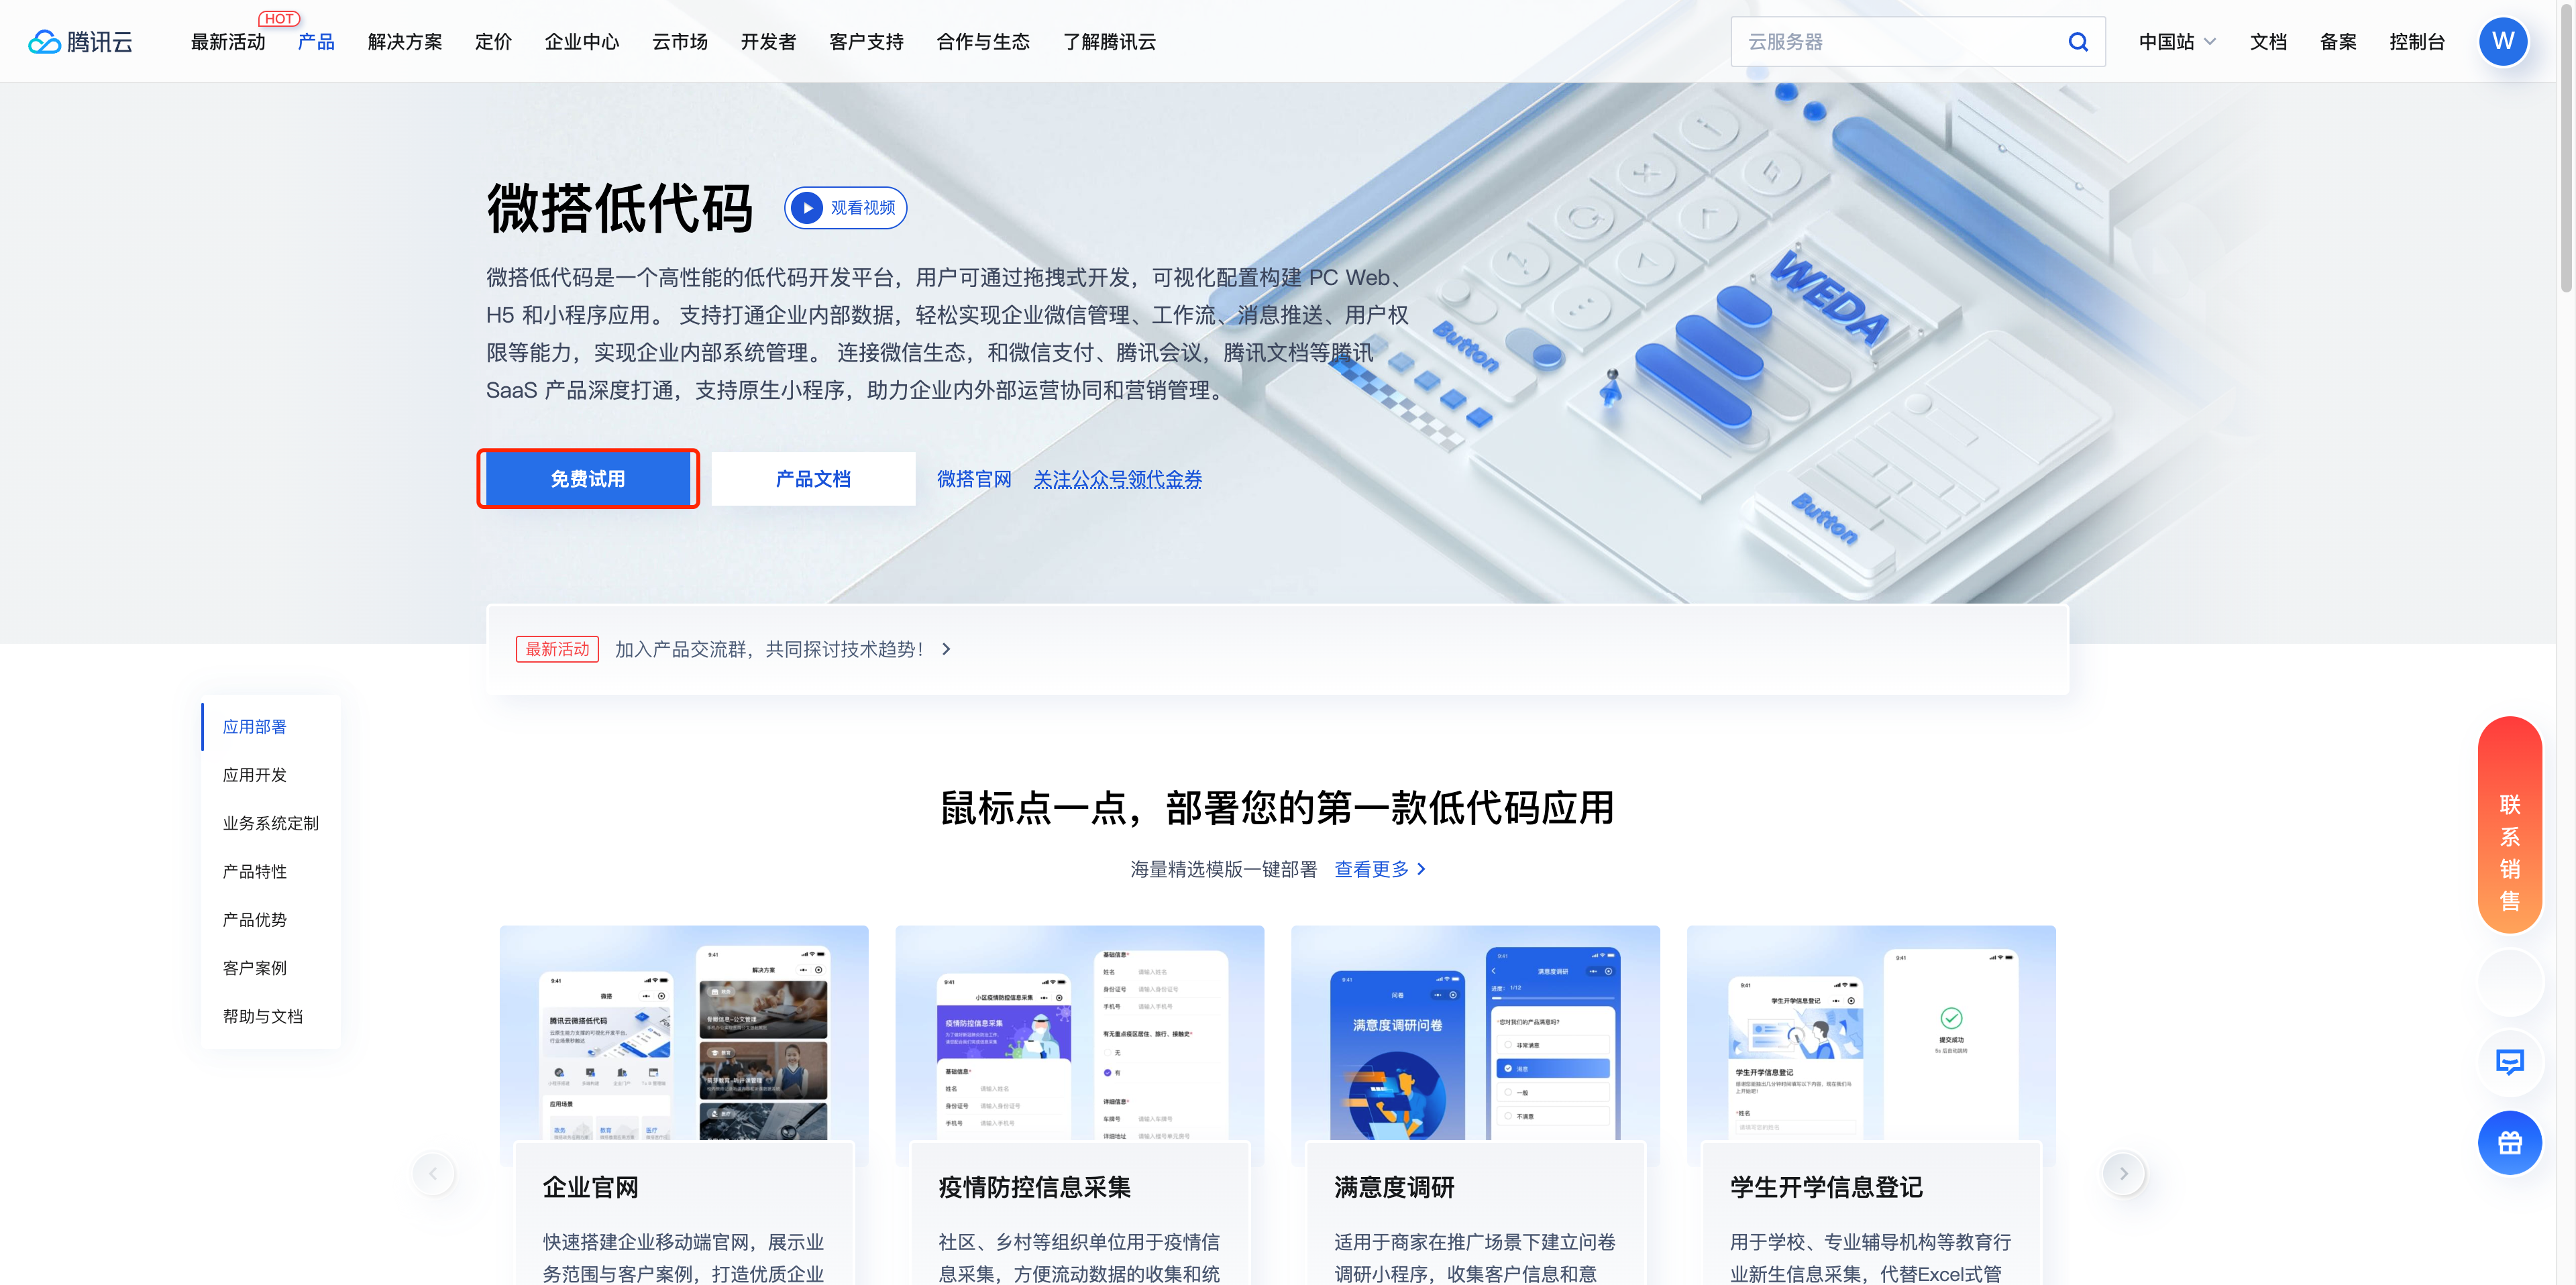
Go to the WeDa official website and click Free Trial.
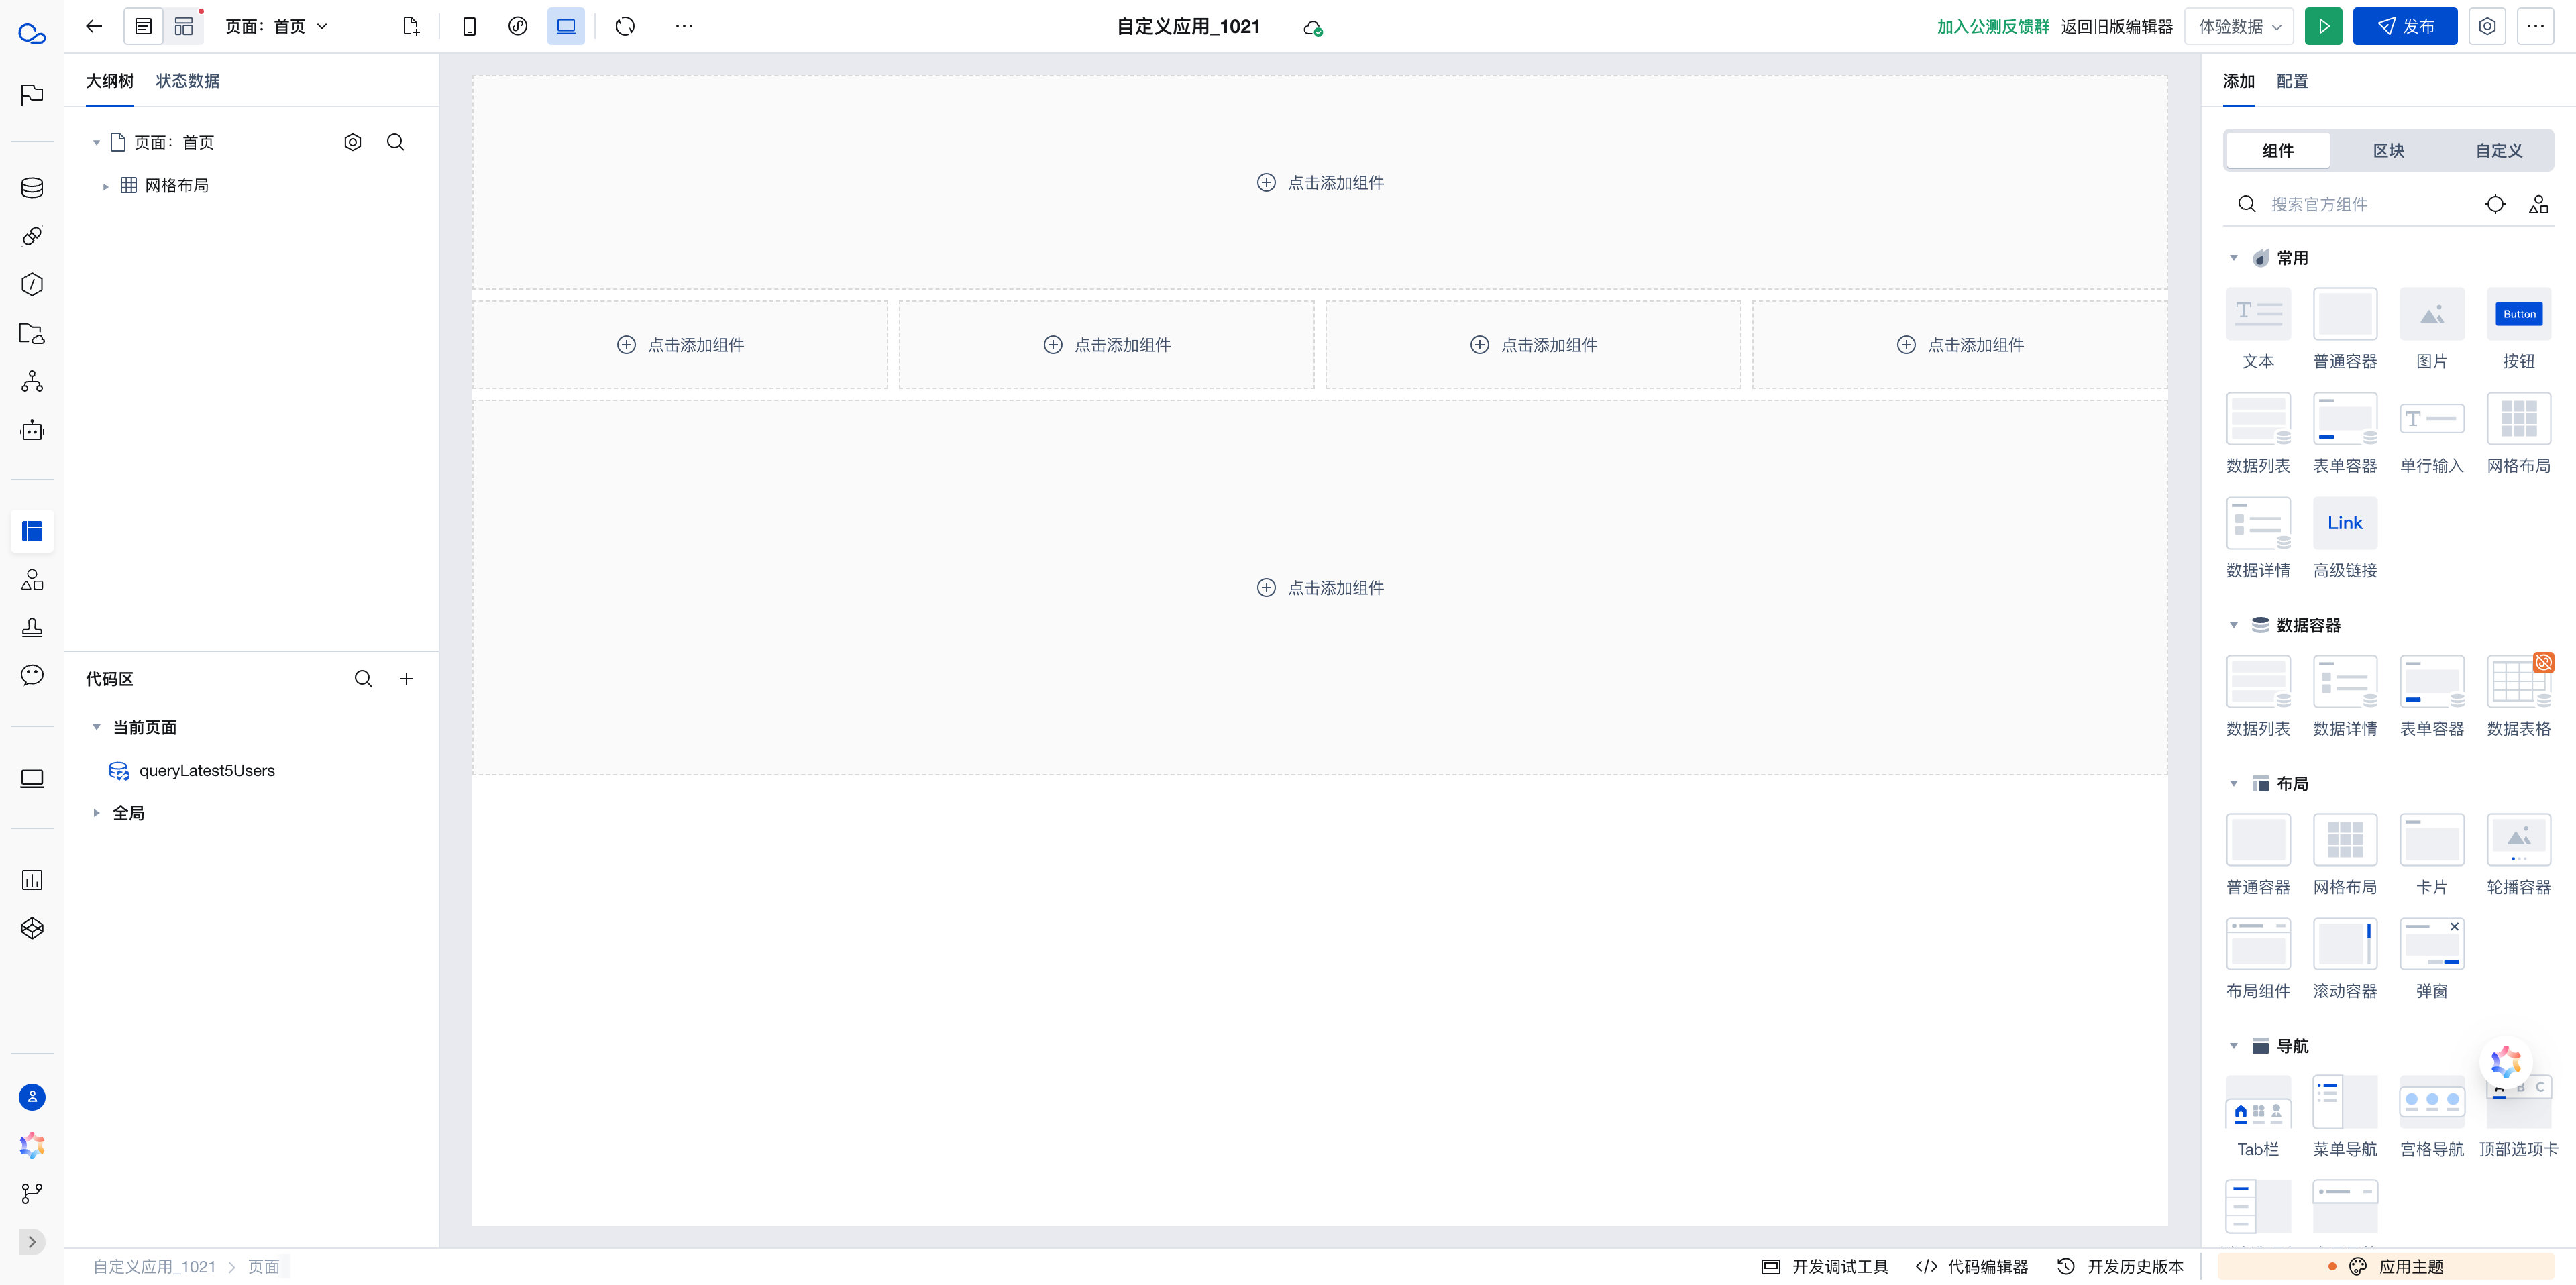
After logging in, go to the WeDa console. On the homepage, click Create from Scratch to go to the editor development page, where you can view the Editor Introduction.
Private Cloud Development
On-Premises Management System Development Tools
First, follow the above documentation to deploy WeDa locally. Then, apply for a license to use WeDa.
- After deployment is completed, log in to the WeDa platform and click Create Application.
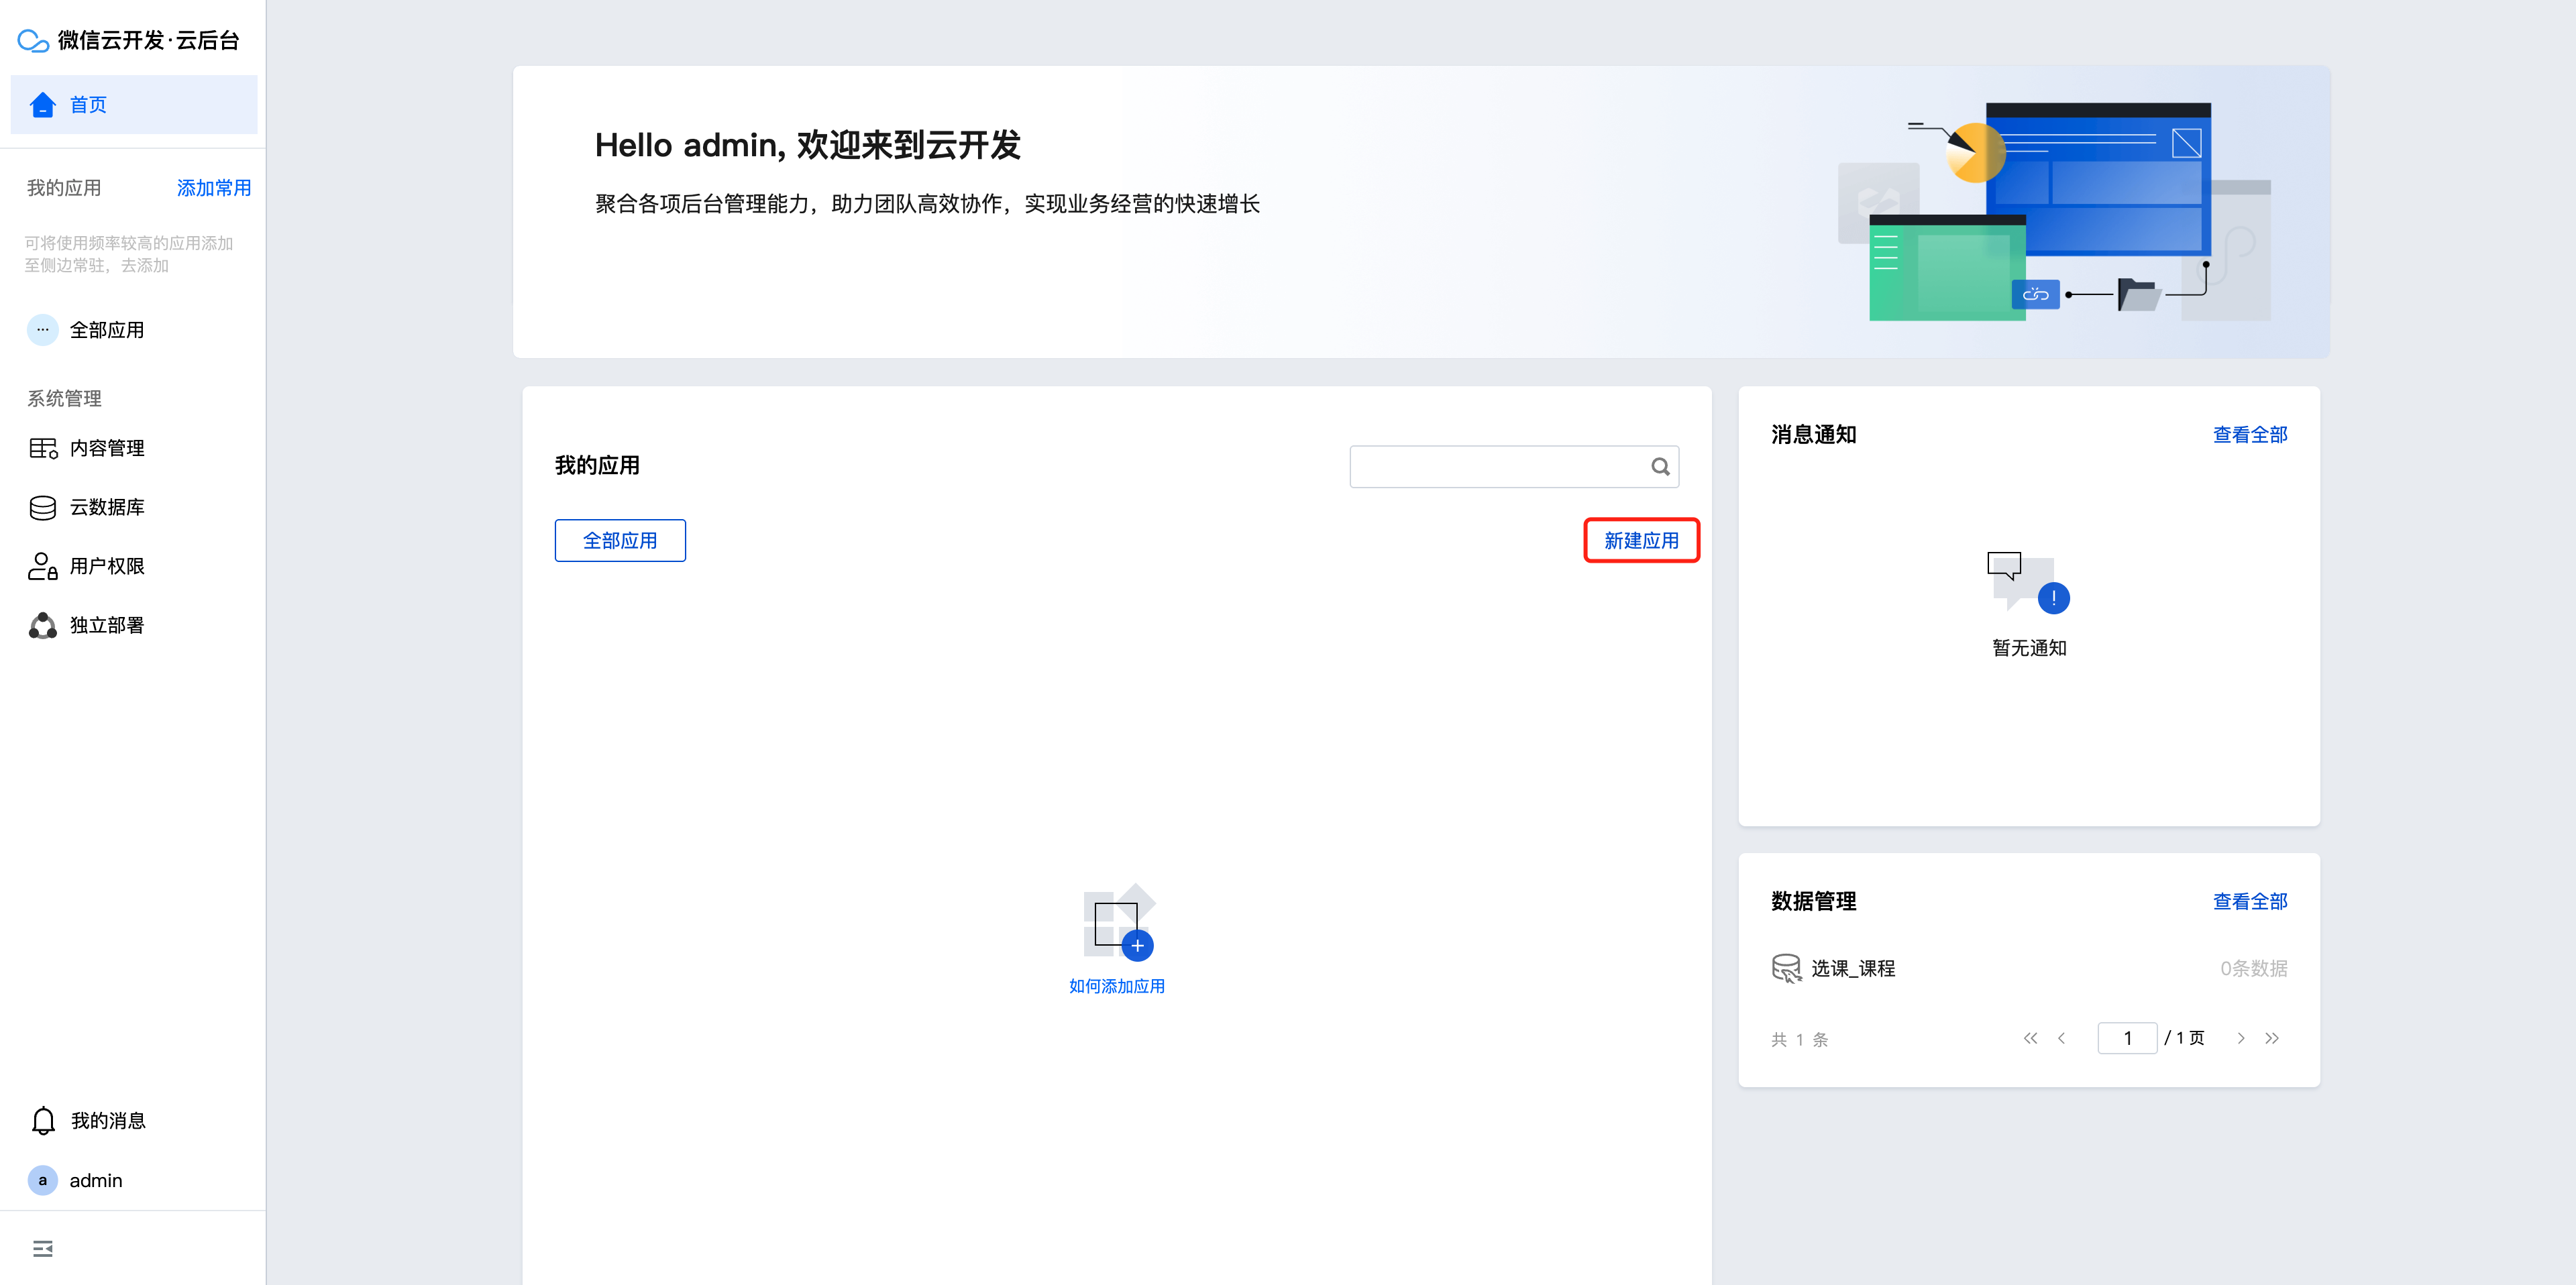
- On the homepage, click Create from Scratch to go to the editor development page.
Private Cloud Development
In WeDa, all data collections are named data sources, which are categorized into data models, APIs (private cloud currently only supports http, postman, openapi), and data connectors. For specific usage, refer to Data Source Overview.
Here, we use WeDa's data model for development. Data Model Overview
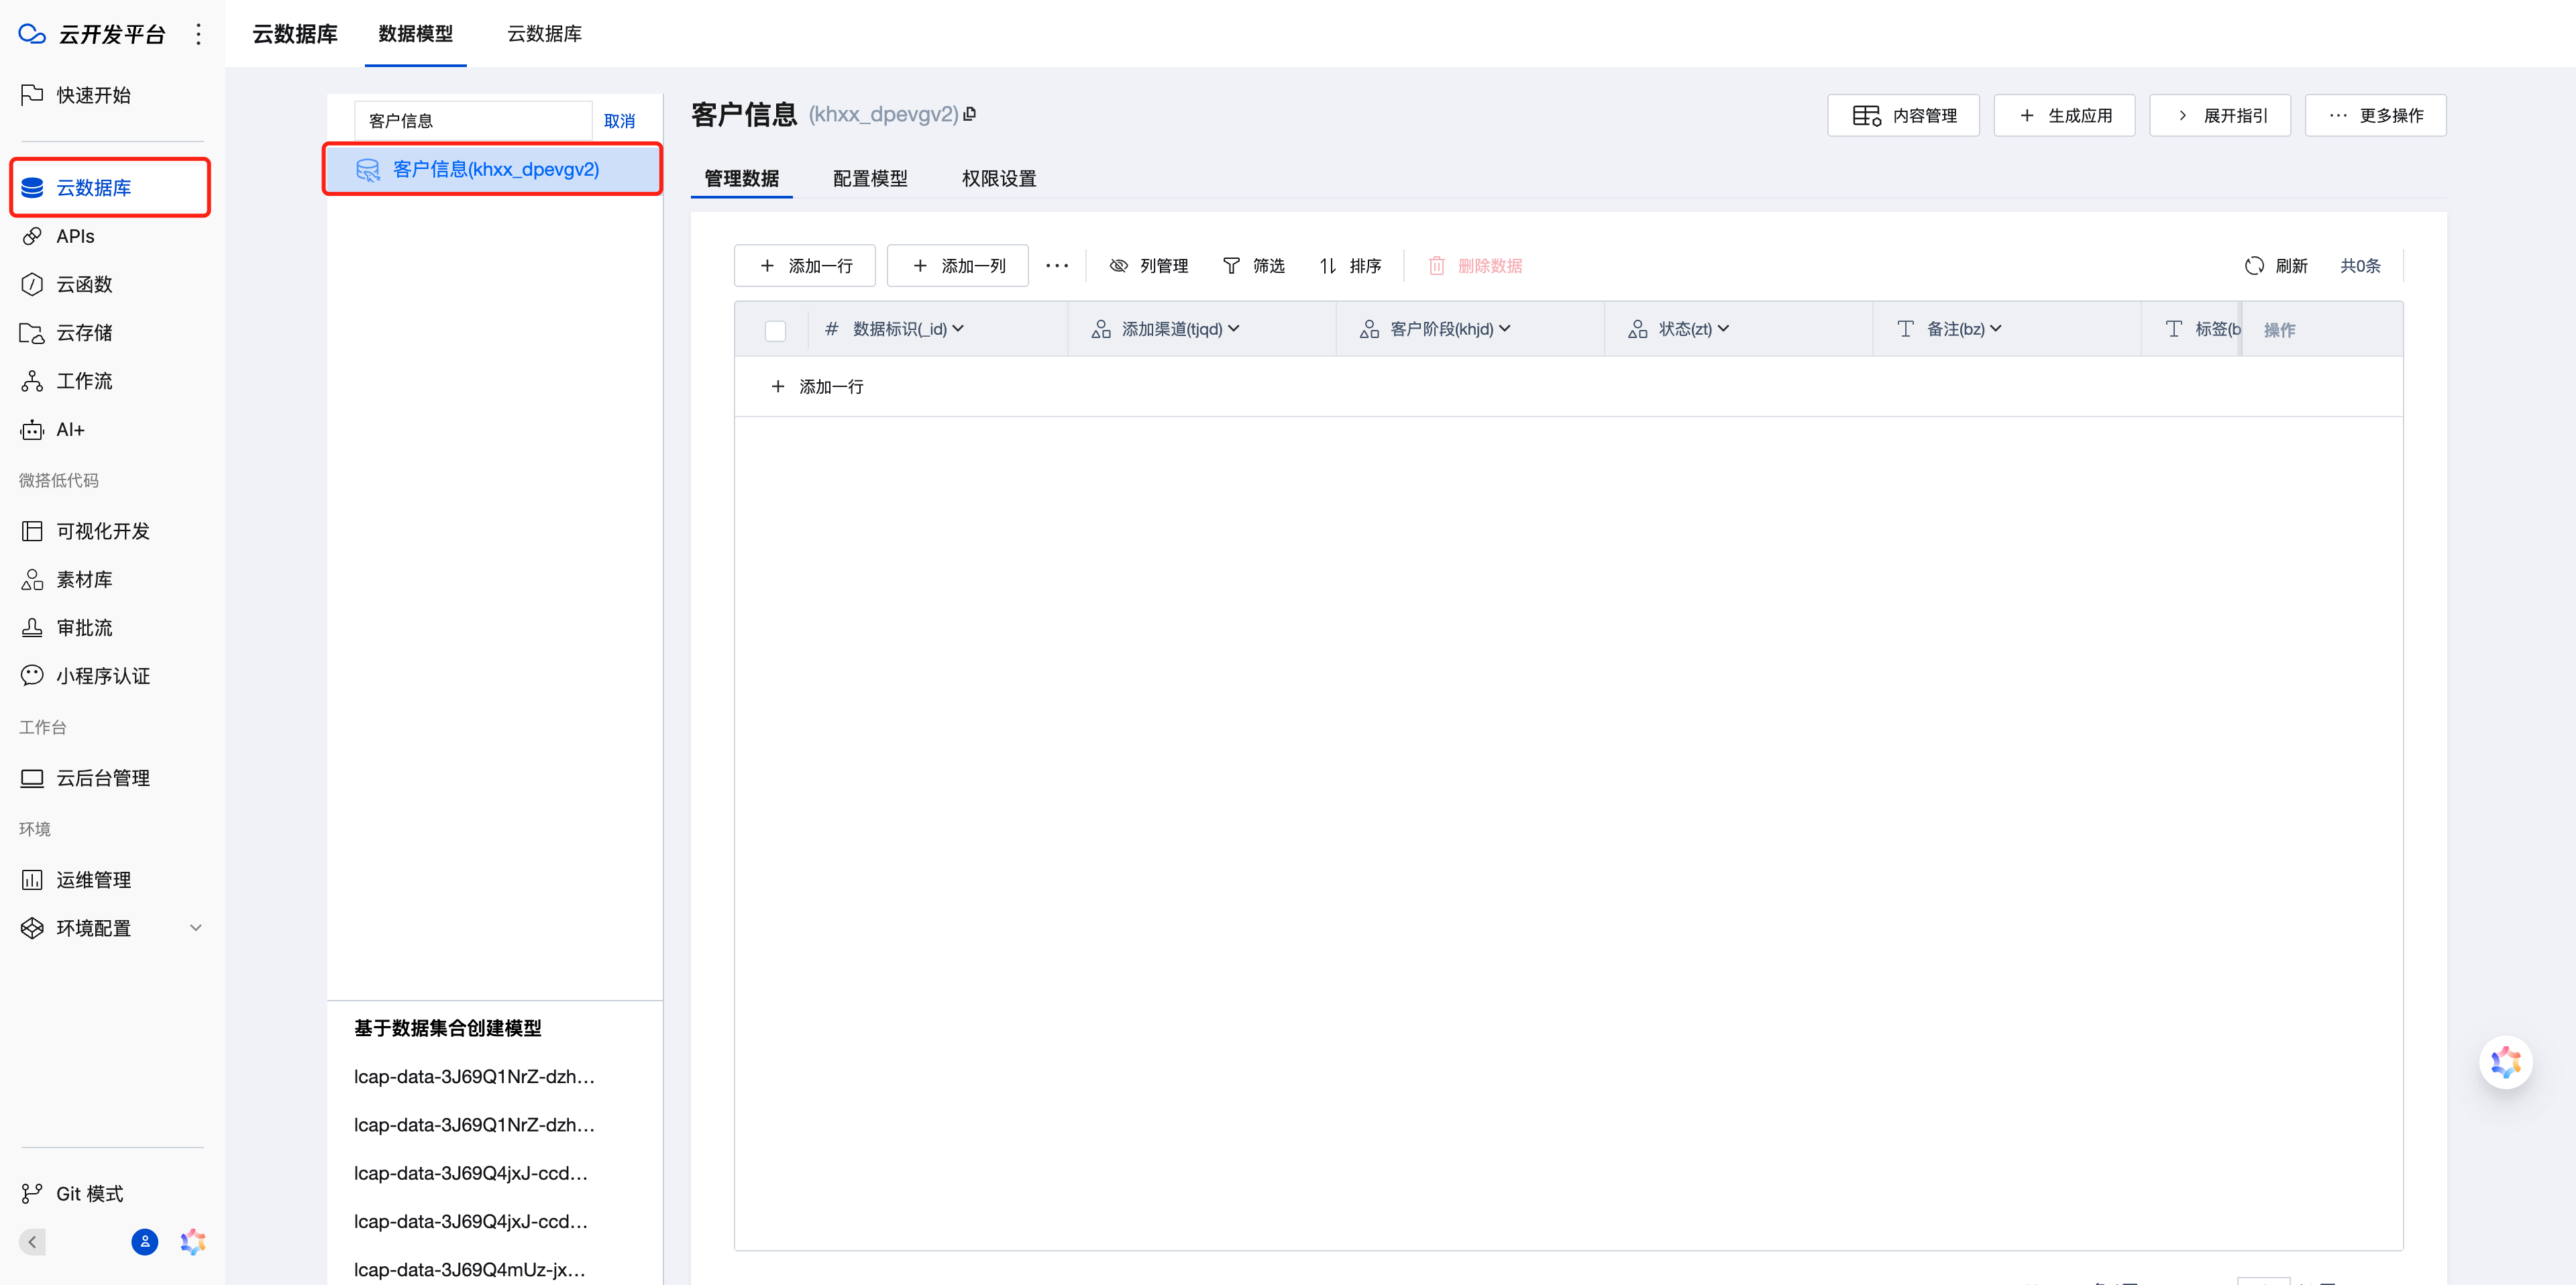
Public Cloud
Click the database to go to the data model creation page.
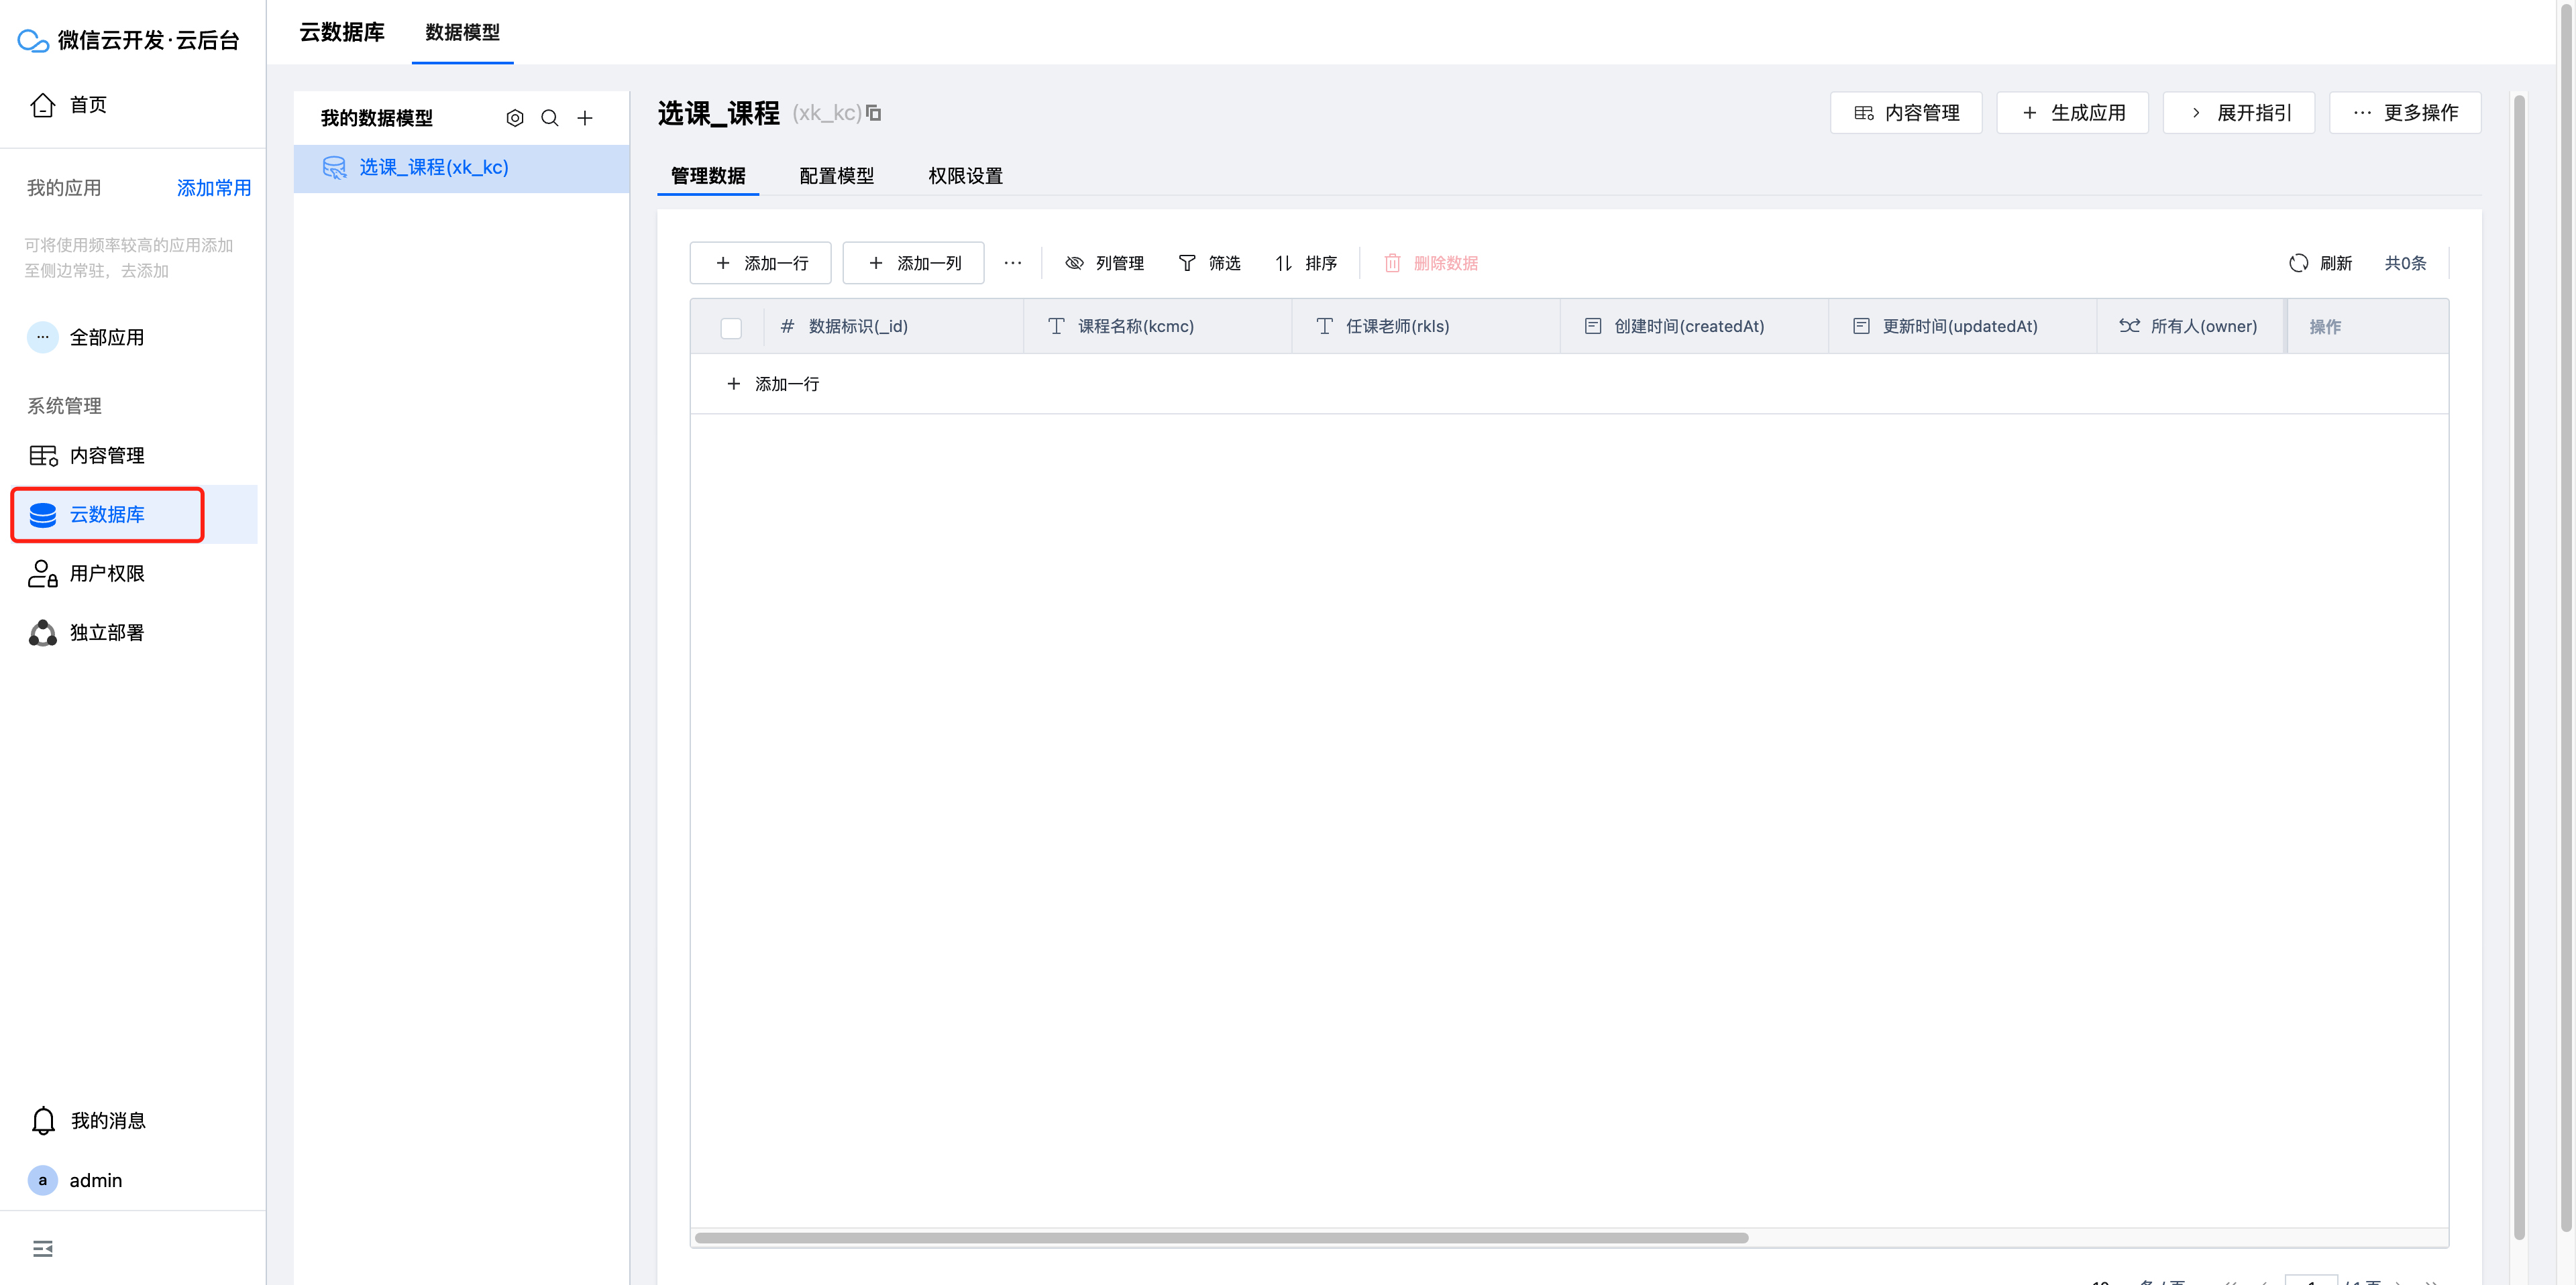
Private Cloud
Click the database to go to the data model creation page.
Click New Data Model, enter "Customer Information" as the name. The identifier serves as the unique identifier for the data model and will be automatically generated, requiring no manual adjustment here.
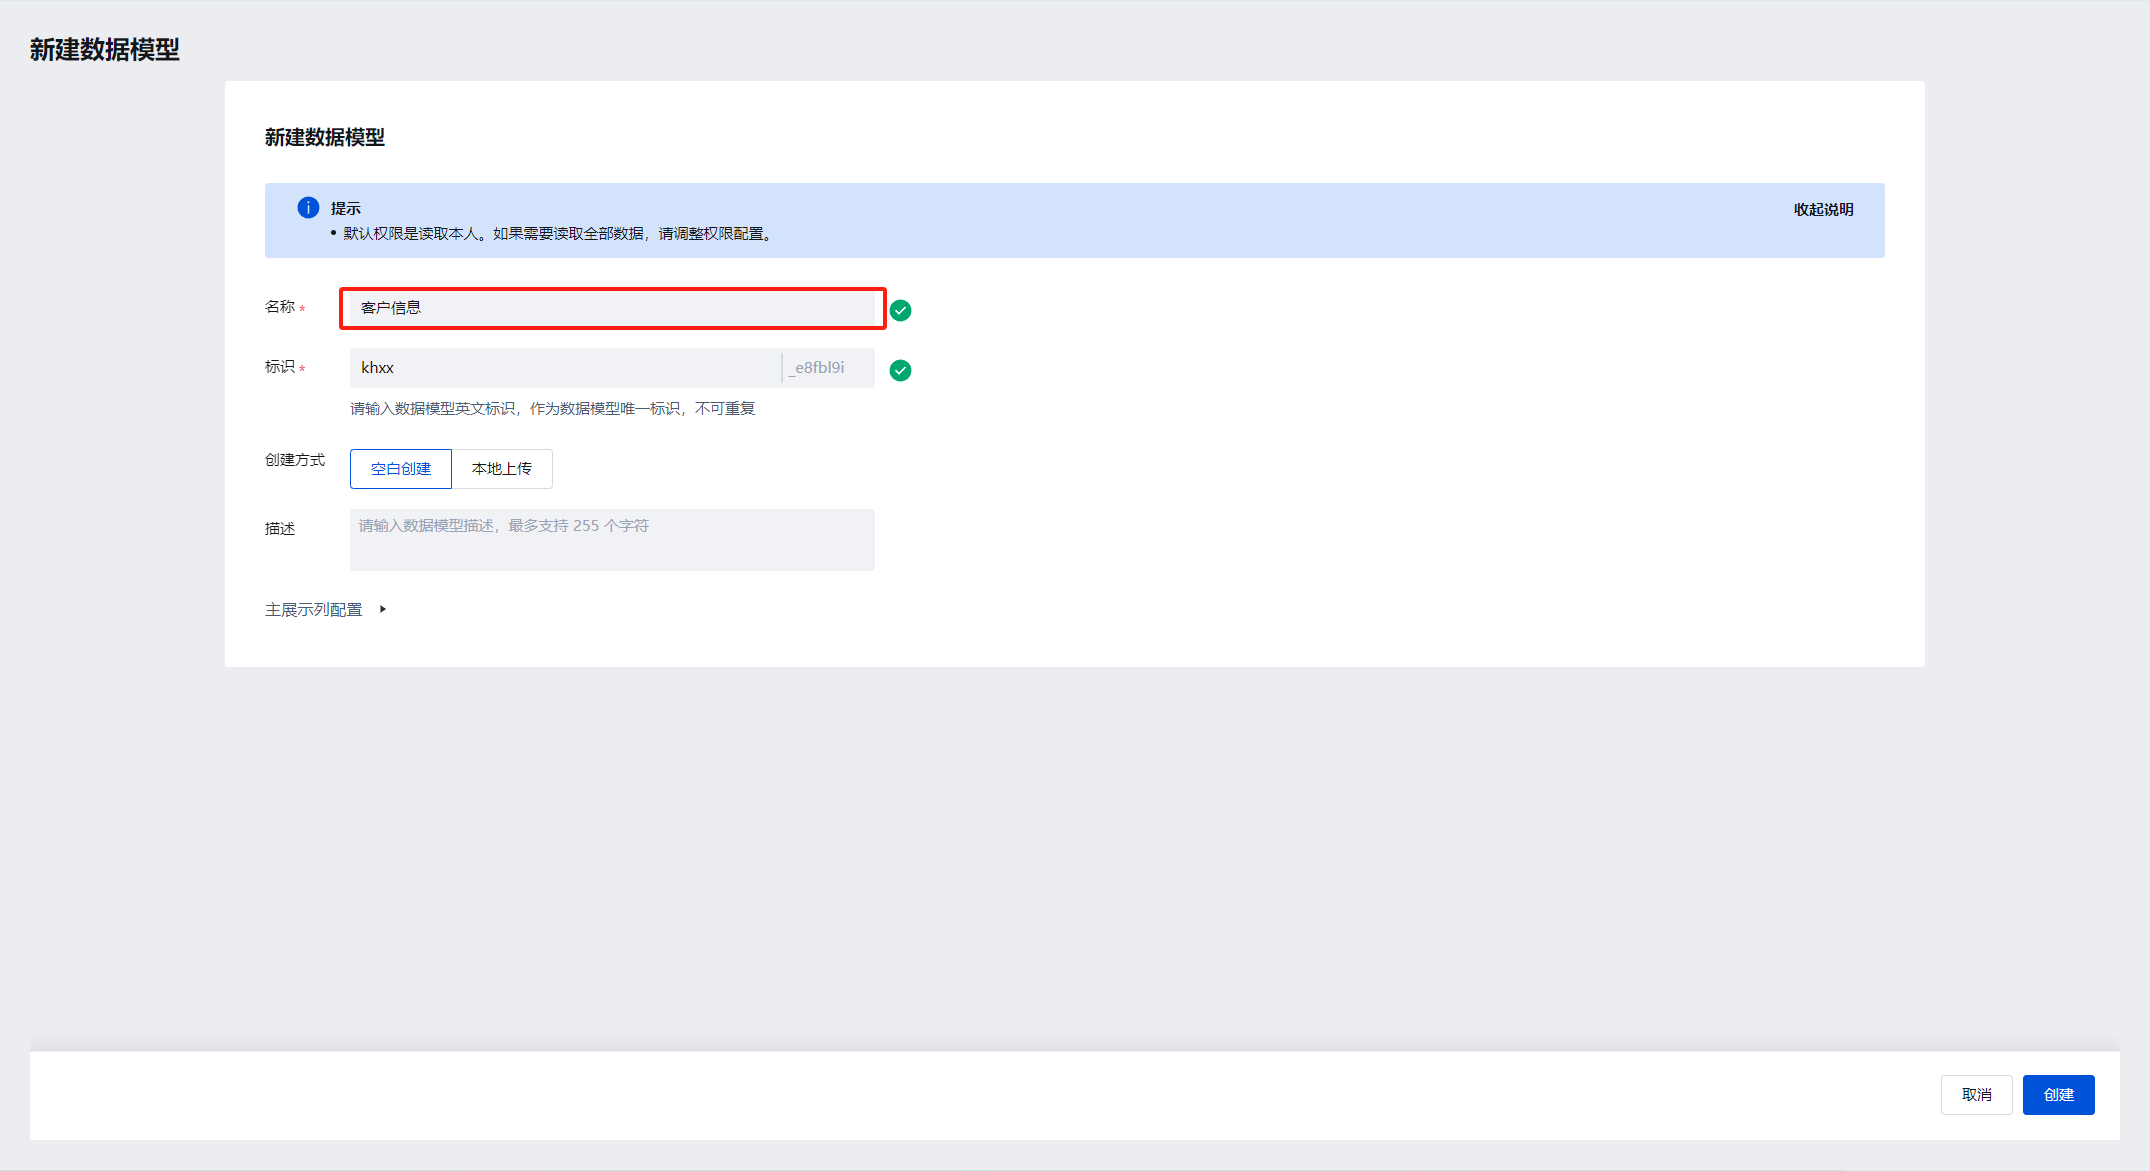
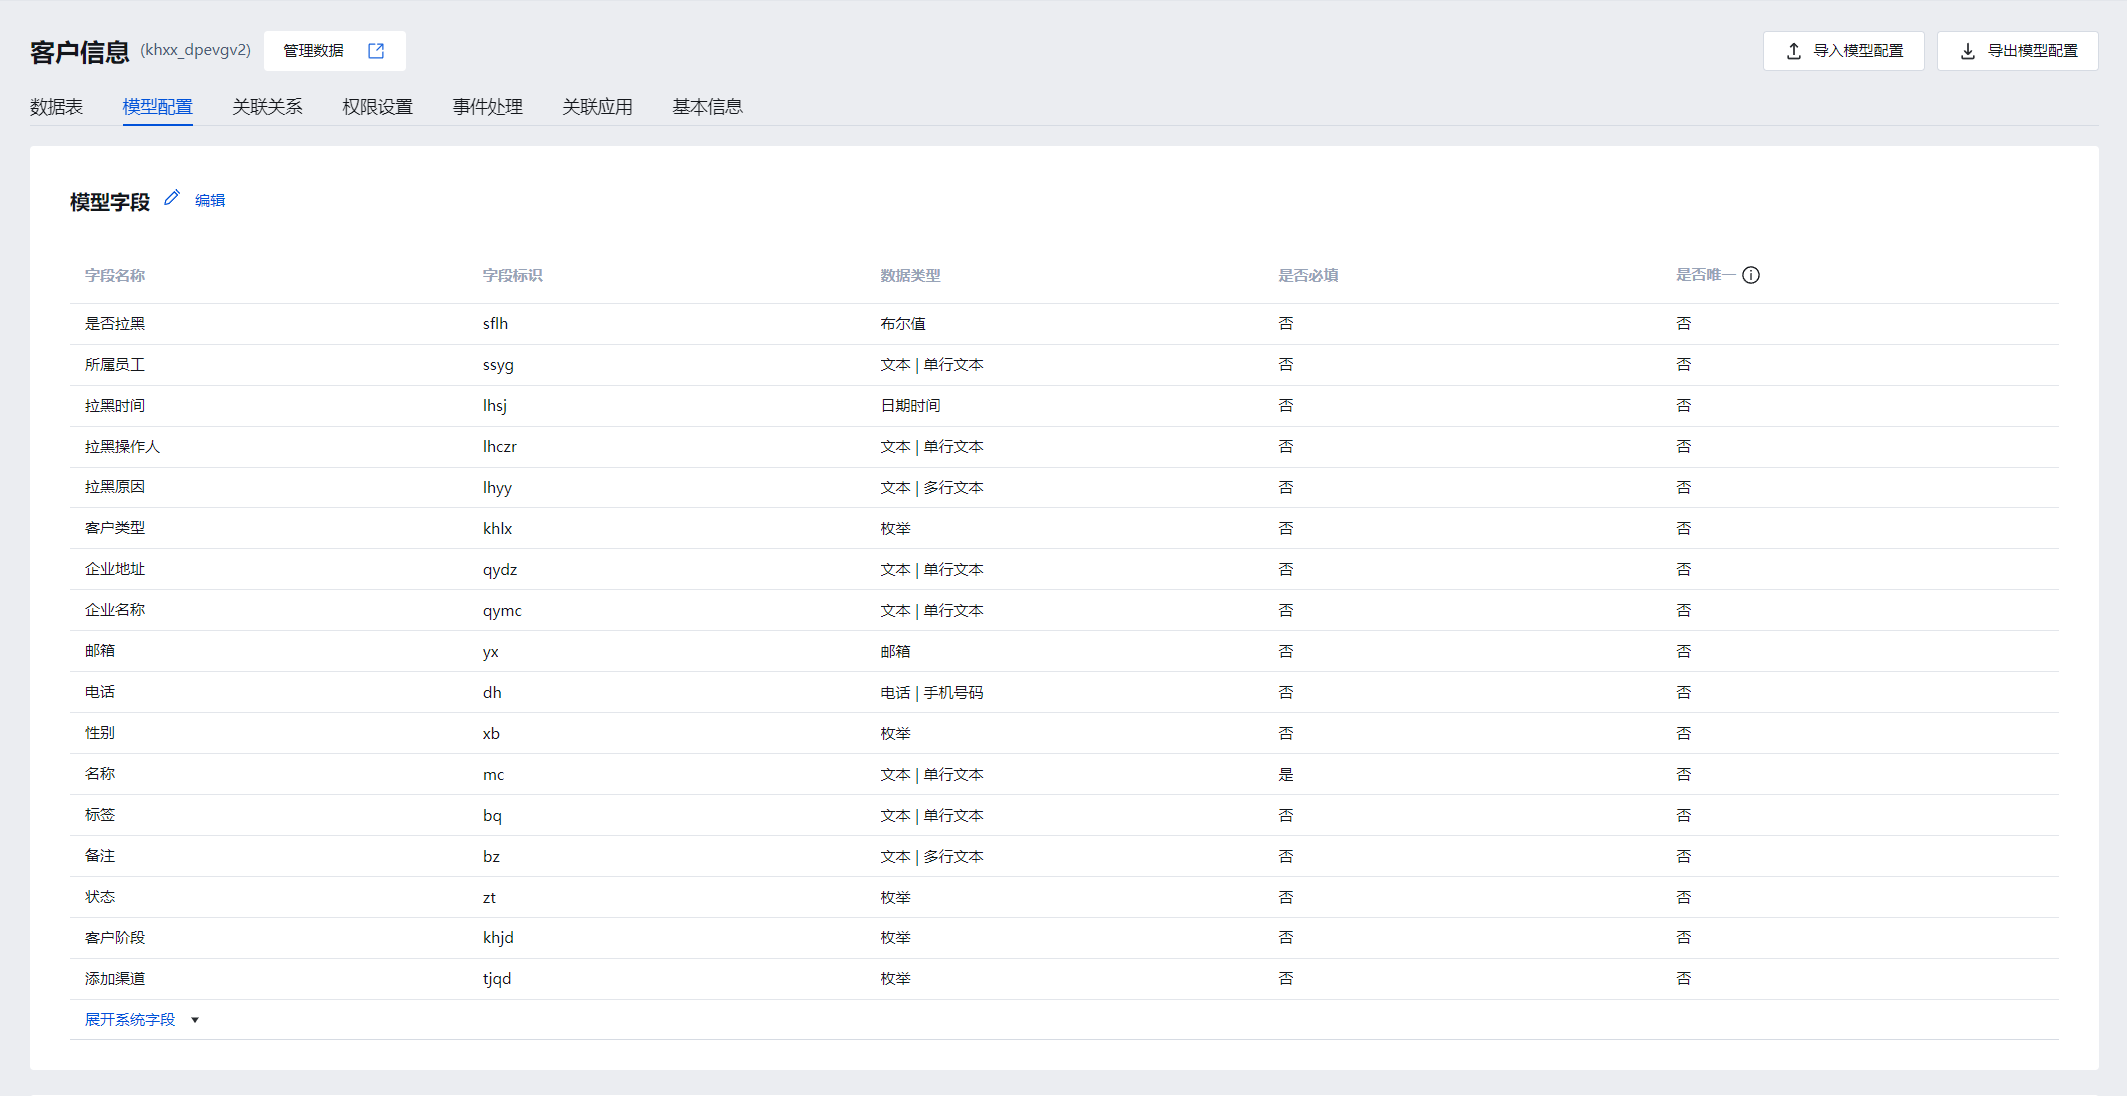
Click the Create button. After success, go to the model configuration page, click Edit, add fields, and enter all field information according to the above data structure.
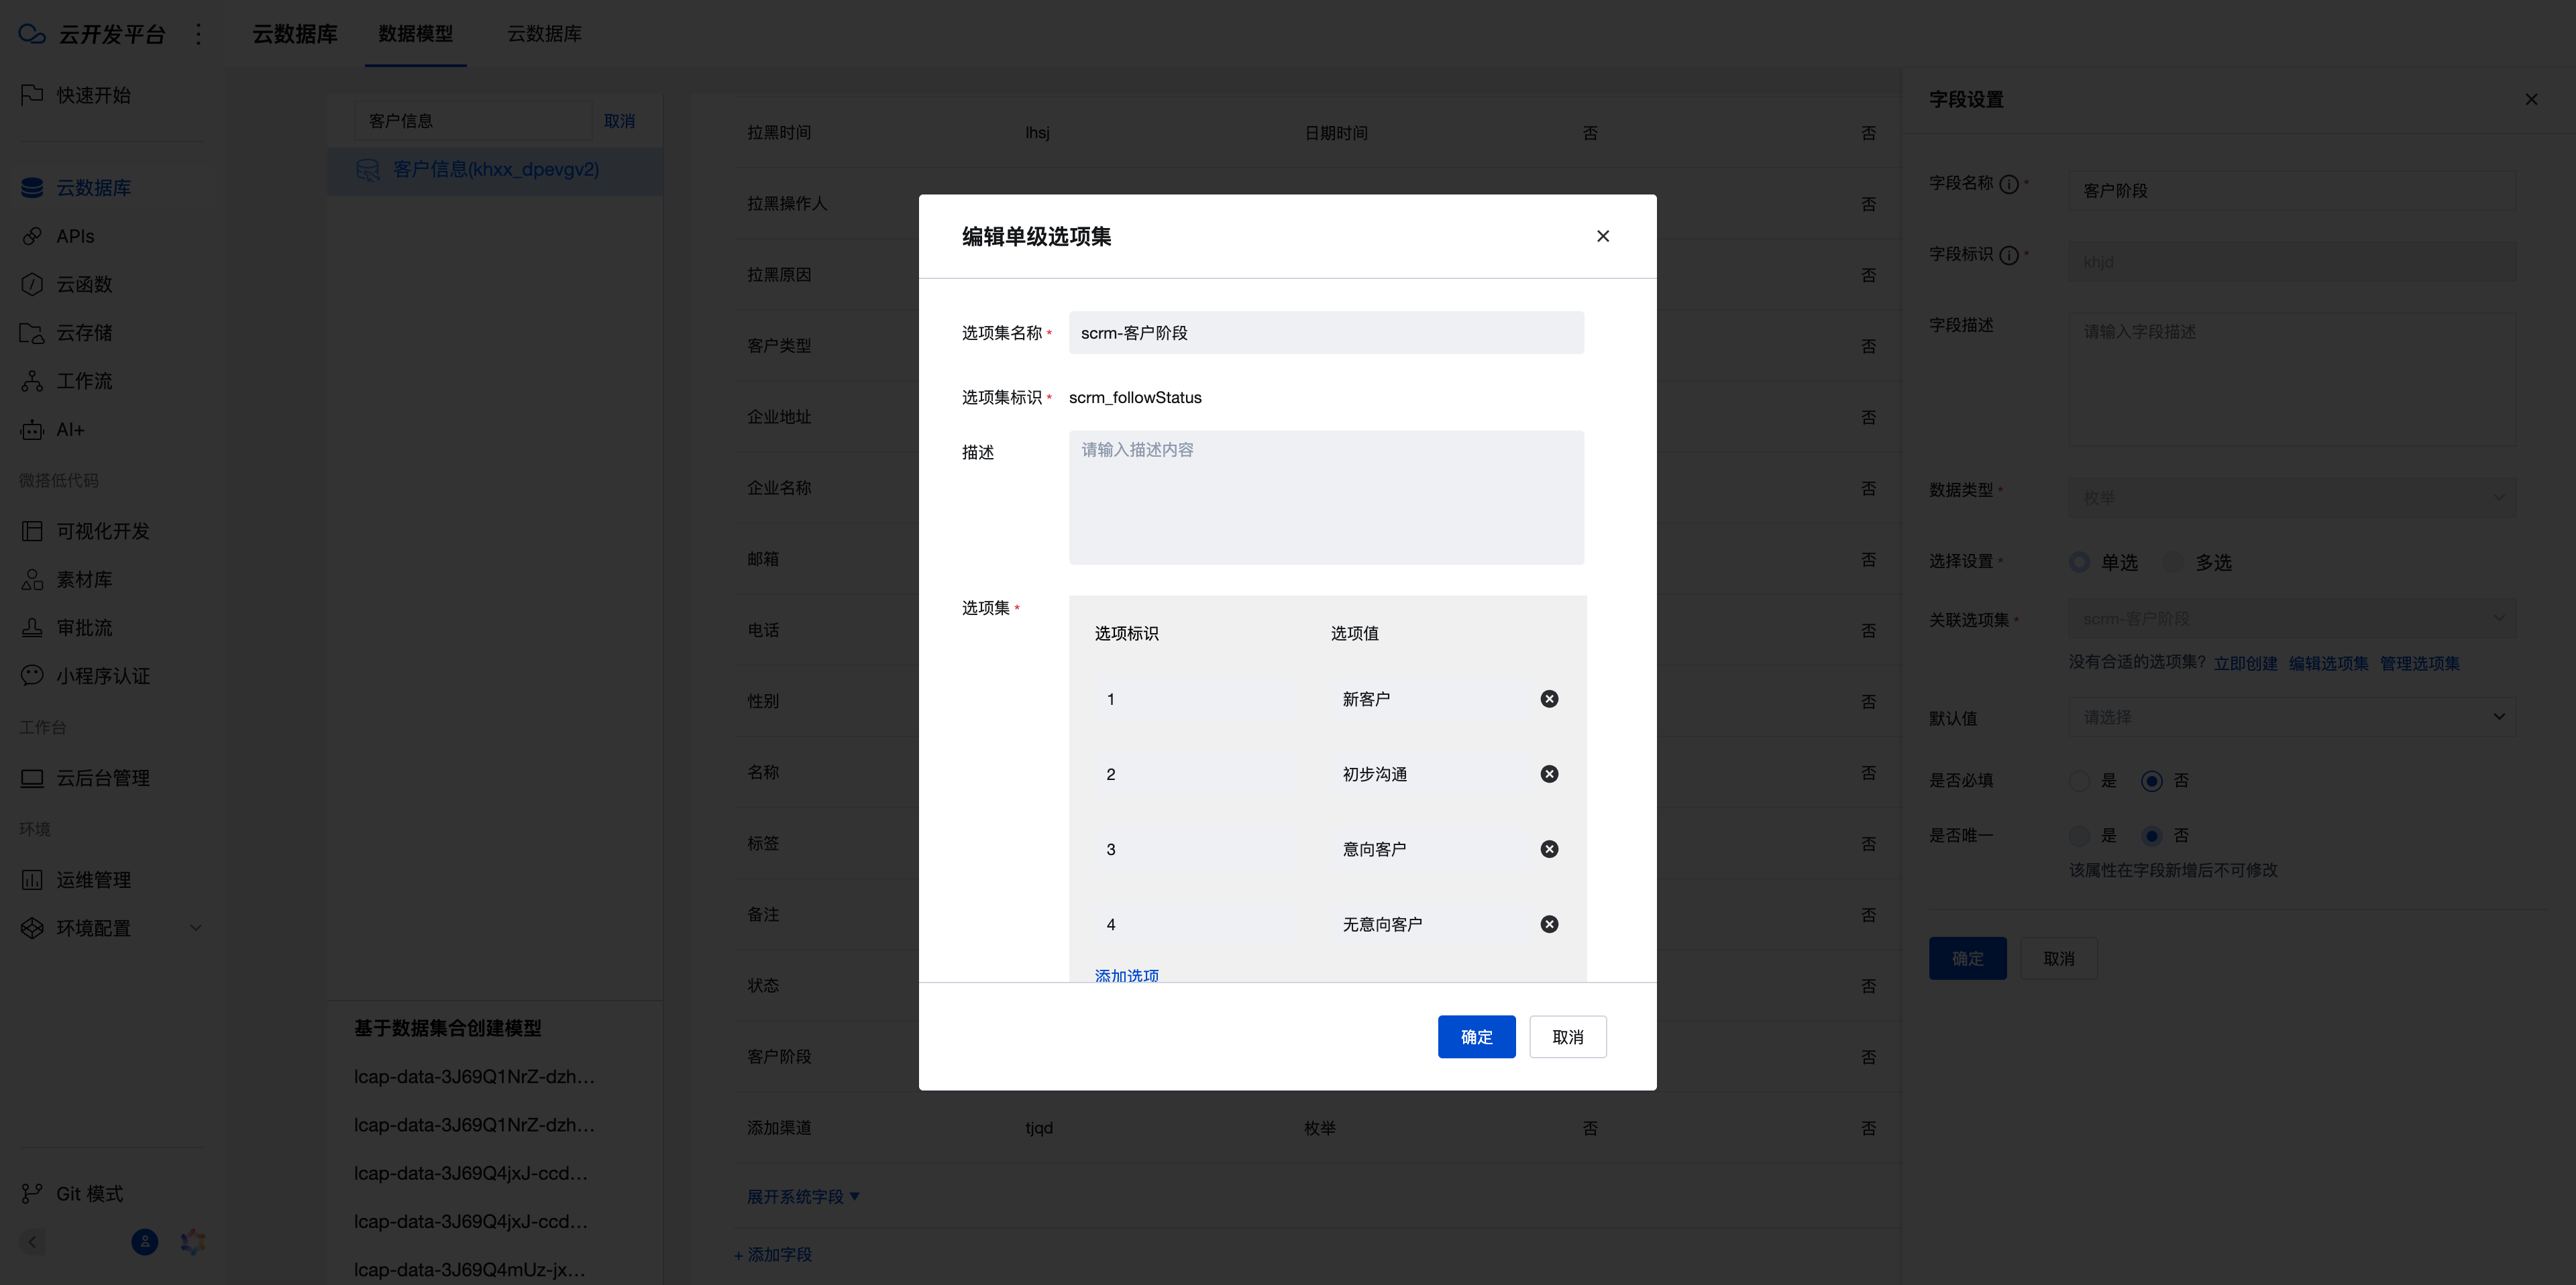
Here, the enum field needs to be associated with a dataset; click 'Create Now'.
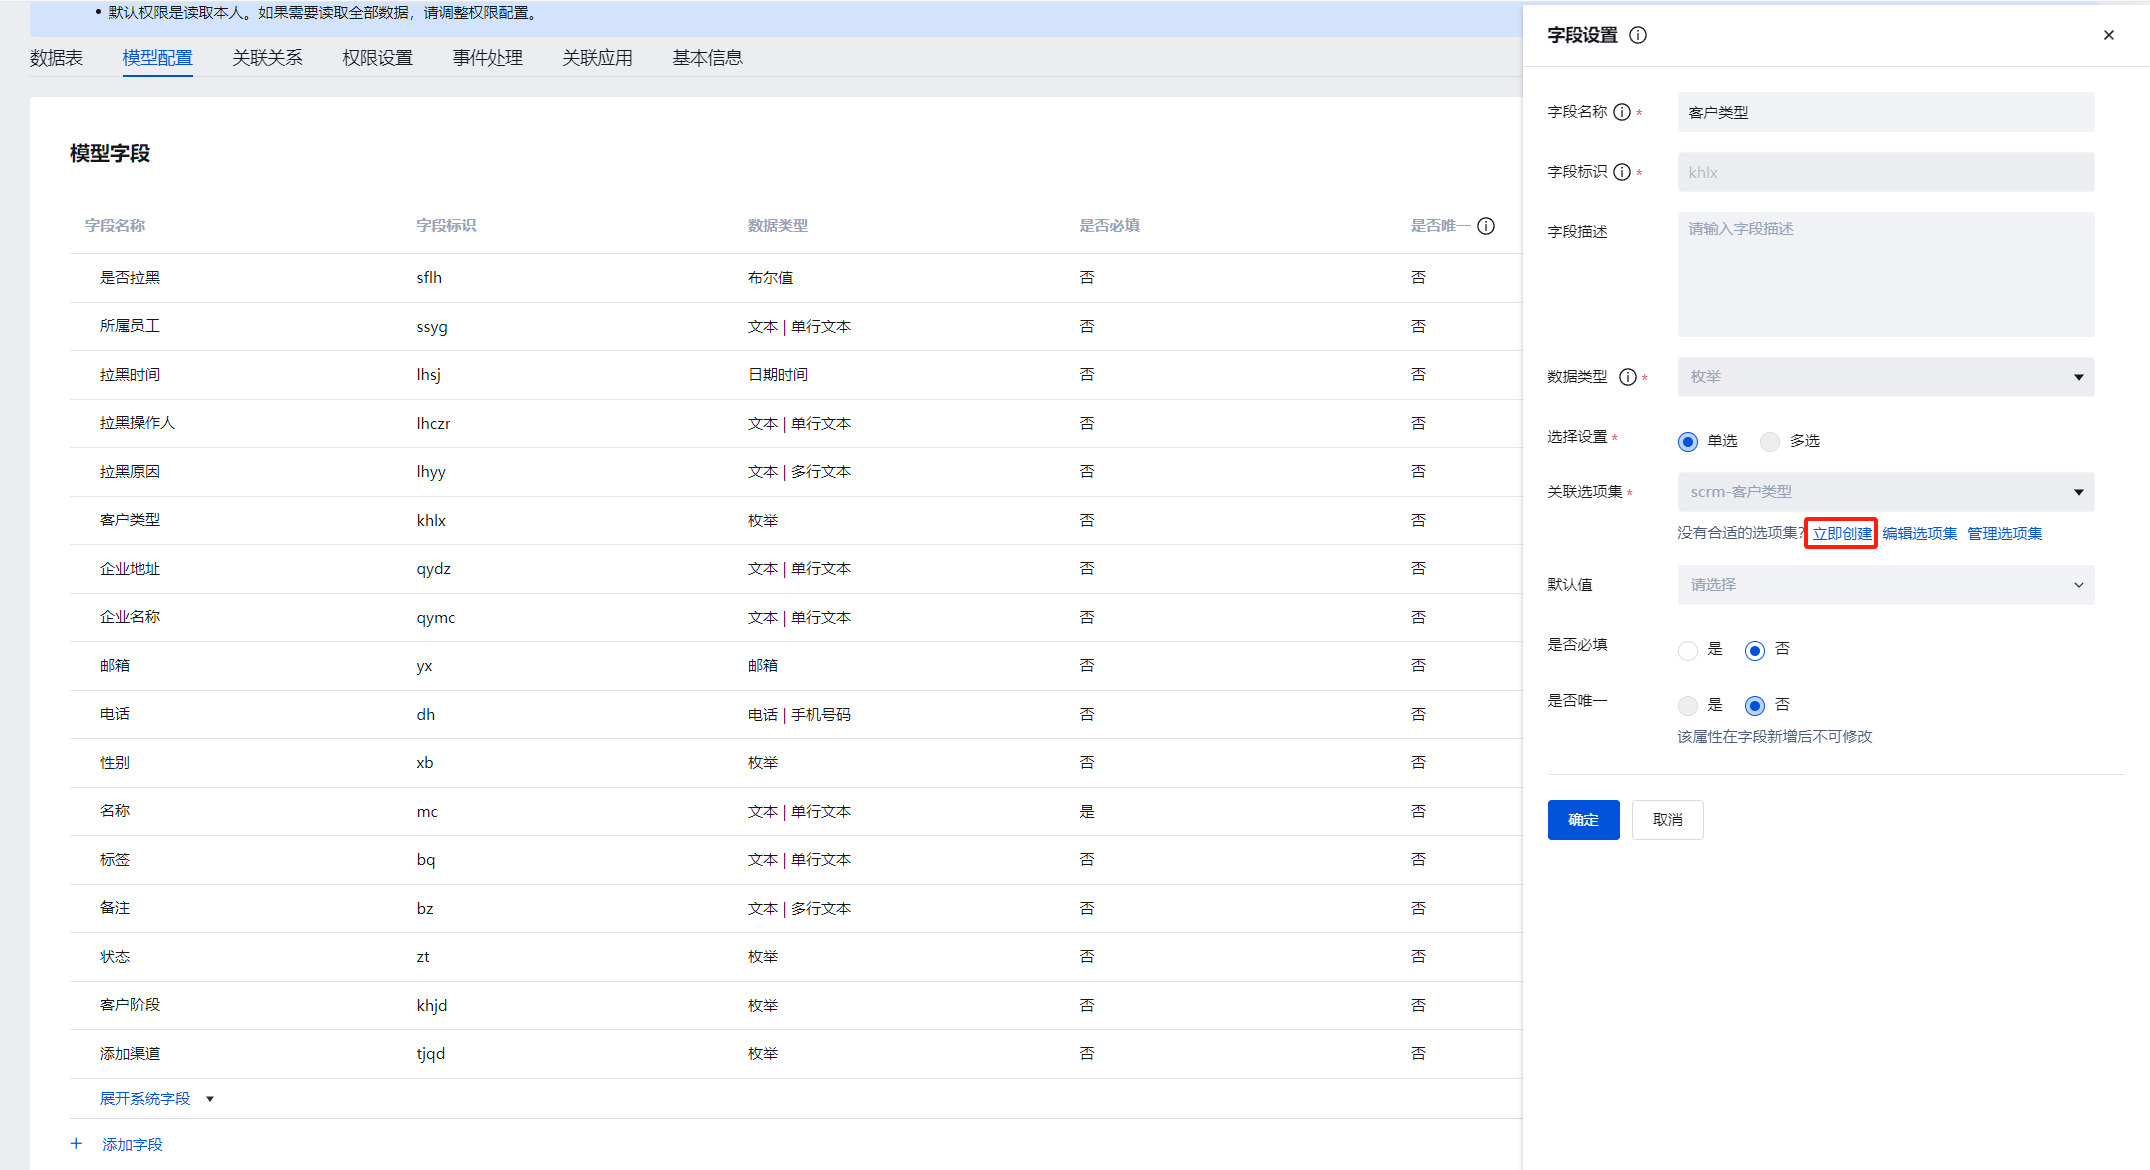
-
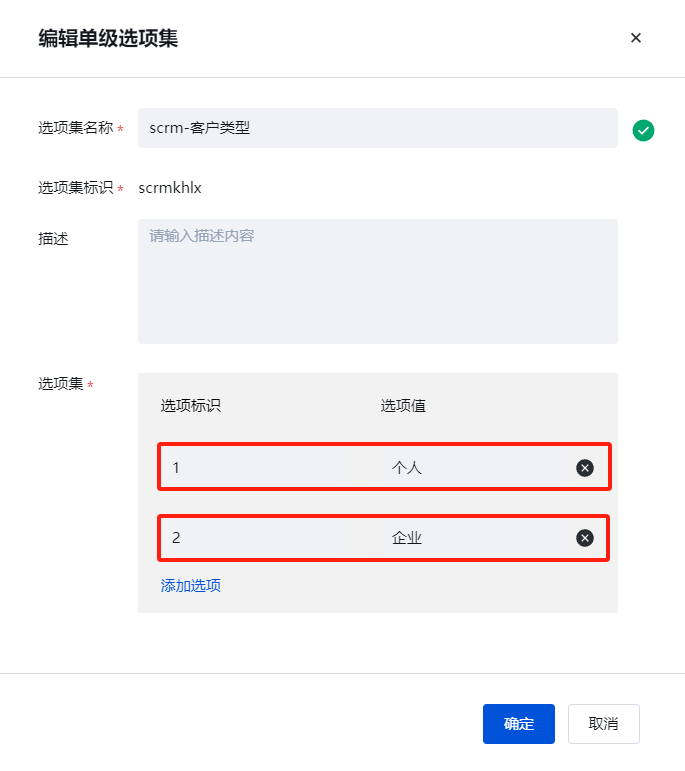
Then enter the corresponding dictionary data. Here, take customer type as an example. Click 'Create Now'.
-
Enter the name as scrm-Customer Type. We default to using the 1/2 option identifiers, corresponding to Individual/Enterprise respectively.
-
Click OK to bind the option set to the Customer Type field.
The option identifier is the data stored in the database, and the option value is the Chinese text for frontend display.
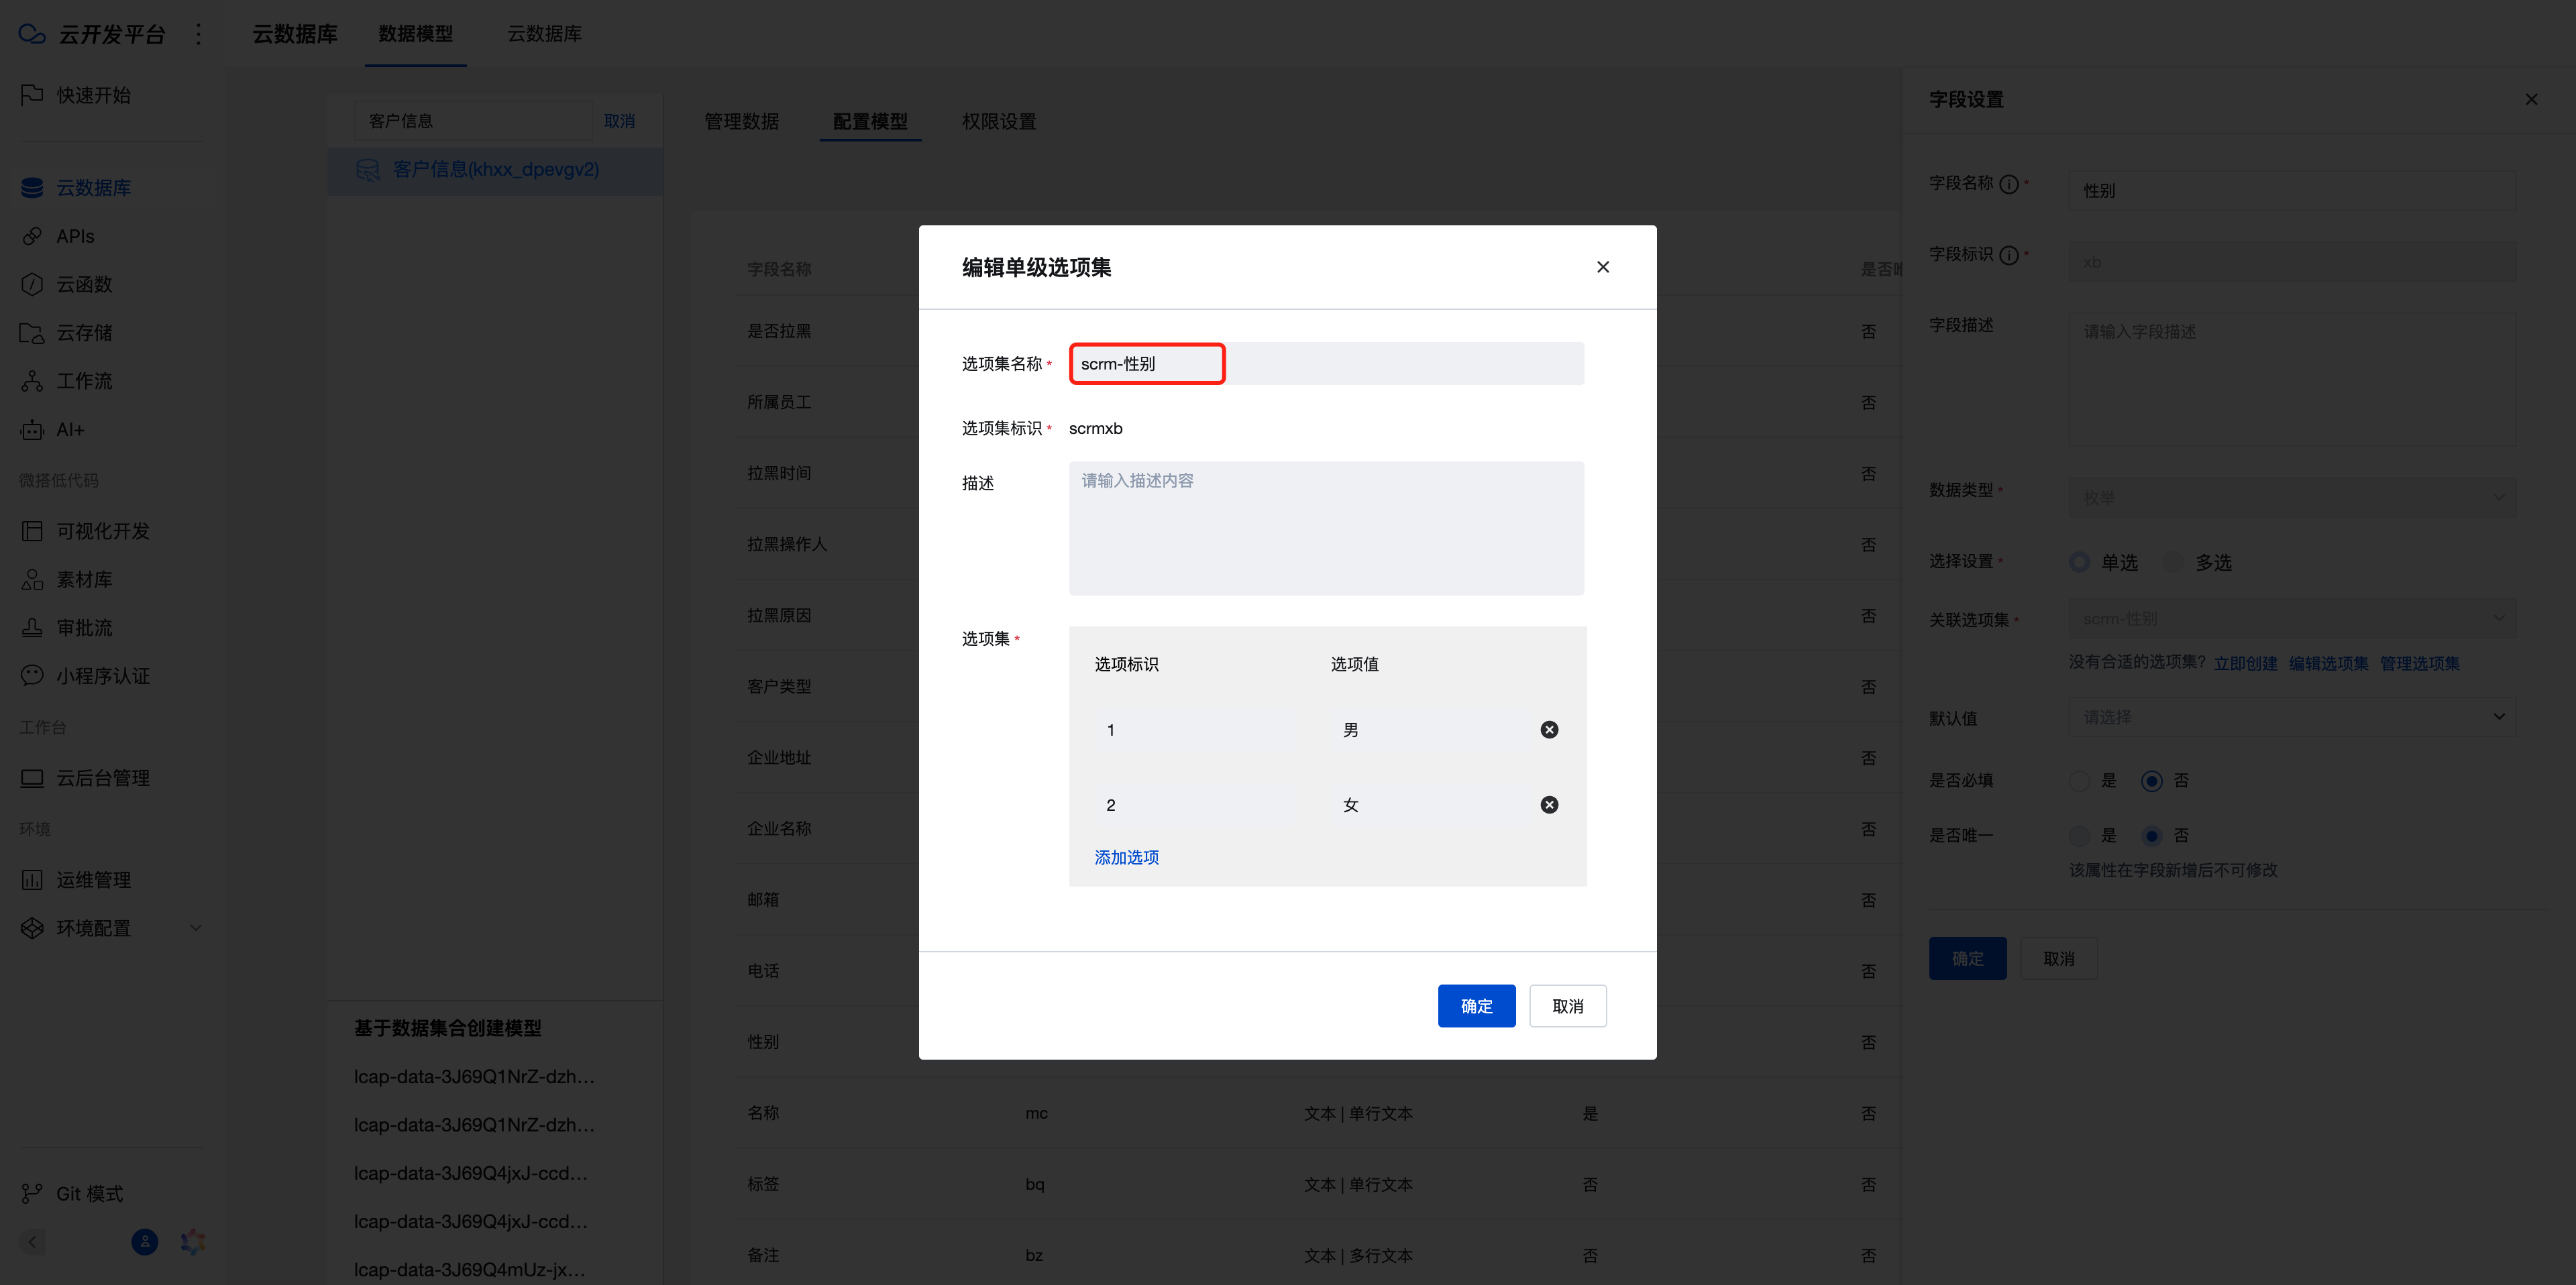
Create the corresponding option set for the gender enum.
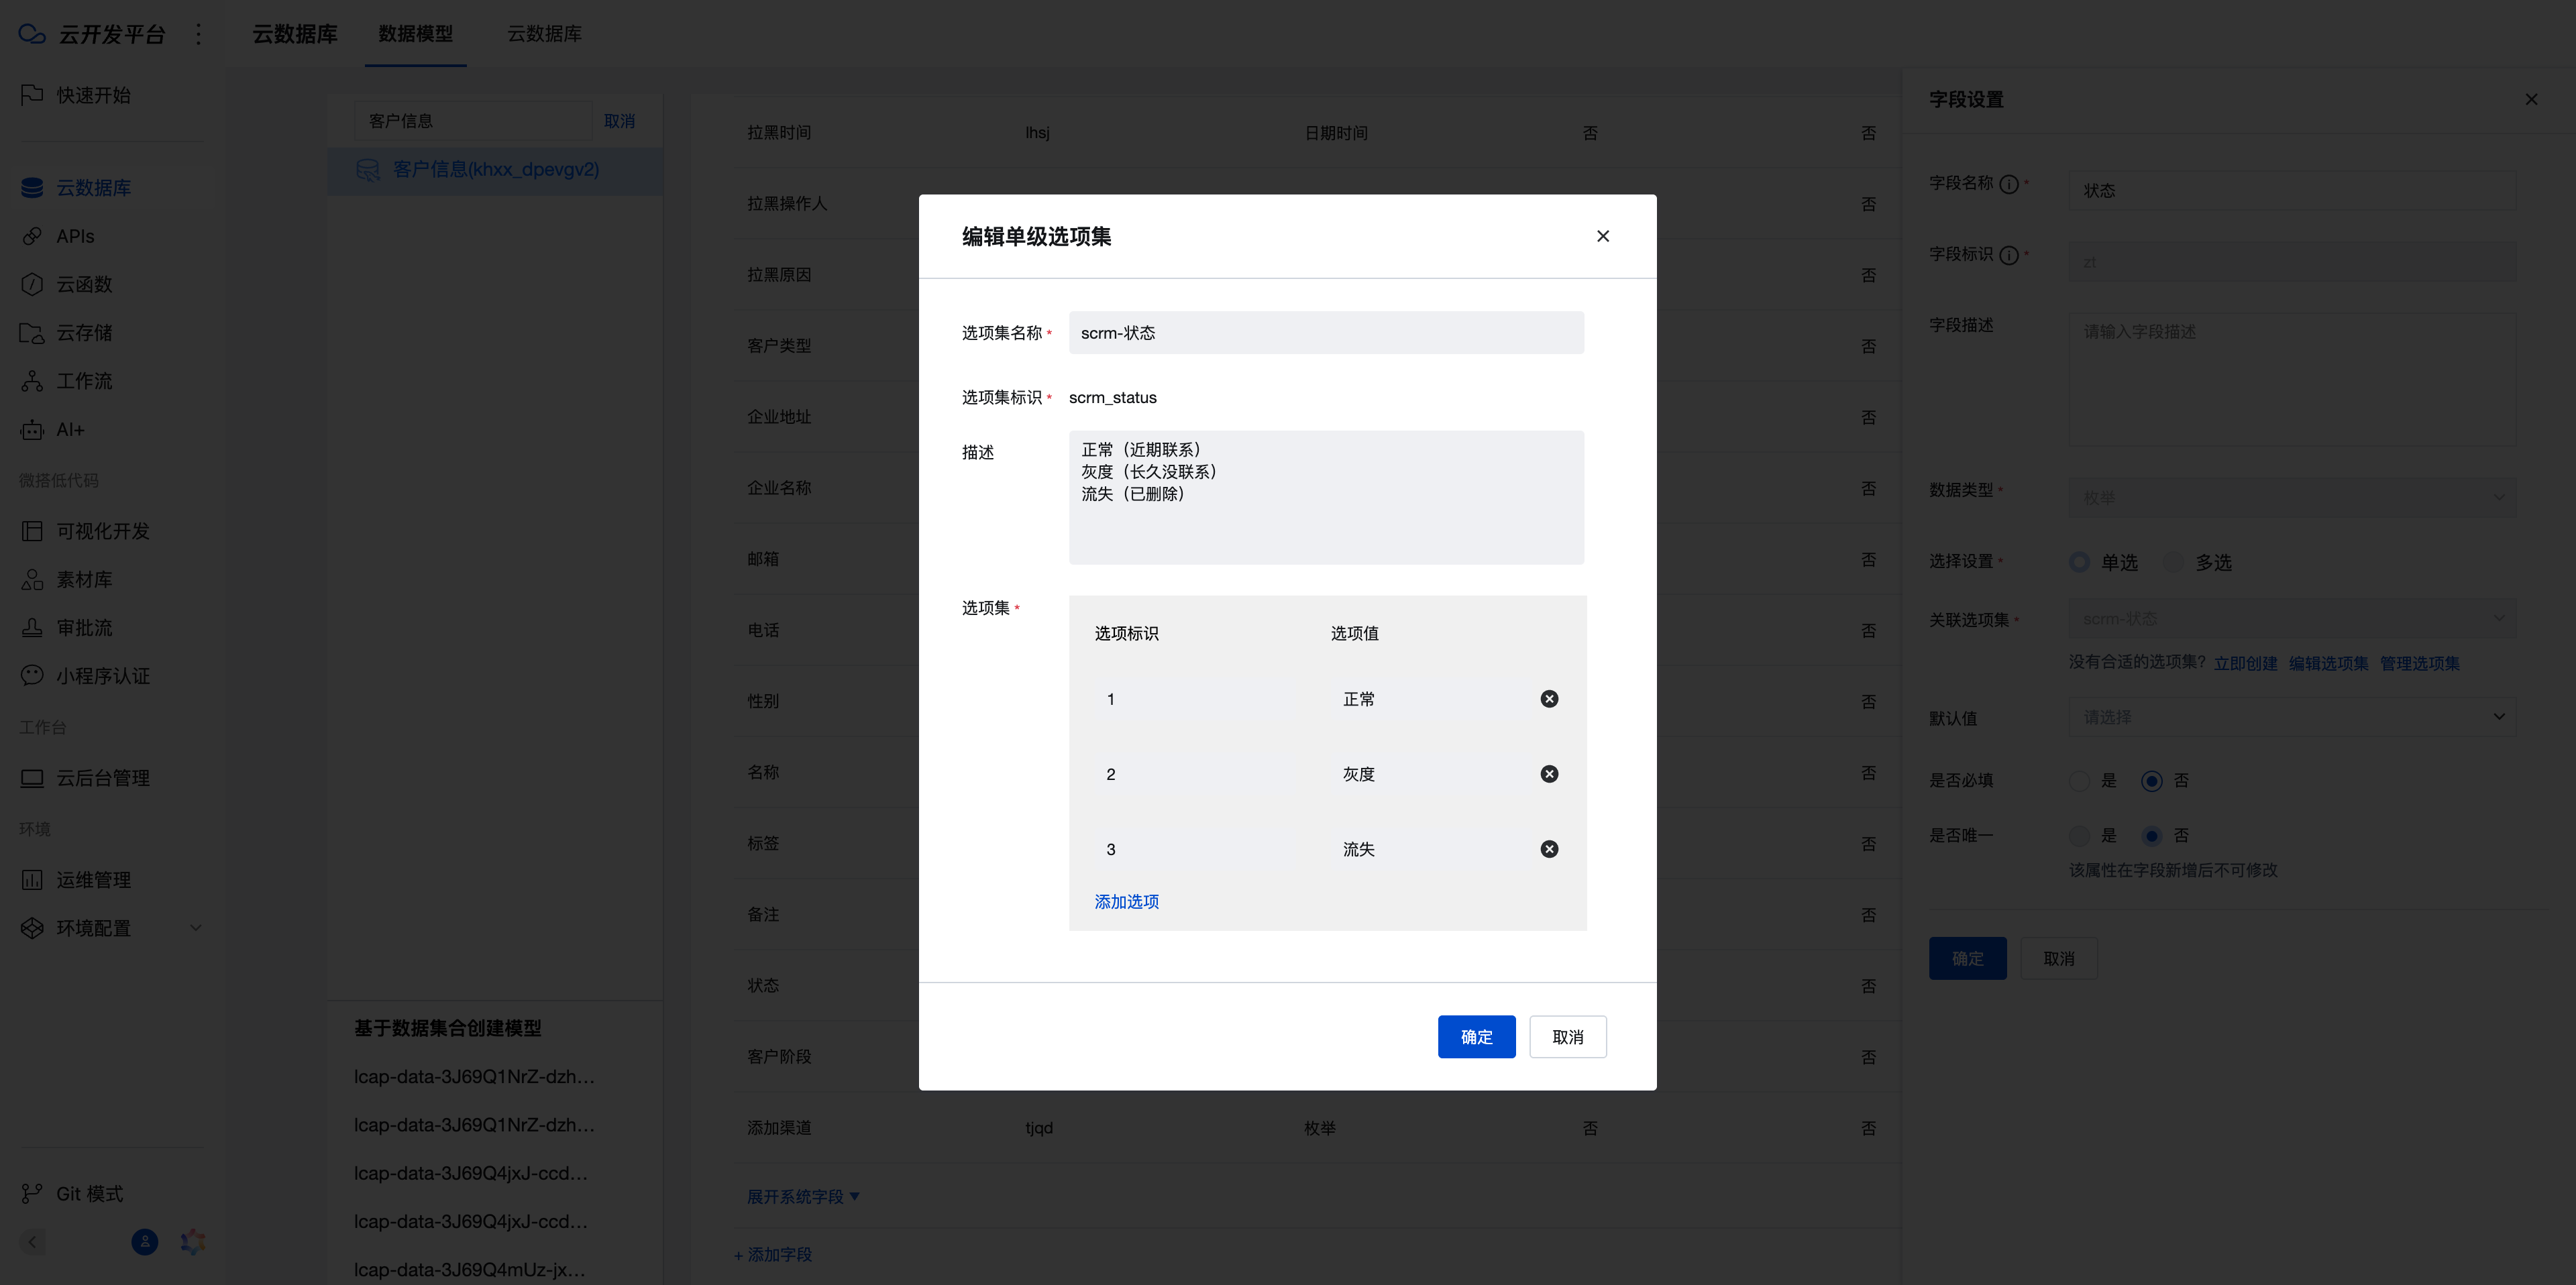
Create the status enum.
Create the customer stage enum.
Create the channel addition enum.
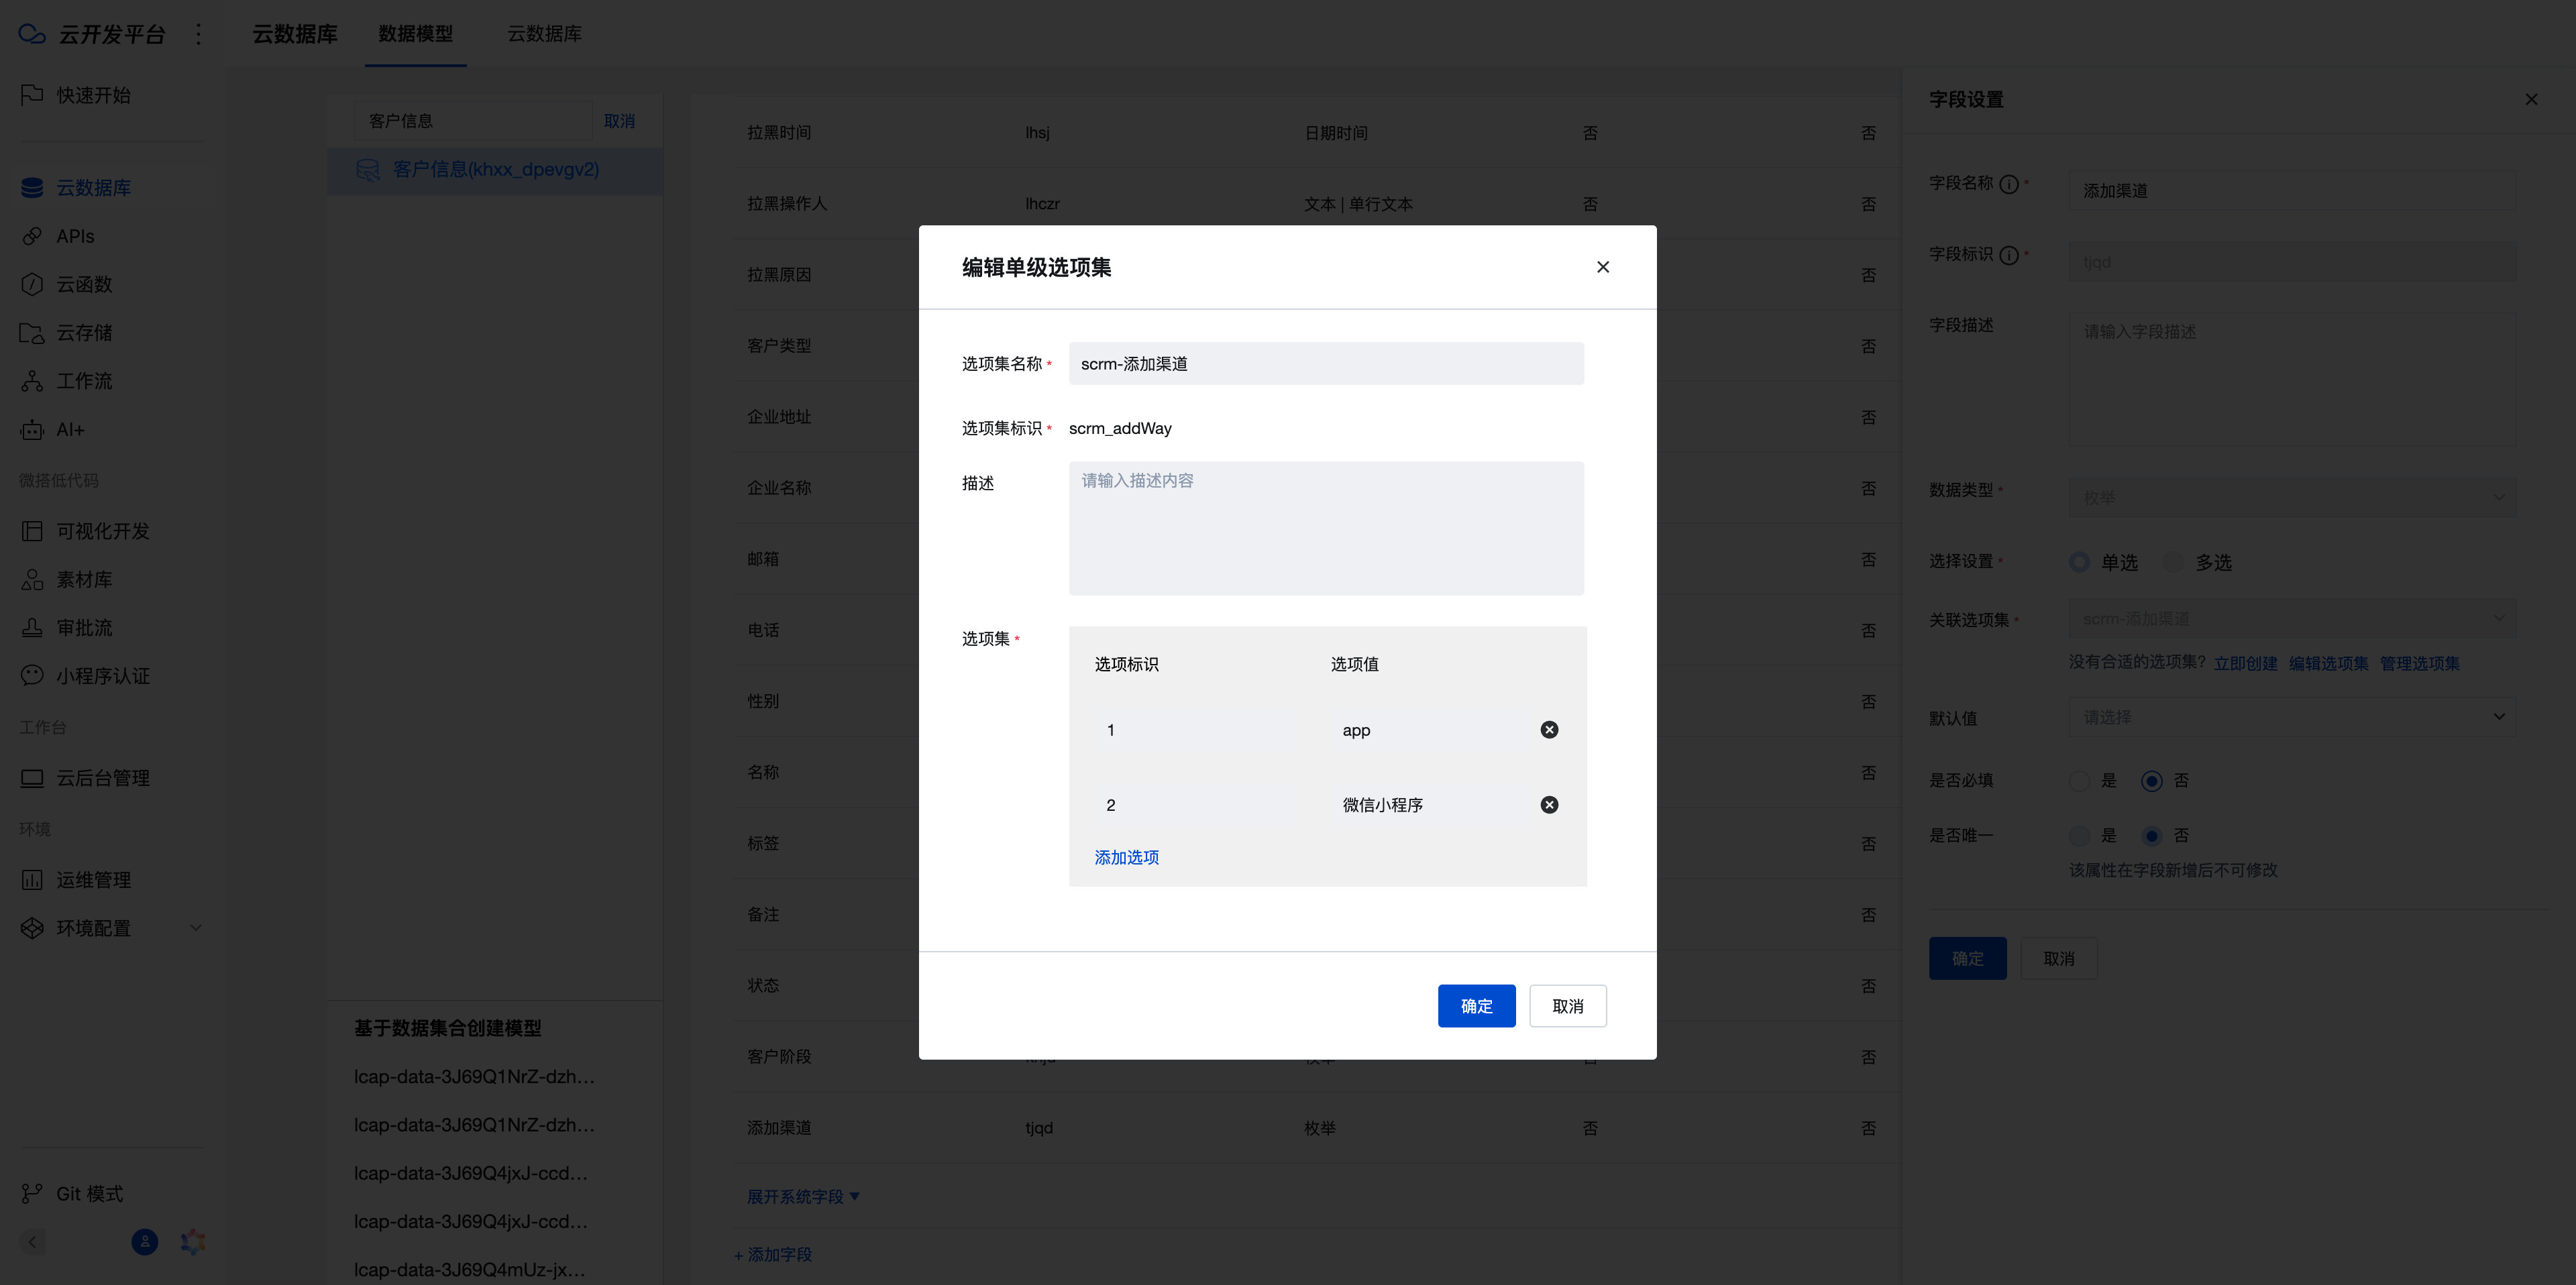
If the options for these enum fields change later, simply update them in the option set to take effect immediately.
Continue creating the Customer Follow-up Record Table
At this point, we have completed the creation of the two tables. Next, we will begin developing the pages.
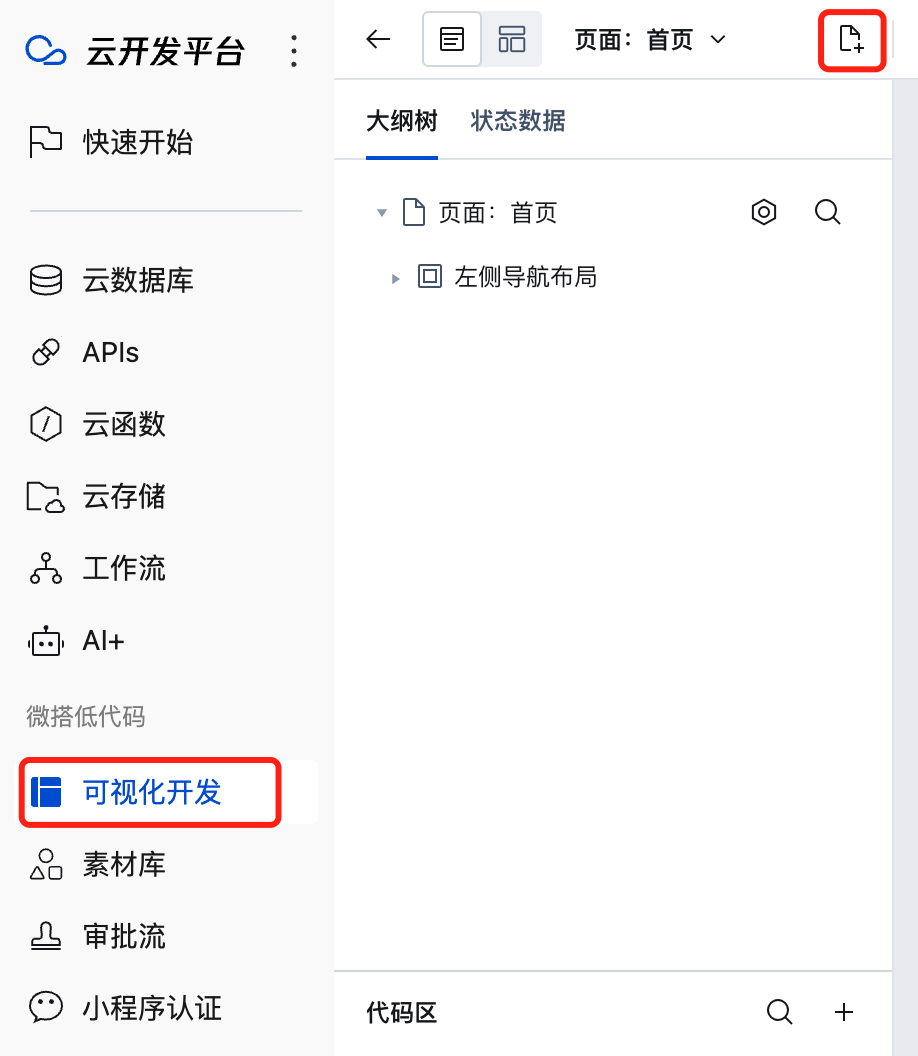
Page Development
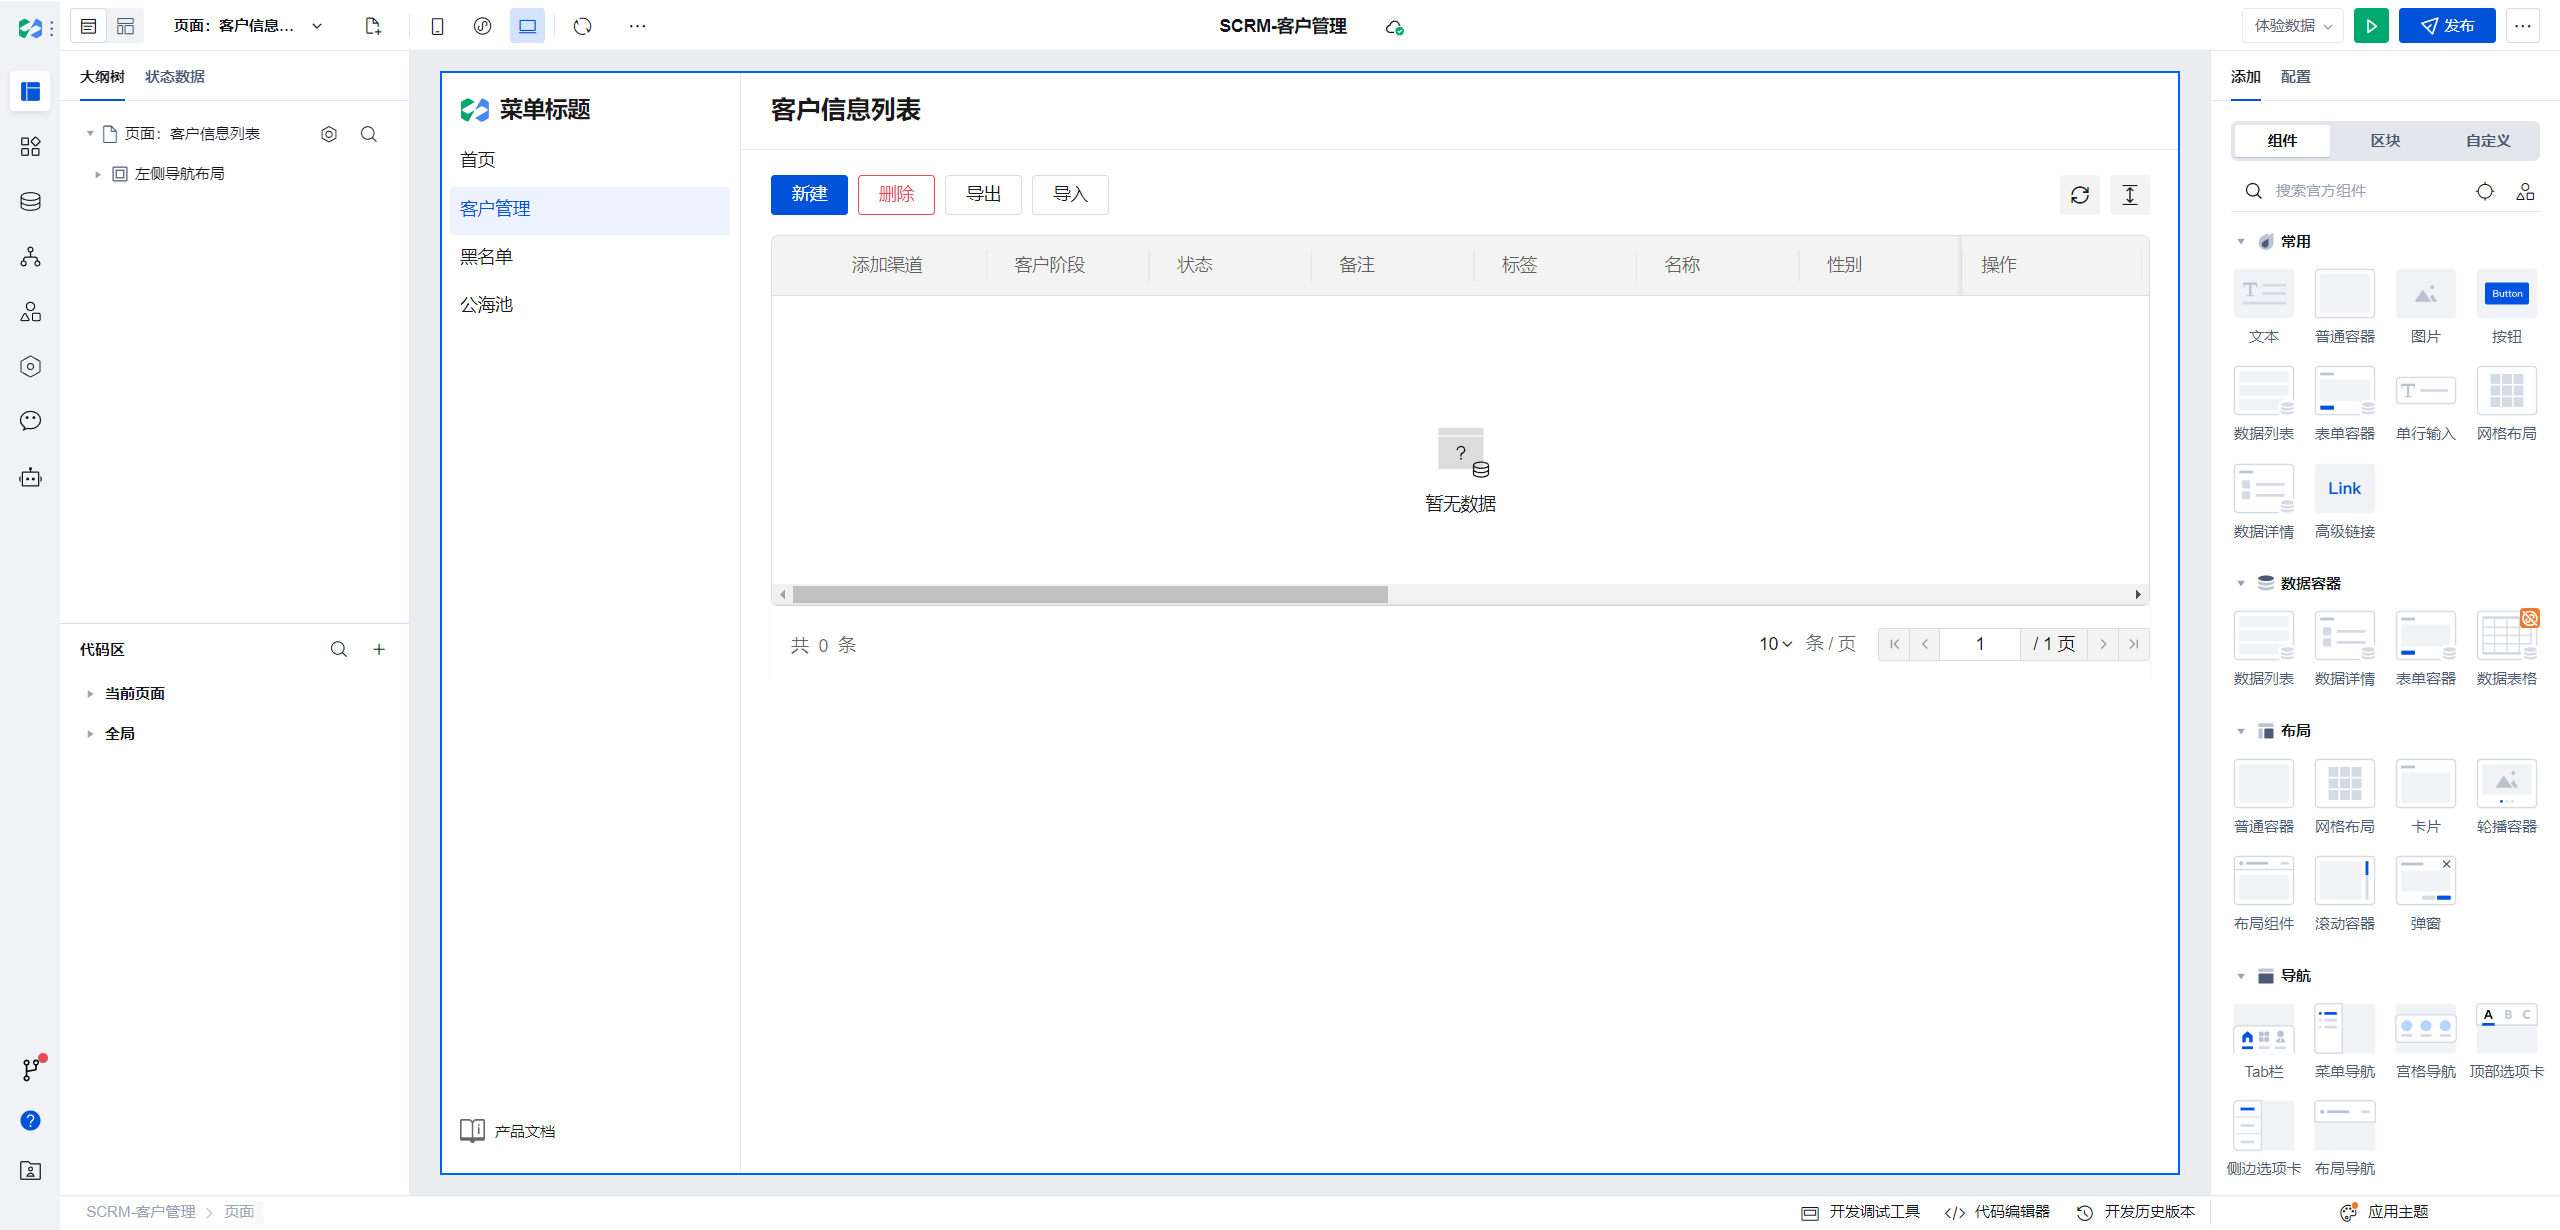
Return to the visual development tab. Here we confirm there are 4 page modules to develop, so we'll first create four blank pages.
- Click the new page button
- Select the Table and Form Page template, set the data model to the newly created Customer Management, and temporarily choose the left-side layout for the page layout.
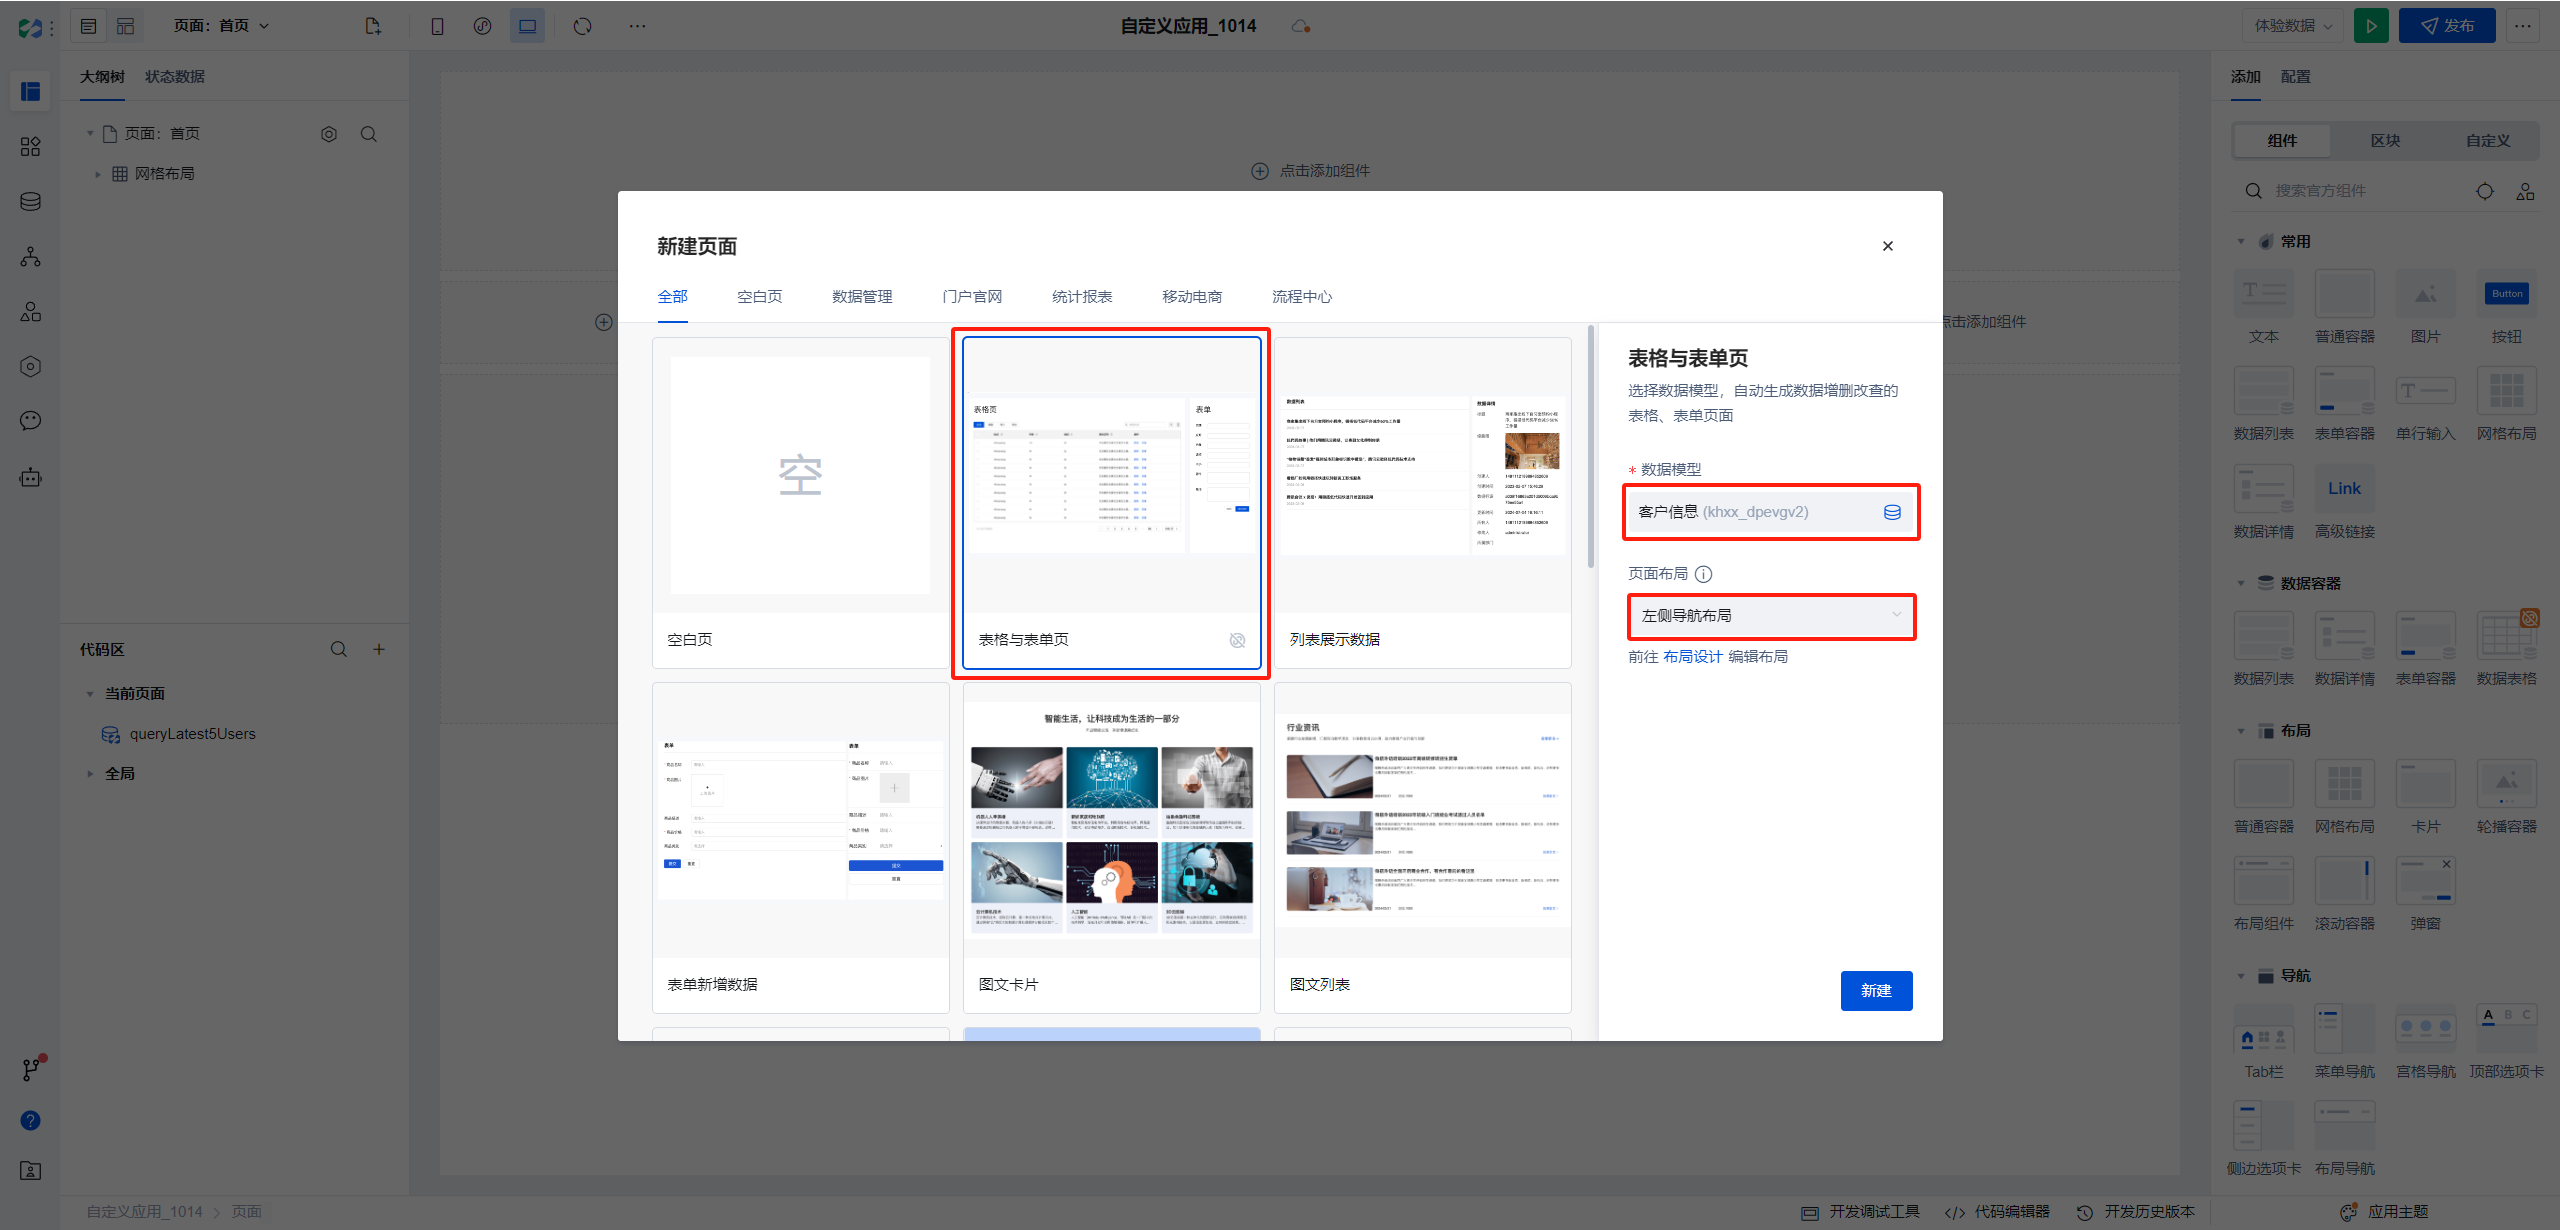
- After clicking new,
WeDawill automatically create three pages for us. The overall page layout and the main content of individual pages are configured separately. Here, we will first configure all page entries.
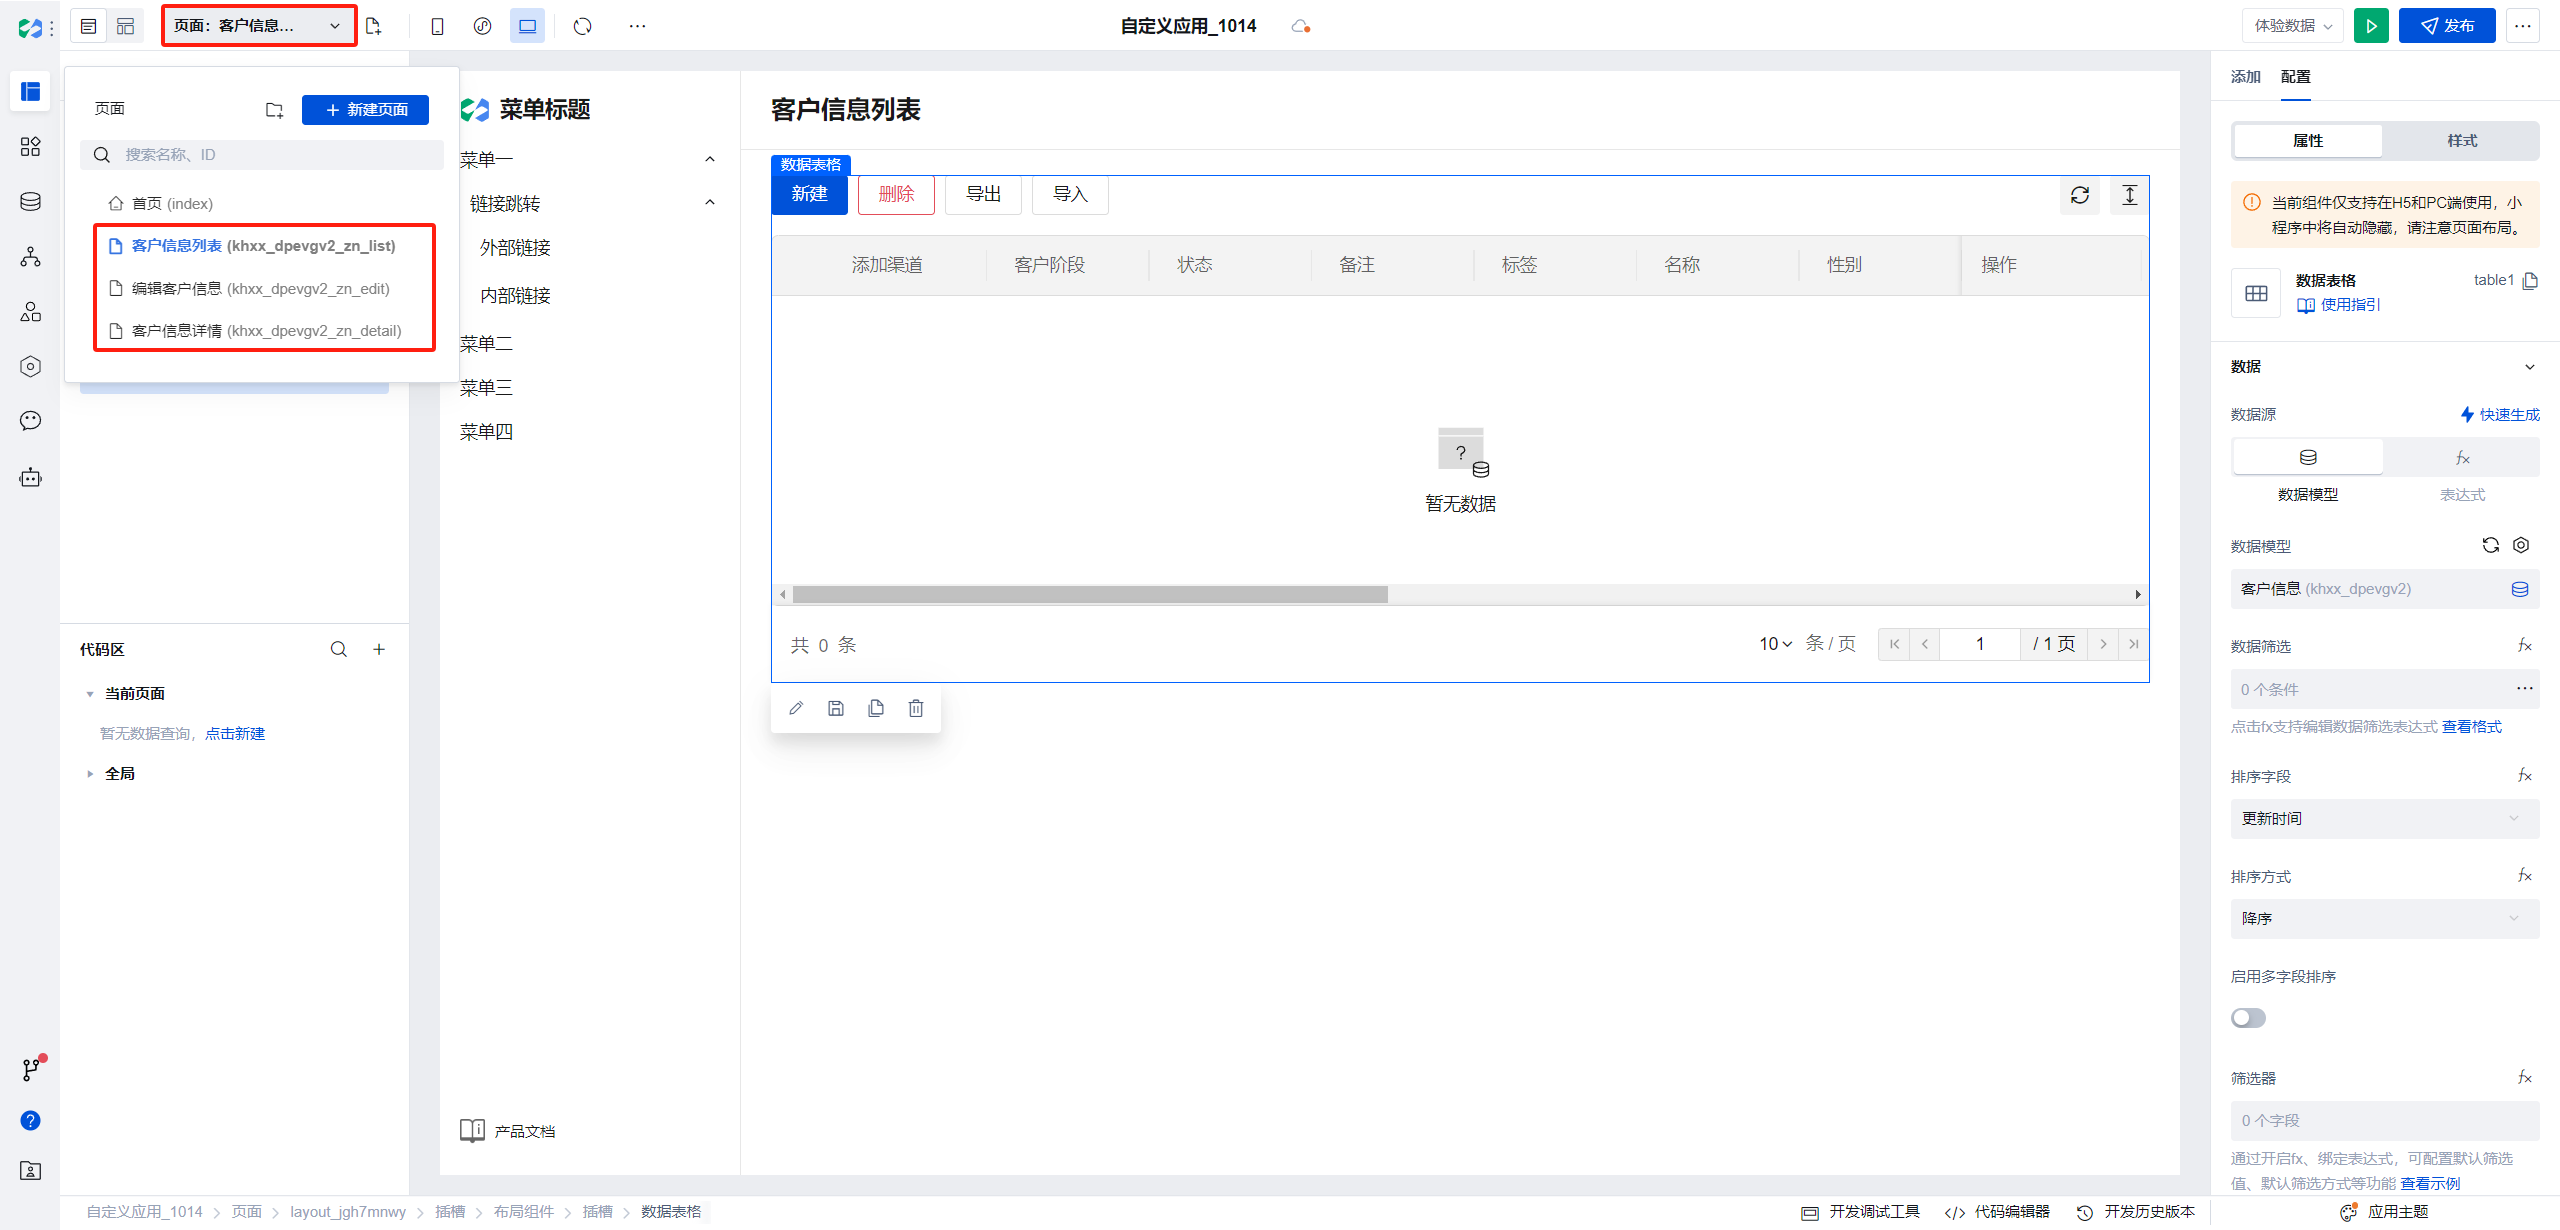
- Here we clone the customer list twice, and name the cloned pages as Blocklist and Public Pool respectively.

And group subpages such as editing customer information and customer information details together for easier future maintenance.
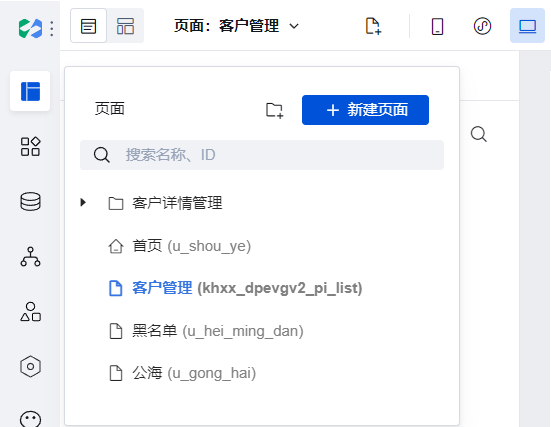
- After all page entries are created, we proceed to configure the page layout. Click the header to switch to the layout design, select the left-side layout, and click the one-click generation button based on pages. This will generate a directory tree consistent with the above page management directory structure for us.
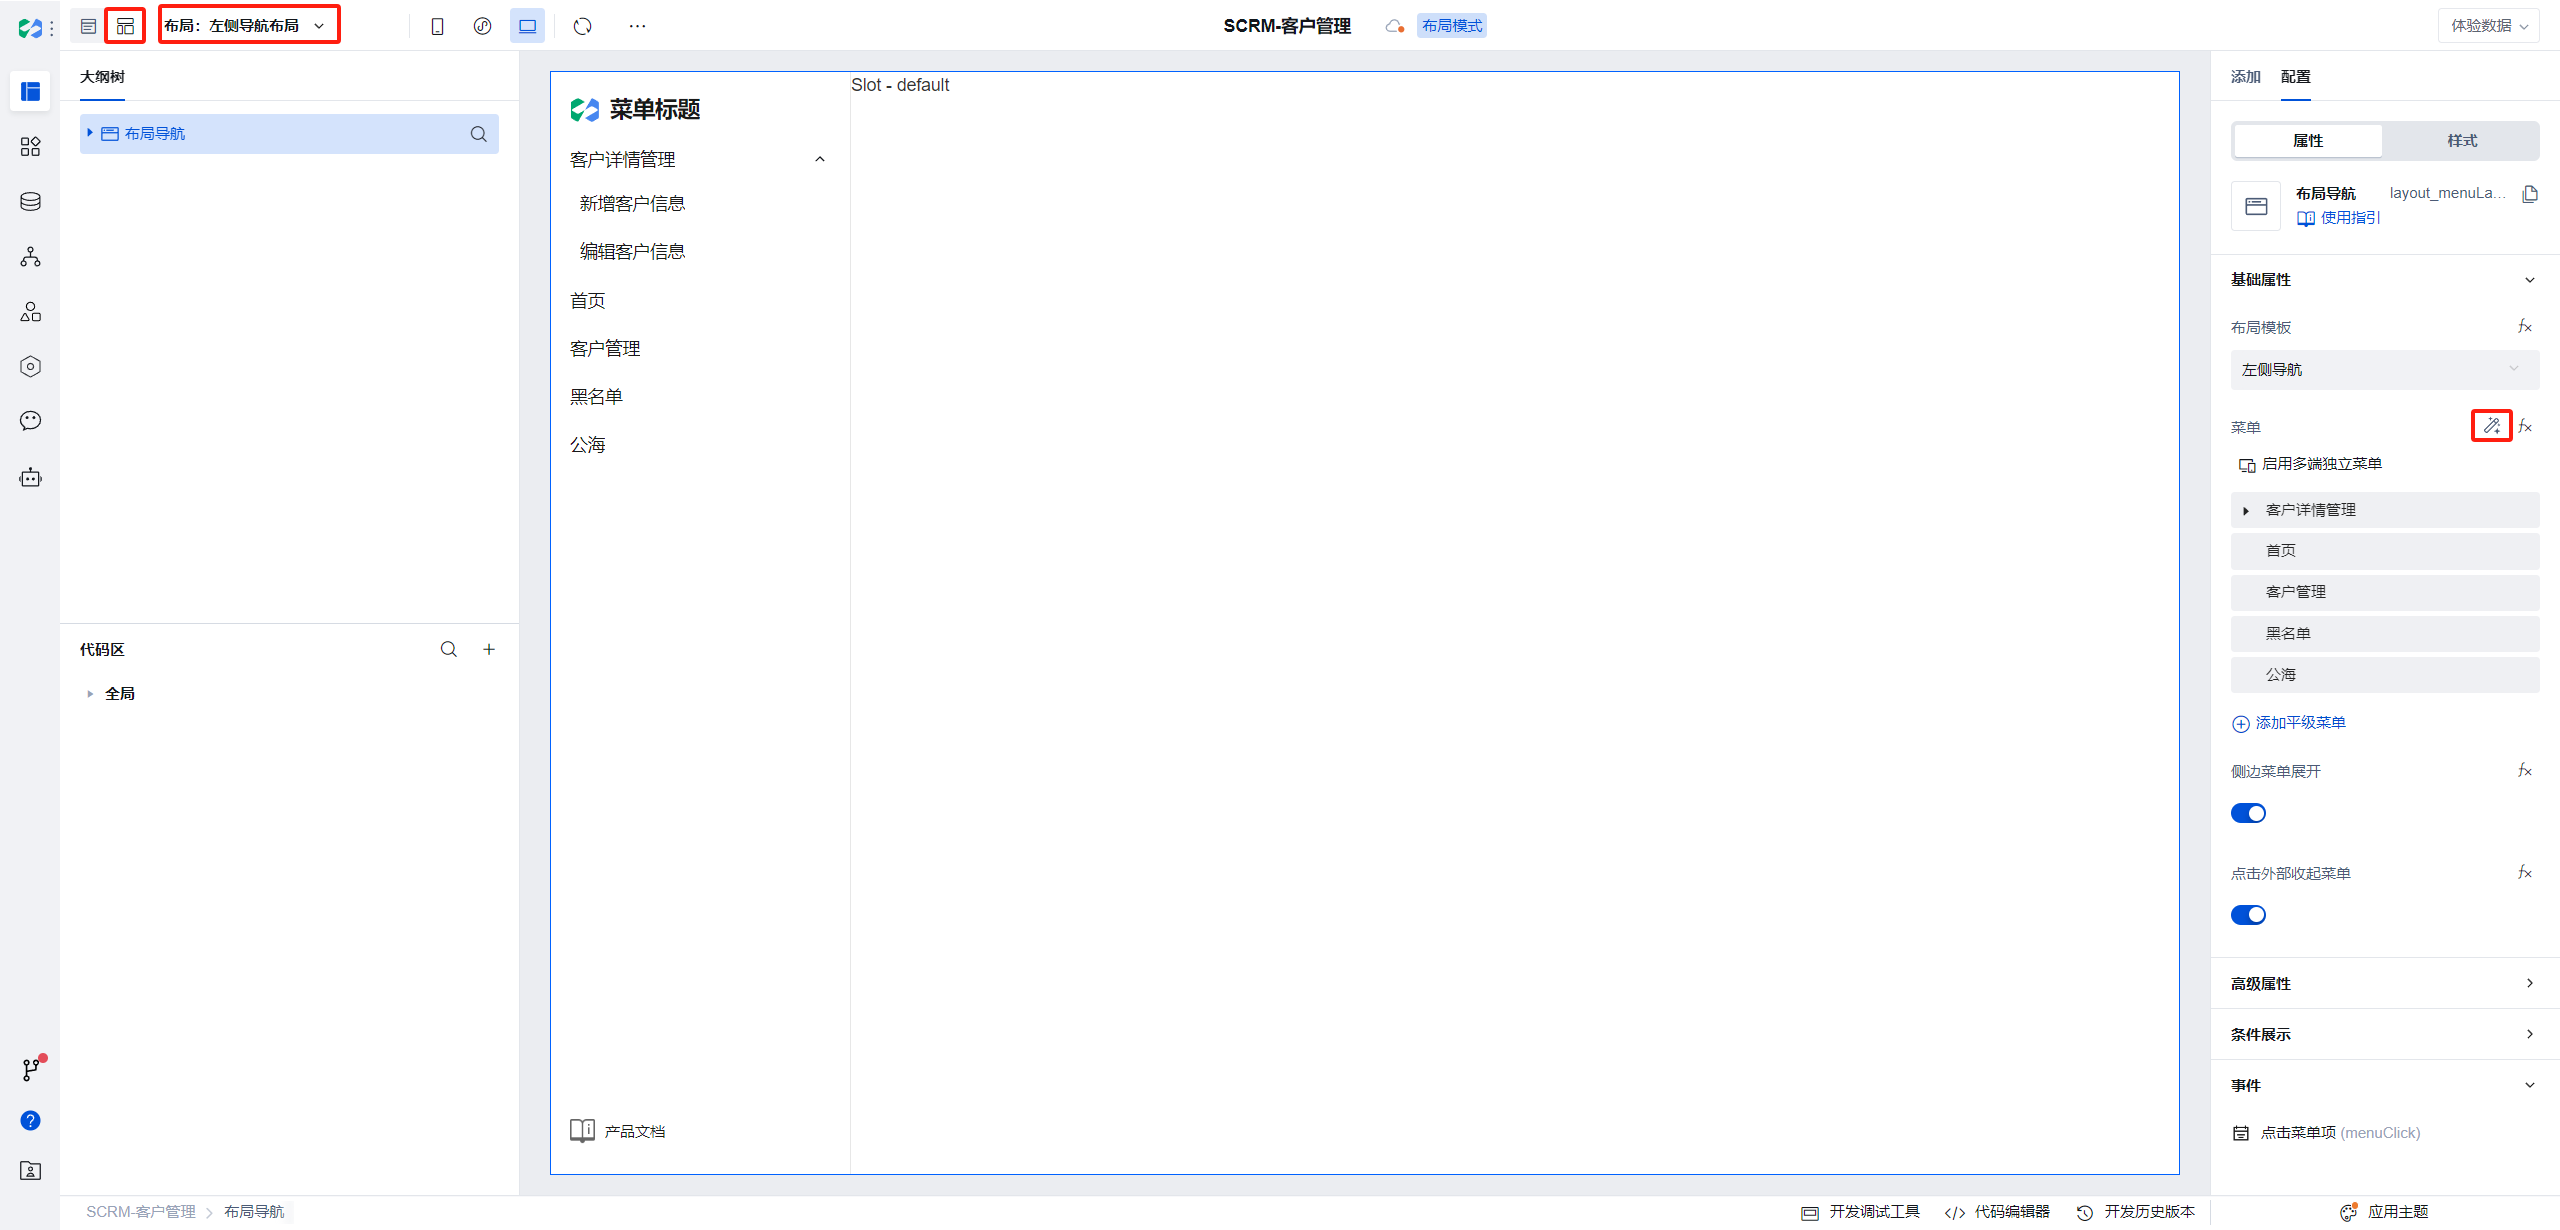
Since the detail page does not need to be directly displayed in the directory, delete the customer detail management directory and press ctrl+s to save.
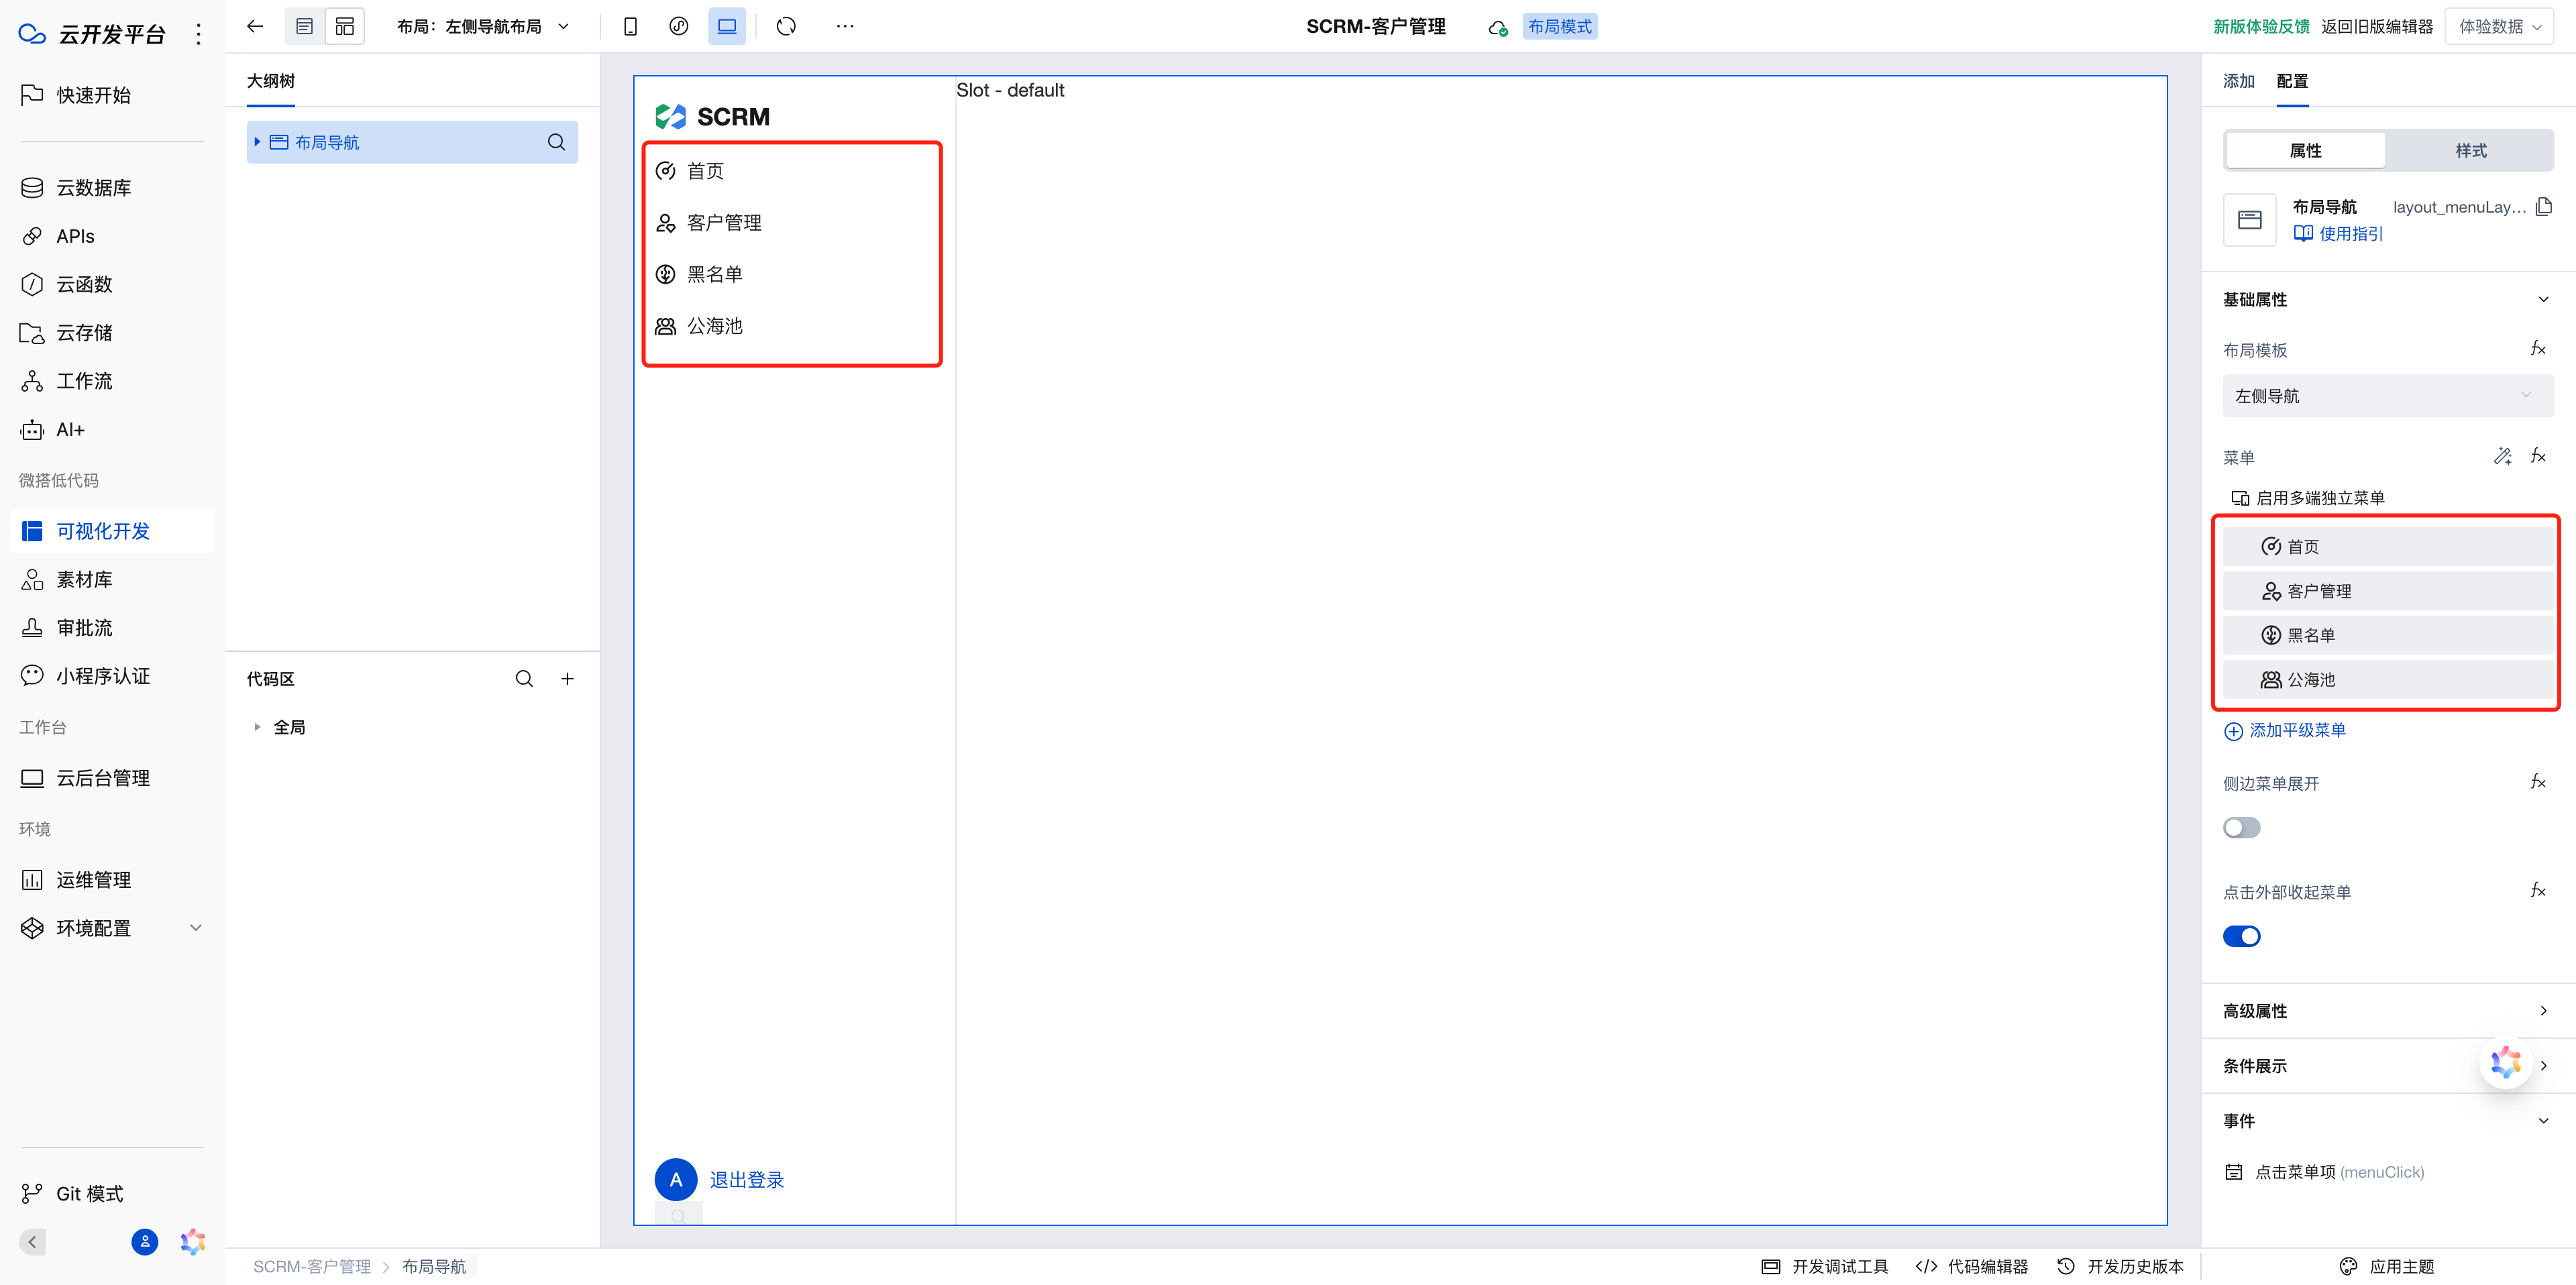
- Click the header to switch to page design, and you will see the left directory tree has been updated.
Now we proceed to develop individual modules.
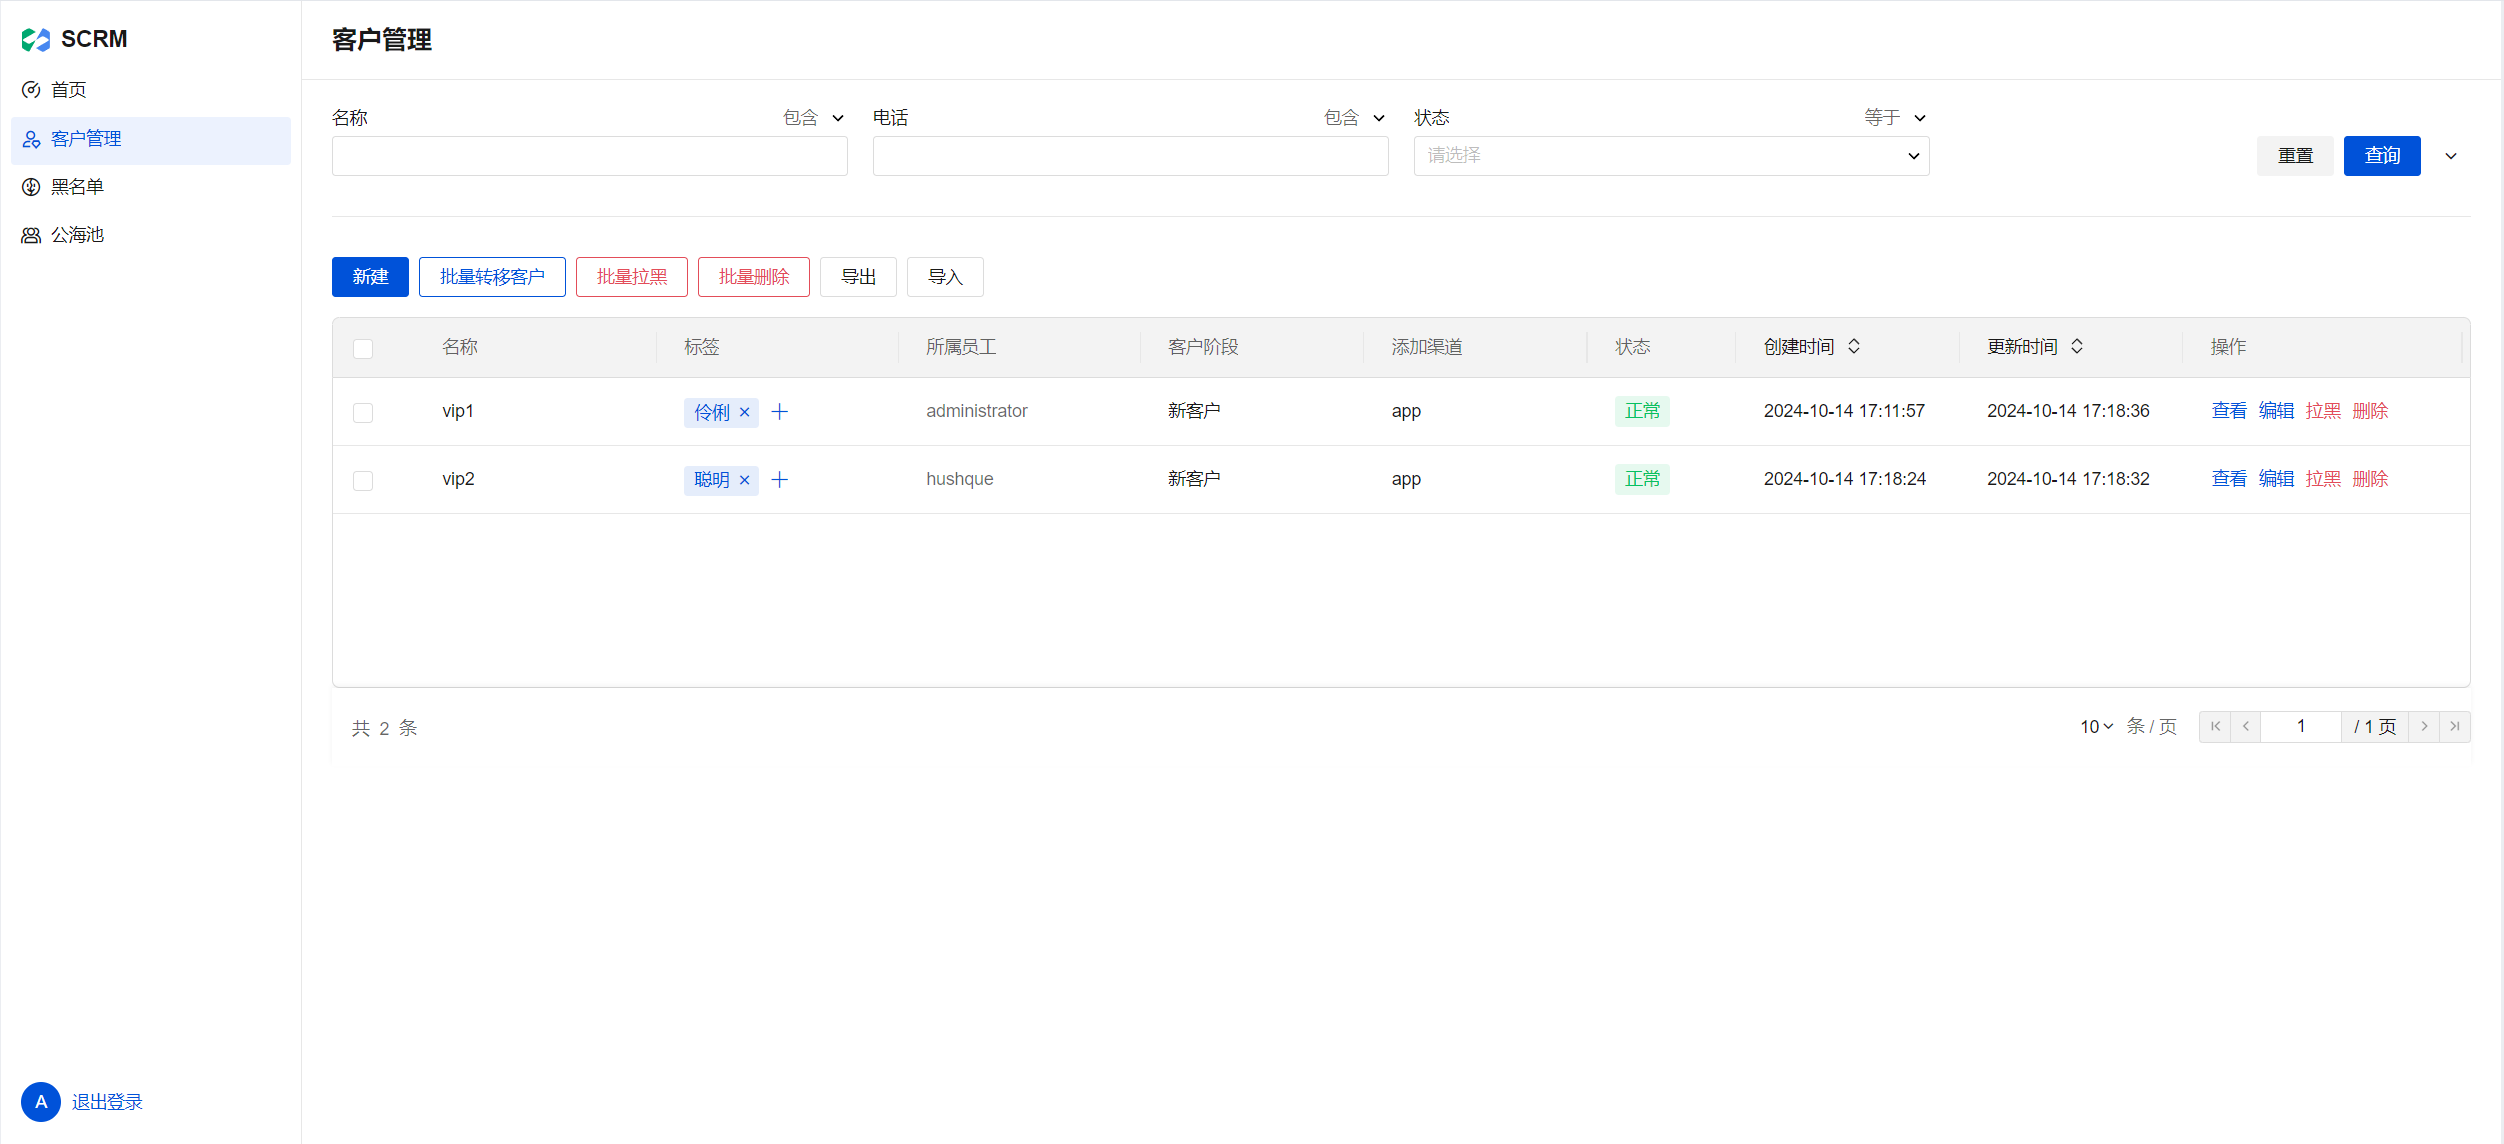
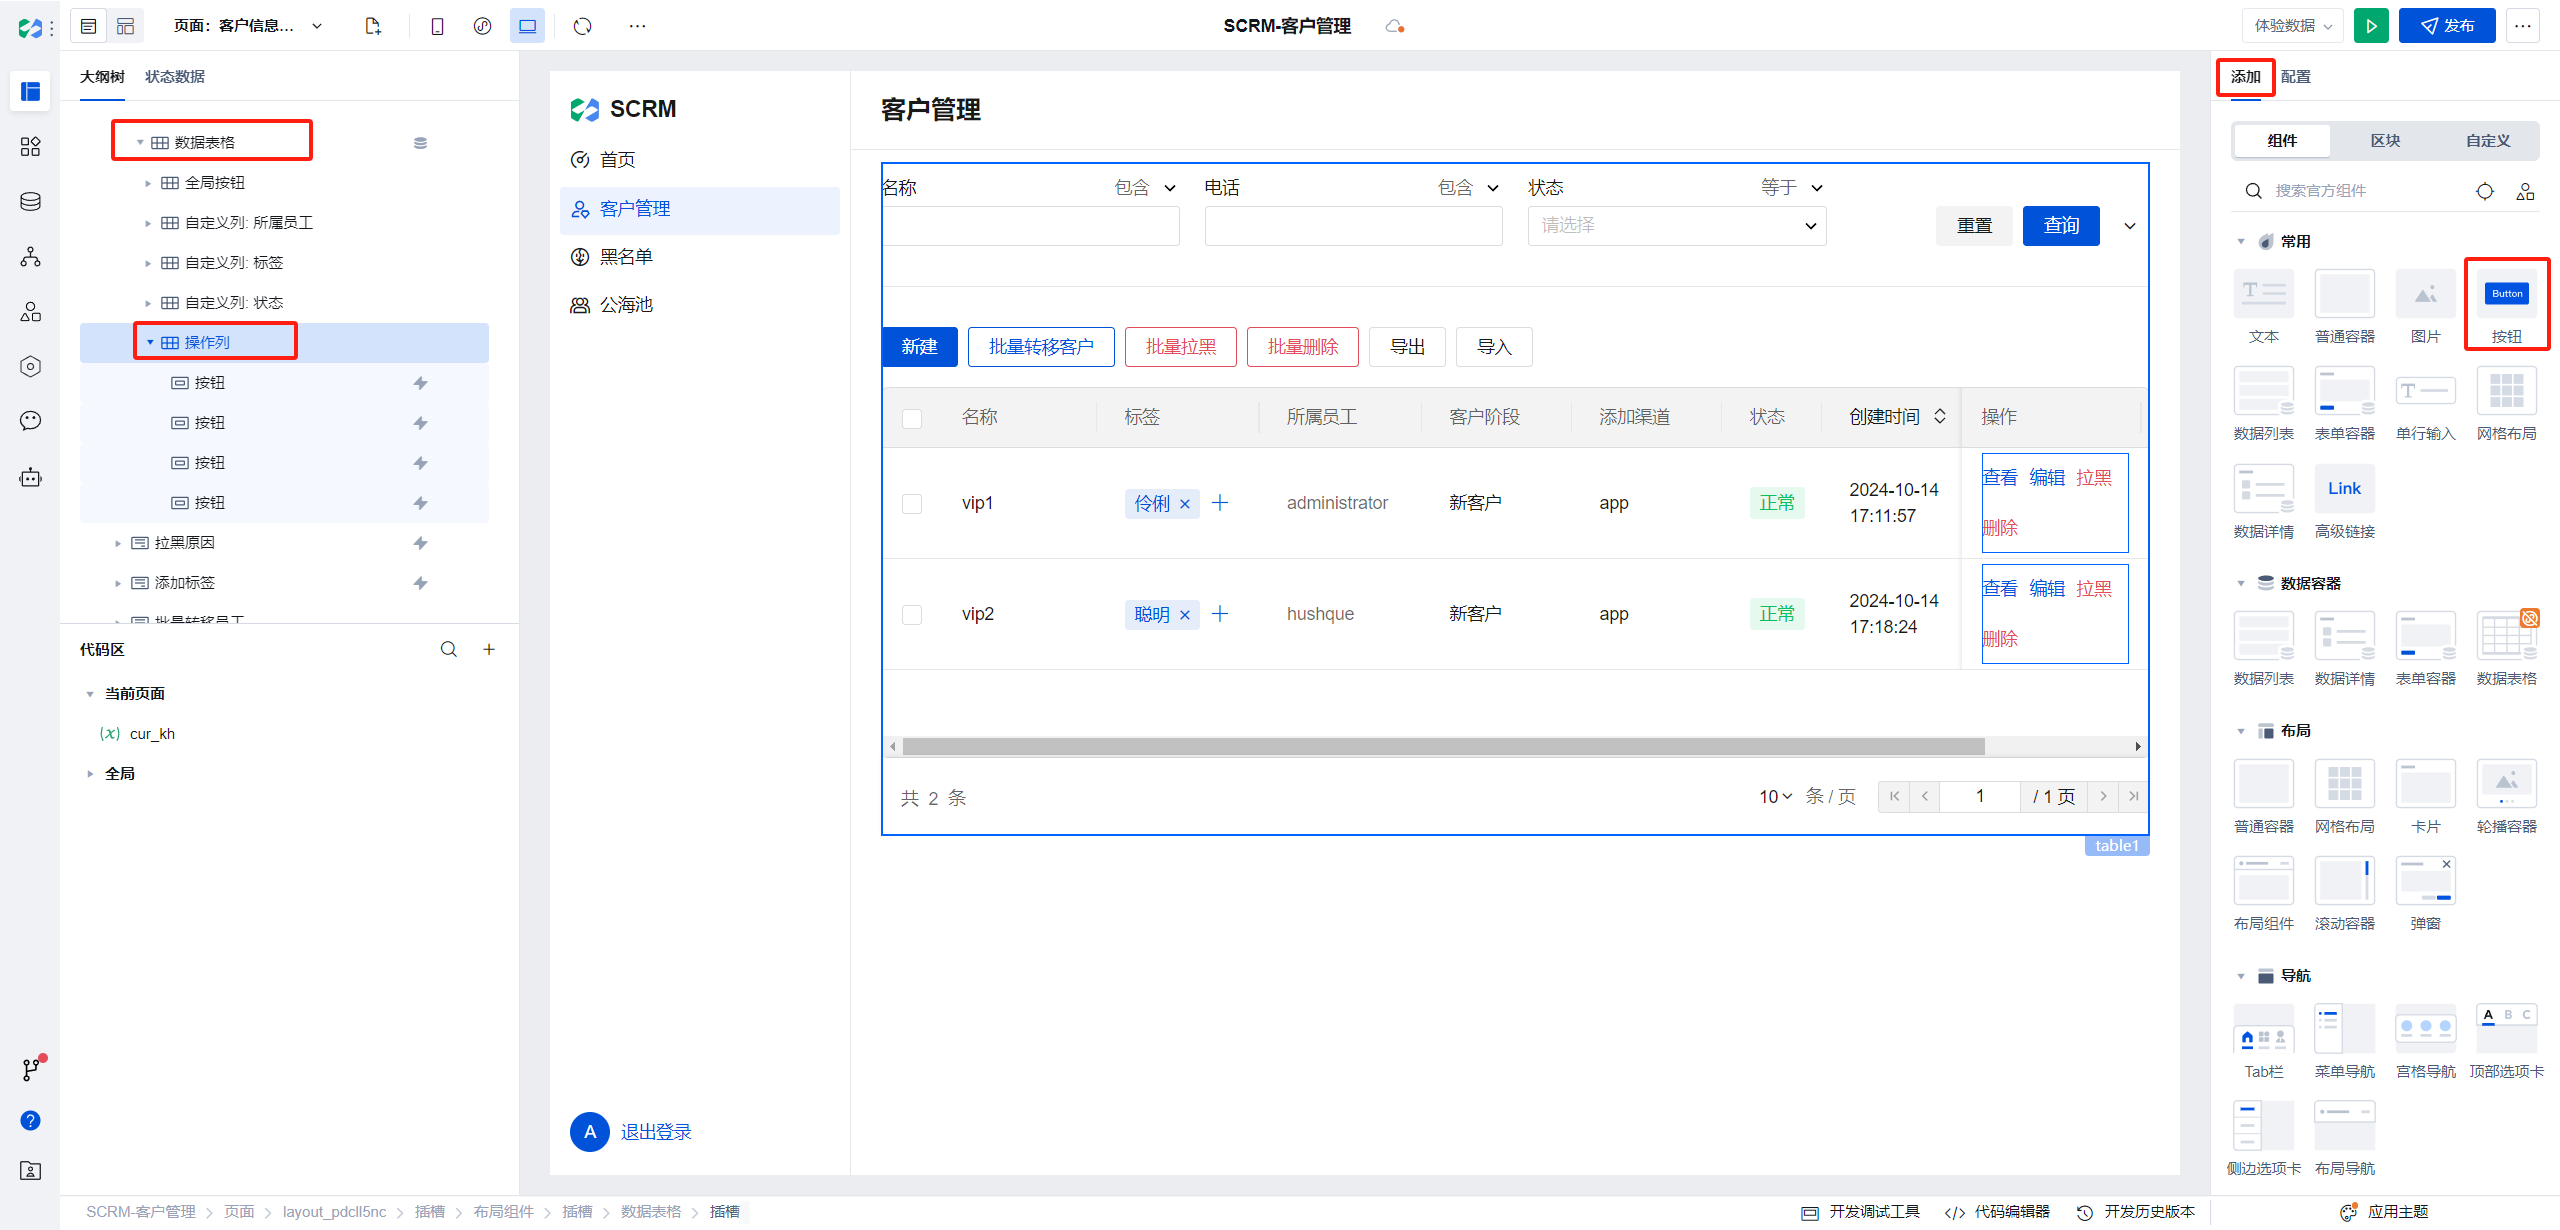
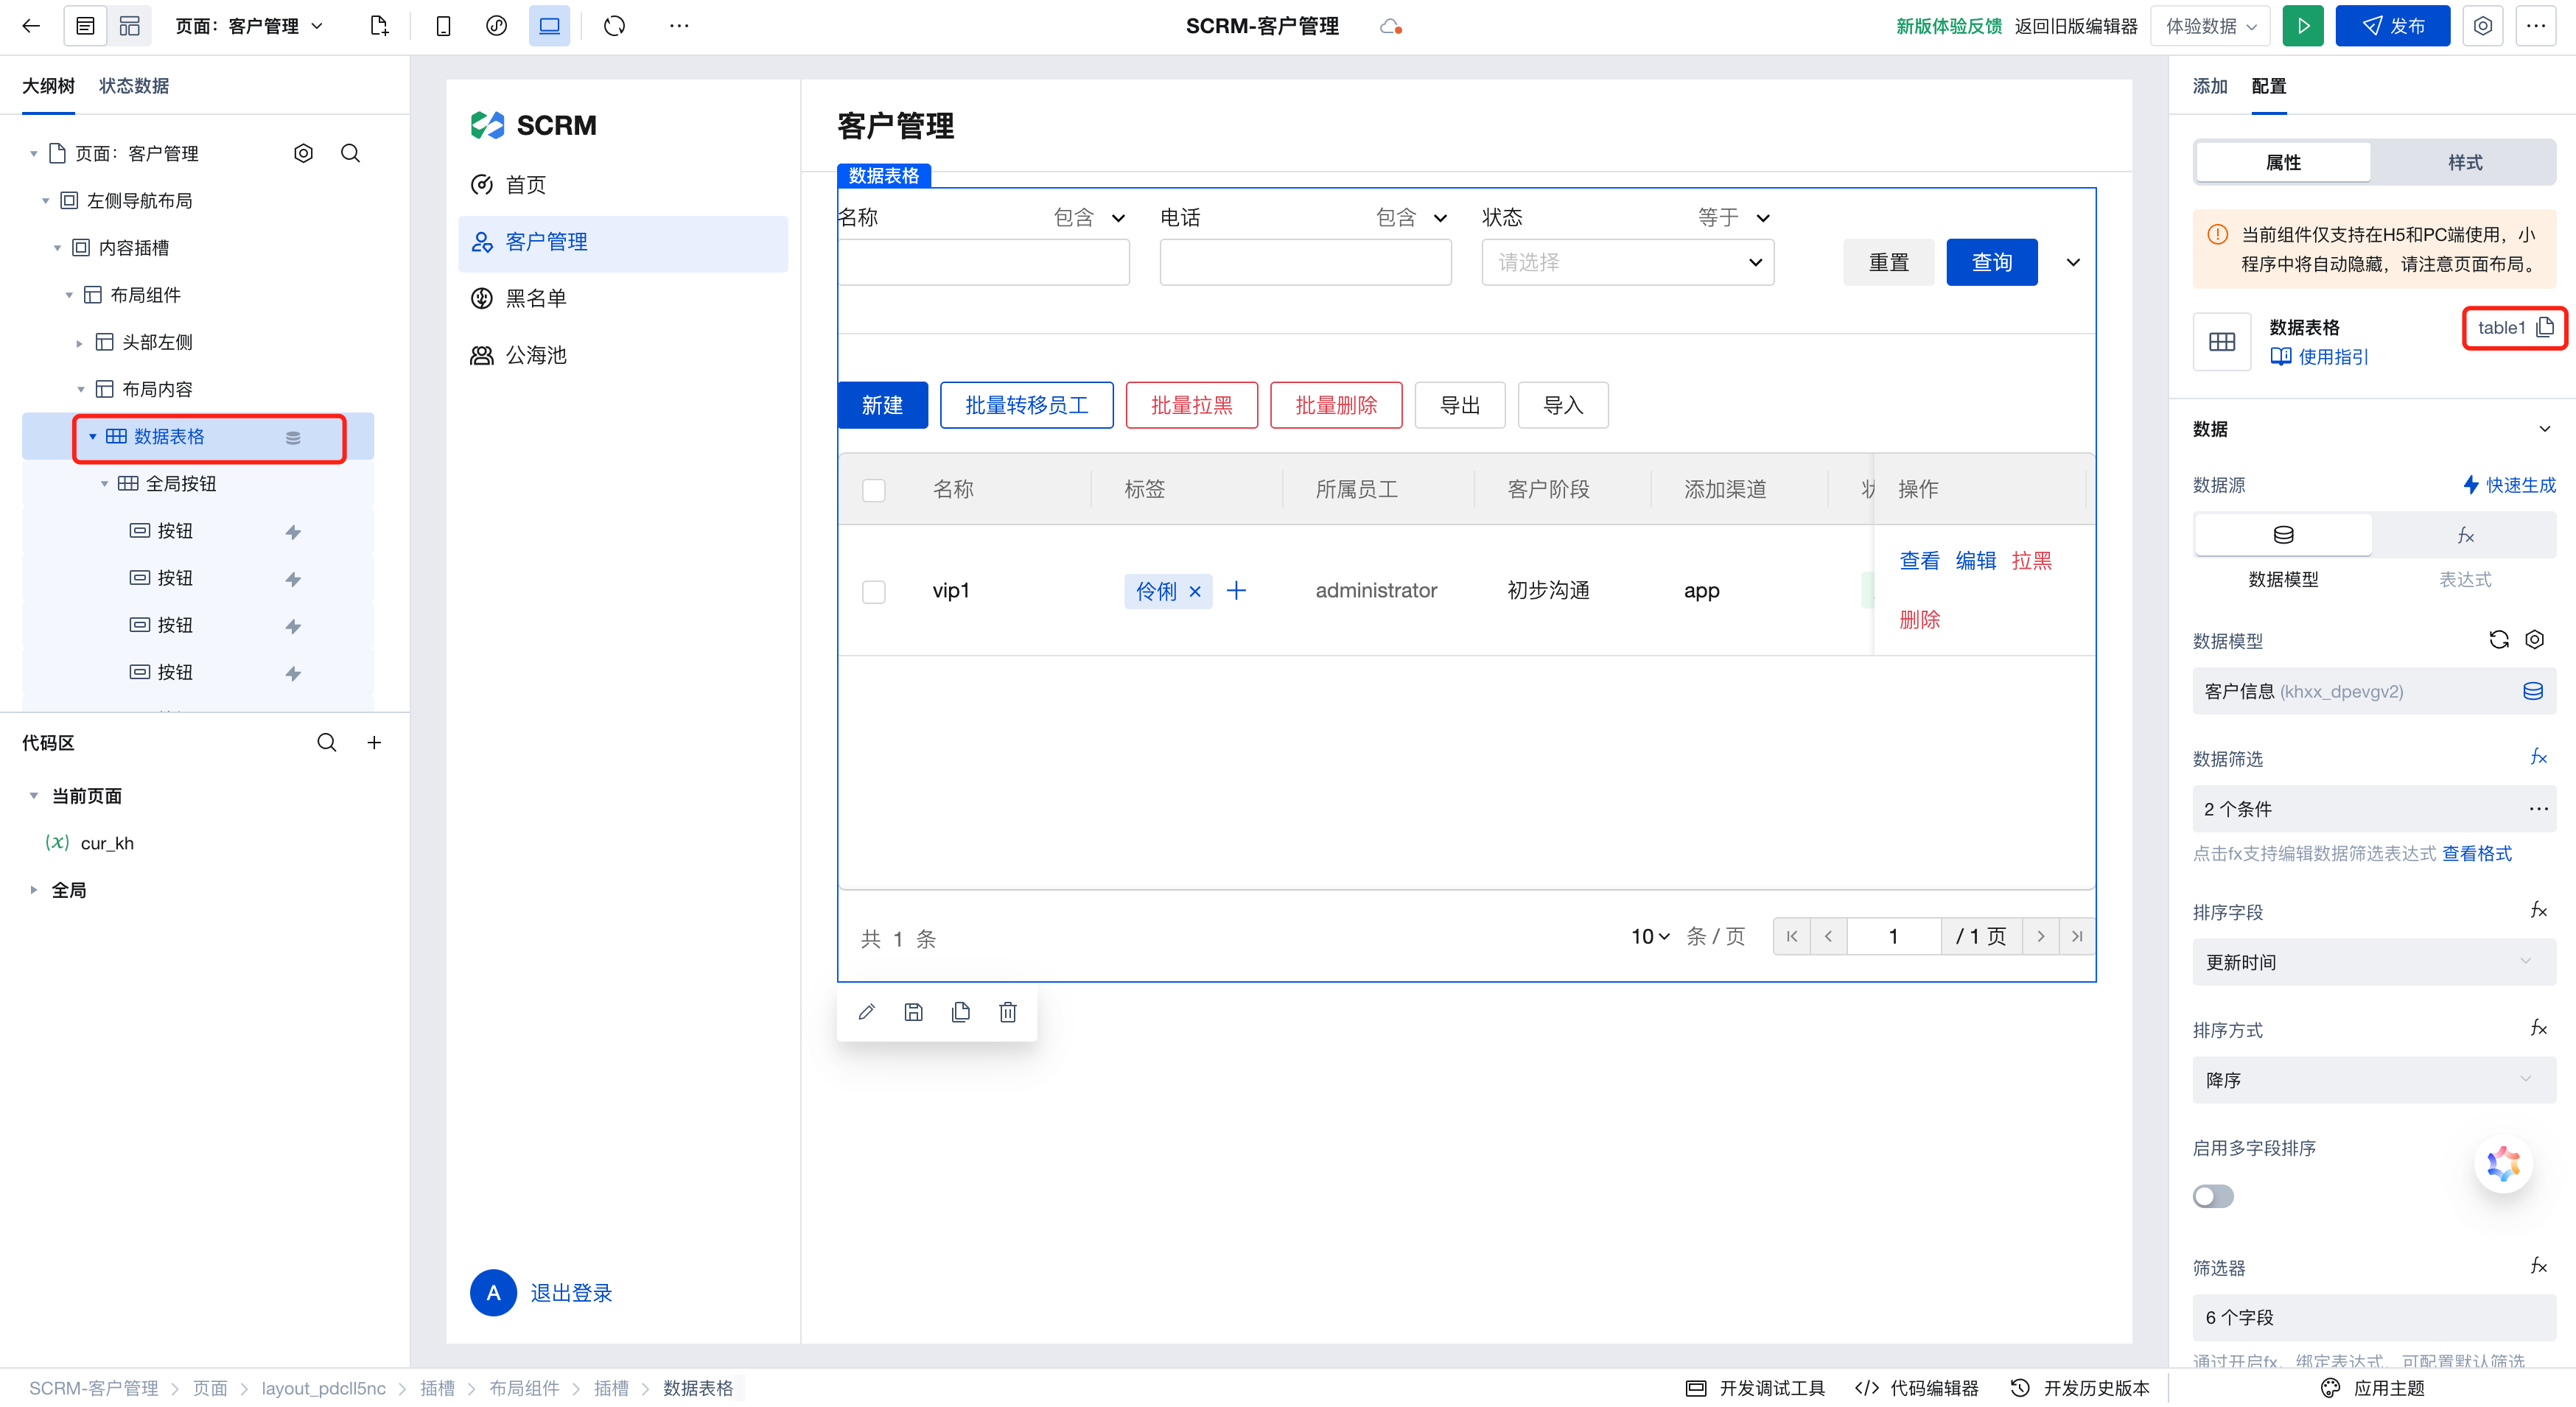
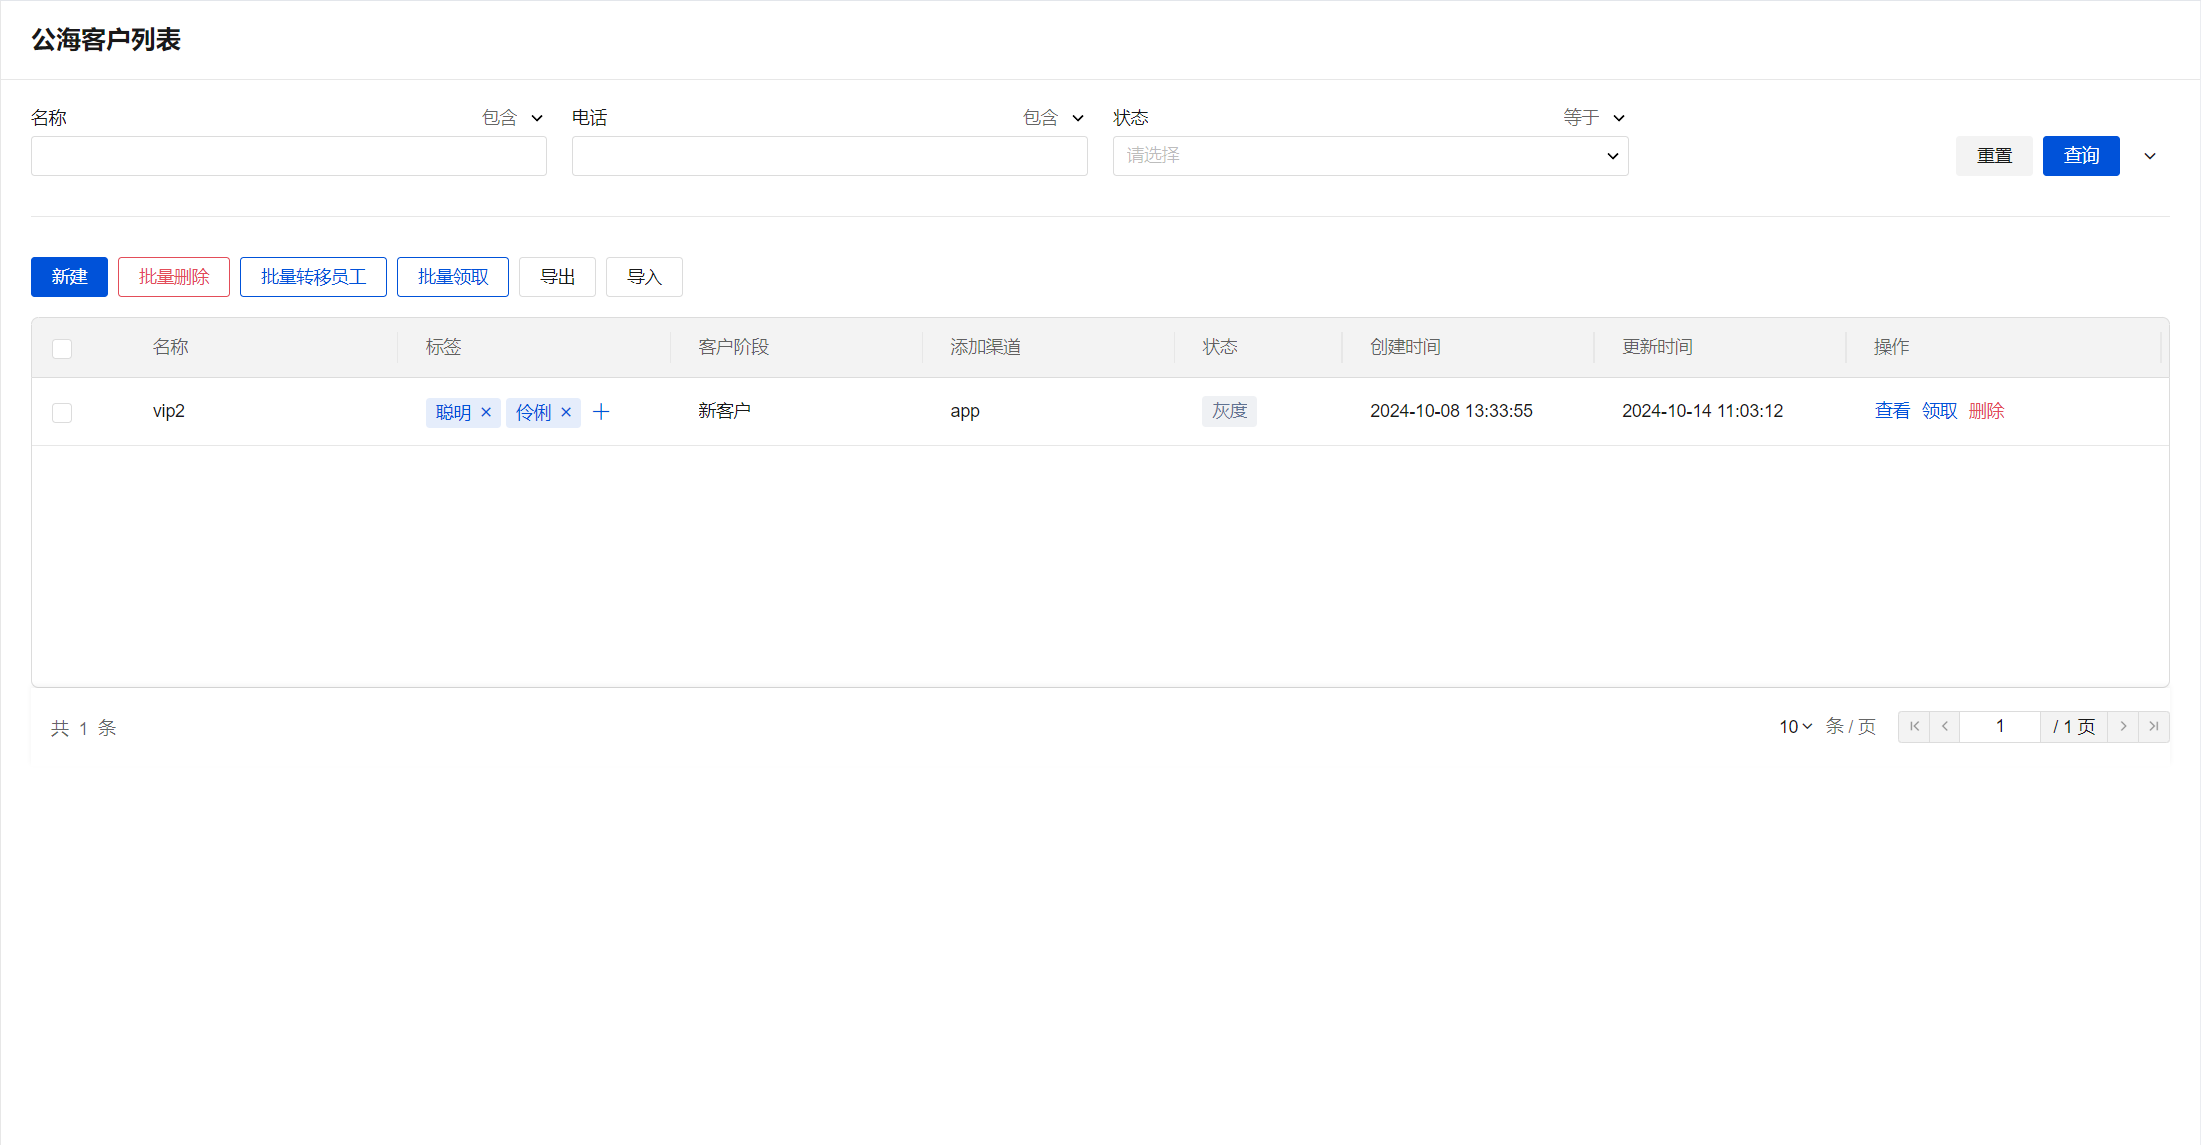
Customer Management
Effect:
Click the list in the editor and adjust the following in the right-side configuration.
- The filter conditions are
Is Blacklisted: falseandAssigned Employee: not empty.
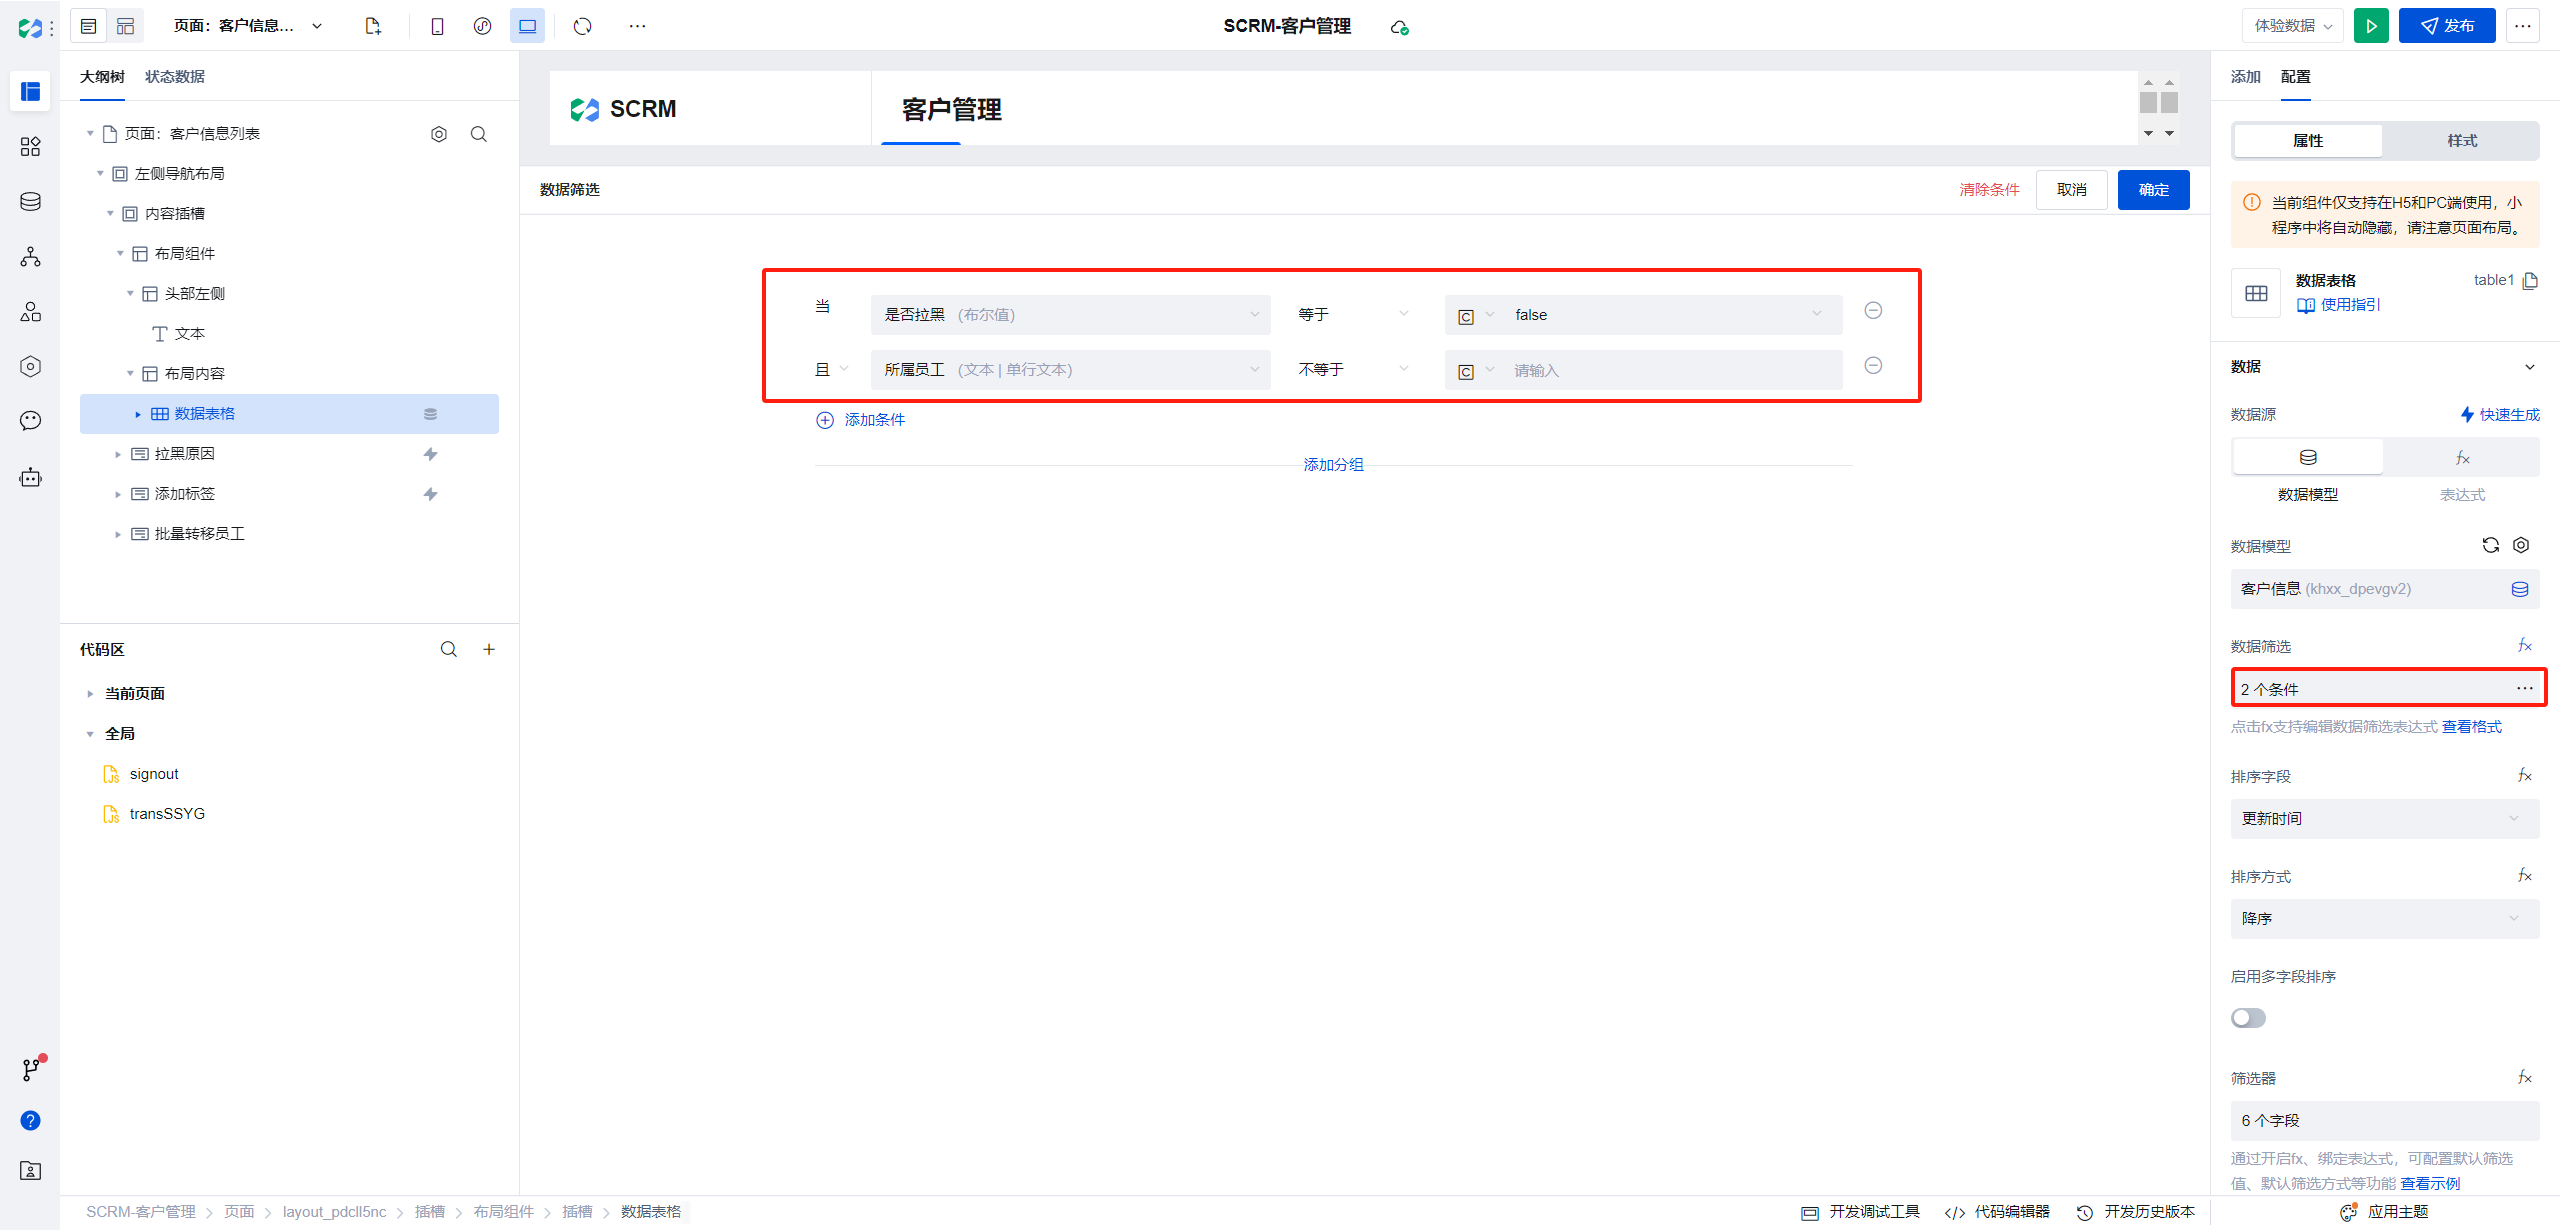
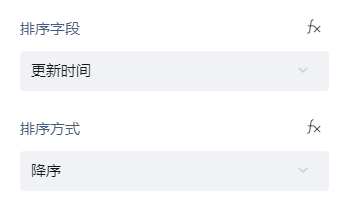
- Select
Update Timefor the sort field andDescendingfor the sort order.
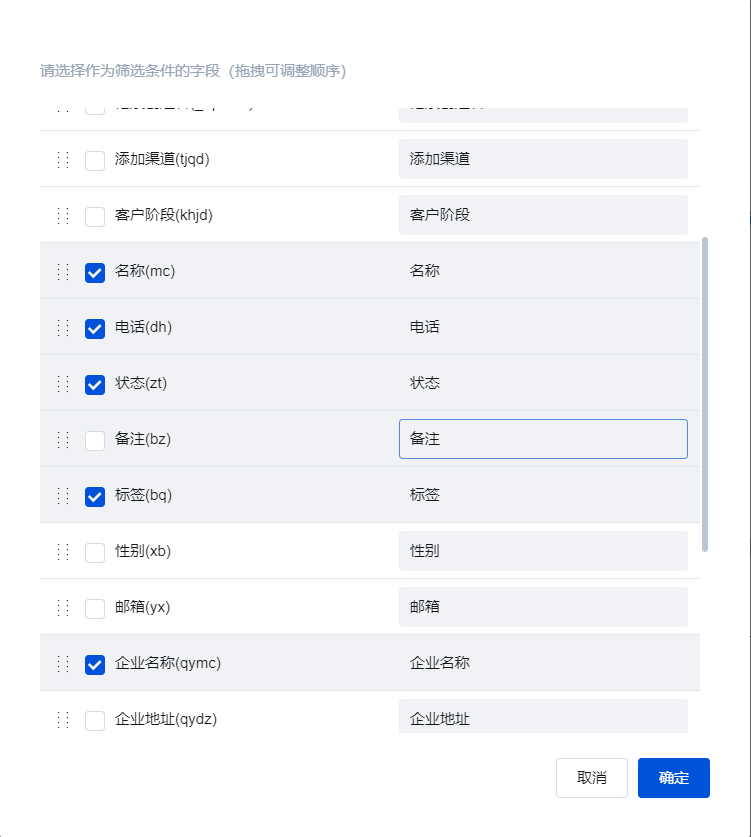
- Select fields such as Name, Phone, Status, and Tags in the filter.
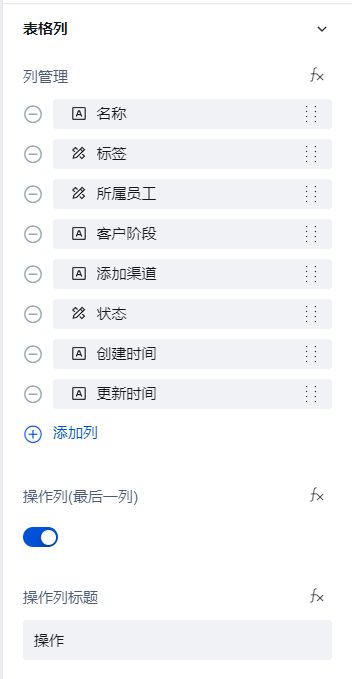
- The column order is as shown in the figure.
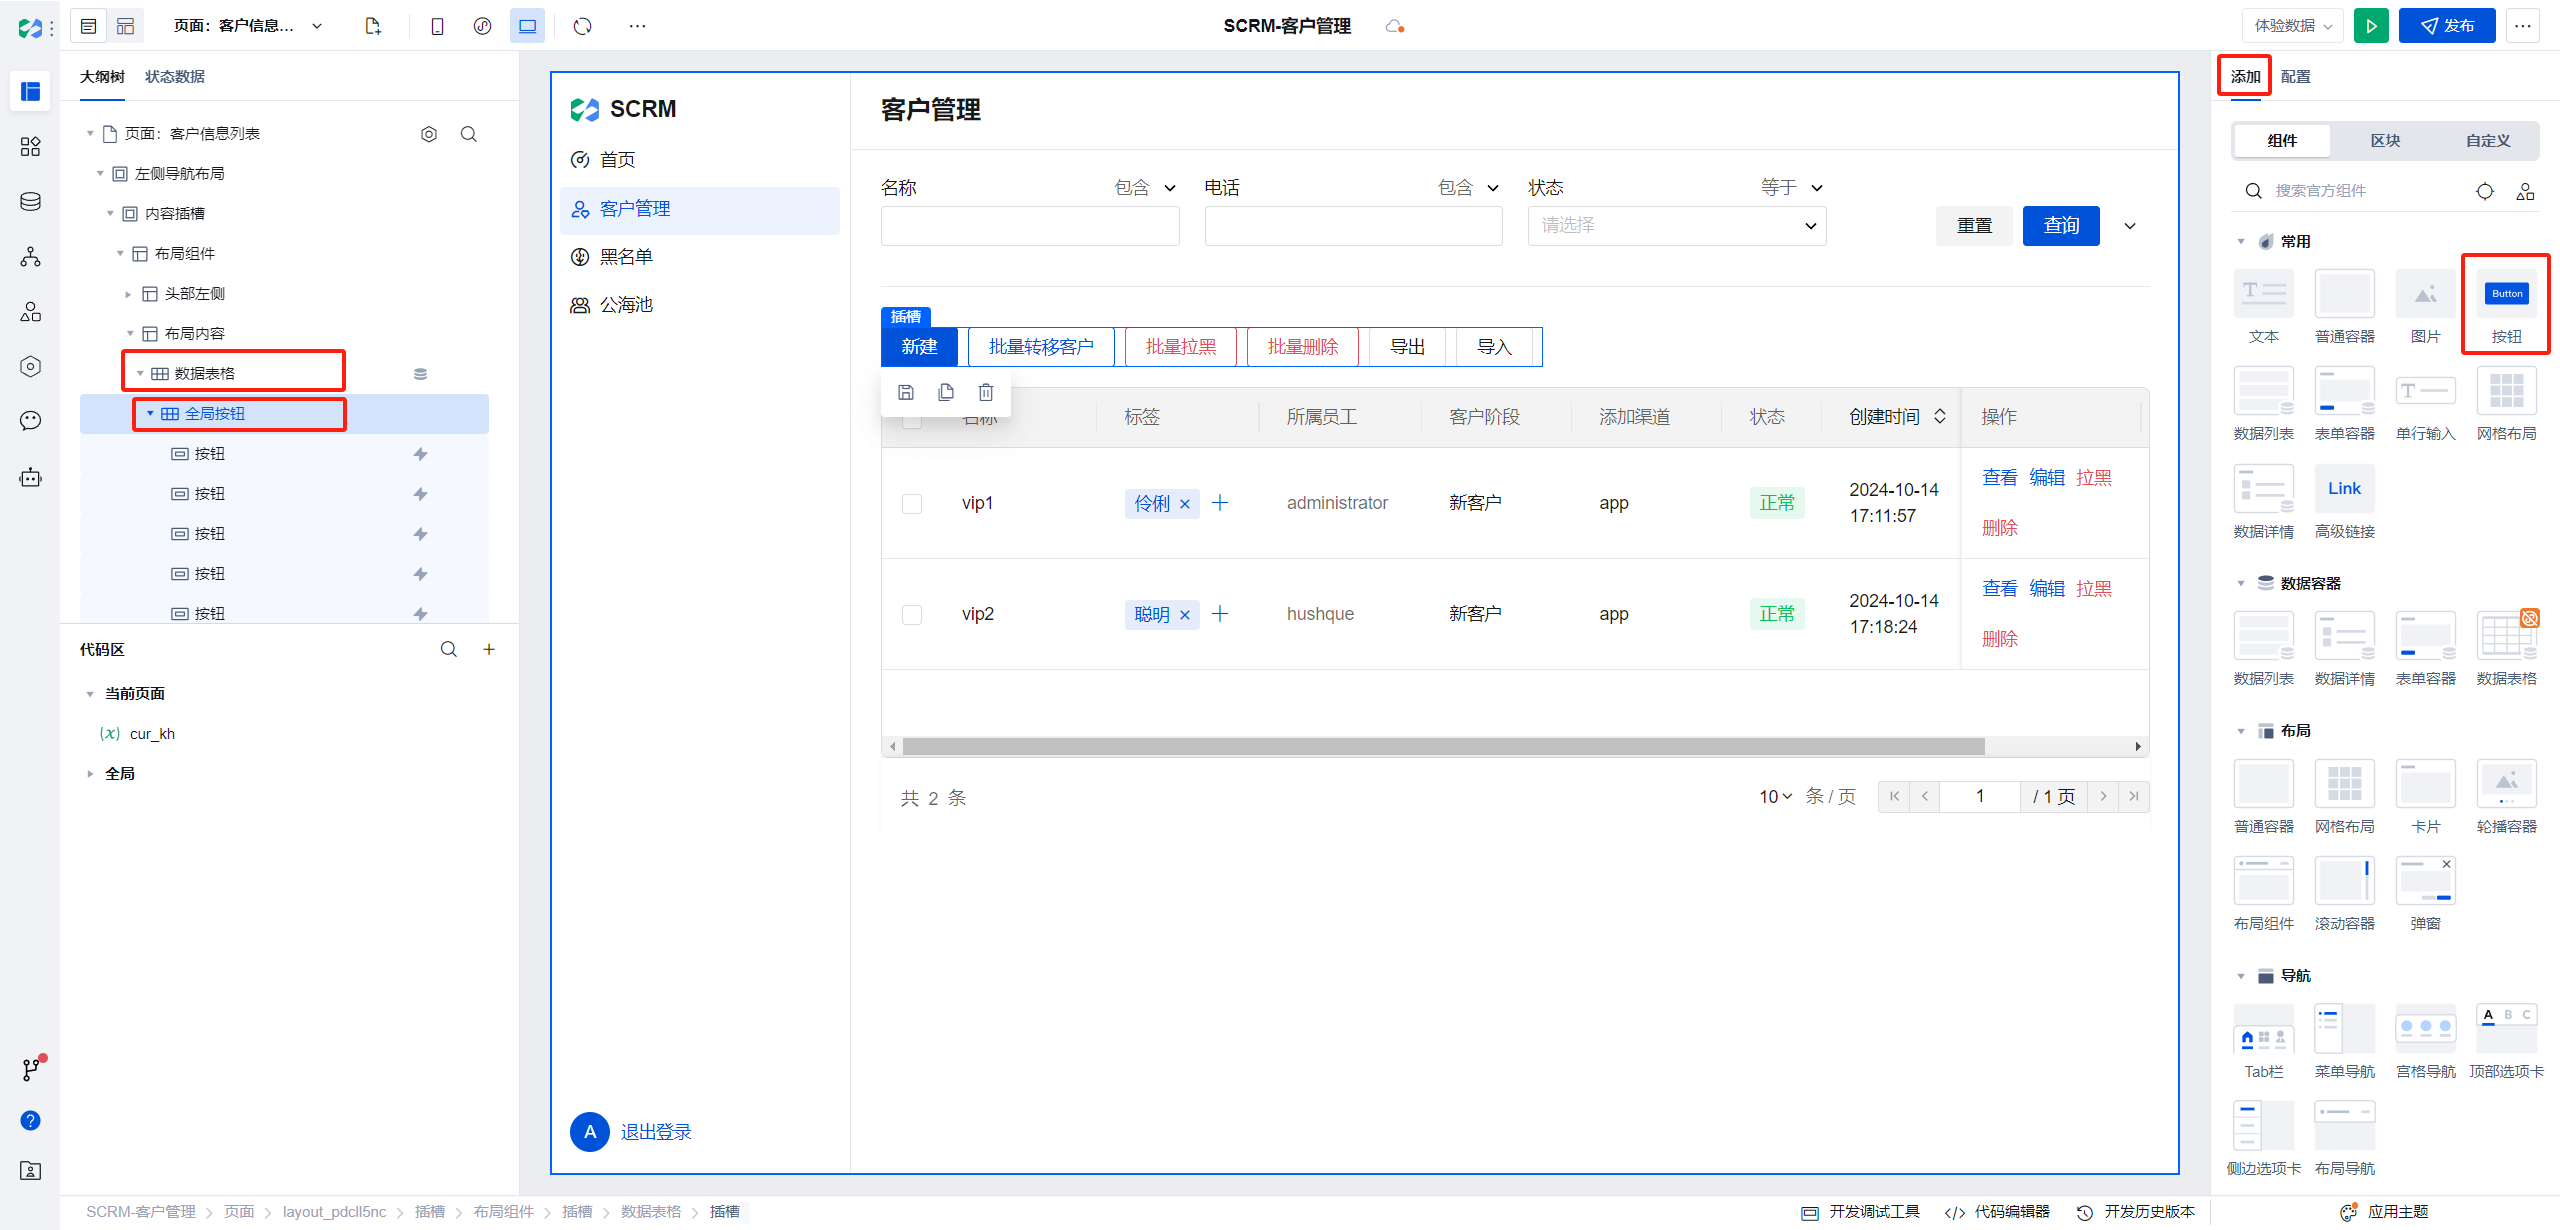
- The global buttons include Add, Batch Transfer Customers, Batch Add to Blocklist, Batch Delete, Export, Import
Among them, Add, Delete, Export, Import are default built-in feature buttons; here we can simply modify their names.
Select the global buttons in the left outline tree, click the button under Add/Component on the right to add, and add Batch Transfer Customers and Batch Add to Blocklist buttons.
- The operation buttons include View, Edit, Add to Blocklist, Delete
Among them, the View, Edit, and Delete buttons are default built-in operation buttons.
Similar to adding global buttons, select the operation buttons in the left outline tree, add an Add to Blocklist button, and adjust its position to the third place.
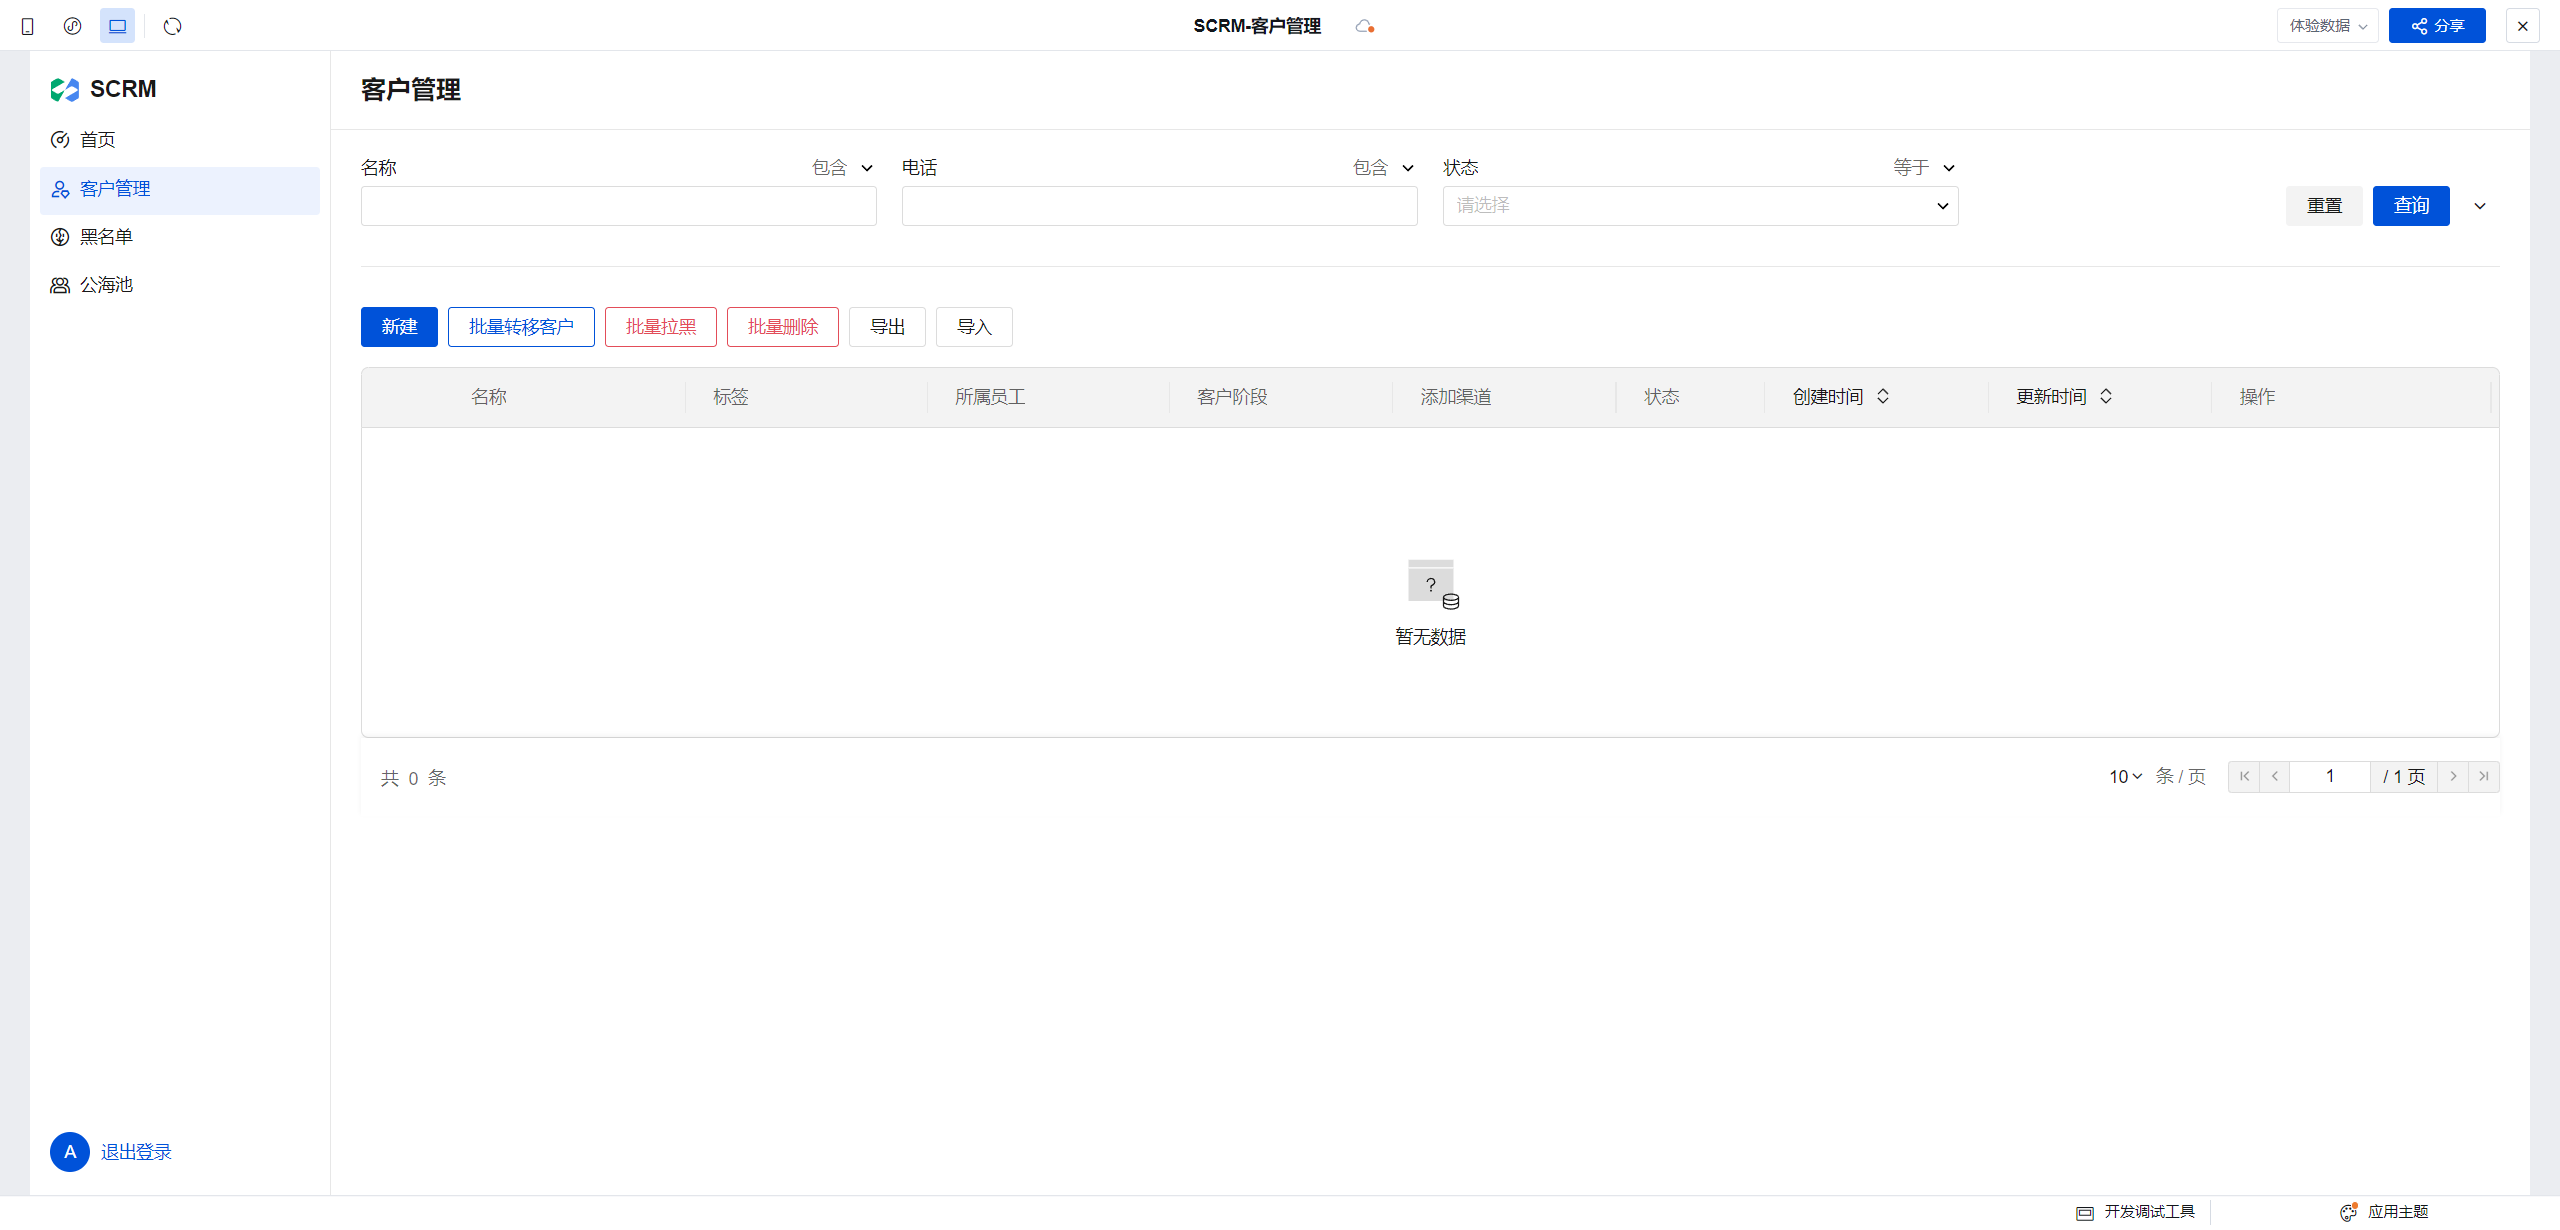
- The Customer Management page has been initially set up; now you can click the play button in the upper right corner for preview.
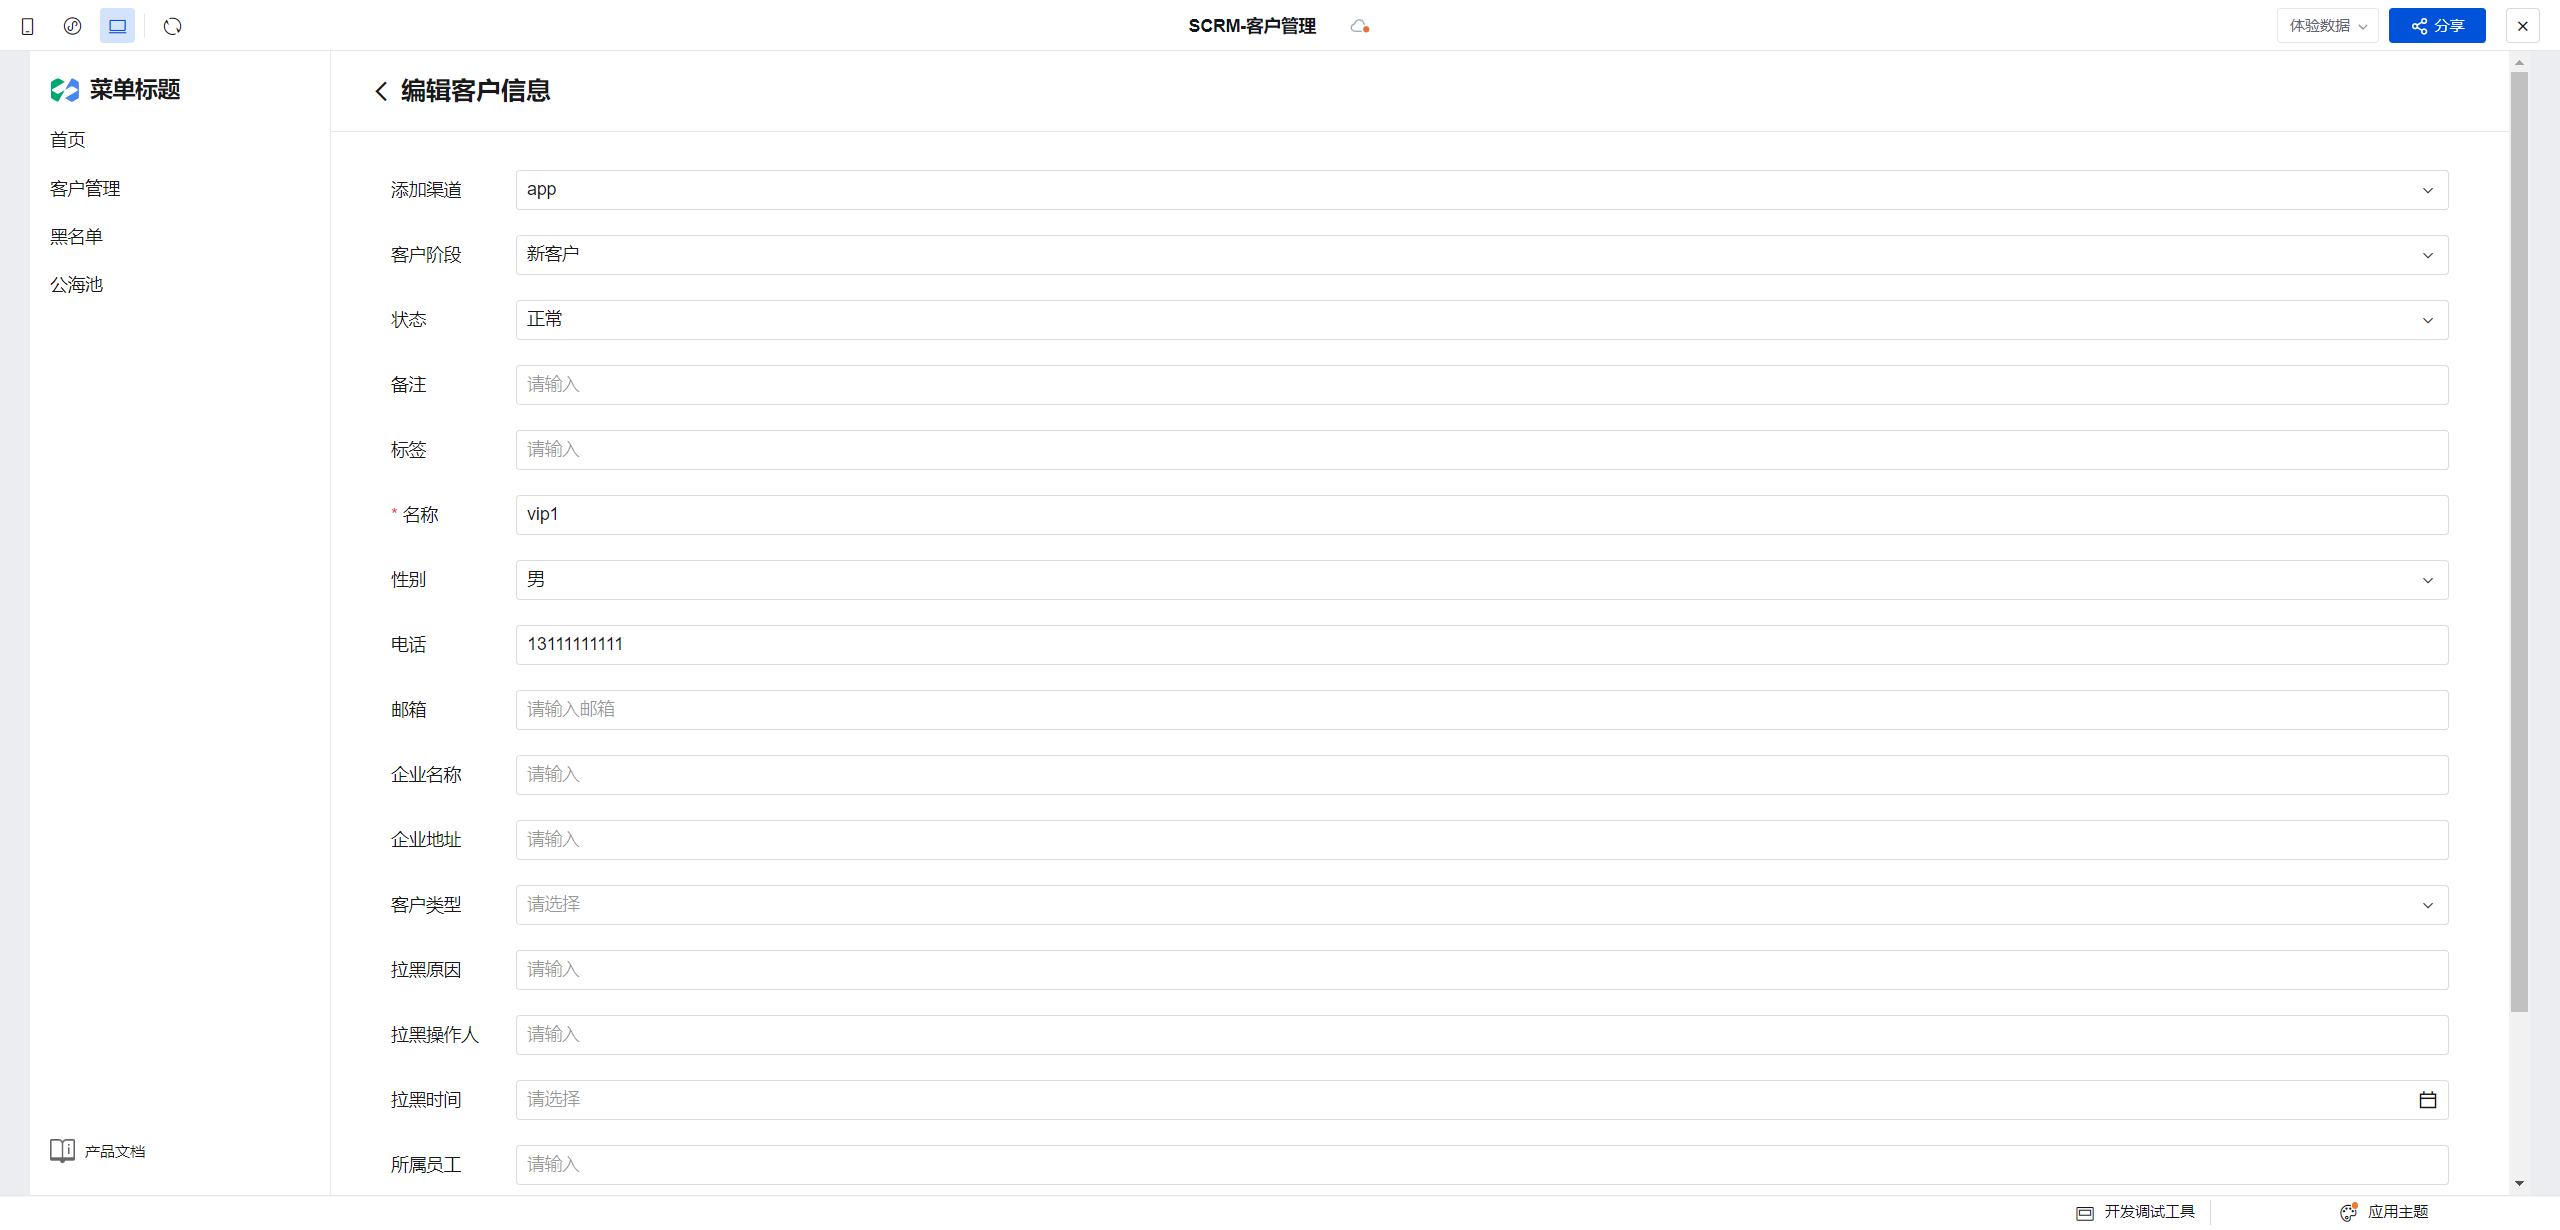
Click New, fill in the information, and click Save.
Return to the list to see that a new record has been added.
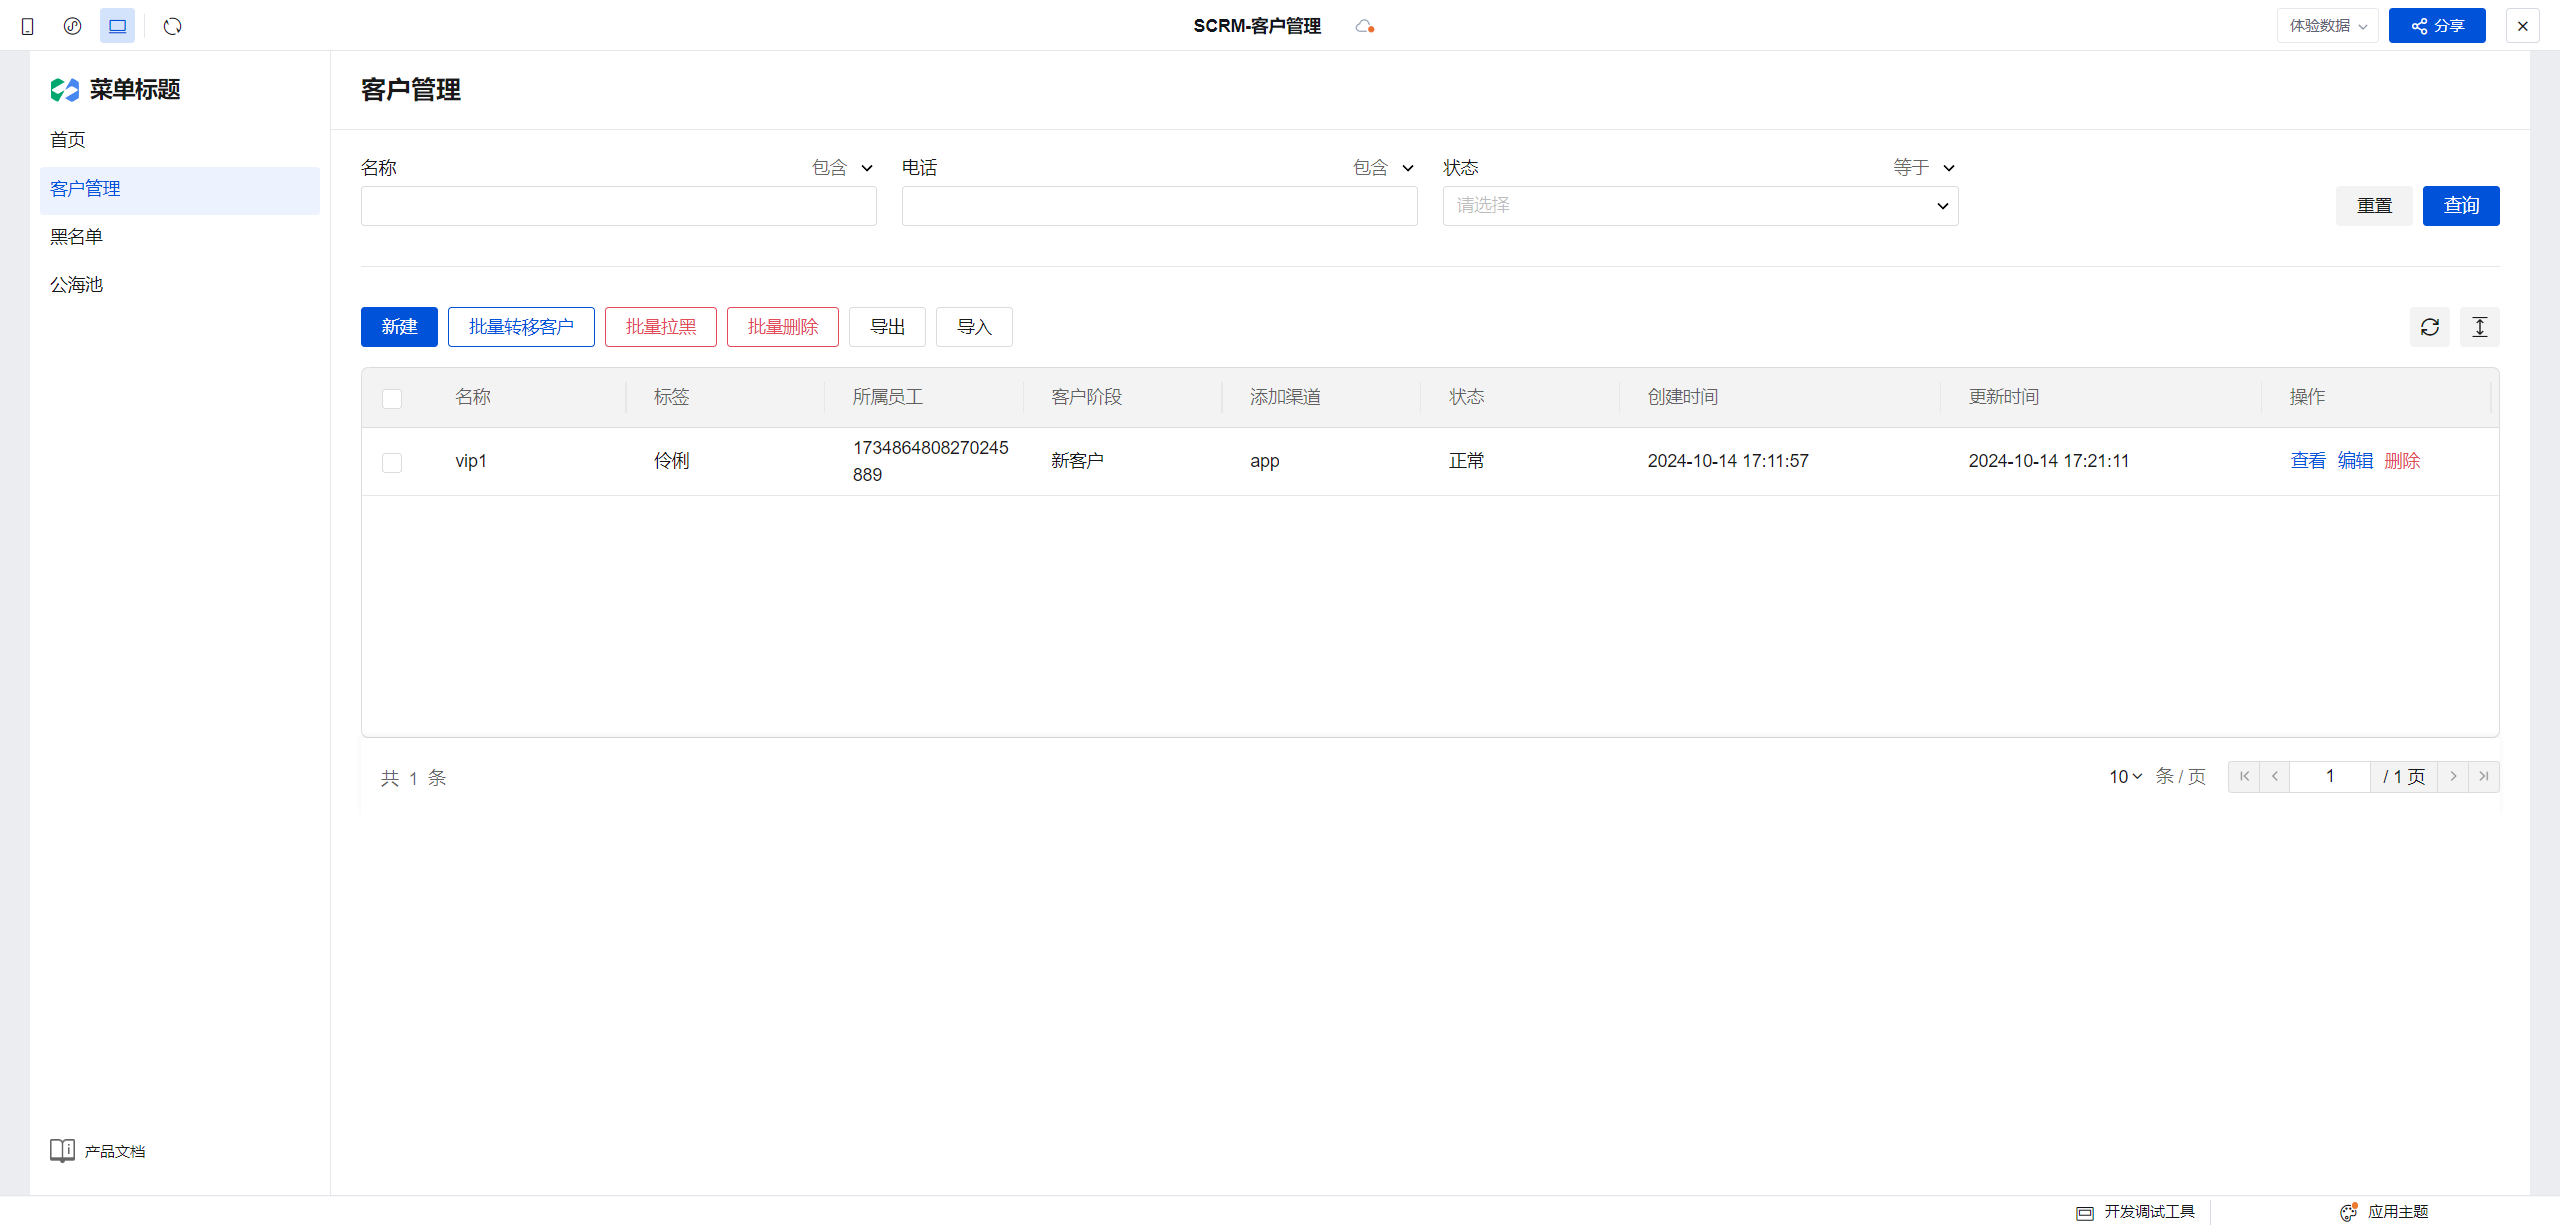
Clicking Edit can correctly display the data; after editing the data, saving can properly update the data.
Next, we are starting to improve the features for transferring customers, adding to blocklist, and customizing column display.
Batch Transfer
When clicking Batch Transfer, you need to select the new assigned employee to update the current record.
Therefore, use a pop-up window to select the Assigned Employee, and after confirmation, update the Assigned Employee information of the current item's data. Our logic flow is:
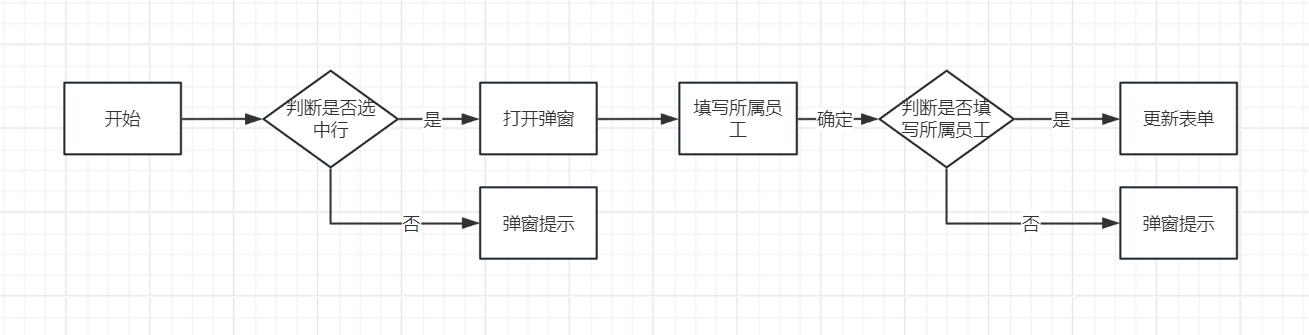
Procedures:
- Add a pop-up component for selecting the assigned employee.
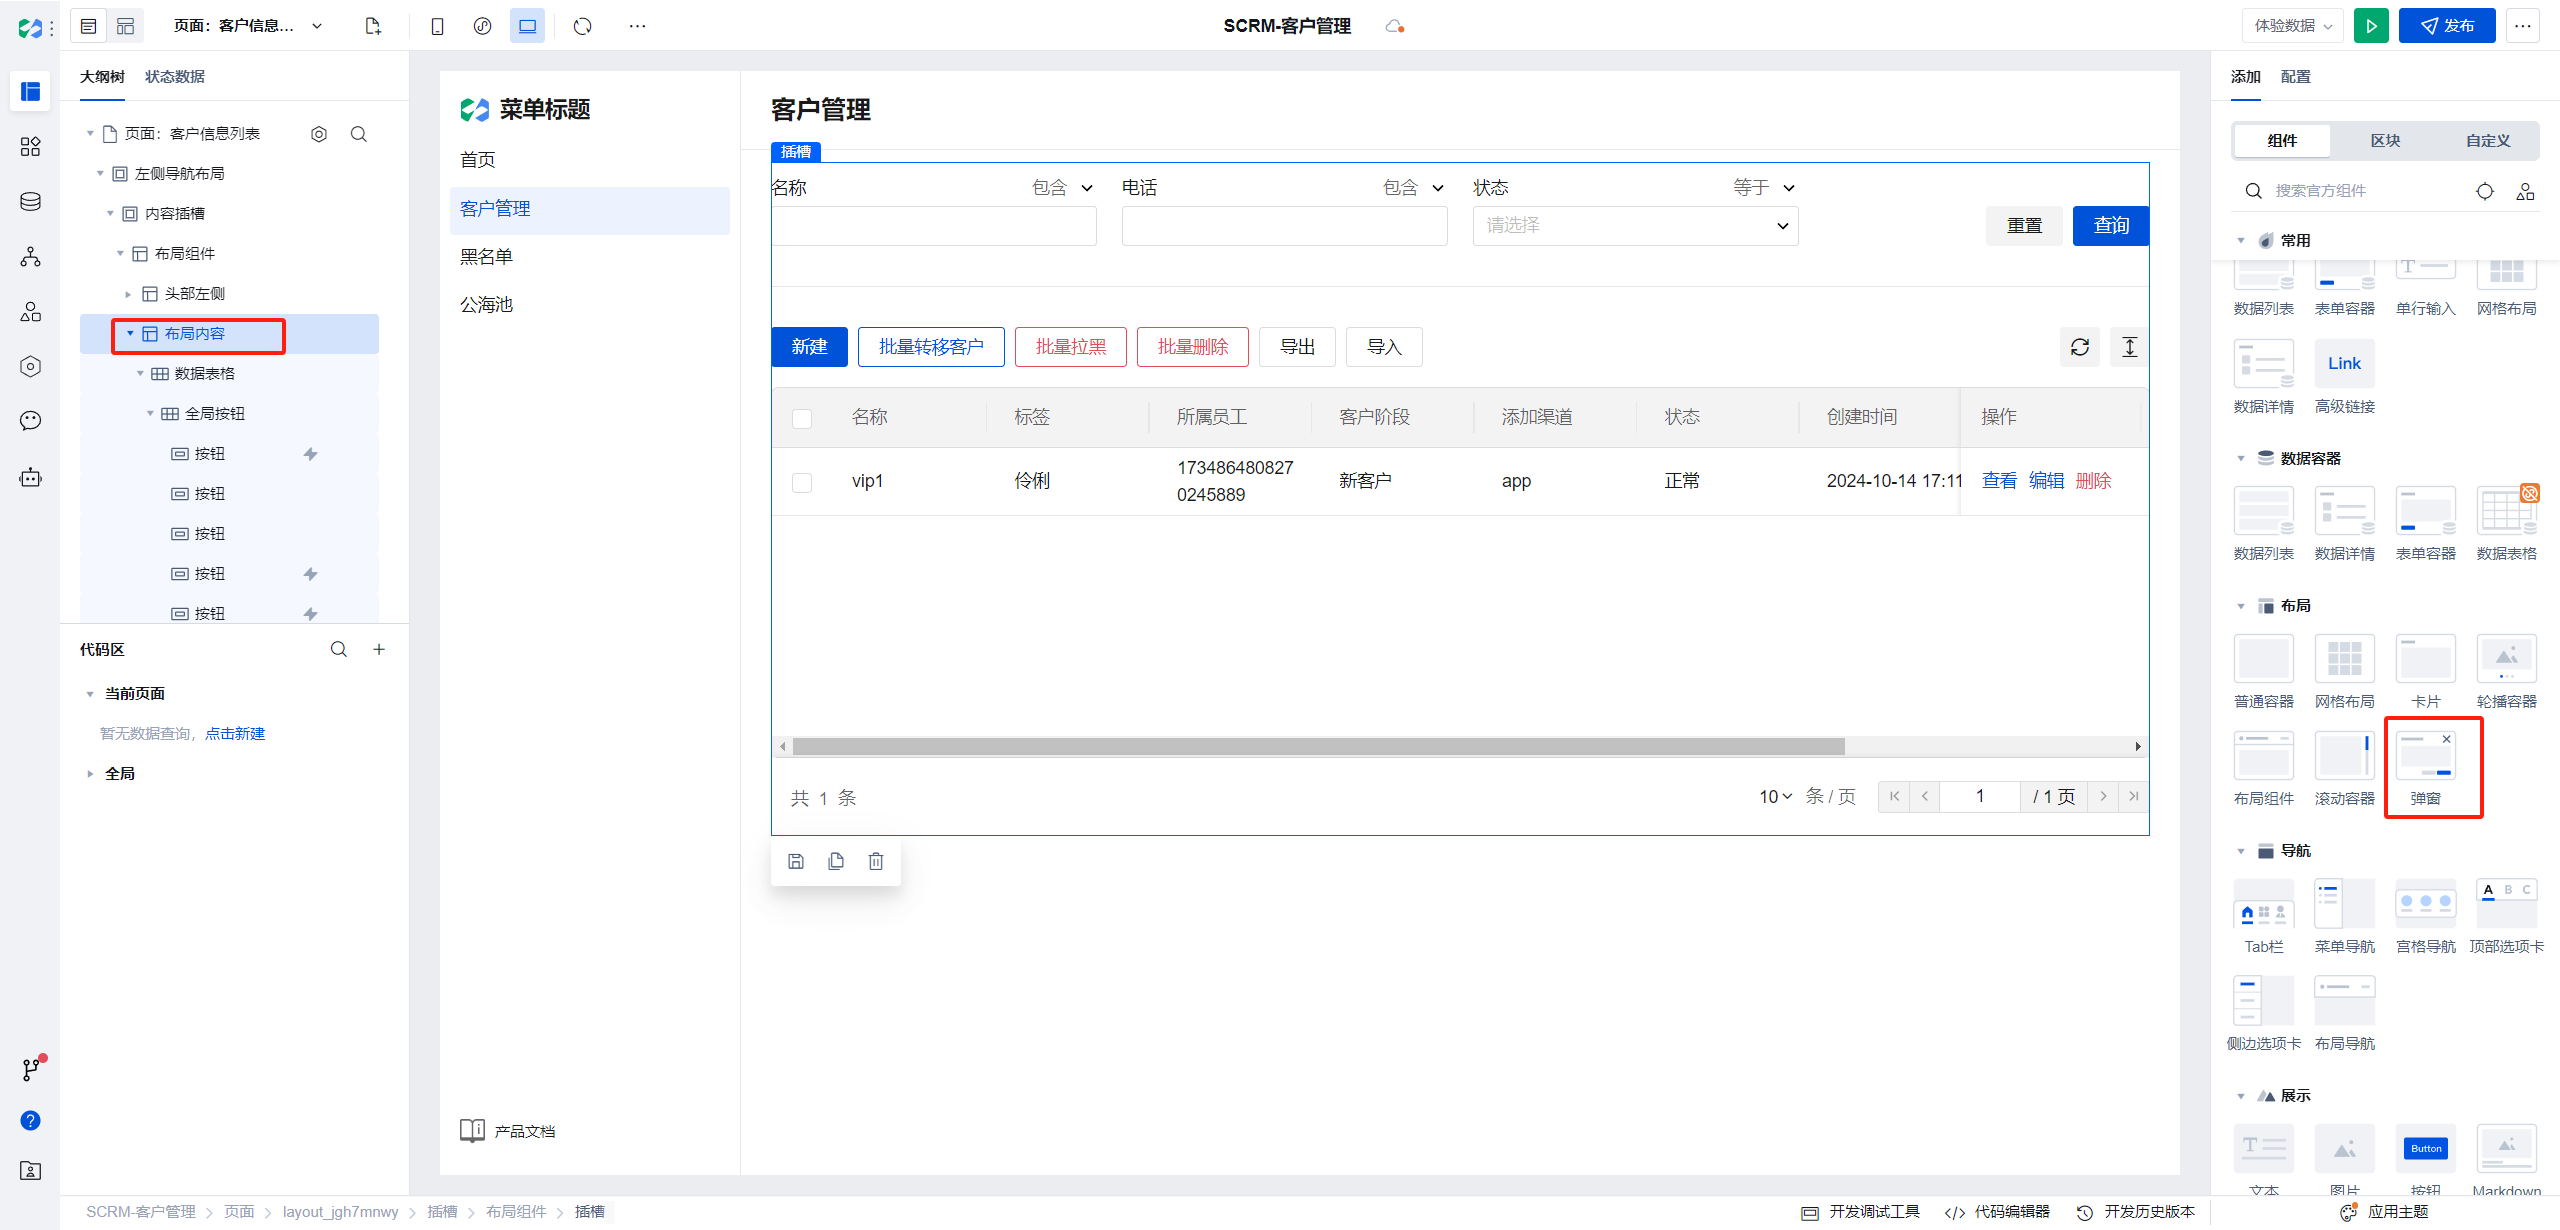
The selection dialog is closed by default; otherwise, it will appear when the page is opened.
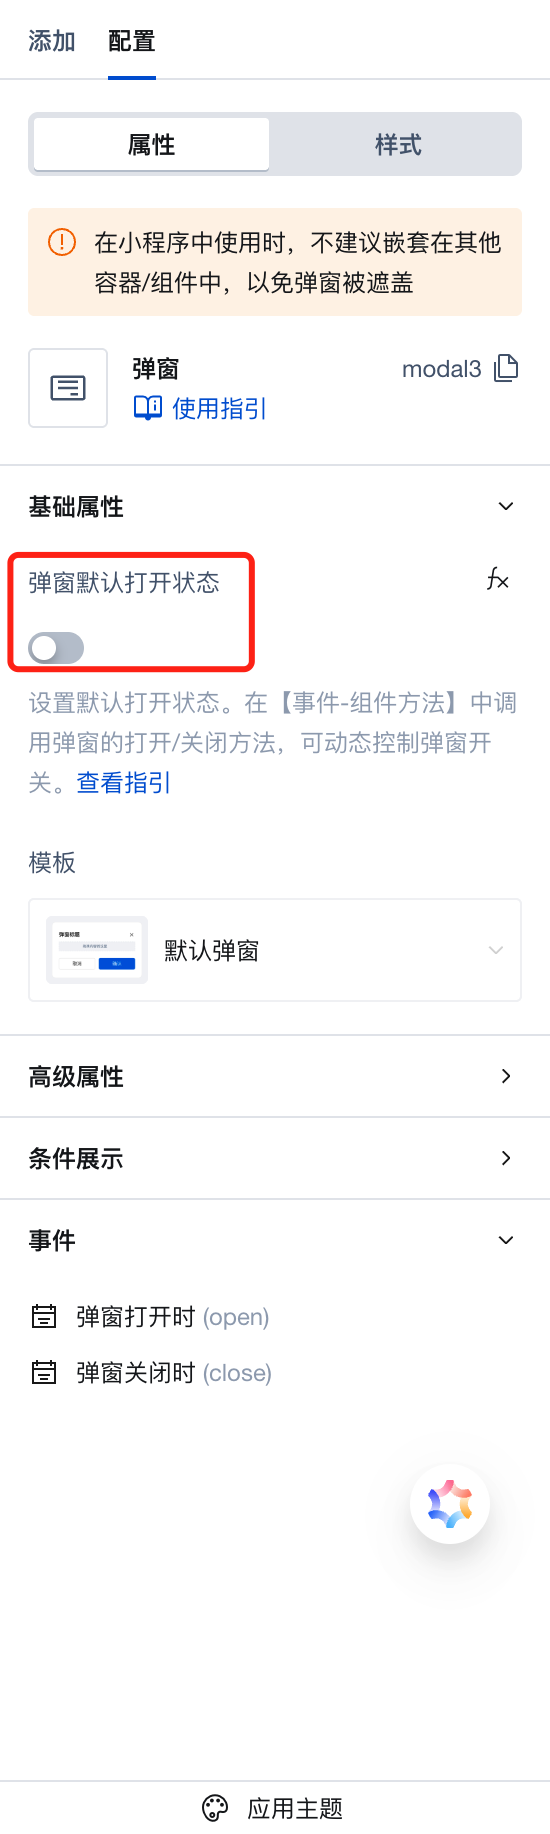
- In the click event of the Batch Transfer button, select the logic branch.

After clicking, the logic branch configuration window opens. Here we click the expand icon.
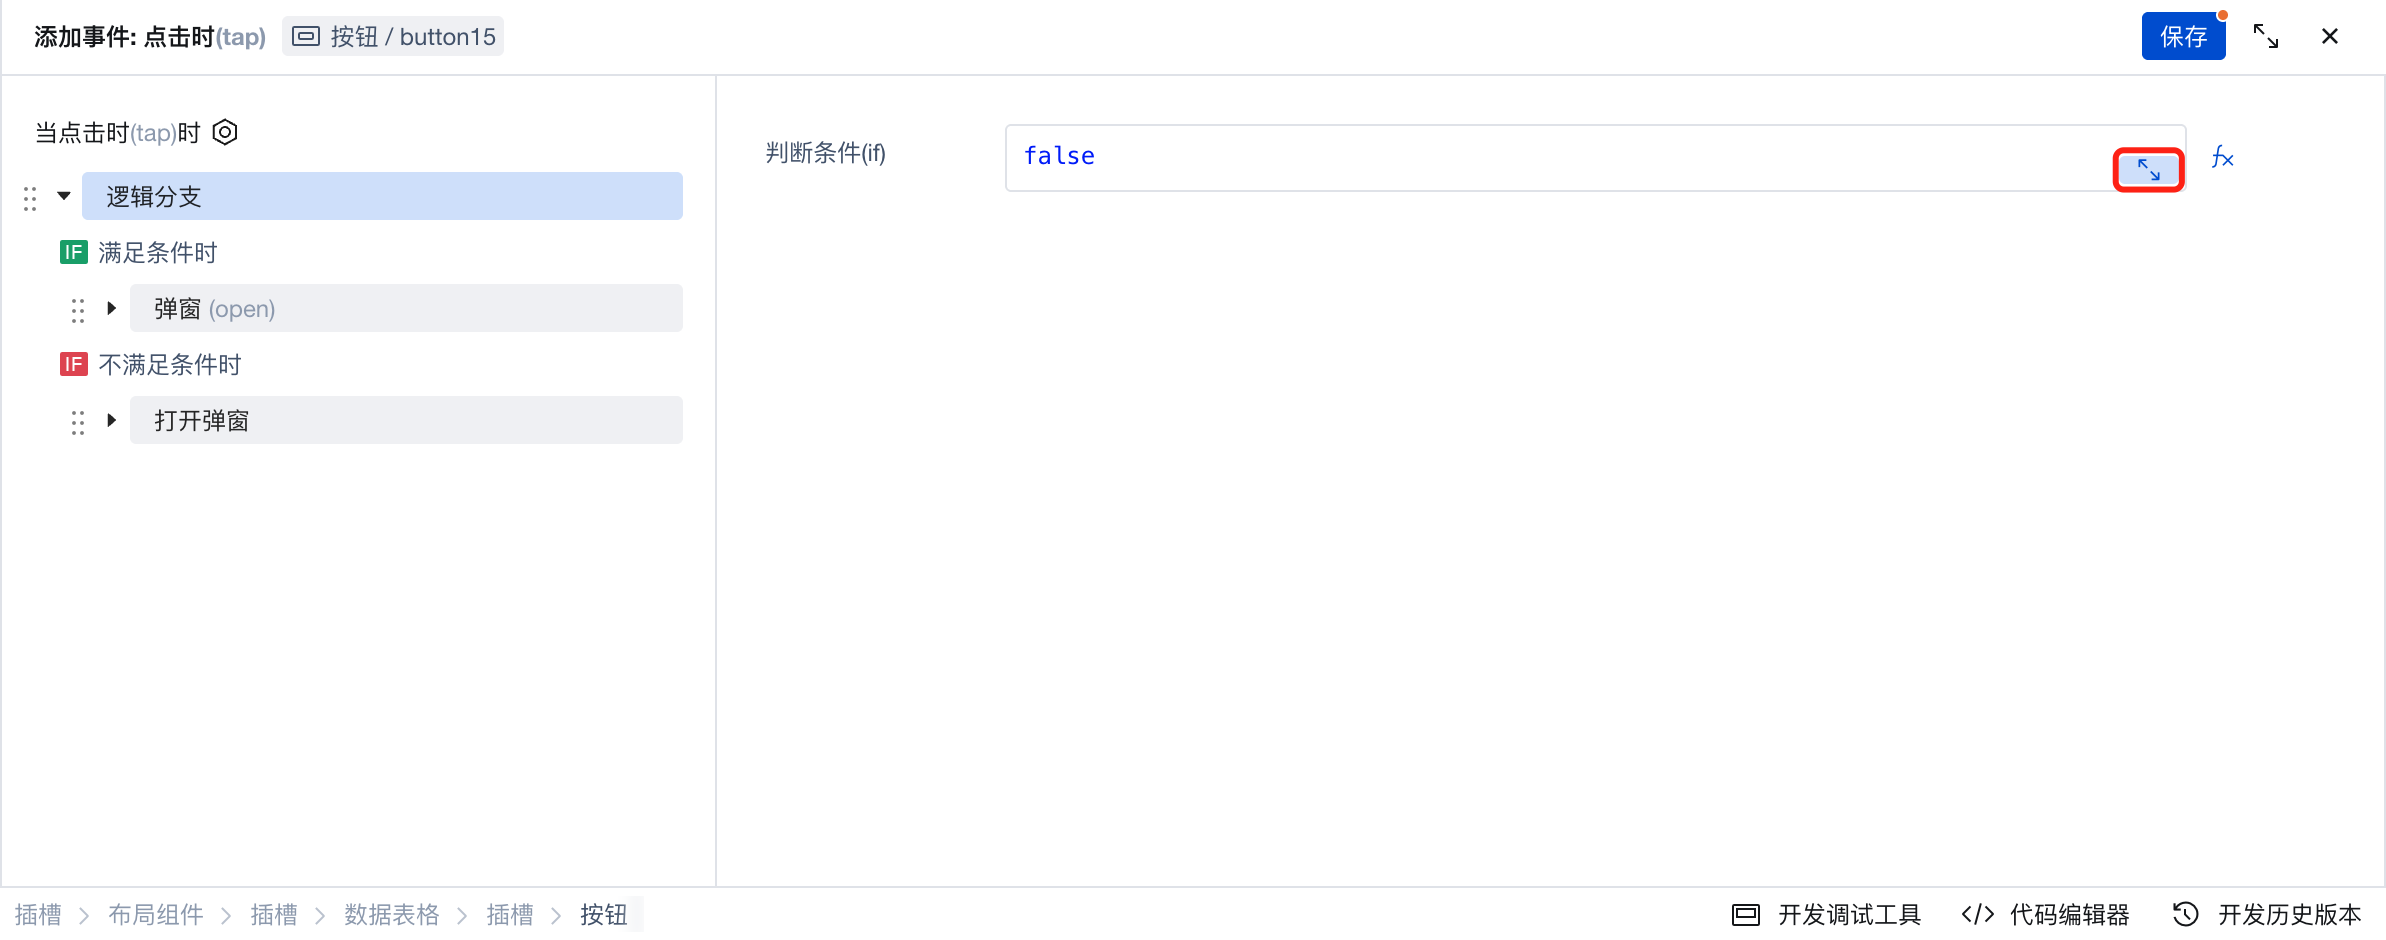
You can view some global variables provided within WeDa and the current expression test results.
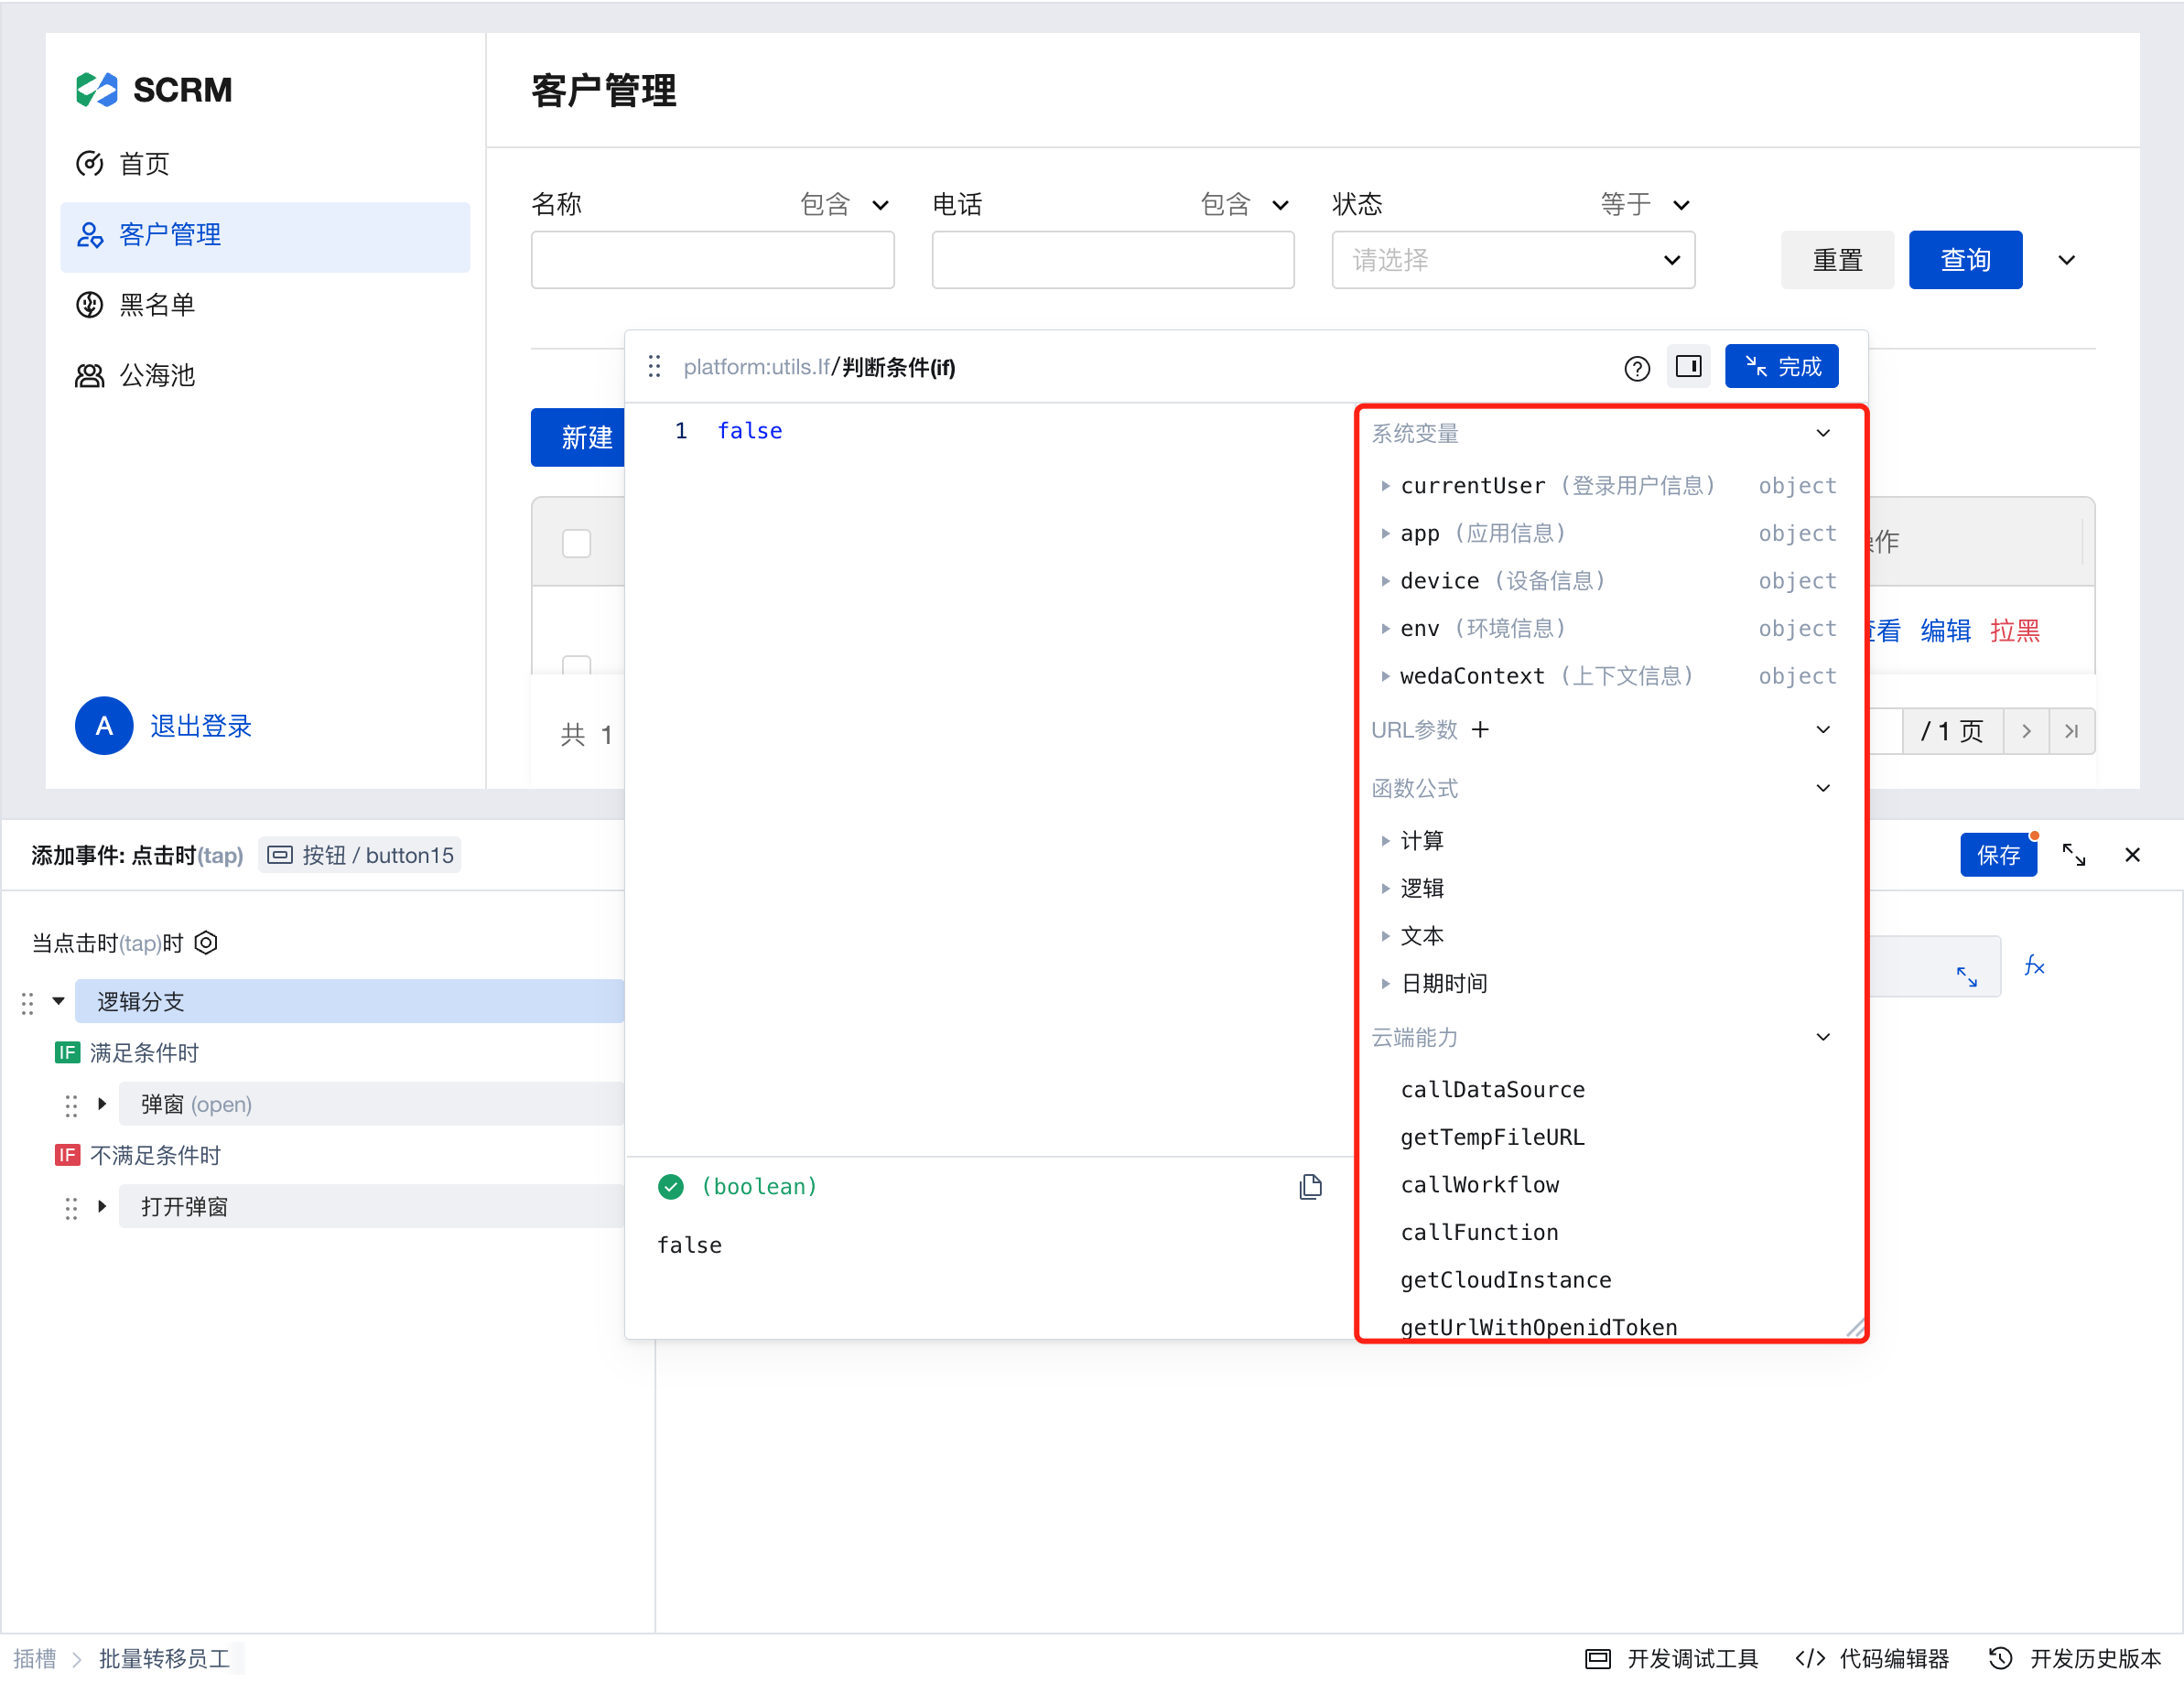
Enter the expression below in the code box.
If(!!$w.table1.selectedRecords.length, true, false);
$w is a global variable provided by WeDa, which contains all information about the current environment.
table1 is the id of the current list.
After entering, the result is as follows:
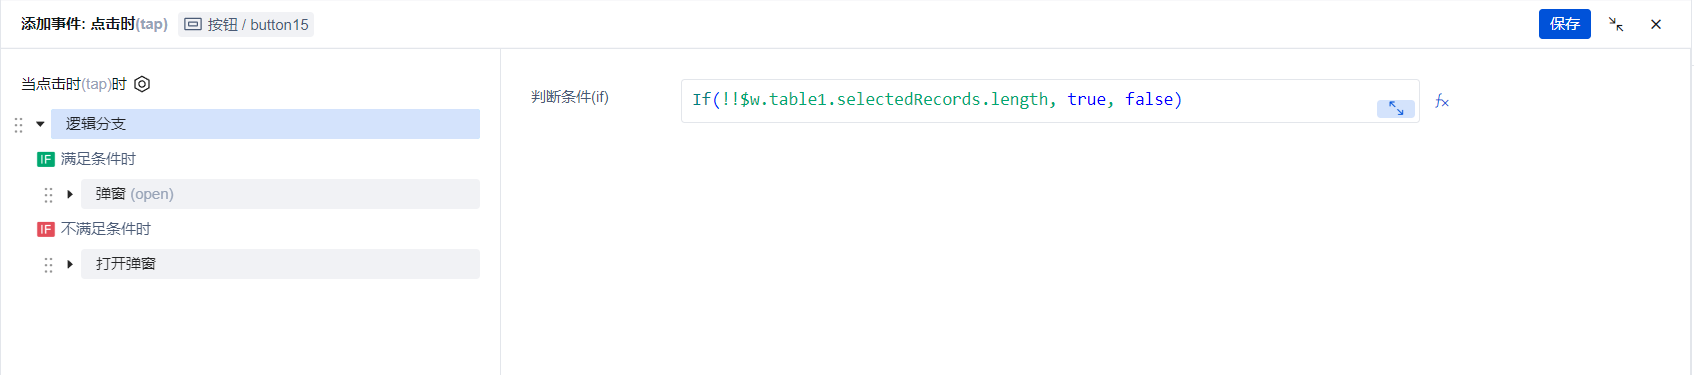
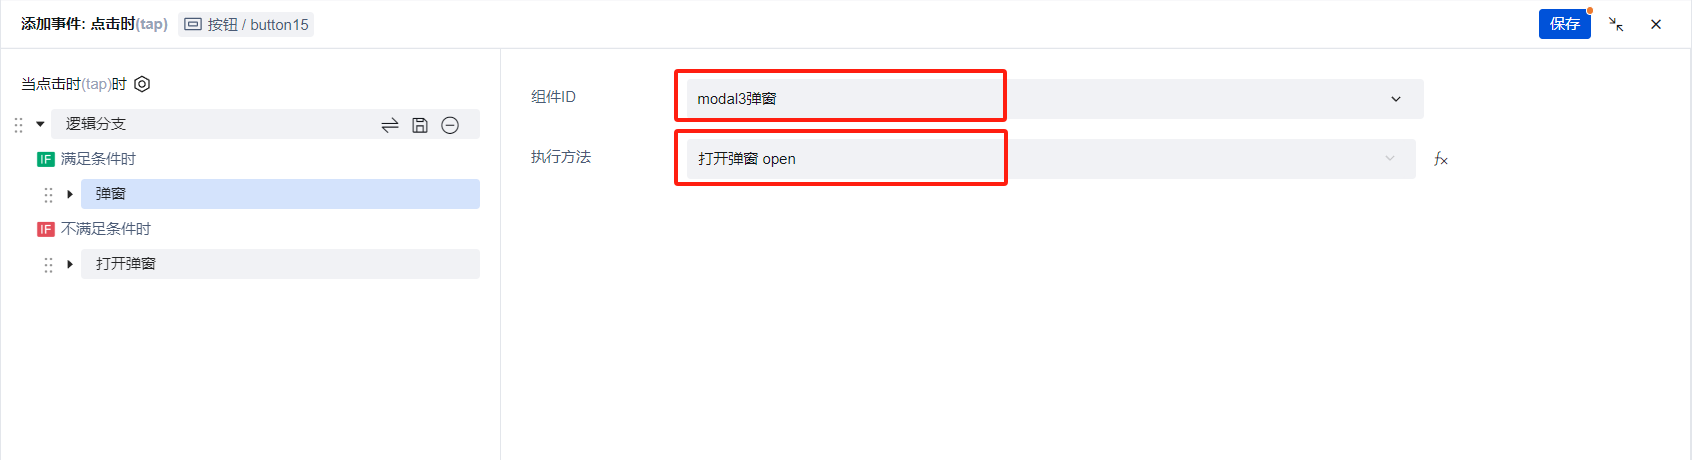
- When conditions are met, select to open the dialog component.
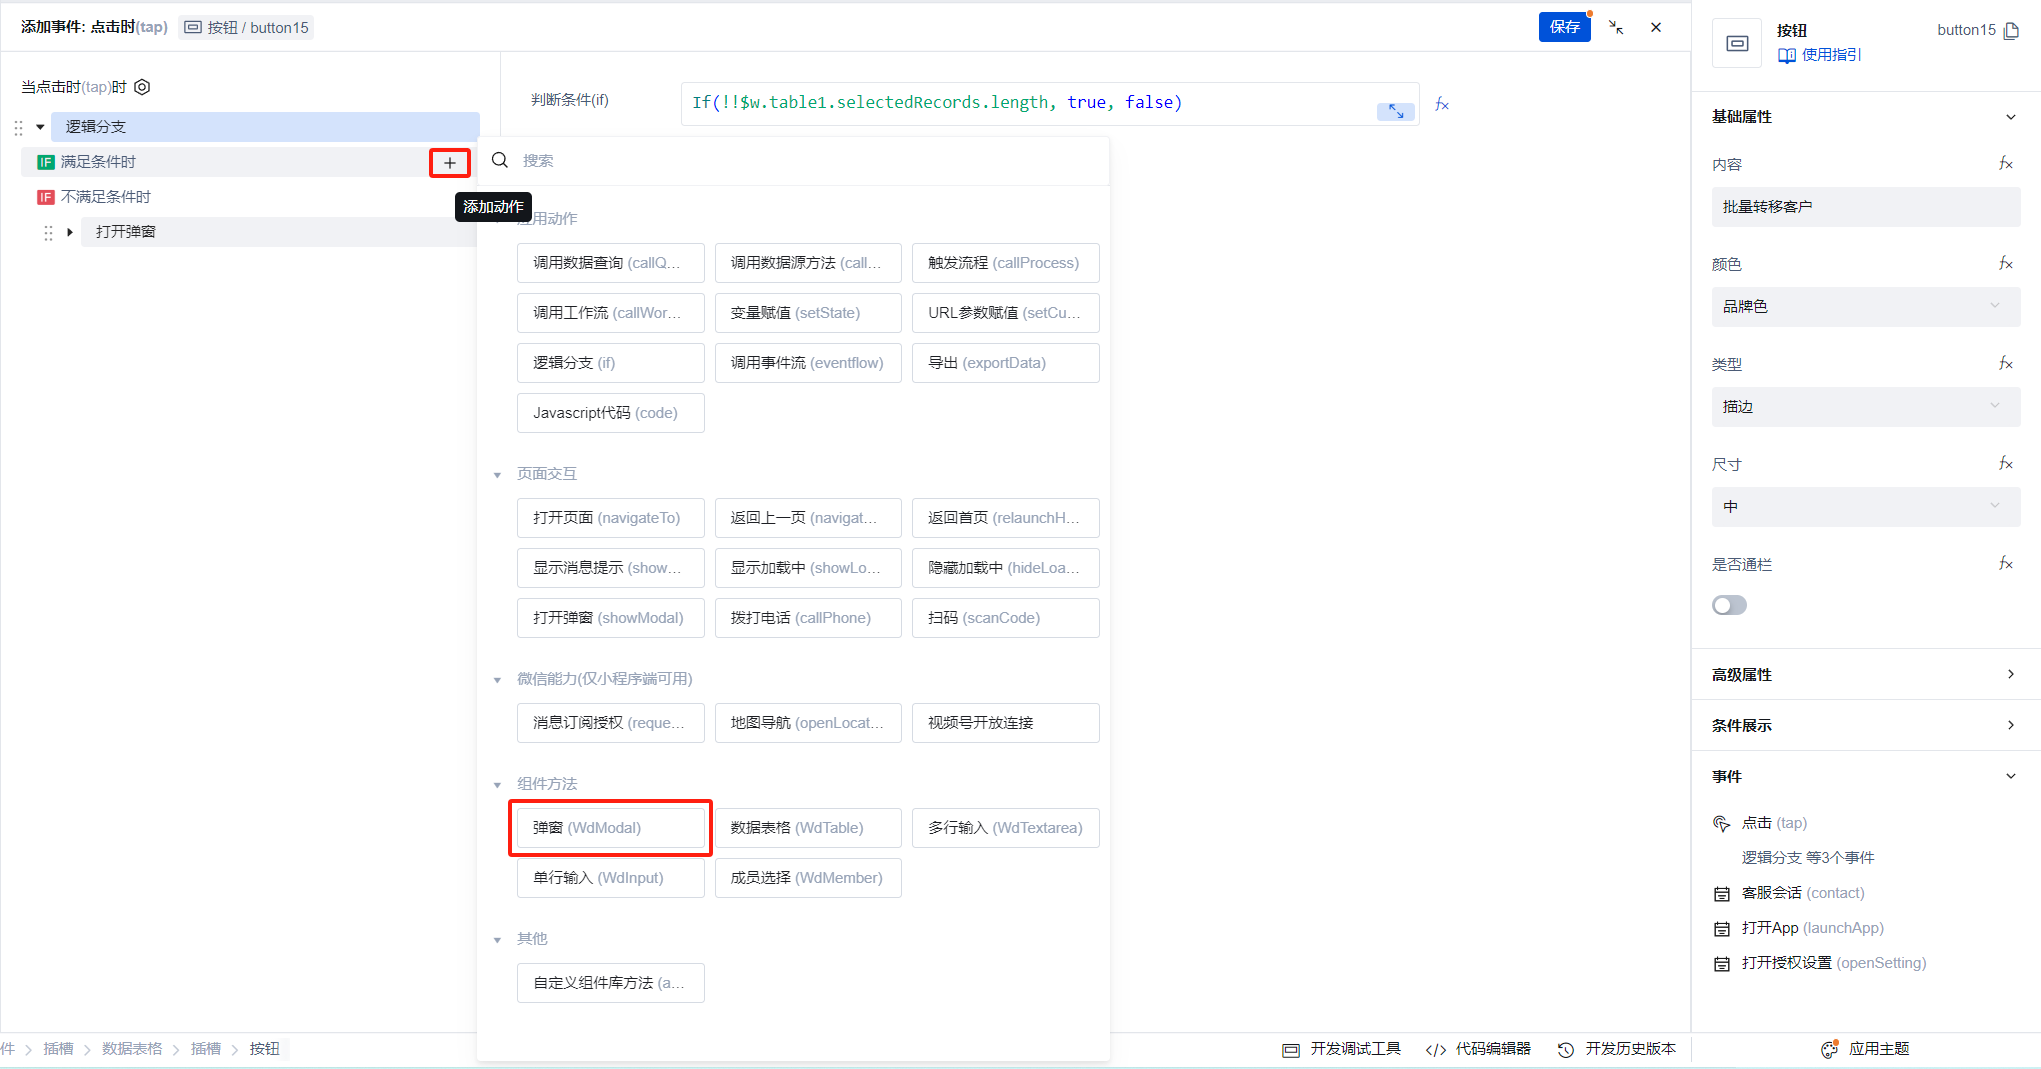
- Select the newly added dialog, choose the method to open the dialog, and note that modal3 is the id of the newly added dialog.
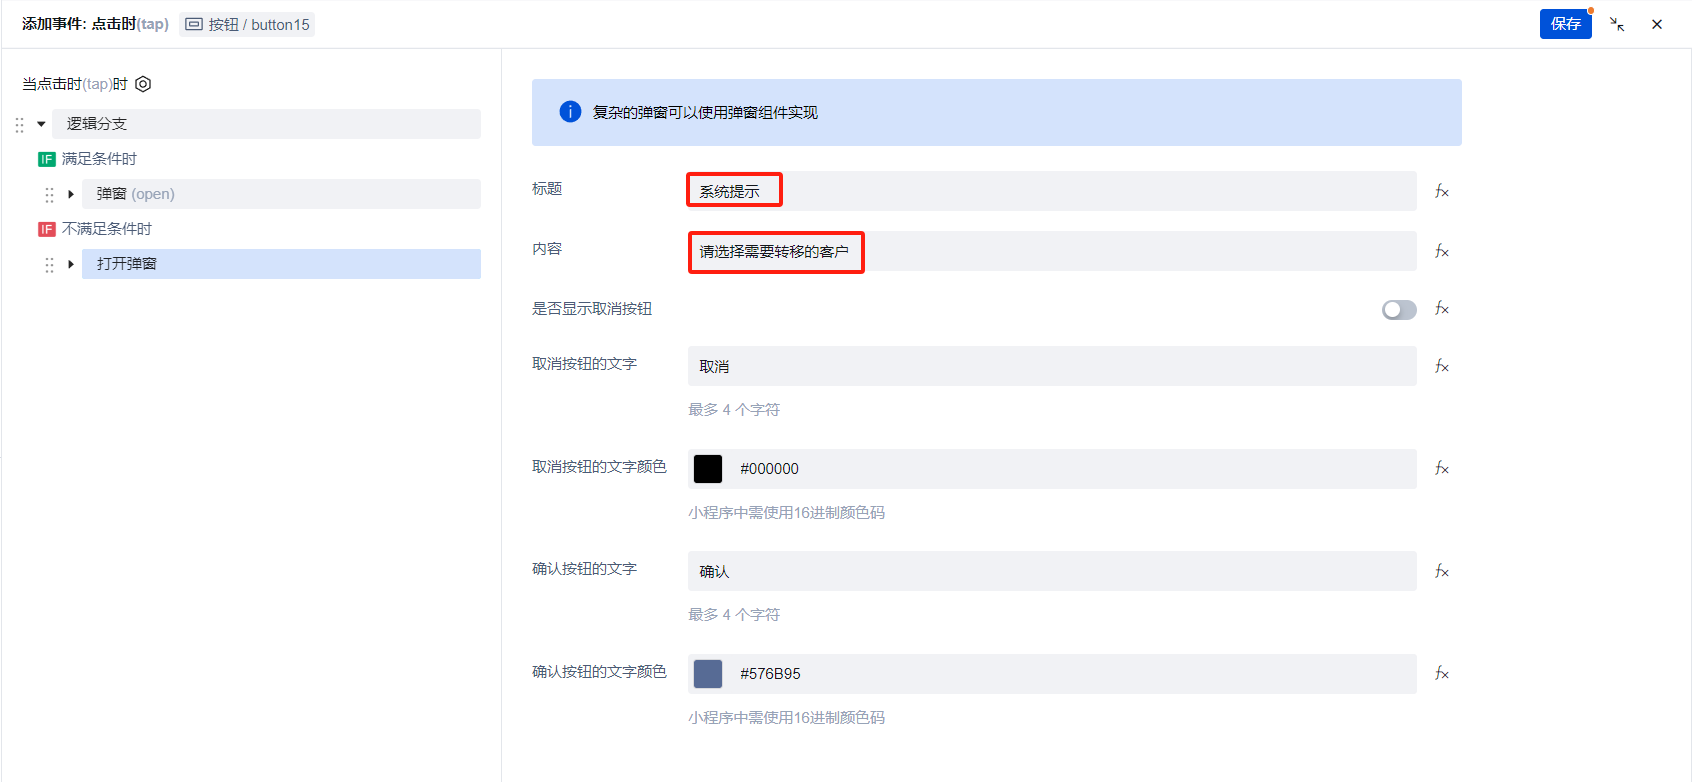
- When conditions are not met, select to open the notification dialog.

- The title is System Prompt, and the content is Please select the customers to be transferred.
-
Click the save button in the top-right corner to complete.
-
Return to the newly added modal box and add a personnel field to it.
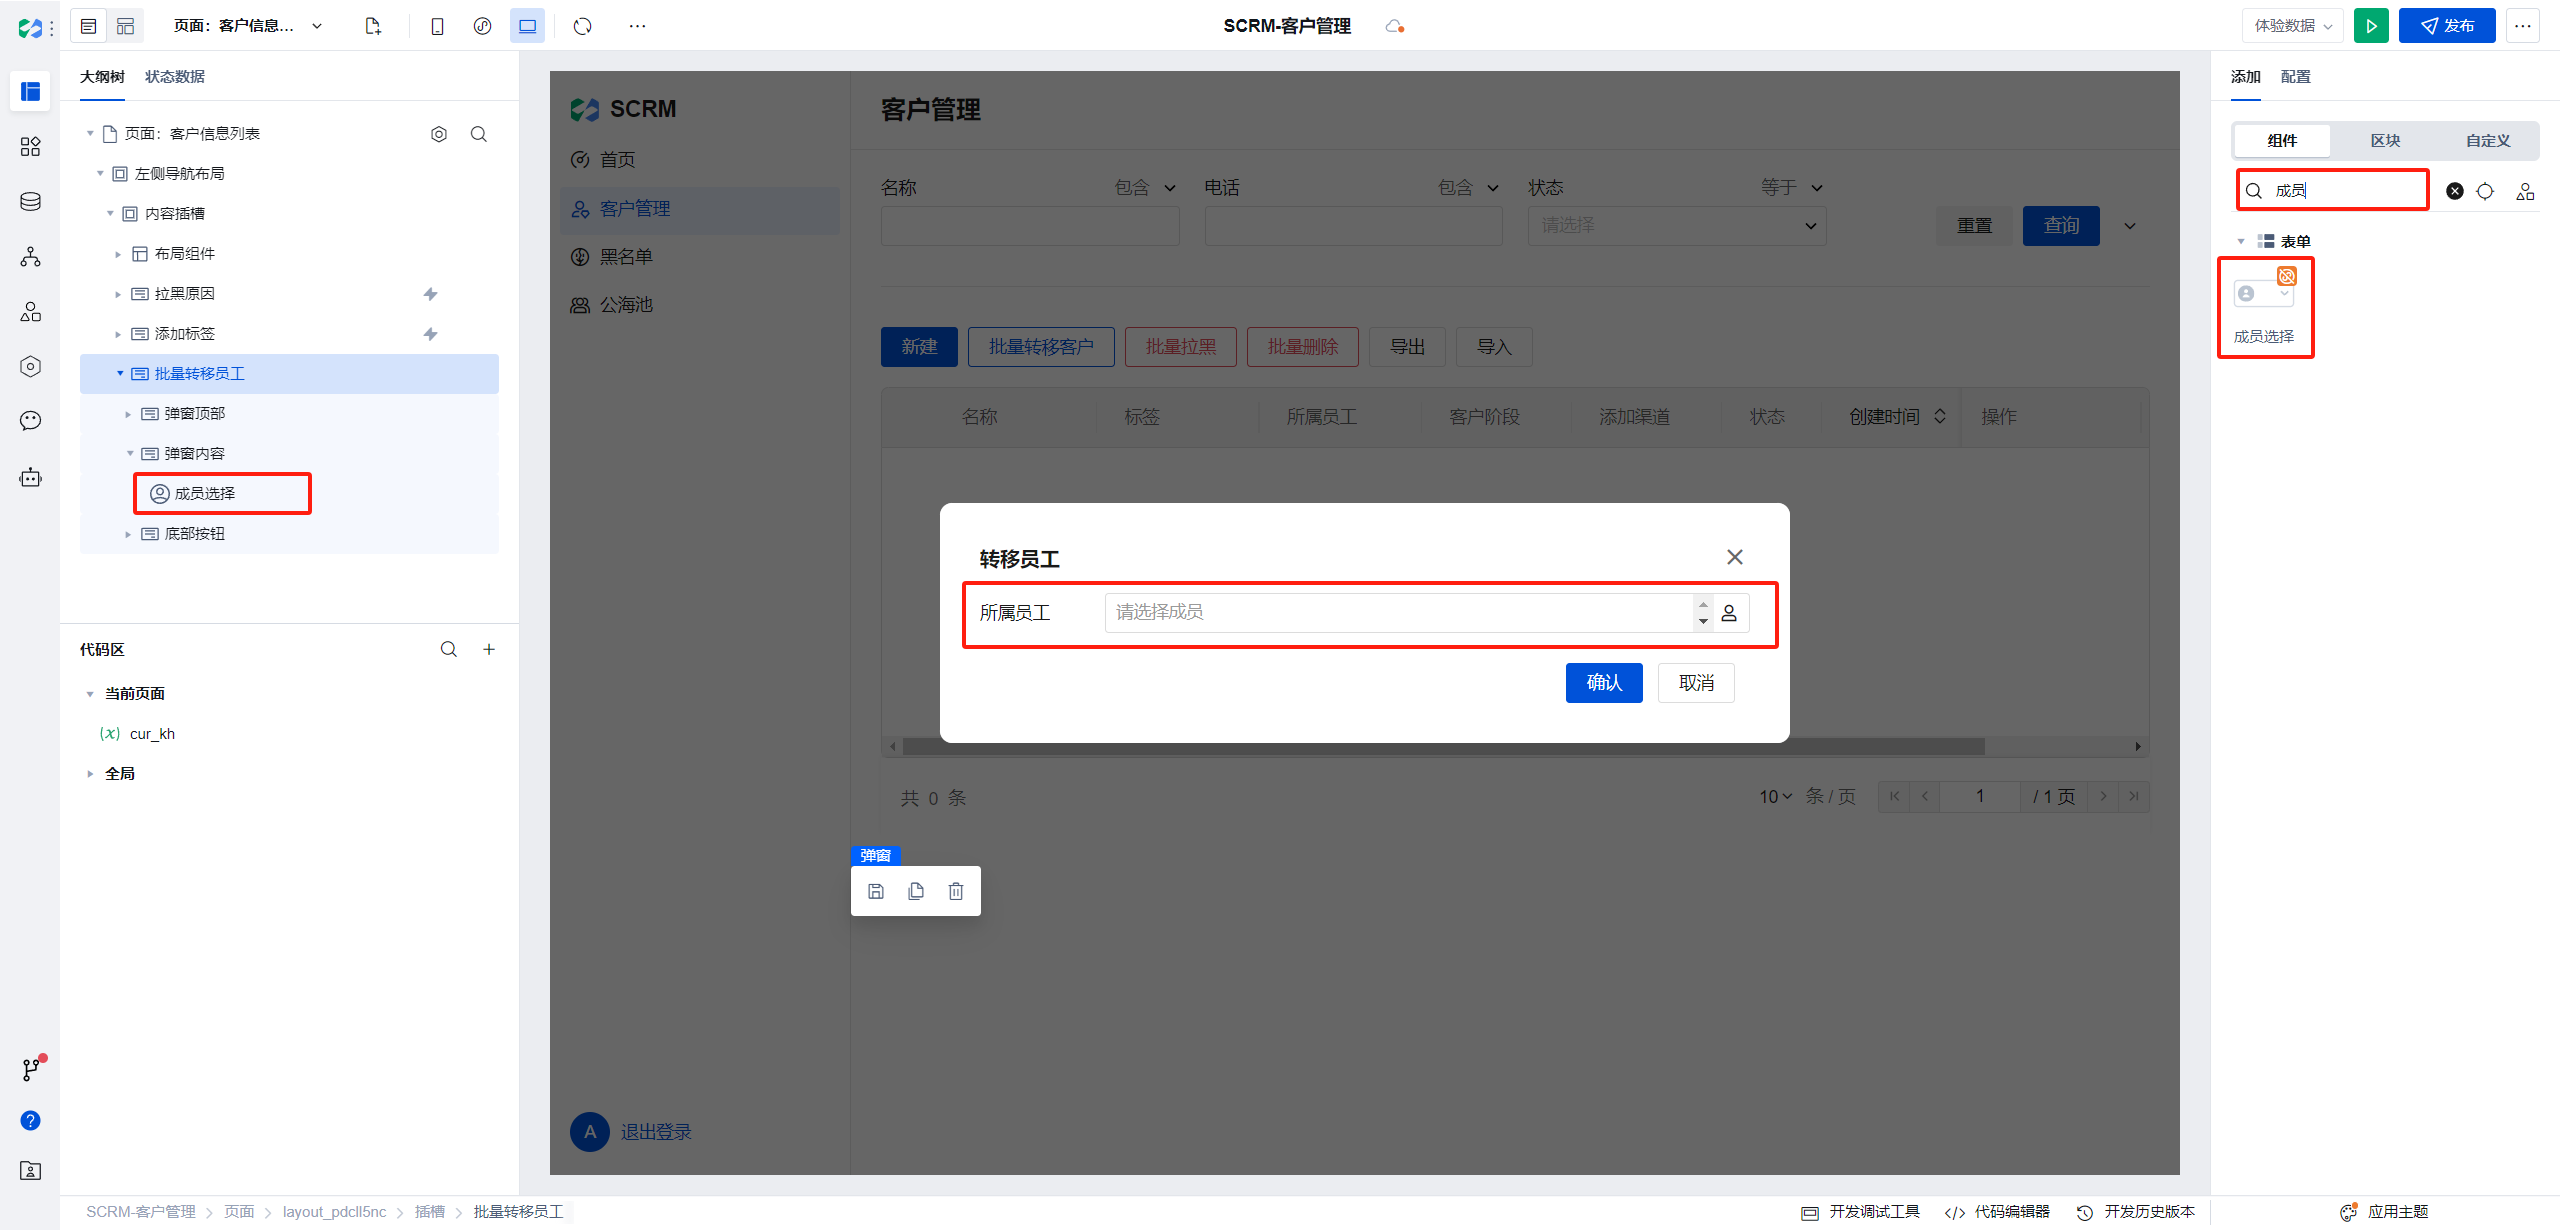
-
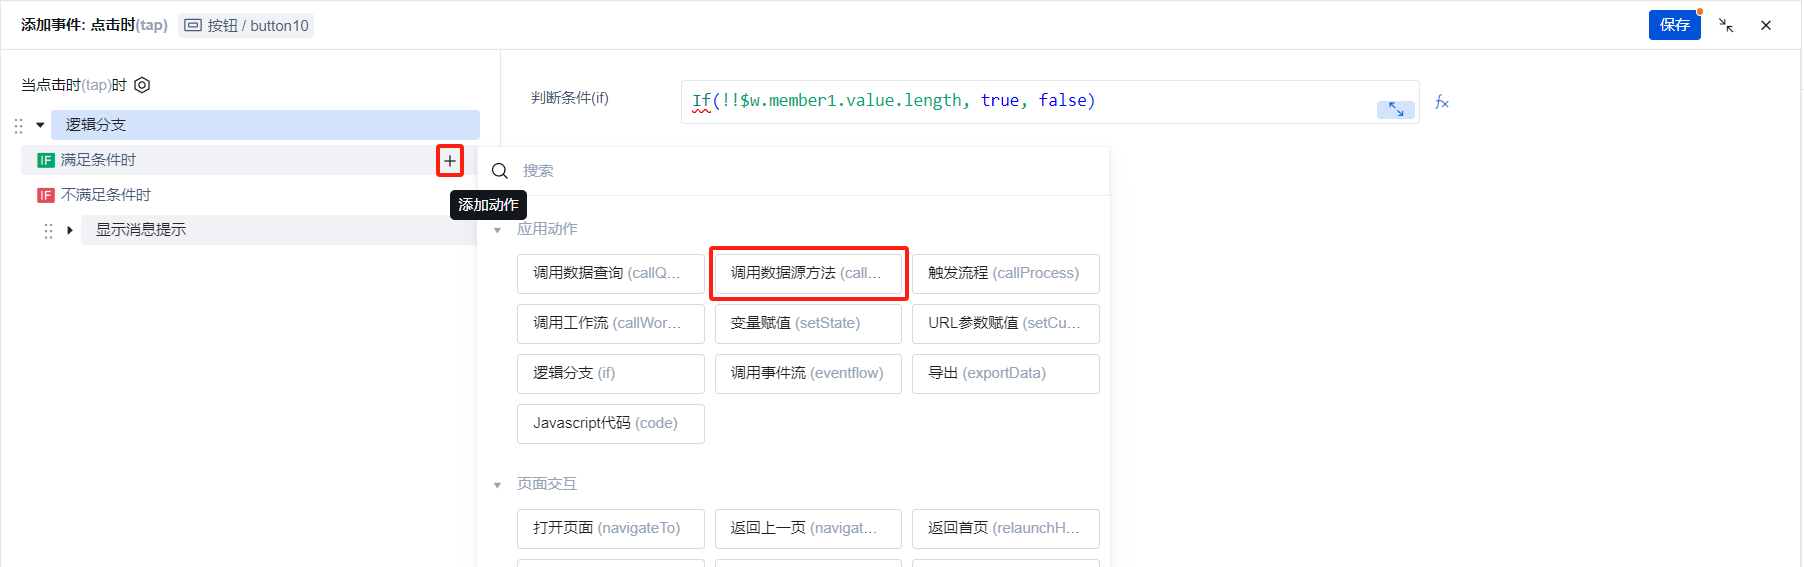
Configure the event for the confirmation button at the bottom of the dialog, select a logic branch, and set the judgment condition to the following expression:
merber2is the id of the newly added assigned employee field.
If(!!$w.member2.value.length, true, false);
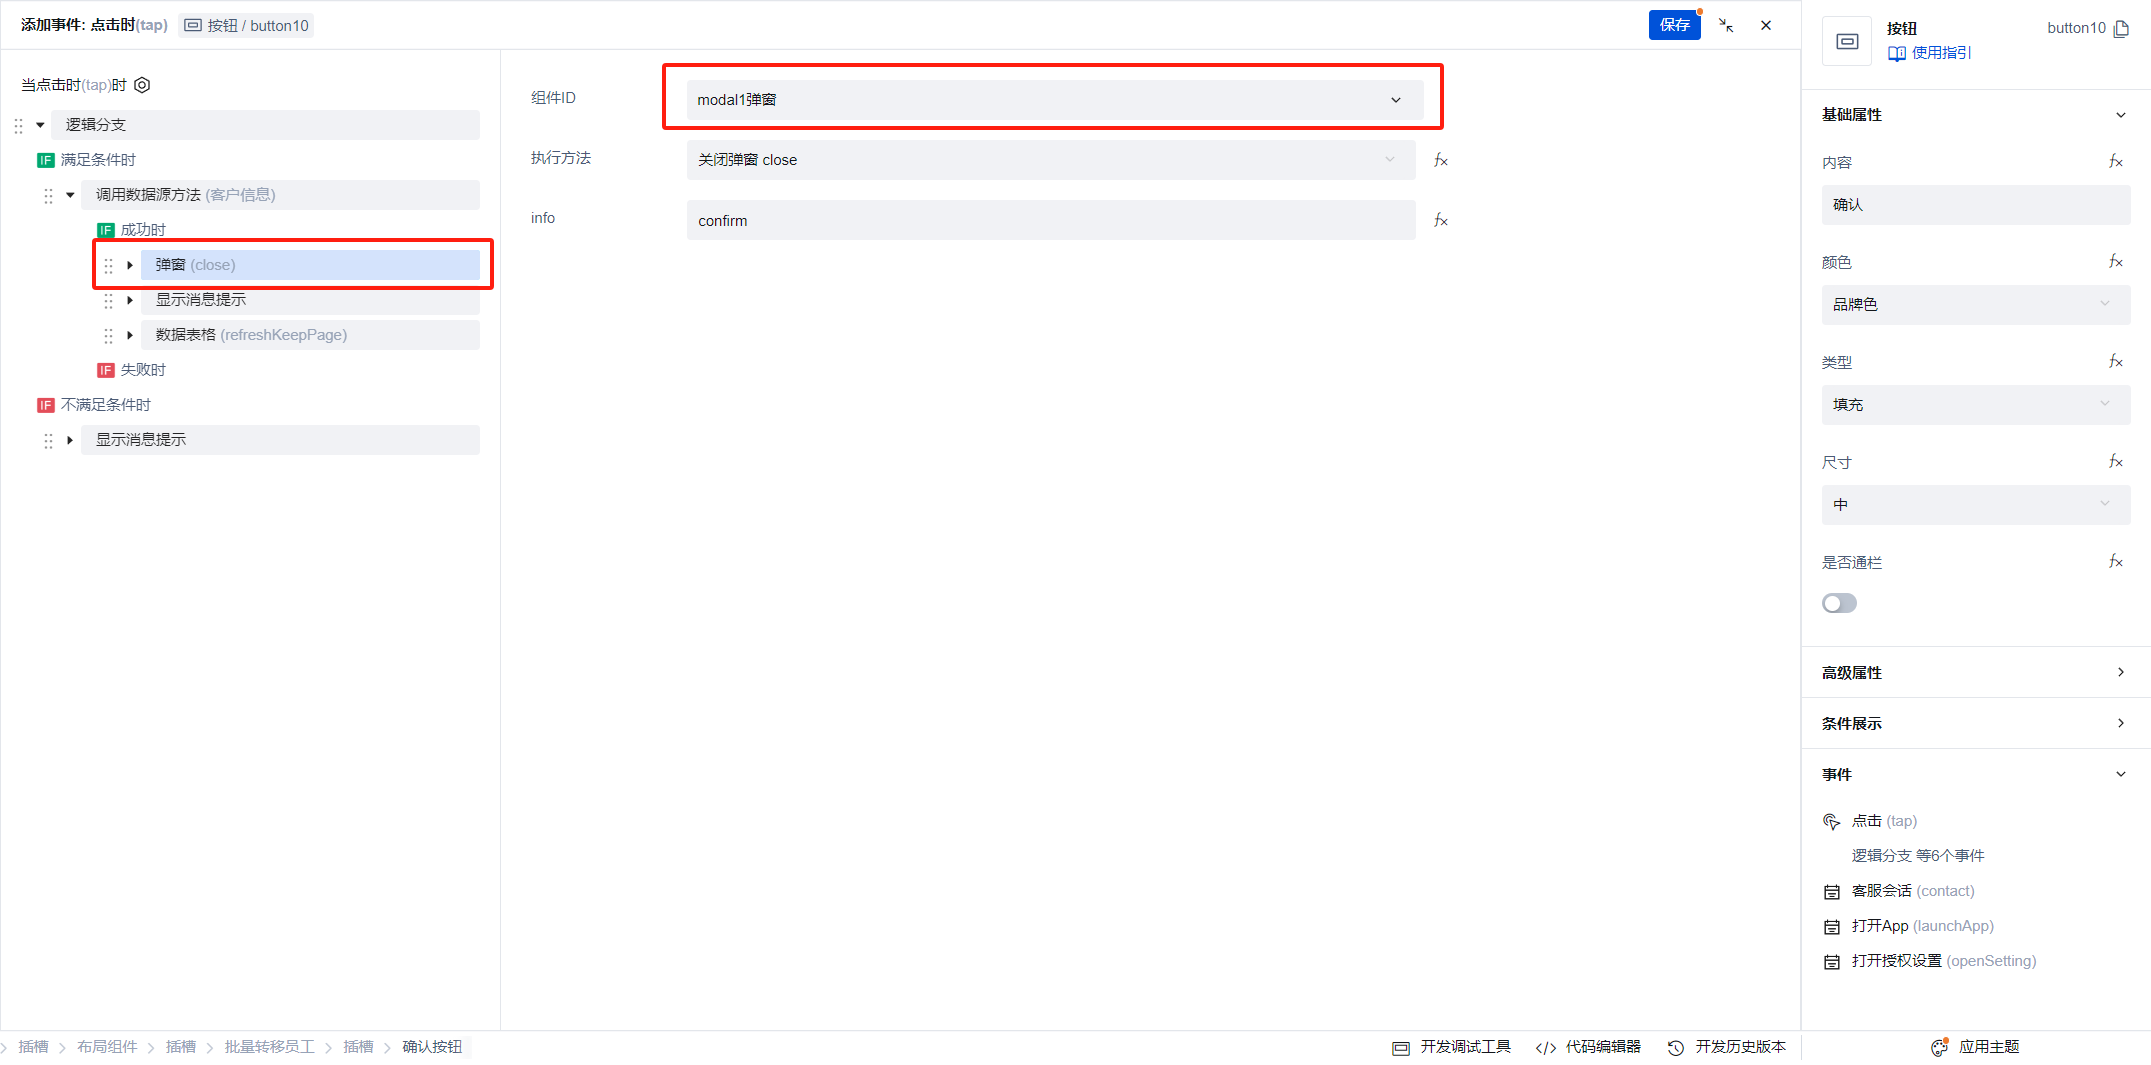
- When conditions are met, call the data source method.
- Select the data source name as customer management, and set the method to modify multiple.
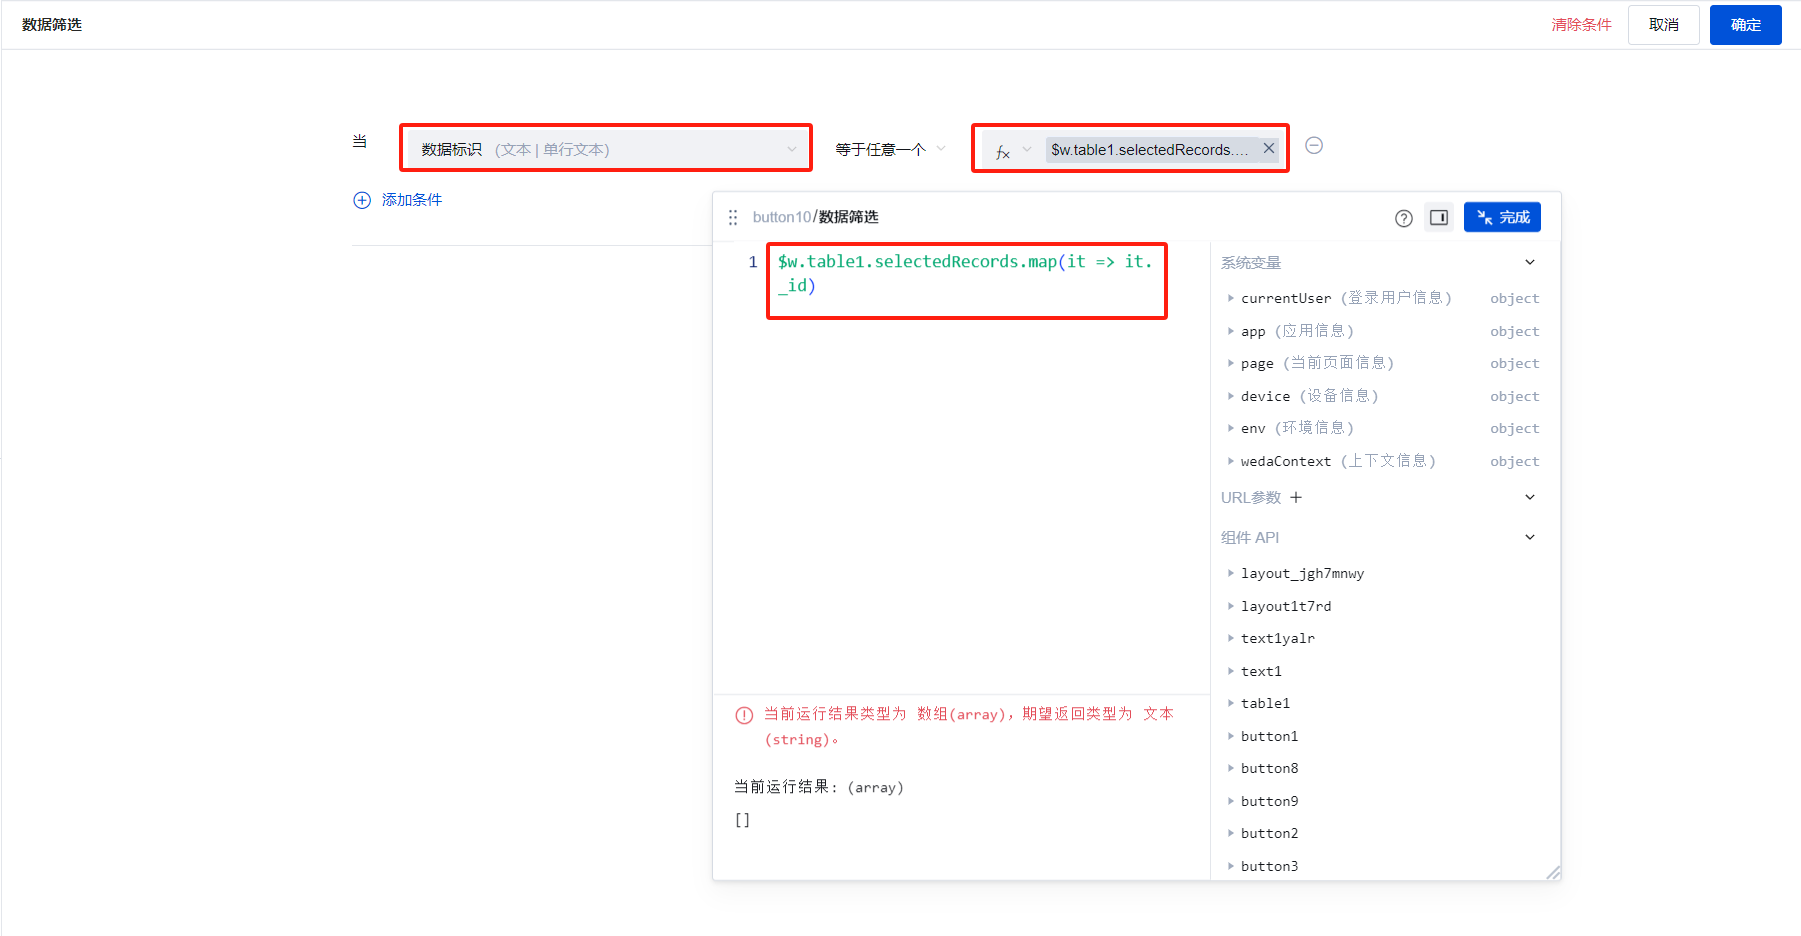
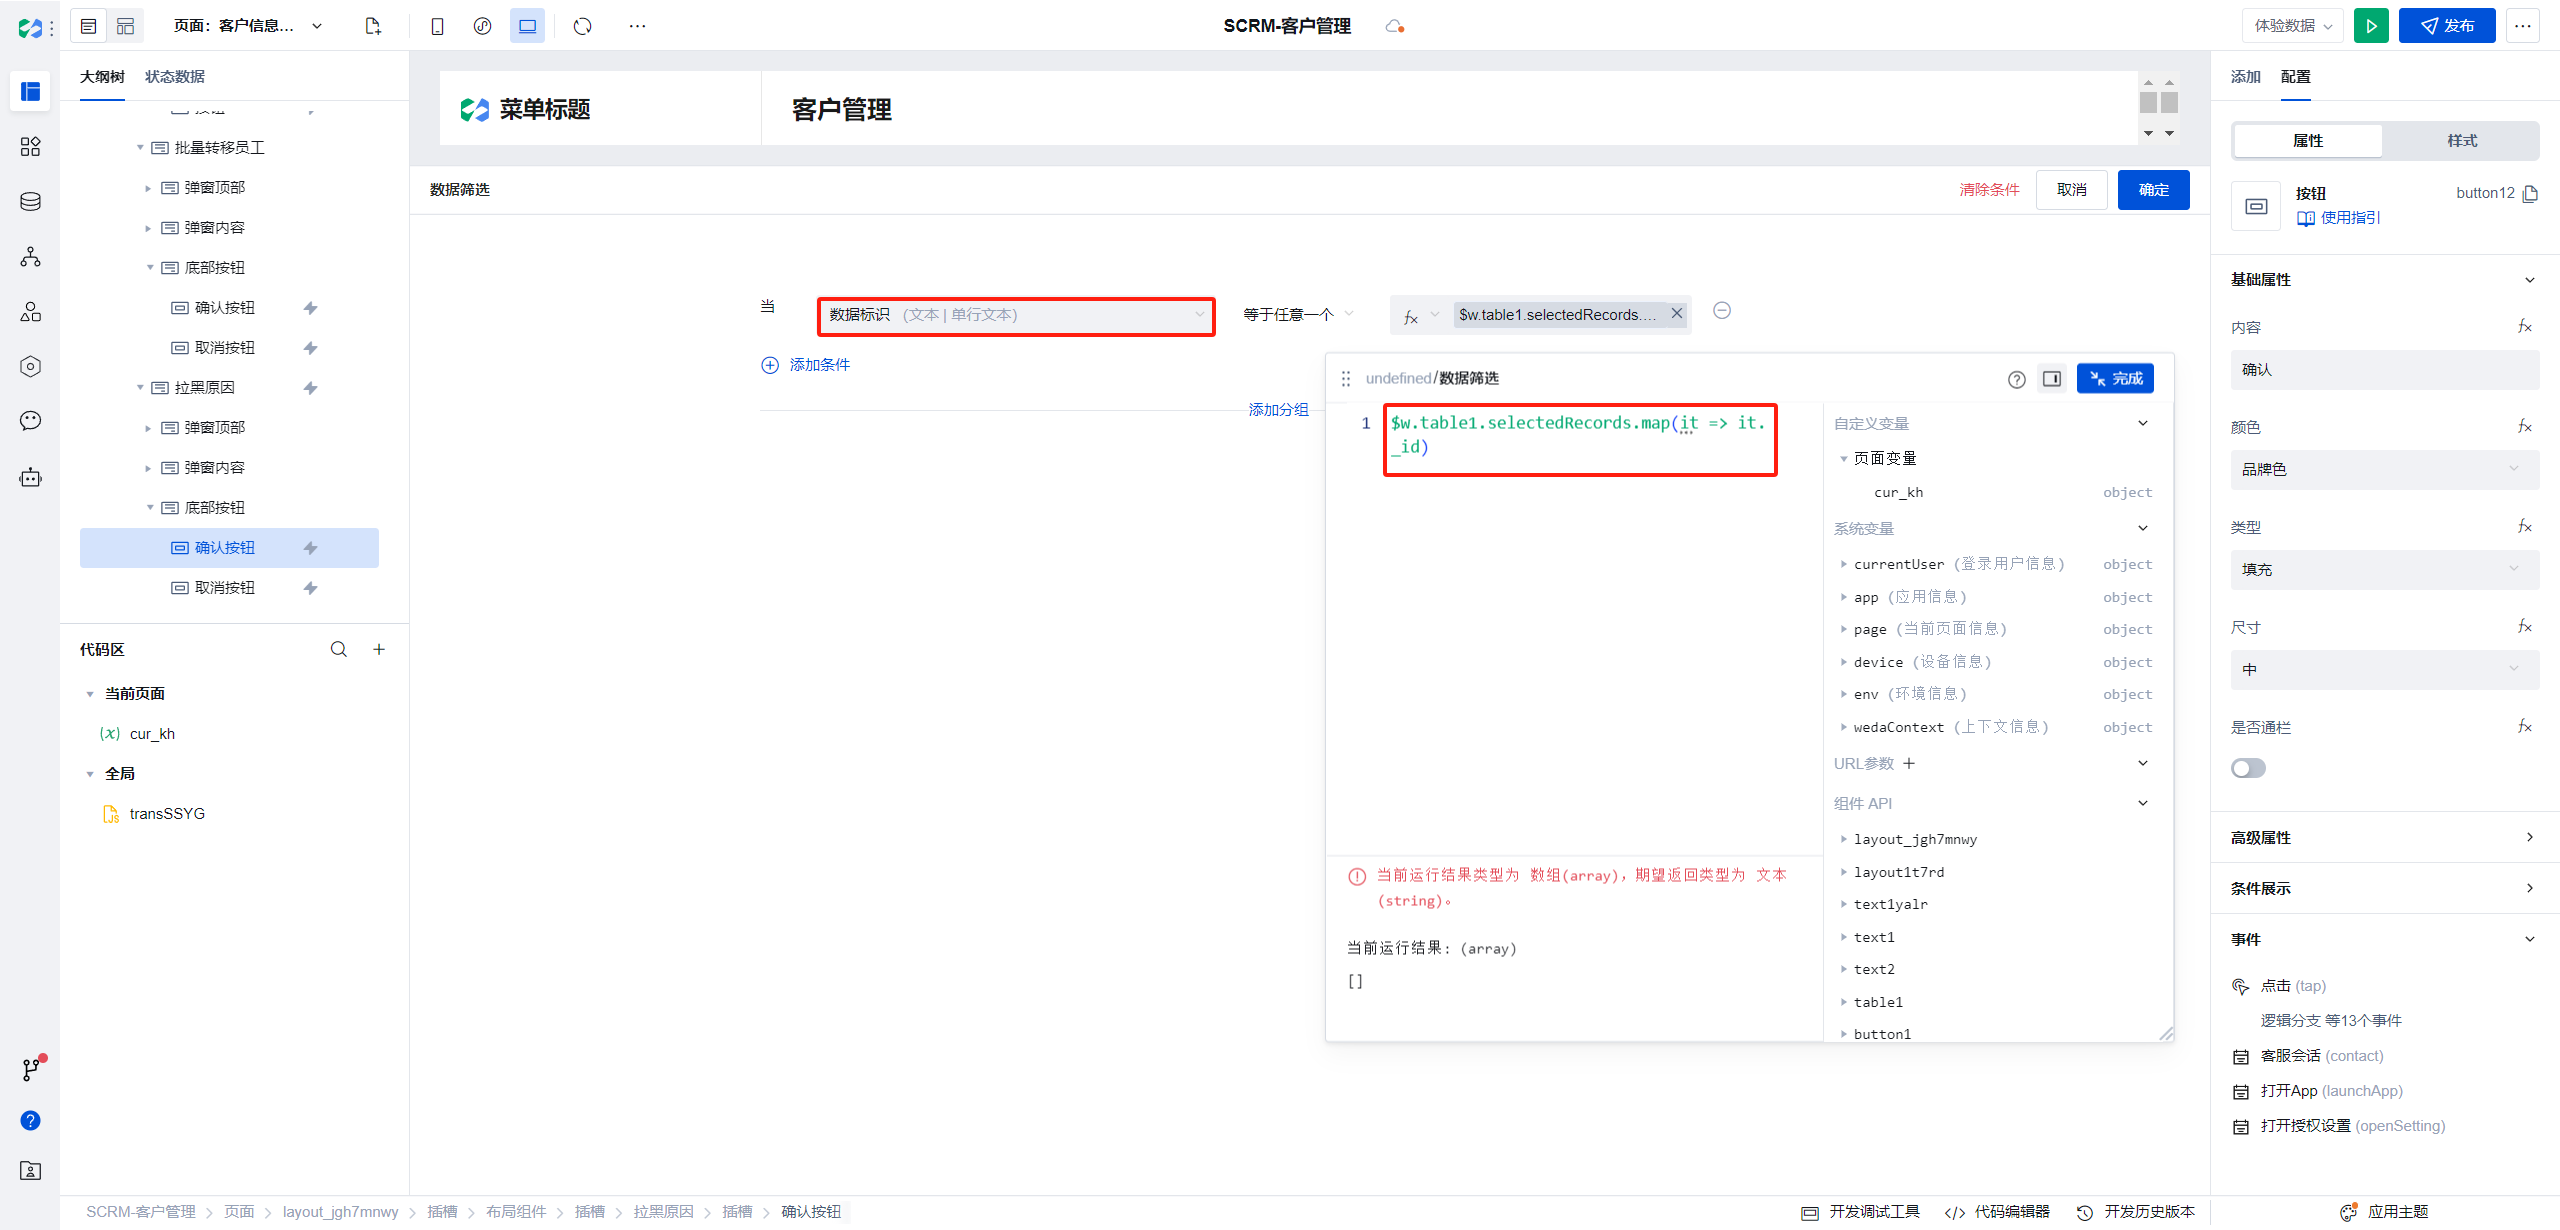
We need to update the selected data, therefore, in the query condition (object), we add a filter condition: when data identifier equals any one of set of data identifiers for the selected items in the list.
For the set of data identifiers for the selected items in the list, we obtain it via expressions:
table1 is the current list id.
selectedRecords is the data of the selected items in the list.
We use the map method in JavaScript to return the _id (data identifier) of each item.
$w.table1.selectedRecords.map((it) => it._id);
Since we only need to update the Assigned Employee field, we adjust the Assigned Employee under the data parameter and select an expression.
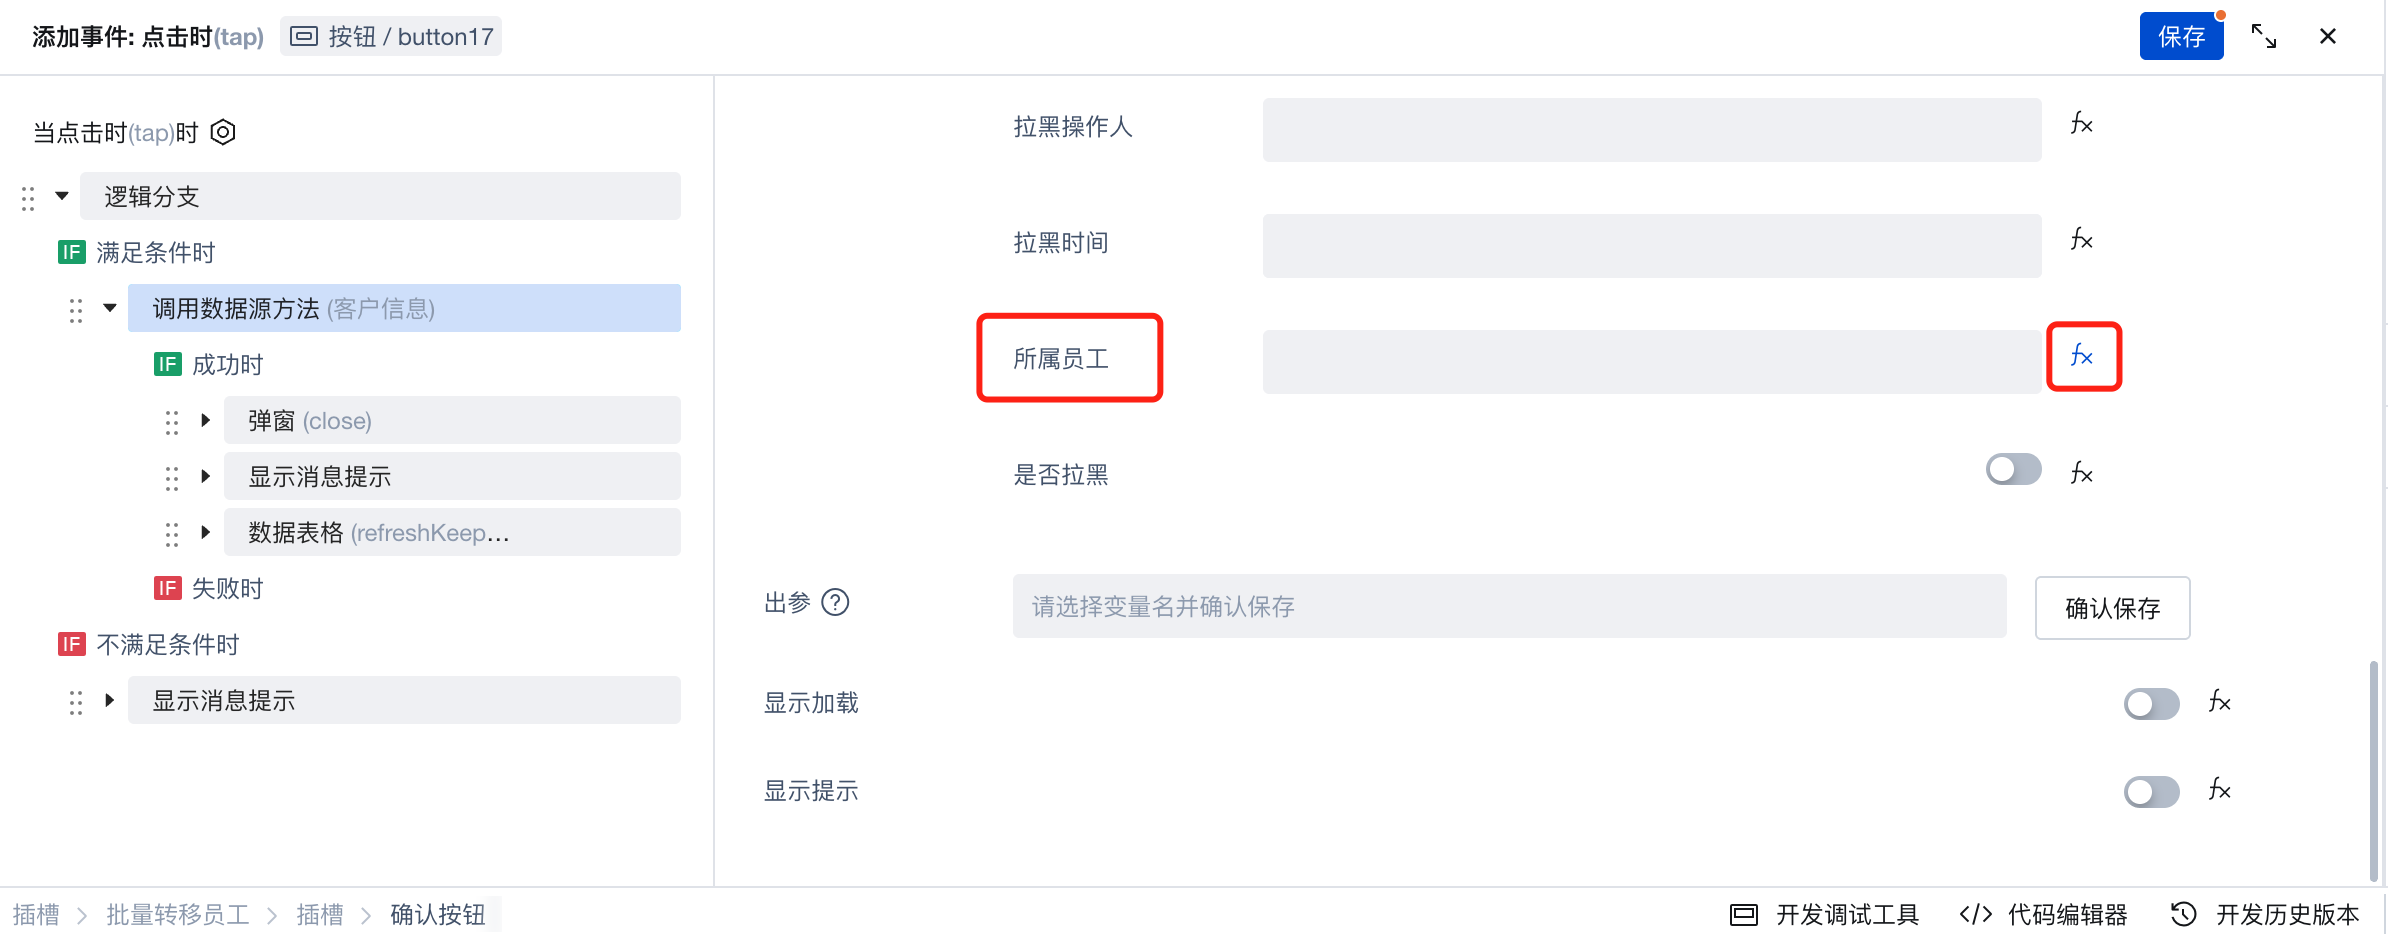
- Since the assigned employee is a personnel field with an array data structure, while the assigned employee field in the table is in string format, we need to modify all data source method calls to return this field as a string structure.
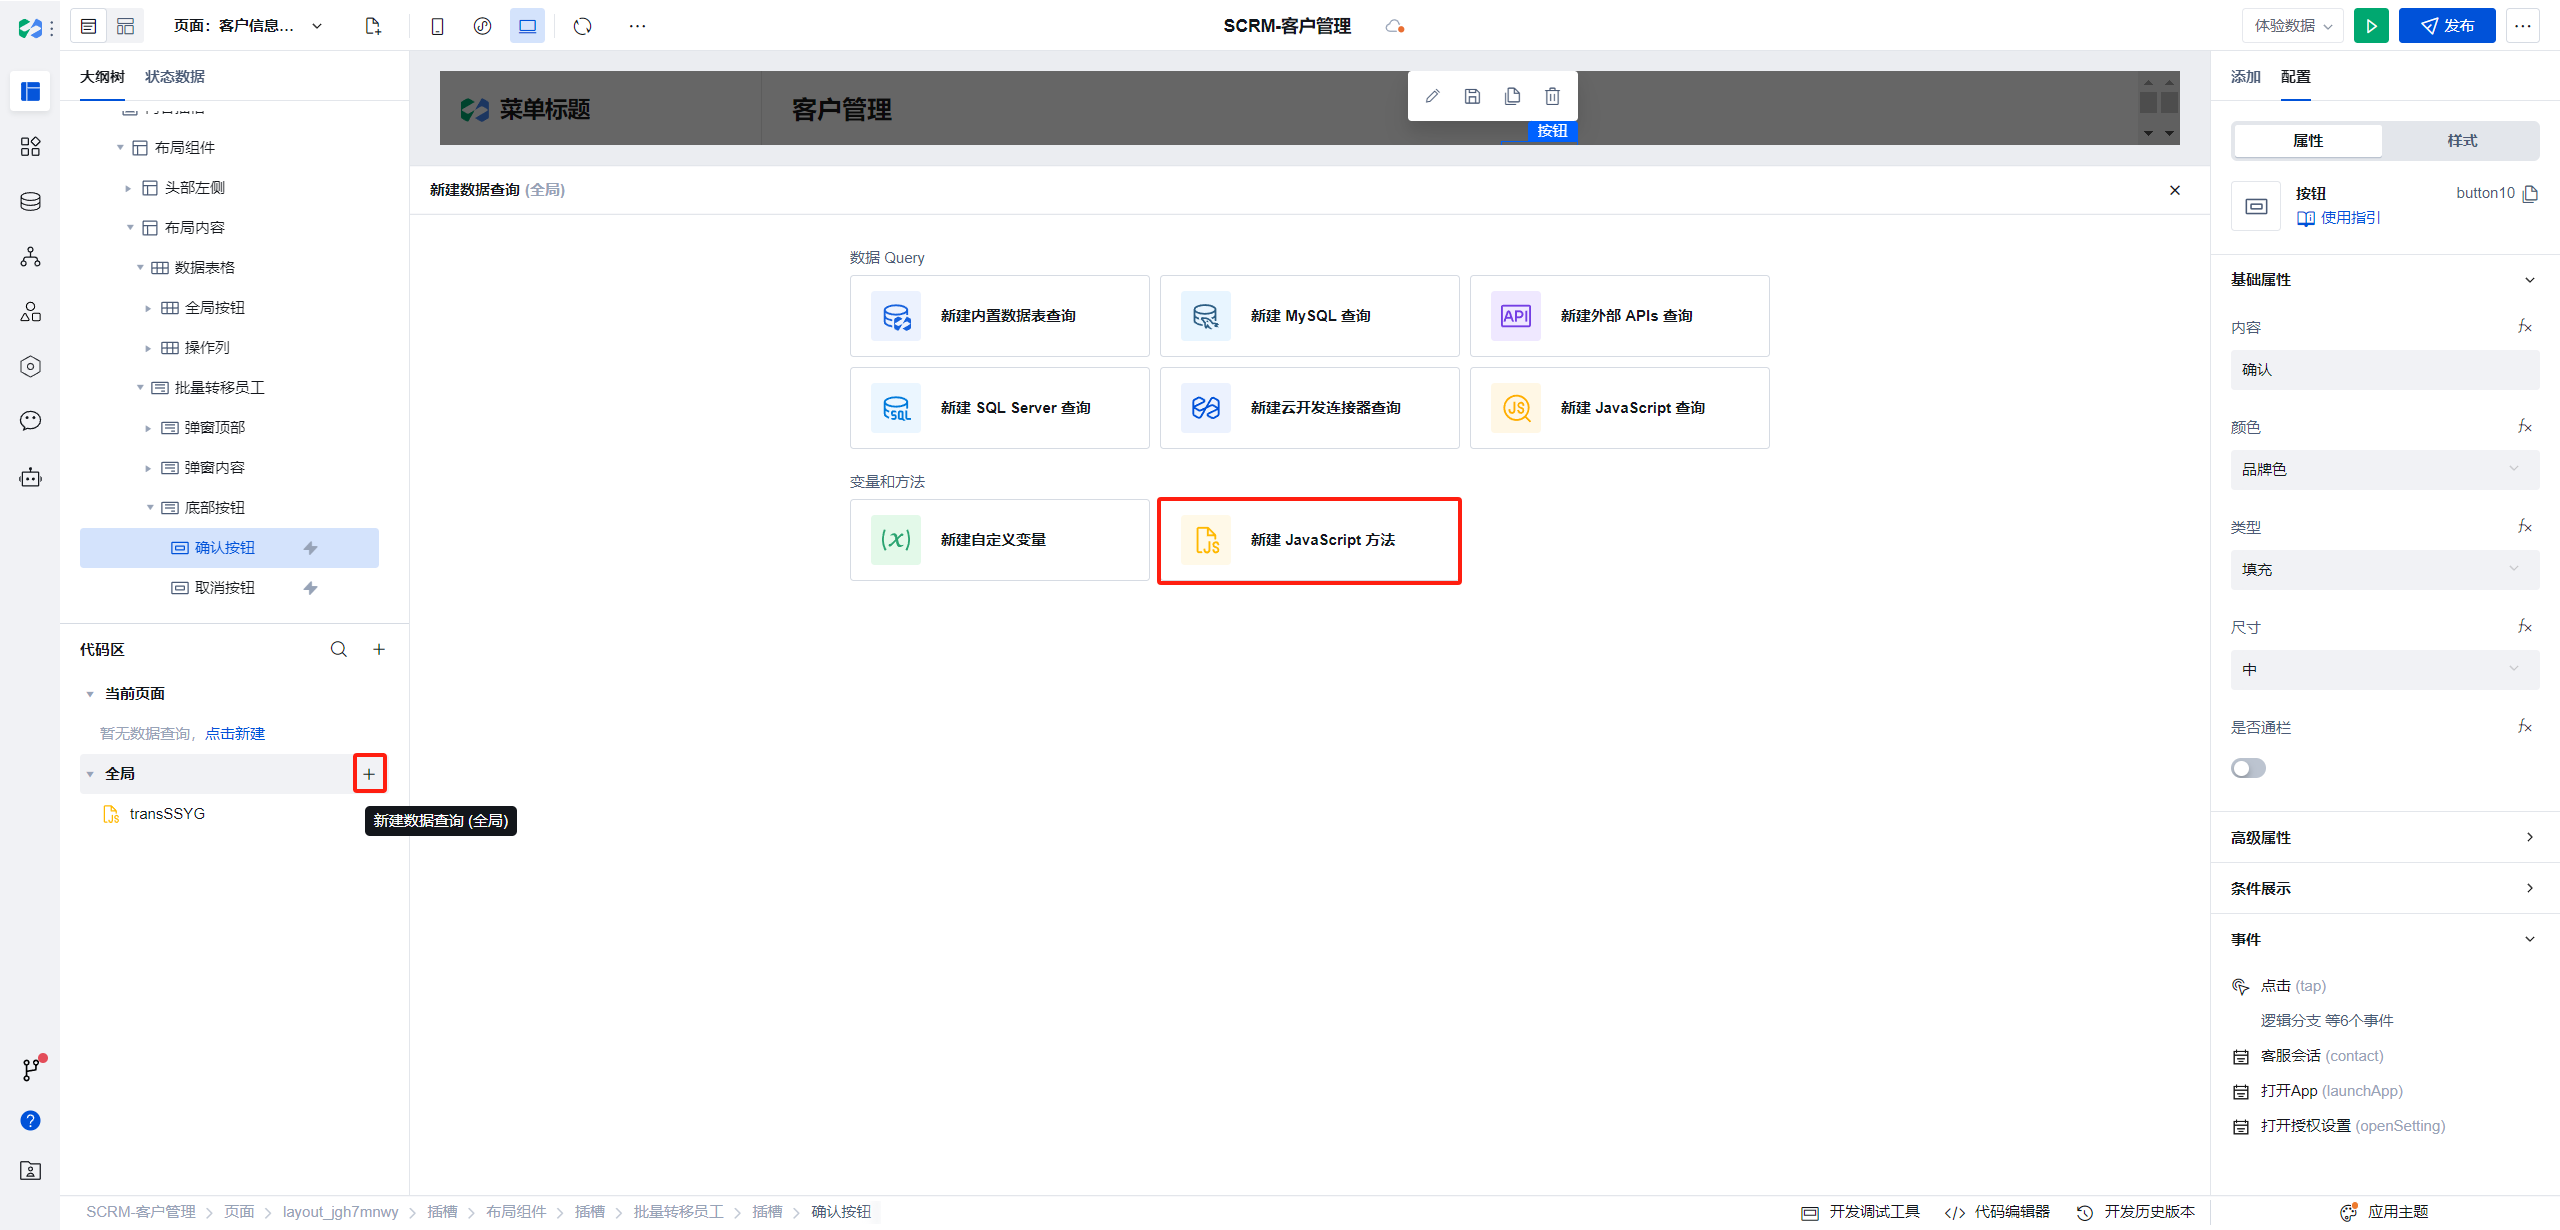
Here, create a global method named transSSYG to convert arrays to strings.
The specific transSSYG code is as follows:
export default function (arr) {
  return arr ? (typeof arr === "string" ? arr : arr.join(",")) : "";
}

The way to reference a global method is $w.app.common.methodName
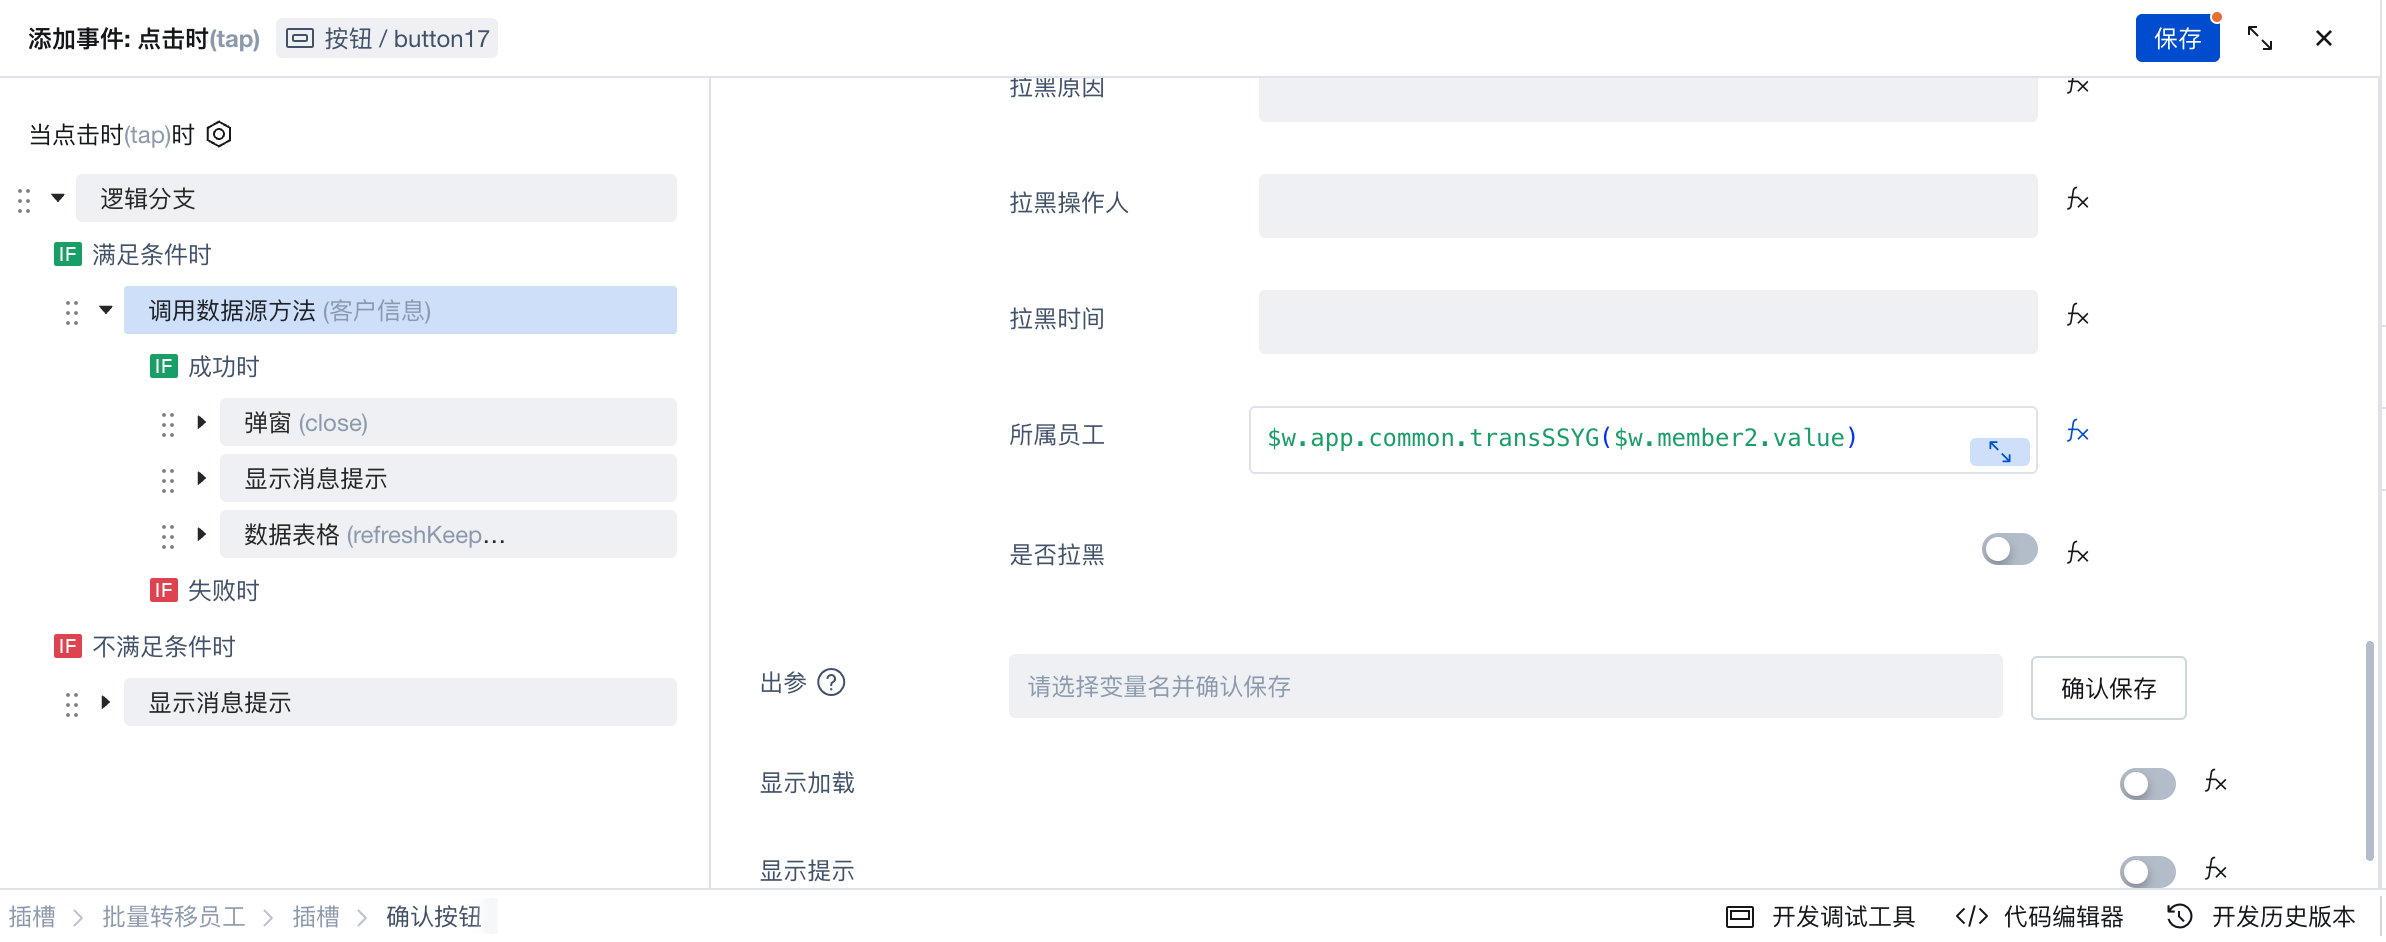
Enter the following expression:
merber2 is the id of the newly added assigned employee field.
$w.app.common.transSSYG($w.member2.value);
-
Since personnel fields are stored in array format while the assigned employee field in the table is in string format, we create a global method named
transSSYGto convert arrays to strings. -
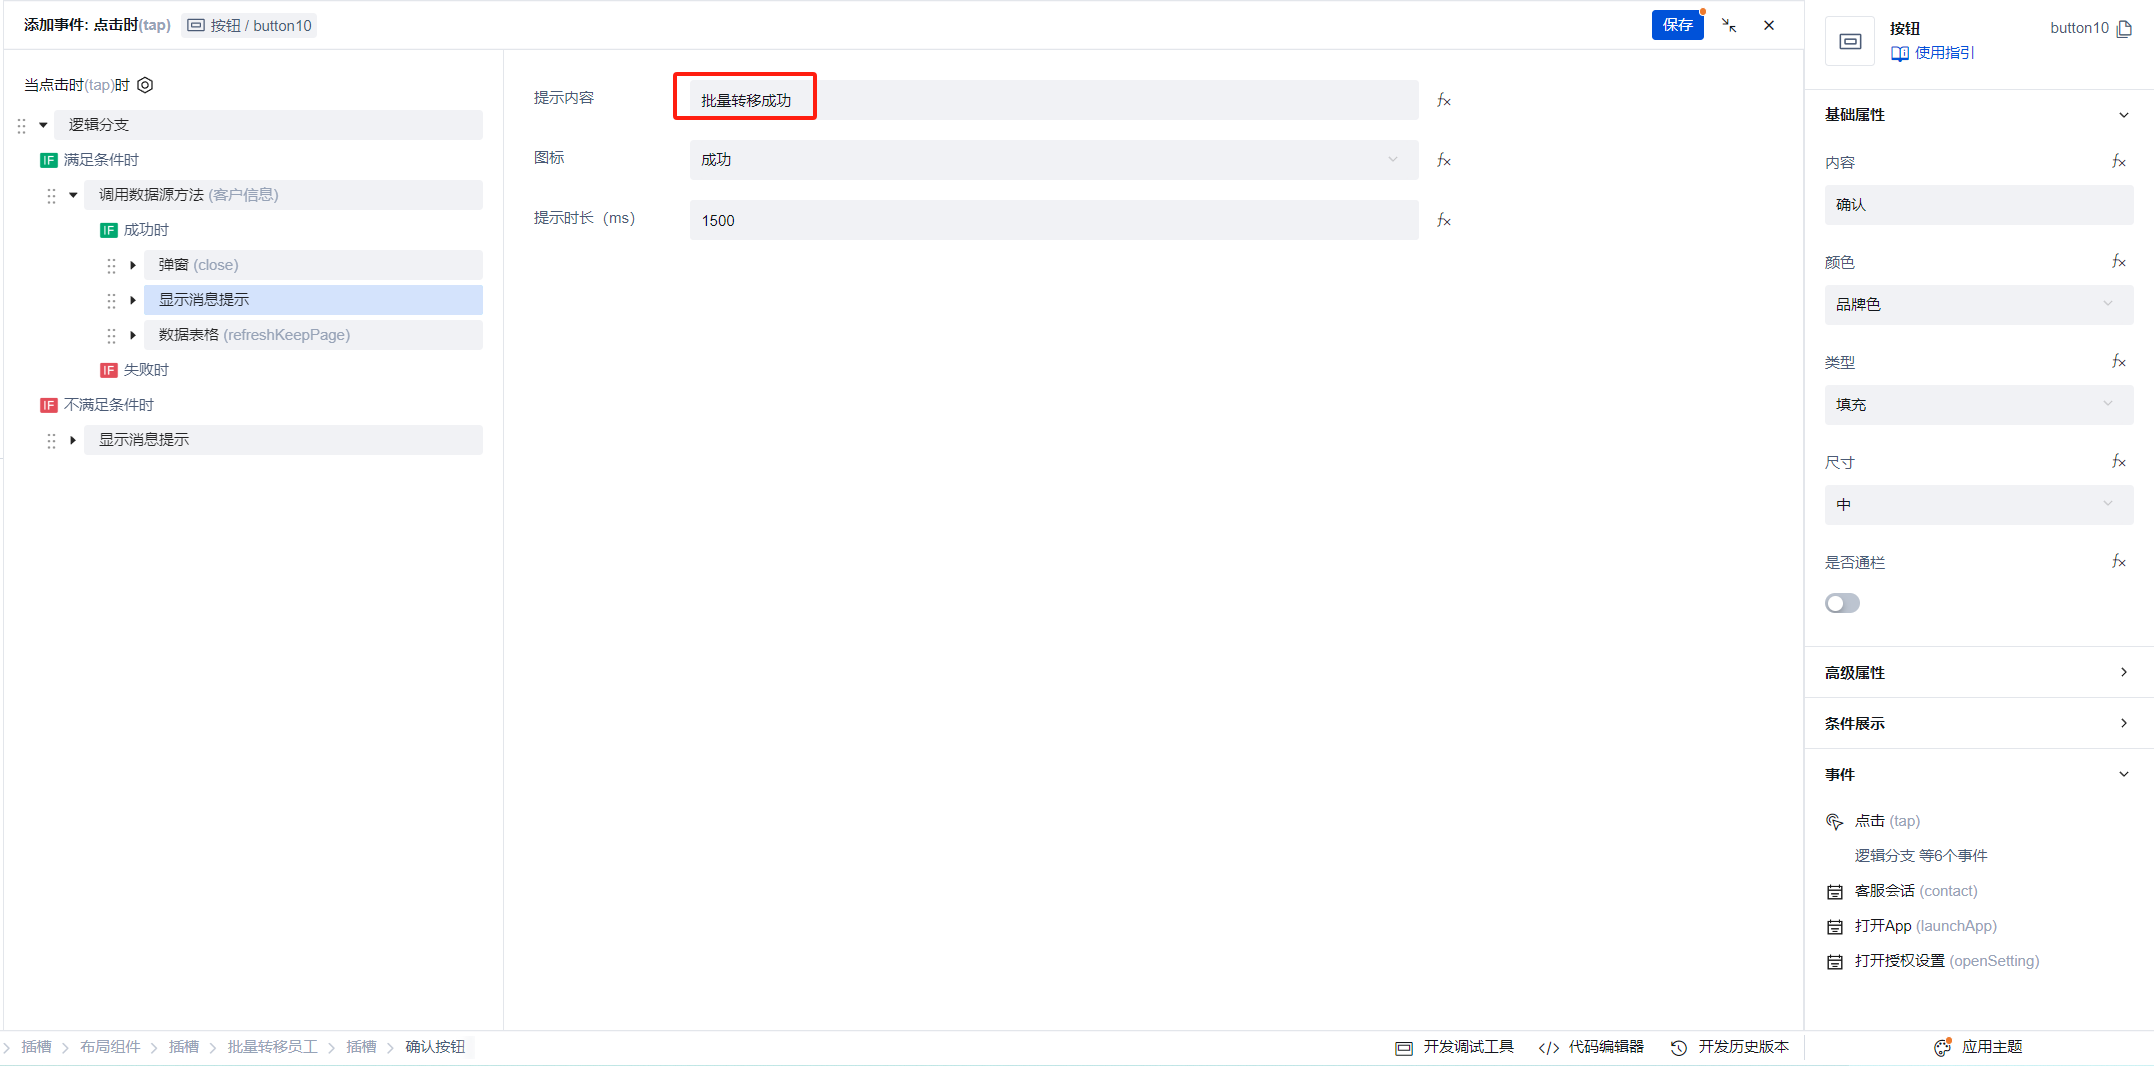
Close the dialog on success.
- Continue displaying the success message
- Refresh the current page of the list
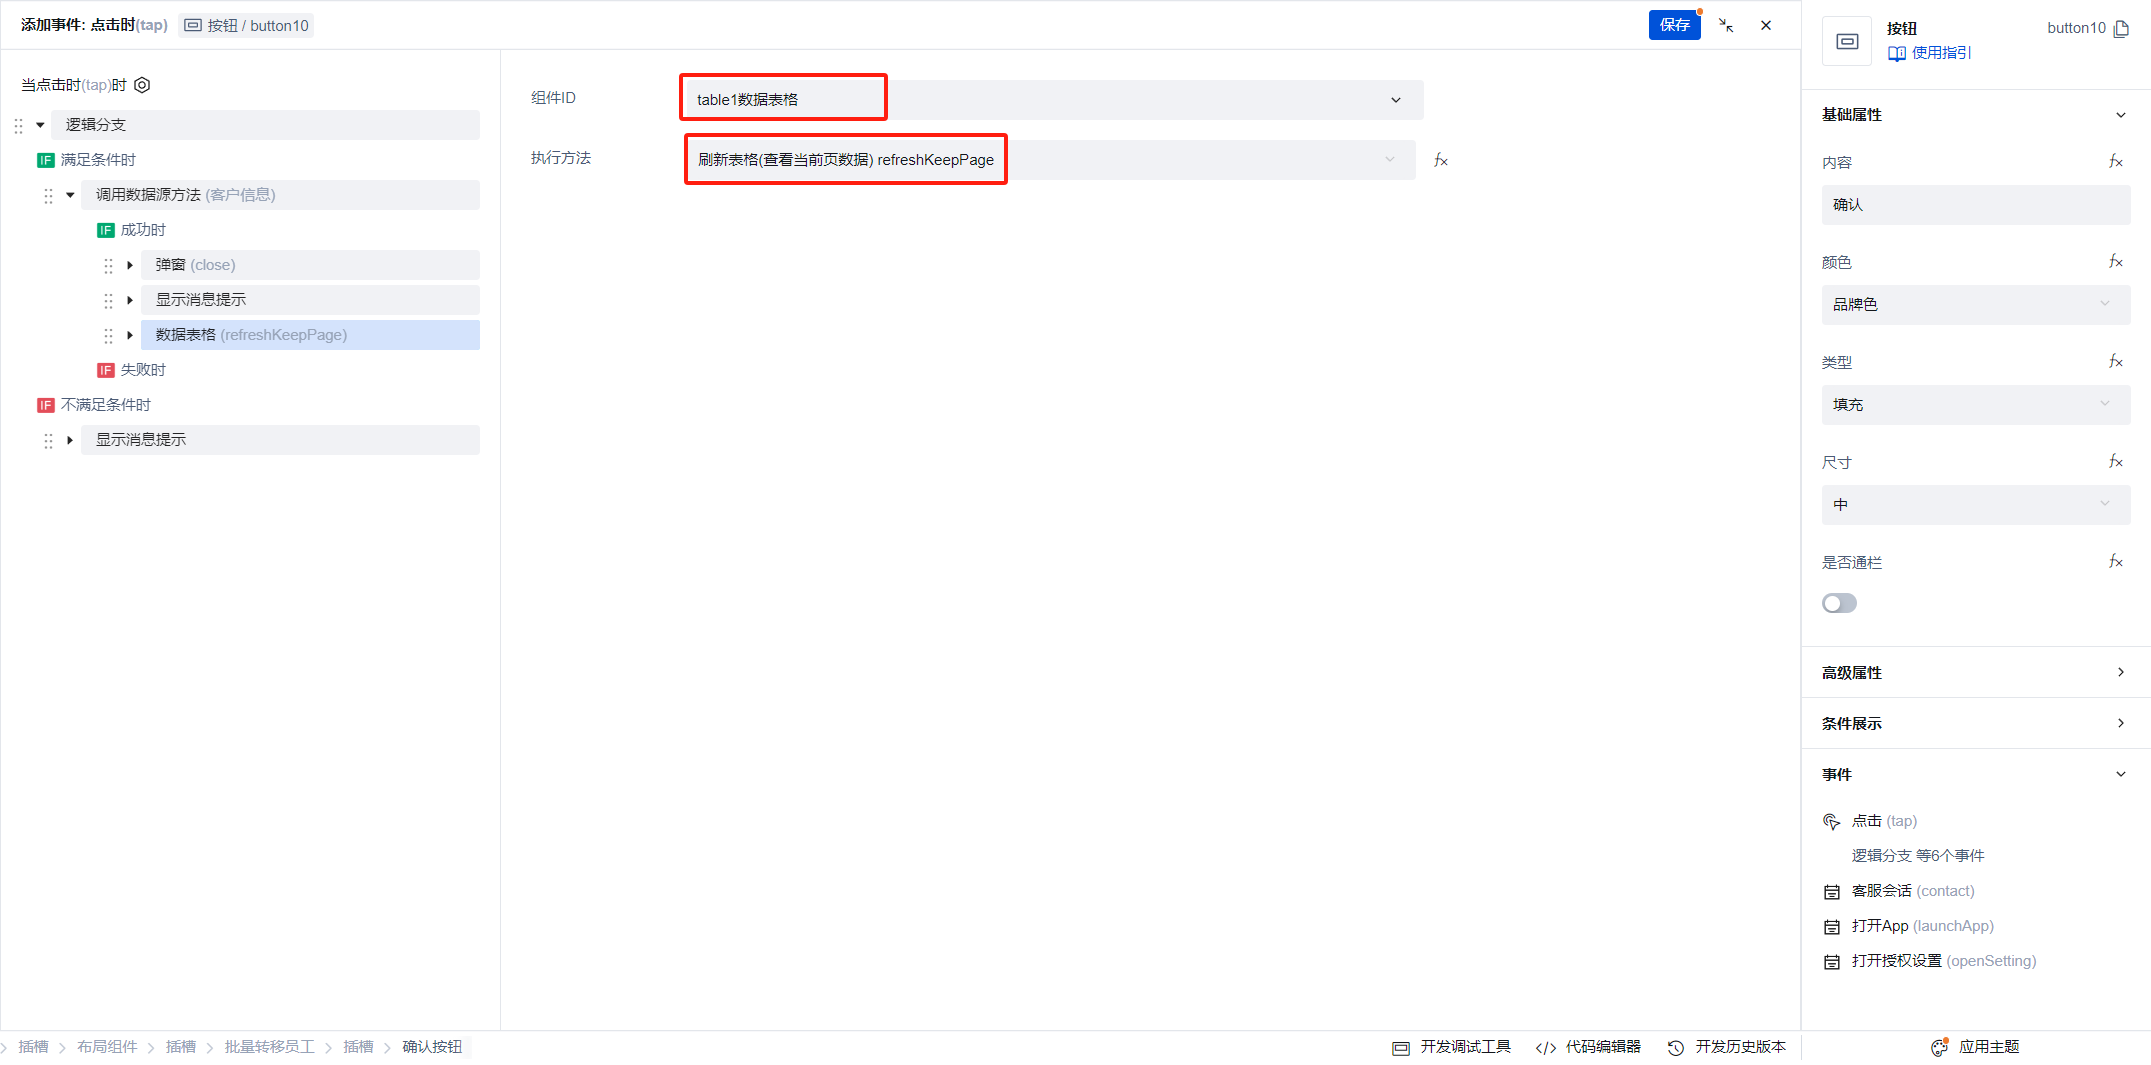
- Click Save. This completes the development of the entire transfer feature.
Block
Clicking Block, Batch Block requires filling in the block reason.
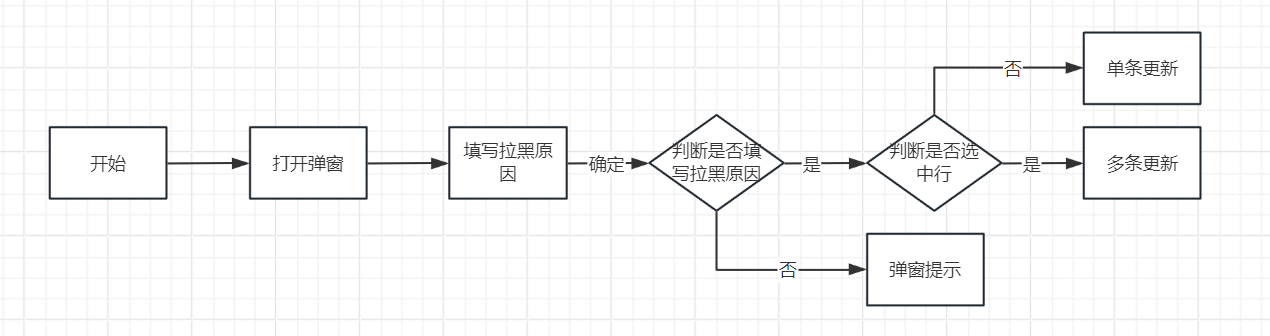
Therefore, use a dialog to fill in the block reason. After confirmation, modify the current item's data such as isBlocked: true, blockReason: the filled-in text content, blockTime: current time, blockOperator: current logged-in user's userId, etc. Our logic flow is:
When clicking Block, the dialog cannot obtain the clicked row data. Therefore, we need to create a global variable to store the currently clicked row data. Add an object variable named cur_kh on the current page.
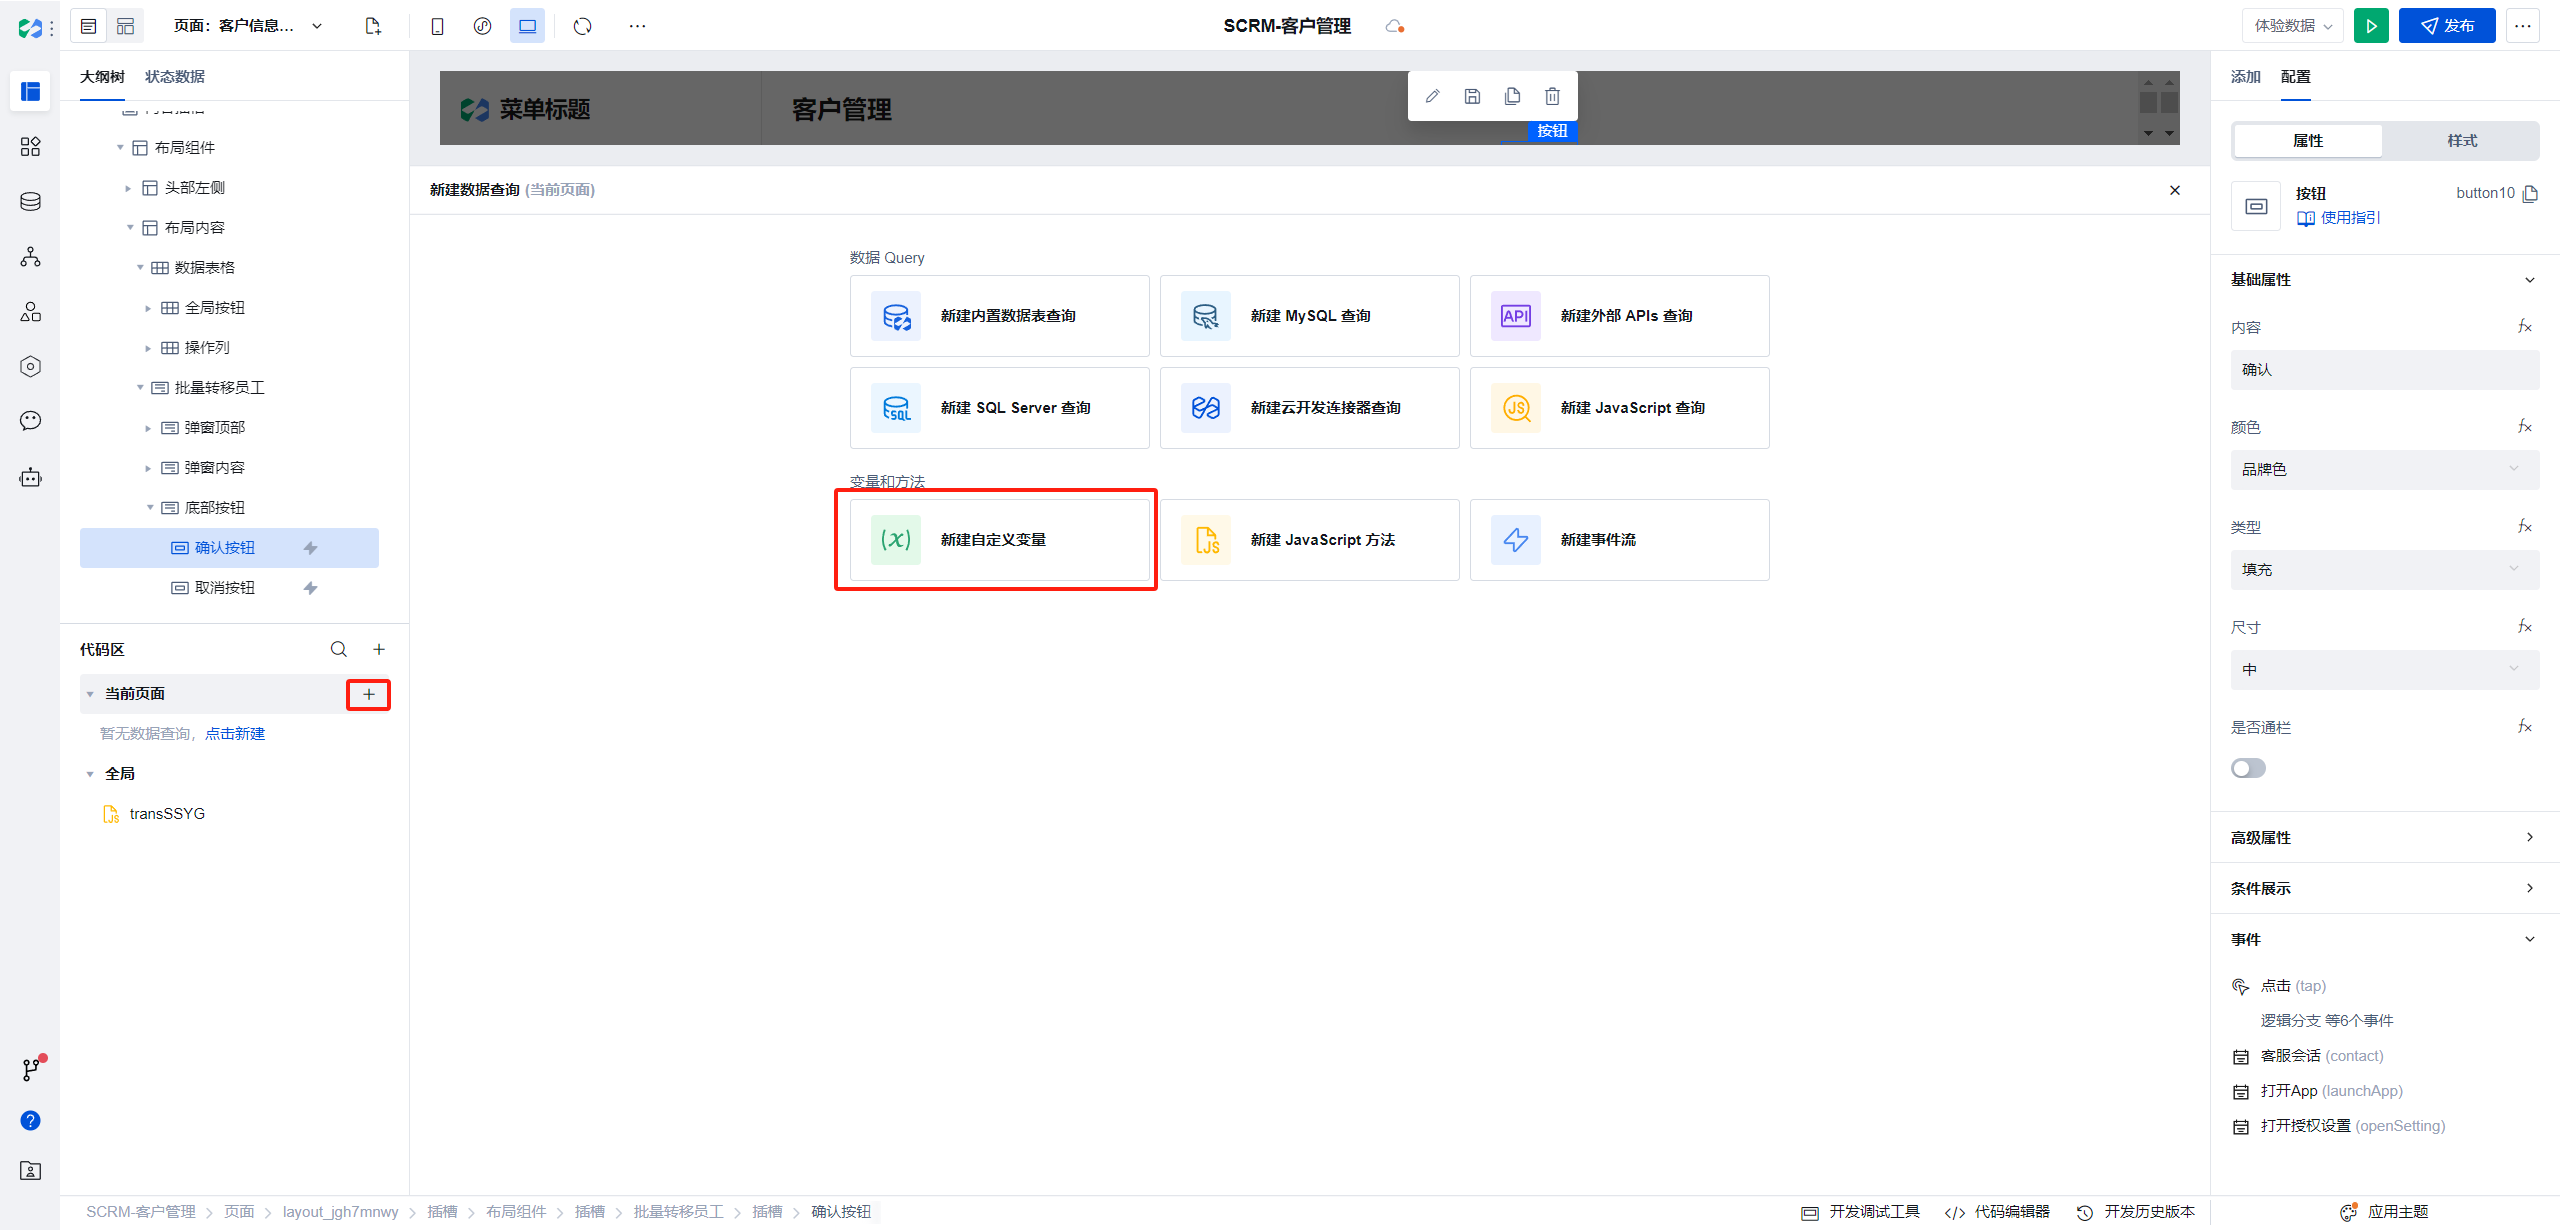
The overall process is similar to the batch transfer feature above. Here, the development process is briefly described.
- Create a new dialog

Add a multi-line text field in the dialog to enter the block reason.
- When clicking Batch Block, Block, open this dialog.
When clicking Batch Block, first check if there are any selected items in the list. If not, prompt the user to select customers to block.
If the Block button in the operation column is clicked, the global variable needs to be set.
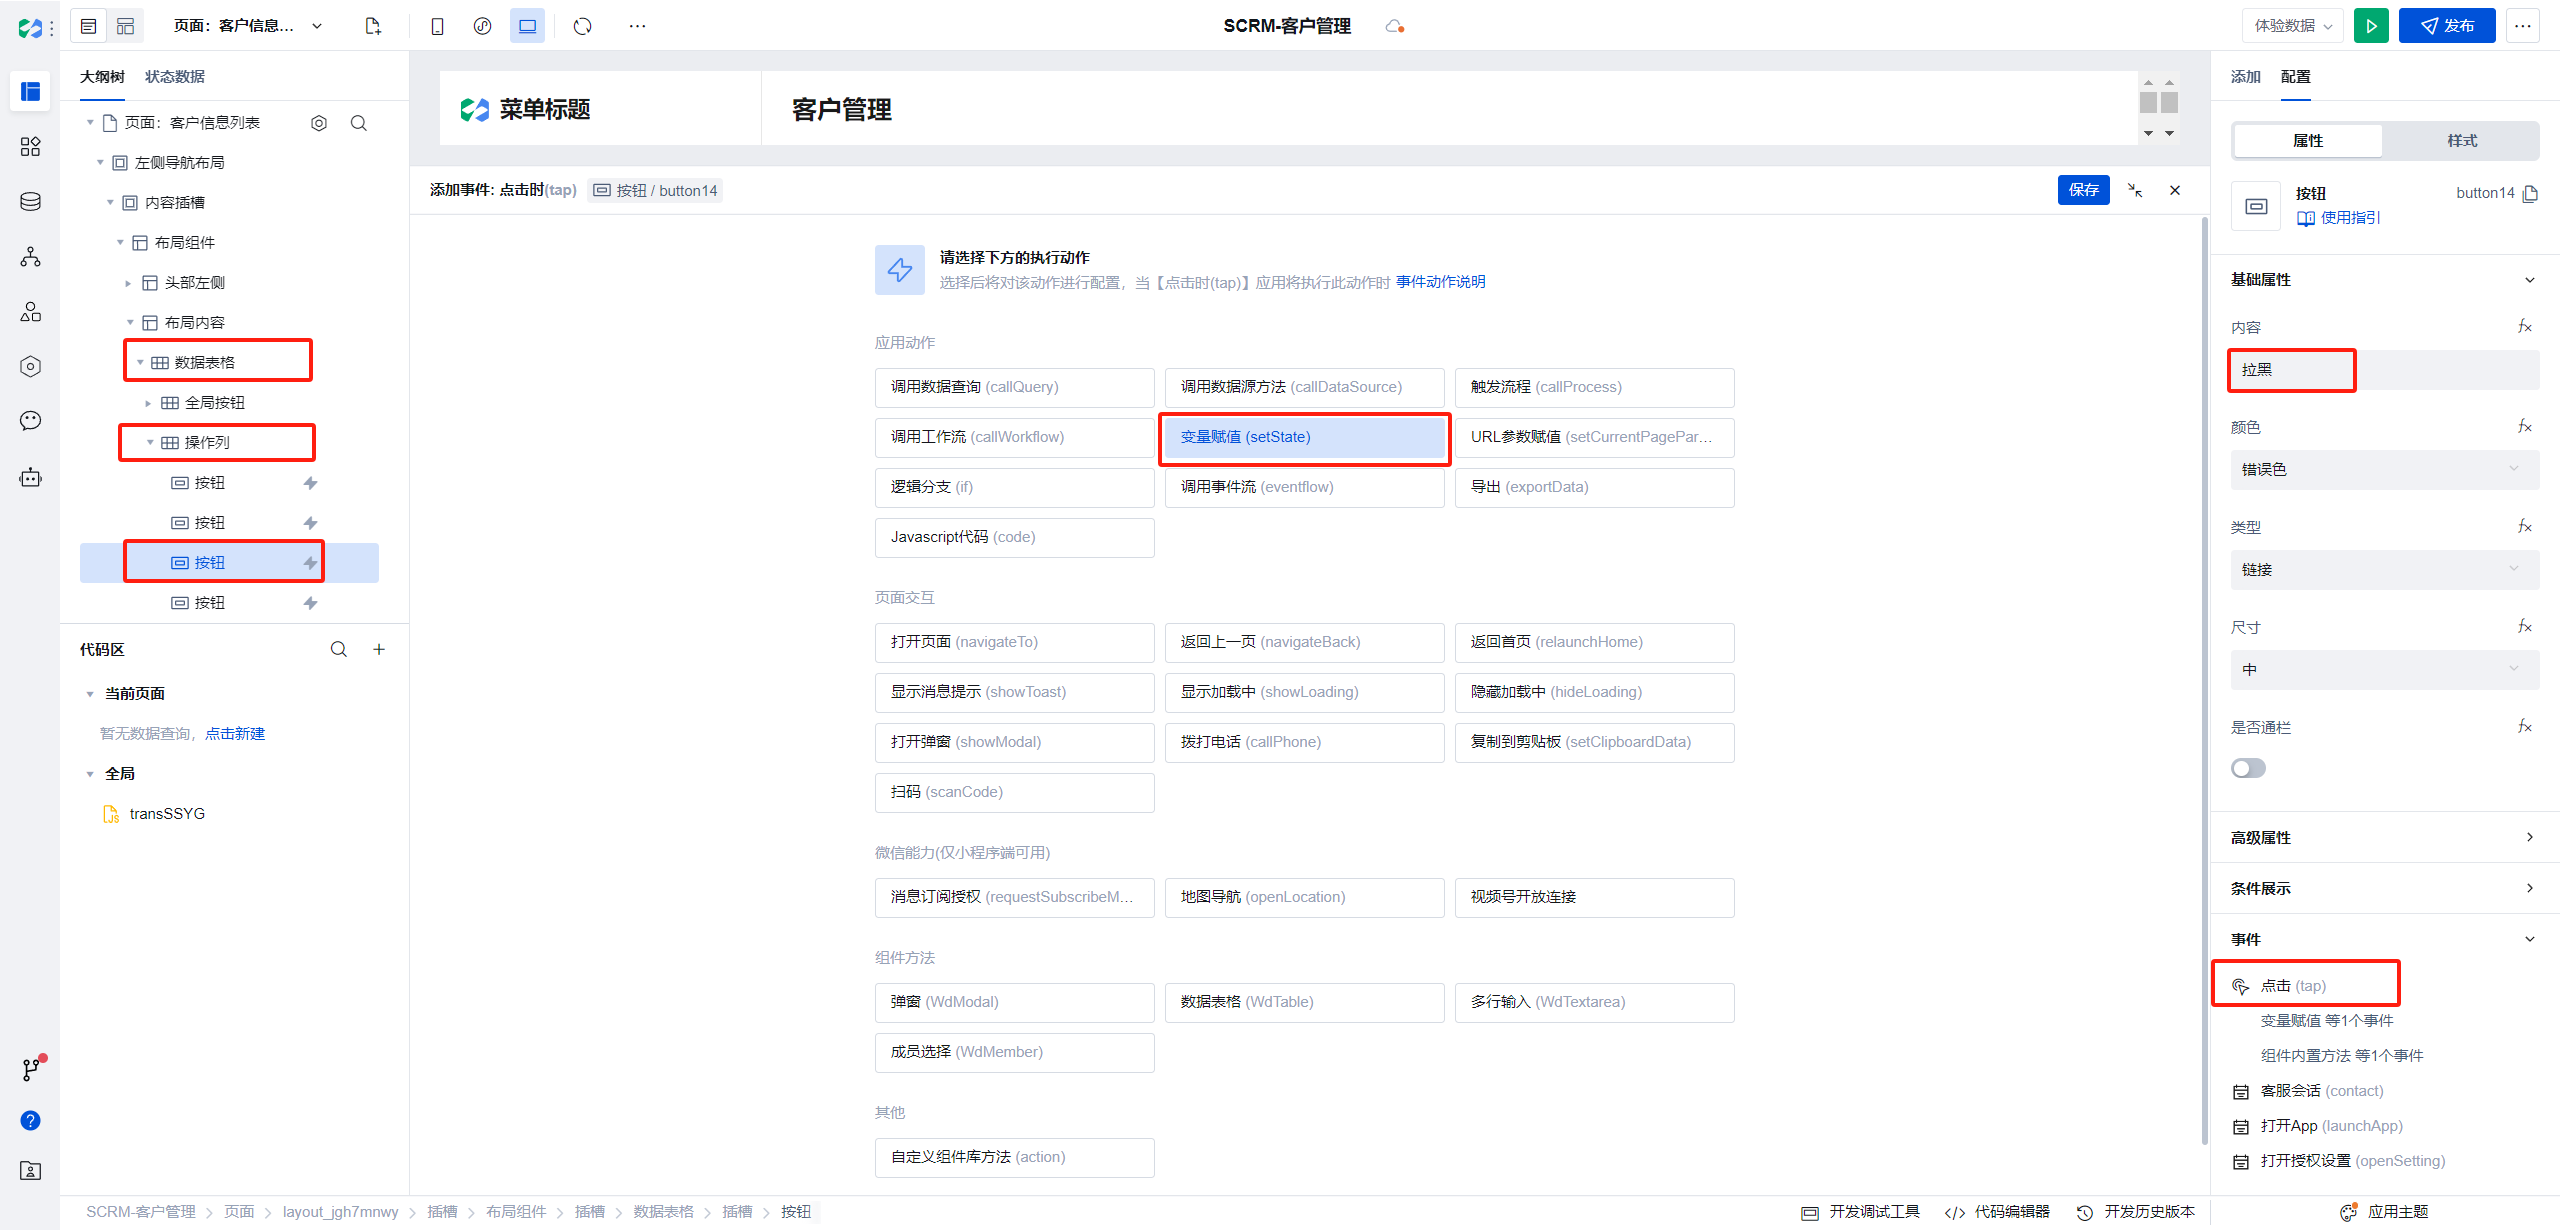
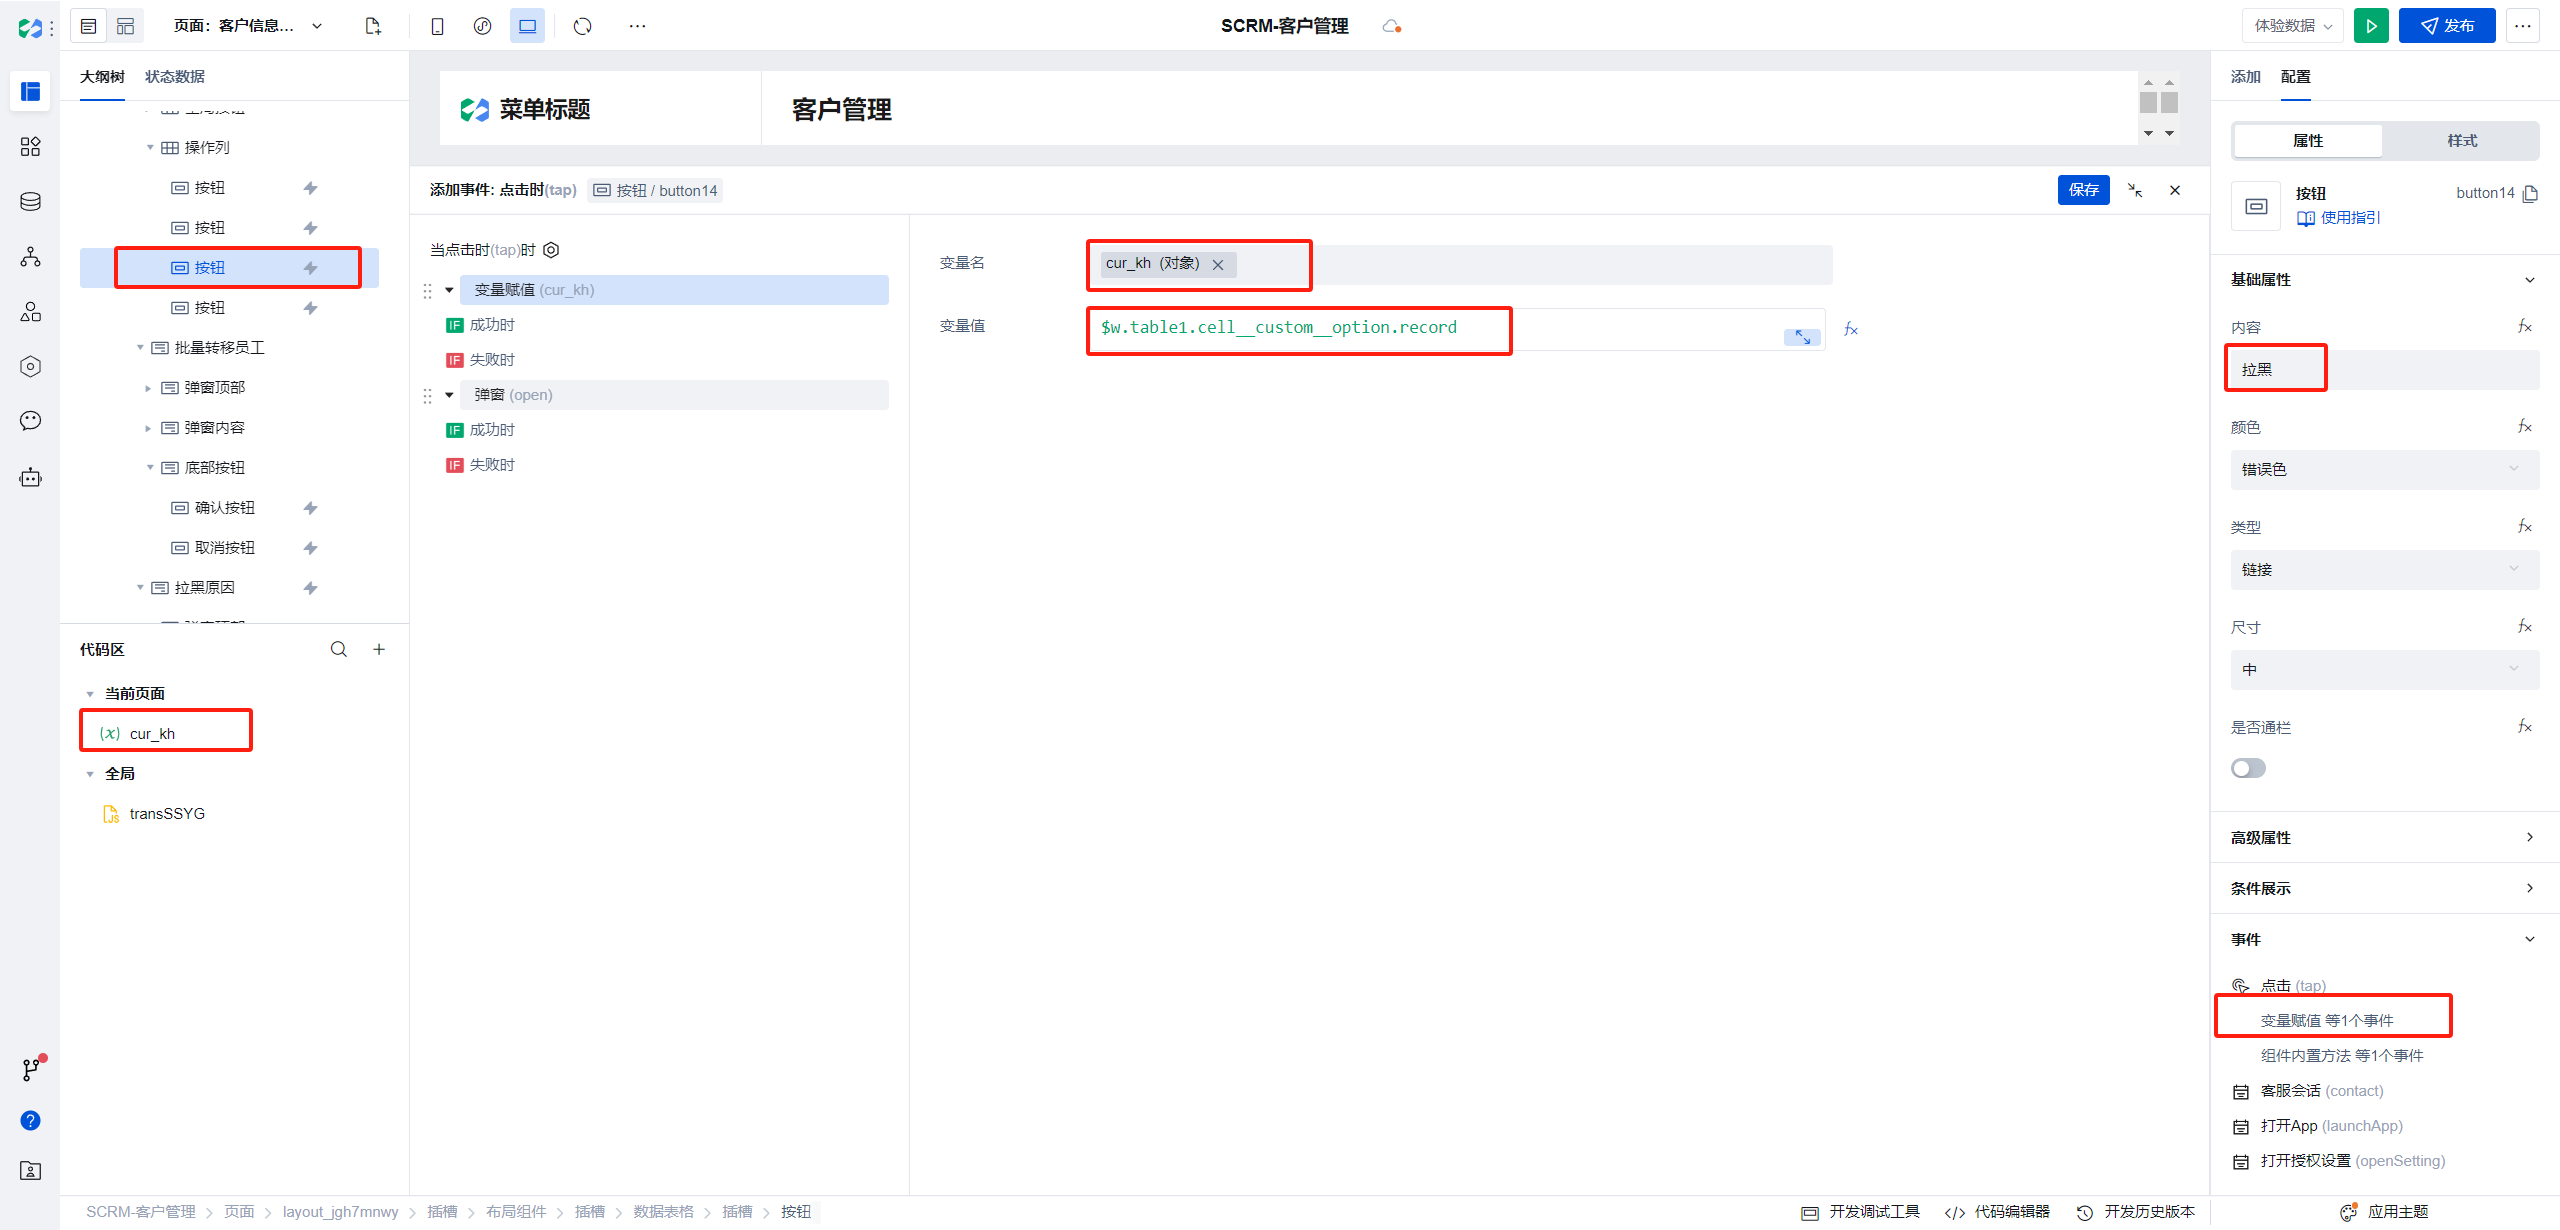
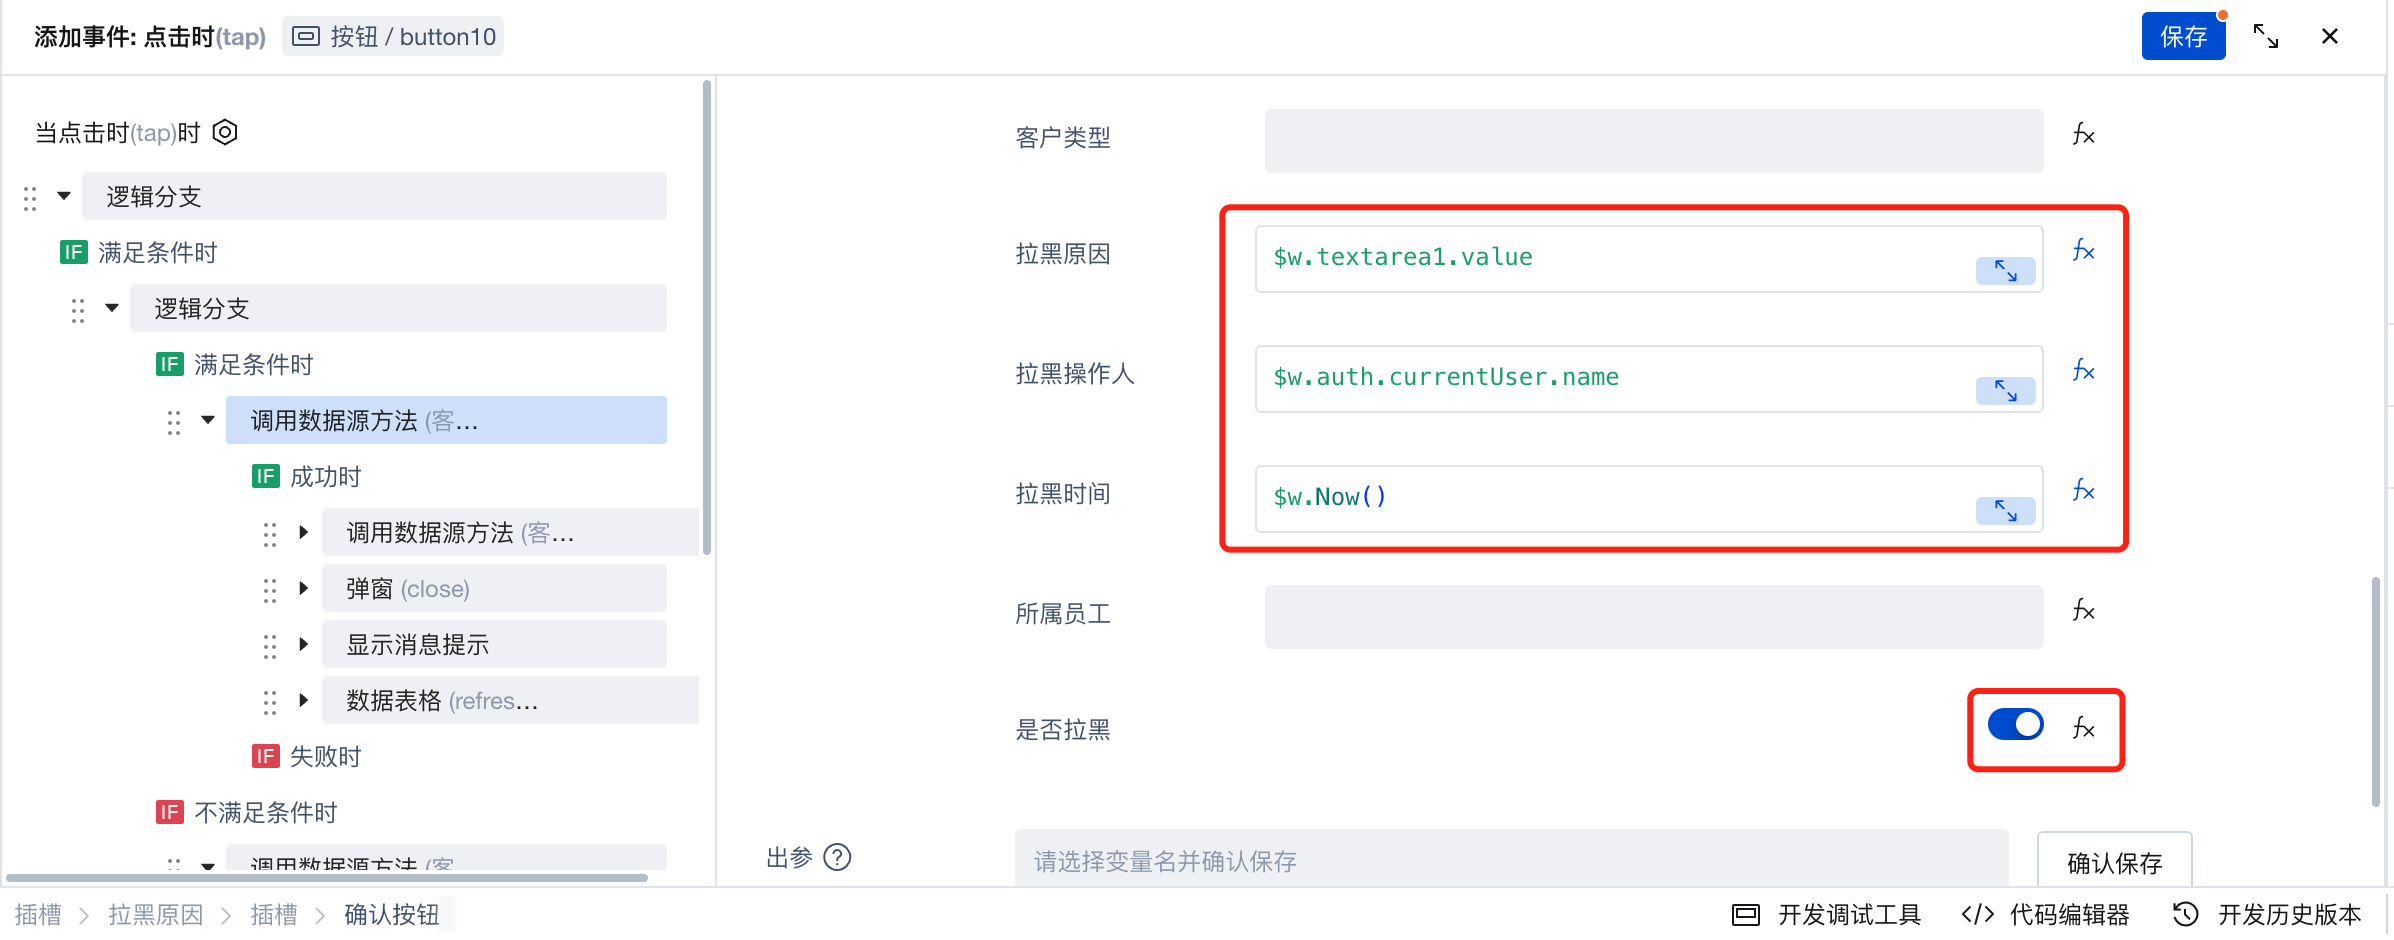
- Editing the click event for the confirm button in the dialog
First, add a condition to check if the block reason is empty. The expression is as follows:
textarea1 is the id of the block reason text box
If(!!$w.textarea1.value, true, false);
- If the condition is met, check whether the global variable
cur_khhas a value.
The way to reference global variables is:$w.page.dataset.state.variable_name
If(!!$w.page.dataset.state.cur_kh._id, true, false);
- If there is a value, update a single data record; if there is no value, perform batch blocking and update multiple data records.
The query conditions for a single record update are as follows:
$w.page.dataset.state.cur_kh._id;
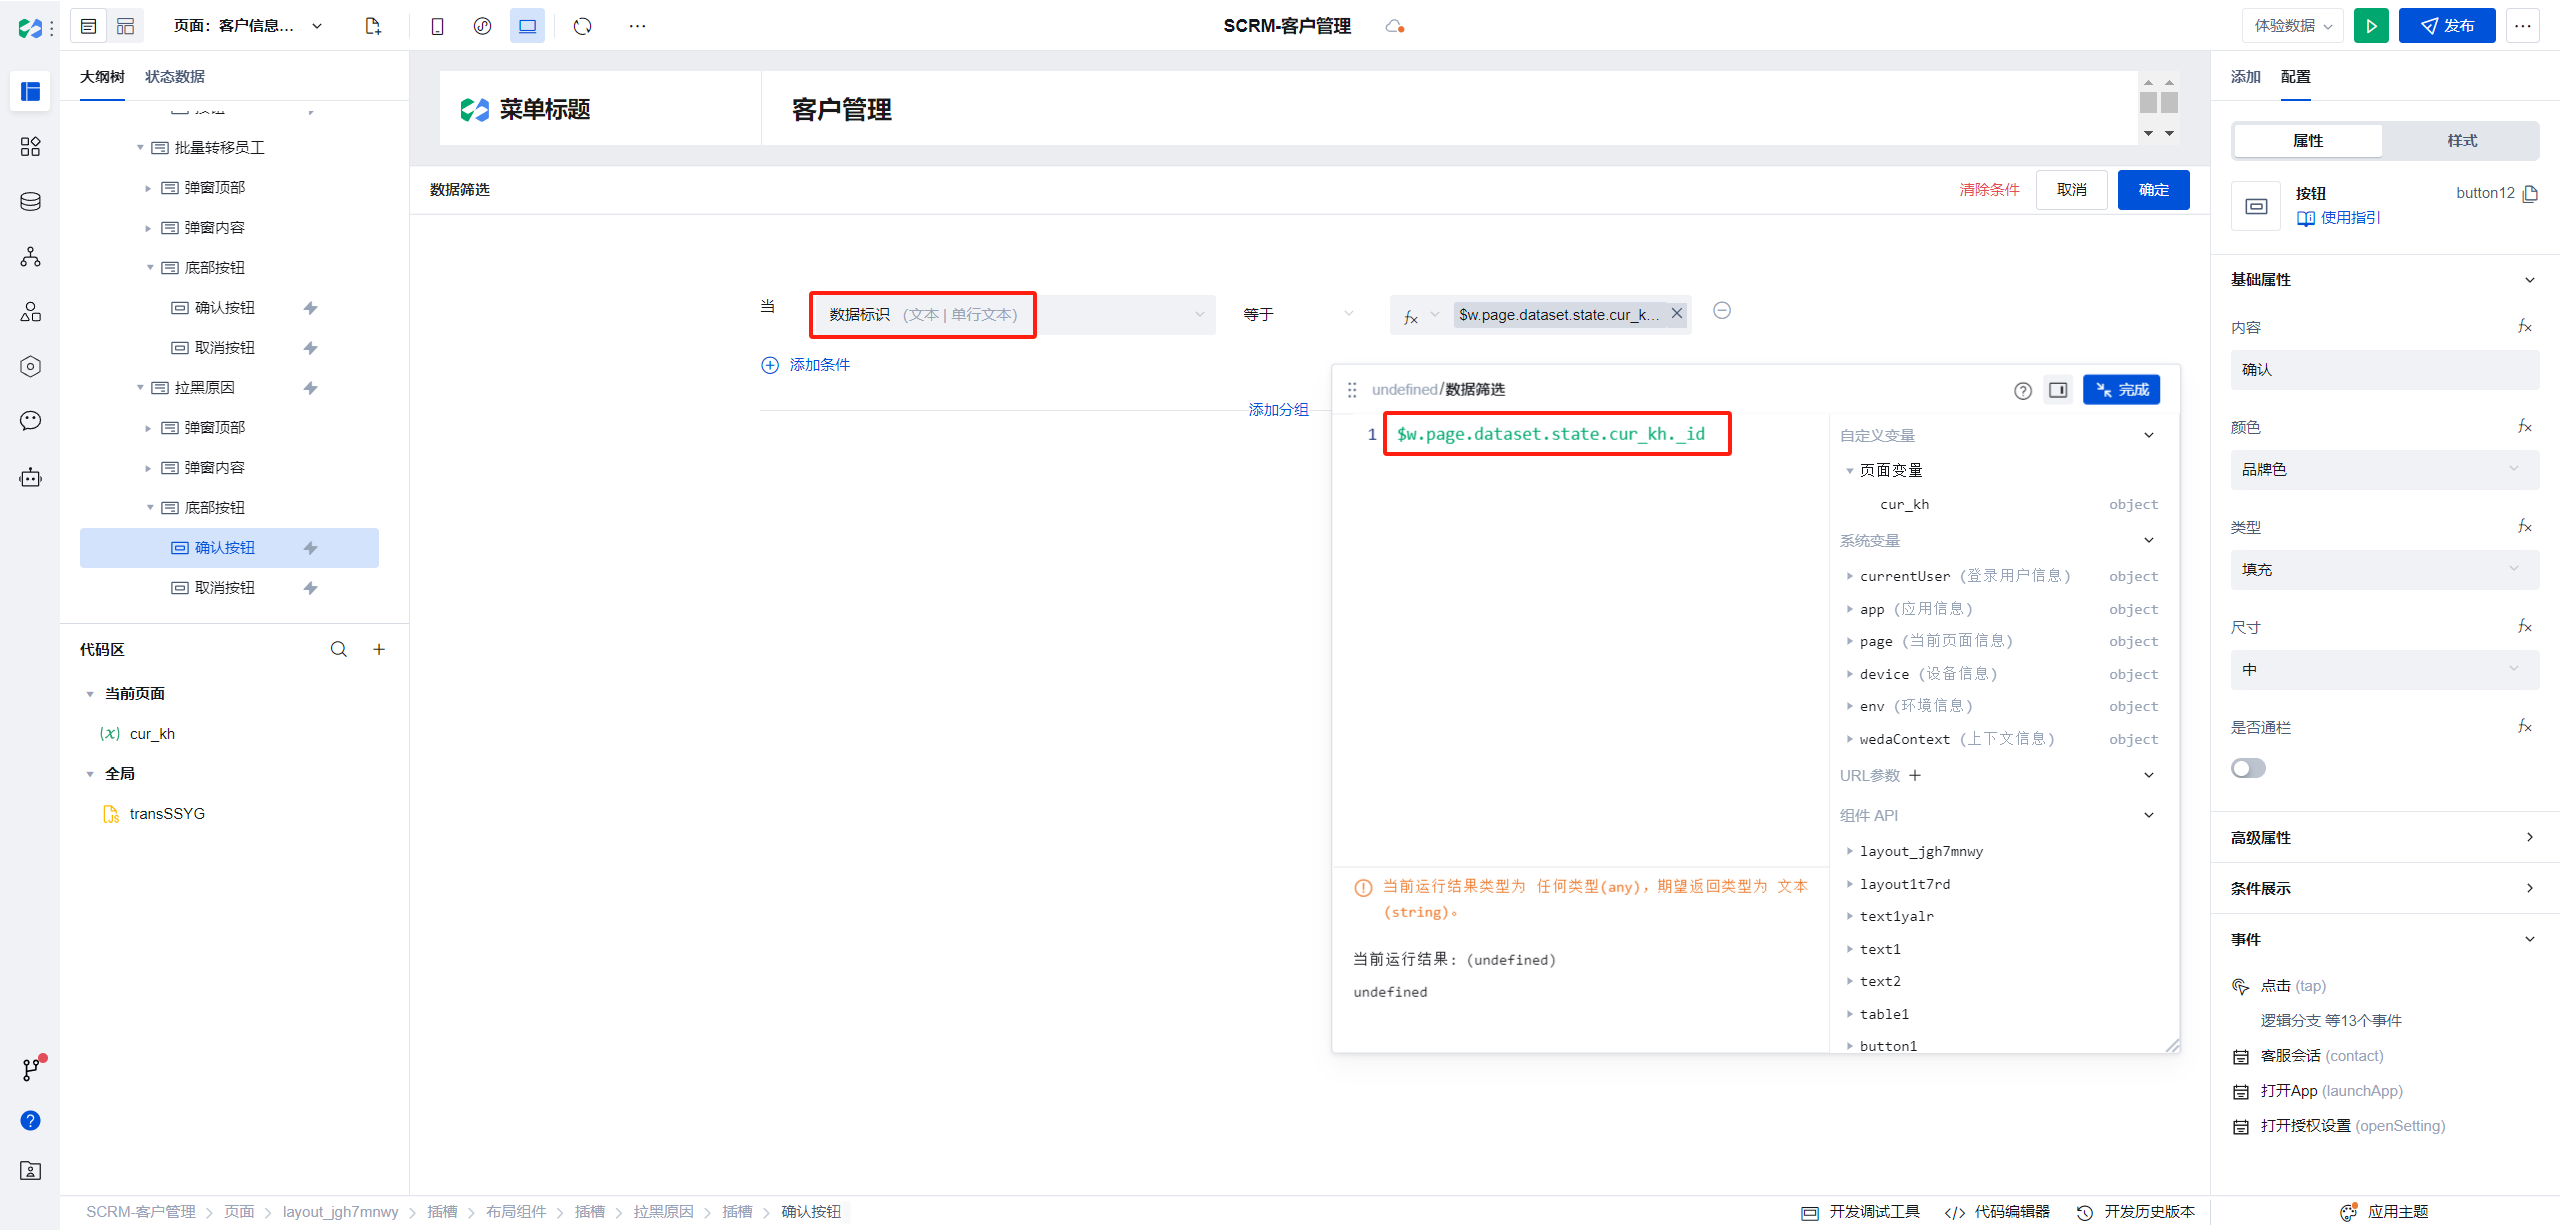
Update the data object as follows:
$w.auth.currentUser is a built-in method provided by $w to obtain the current user's information.
$w.Now() is a built-in method provided by $w to obtain the current time.
The query conditions for multiple record updates are as follows:
The input parameters for multiple record updates are the same as those for single record updates.
- After a successful update, add new records to the customer tracking record table. For a single update, create a single record; for multiple updates, create multiple records.

The parameter structure for creating a single record is as follows:

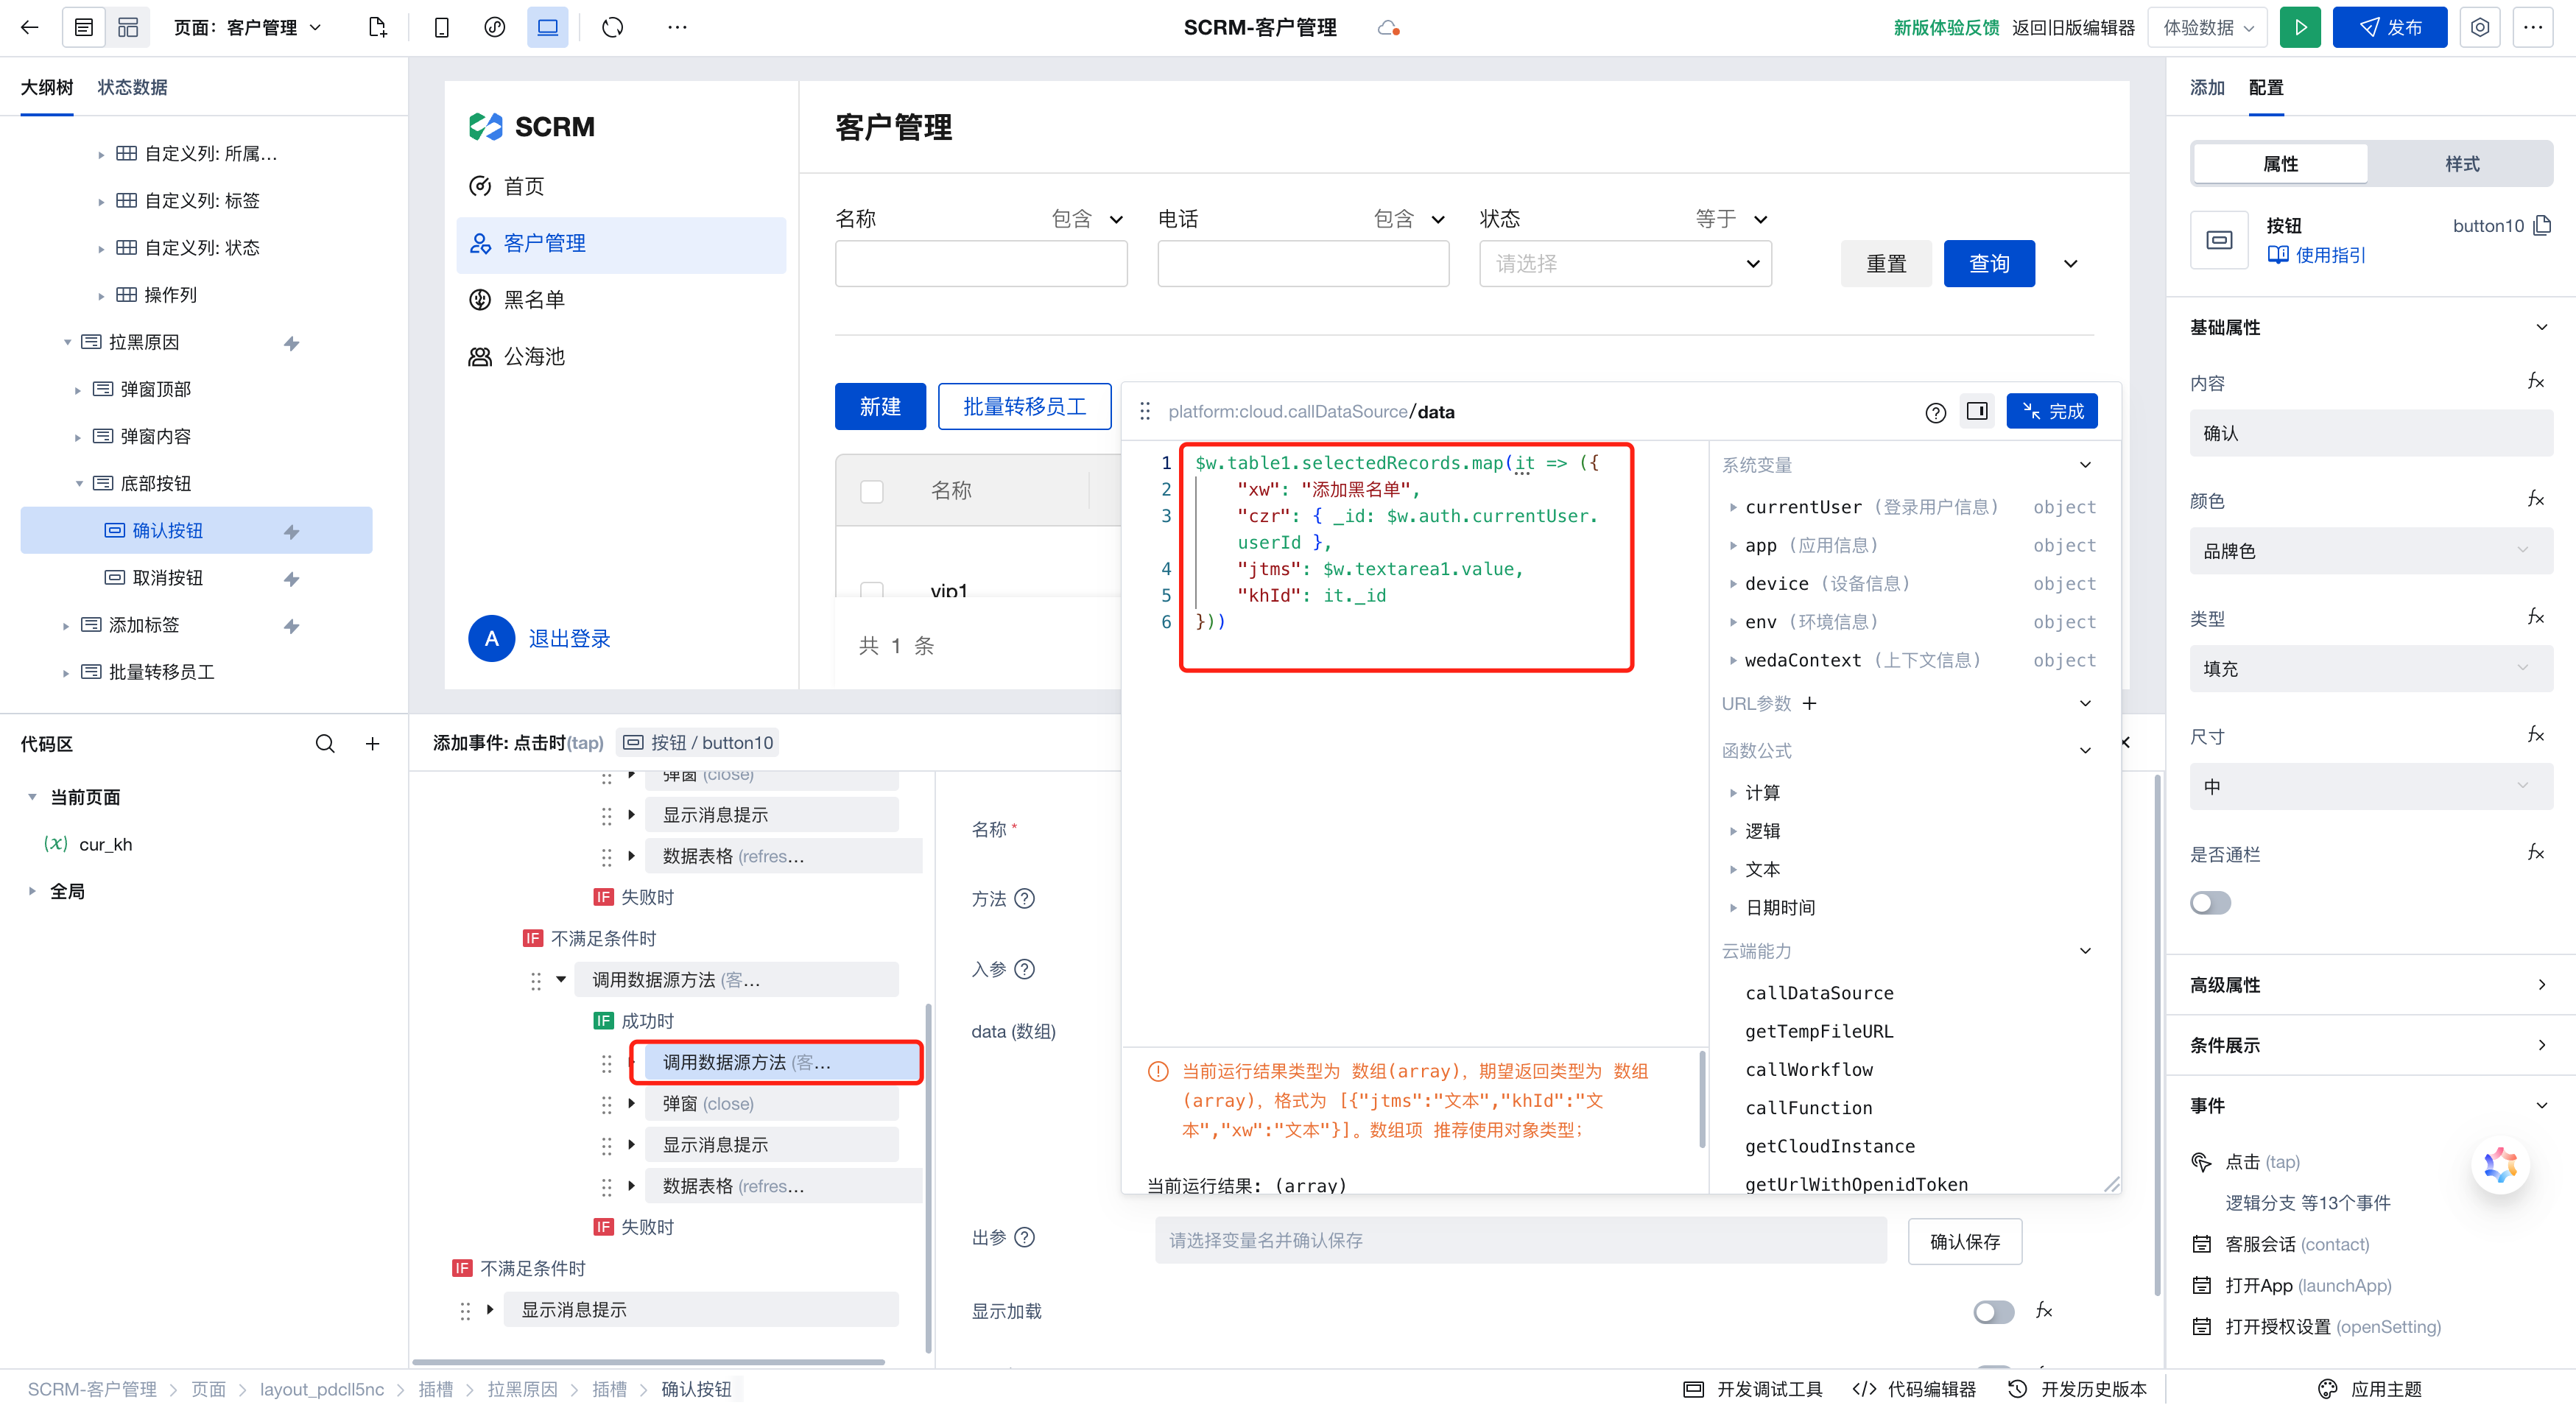
When creating multiple records, the quantity cannot be dynamically confirmed; therefore, an expression-based method is used here for creation.
Obtain the currently selected records in the list via $w.table1.selectedRecords, and use a map loop to return the parameter content for each newly created data record.
$w.table1.selectedRecords.map((it) => ({
  xw: "Add to blocklist",
  jtms: $w.textarea1.value,
  khId: it._id,
}));
- Clear the
cur_khvariable when closing the dialog
Custom Tags
Since dynamic tag addition is required and tags need to be displayed, a custom tag component is implemented. It is displayed in custom columns within the Customer List and also appears on pages such as creation and editing.
The specific creation process is as follows:
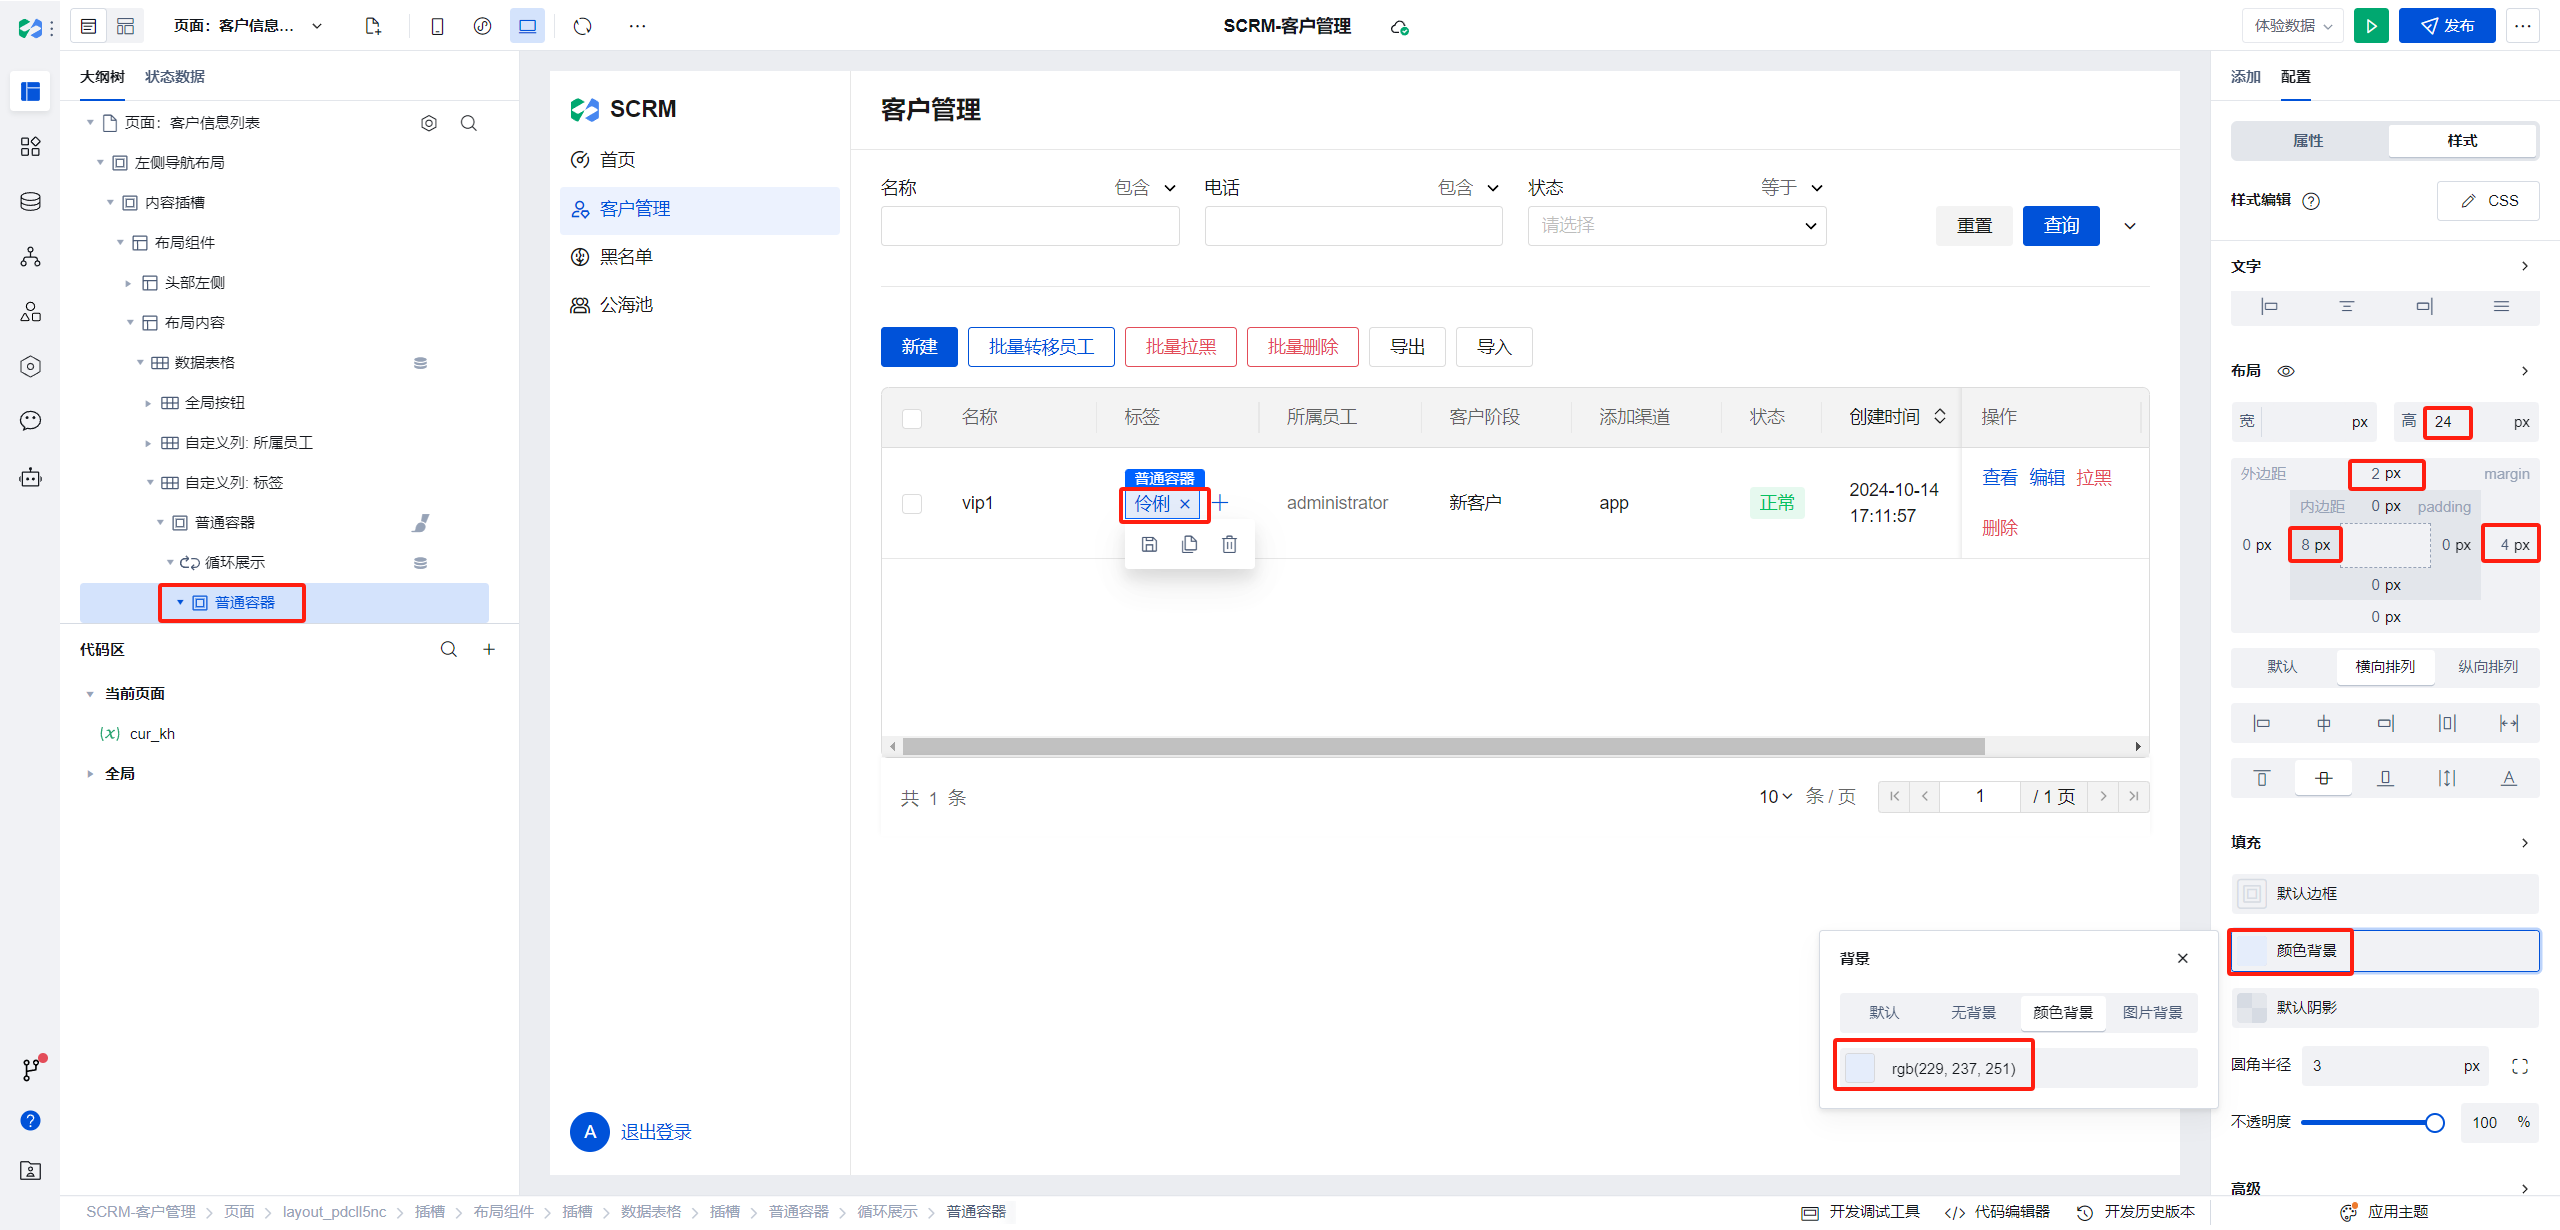
- Select the tag column as a custom column
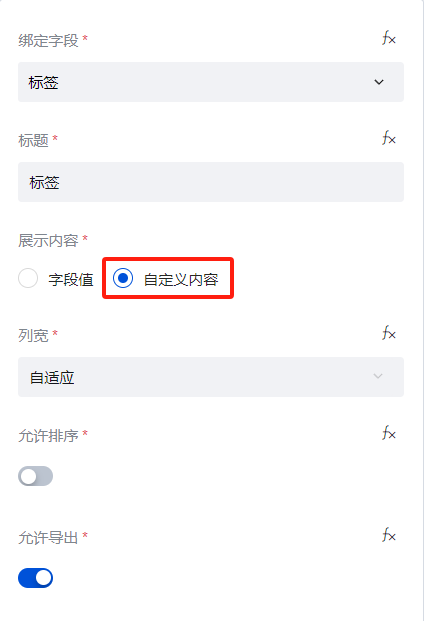
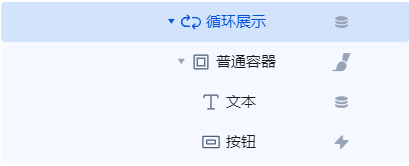
- Add the following nodes to the custom slot
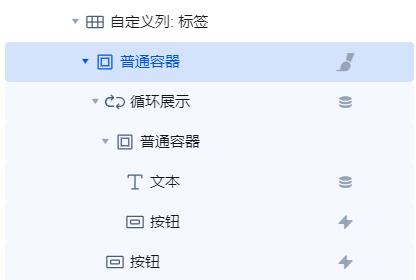
Loop display ordinary containers. The text within the ordinary container is tag content, and the button is delete button. We add some styling to this ordinary container.
The button below the loop display is the New button
The data source is the label data of the current row. The labels are stored in string format, therefore they need to be converted to array format for rendering.
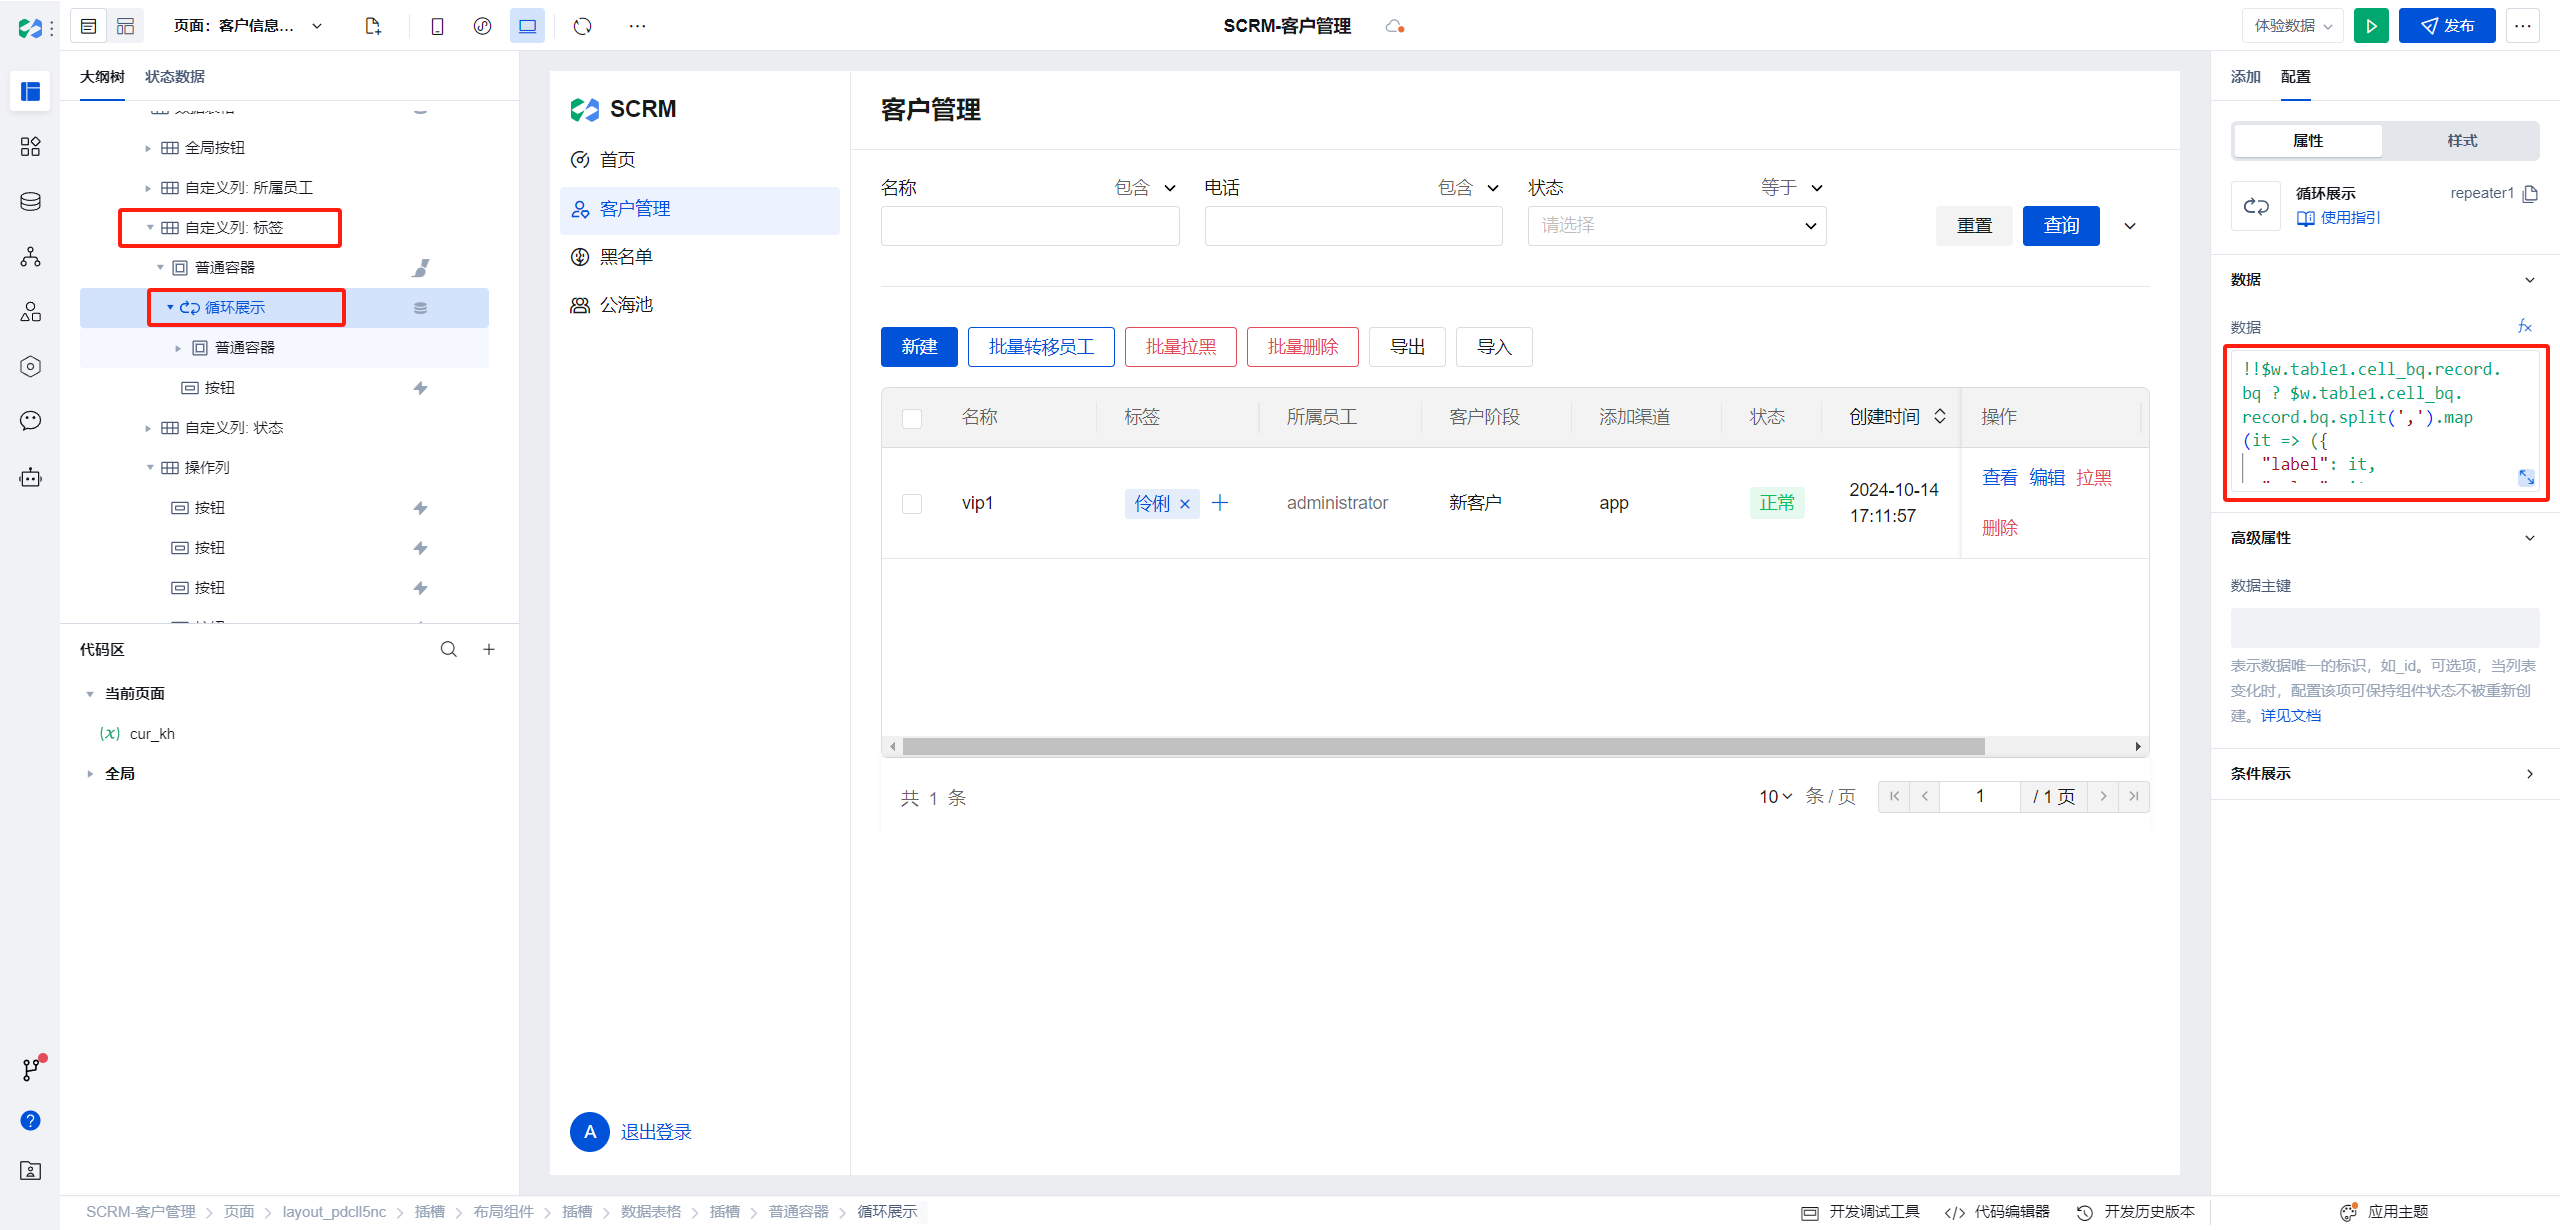
Loop display data expression as follows:
$w.table1.cell_bq.record is the current row data
!!$w.table1.cell_bq.record.bq
  ? $w.table1.cell_bq.record.bq.split(",").map((it) => ({
      label: it,
      value: it,
    }))
  : [];
- Click the New button
Clicking the New button requires saving the current row data, opening a pop-up window to fill in the tag content, and after filling, clicking confirm to update the current row data.
Steps are as follows:
Create a new dialog component and place a text field for tag content within the dialog.
Set the global variable cur_kh to the current row data and open the dialog when clicked
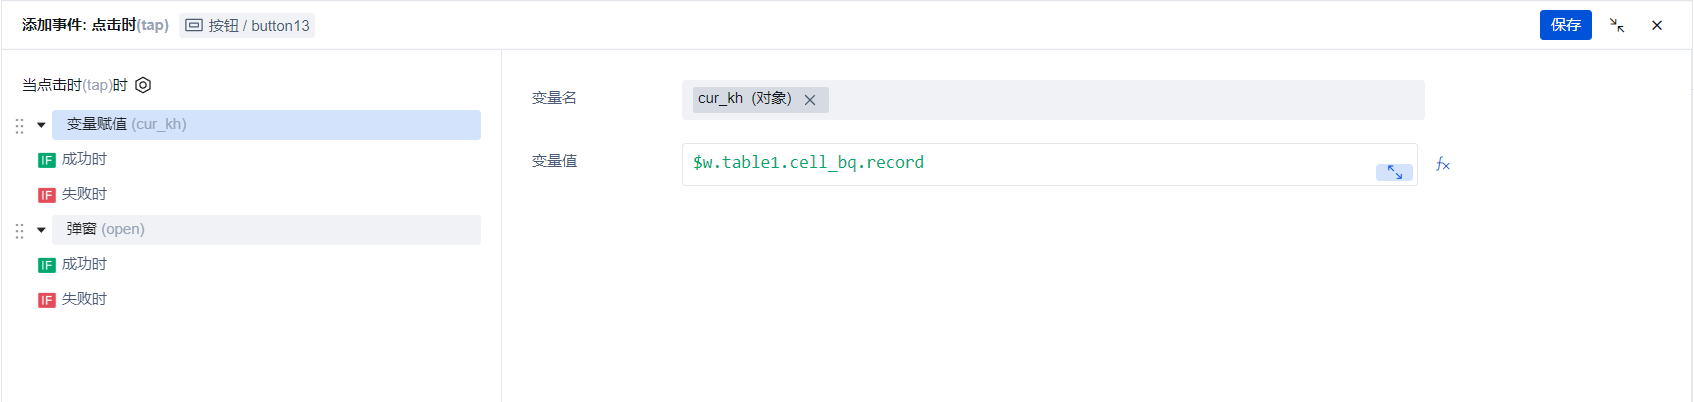
When clicking Confirm, call the update single record method to update the current row data
Update current row data parameters are:
$w.page.dataset.state.cur_kh is the current row information
$w.input1.value text content in the dialog
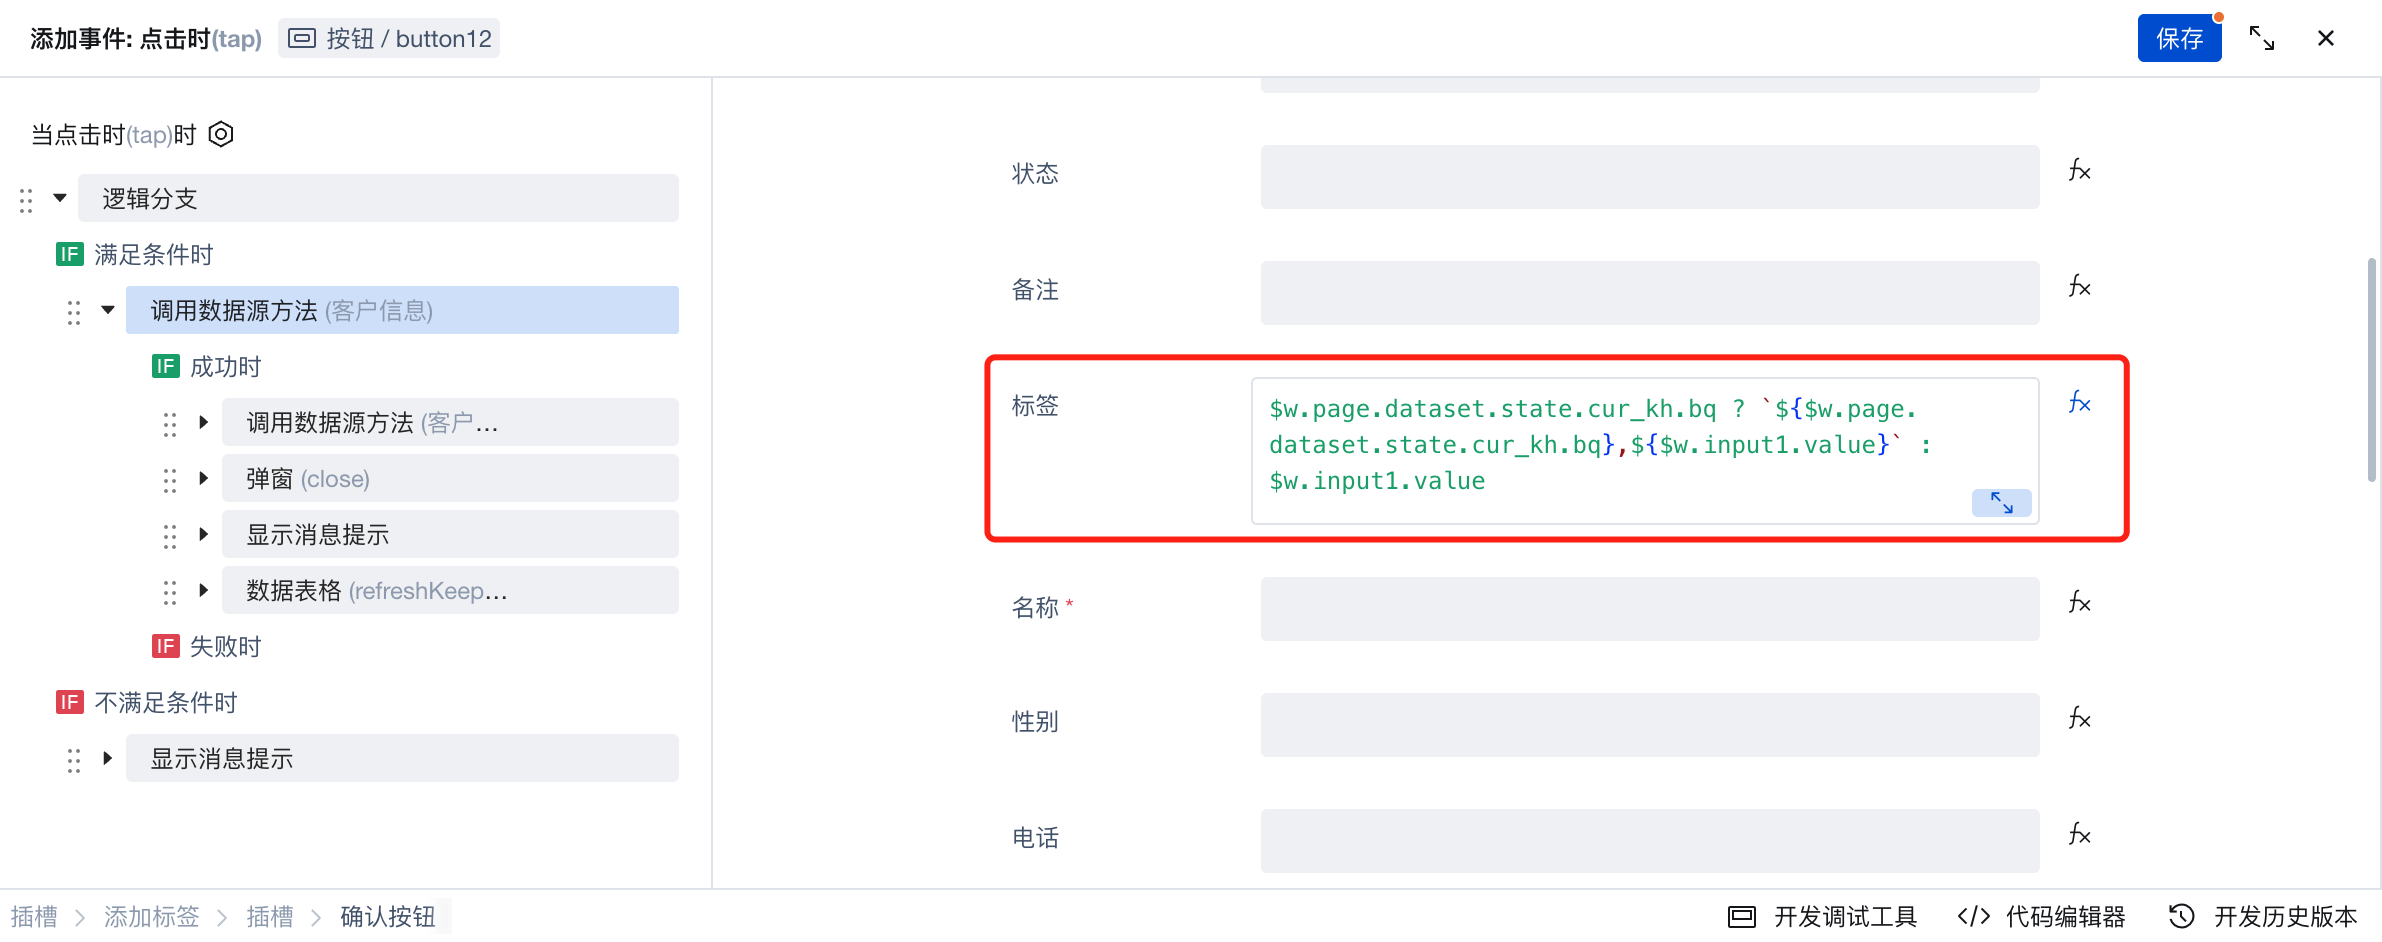
Check if the current row has tags; if yes, concatenate with a comma; if not, assign the tag directly as the text content in the dialog.
$w.page.dataset.state.cur_kh.bq
  ? `${$w.page.dataset.state.cur_kh.bq},${$w.input1.value}`
  : $w.input1.value;
and call the customer tracking record table to add a new record (similar to the blacklisting feature). The parameter structure is as follows:
({
  xw: "Add tag",
  jtms: `Add [${$w.input1.value} tag`,
  khId: $w.page.dataset.state.cur_kh._id,
});
-
Clear the
cur_khvariable when closing the dialog -
Click the "Delete" button
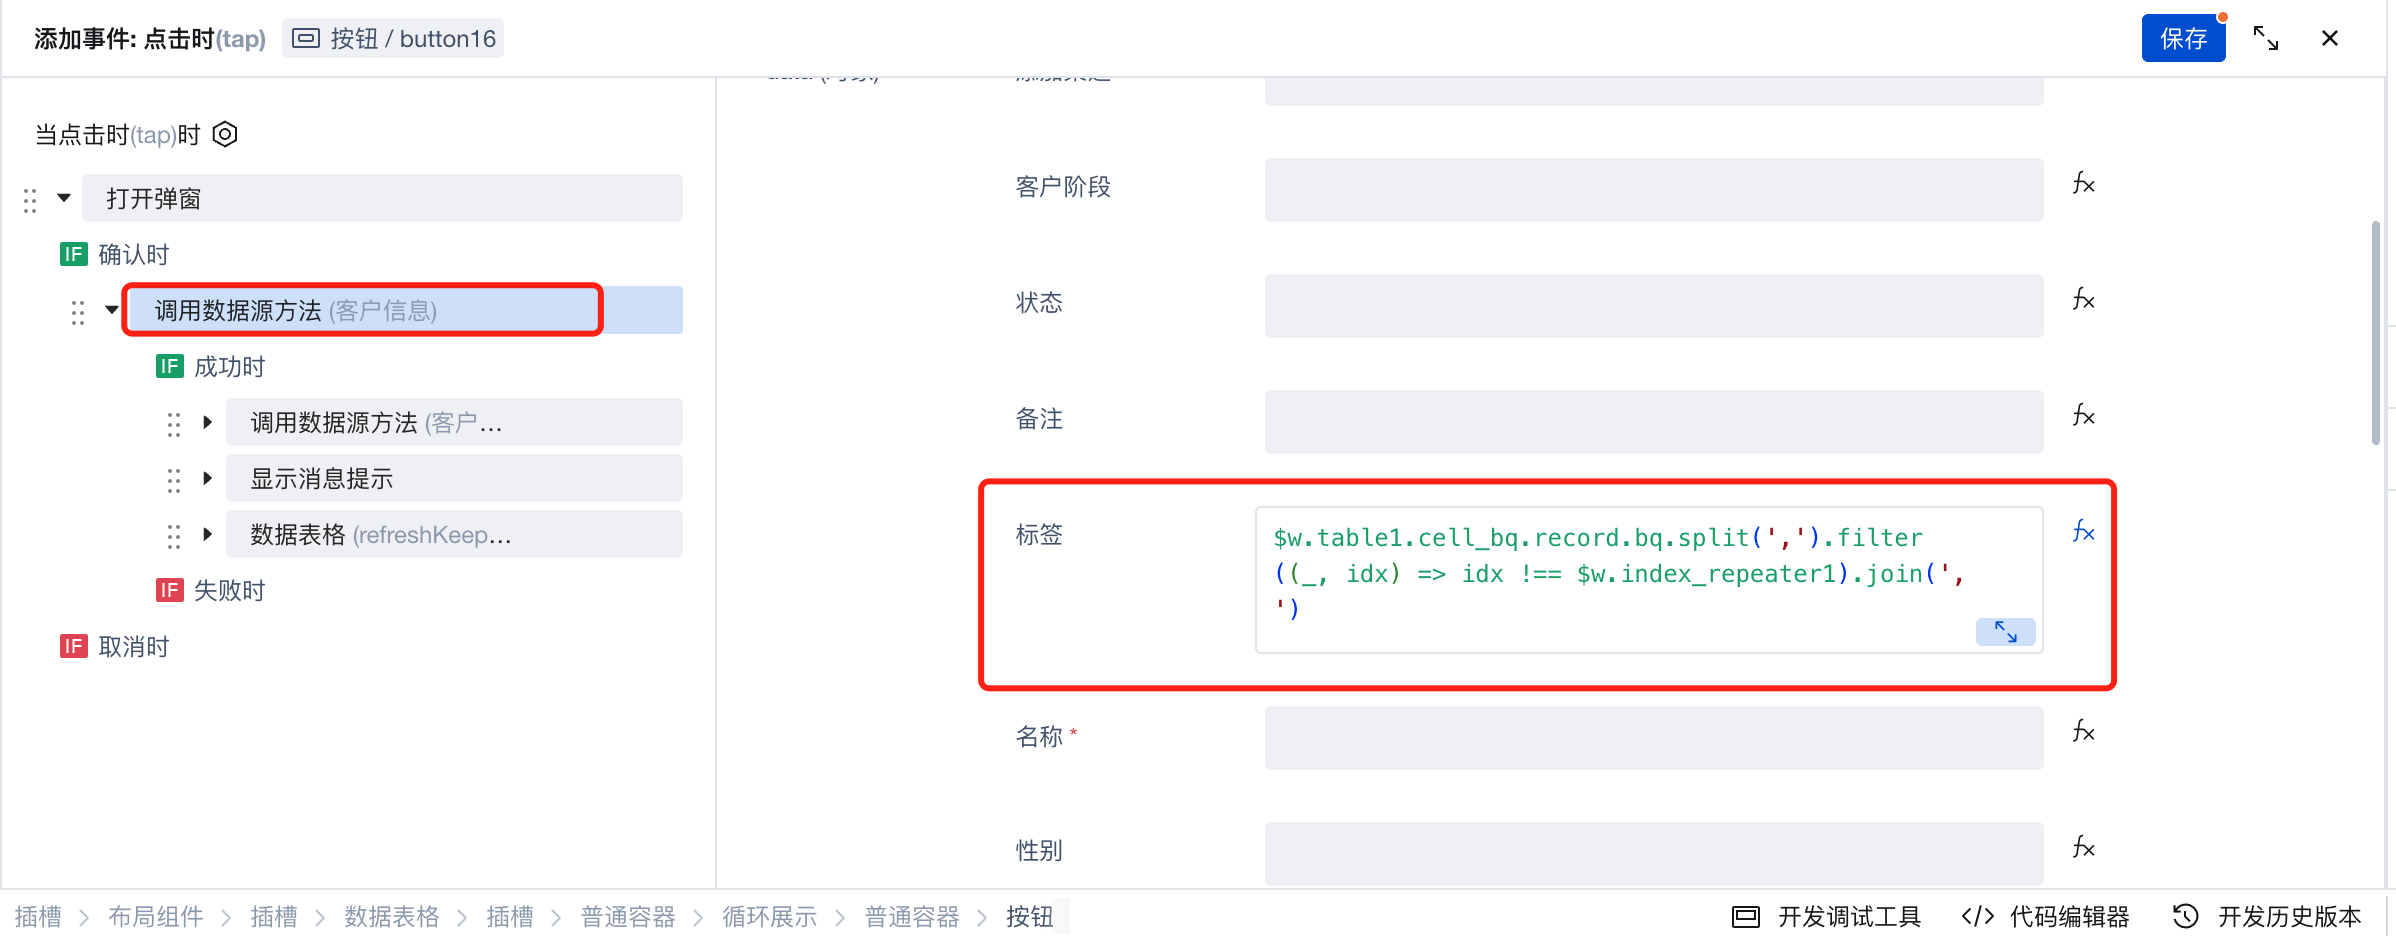
When clicking the Delete button, a pop-up window appears for secondary confirmation. Upon successful confirmation, obtain the current row data for updating, and set the tag field value to the following expression:
$w.table1.cell_bq.record is the current row data
$w.index_repeater1 is the index of the currently clicked Delete button
$w.table1.cell_bq.record.bq
  .split(",")
  .filter((_, idx) => idx !== $w.index_repeater1)
  .join(",");
Similarly, after deletion is completed, also need to call the customer tracking record table to add a new record (similar to the blacklisting feature). The parameter structure is as follows:
({
  xw: "Remove tag",
  jtms: `Remove [${$w.item_repeater1.label}] tag`,
  khId: $w.table1.cell_bq.record._id,
});
Customer Editing Page
- To display customer activities, use tabs to show basic information and customer activities separately.
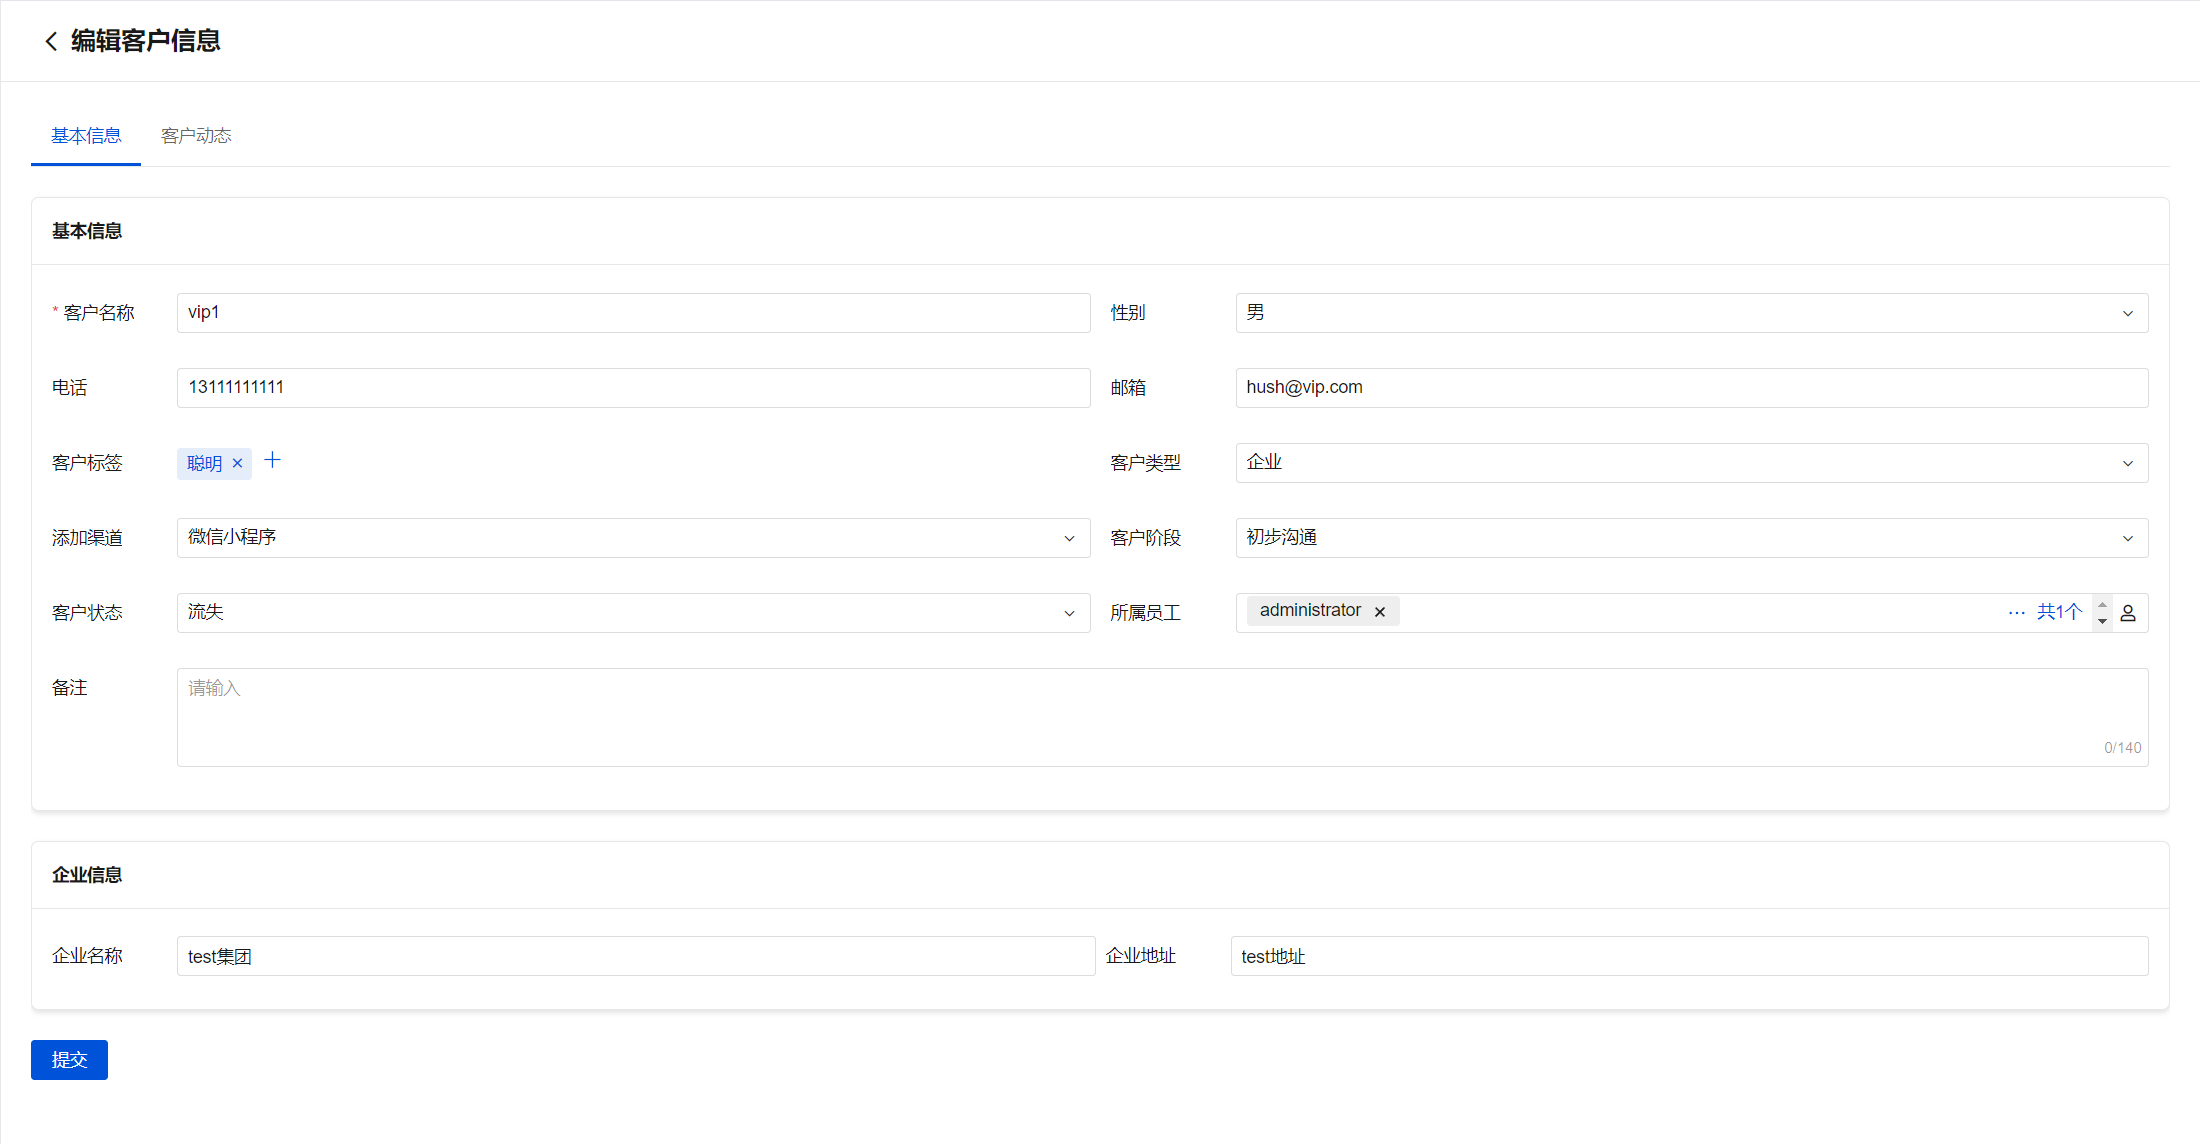
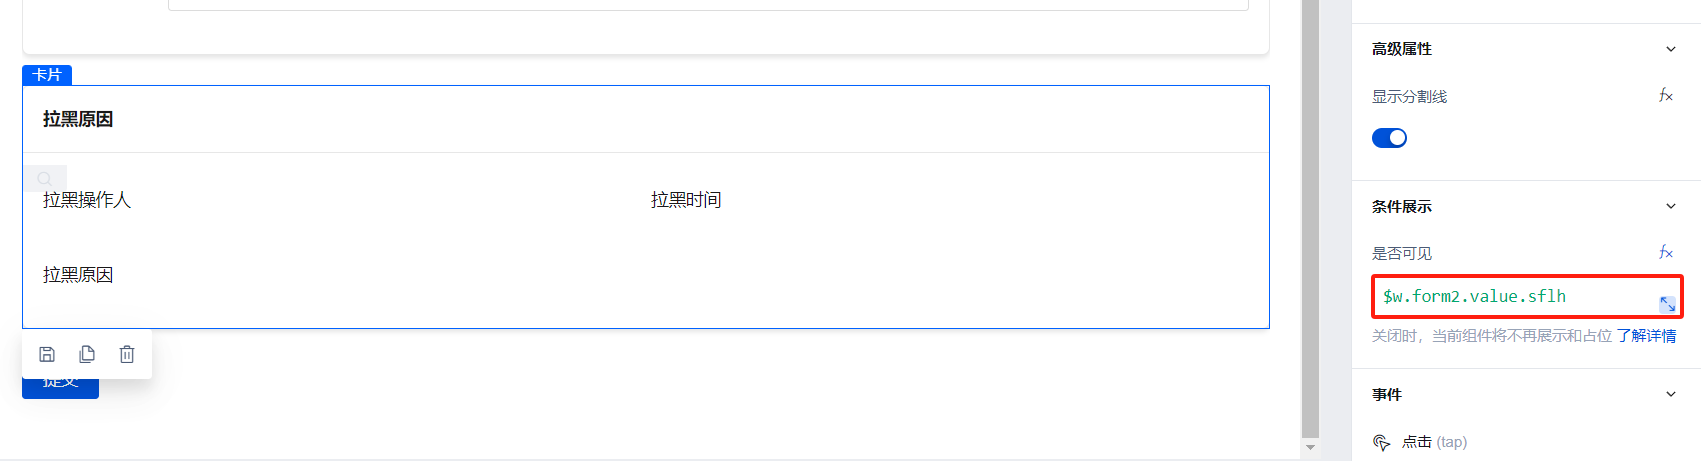
- When Whether to Block is set to Block, display the block reason module to show block-related information.
- When Customer Type is set to Company, display the company module form for entering company information.

- Customer activities are displayed via a data list. Select the data model as Customer Tracking Record.
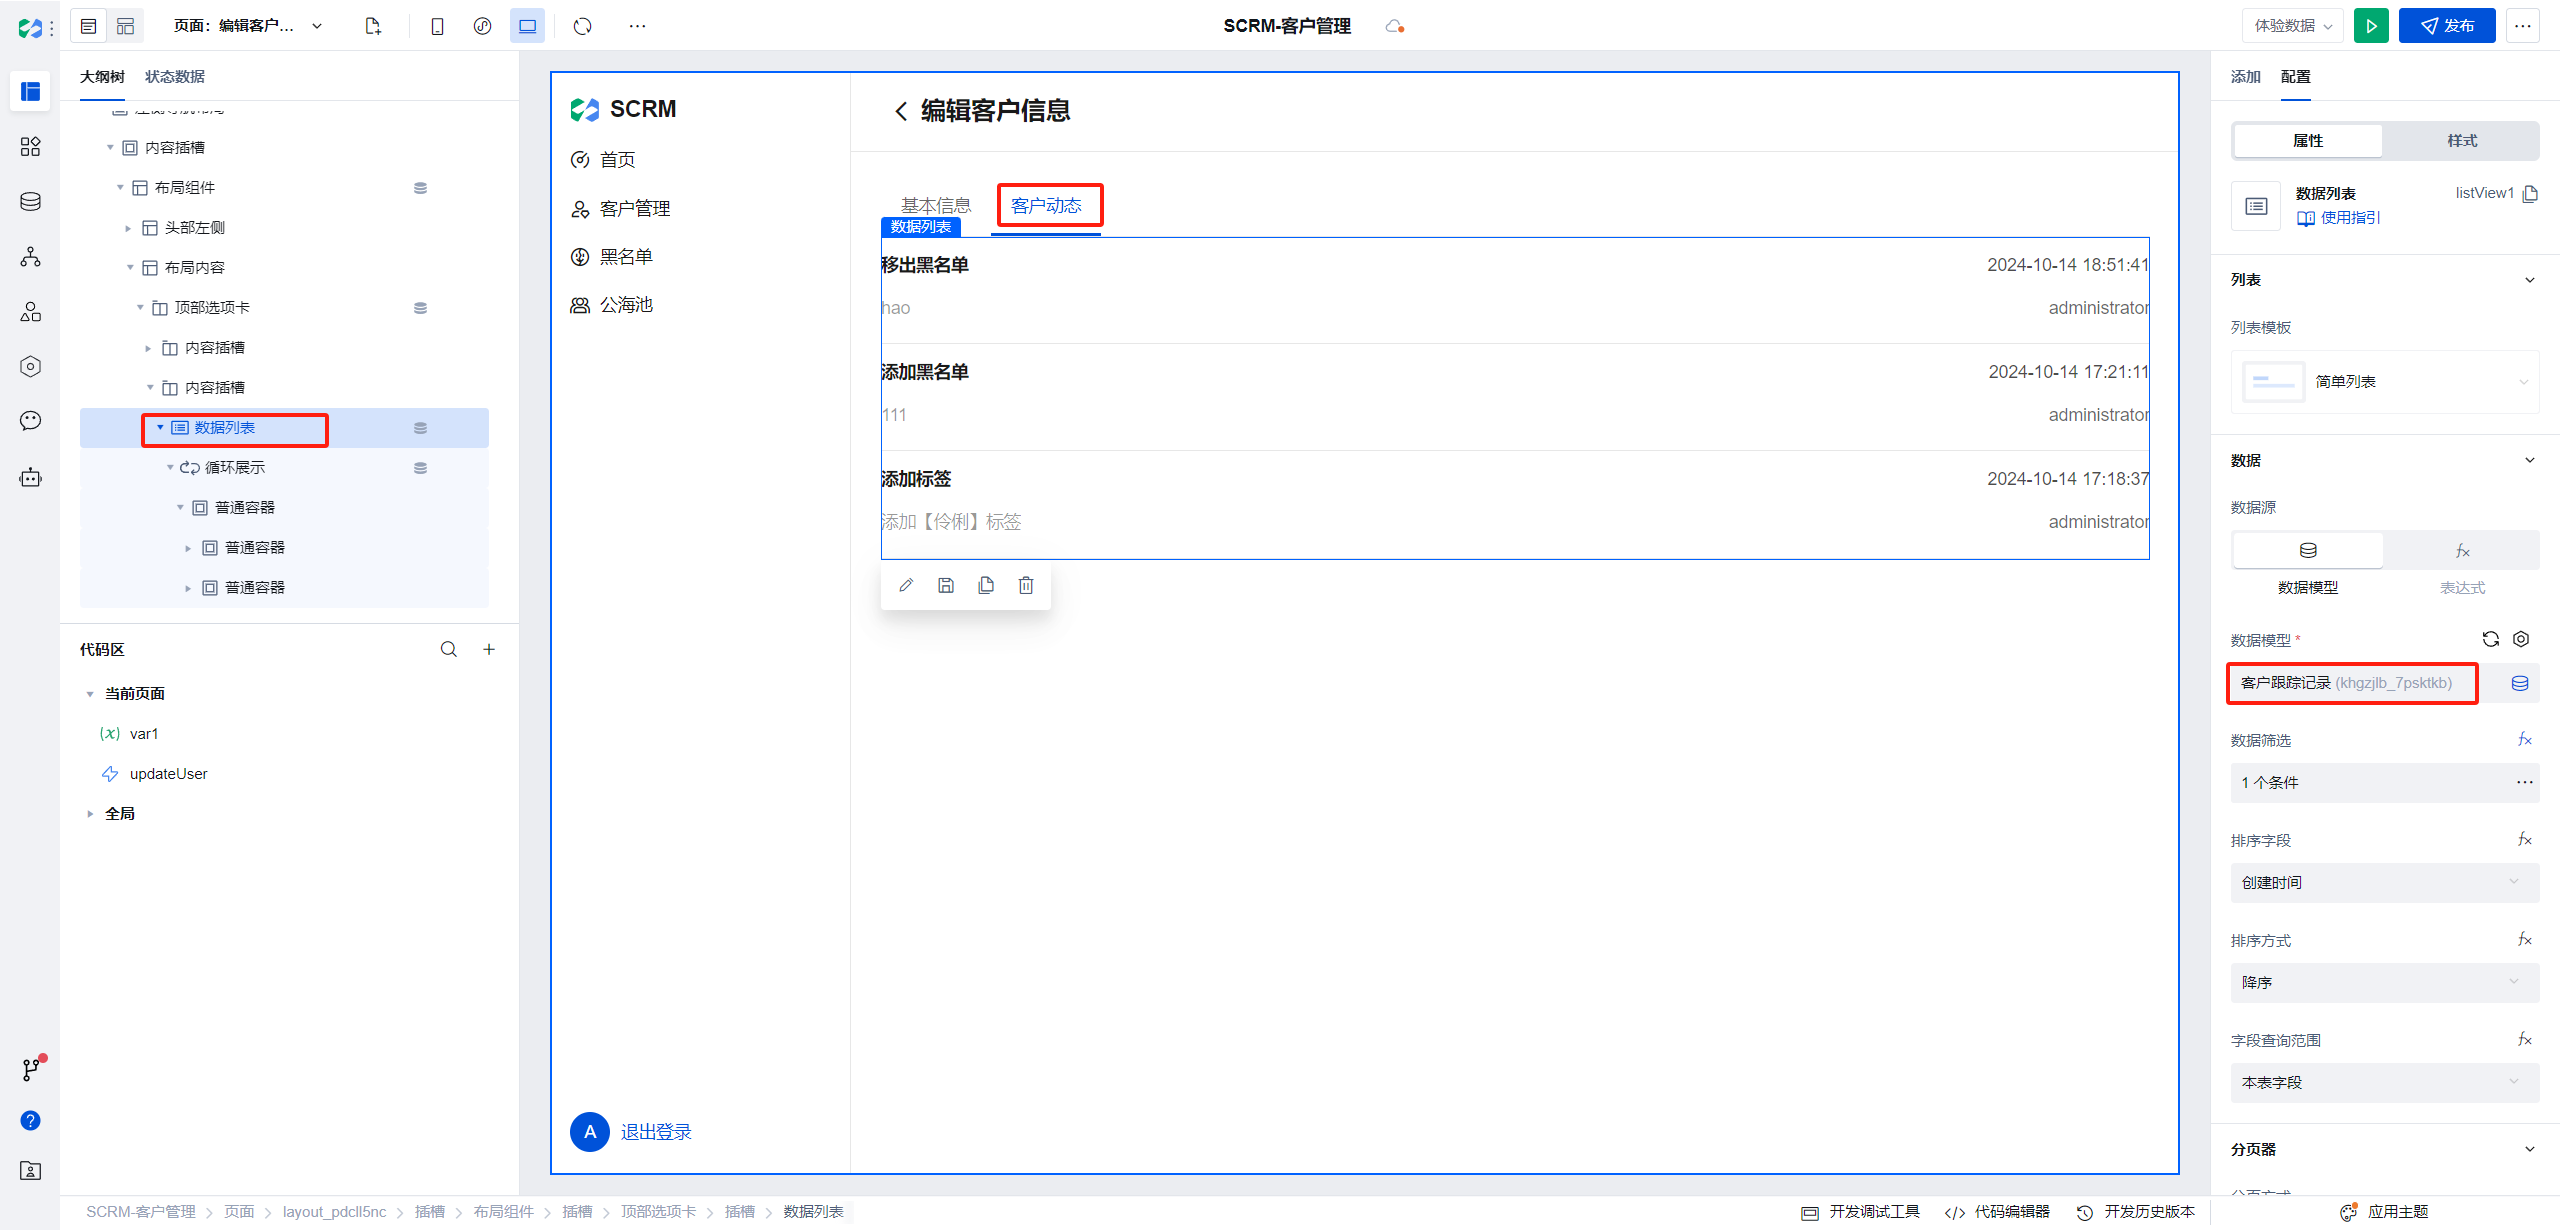
Each form only needs to display data relevant to the current form, thus the filtering conditions are as follows:
$w.page.dataset.params._id is the parameter received by the current page

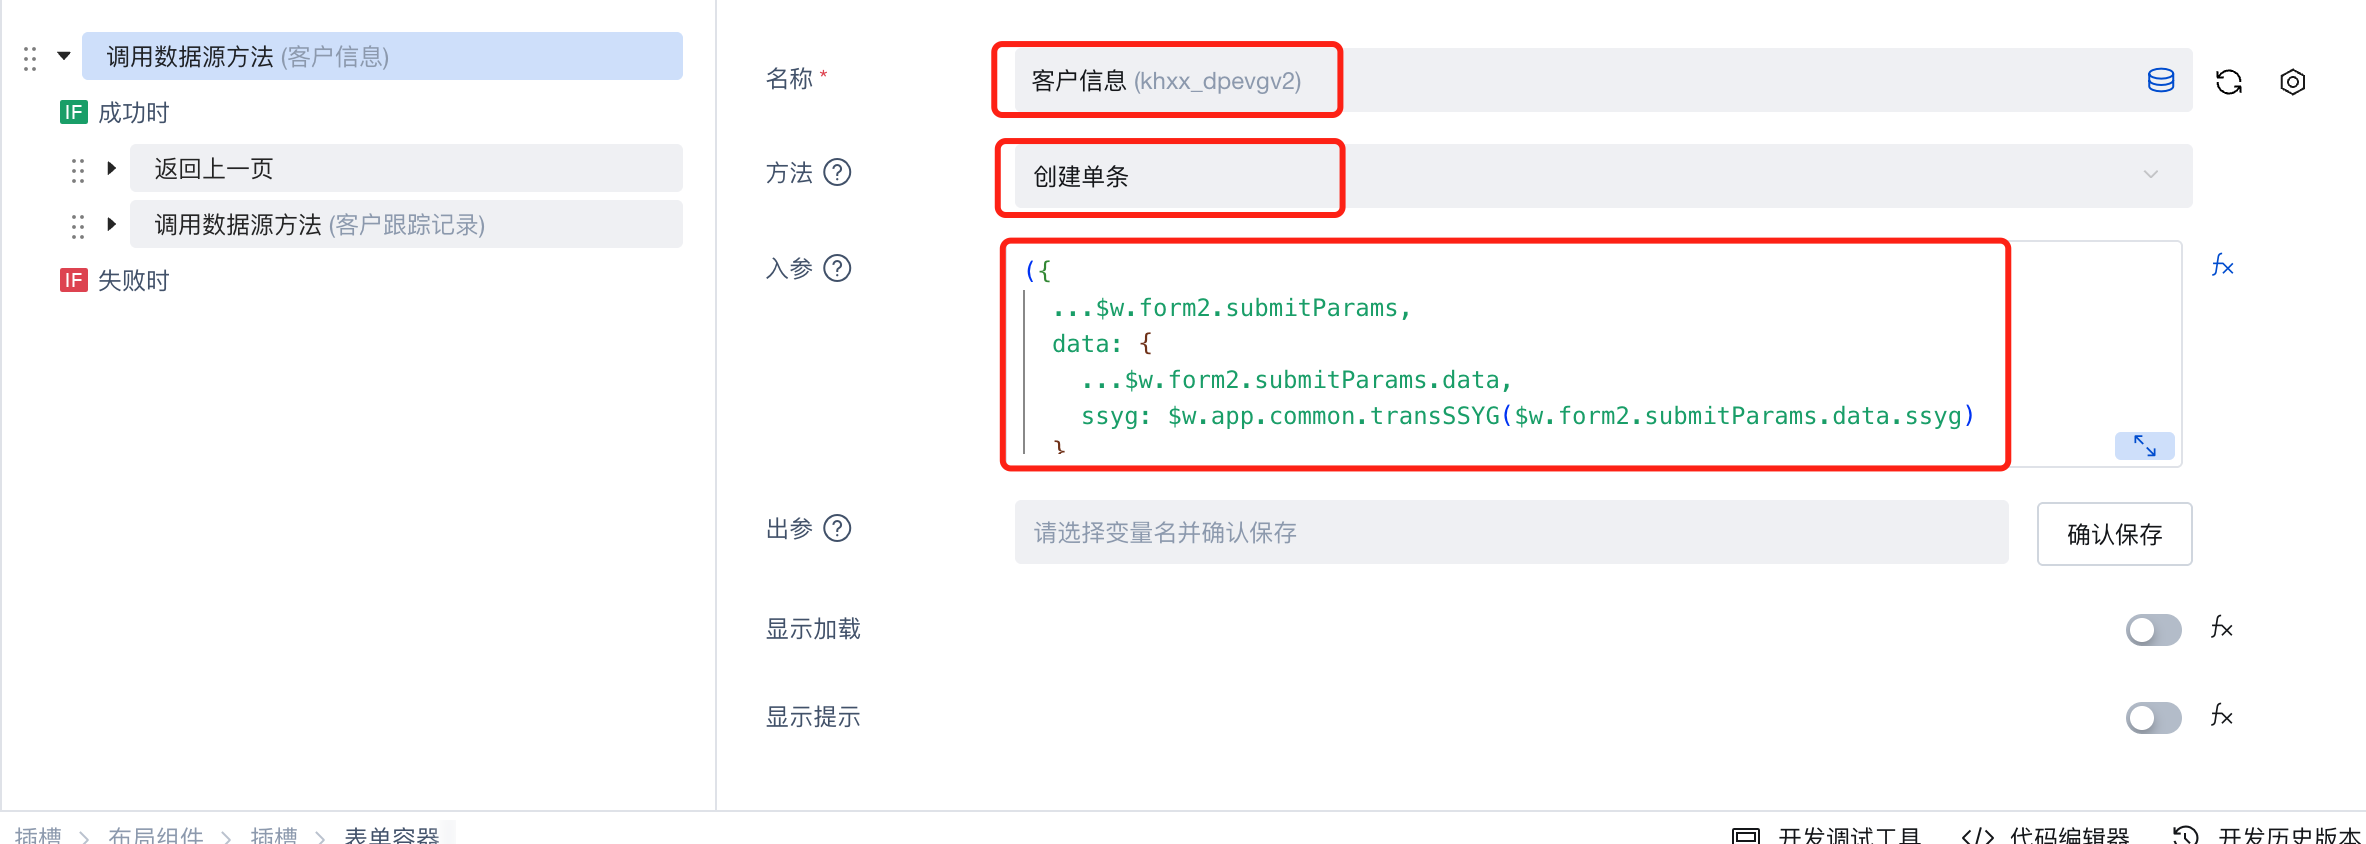
- Change the assigned employee field to the personnel field. Since the personnel field can display data in string format but stores data as an array, convert this field to a string during saving. Modify the form submission event parameters as follows:
({
  ...$w.form2.submitParams,
  _id: $w.page.dataset.params._id,
  data: {
    ...$w.form2.submitParams.data,
    ssyg: $w.app.common.transSSYG($w.form2.submitParams.data.ssyg),
  },
});
- The tag field is also consistent with the list items in the details page.
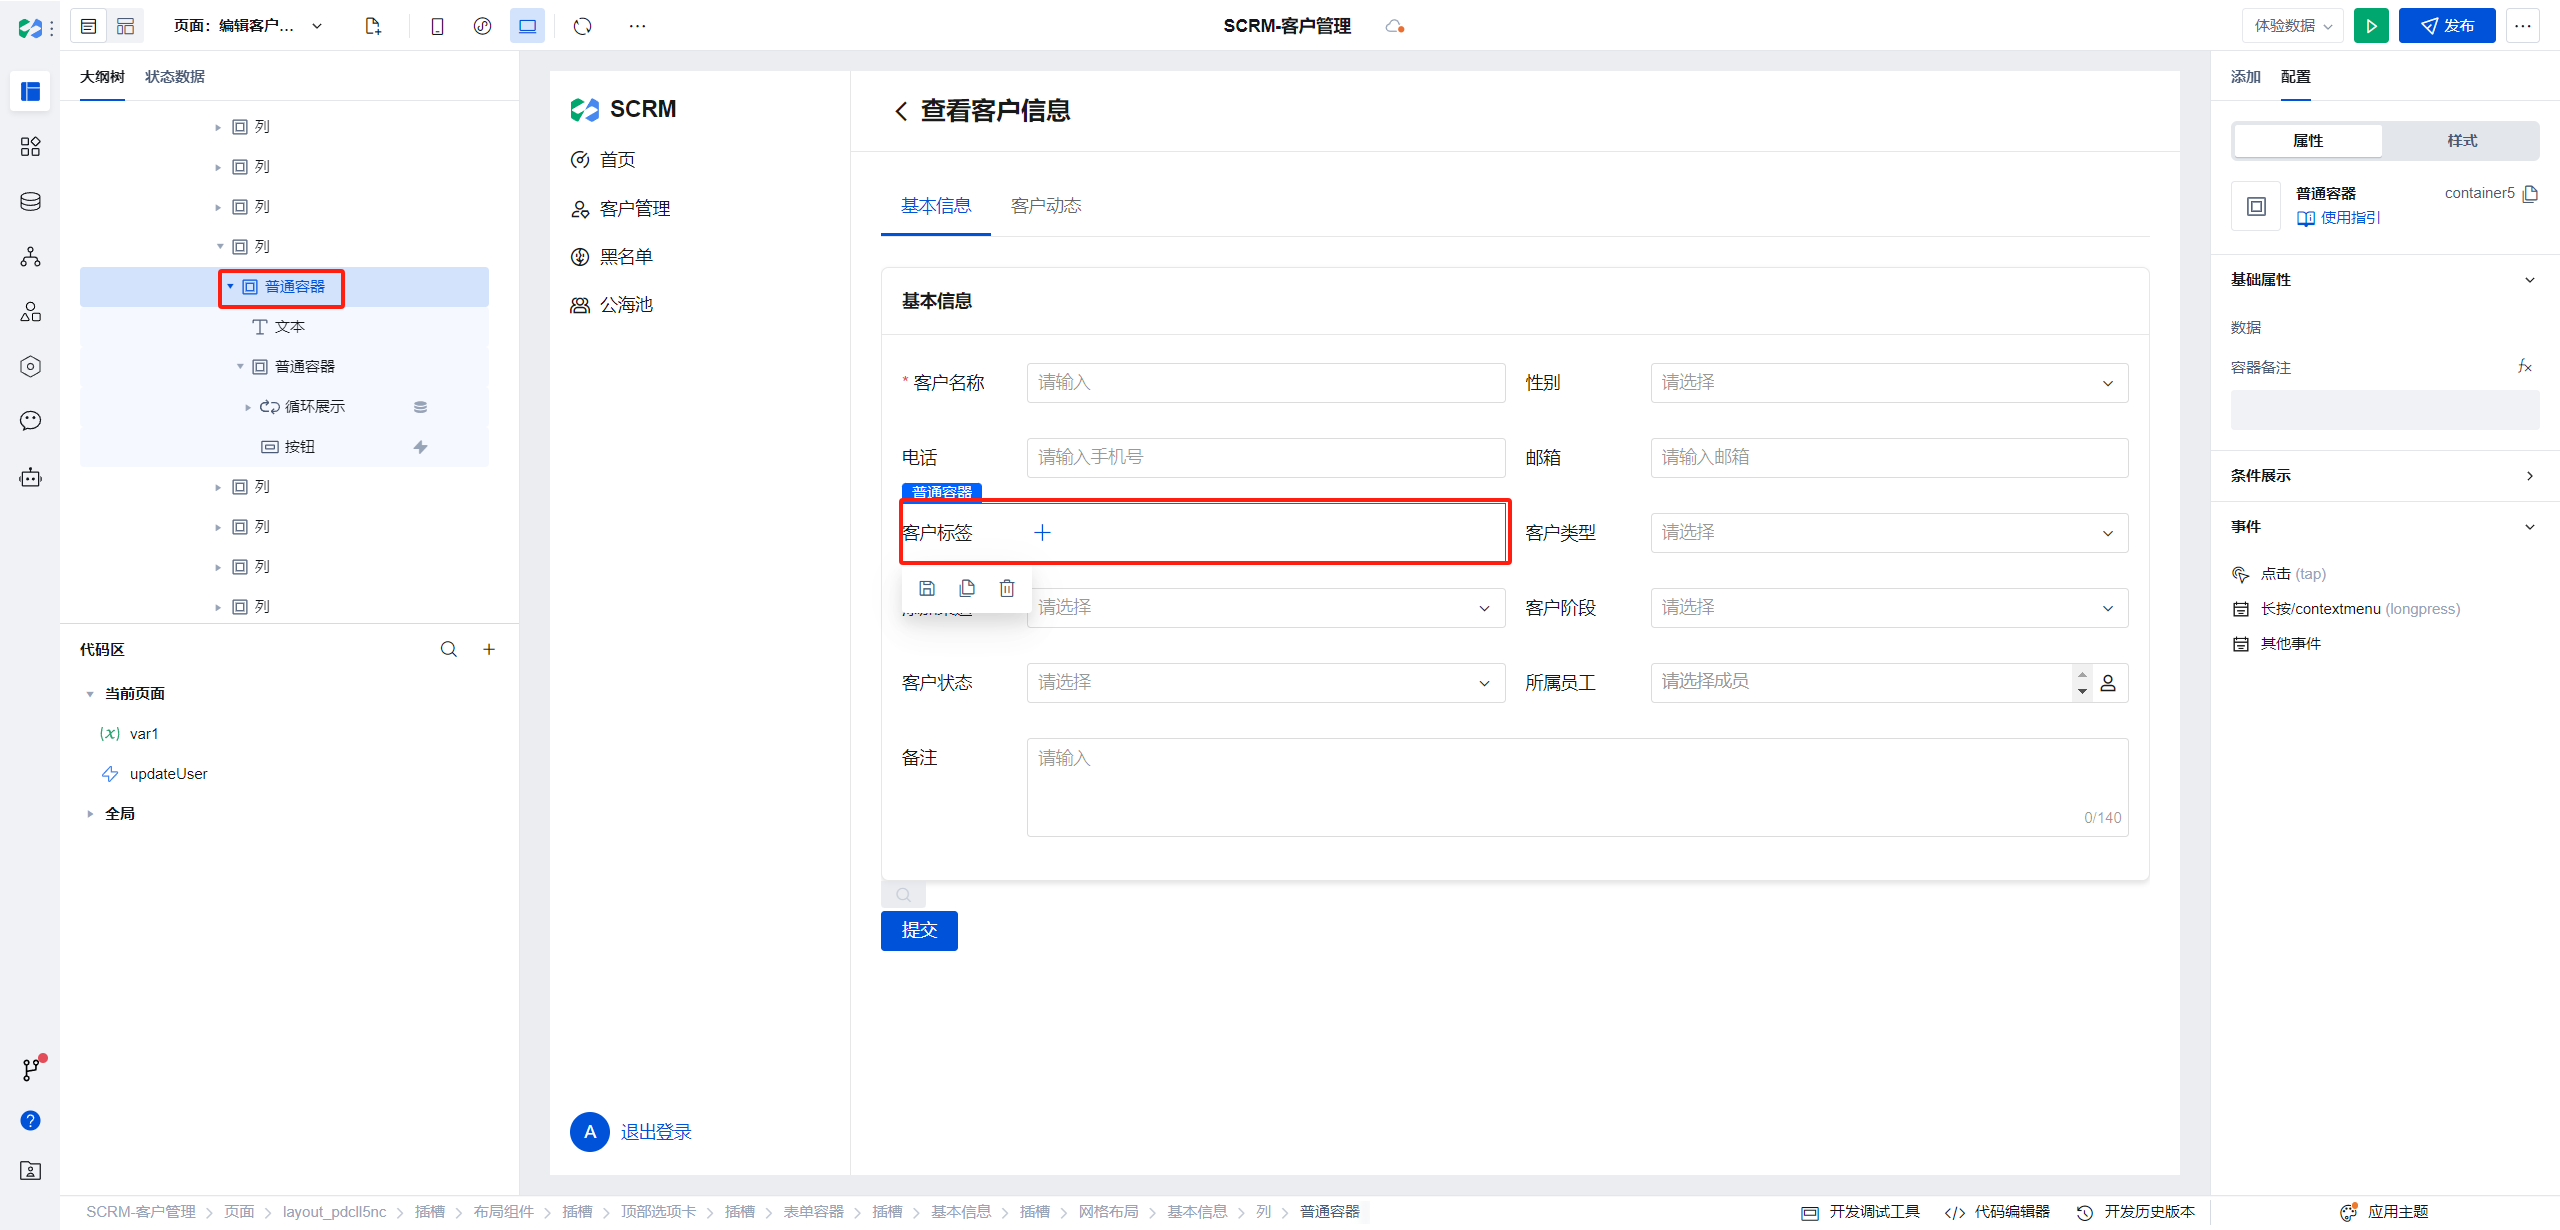
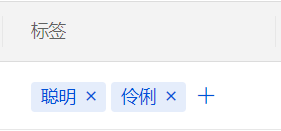
Create a container, replace the label tag with a text field, display tag content using a loop display component, and add a button at the rear for creating new items.
The content of the Loop Display component is consistent with the label column of the external list.
The Loop Display component data corresponds to the tag field data of the current form item. Since the tag data in the form is a string, it needs to be converted to an array and assigned to the loop component.
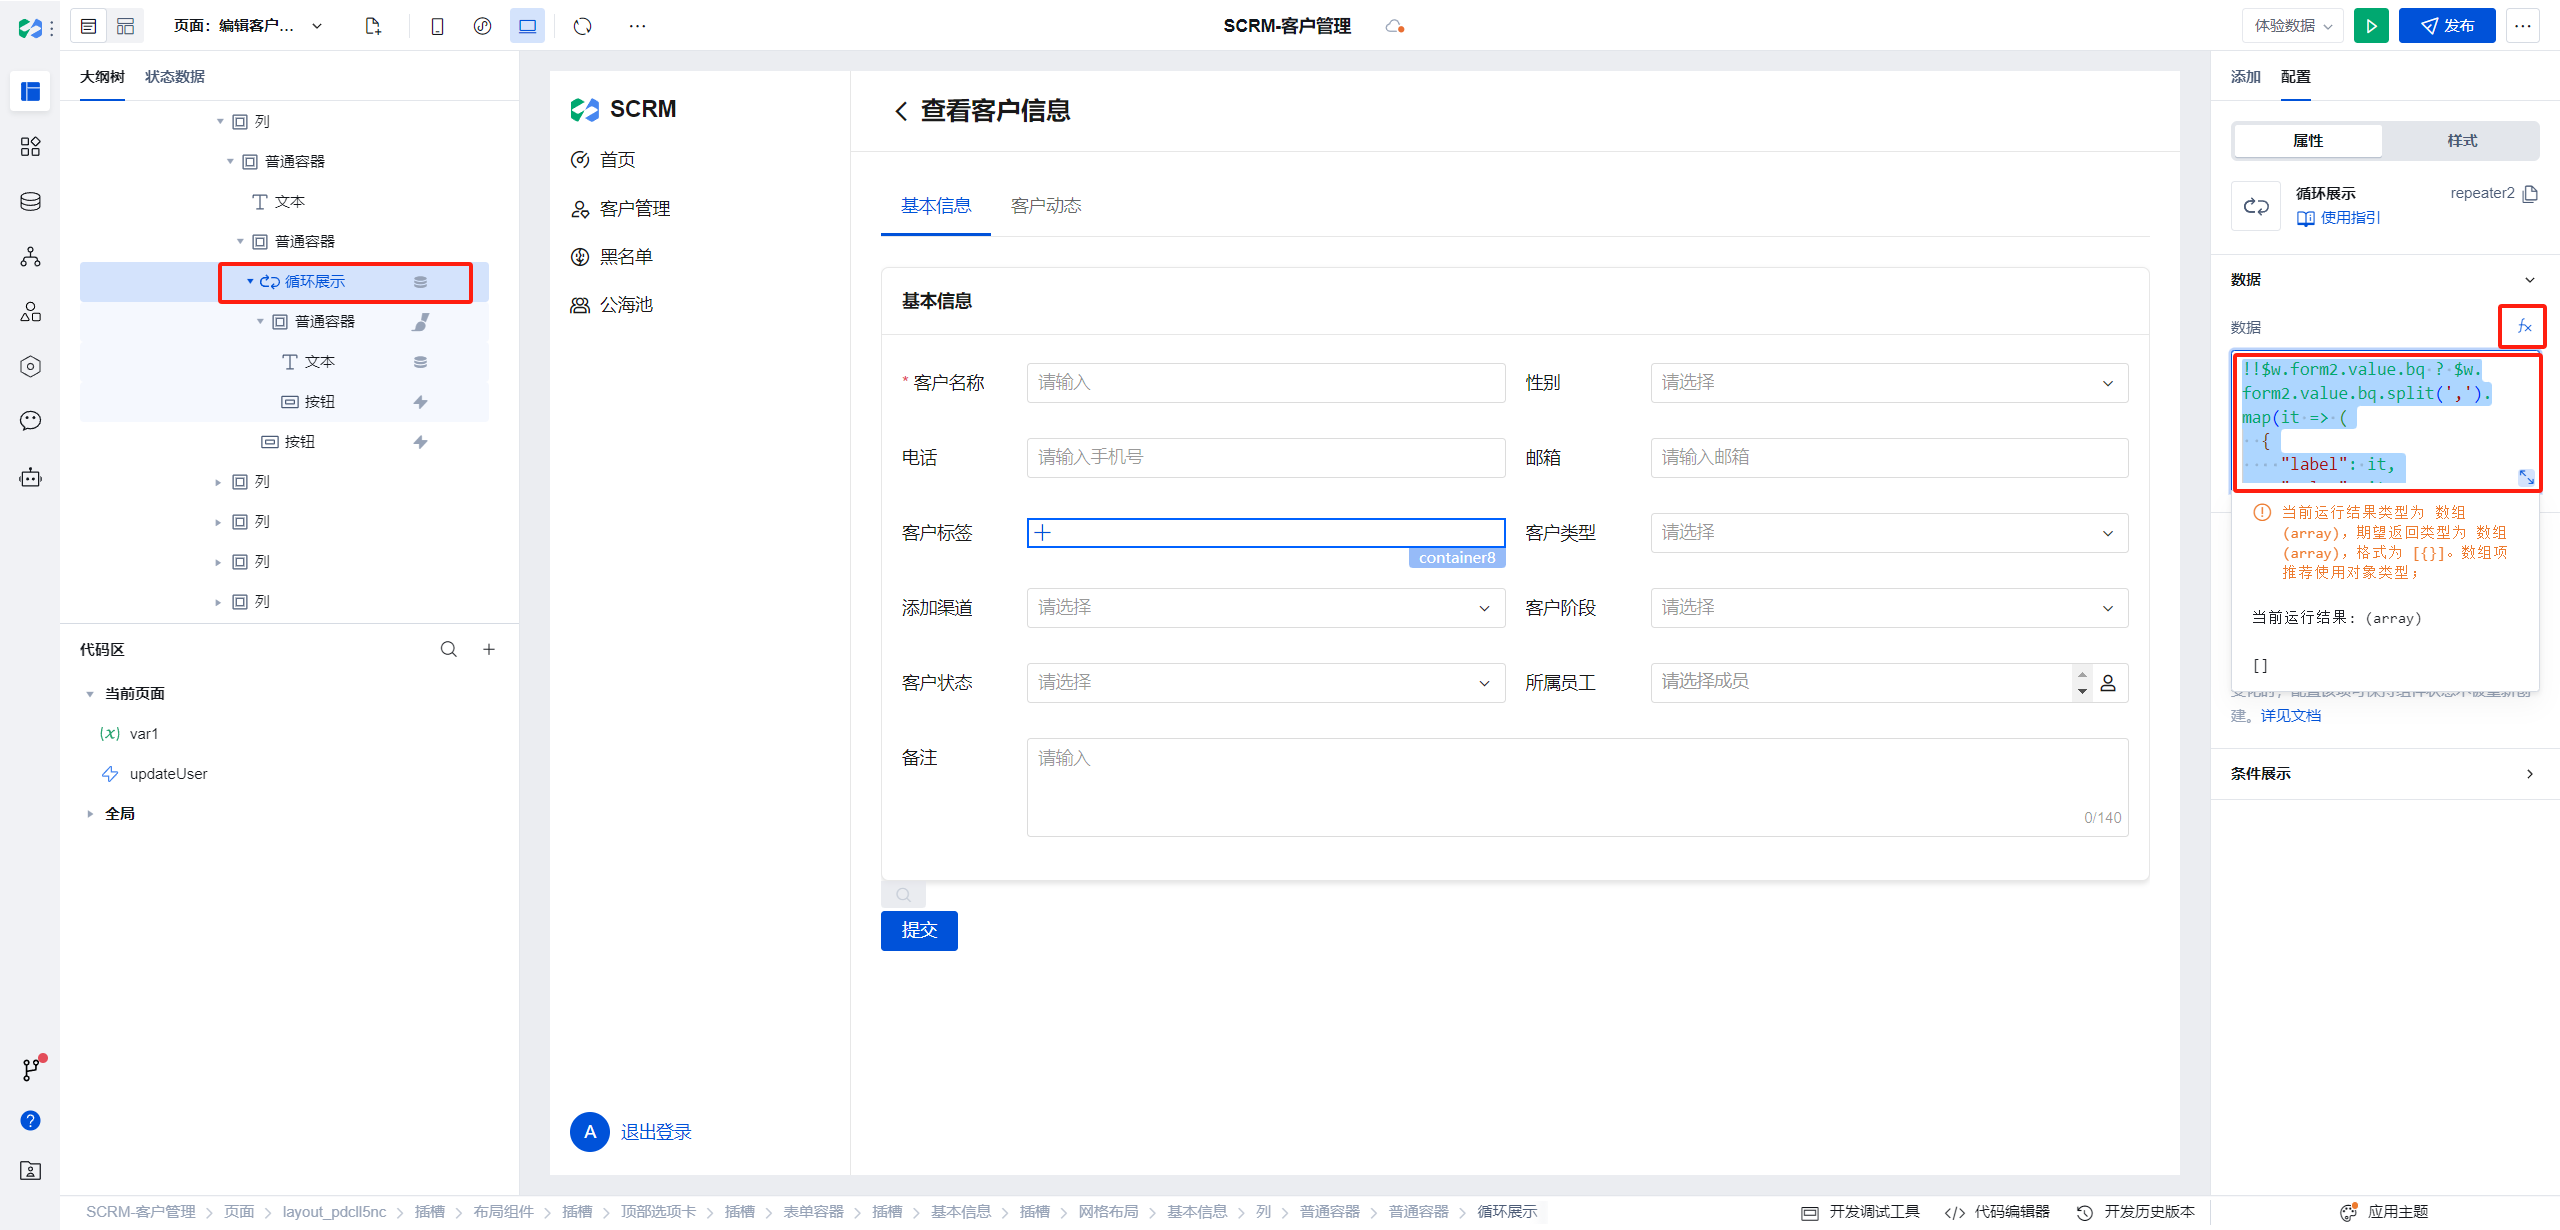
The expression content is as follows:
!!$w.form2.value.bq
  ? $w.form2.value.bq.split(",").map((it) => ({
      label: it,
      value: it,
    }))
  : [];
Clicking the New button requires a pop-up window to fill in the new tag content, consistent with the operation method of the external list. Add a dialog container in the current page.
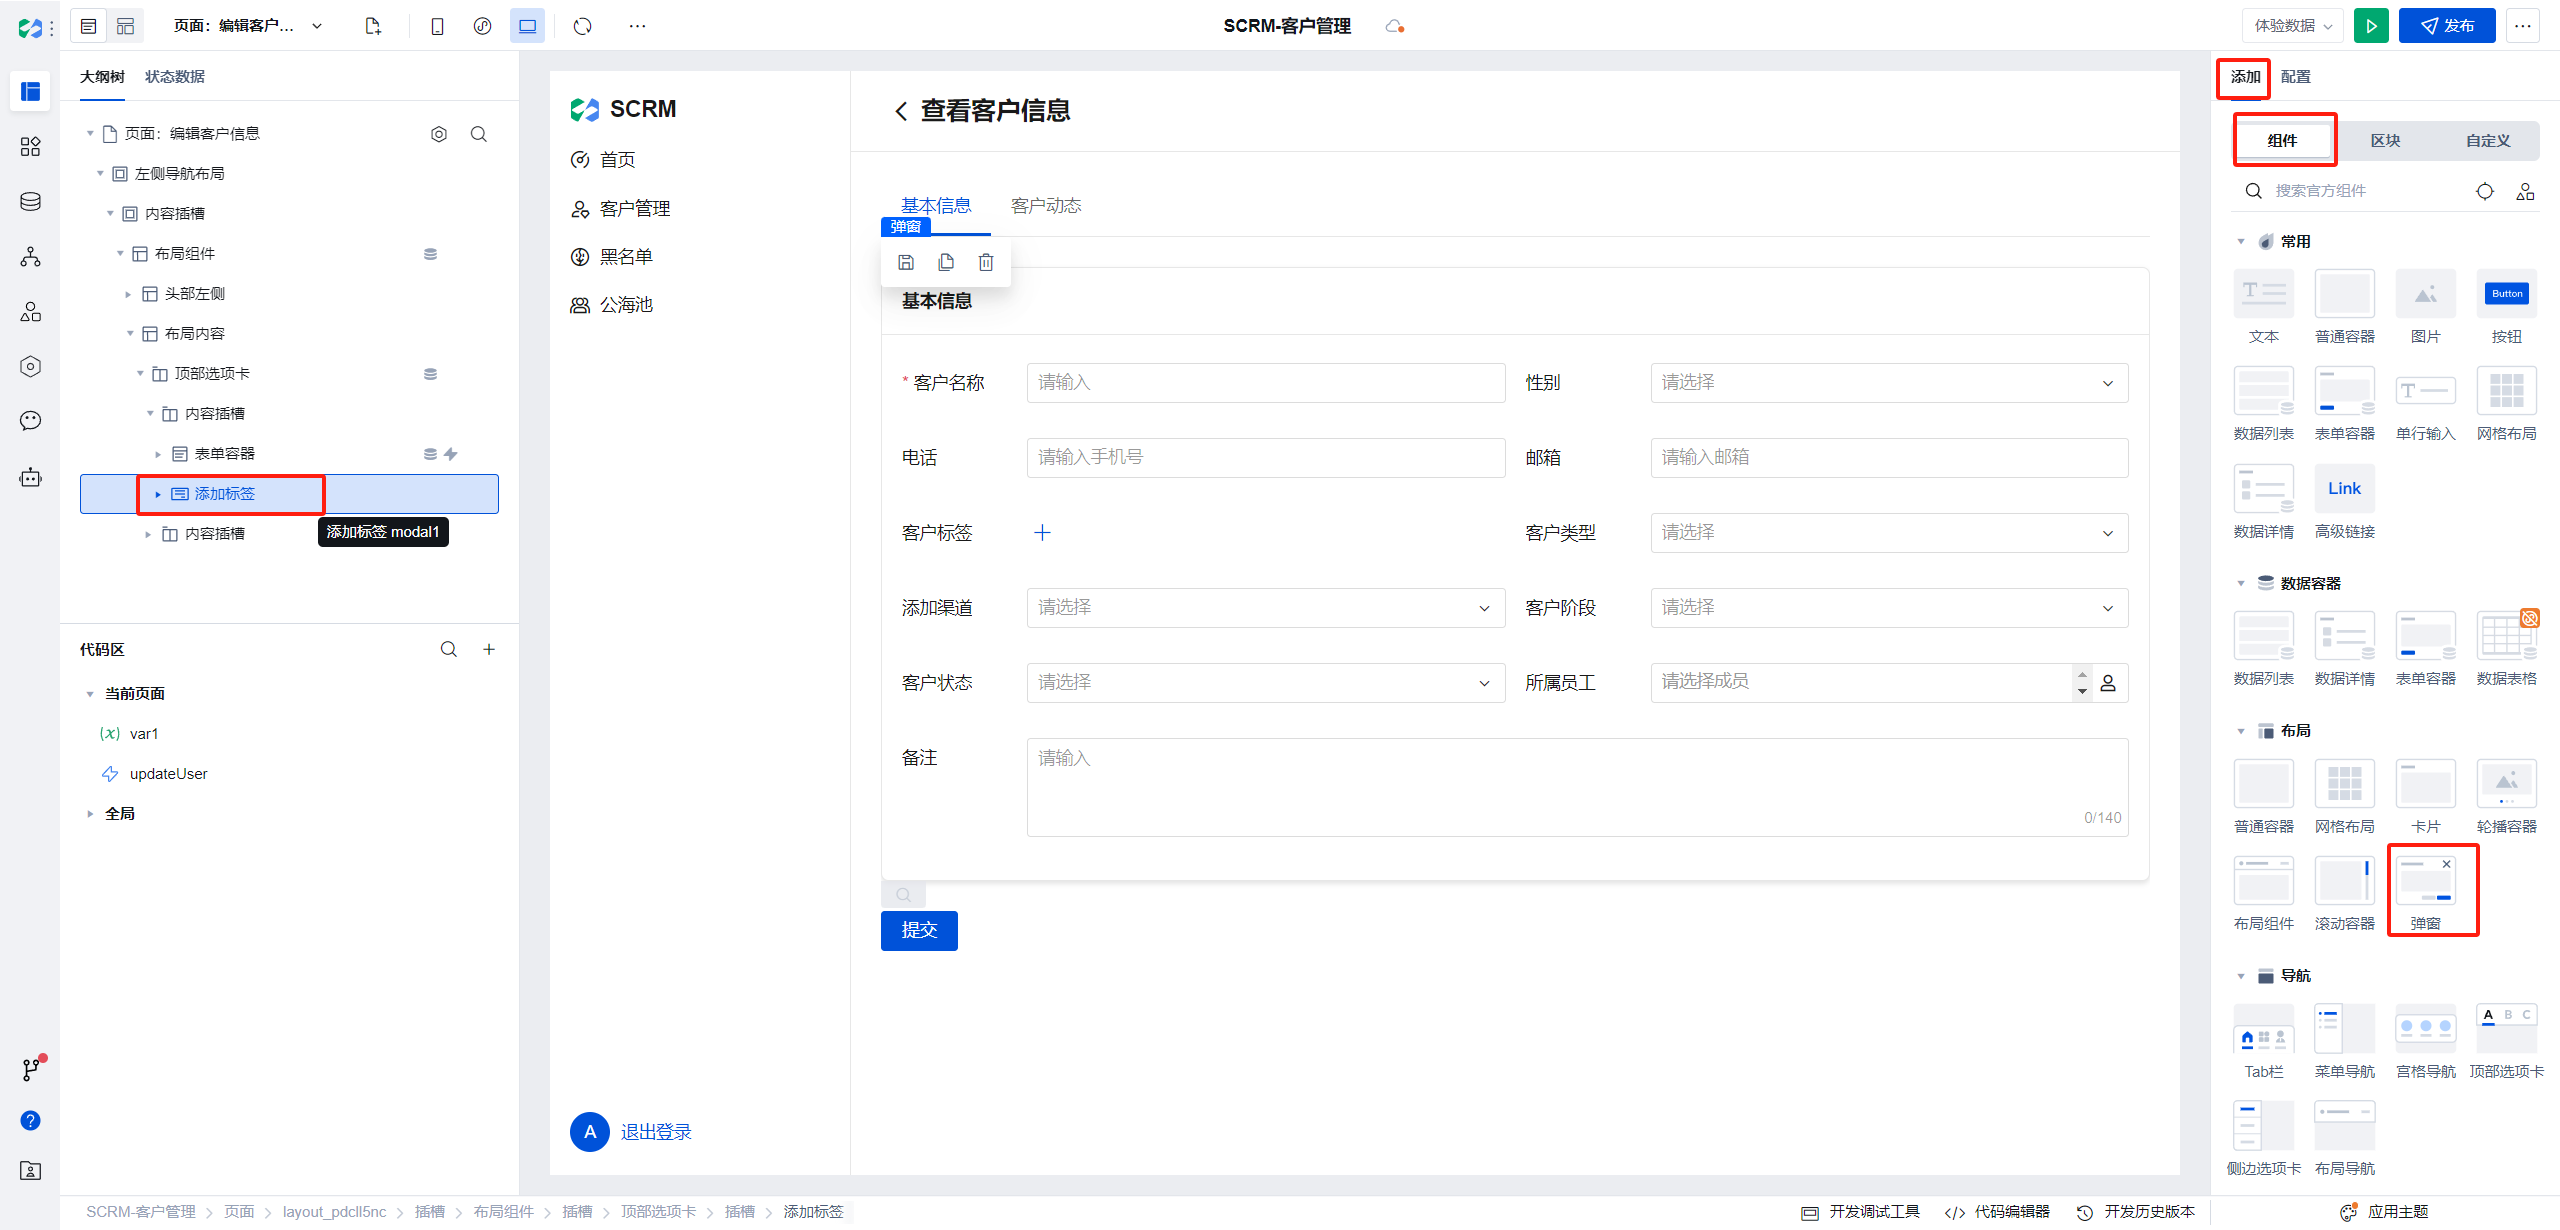
Clicking the New button opens a dialog containing a text field.
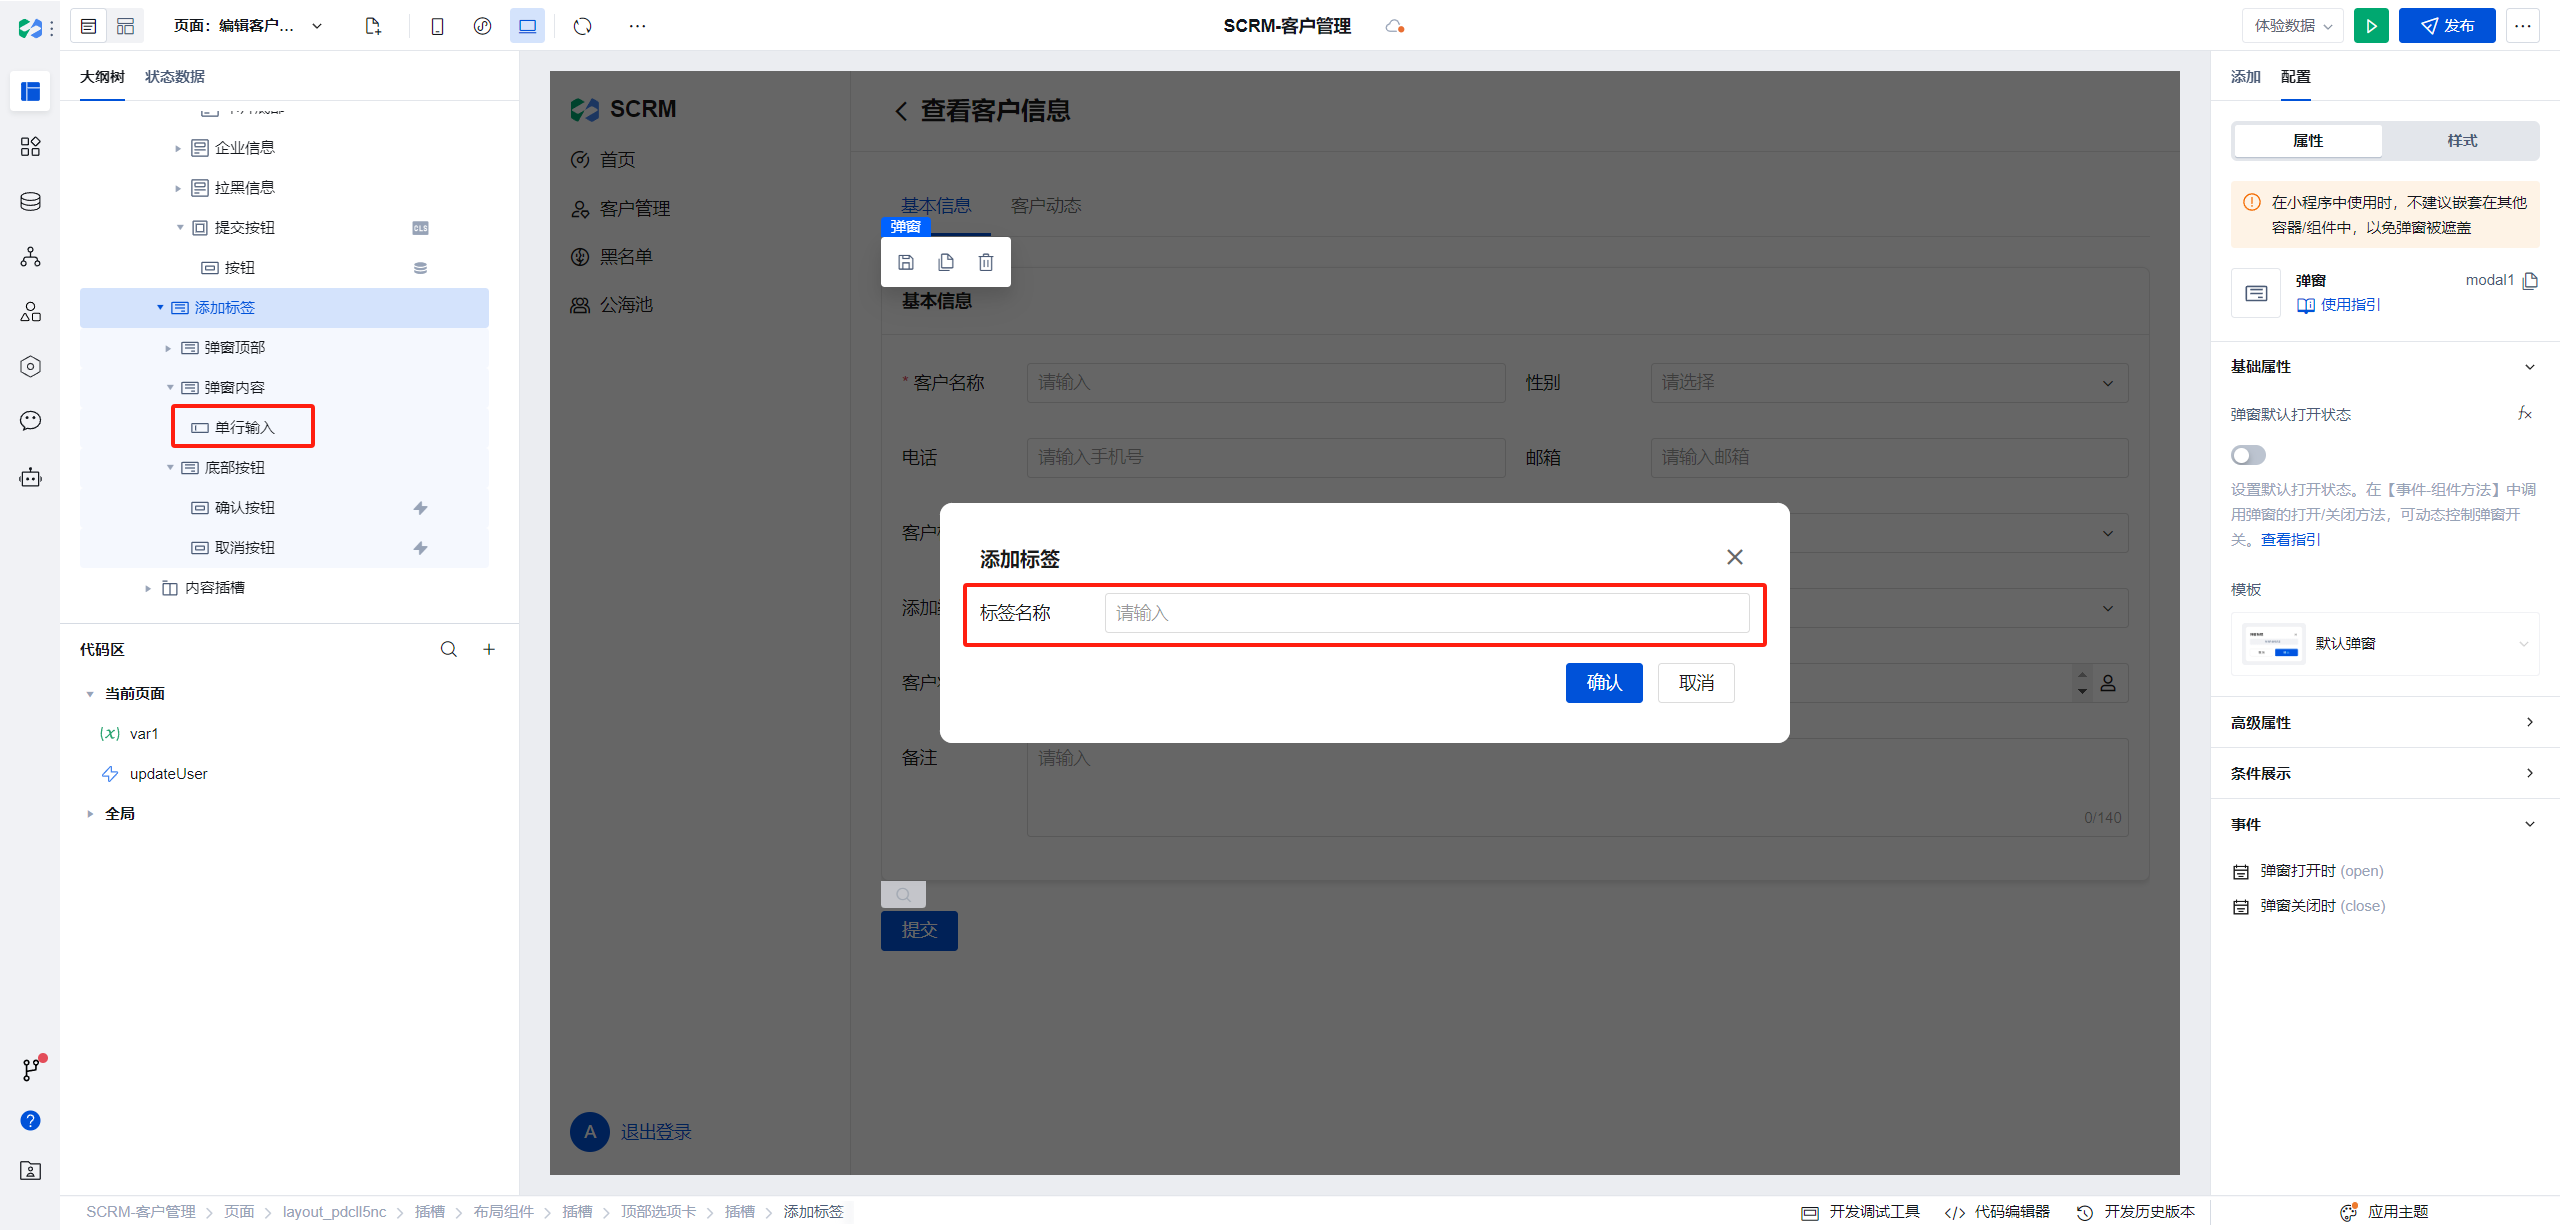
When clicking the confirm button in the dialog, check whether the tag content is filled in. If the check is successful, execute a js script to reassign the value of the tag field in the current form by appending the new tag content.
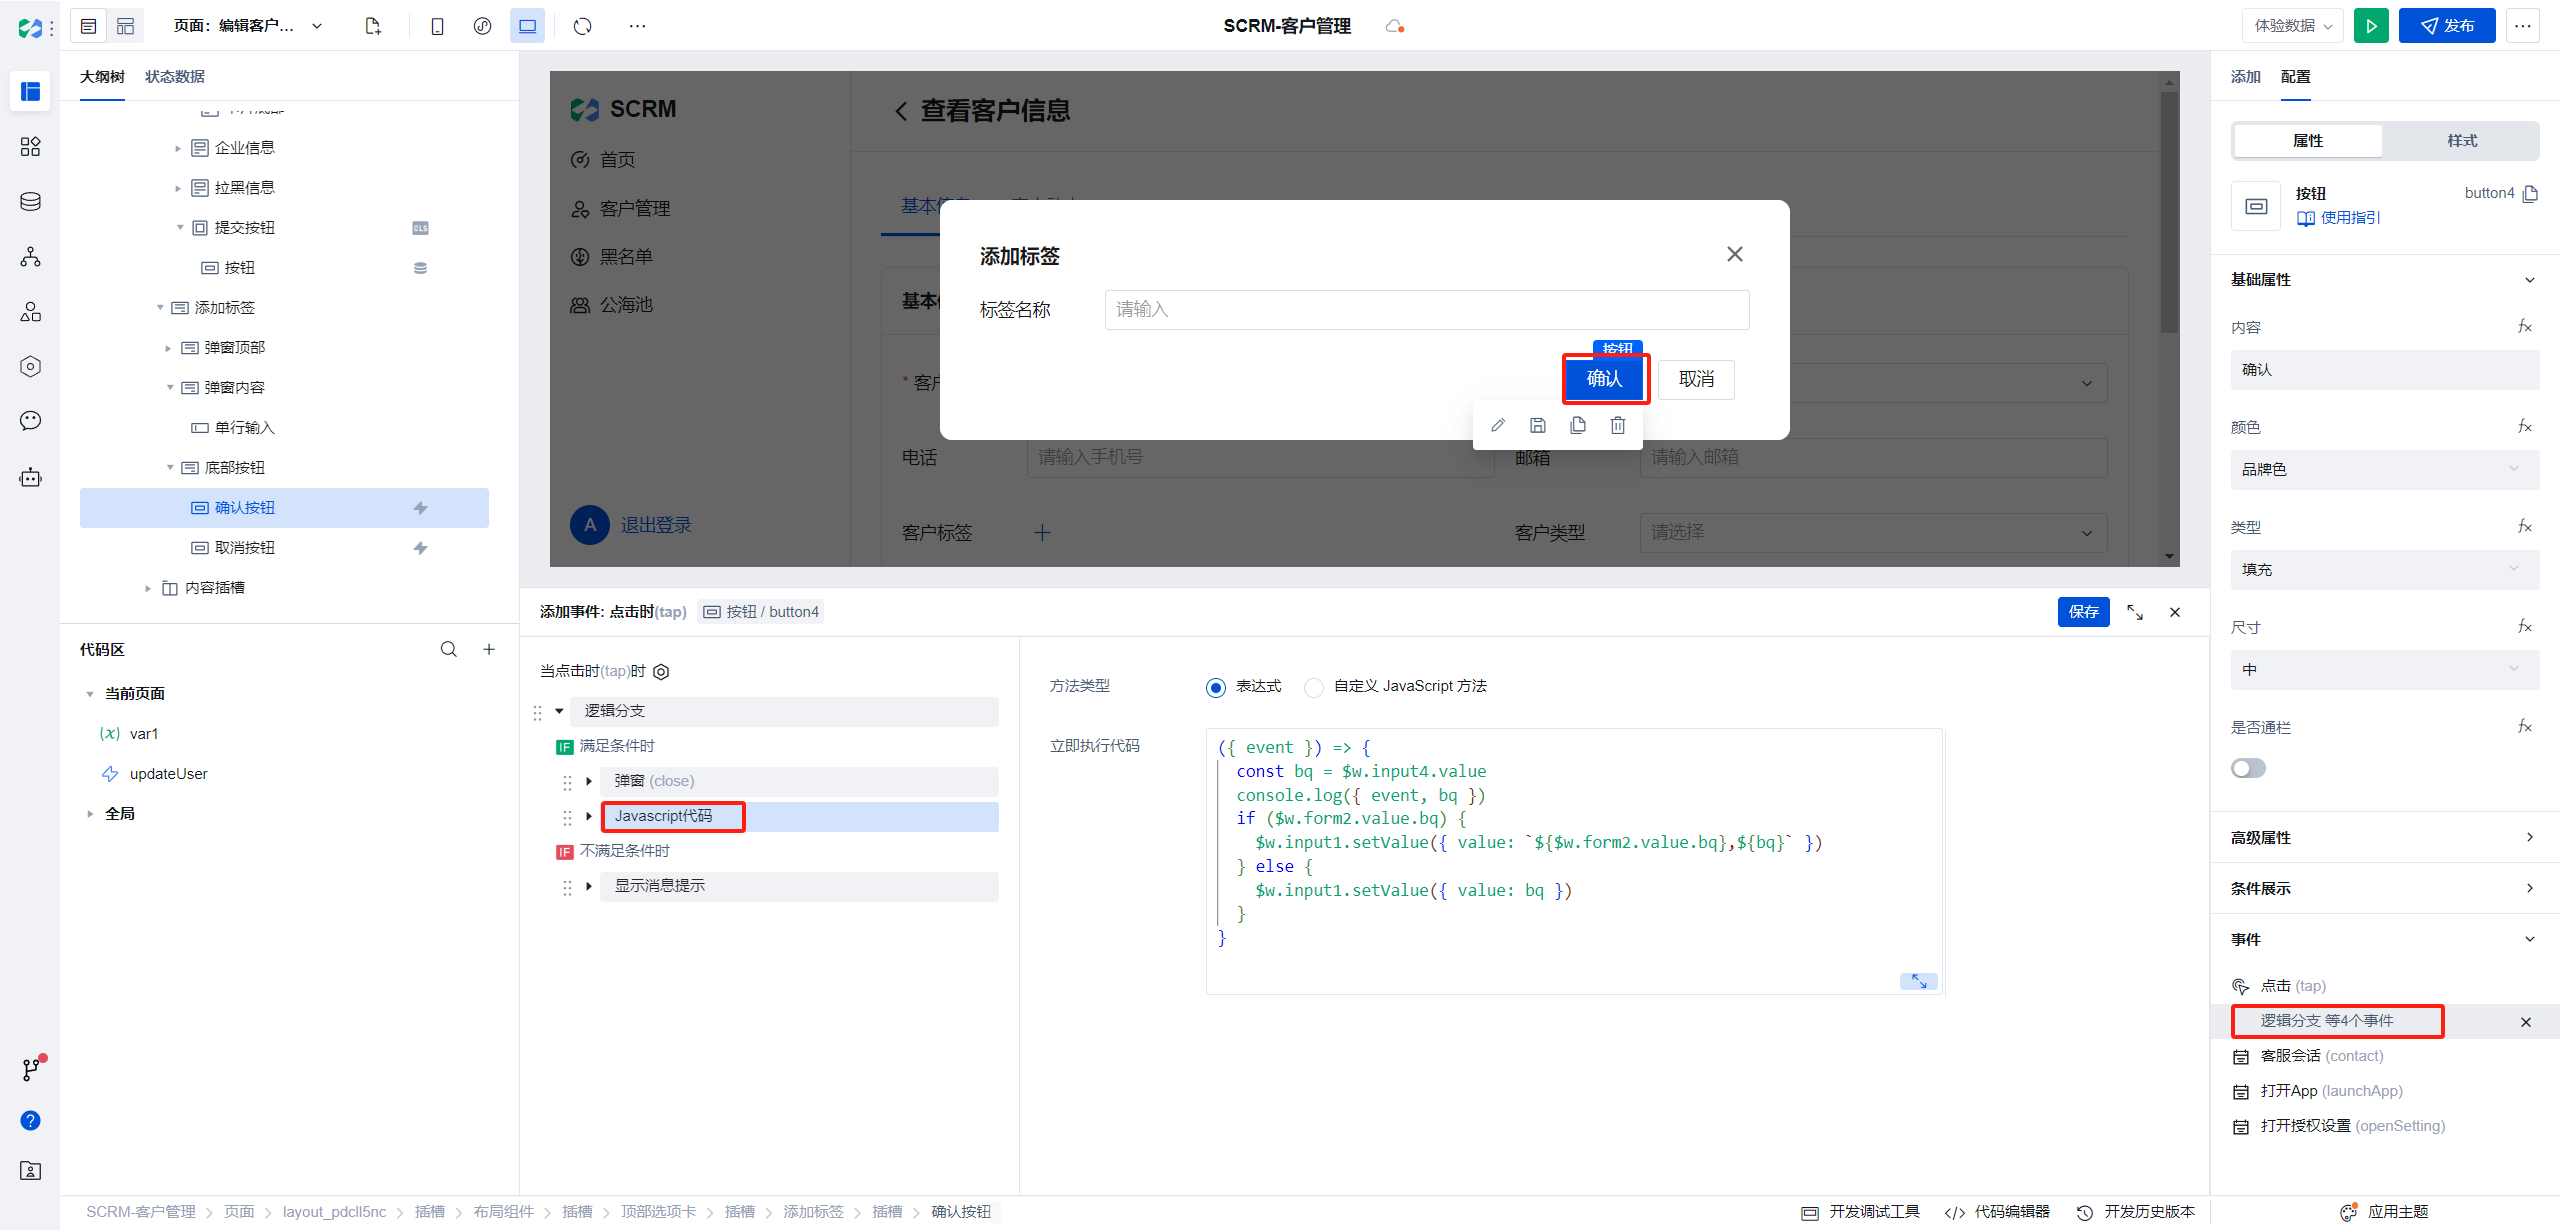
js script as follows:
$w.input4.value is the text content in the dialog
({ event }) => {
  const bq = $w.input4.value;
  if ($w.form2.value.bq) {
    $w.input1.setValue({
      value: `${$w.form2.value.bq},${bq}`,
    });
  } else {
    $w.input1.setValue({
      value: bq,
    });
  }
};
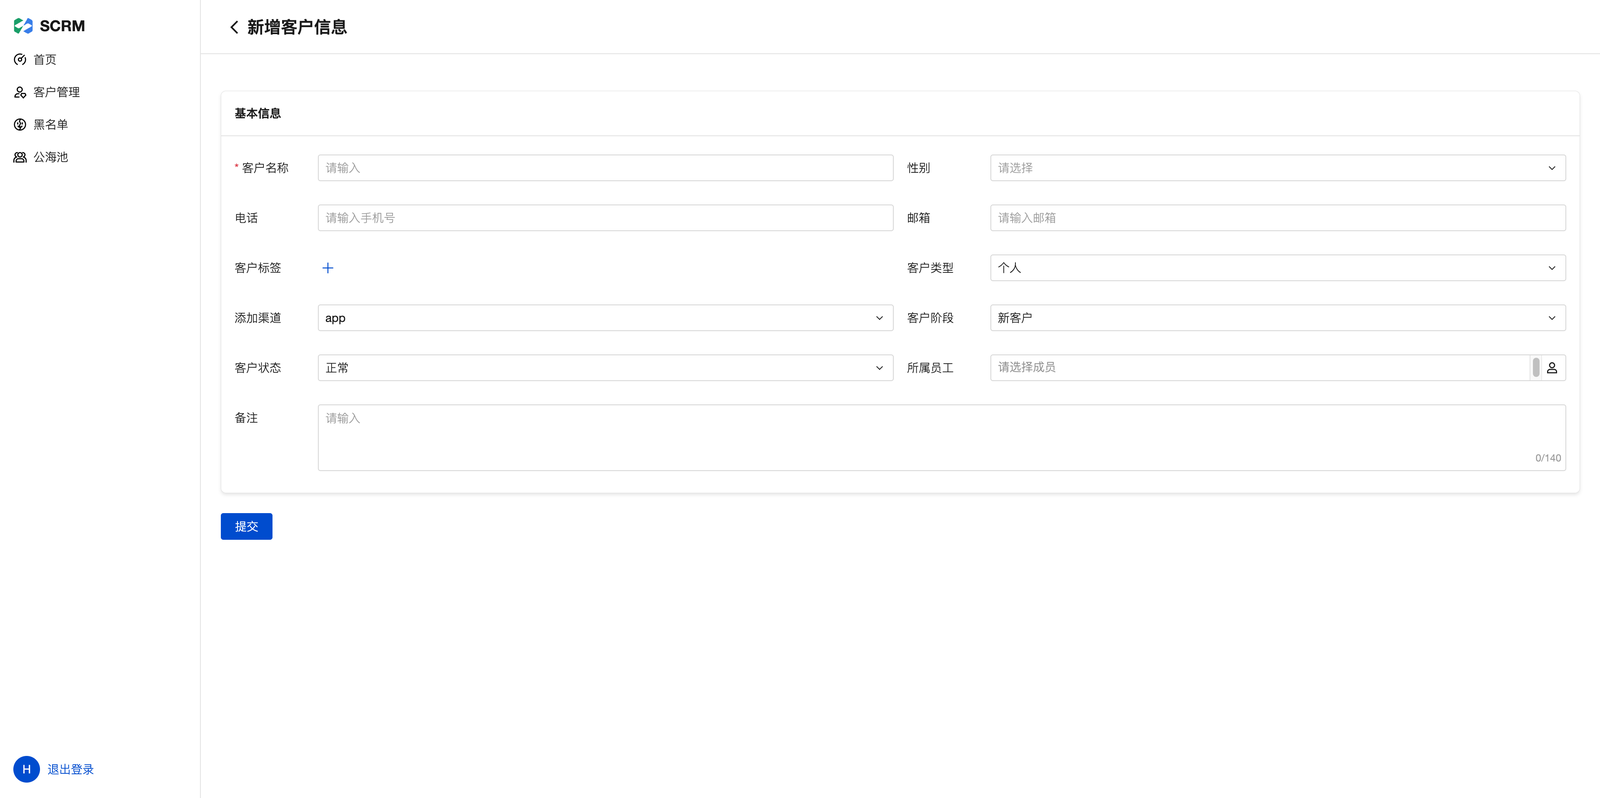
Customer Addition Page
Since the new page does not display customer activities, copy the edit page, delete the tab component, and retain only the main form fields.
Modify the form scenario to addition

Submit event parameters adjusted as follows:
({
  ...$w.form2.submitParams,
  data: {
    ...$w.form2.submitParams.data,
    ssyg: $w.app.common.transSSYG($w.form2.submitParams.data.ssyg),
  },
});
Customer Details Page
The details page is consistent with the edit page, so the edit page can be reused. When clicking "View" in the list to navigate to the details page, choose the edit page and pass formType as read.
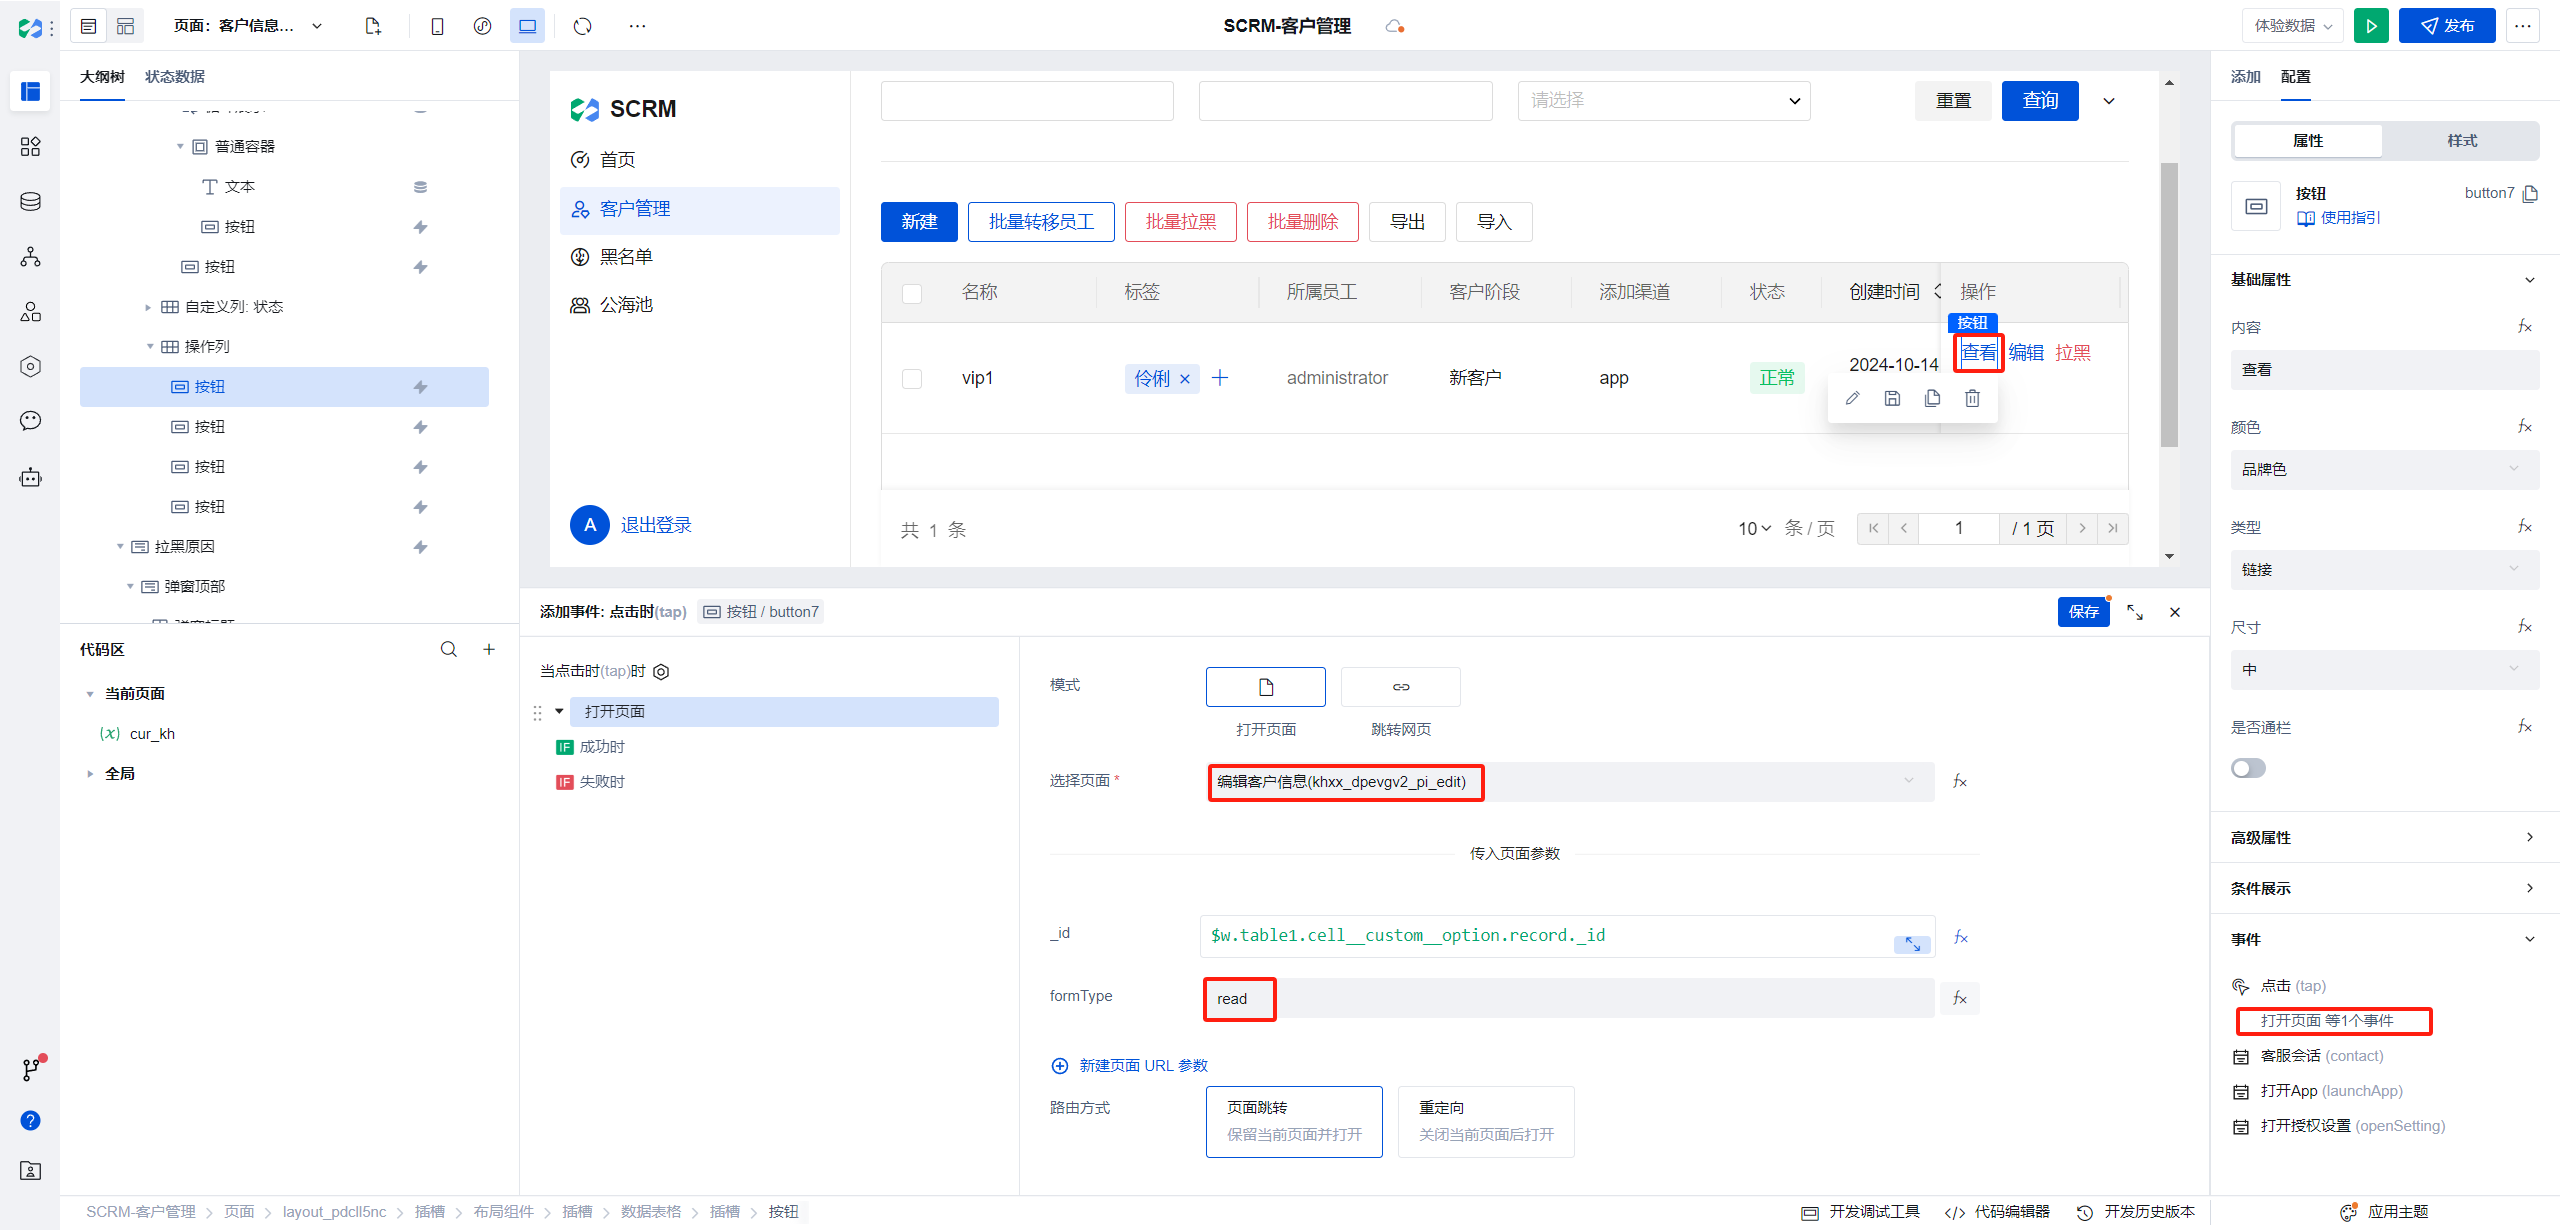
The submit button, tag deletion, and new button in the edit page all require checking that the current form is not in a read-only scenario.
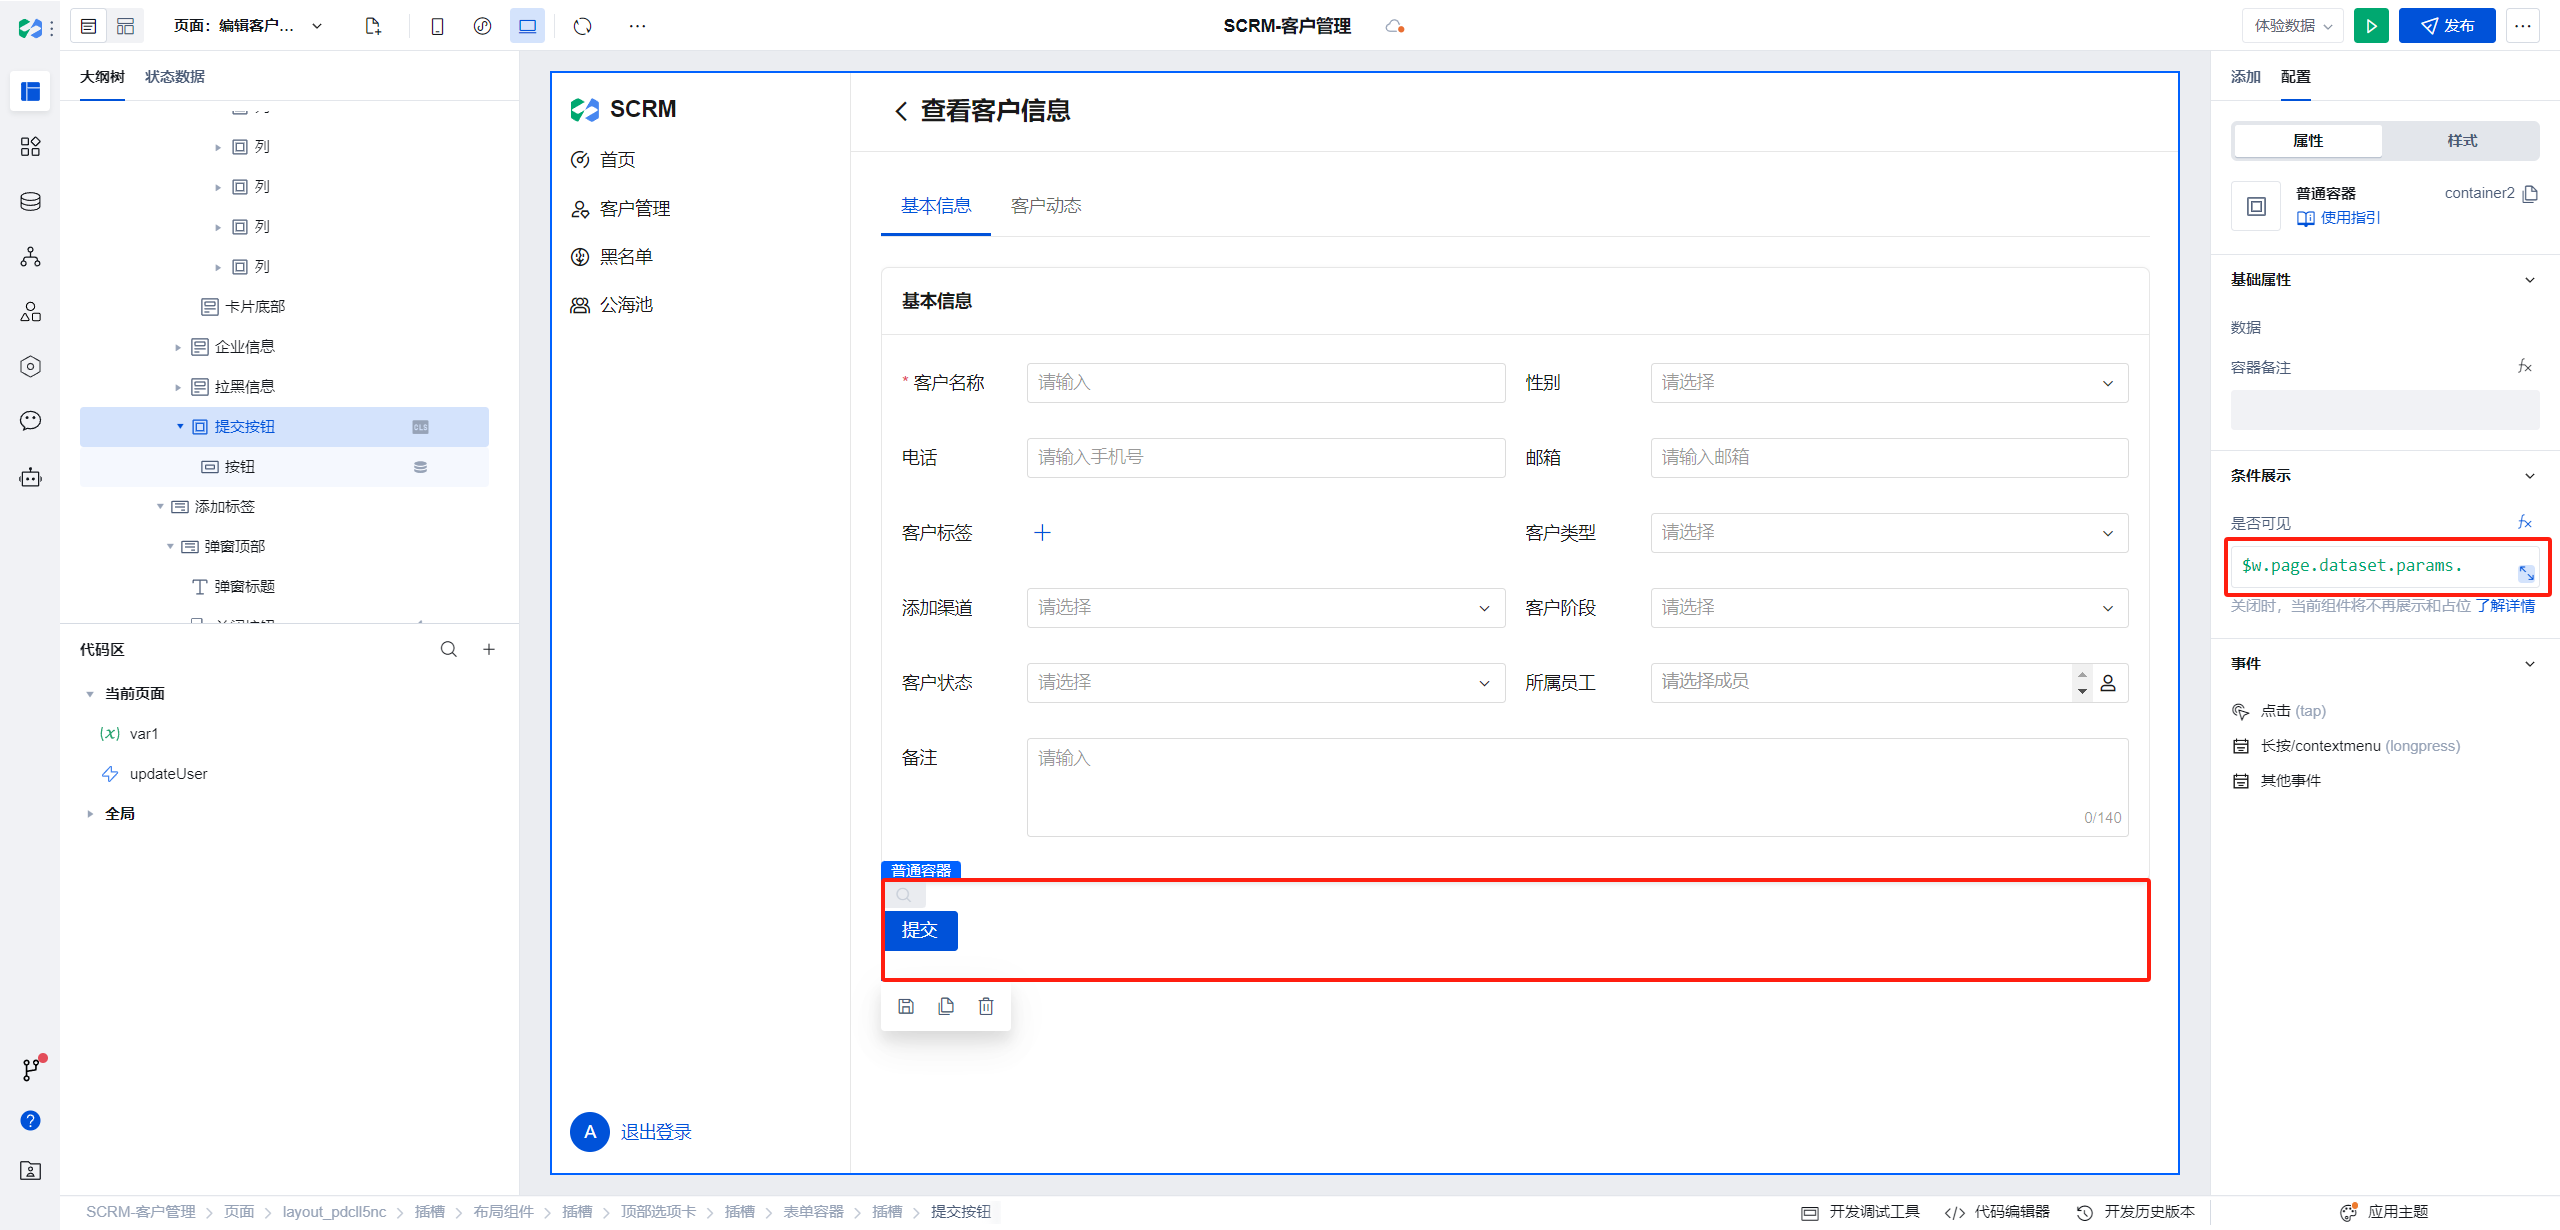
The visibility expression is as follows:
$w.page.dataset.params.formType !== "read";
Customer Statistics
Effect:
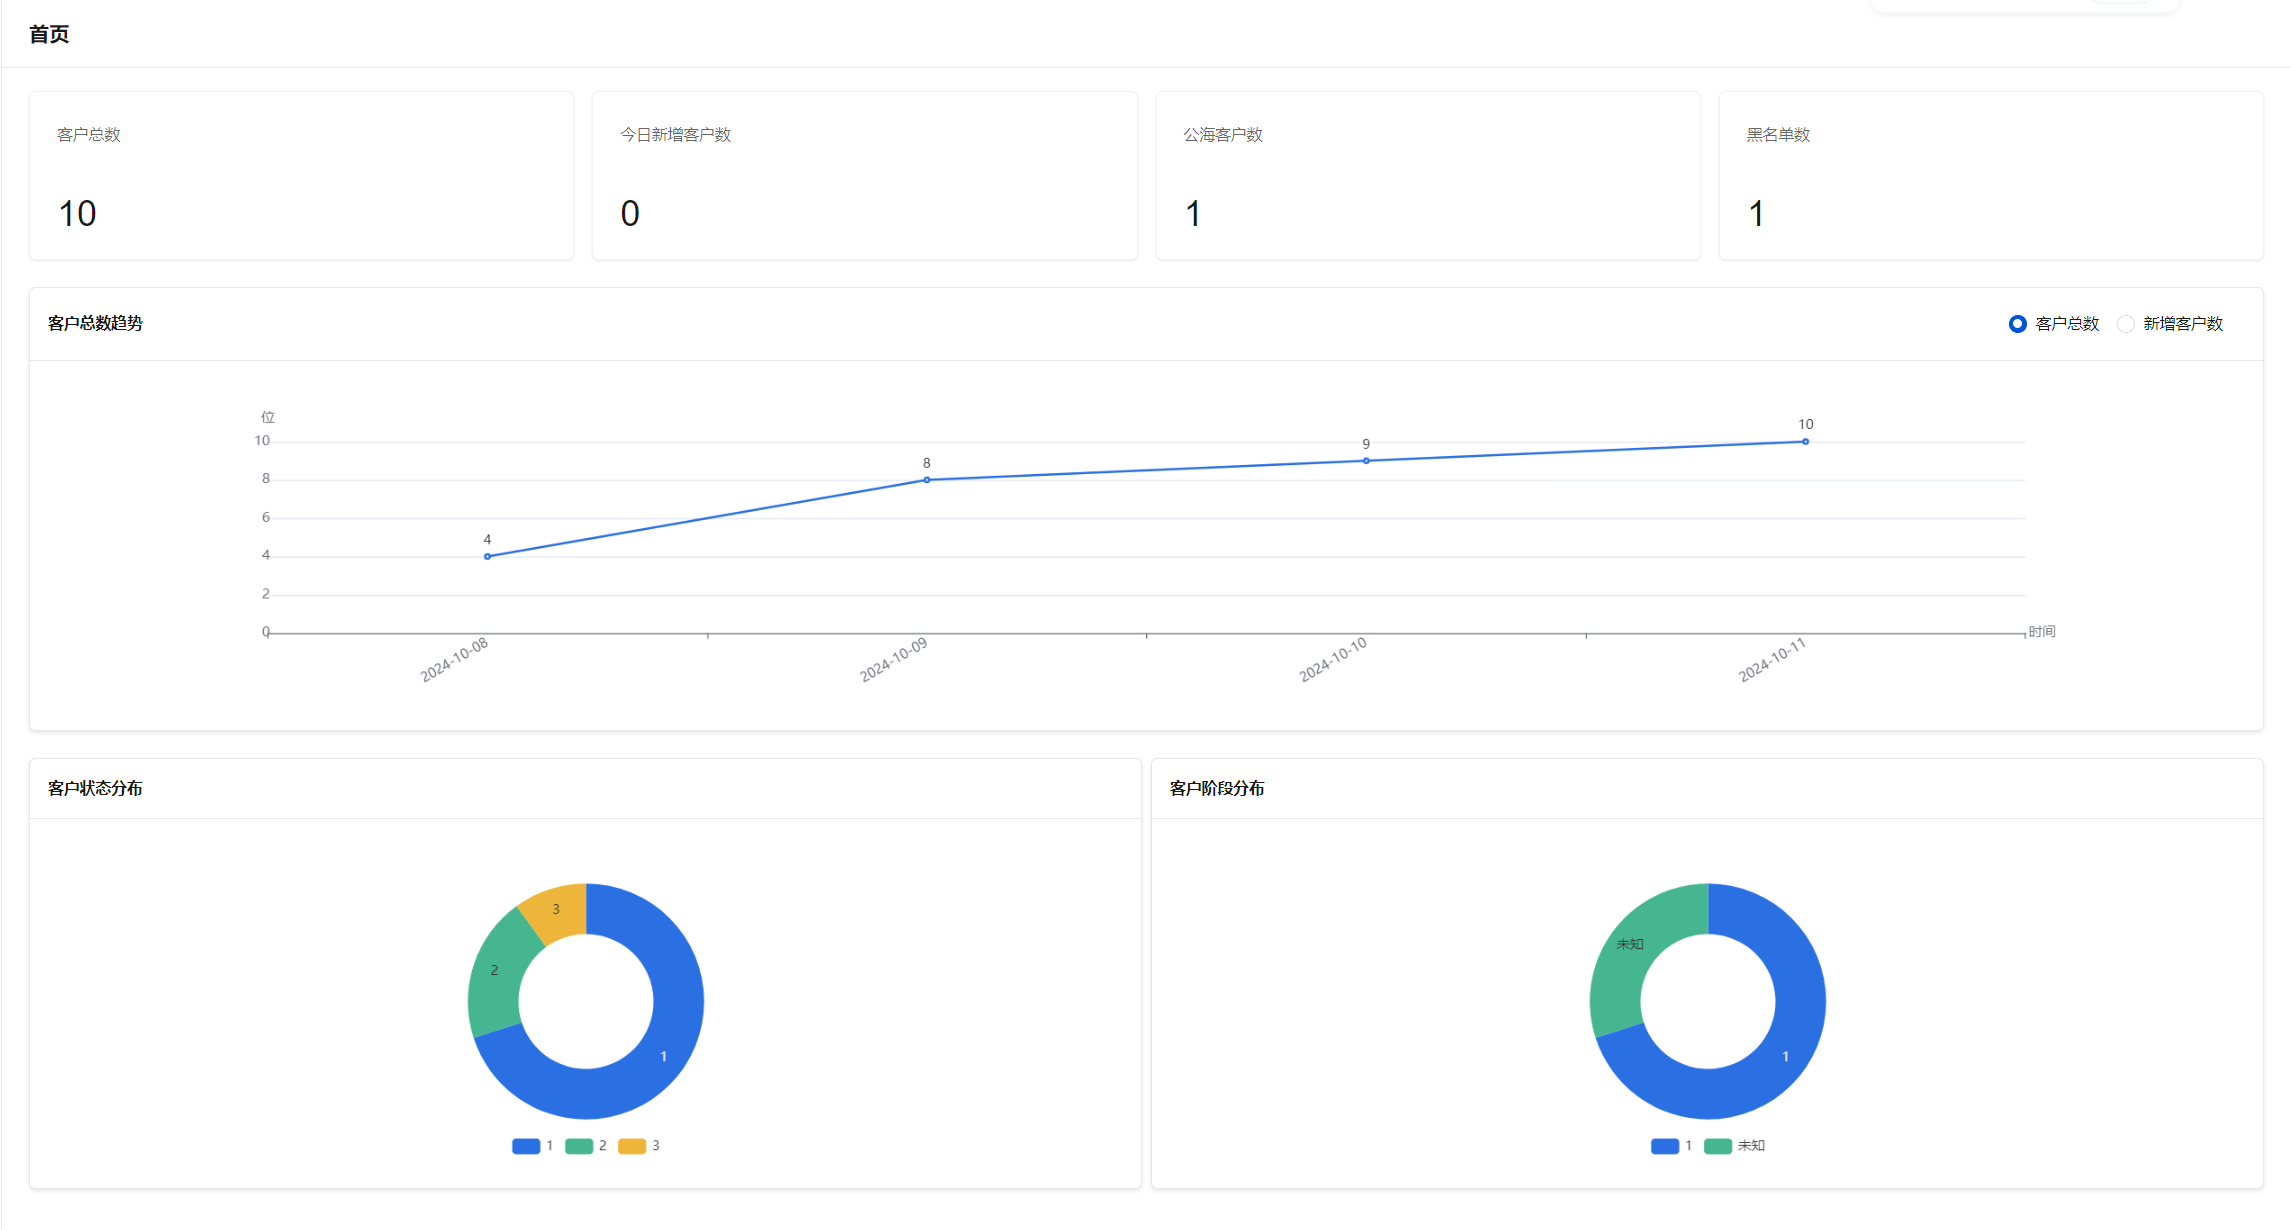
Display customer information in charts for the following dimensions
| Name | Chart Type | Data Source |
|---|---|---|
| Total Customers | Statistical Card | Customer Information/Statistics |
| New Customers Today | Statistical Card | Customer Information/Statistics |
| Customer Count in Public Resource Pool | Statistical Card | Customer Information/Statistics |
| Blocklist Count | Statistical Card | Customer Information/Statistics |
| Total Customers Trend | Line Chart | Custom APIs |
| New Customer Count Trend | Line Chart | Customer Information |
| Customer Status Distribution | Pie Chart | Event Stream/Custom Variables |
| Customer Stage Distribution | Pie Chart | Event Stream/Custom Variables |
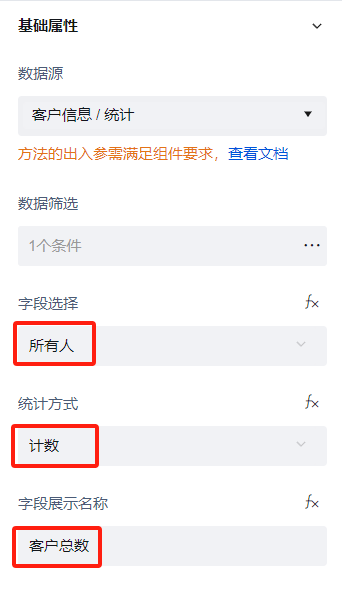
Total Customers
- Use the statistical card component for rendering, with the data source selecting Statistics.
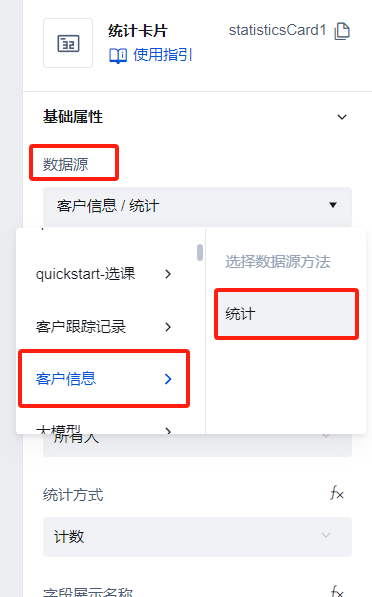
- Filtering rule: we exclude blacklisted users.

- For field selection, we select Everyone, and for the statistical method, select Count.
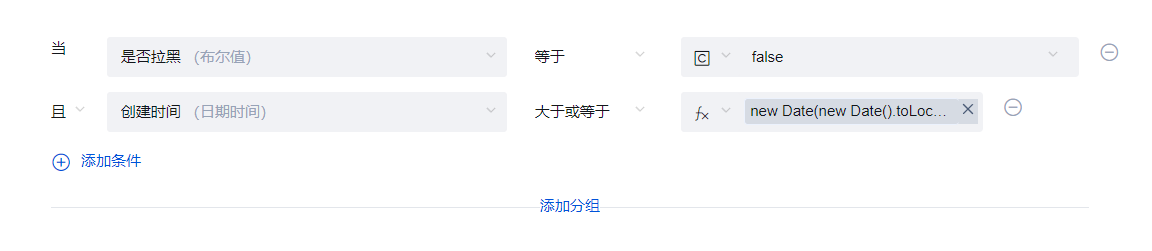
New Customers Today
-
Same as total customers, select the data source as Customer Information Statistics.
-
The filter conditions are:
Creation time greater than 00:00 today,Is Blacklisted: false
Today's 00:00 timestampnew Date(new Date().toLocaleDateString()).getTime()
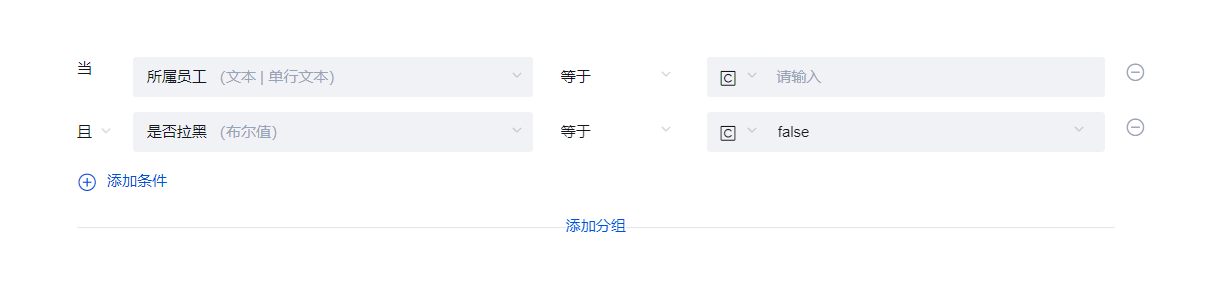
Public Pool Customer Count
- Same as total customers, select the data source as Customer Information Statistics.
- The filter conditions are:
Assigned Employee: emptyandIs Blacklisted: false
Blocklist Count
-
Same as total customers, select the data source as Customer Information Statistics.
-
The filter conditions are:
Is Blacklisted: true

Total Customer Trend
This chart primarily displays the cumulative data of the customer information table based on creation time. Therefore, the table data needs to be processed. Here, custom APIs are used for development, where a new API method is added to process the data using custom code (not currently supported in private cloud).
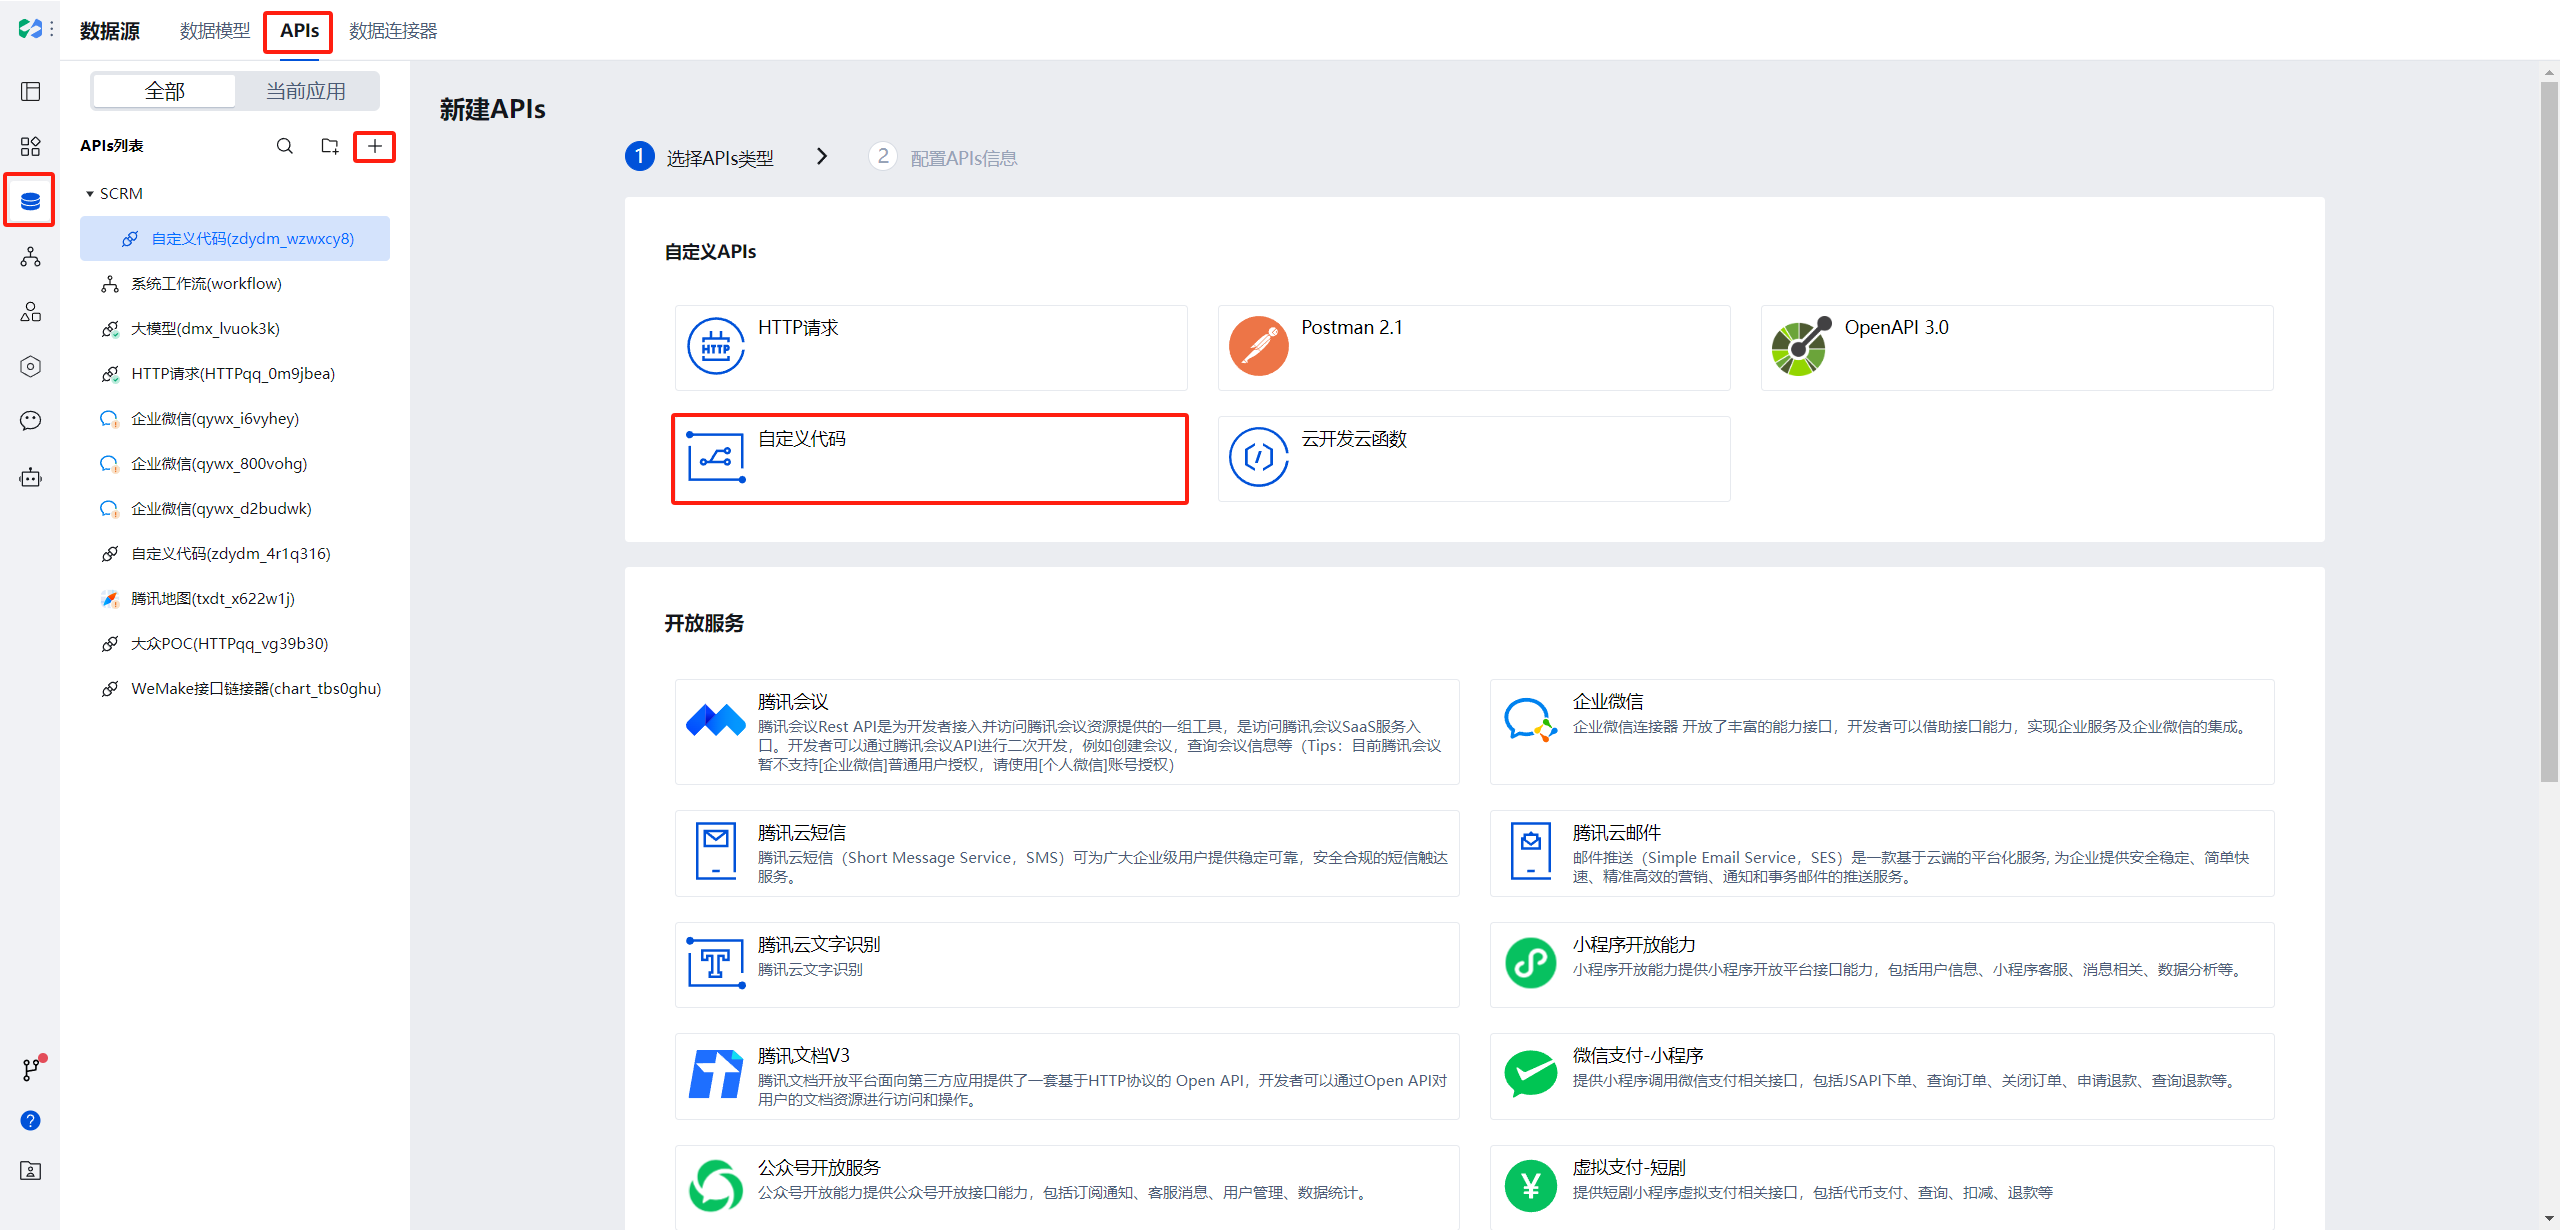
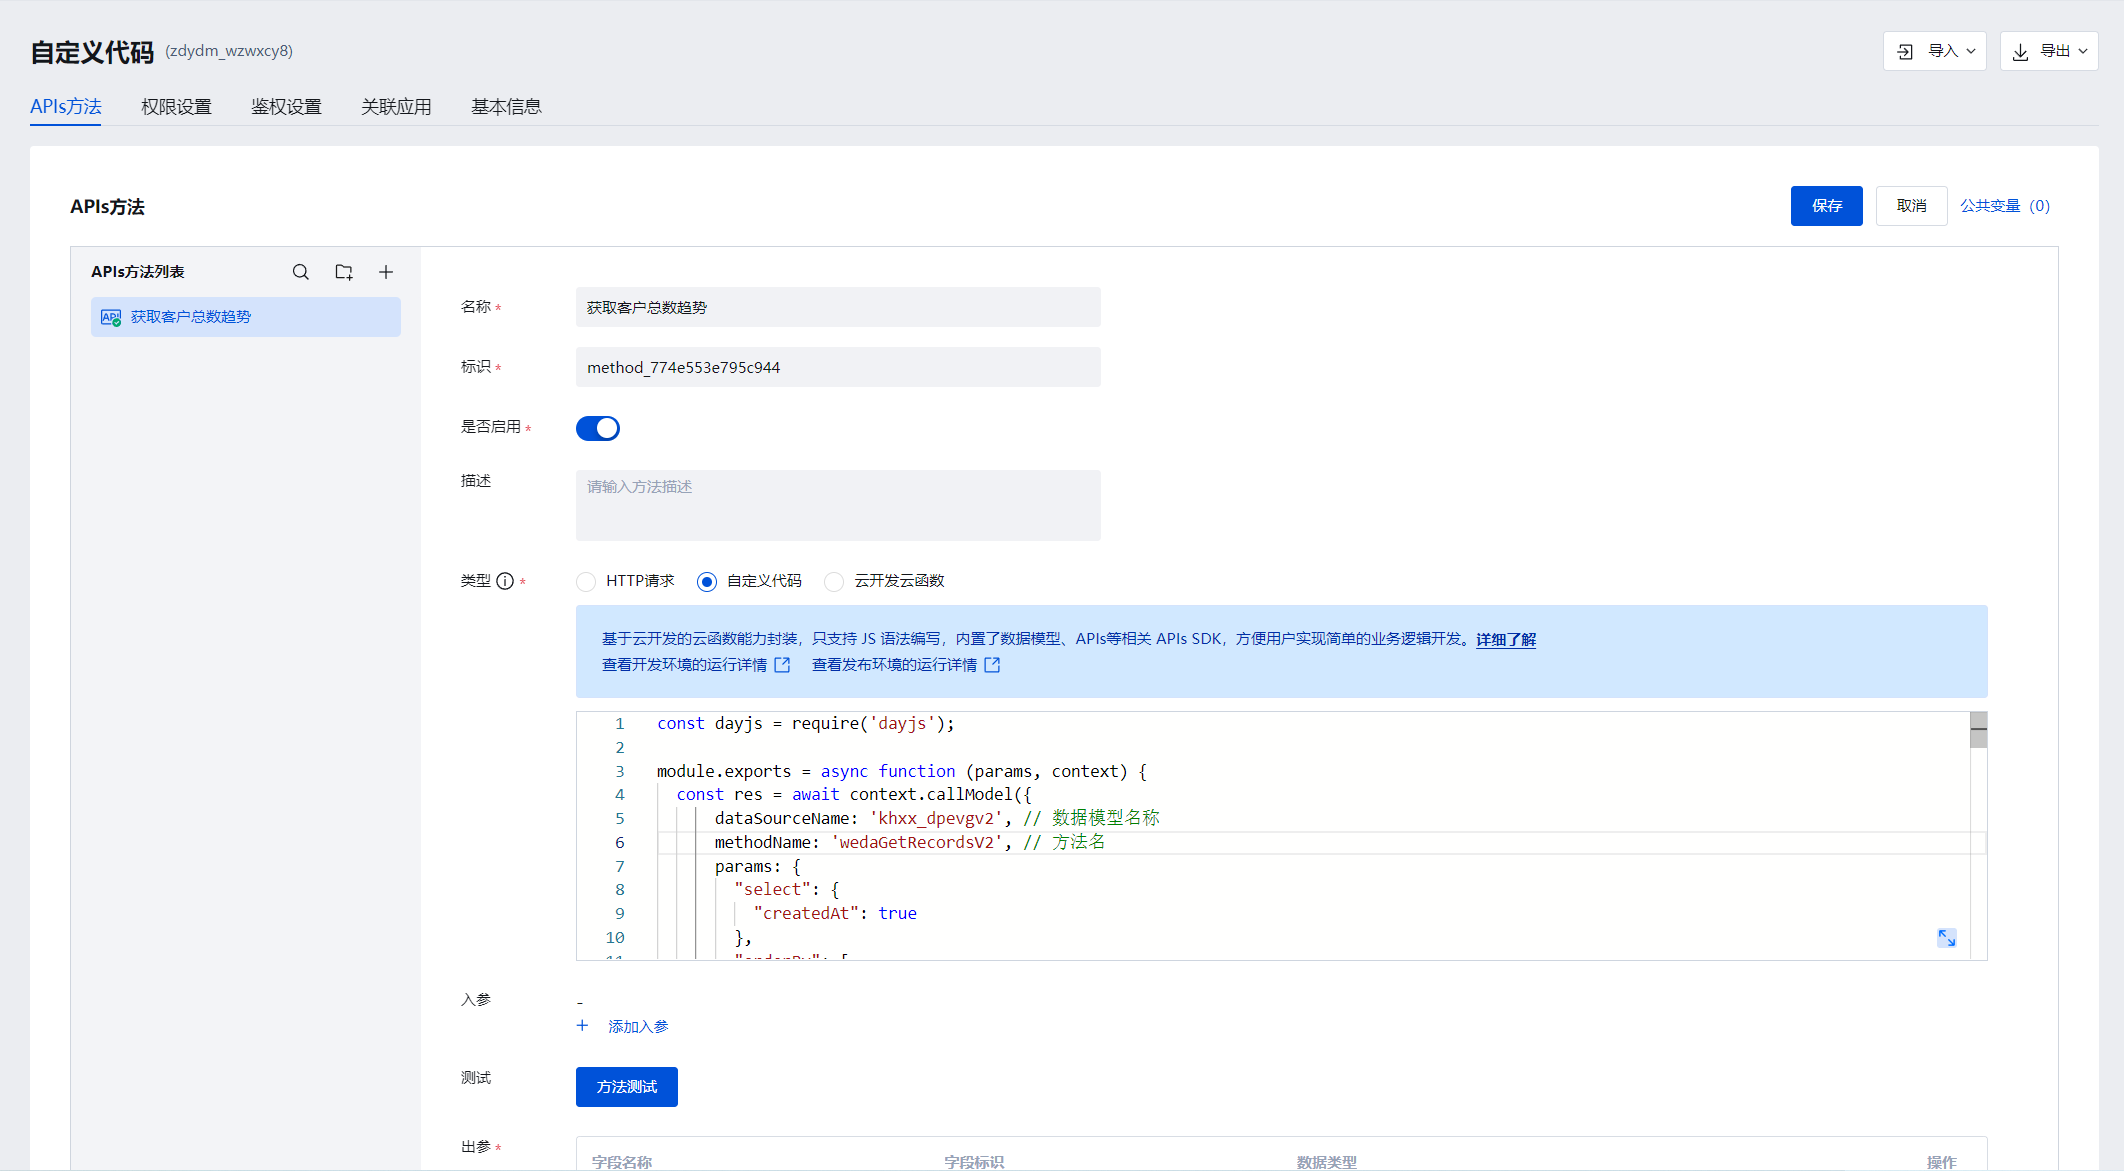
Specific custom code is as follows:
const dayjs = require("dayjs");

module.exports = async function (params, context) {
  const res = await context.callModel({
    dataSourceName: "khxx_dpevgv2", // Data model name
    methodName: "wedaGetRecordsV2", // method name
    params: {
      select: {
        createdAt: true,
      },
      orderBy: [
        {
          createdAt: "asc",
        },
      ],
    },
  });

  const formatStemp = (time) => {
    return dayjs(time).format("YYYY-MM-DD");
  };

  const transData = ({ x, y }) => {
    return {
      XLabel: {
        Value: x,
      },
      YLabels: [
        {
          Name: "Total",
          Value: y,
        },
      ],
    };
  };

  const getX = (data) => {
    return data.XLabel.Value;
  };

  const getY = (data) => {
    return data.YLabels[0].Value;
  };

  const result = res.records.reduce((arr, itm) => {
    if (!arr.length) {
      arr.push(
        transData({
          x: formatStemp(itm.createdAt),
          y: 1,
        })
      );
    } else if (getX(arr[arr.length - 1]) === formatStemp(itm.createdAt)) {
      arr[arr.length - 1].YLabels[0].Value += 1;
    } else {
      arr.push(
        transData({
          x: formatStemp(itm.createdAt),
          y: getY(arr[arr.length - 1]) + 1,
        })
      );
    }
    return arr;
  }, []);

  return {
    result,
  };
};
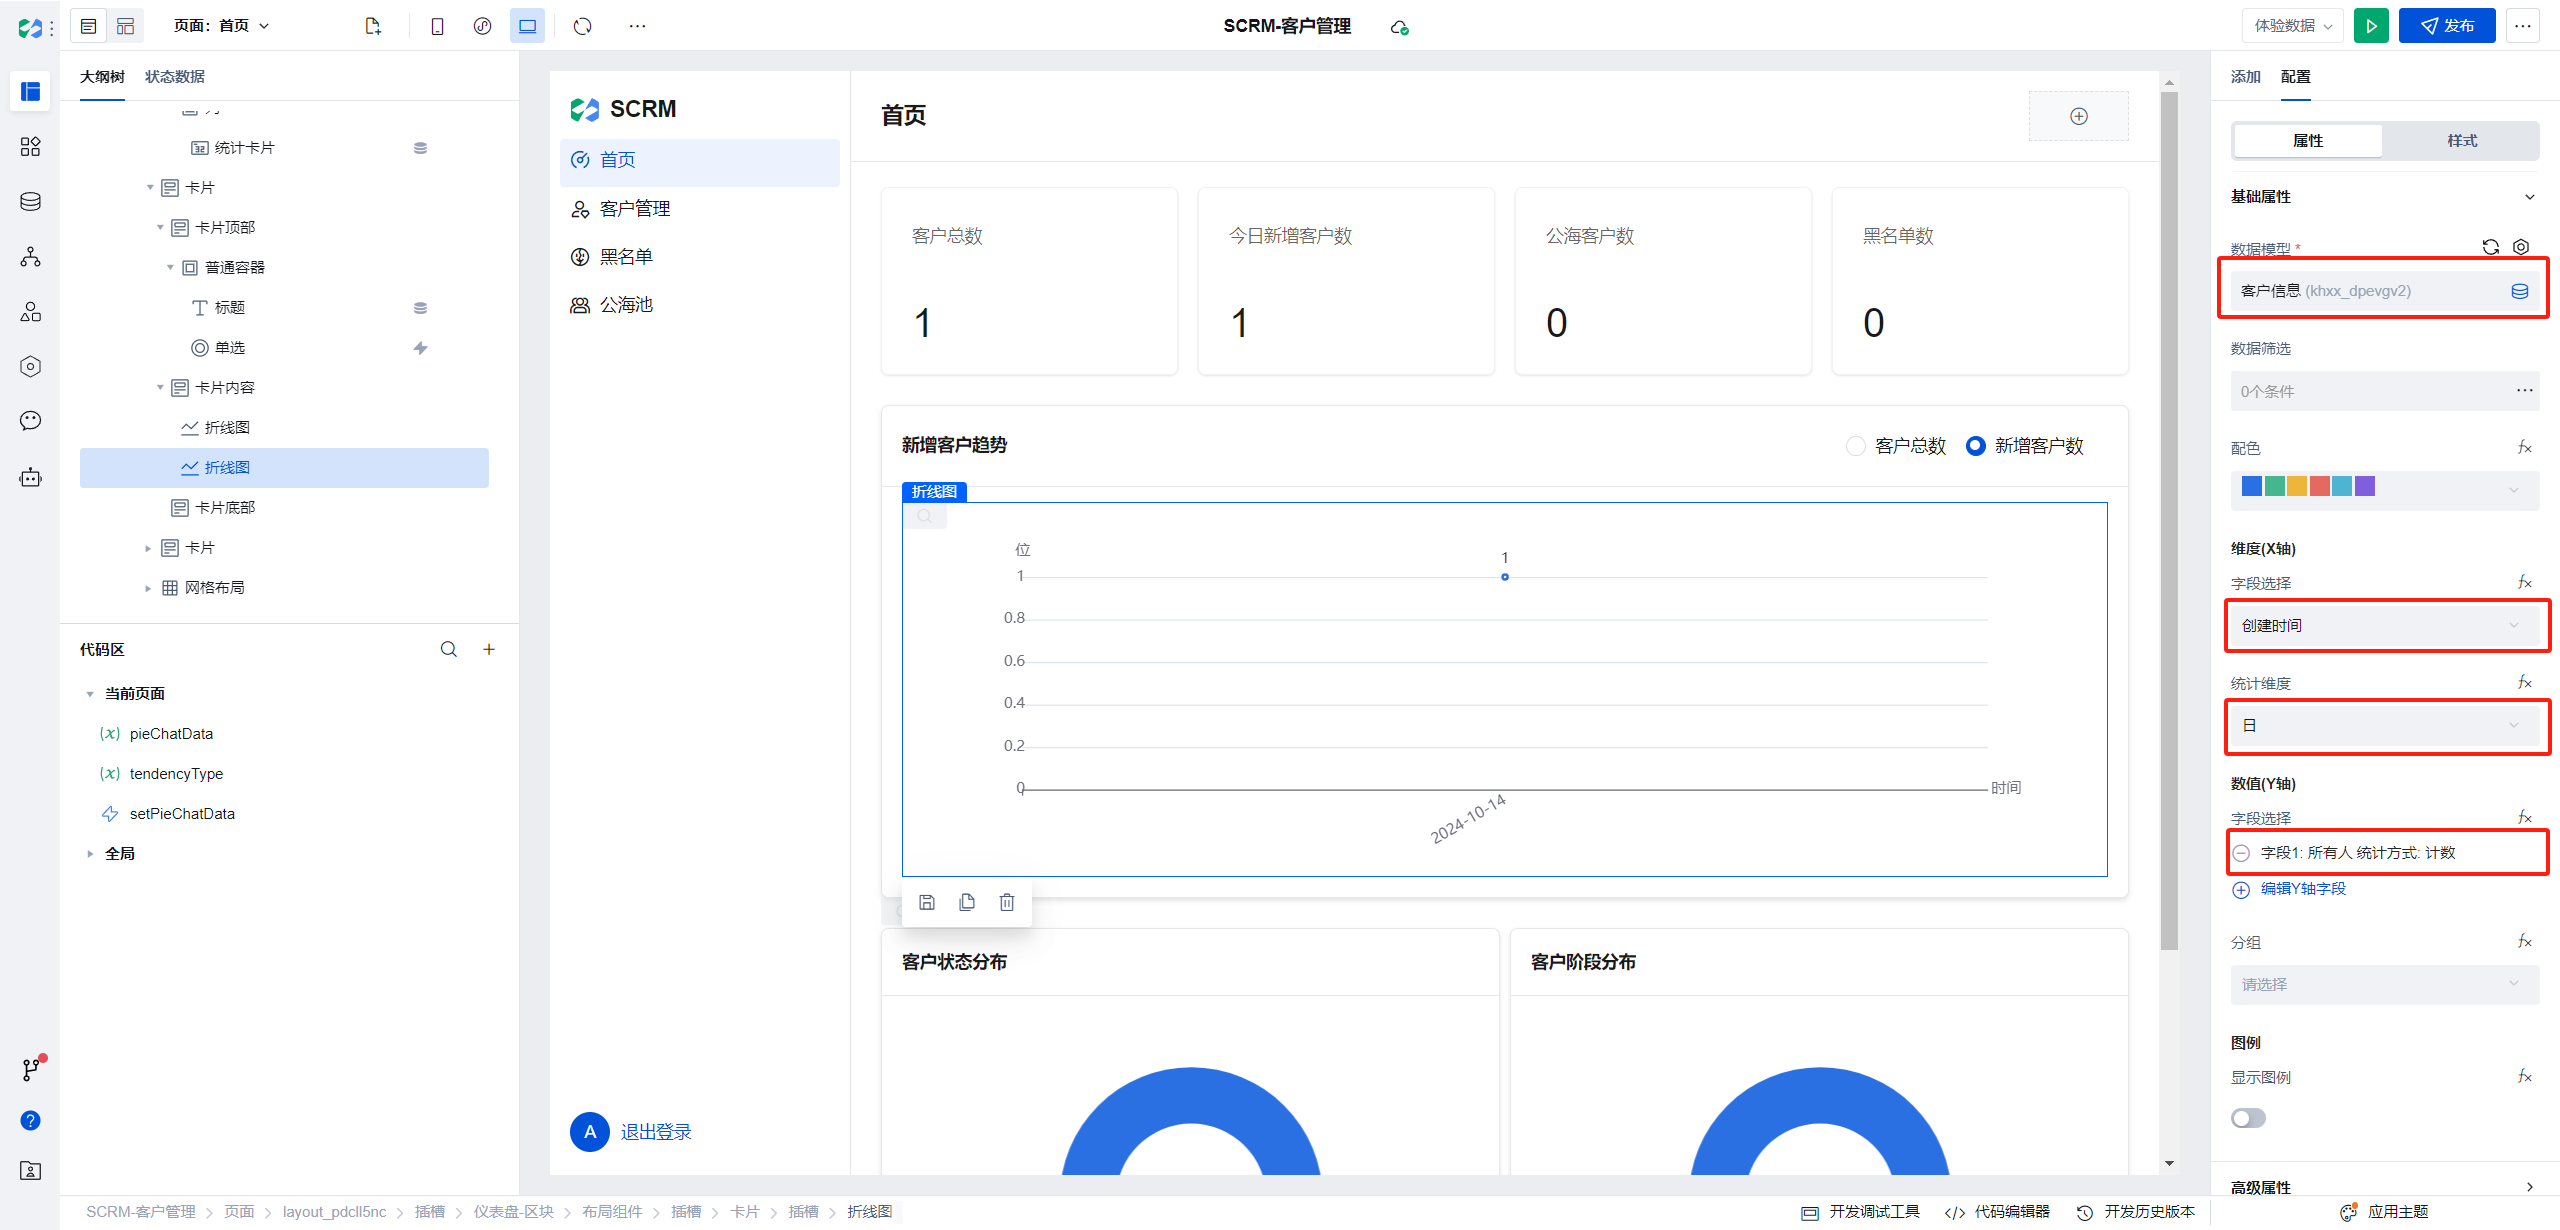
New Customer Trend
This chart needs to display data accumulated daily based on creation time. Therefore, a line chart can be used directly. Select the x-axis dimension as creation time and the y-axis statistical method as count.
Customer Status Distribution / Customer Stage Distribution
This chart requires translating the status and customer stage fields (both are enums), then performing statistical counts on the customer information table data based on status and stage.
Operation steps are as follows:
- Create a new object variable on the current page: pieChatData
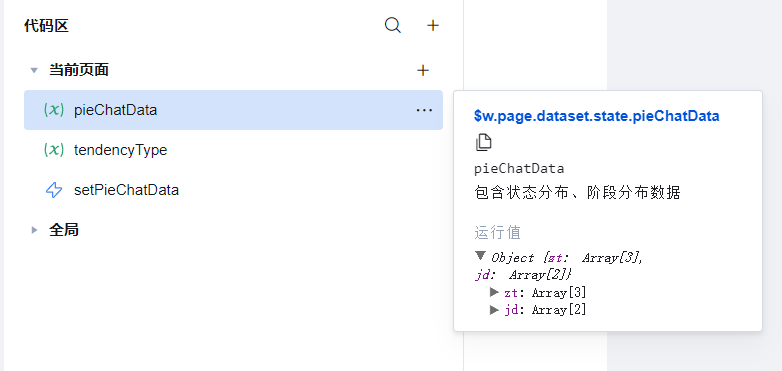
-
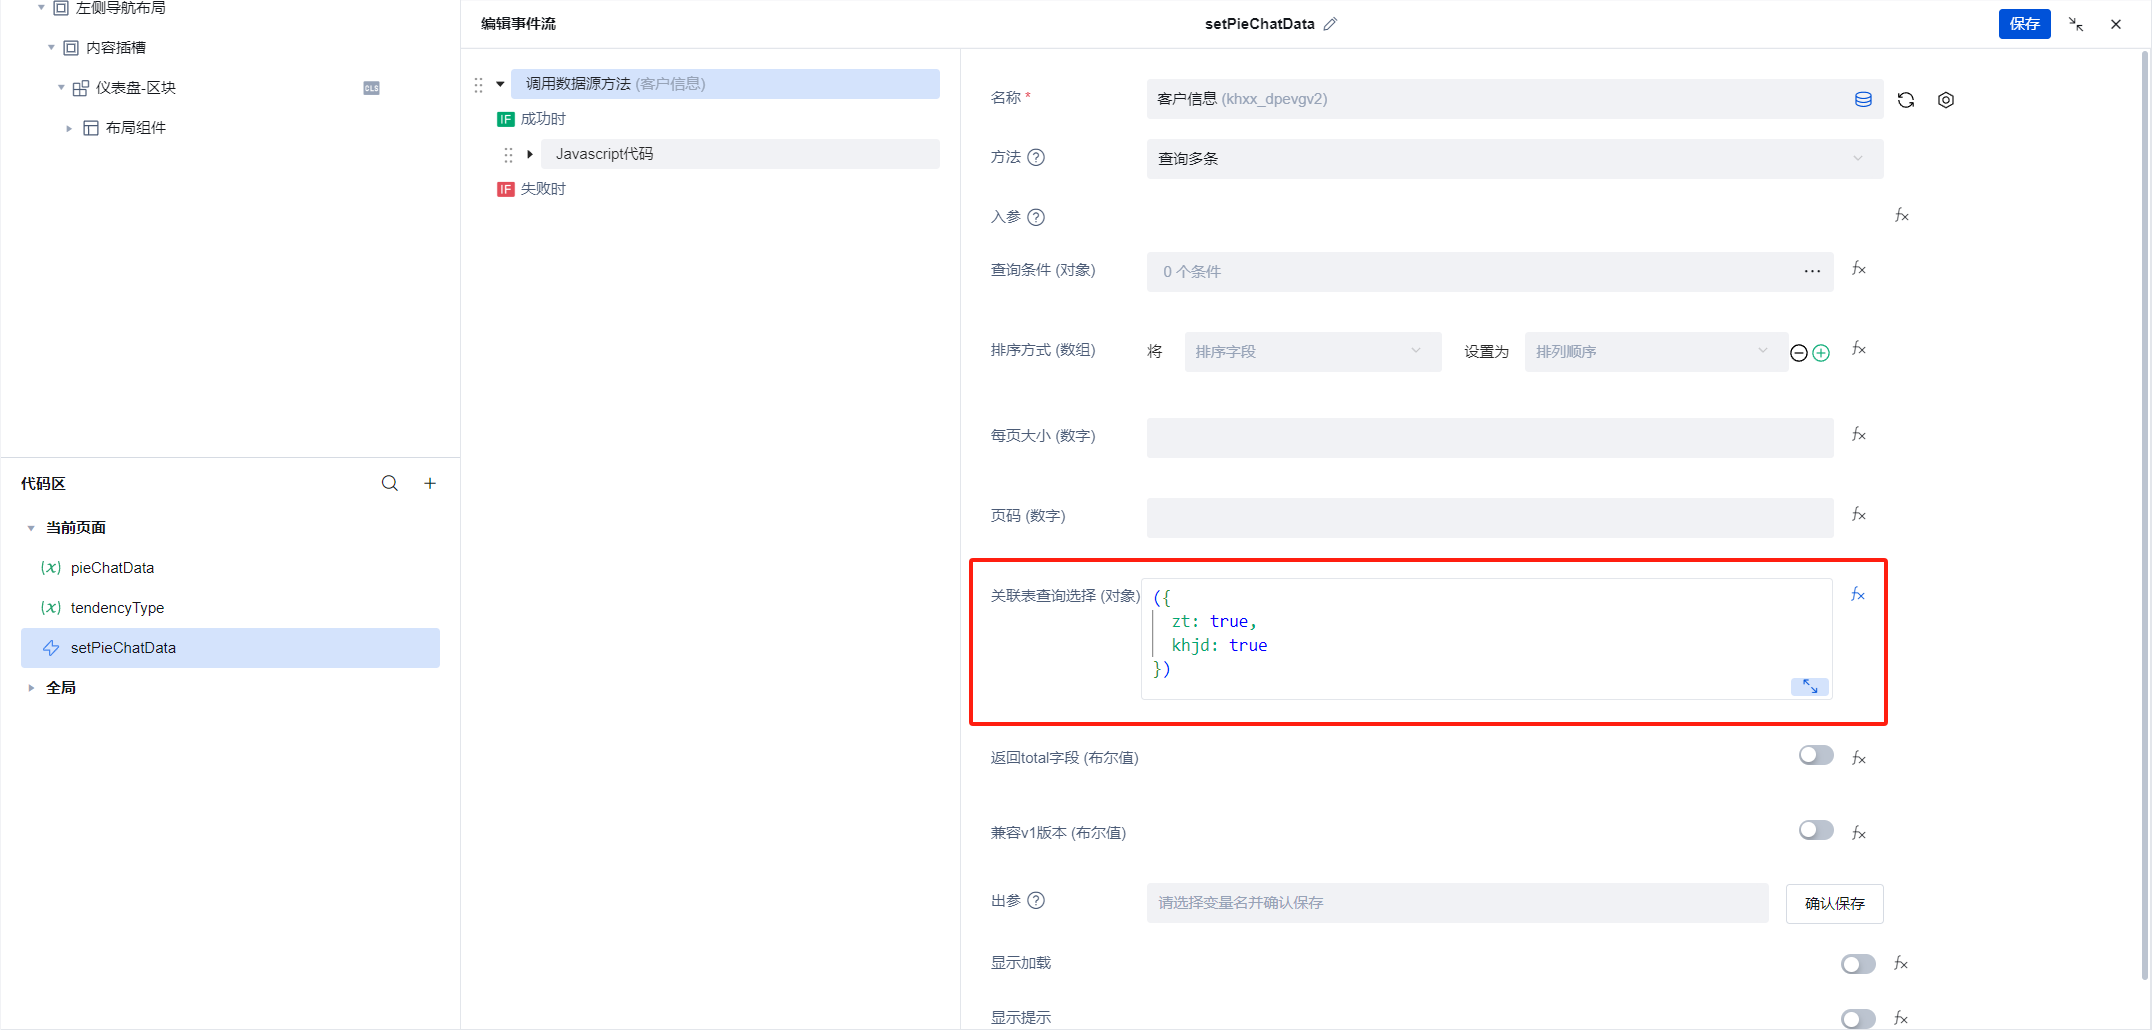
Create a new event stream: setPieChatData on the current page
-
Step 1 in setPieChatData: Obtain the full data set of the customer information table Since only the status and customer stage fields are required here, configure the associate table query selection (object) as follows:
{
    "zt": true,
    "khjd": true
}
- After successfully obtaining the data, execute the following JavaScript code:
({ event }) => {
  const arr = event.detail.records;

  const transData = ({ x, y }) => {
    return {
      XLabel: {
        Value: x,
      },
      YLabels: [
        {
          Name: "Total",
          Value: y,
        },
      ],
    };
  };

  const formatVal = (val, code) => {
    return $w.app.utils.formatEnum(val, code, $w.app);
  };

  const getChatVal = (type, code) => {
    return Object.entries(newArr[type]).map(([key, value]) => {
      const newKey = key === "other" ? "Unknown" : formatVal(key, code);
      return transData({
        x: newKey,
        y: value,
      });
    });
  };

  const newArr = arr.reduce(
    (obj, itm) => {
      const ztKey = itm.zt || "other";
      obj["zt"][ztKey] = obj["zt"][ztKey] ? obj["zt"][ztKey] + 1 : 1;

      const jdKey = itm.khjd || "other";
      obj["jd"][jdKey] = obj["jd"][jdKey] ? obj["jd"][jdKey] + 1 : 1;

      return obj;
    },
    {
      zt: {},
      jd: {},
    }
  );

  const obj = {
    zt: getChatVal("zt", "scrm_status"),
    jd: getChatVal("jd", "scrm_followStatus"),
  };

  $w.page.dataset.state.pieChatData = obj;
};
- Invoke
setPieChatDatawhen the current page is displayed
Blocklist
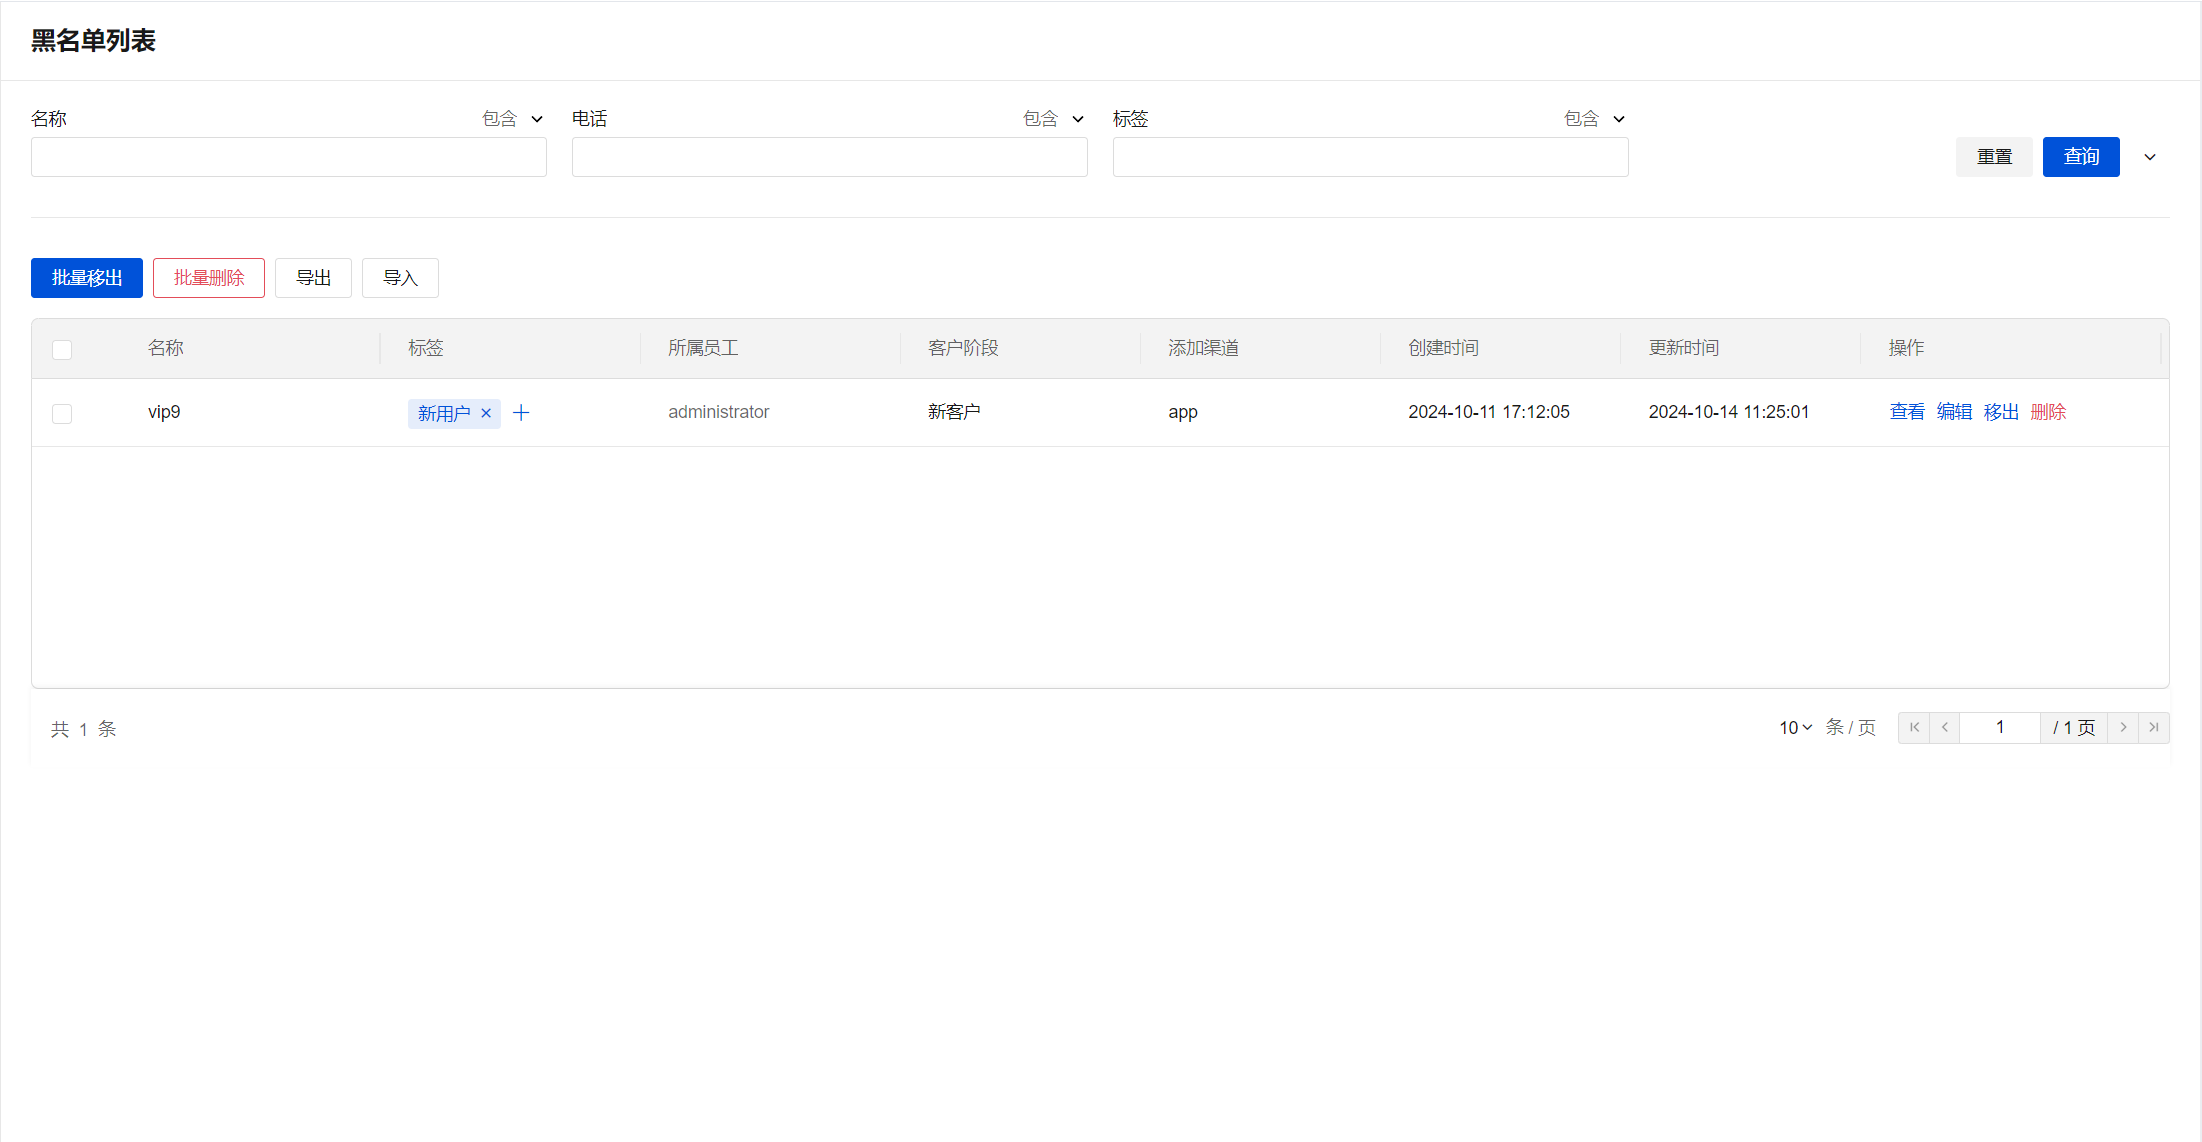
This page is similar to the Customer Management page, differing only in data filtering criteria and functional buttons. Therefore, copy and modify the Customer Management page.
-
The filter conditions are:
Is Blacklisted: true -
The global buttons include batch remove customers, batch delete, export, import
-
The operation buttons include View, Edit, Remove, Delete
Remove
Blocking operations are consistent with customer management
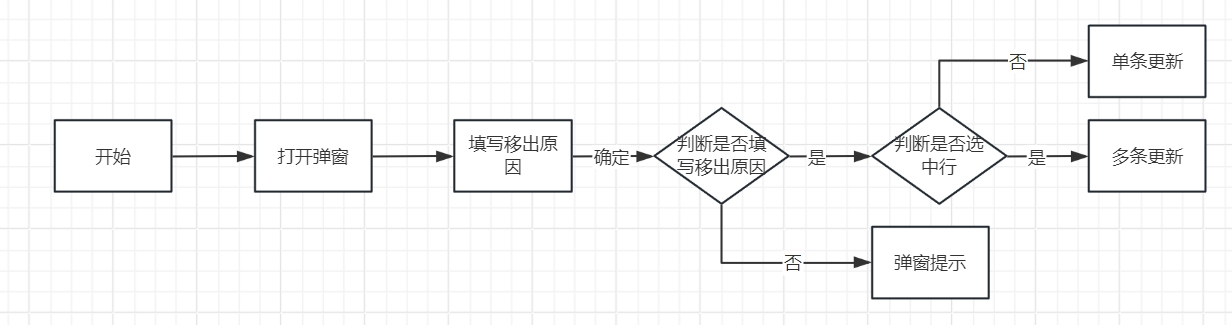
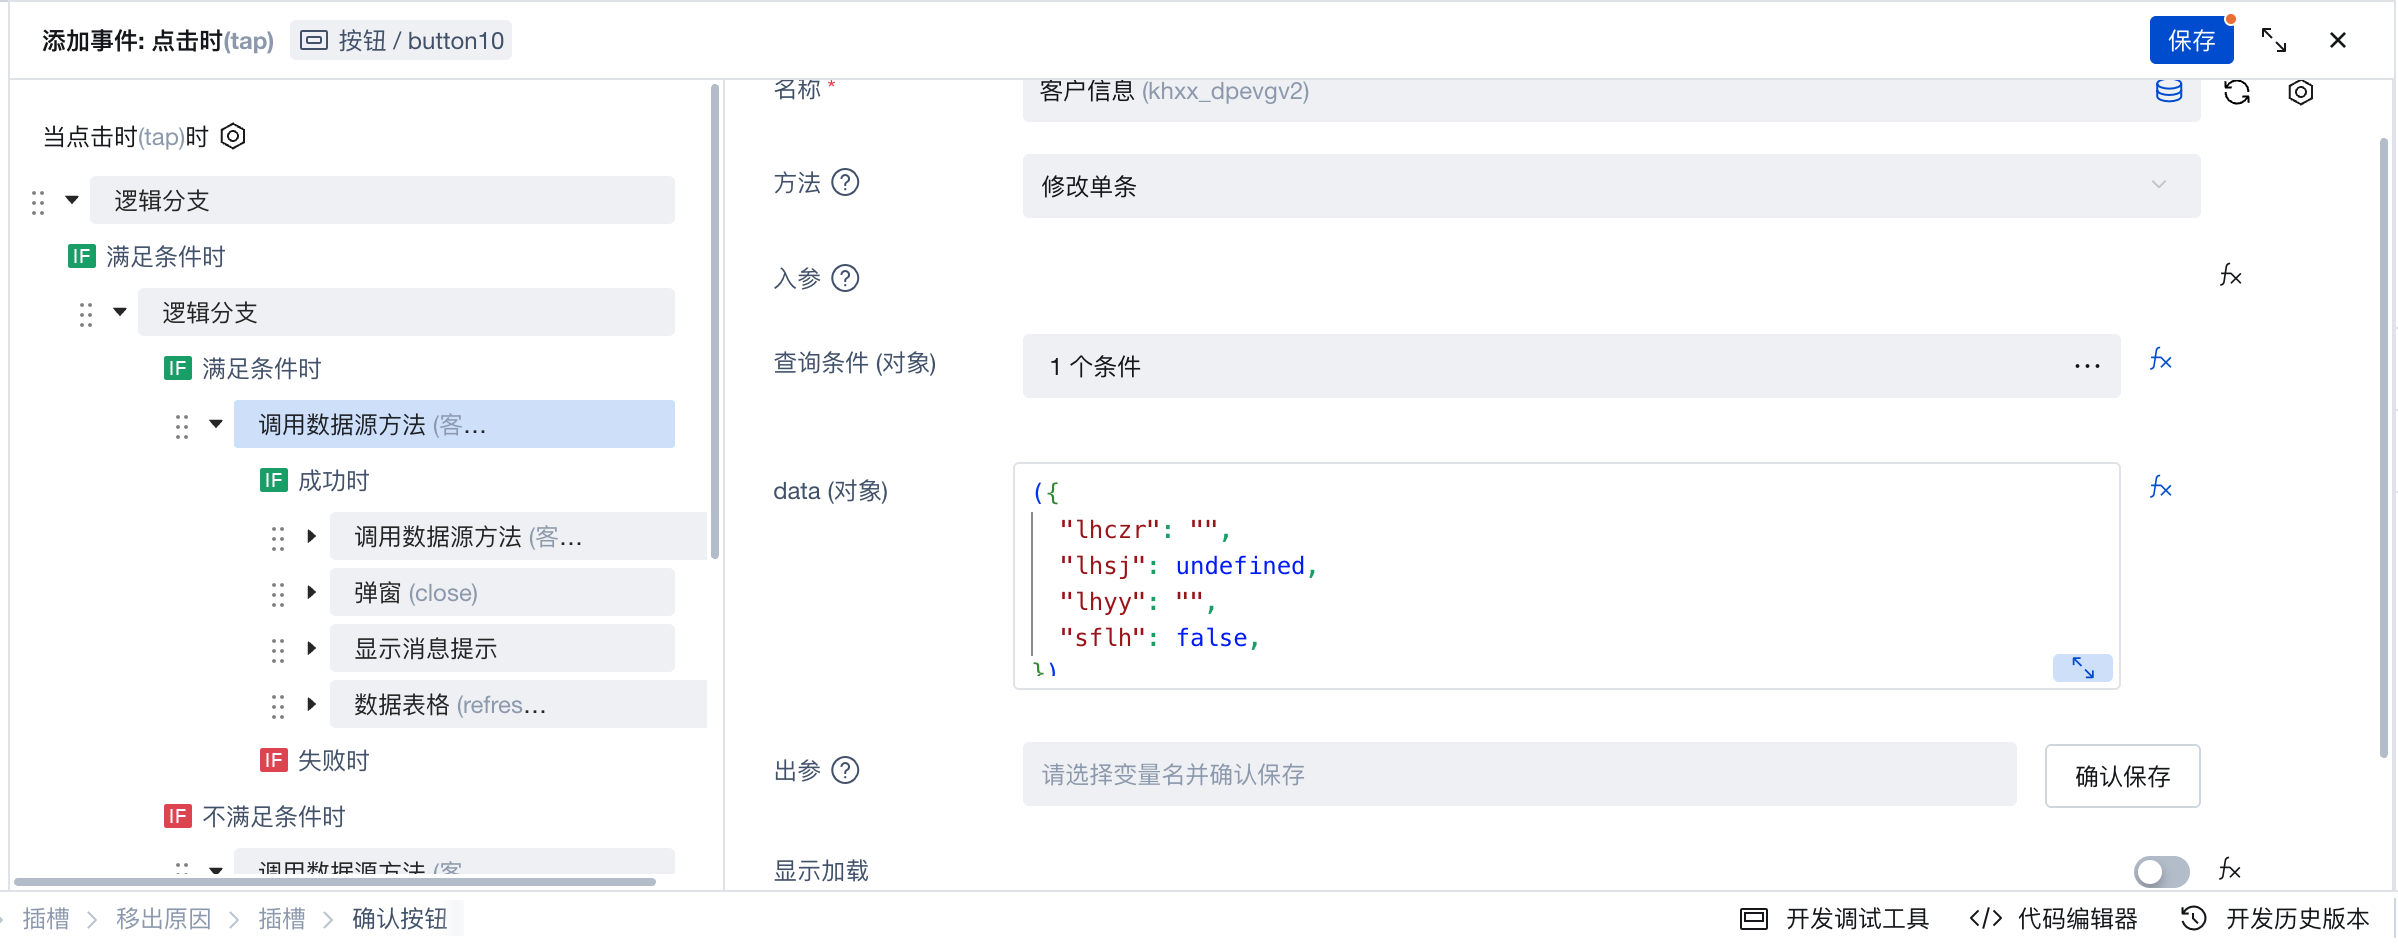
When clicking Remove or Batch Remove, a dialog appears to fill in the removal reason. After confirmation, modify the current item's data such as isBlocked: false, blockReason: empty, blockTime: empty, blockOperator: empty, and other information.
The logical flow is as follows:
Since it is necessary to set the data to empty, parameters are input using expressions when calling the update customer information method, as follows:
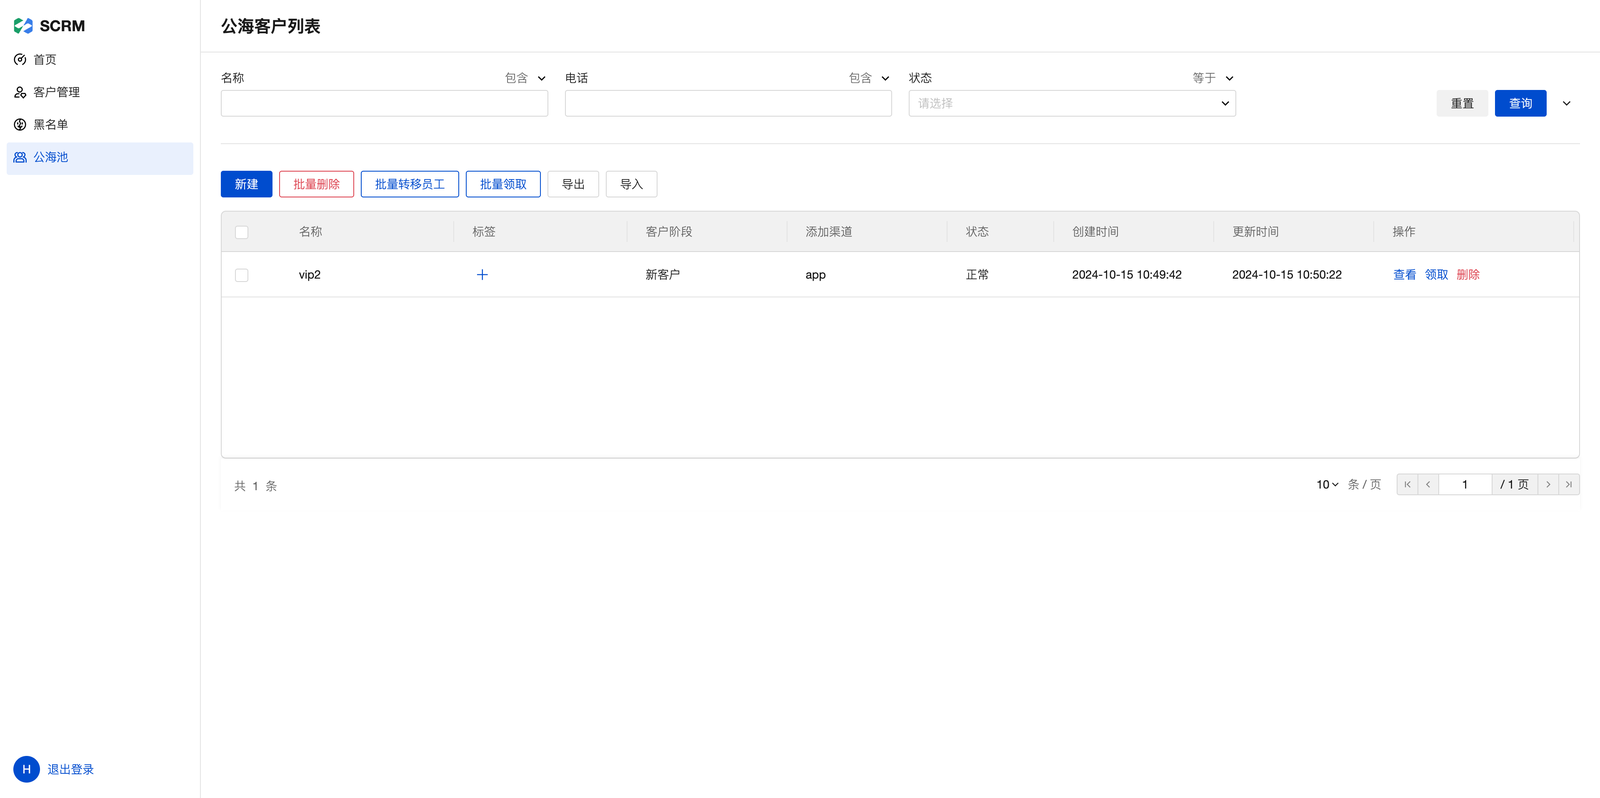
Public Pool
This page is similar to the Customer Management page, differing only in data filtering criteria and functional buttons. Therefore, copy and modify the Customer Management page.
-
The filter conditions are
Is Blacklisted: falseandAssigned Employee: empty. -
The global buttons include Create, Batch Delete, Batch Transfer Customers, Batch Claim, Export, Import
-
The operation buttons include View, Claim, Delete
Batch Transfer
Same as Customer Management Batch Transfer
Claim
Clicking Claim changes the Assigned Employee in the customer information to the current user. Therefore, the button event sequence is as follows: 01. Confirmation 02. After successful confirmation, call the update customer information method 03. Simply update Assigned Employee: current user.
Query conditions are:
The data ID equals the _id of the current row data (data ID)
Log in.
({
  ssyg: $w.auth.currentUser.userId,
});
Batch Claim
Same as the claim feature, changes the query conditions to:
Data ID equals any one of the _id (data ID) collection of the currently selected rows in the list.
Parameters are consistent.
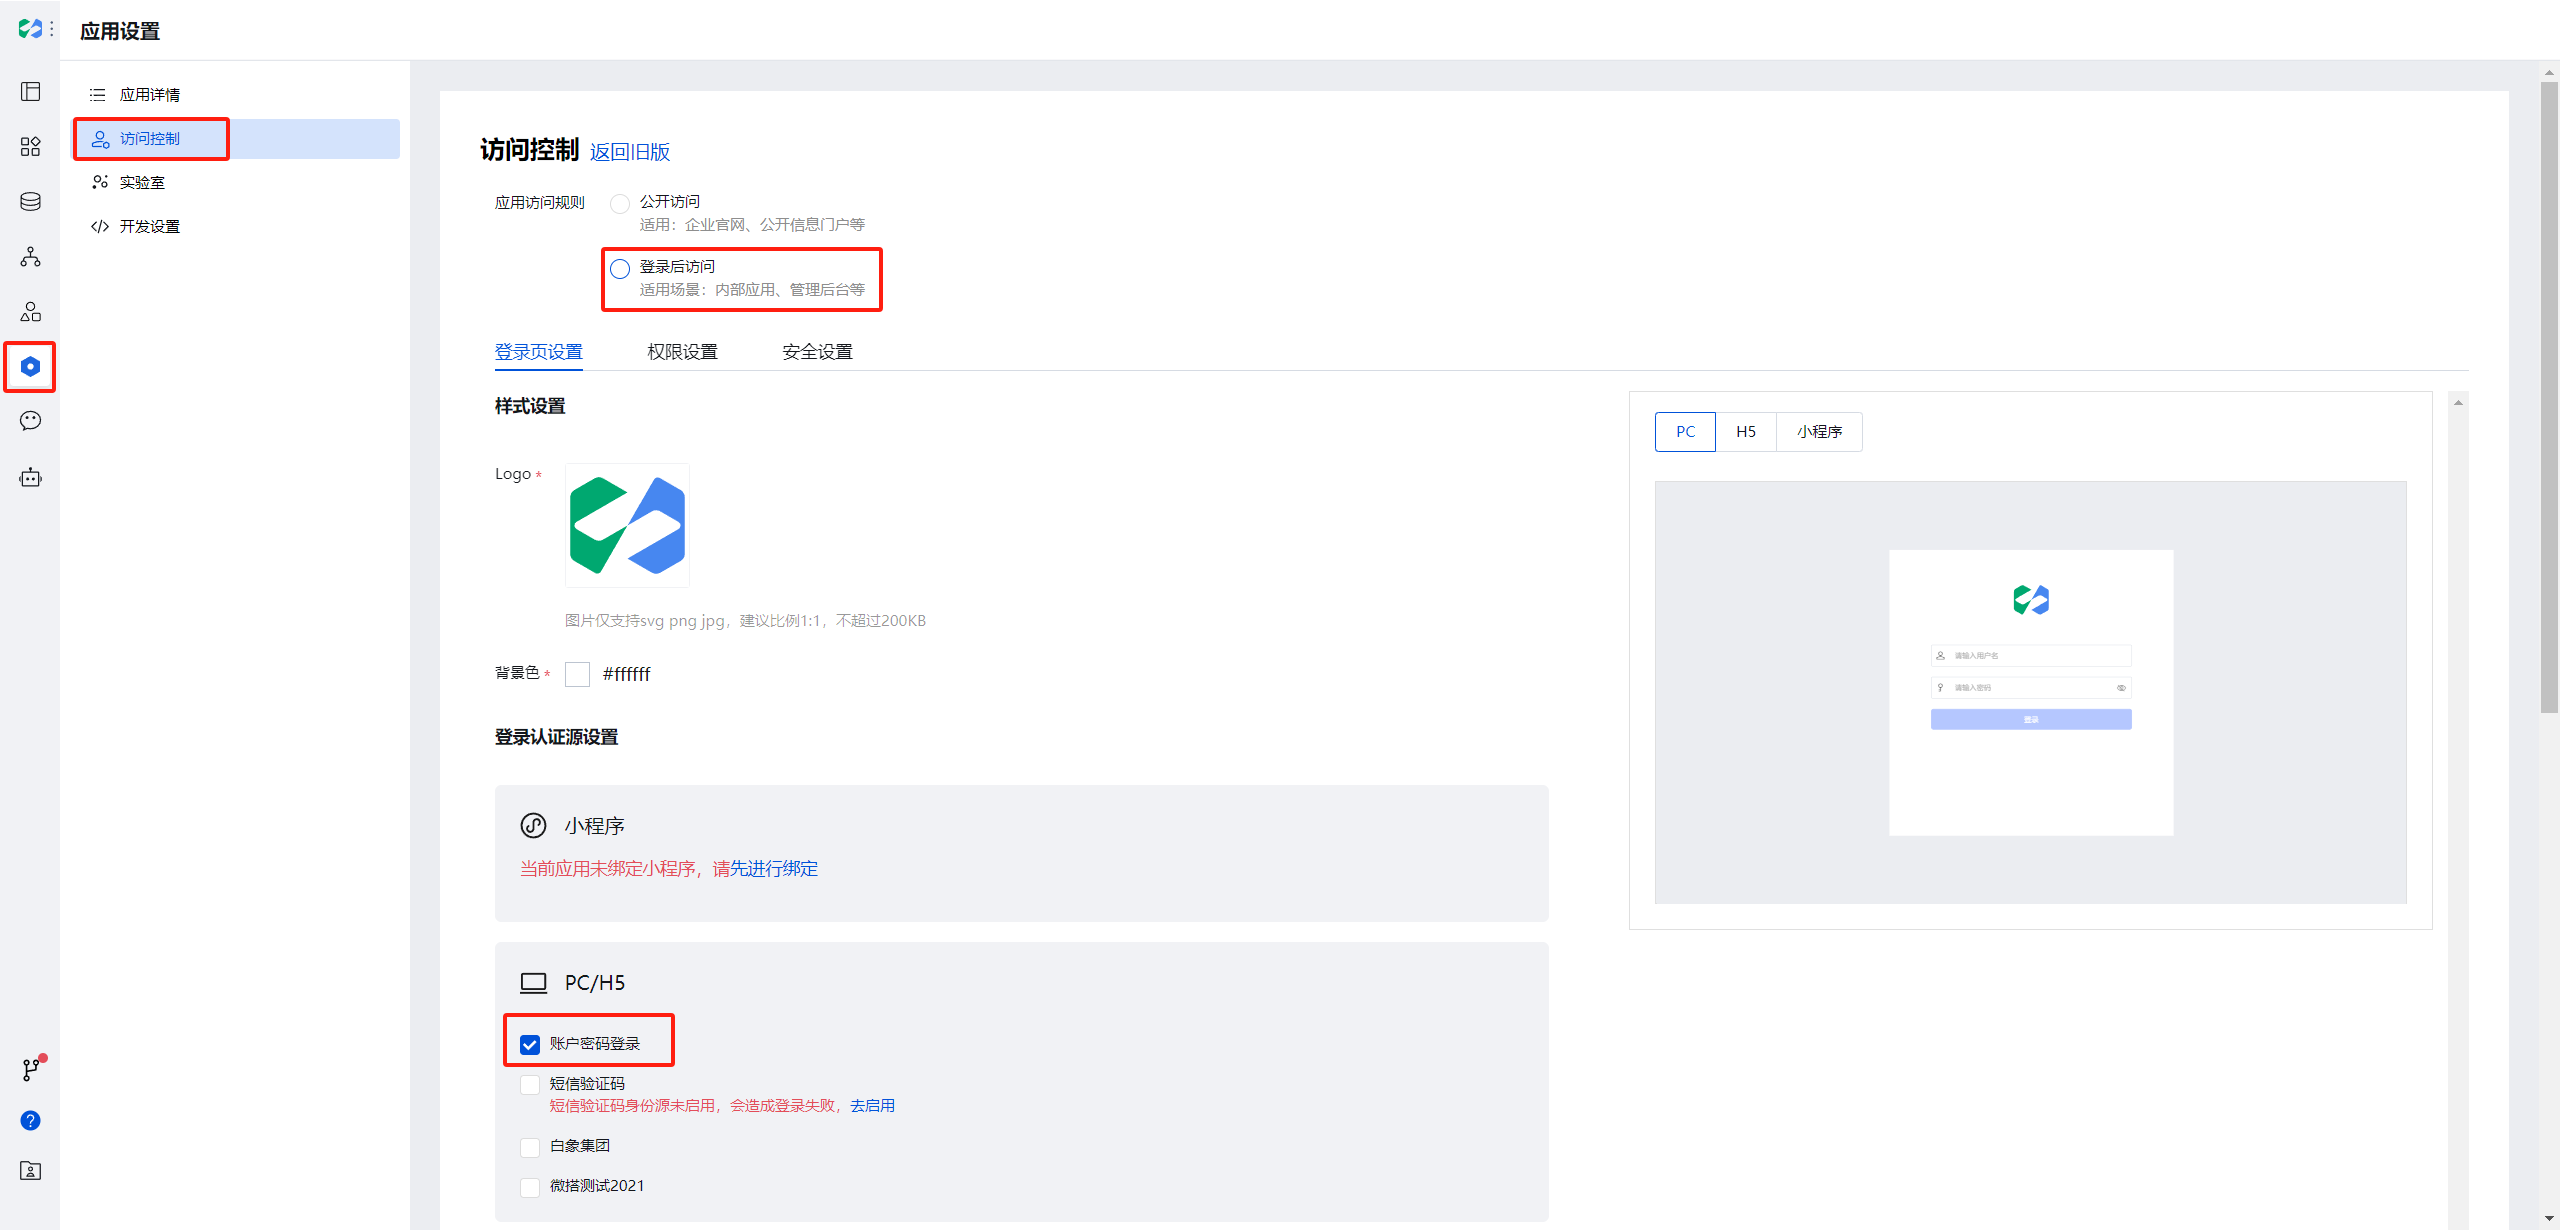
Log in.
Go to the left-side application settings, select access control, then select 'Access after login', and select 'Account password login'.
Log out.
We are adding a sign-out feature here. You can refer to the documentation center for how to implement the sign-out feature.
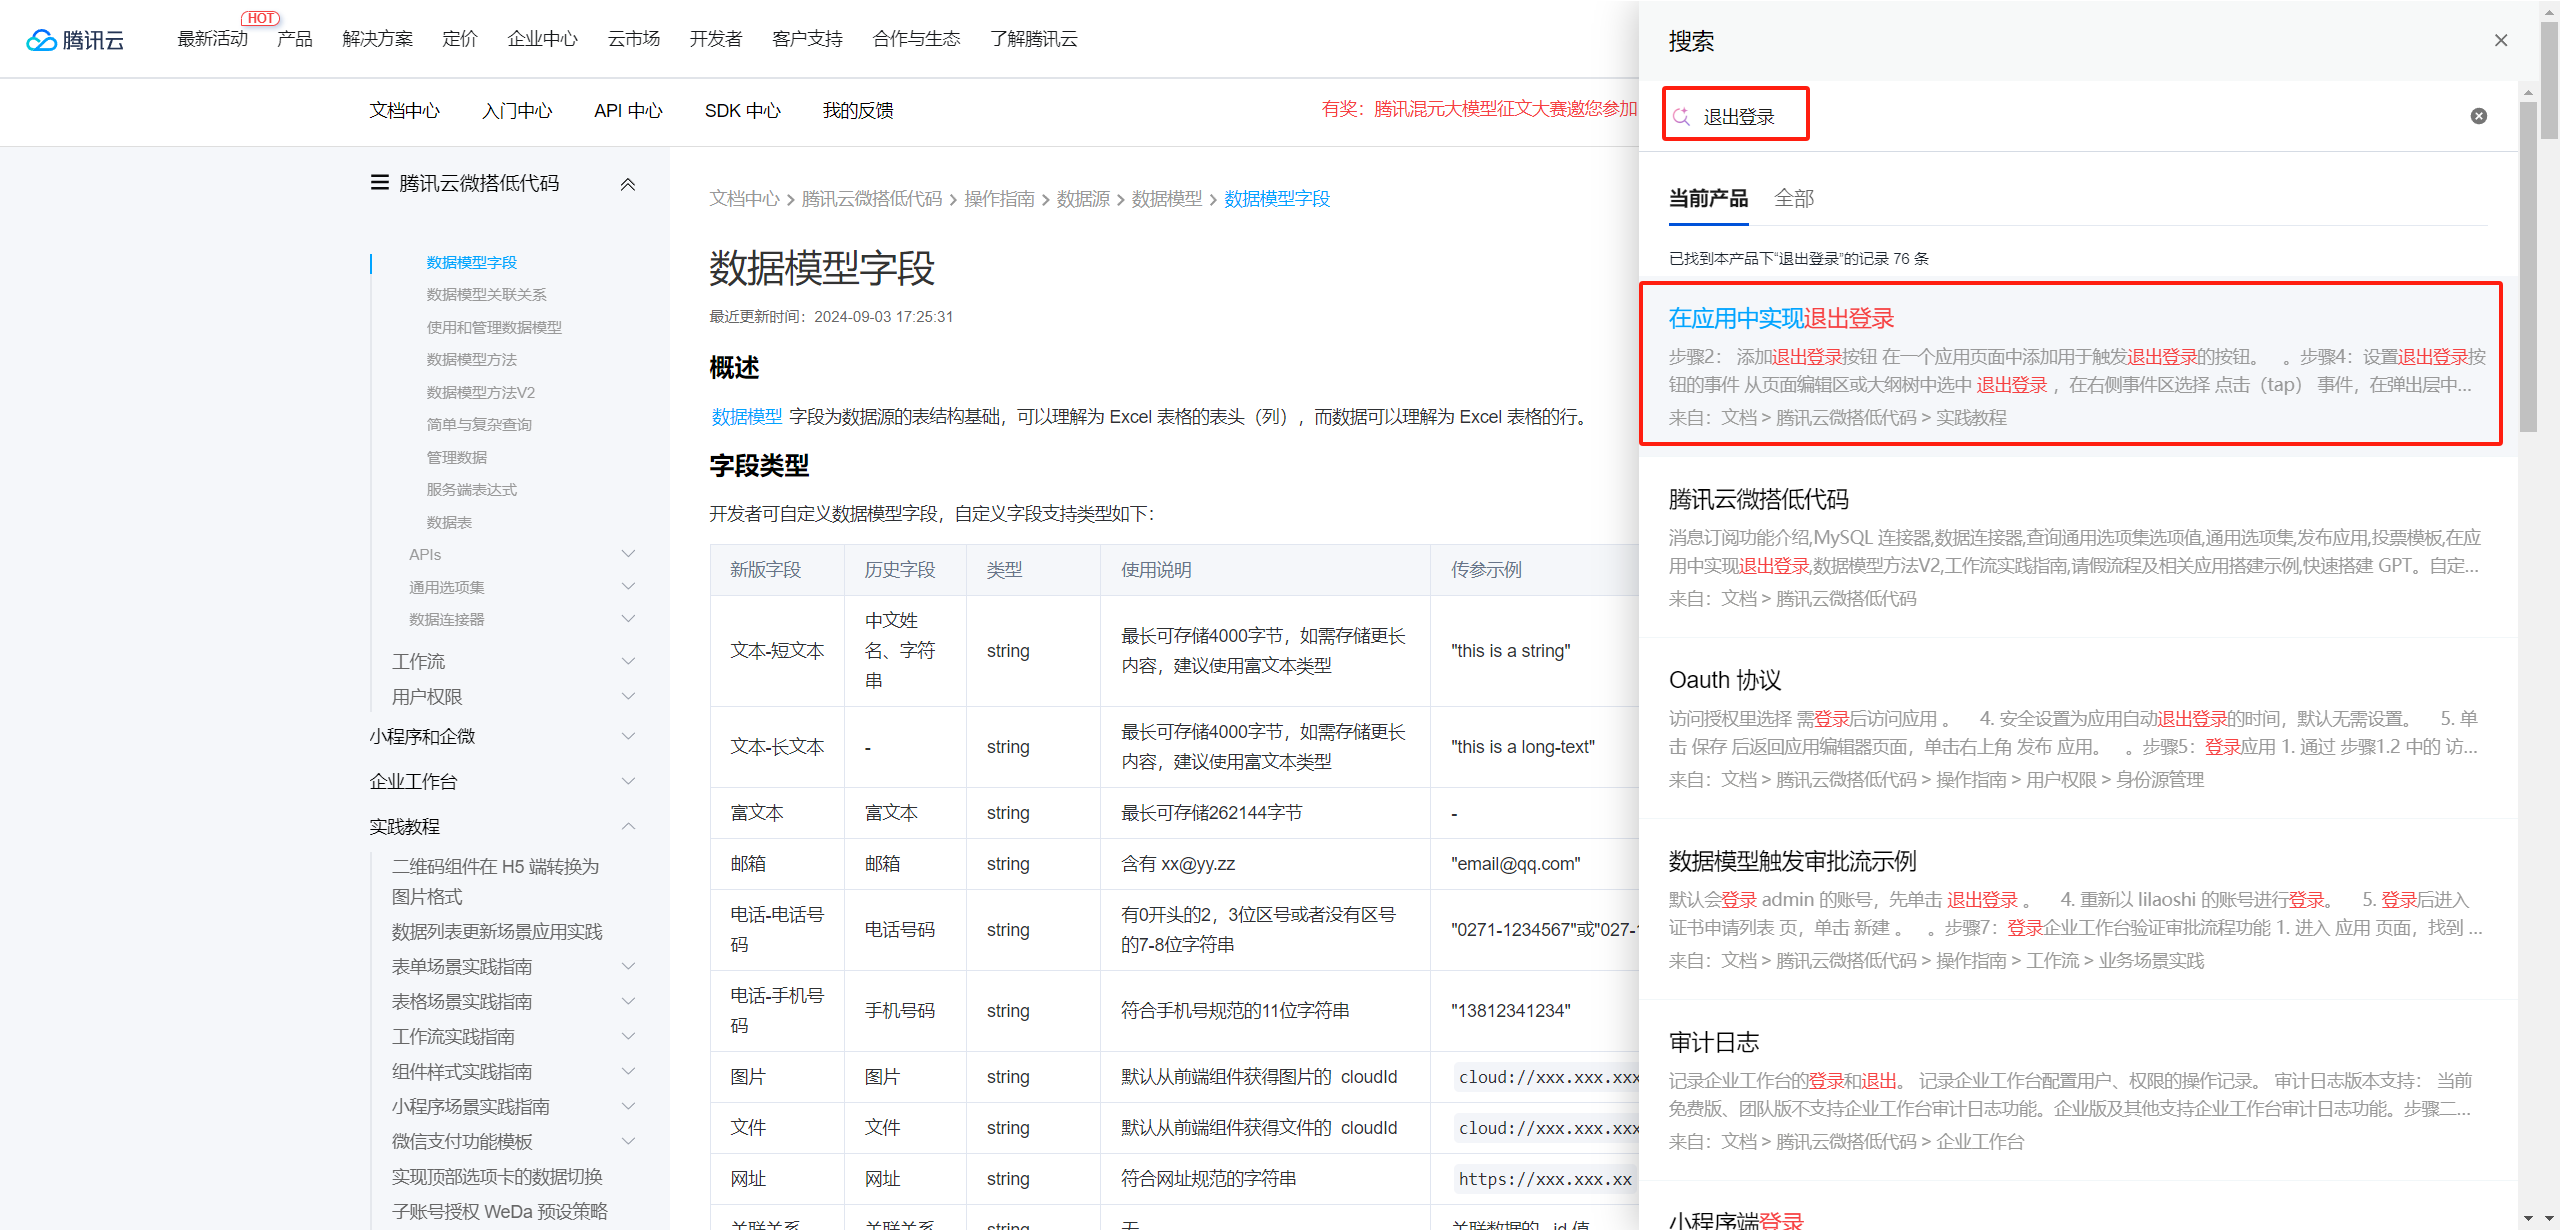
Here, we click in and see that by clicking a button, we can execute a js script to implement the logout feature.
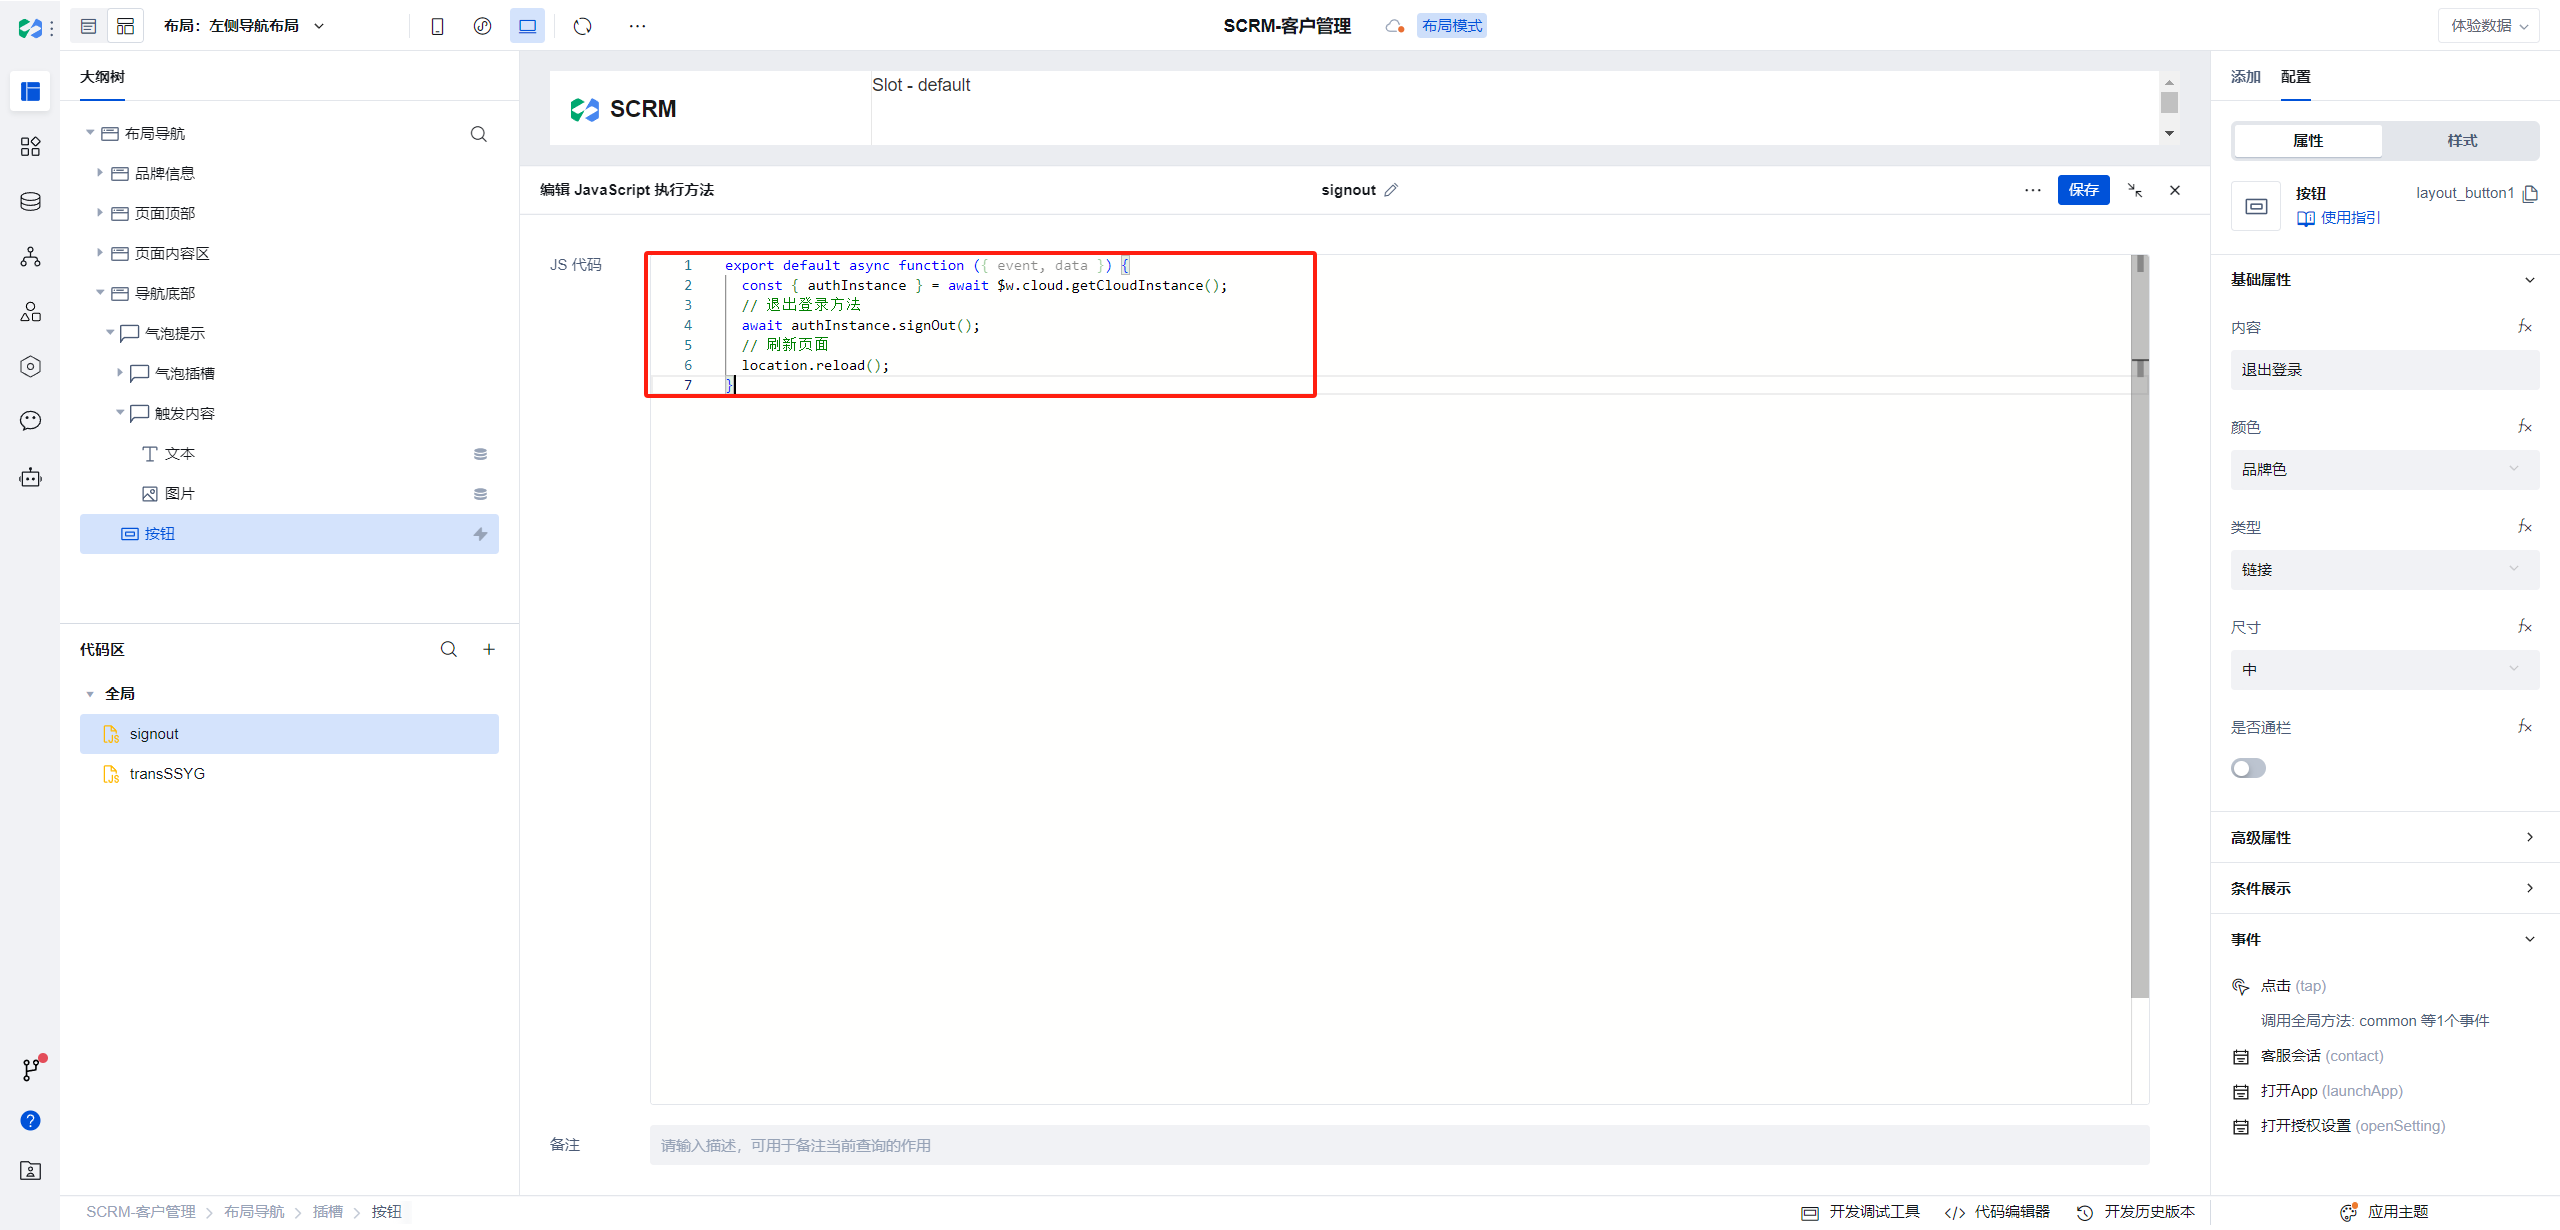
Similarly, we click the + in the global area of the code section at the bottom left of the editor, and select Create New JavaScript Method in the pop-up layer.
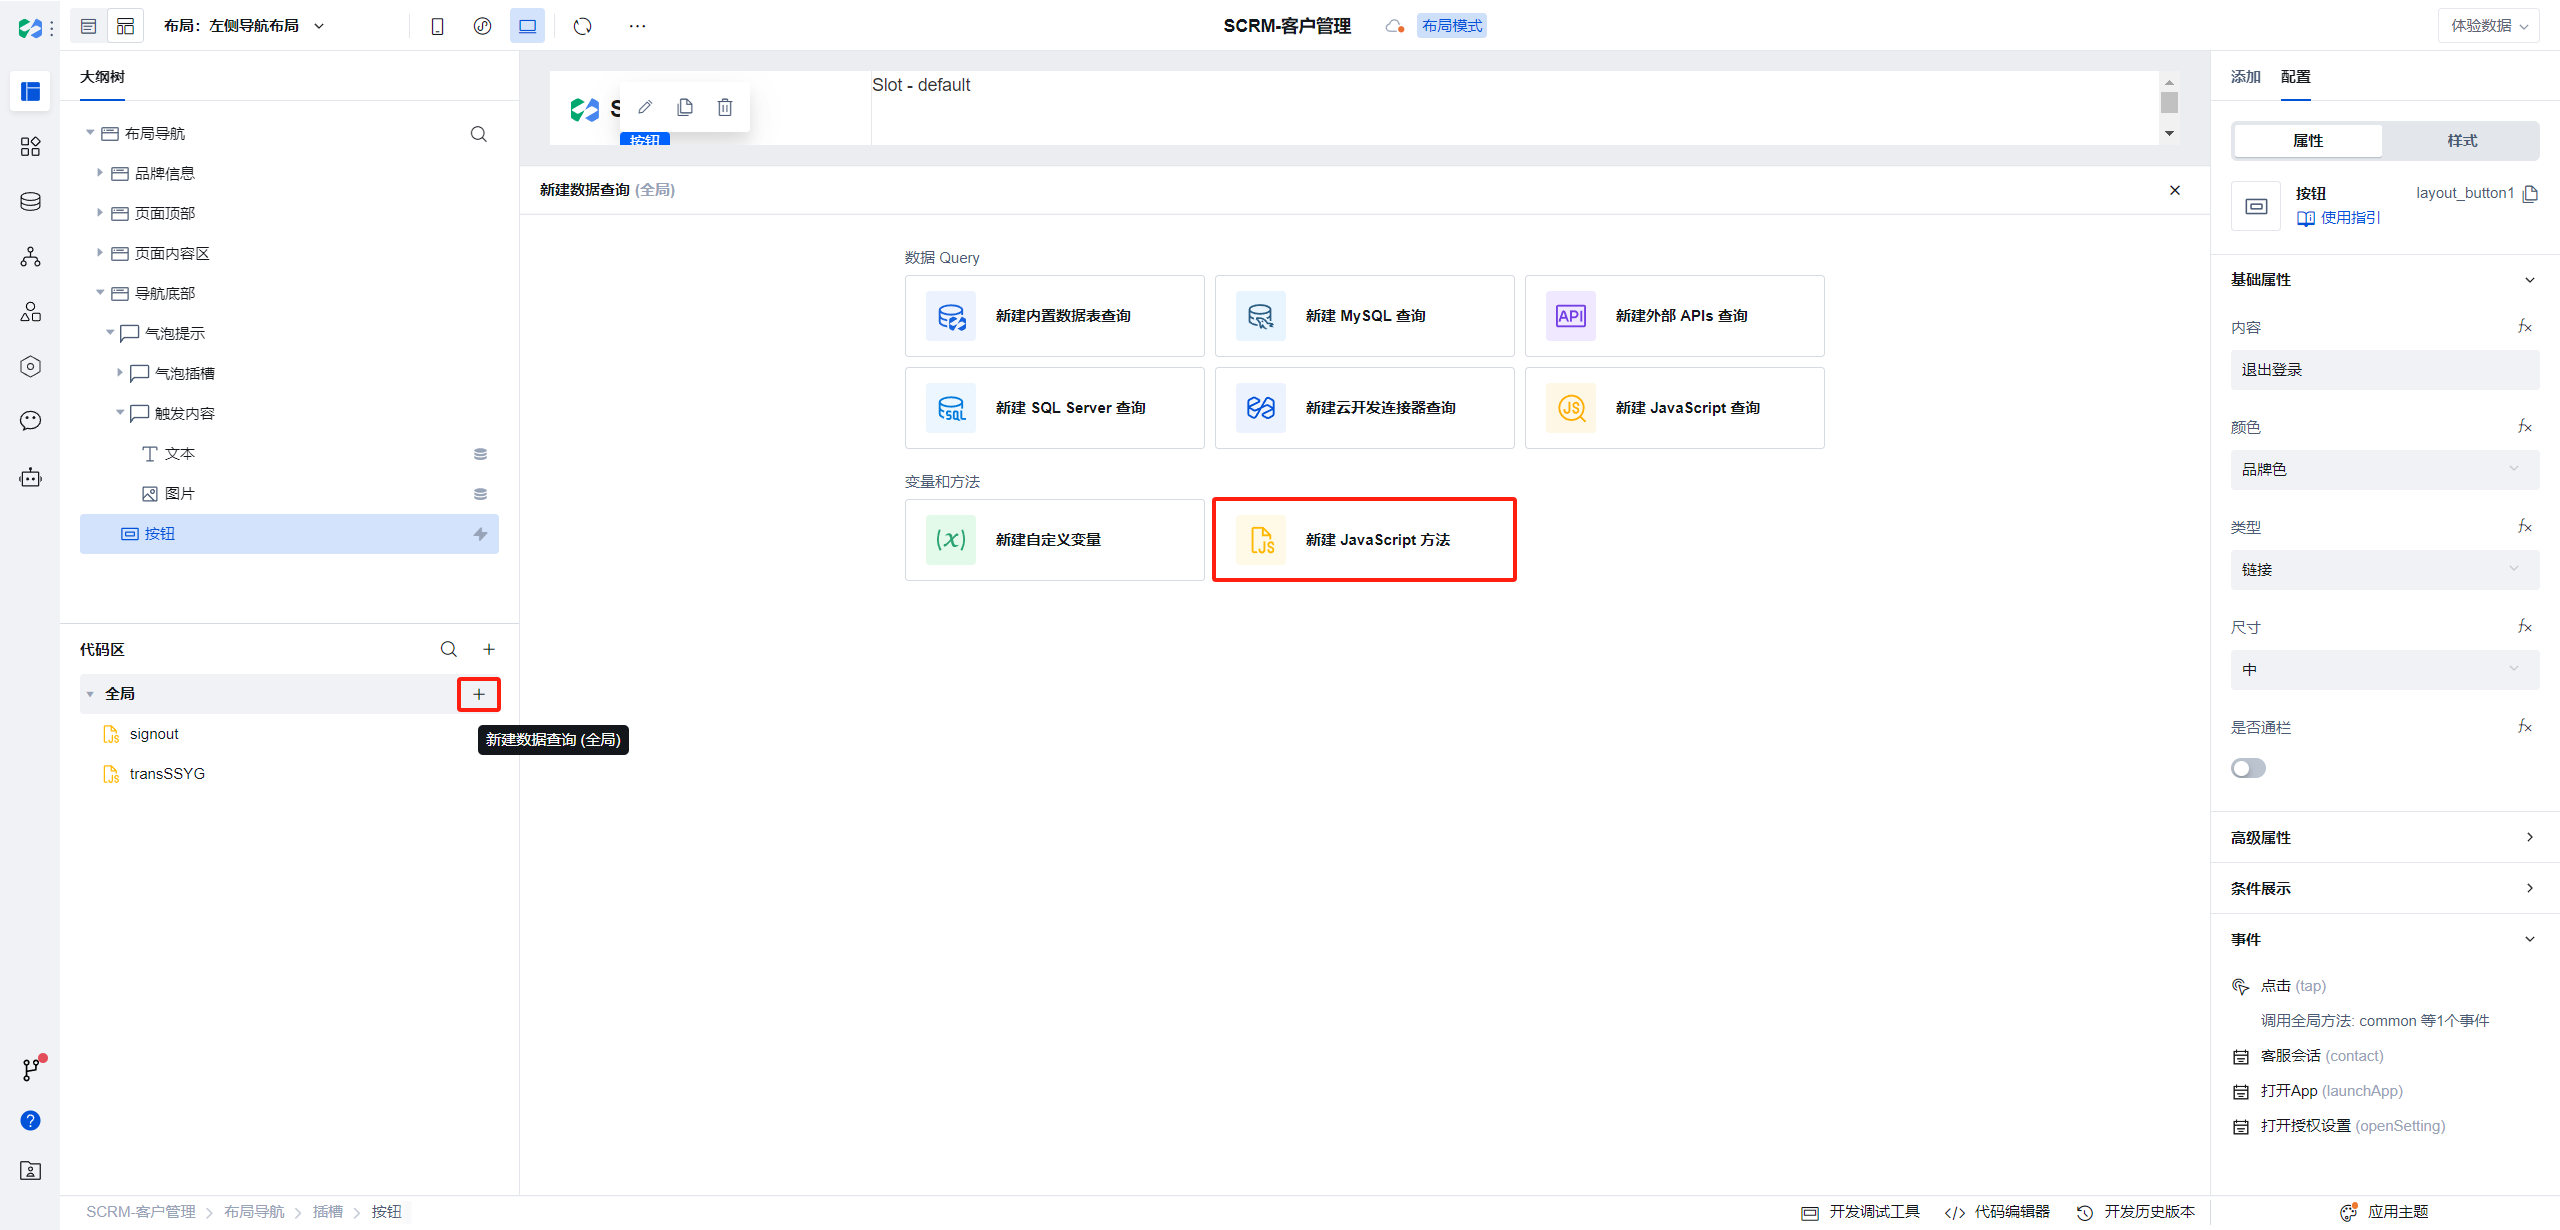
In the pop-up code editor, copy the script prompted in the above document and paste it in, modify the method name to signout, then click Save in the upper right corner.
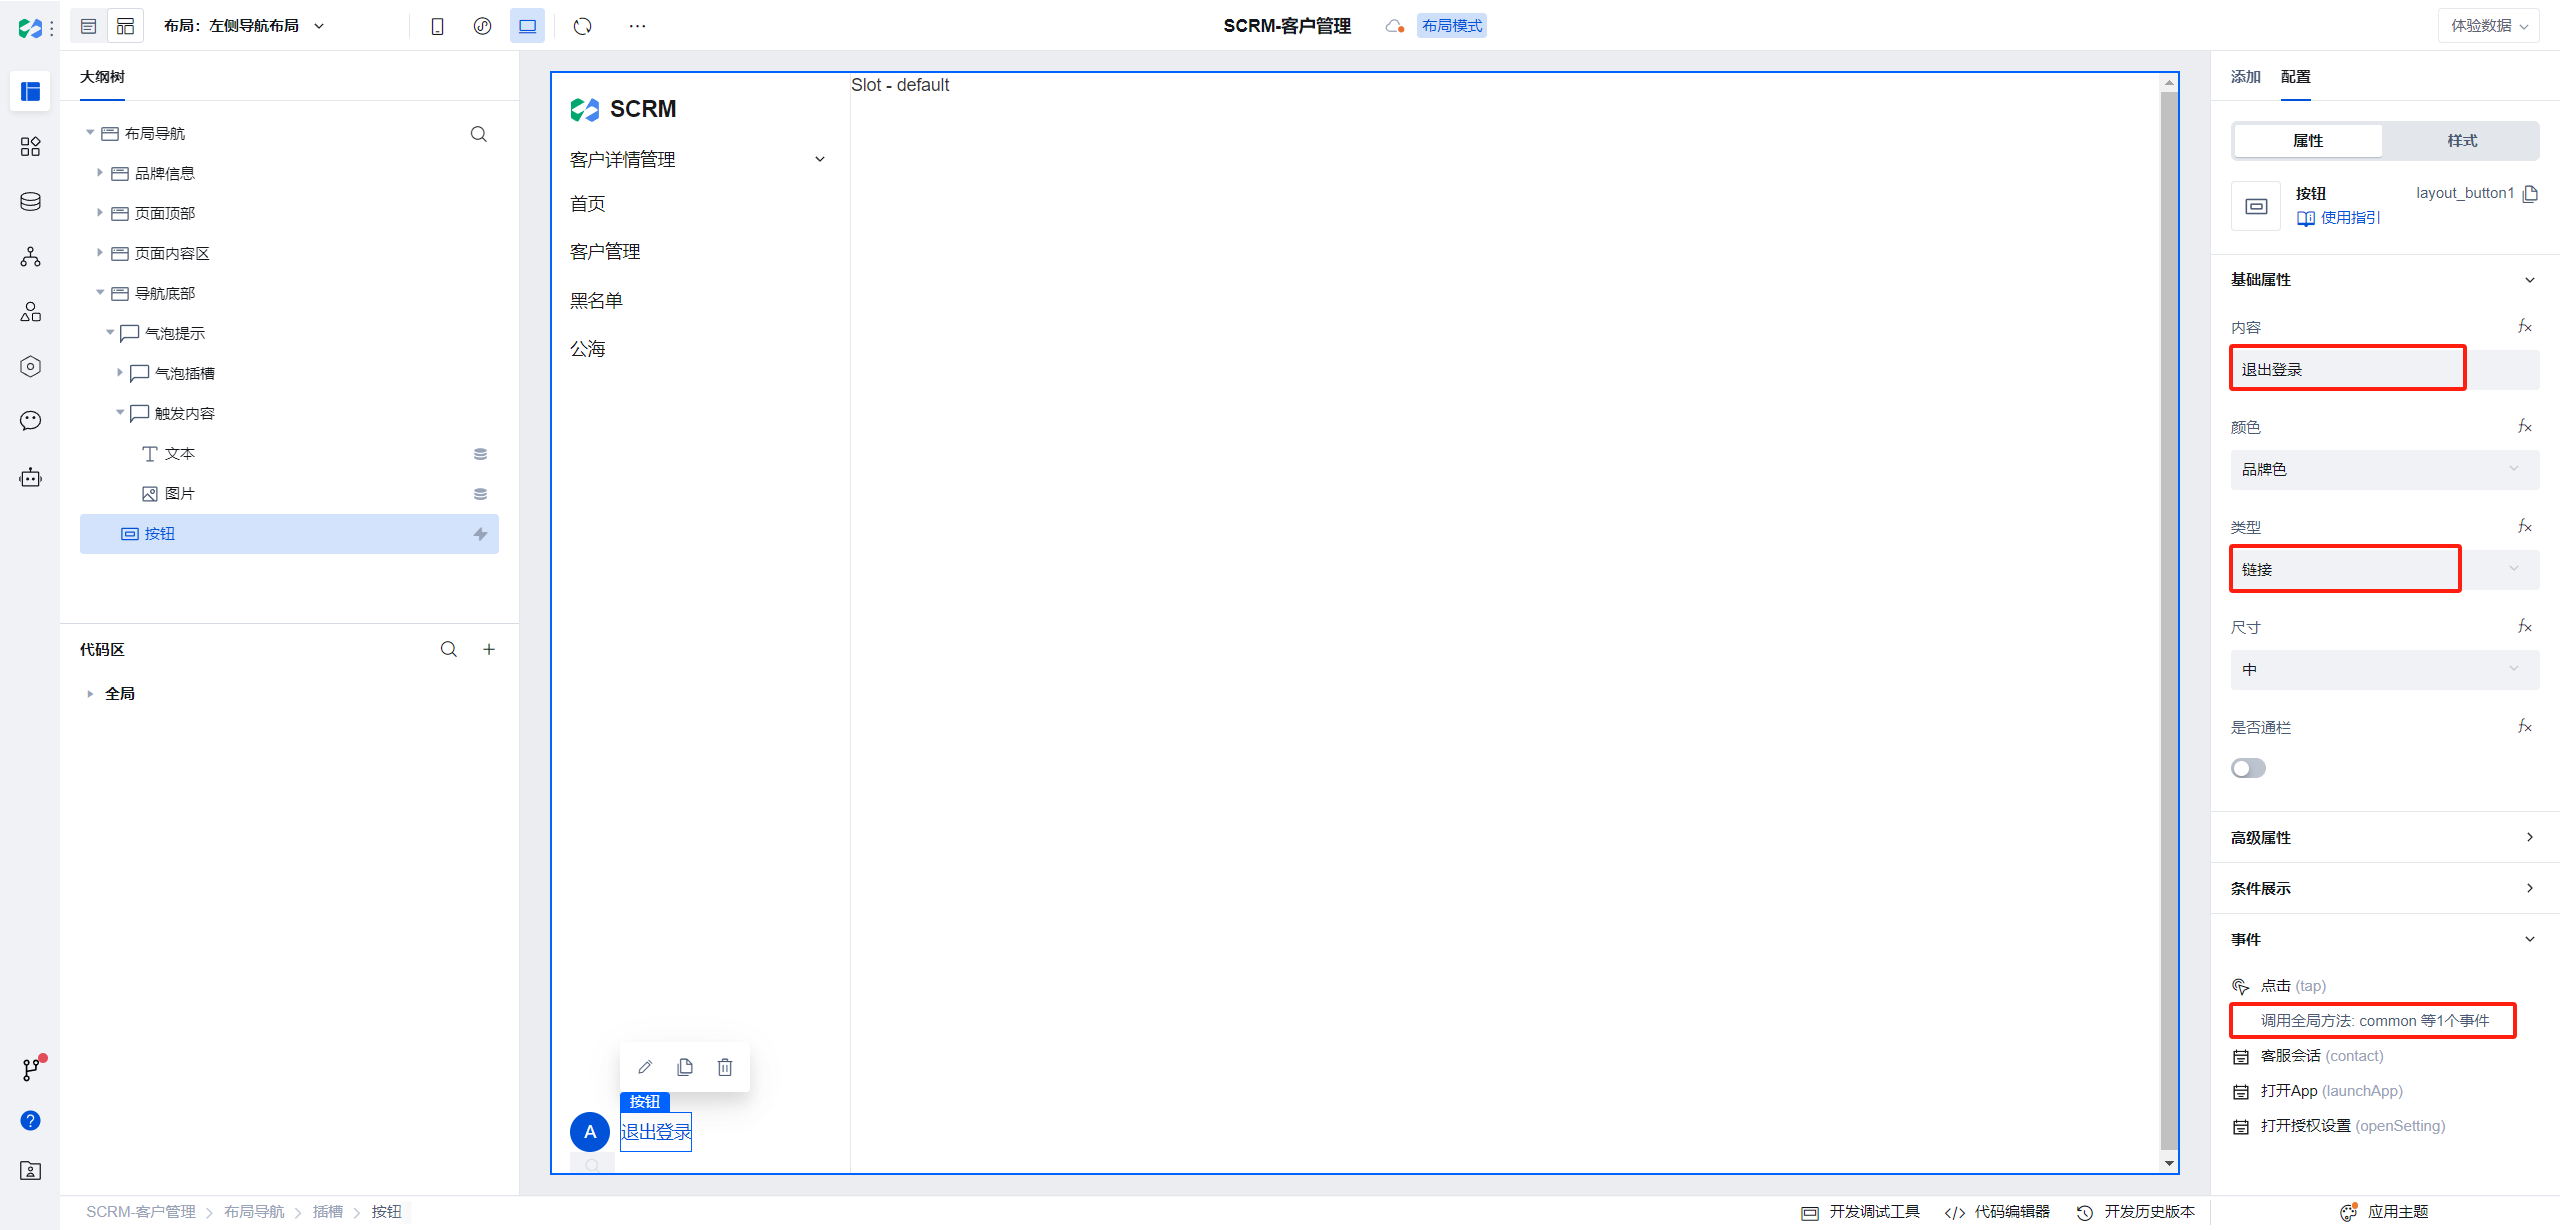
Next, we delete the product documentation text component in the bottom-left corner of the designer, modify the left-side icon, add a button, and modify the button name and type.
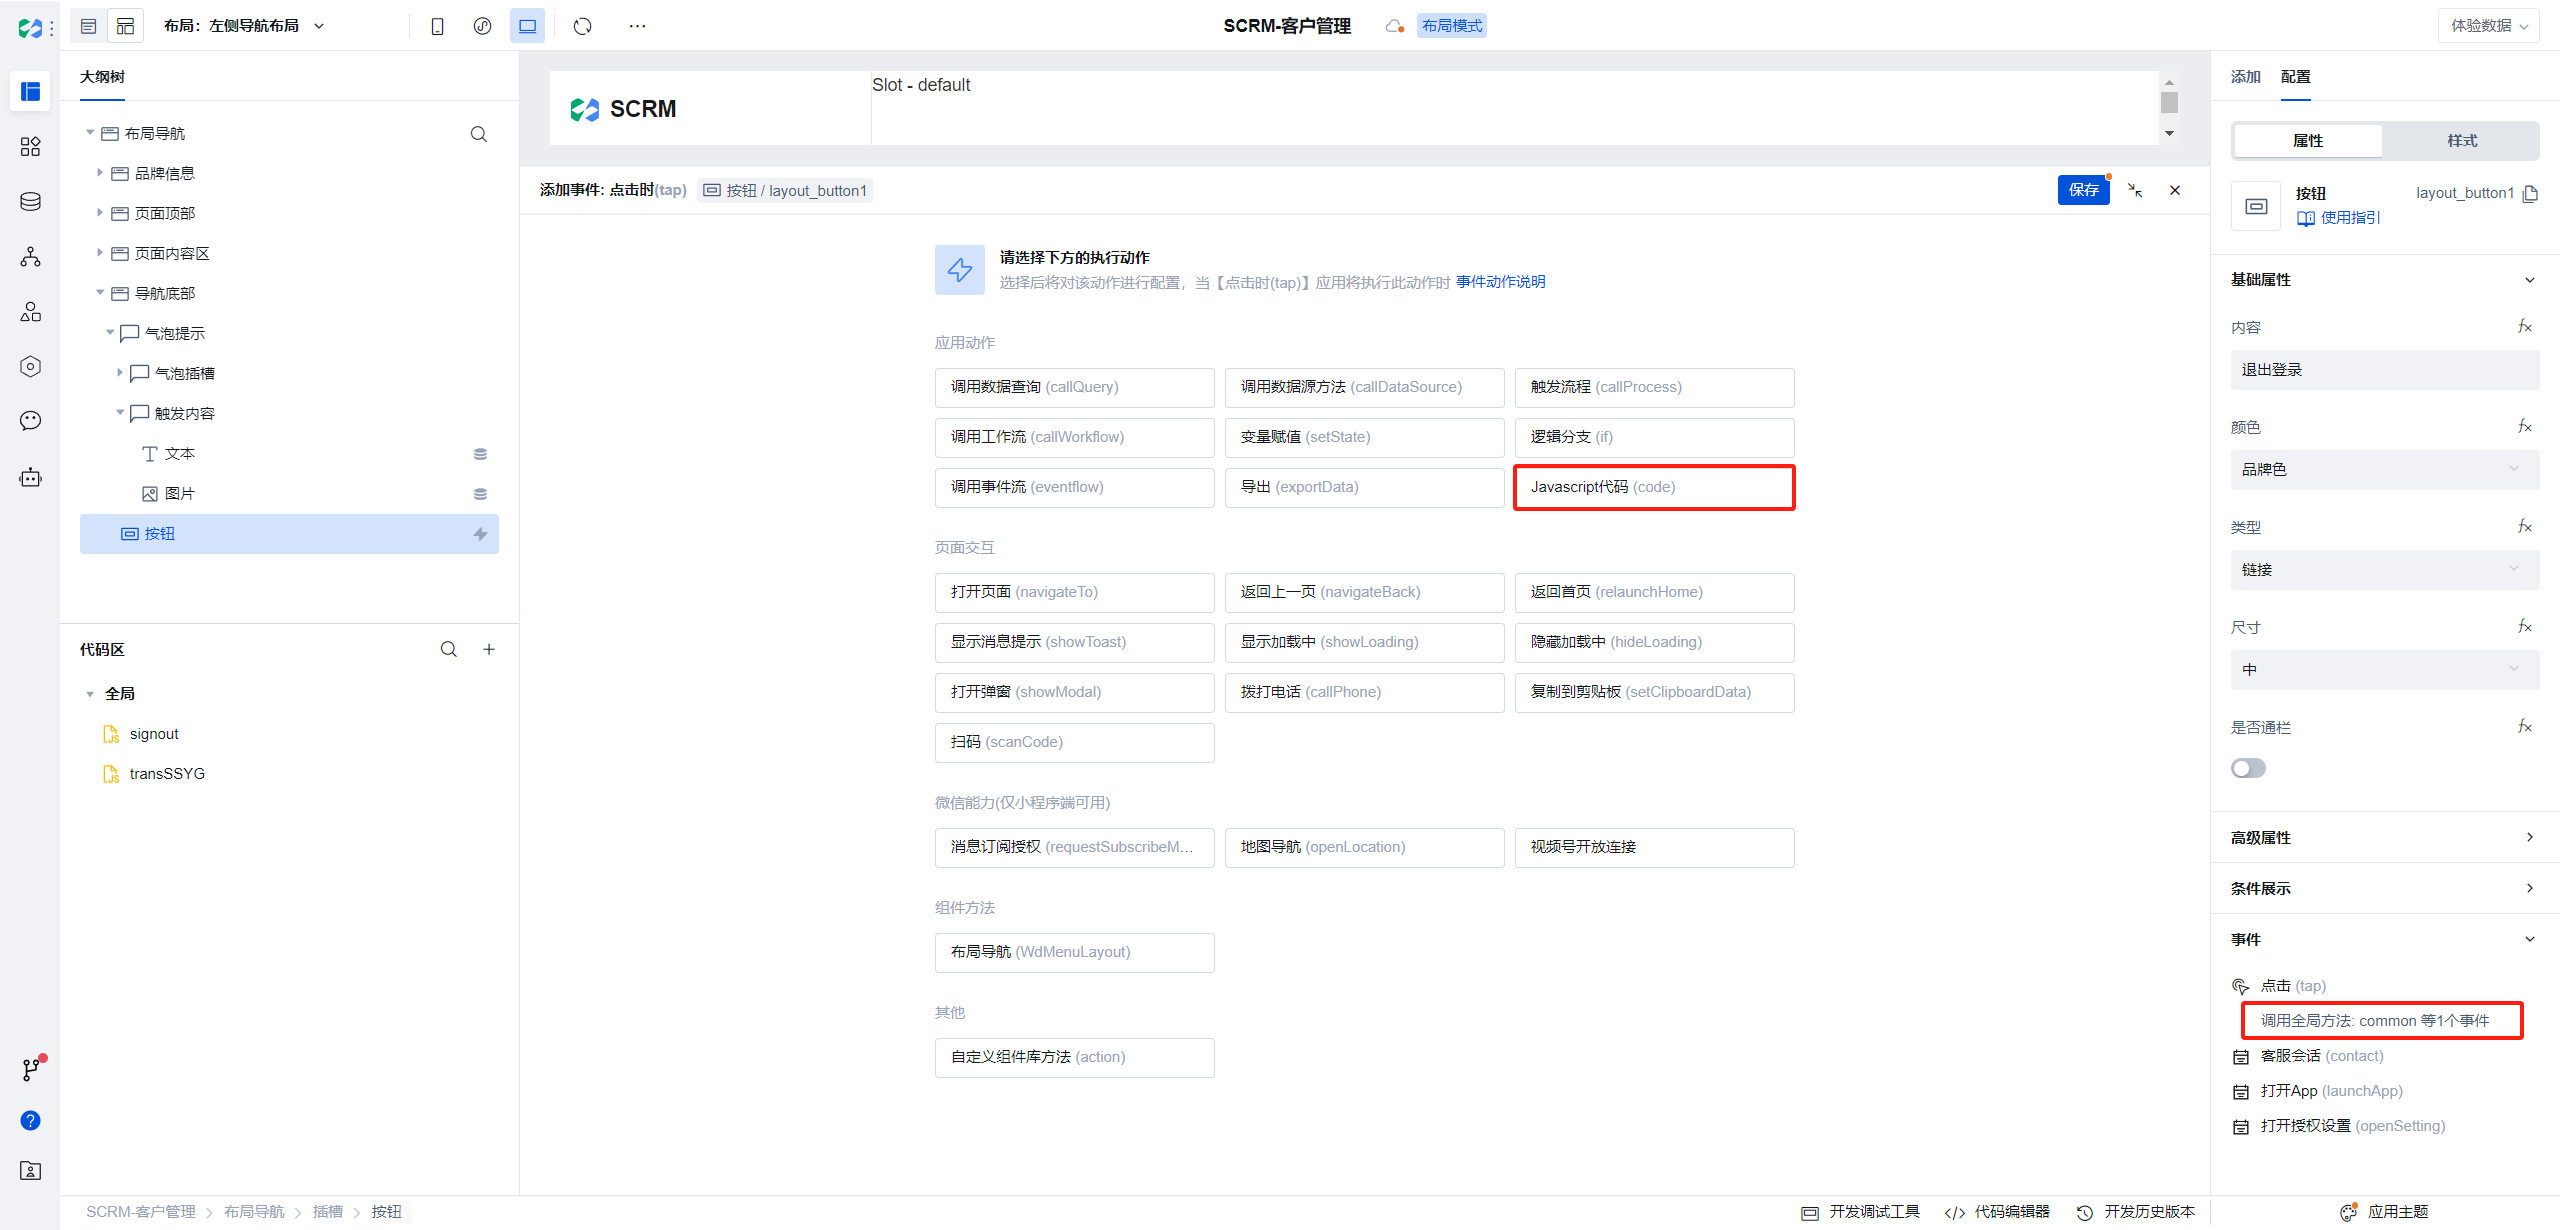
Click the click event in the bottom right corner, and choose JavaScript method.
Select custom method signout.
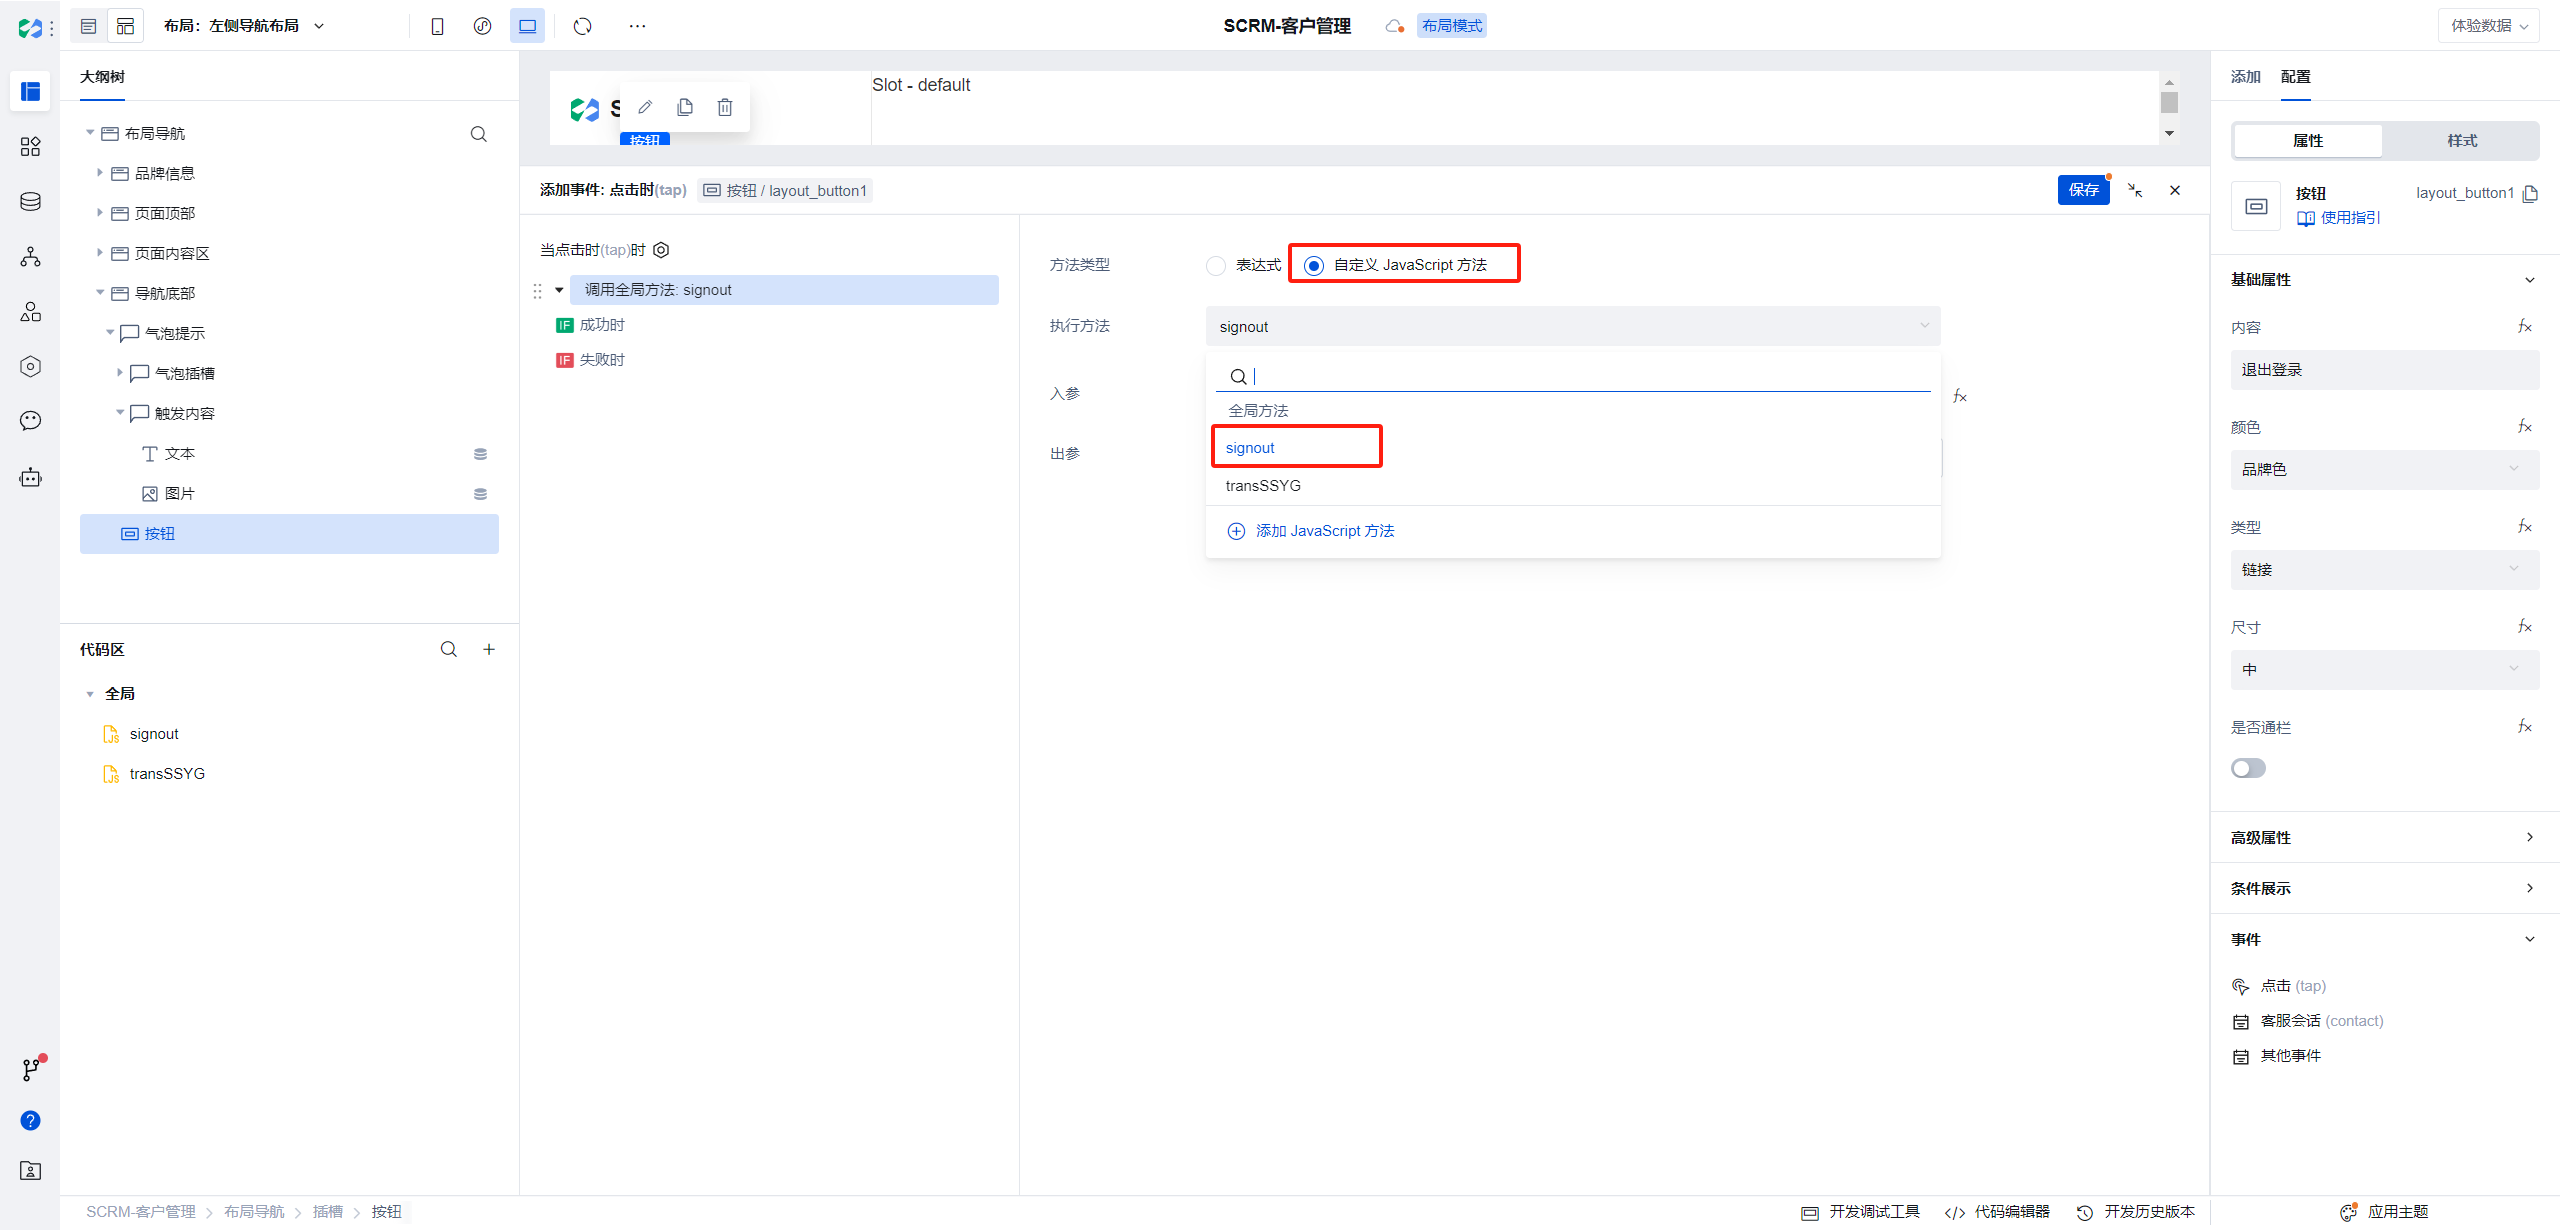
Click the Save button in the upper right corner of the event box.
Release
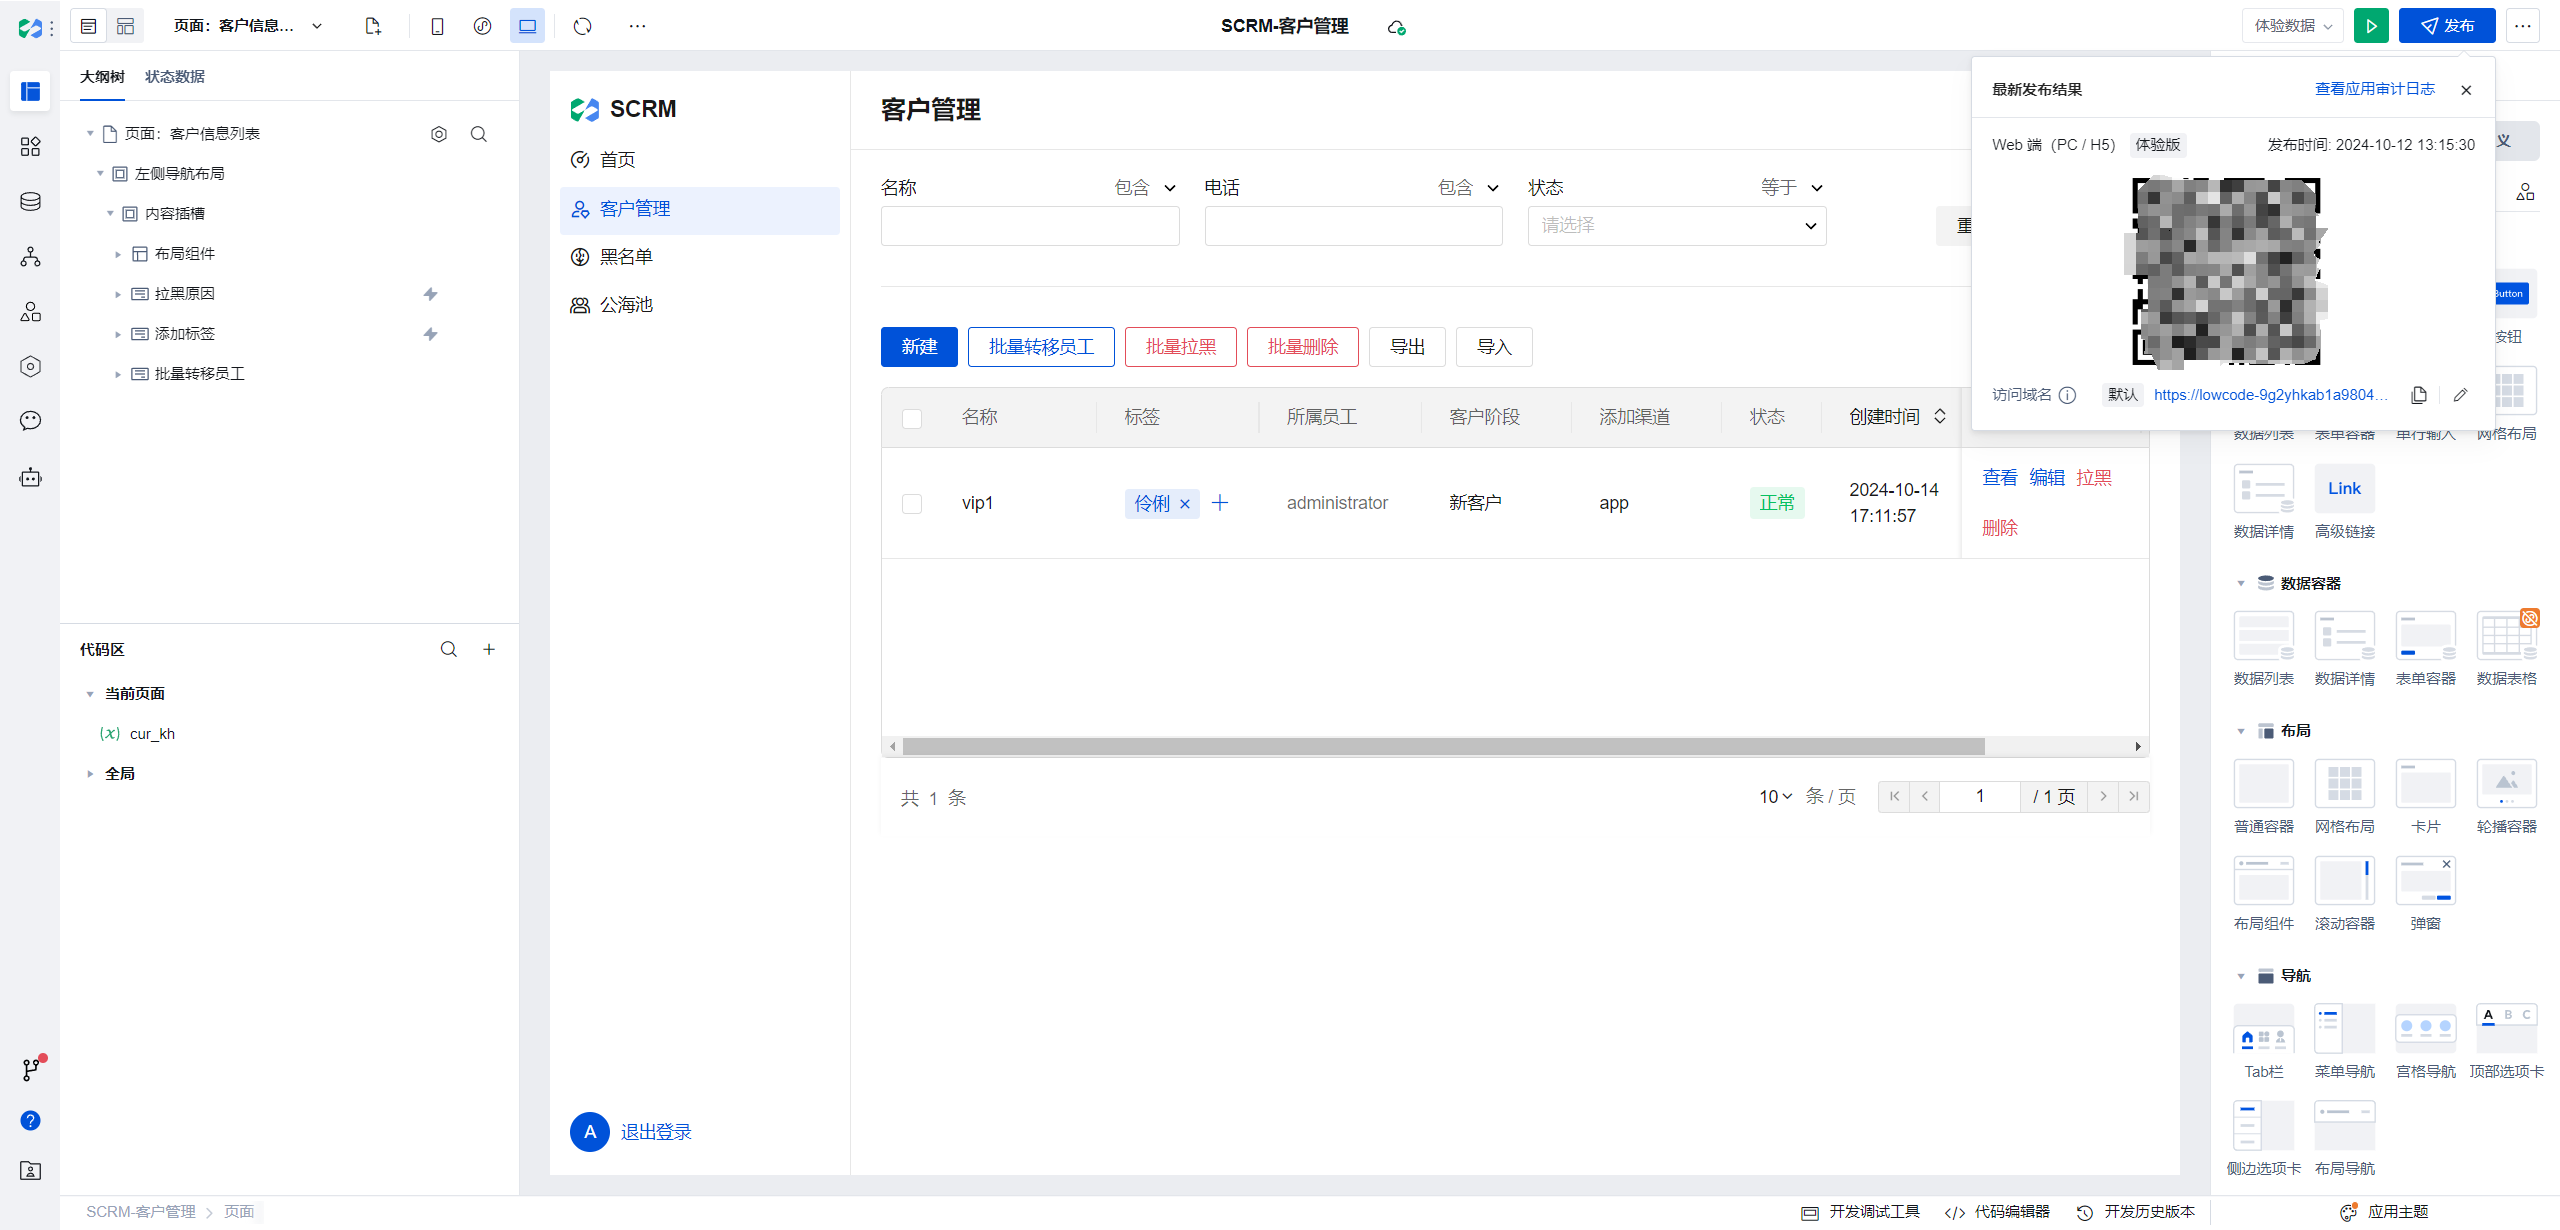
After completing the above configuration, you can publish it to the trial version for viewing. Publish Application
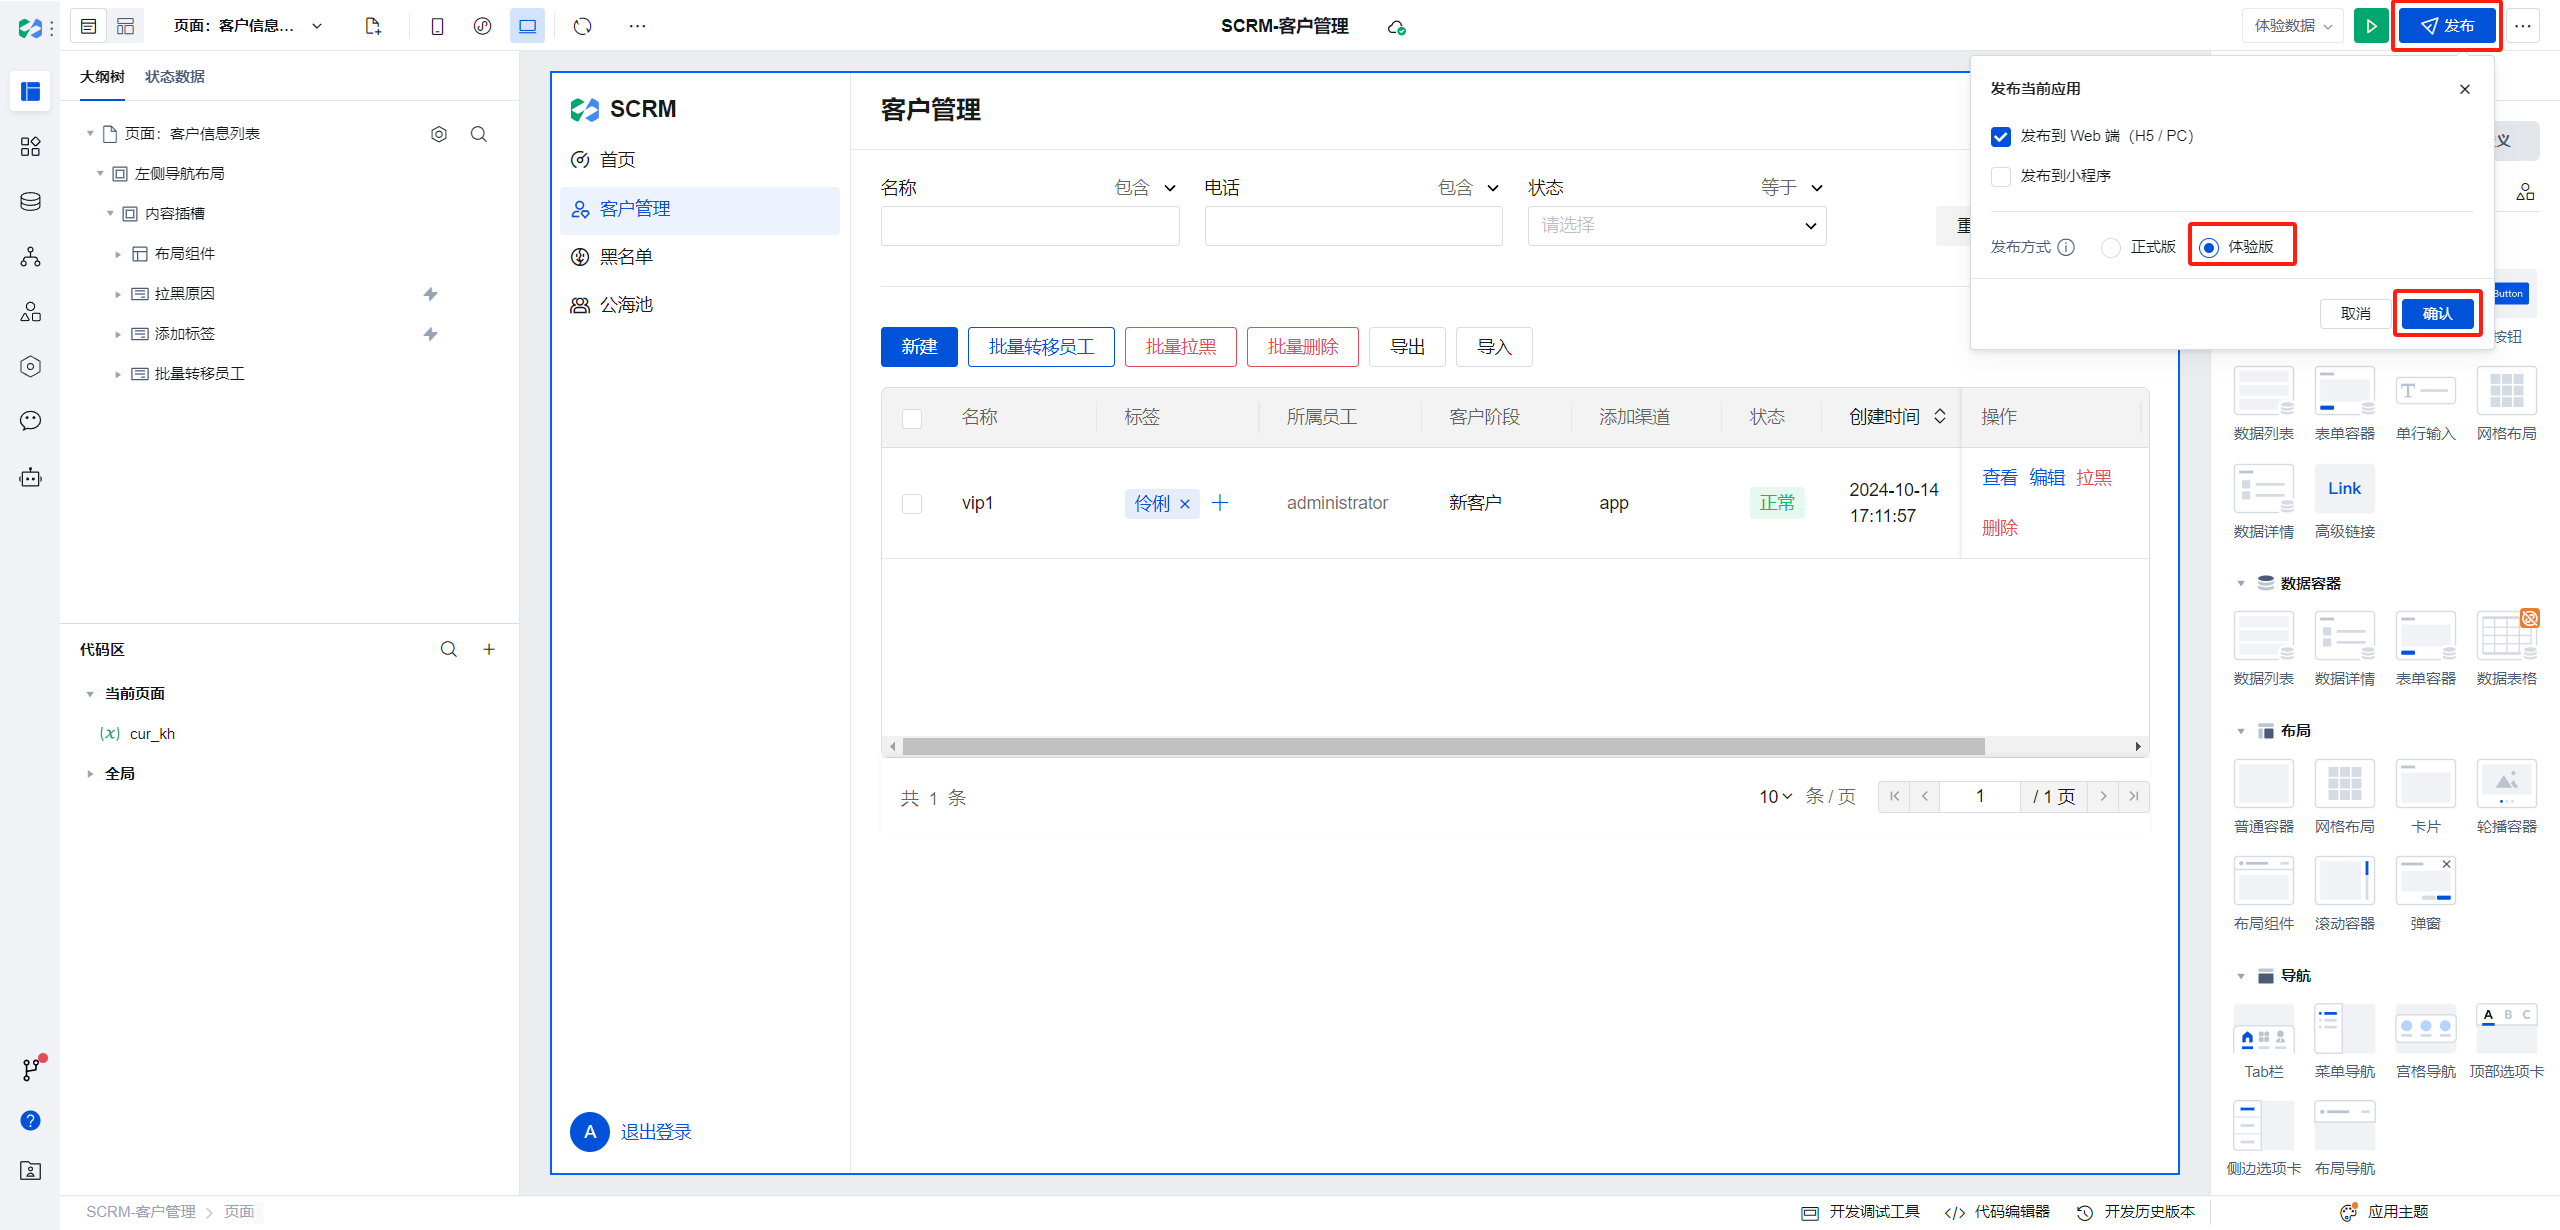
After successful publication, access to the trial version will be provided. Go to it to see the page.
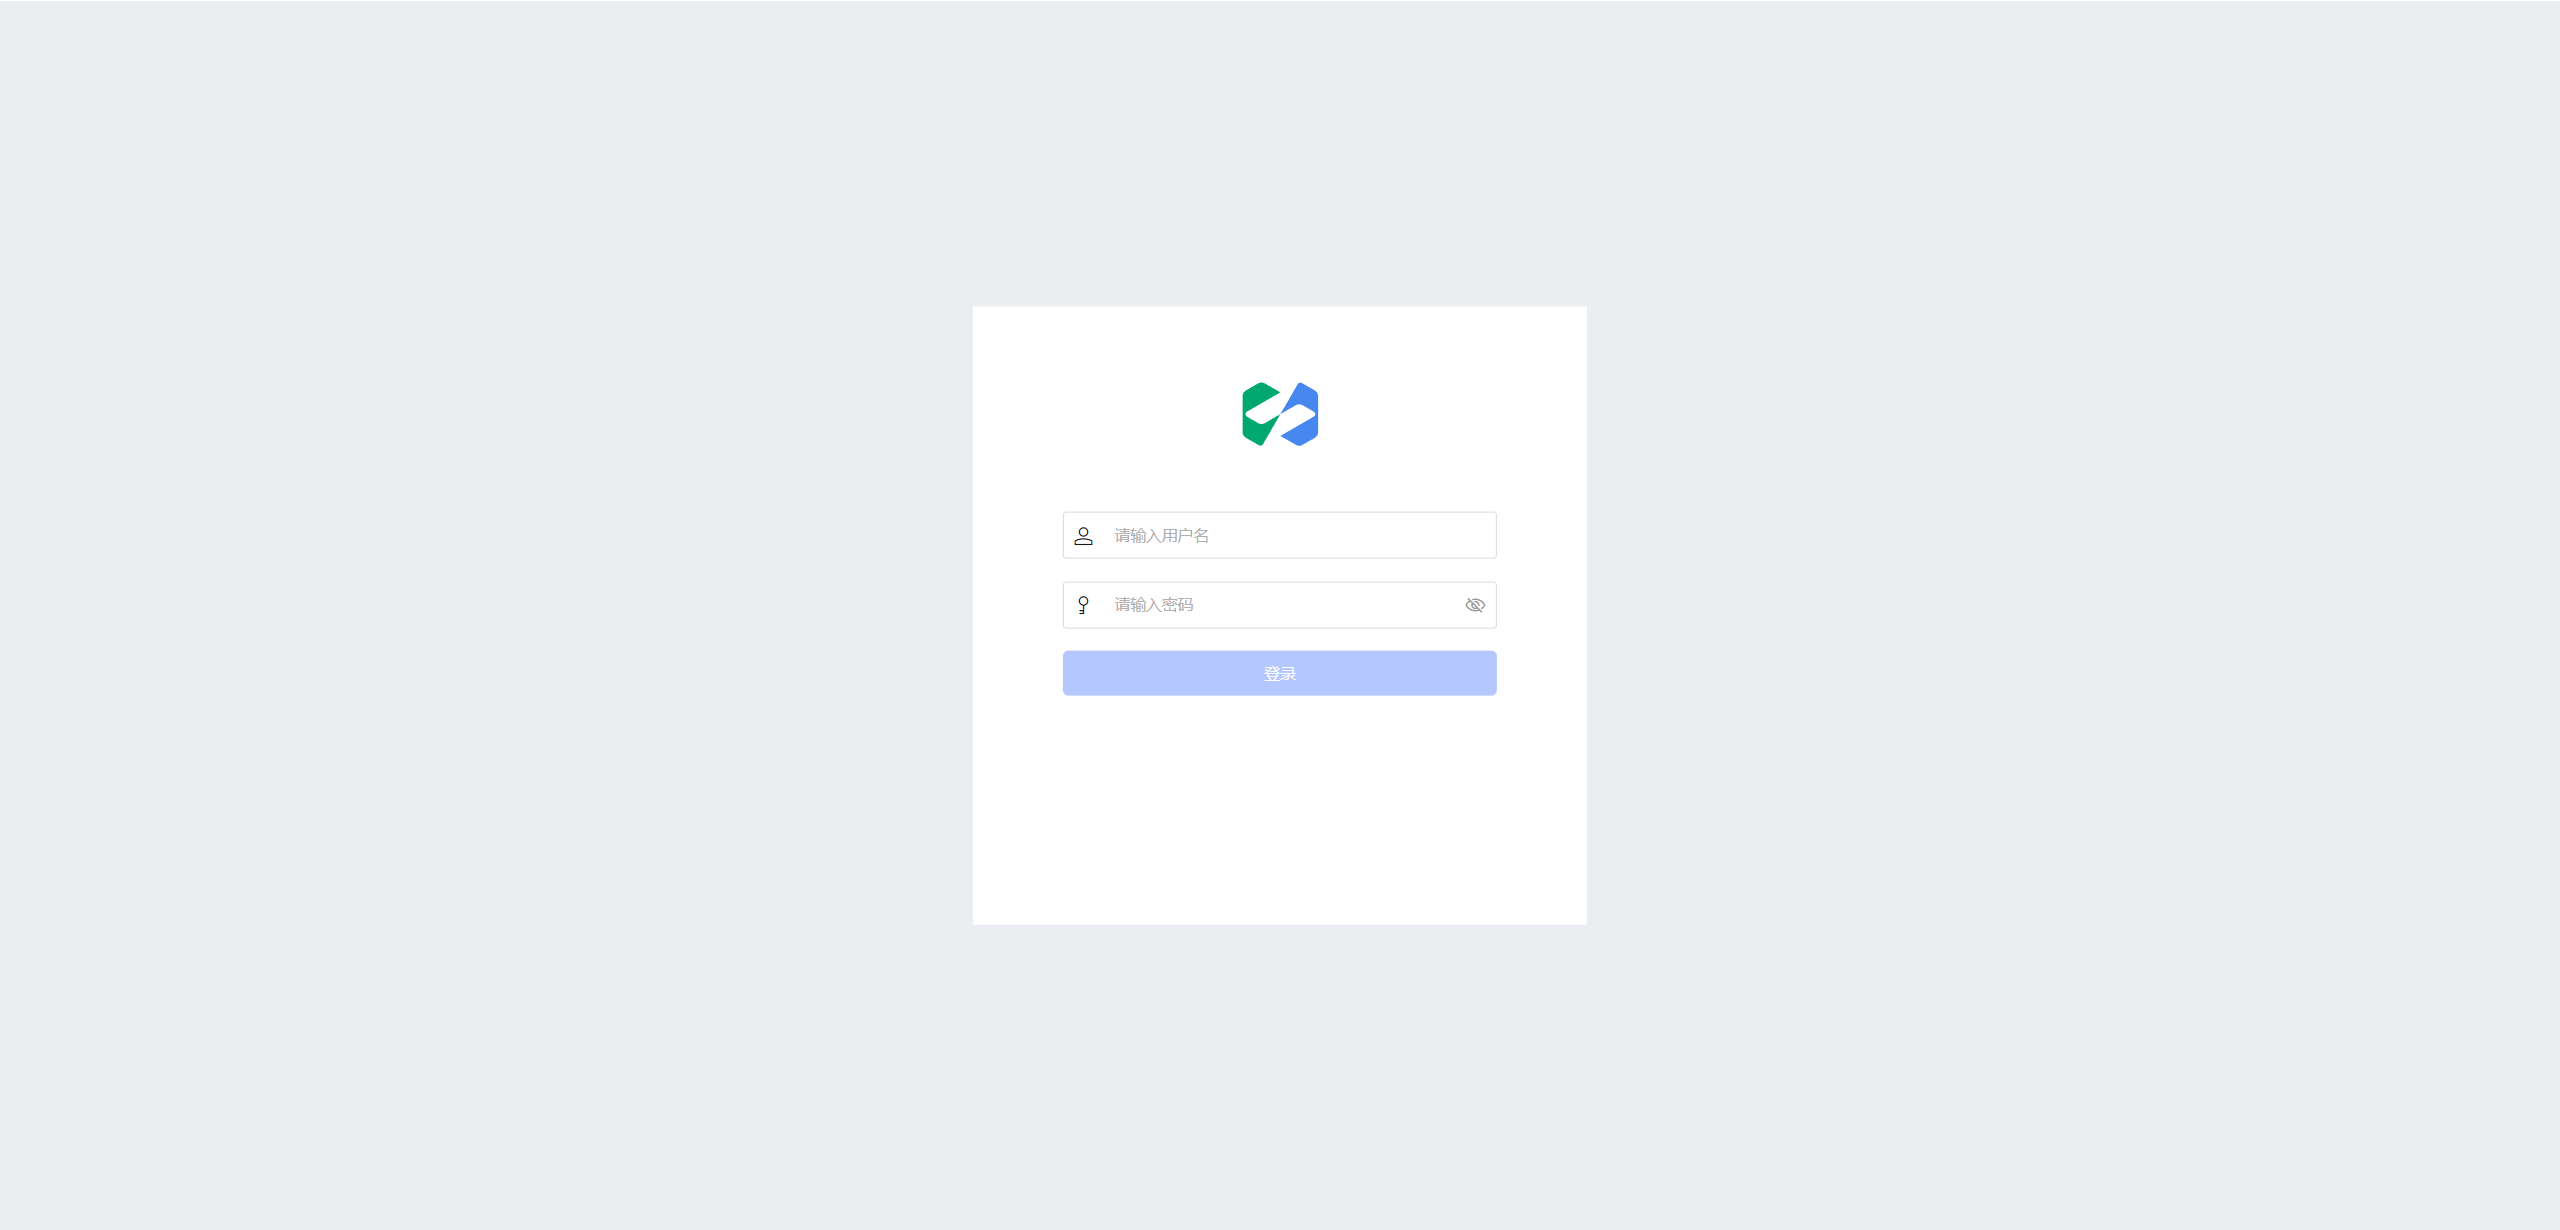
Trial Version
Login Page
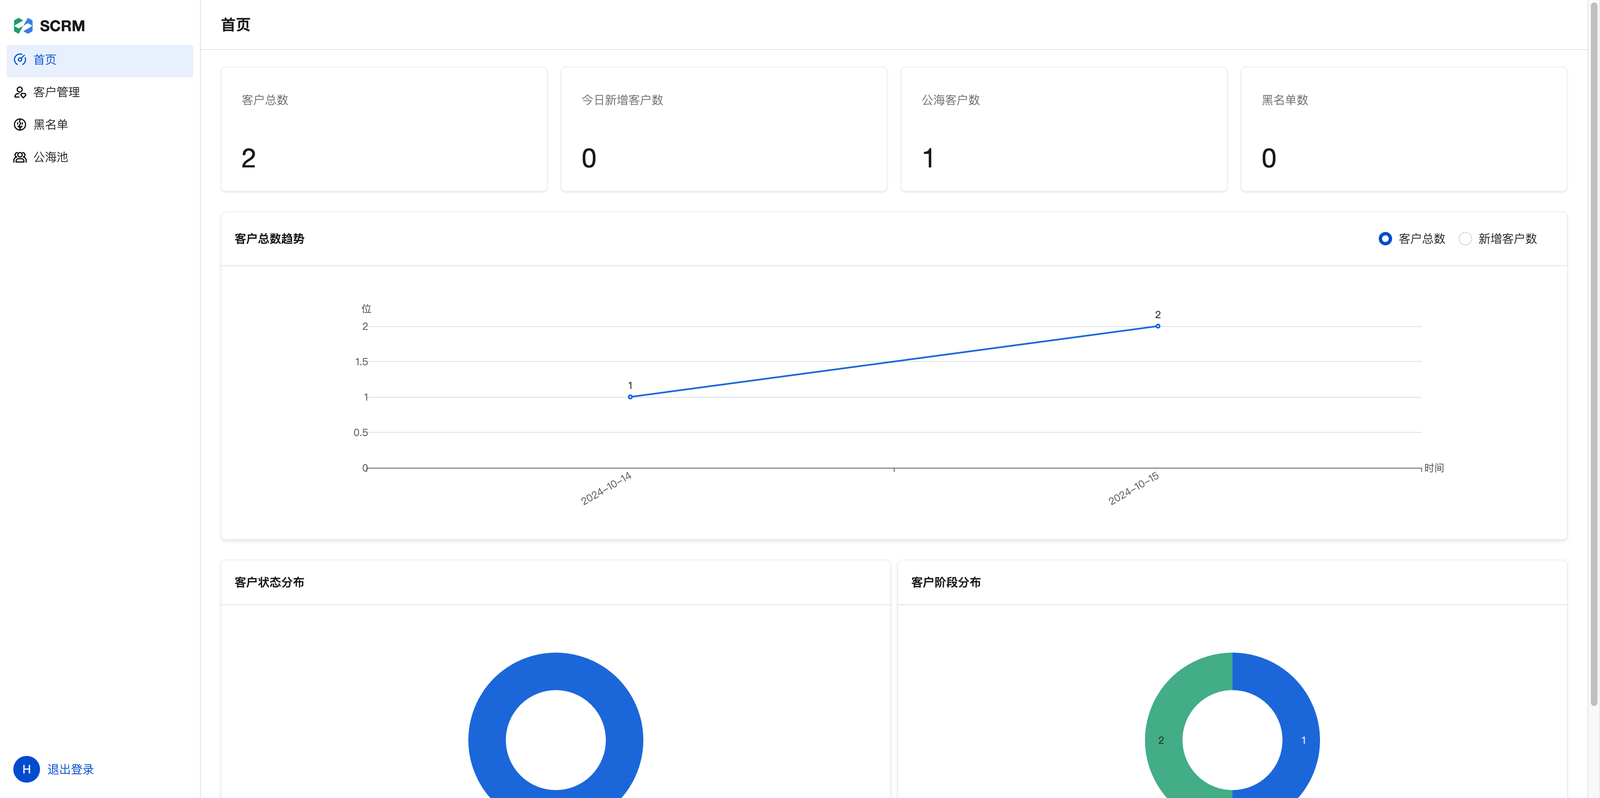
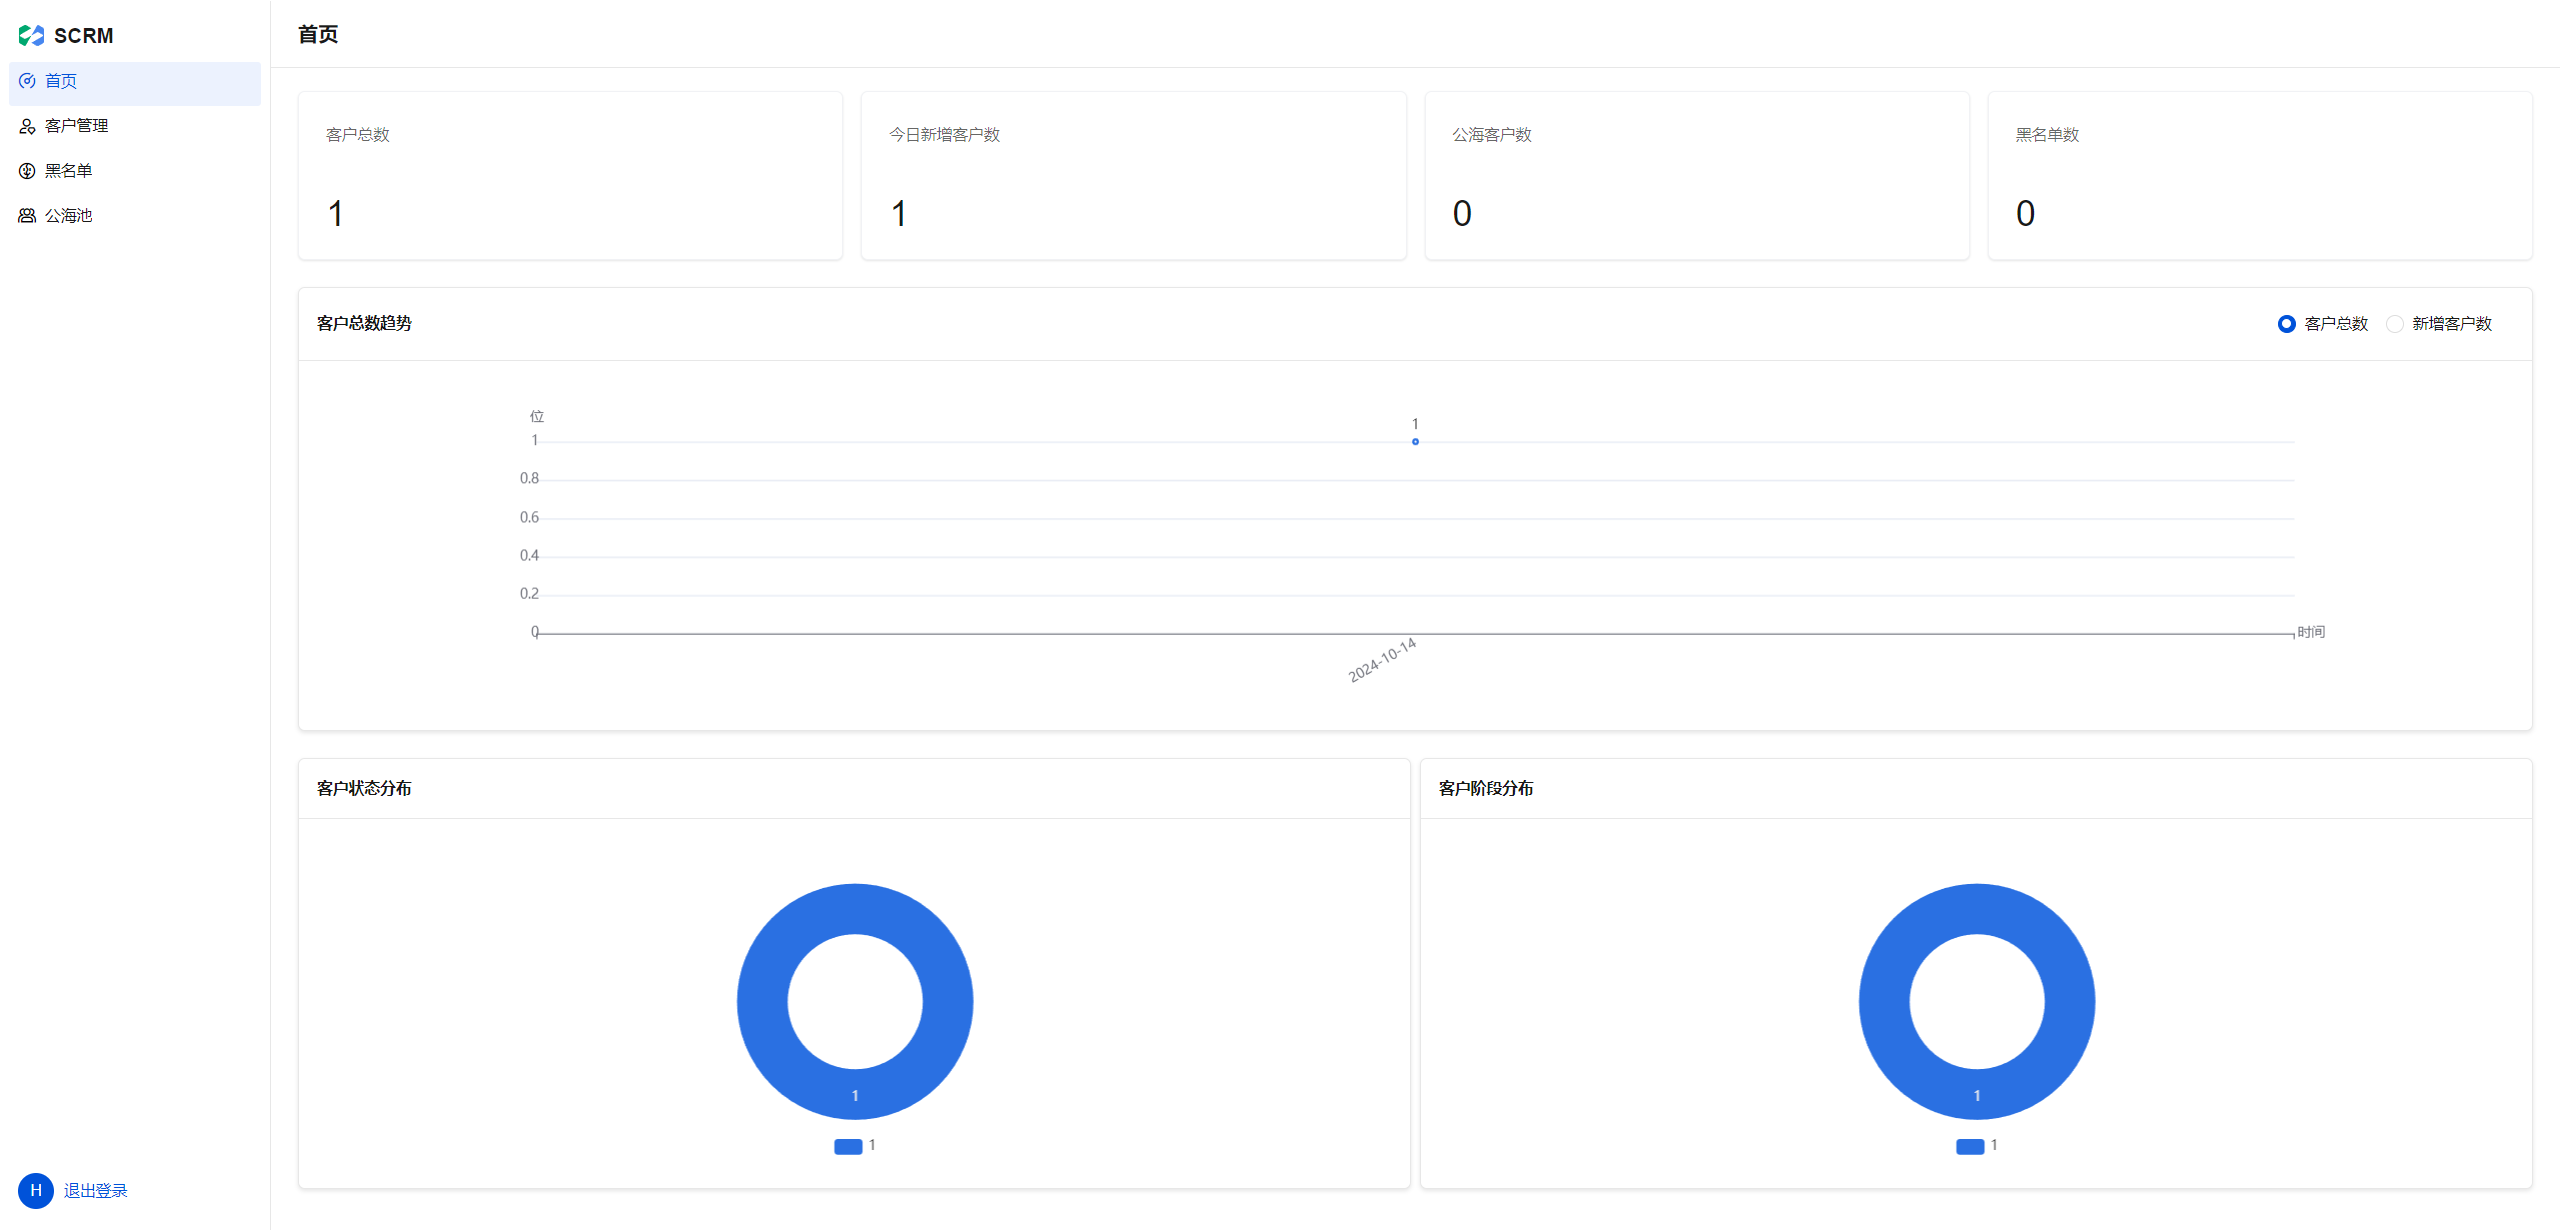
Home
Customer Management
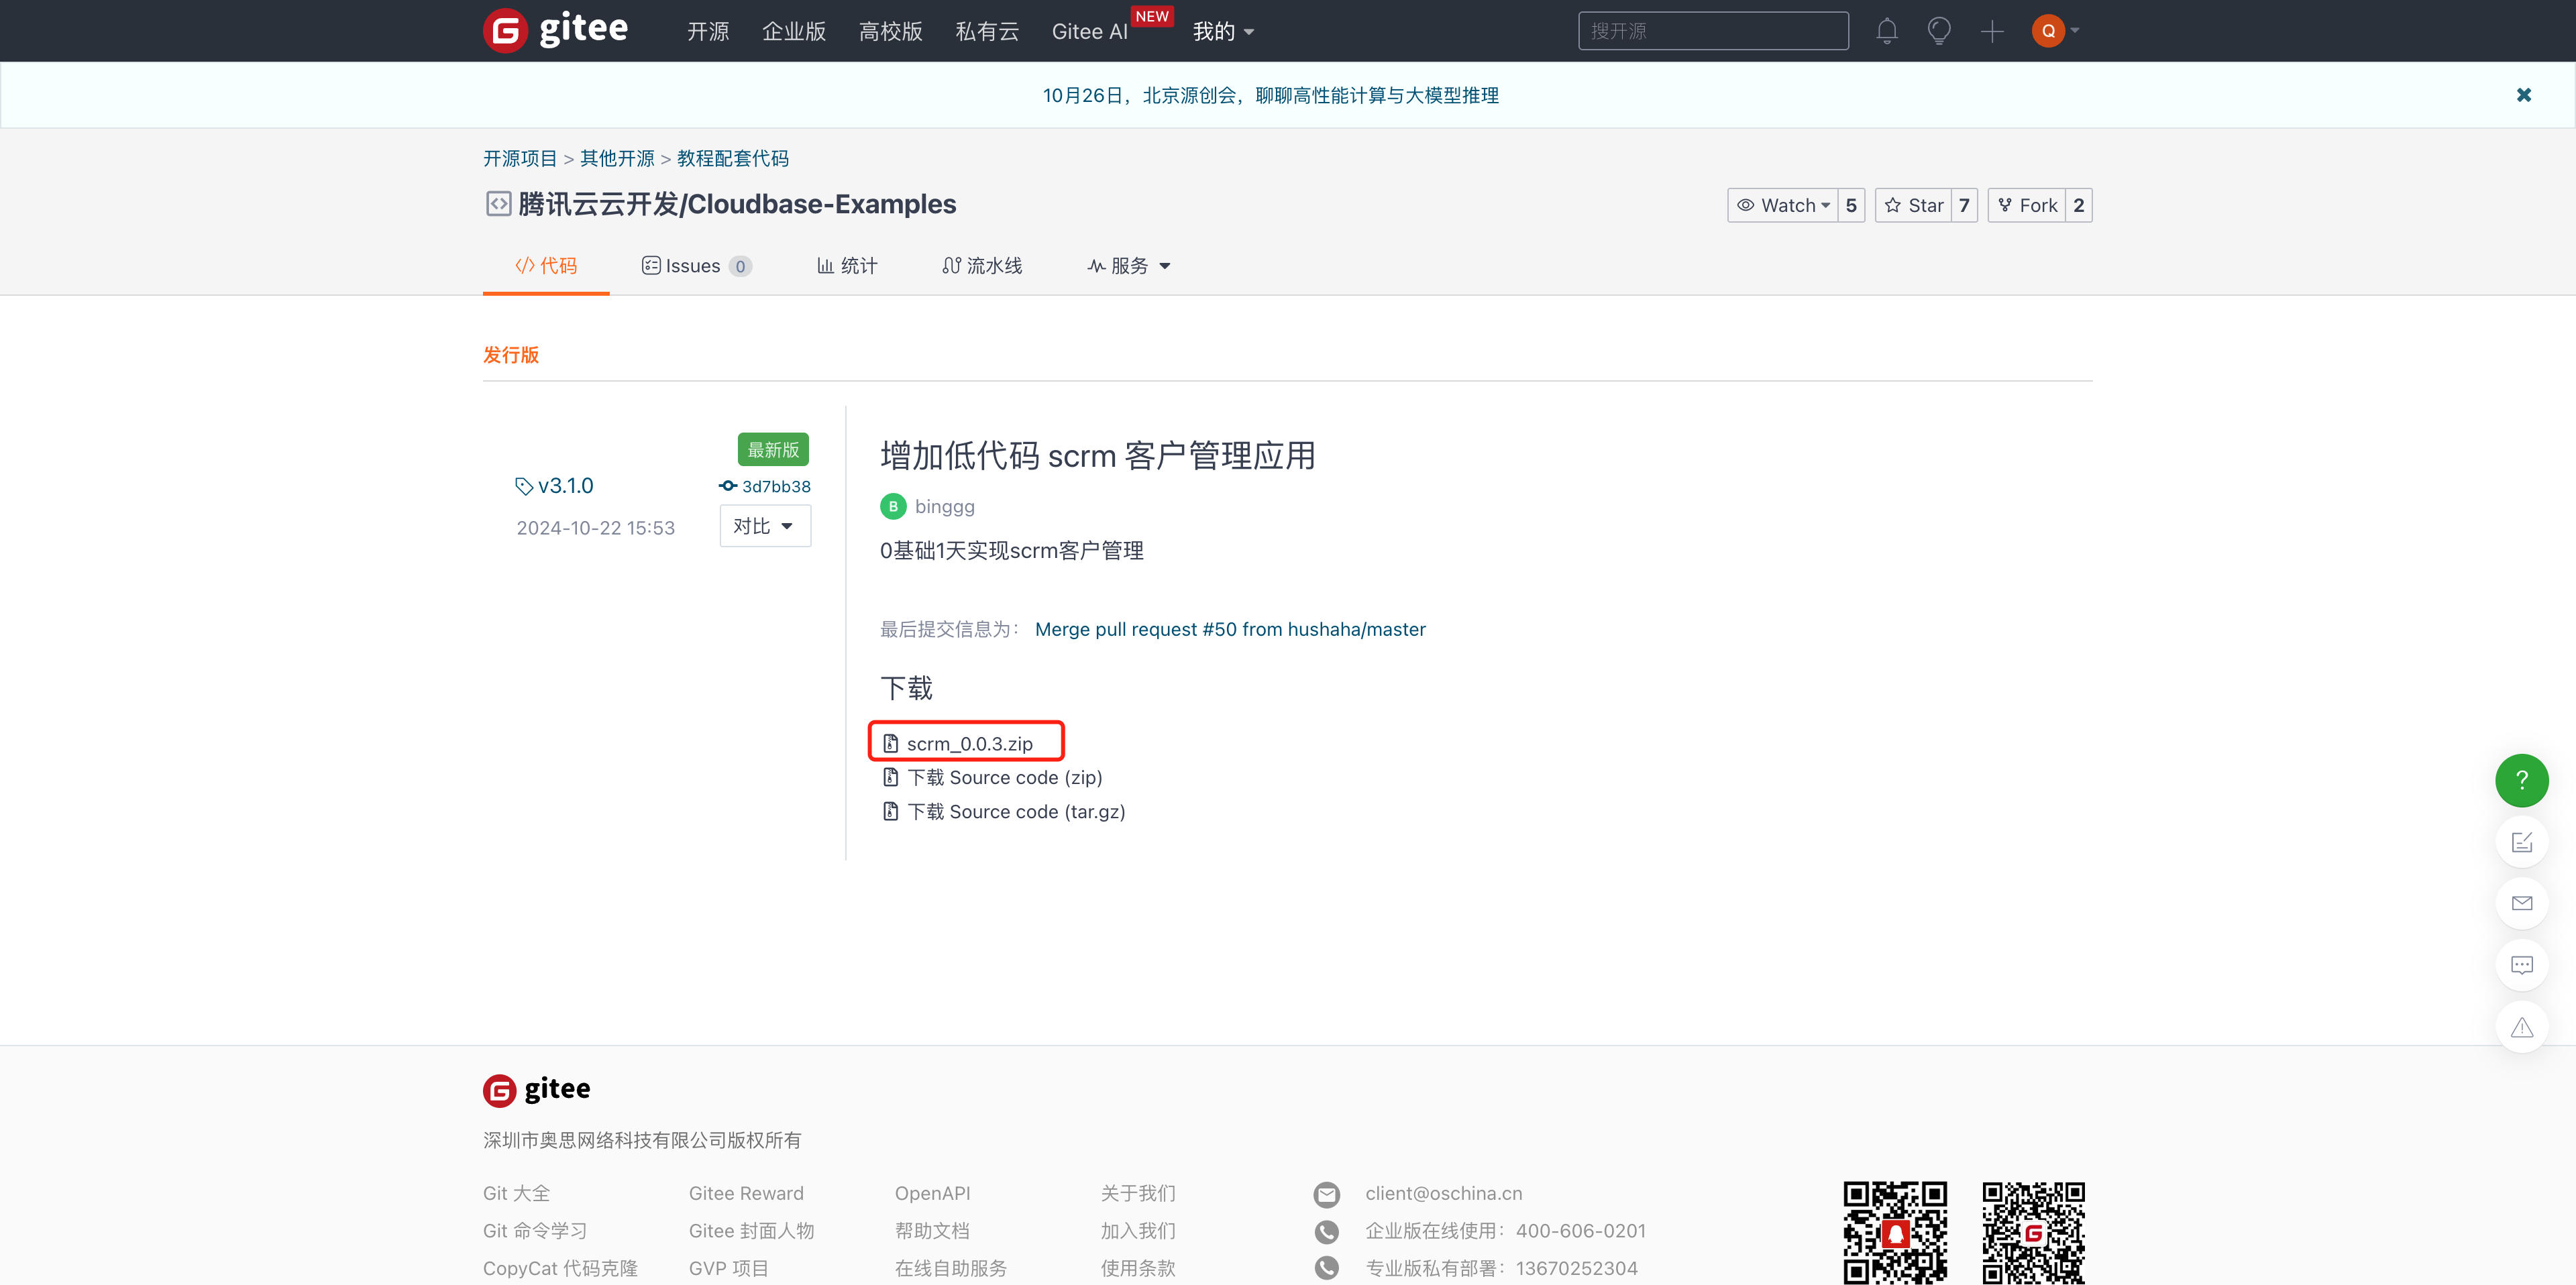
Installation Example
Click the source code address to download scrm_0.0.3.zip.
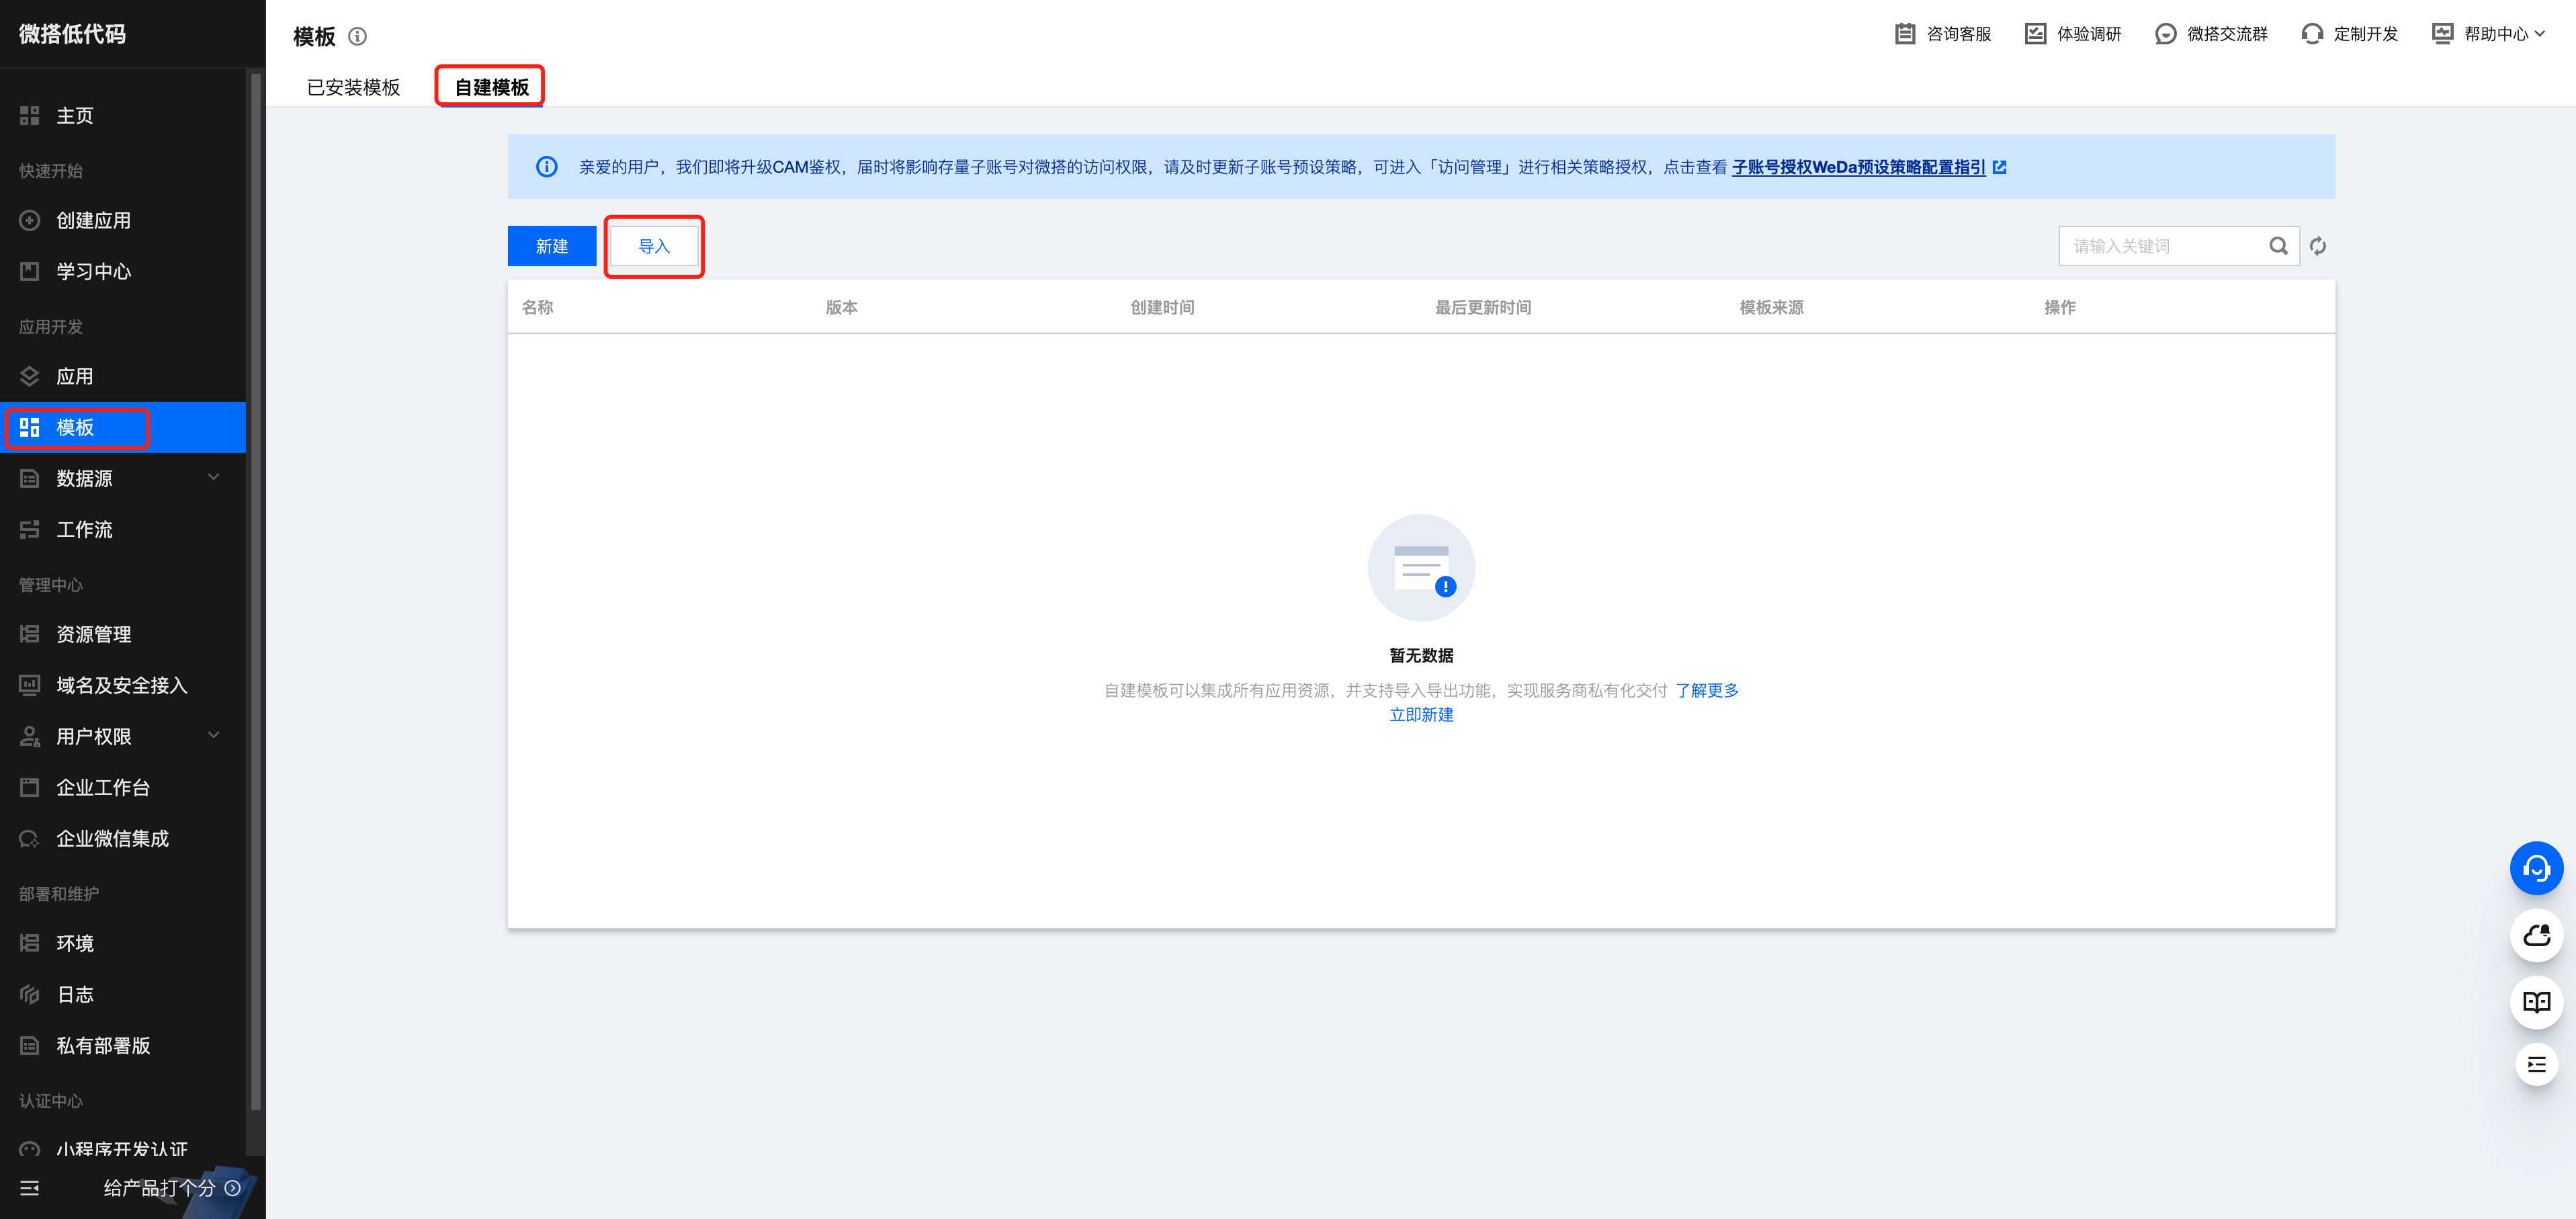
Go to the WeDa console, find the template module, select the custom template, and click Import.
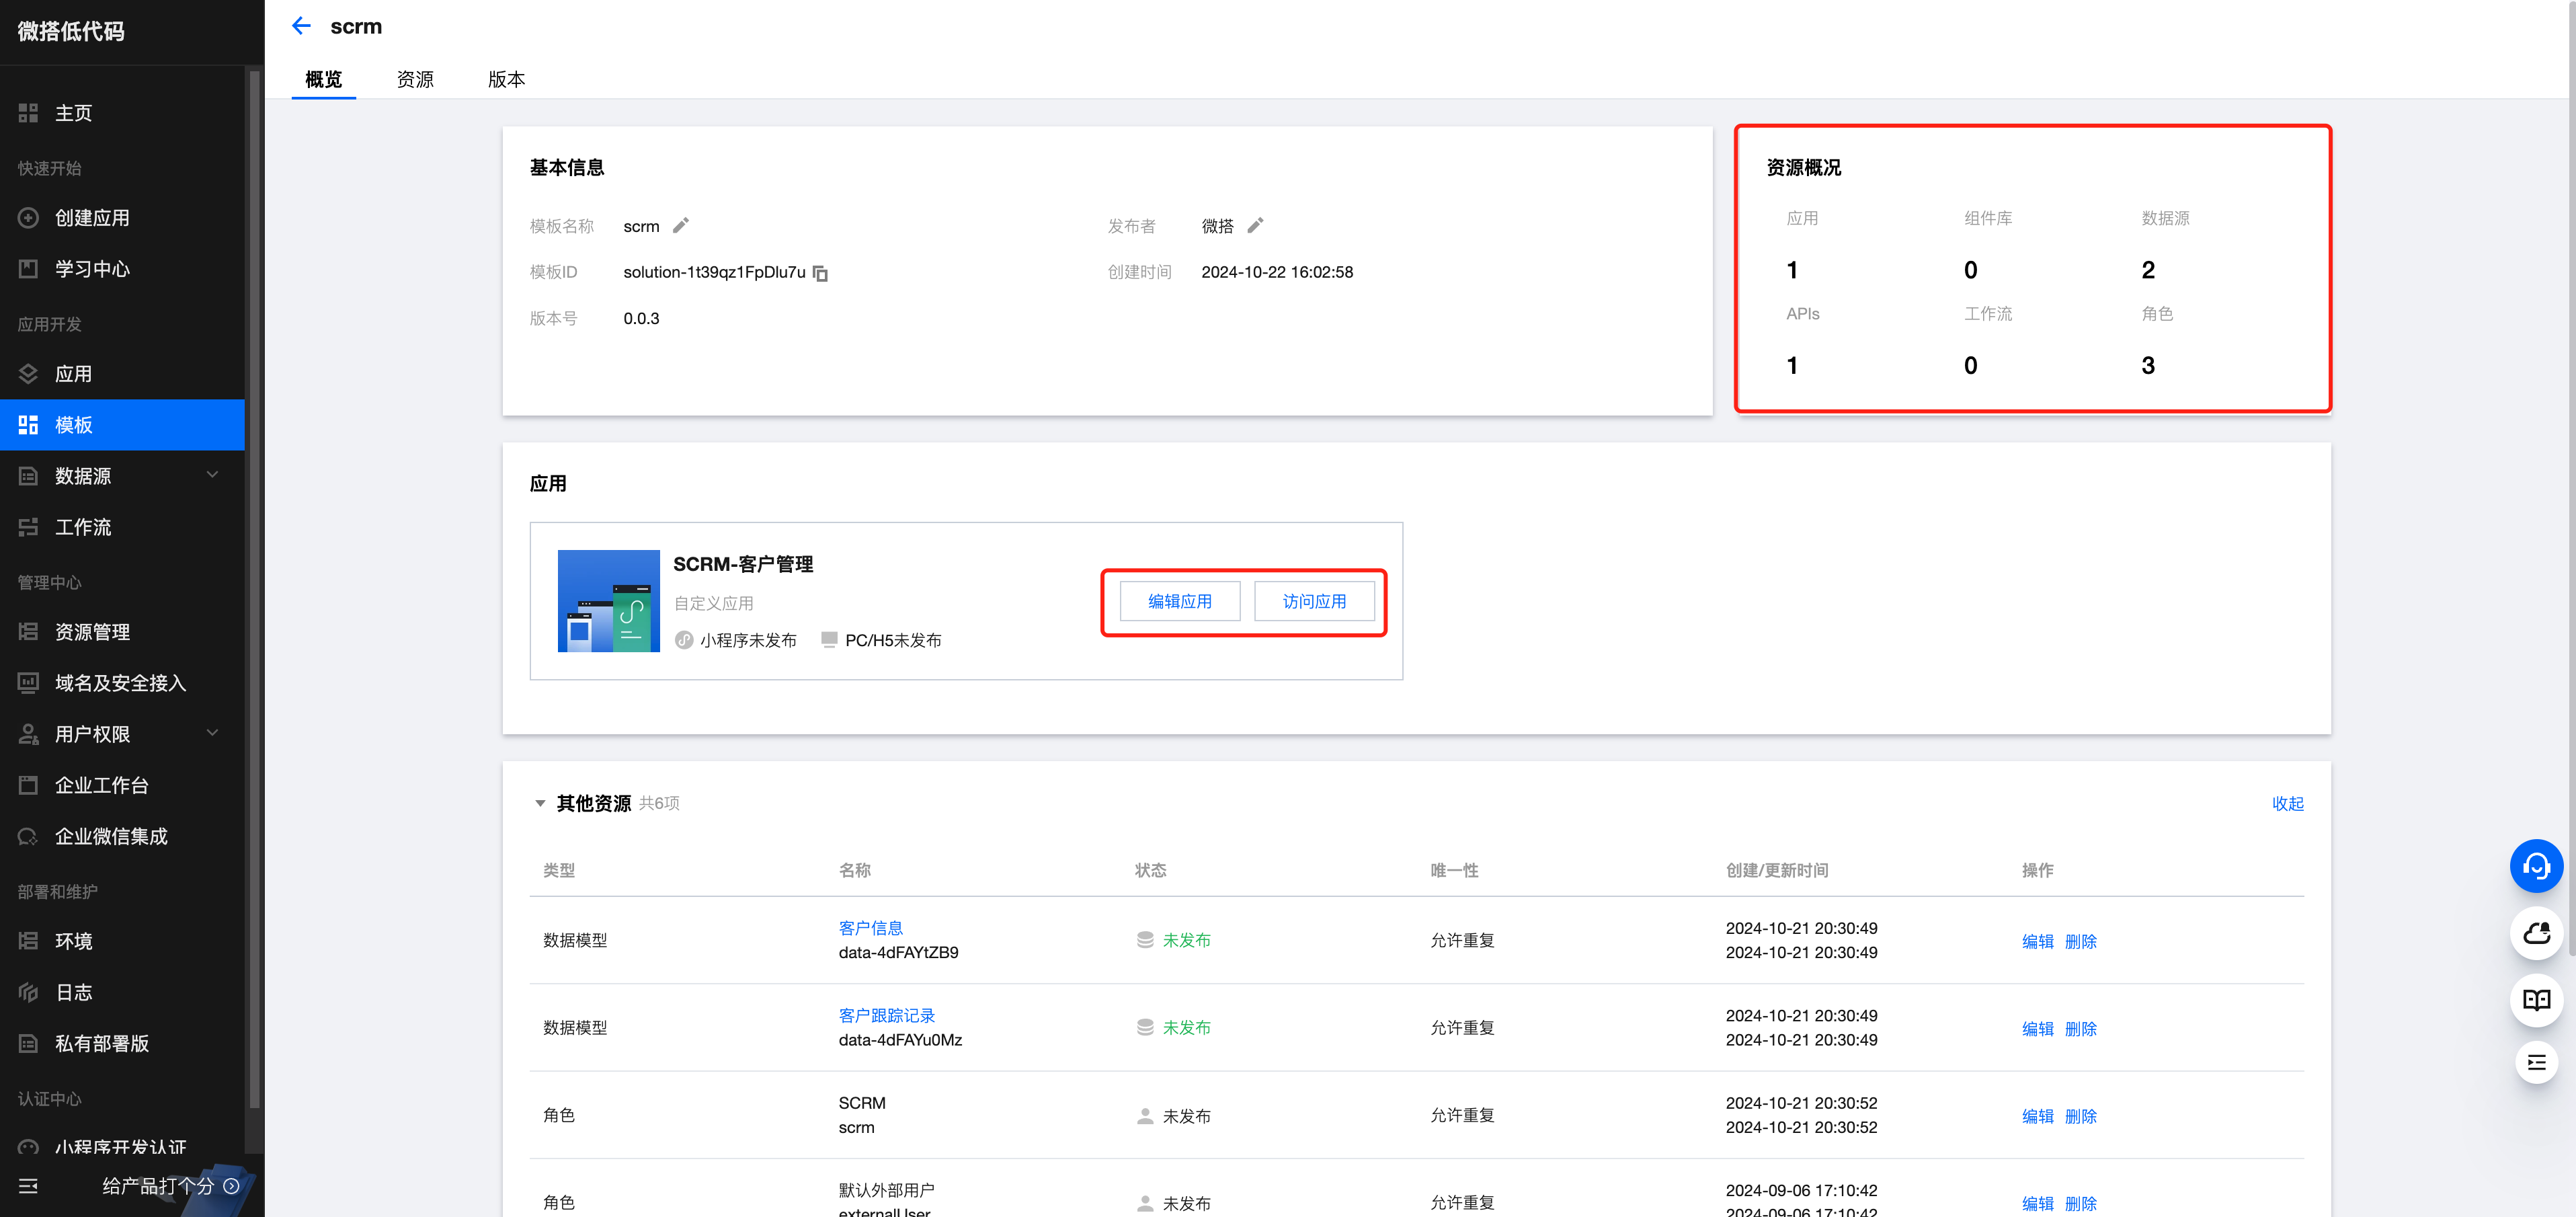
After a successful import, you will see a scrm template in the templates.
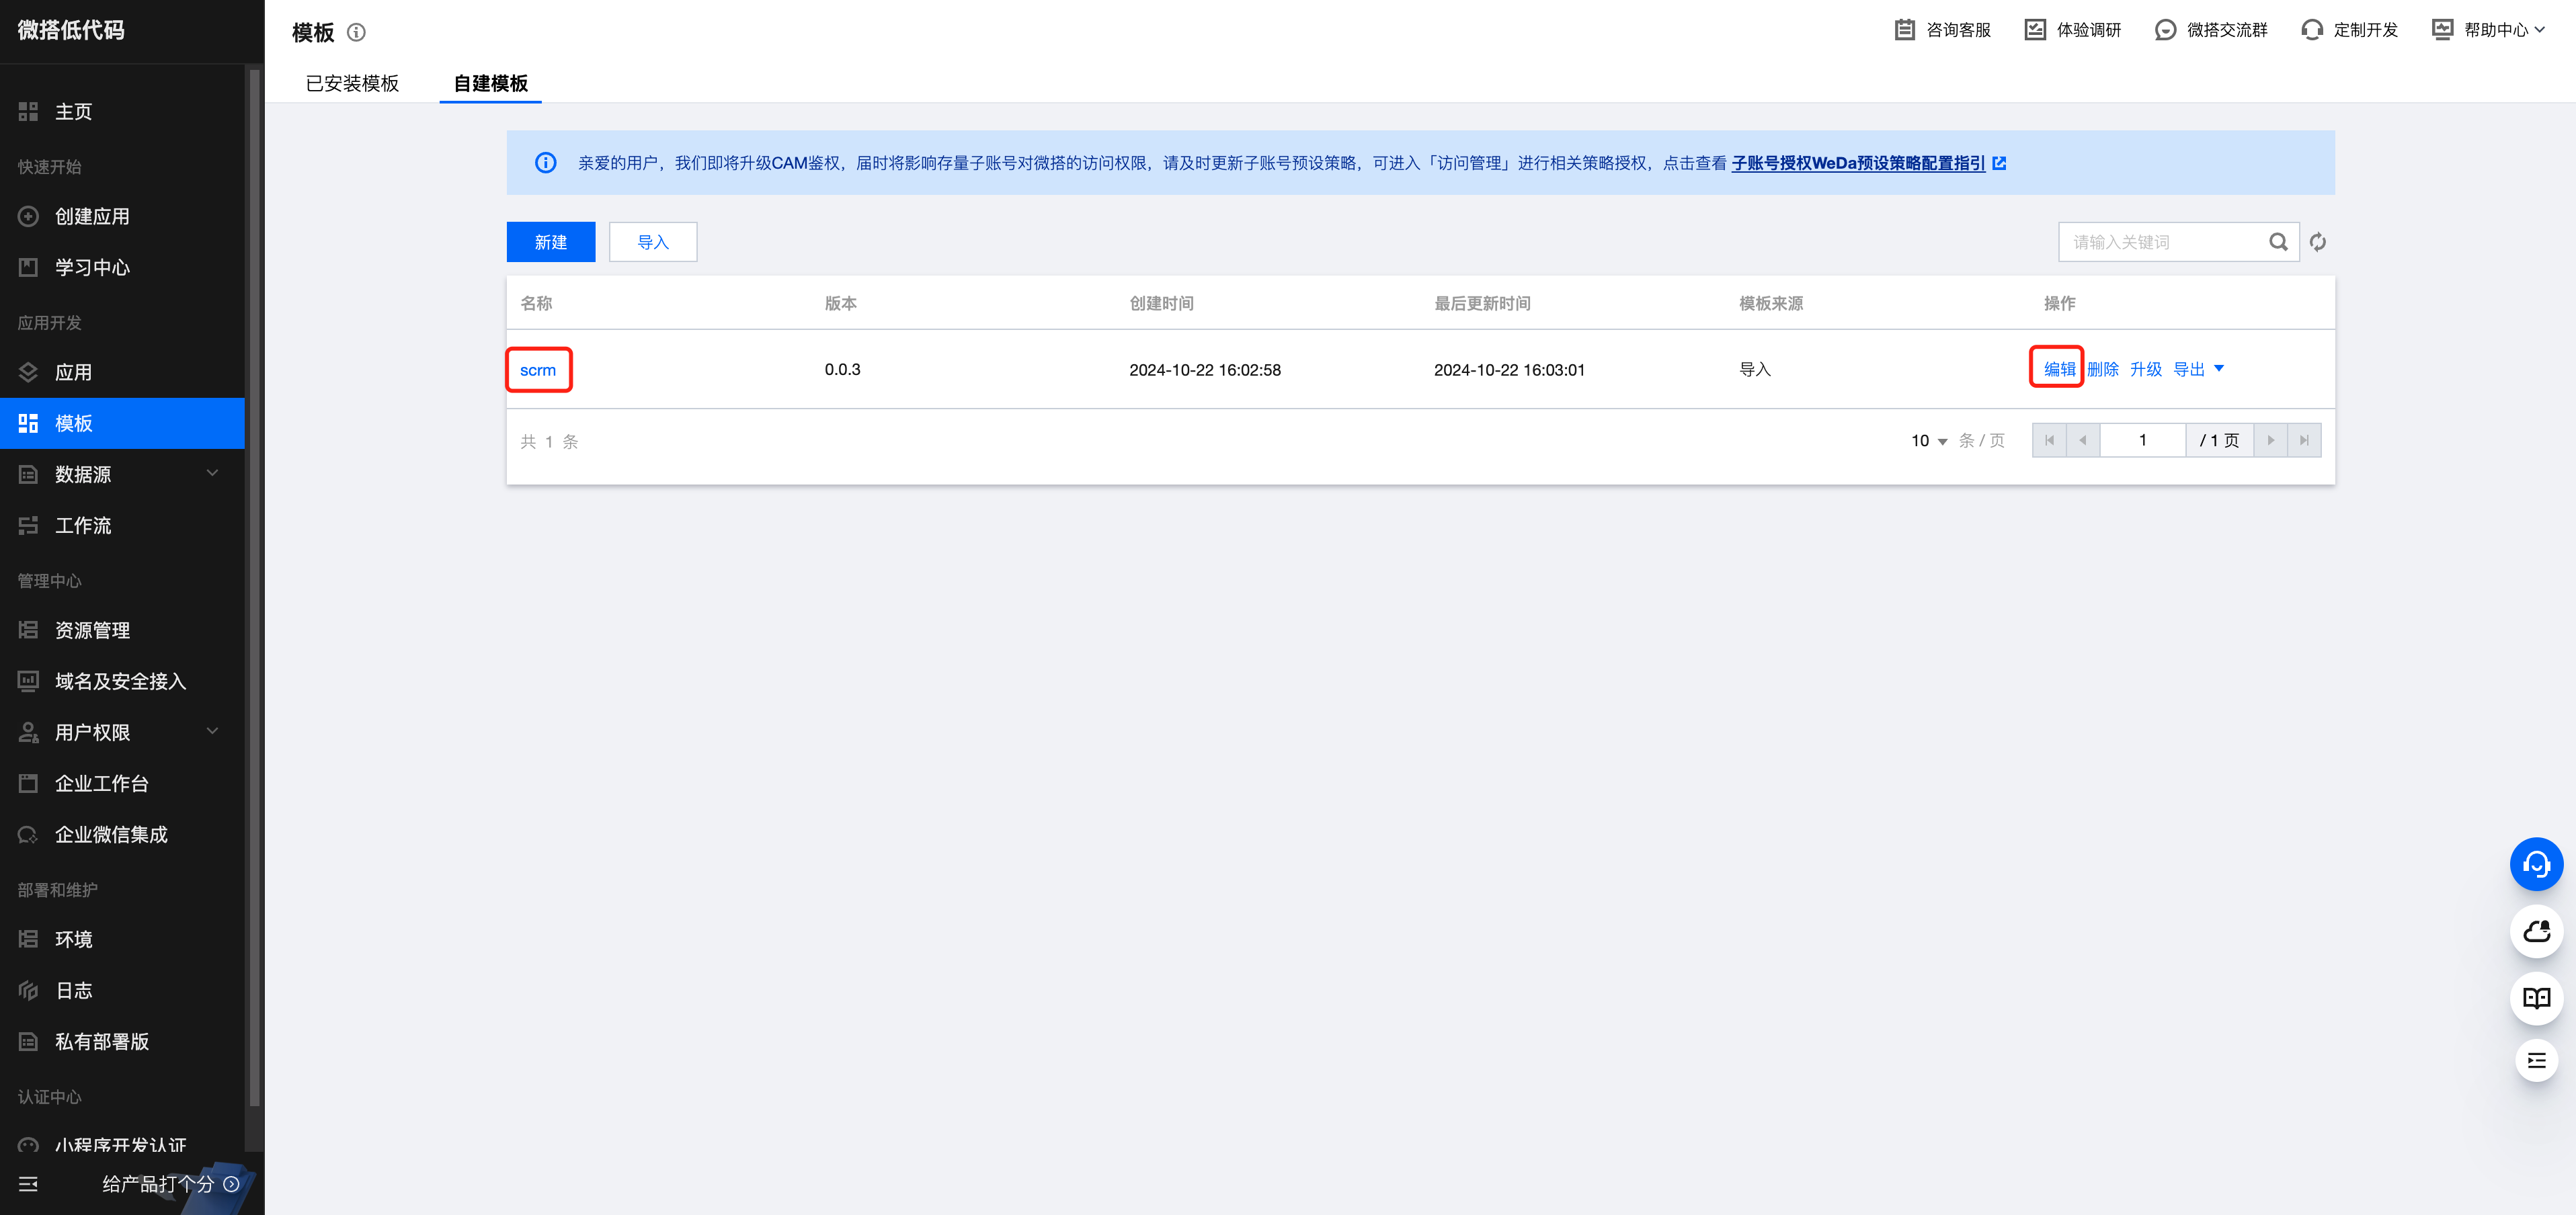
Click the name or Edit button to view the template details, including the data sources, number of applications, roles, etc.
Click Edit Application and Access Application to start using it immediately.