Sub-table Scenario Guide
Overview
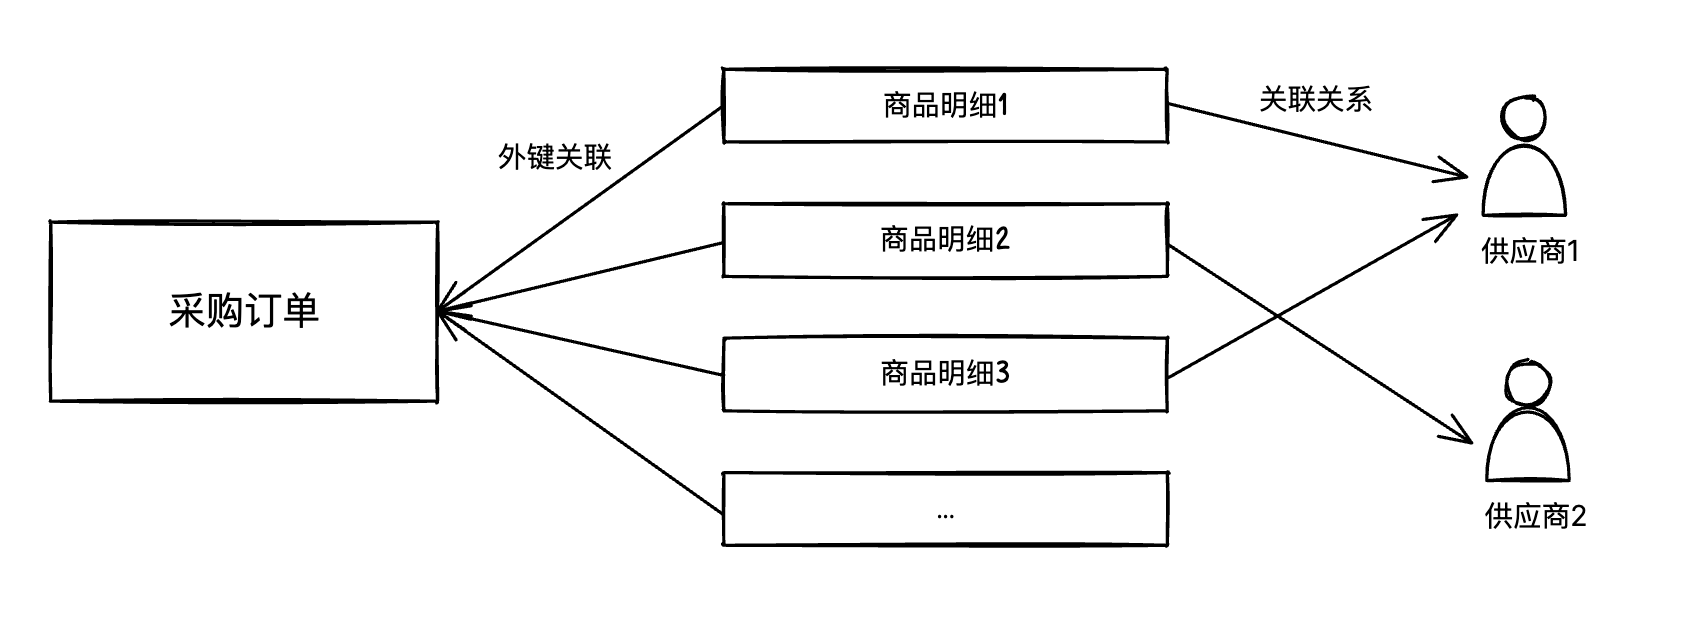
The sub-table scenario is used to handle one-to-many data entry requirements. For example, in a purchase order, you need to enter multiple product details, each containing product name, price, quantity, and other fields. To efficiently manage data, orders and product details are typically stored in separate tables and linked through foreign key associations.
- Orders and product details
- Customers and contacts
- Projects and task lists
- Other one-to-many data relationships
Data Association Design
In sub-table scenarios, parent and child tables are associated through foreign keys:
Association Principles
- Child table stores foreign key: Create a foreign key field in the child table (e.g.,
order_id) that points to the_idof the parent table record - Parent table is agnostic: The parent table does not need to maintain child table relationships, keeping the data structure simple
- Unidirectional association: Child table → Parent table unidirectional reference, avoiding the complexity of bidirectional maintenance
Association Configuration Example
Create an orderId field in the child table to associate with the _id field of the parent order table, implementing parent-child table association.
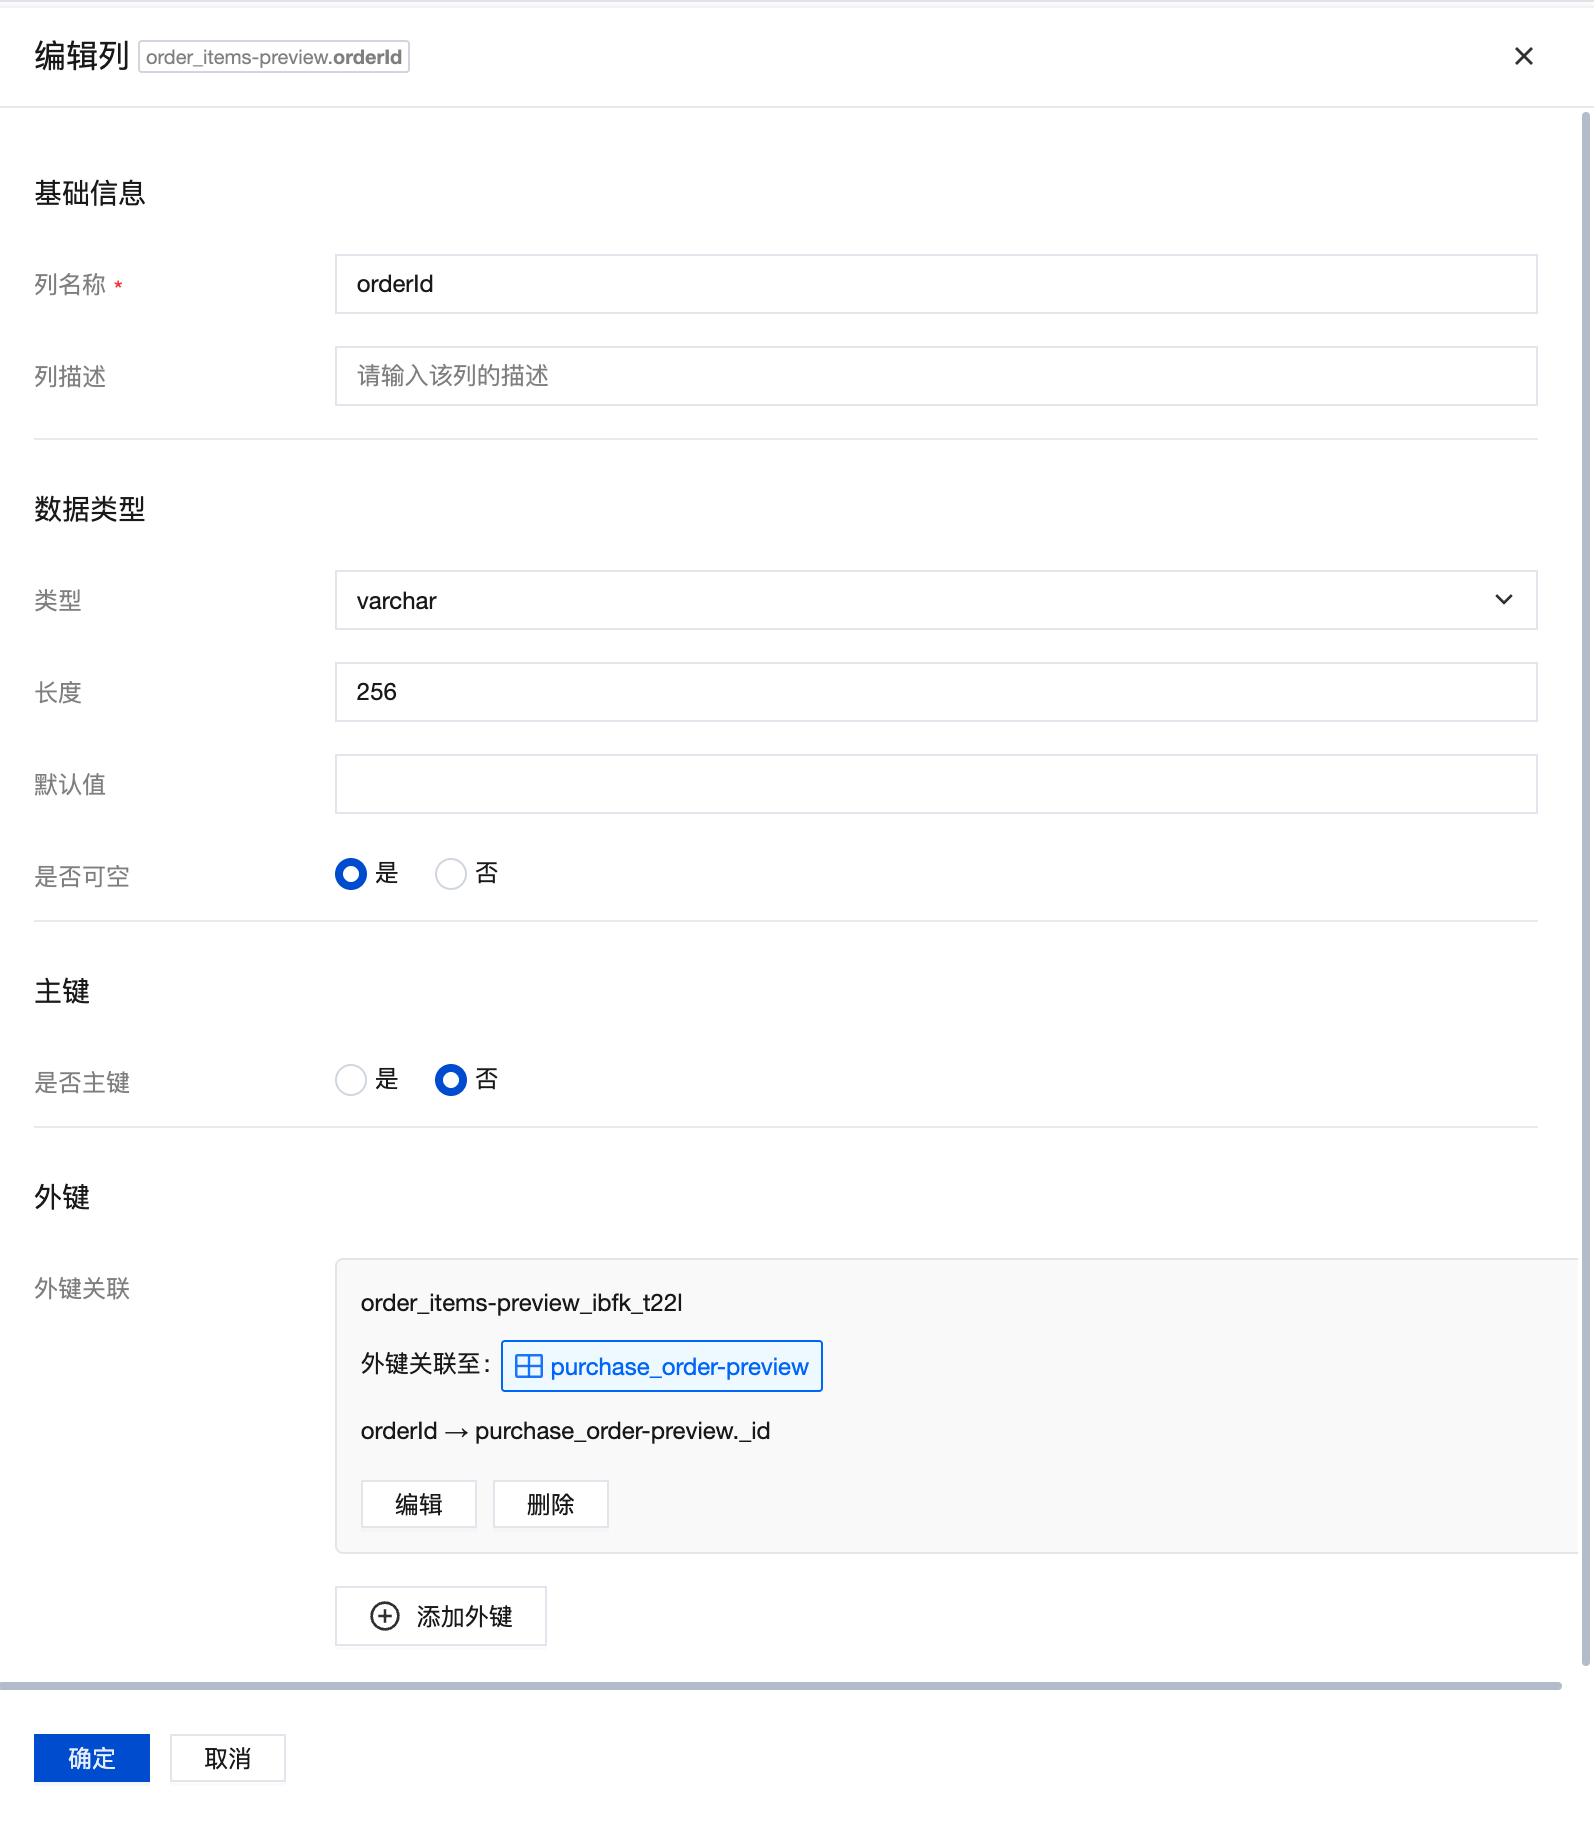
When creating a foreign key, the deletion rule can be set to "cascade". When data in the referenced table (order parent table) is deleted, records in the current table (product details table) that reference that data will also be deleted.
Data Processing Flow
When submitting a page, the data processing order is as follows:
- Process parent table first: Create or update parent table data, get the
_idof the parent table record - Then process child table: Use the parent table
_idas the foreign key to batch process child table create, update, and delete operations
If association relationship fields are used, field format conversion needs to be handled separately in the cloud function (converting simple values to {_id: value} format).
Since it involves multiple database interactions and data comparison logic, child table data processing will be implemented using cloud functions, and the frontend only needs to call the cloud function to complete data updates.
Sub-table Cloud Function Implementation
Processing Steps
Sub-table processing is divided into the following steps:
1. Data Splitting
The cloud function receives sub-table data and compares current data with original data to get the data that needs to be added, updated, or deleted:
- New data: Records without
_idin current data - Updated data: Records with
_idin current data whose field values differ from original data - Deleted data: Records that exist in original data but not in current data
2. Batch Operations
- Batch creation: Collect all new data and create at once using
createMany - Parallel updates: Collect all updated data and execute multiple update operations in parallel using
Promise.all - Unlink association: Set the foreign key field of child table data to
null. If you need to delete data when unlinking, this can also be implemented in this step
3. Association Field Processing
Since association relationship fields have the data format {_id: value} when creating, separate conversion processing is required.
Cloud Function Parameters
The cloud function input parameters are as follows:
| Parameter | Type | Description |
|---|---|---|
| mainId | string | Parent table data object _id |
| subList | SubTableItem[] | Child table list containing all child table information to process |
| isProd | boolean | Environment identifier, true for production, false for pre-release |
SubTableItem format:
| Parameter | Type | Description |
|---|---|---|
| subName | string | Child table data model name |
| parentId | string | Foreign key field in child table that associates with parent |
| subData | Object[] | Current child table data array |
| subOldData | Object[] | Original child table data array (for comparison) |
| relateField | string | Association relationship field keys, multiple separated by commas |
Complete Code Example
View Complete Cloud Function Code
const cloudbase = require('@cloudbase/node-sdk');

const app = cloudbase.init({
	env: cloudbase.SYMBOL_CURRENT_ENV,
});
const models = app.models;

/**
 * Handle parent table and multiple child tables data relationships
 * @param {Object} params - Function parameter object
 * @param {string} params.mainId - Parent table data object _id
 * @param {SubTableItem[]} params.subList - Child table list containing all child table information to process
 * @param {boolean} [params.isProd=false] - Environment identifier, true for production, false for pre-release
 * @returns {Promise<any>} Returns processing result object
 */
exports.main = async function ({ mainId, subList, isProd = false }, context) {
	try {
		const envType = isProd ? 'prod' : 'pre';

		// Process create, update, and delete operations for each child table
		for (const subItem of subList) {
			const { subName } = subItem;

			console.log(`Starting to update child table ${subName} data`);
			await executeSubTableOperations(subItem, mainId, envType);
			console.log(`Finished updating child table ${subName}`);
		}

		return {
			success: true,
			message: 'Data processing successful',
		};
	} catch (error) {
		console.error('Data processing failed:', error);
		throw new Error(`Data processing failed: ${error.message}`);
	}
};

/**
 * Convert association fields to object format
 * @param {string} relateField - Association field names, multiple separated by commas
 * @param {Object} obj - Original data object
 * @returns {Object} Converted data object
 */
function transRelateField(relateField, obj) {
	if (!relateField) return obj;

	const fields = relateField.split(',');
	return fields.reduce((acc, field) => {
		if (acc[field]) {
			acc[field] = {
				_id: acc[field],
			};
		}
		return acc;
	}, { ...obj });
}

/**
 * Execute child table data create, update, and delete operations
 * @param {SubTableItem} subItem - Child table information
 * @param {string} mainId - Parent table data object _id
 * @param {string} envType - Environment type
 * @returns {Promise<void>}
 */
async function executeSubTableOperations(subItem, mainId, envType) {
	const { subName, parentId, subData, subOldData, relateField } = subItem;
	const model = models[subName];

	// Parameter validation
	if (!model) {
		throw new Error(`Data model ${subName} does not exist`);
	}
	if (!Array.isArray(subData)) {
		throw new Error(`Child table data ${subName} must be array format`);
	}

	// Collect data to be added and updated
	const addDataList = [];
	const updateList = [];
	const updatePromises = [];

	// 1. Iterate through current data, handle creation and updates
	for (const item of subData) {
		// Filter out empty rows
		const hasValidData = Object.keys(item).some((key) => {
			if (key === '_id' || key === parentId) return false;
			const value = item[key];
			return value !== null && value !== undefined && value !== '';
		});

		if (!hasValidData) {
			continue; // skip empty rows
		}

		if (!item._id) {
			// New data
			addDataList.push(item);
		} else {
			// Check if update is needed (compare with old data)
			const oldItem = subOldData?.find((old) => old._id === item._id);
			if (oldItem) {
				const updateFields = {};
				// Compare all fields, record changes
				Object.keys(item).forEach((key) => {
					if (key !== '_id' && item[key] !== oldItem[key]) {
						updateFields[key] = item[key];
					}
				});

				// If there are field changes, execute update
				if (Object.keys(updateFields).length > 0) {
					const updateData = transRelateField(relateField, {
						[parentId]: mainId,
						...updateFields,
					});

					const updatePromise = model
						.update({
							envType,
							data: updateData,
							filter: {
								where: {
									_id: {
										$eq: item._id,
									},
								},
							},
						})
						.then((res) => ({
							type: 'edit',
							data: res,
							_id: item._id,
						}));

					updateList.push(updateData);
					updatePromises.push(updatePromise);
				}
			}
		}
	}

	// 2. Batch create data
	let addPromises = null;
	let dataWithParent = null;
	if (addDataList.length > 0) {
		// Add parent table association to new data
		dataWithParent = addDataList.map((item) =>
			transRelateField(relateField, { ...item, [parentId]: mainId })
		);
		addPromises = model.createMany({
			envType,
			data: dataWithParent,
		});
	}

	// 3. Handle delete operations (unlink association)
	const newIds = subData.filter((item) => item._id).map((item) => item._id);
	const oldIds = subOldData?.map((item) => item._id) || [];
	const deleteIds = oldIds.filter((id) => !newIds.includes(id));
	let deletePromises = null;

	if (deleteIds.length > 0) {
		// Set foreign key to null, unlink association
		deletePromises = model.updateMany({
			envType,
			data: { [parentId]: null },
			filter: {
				where: {
					_id: {
						$in: deleteIds,
					},
				},
			},
		});
	}

	// Log output
	console.log(`${subName} child table operation details:`);
	console.log('- New data:', dataWithParent);
	console.log('- Updated data:', updateList);
	console.log('- Unlinked associations:', deleteIds);

	// Execute all database operations
	const allPromises = [];
	if (addPromises) allPromises.push(addPromises);
	if (deletePromises) allPromises.push(deletePromises);
	allPromises.push(...updatePromises);

	if (allPromises.length > 0) {
		await Promise.all(allPromises);
	}
}

/**
 * @typedef {Object} SubTableItem - Child table information object
 * @property {string} subName - Child table data model name
 * @property {string} parentId - Parent table ID association in child table
 * @property {Object[]} subData - Current child table data array
 * @property {Object[]} subOldData - Original child table data array (for comparison)
 * @property {string} relateField - Association relationship field keys, multiple separated by commas
 */
Core Logic Explanation
The executeSubTableOperations method is the core of child table data processing, with the following main logic:
- Data comparison: Iterate through
subData, determine whether to create or update based on whether_idexists - Field comparison: For update operations, compare new and old data field by field, only update changed fields
- Batch operations: Use
createManyfor batch creation, usePromise.allfor parallel updates - Delete handling: Compare
_idlists of new and old data to find records to delete, set their foreign keys tonull - Association conversion: Automatically convert specified fields to association object format
{_id: value}through thetransRelateFieldfunction
- Use
createManyfor batch creation to reduce database interaction count - Use
Promise.allto execute update operations in parallel, improving performance - Only update changed fields to reduce unnecessary database writes
Example Scenario Development
Here we use a "Procurement Management" system as an example to demonstrate how to use sub-table functionality.
The data relationships are as follows:
Create Data Models
Go to MySQL Database/Data Models to create the following two data models:
Purchase Order (purchase_order)
| Field Name | Type | Description |
|---|---|---|
| name | Text | Order name |
| amount | Number | Total amount |
| status | Enum | Order status |
The parent table does not need to maintain child table relationship fields.
Purchase Product Details (order_items)
| Field Name | Type | Description |
|---|---|---|
| name | Text | Product name |
| price | Number | Product price |
| quantity | Number | Purchase quantity |
| order_id | Text | Associated order (foreign key) |
The order_id field is a foreign key pointing to the _id of the parent table purchase_order.
This foreign key relationship needs to be created in the corresponding table at MySQL Database/Database Tables after creating the data model.
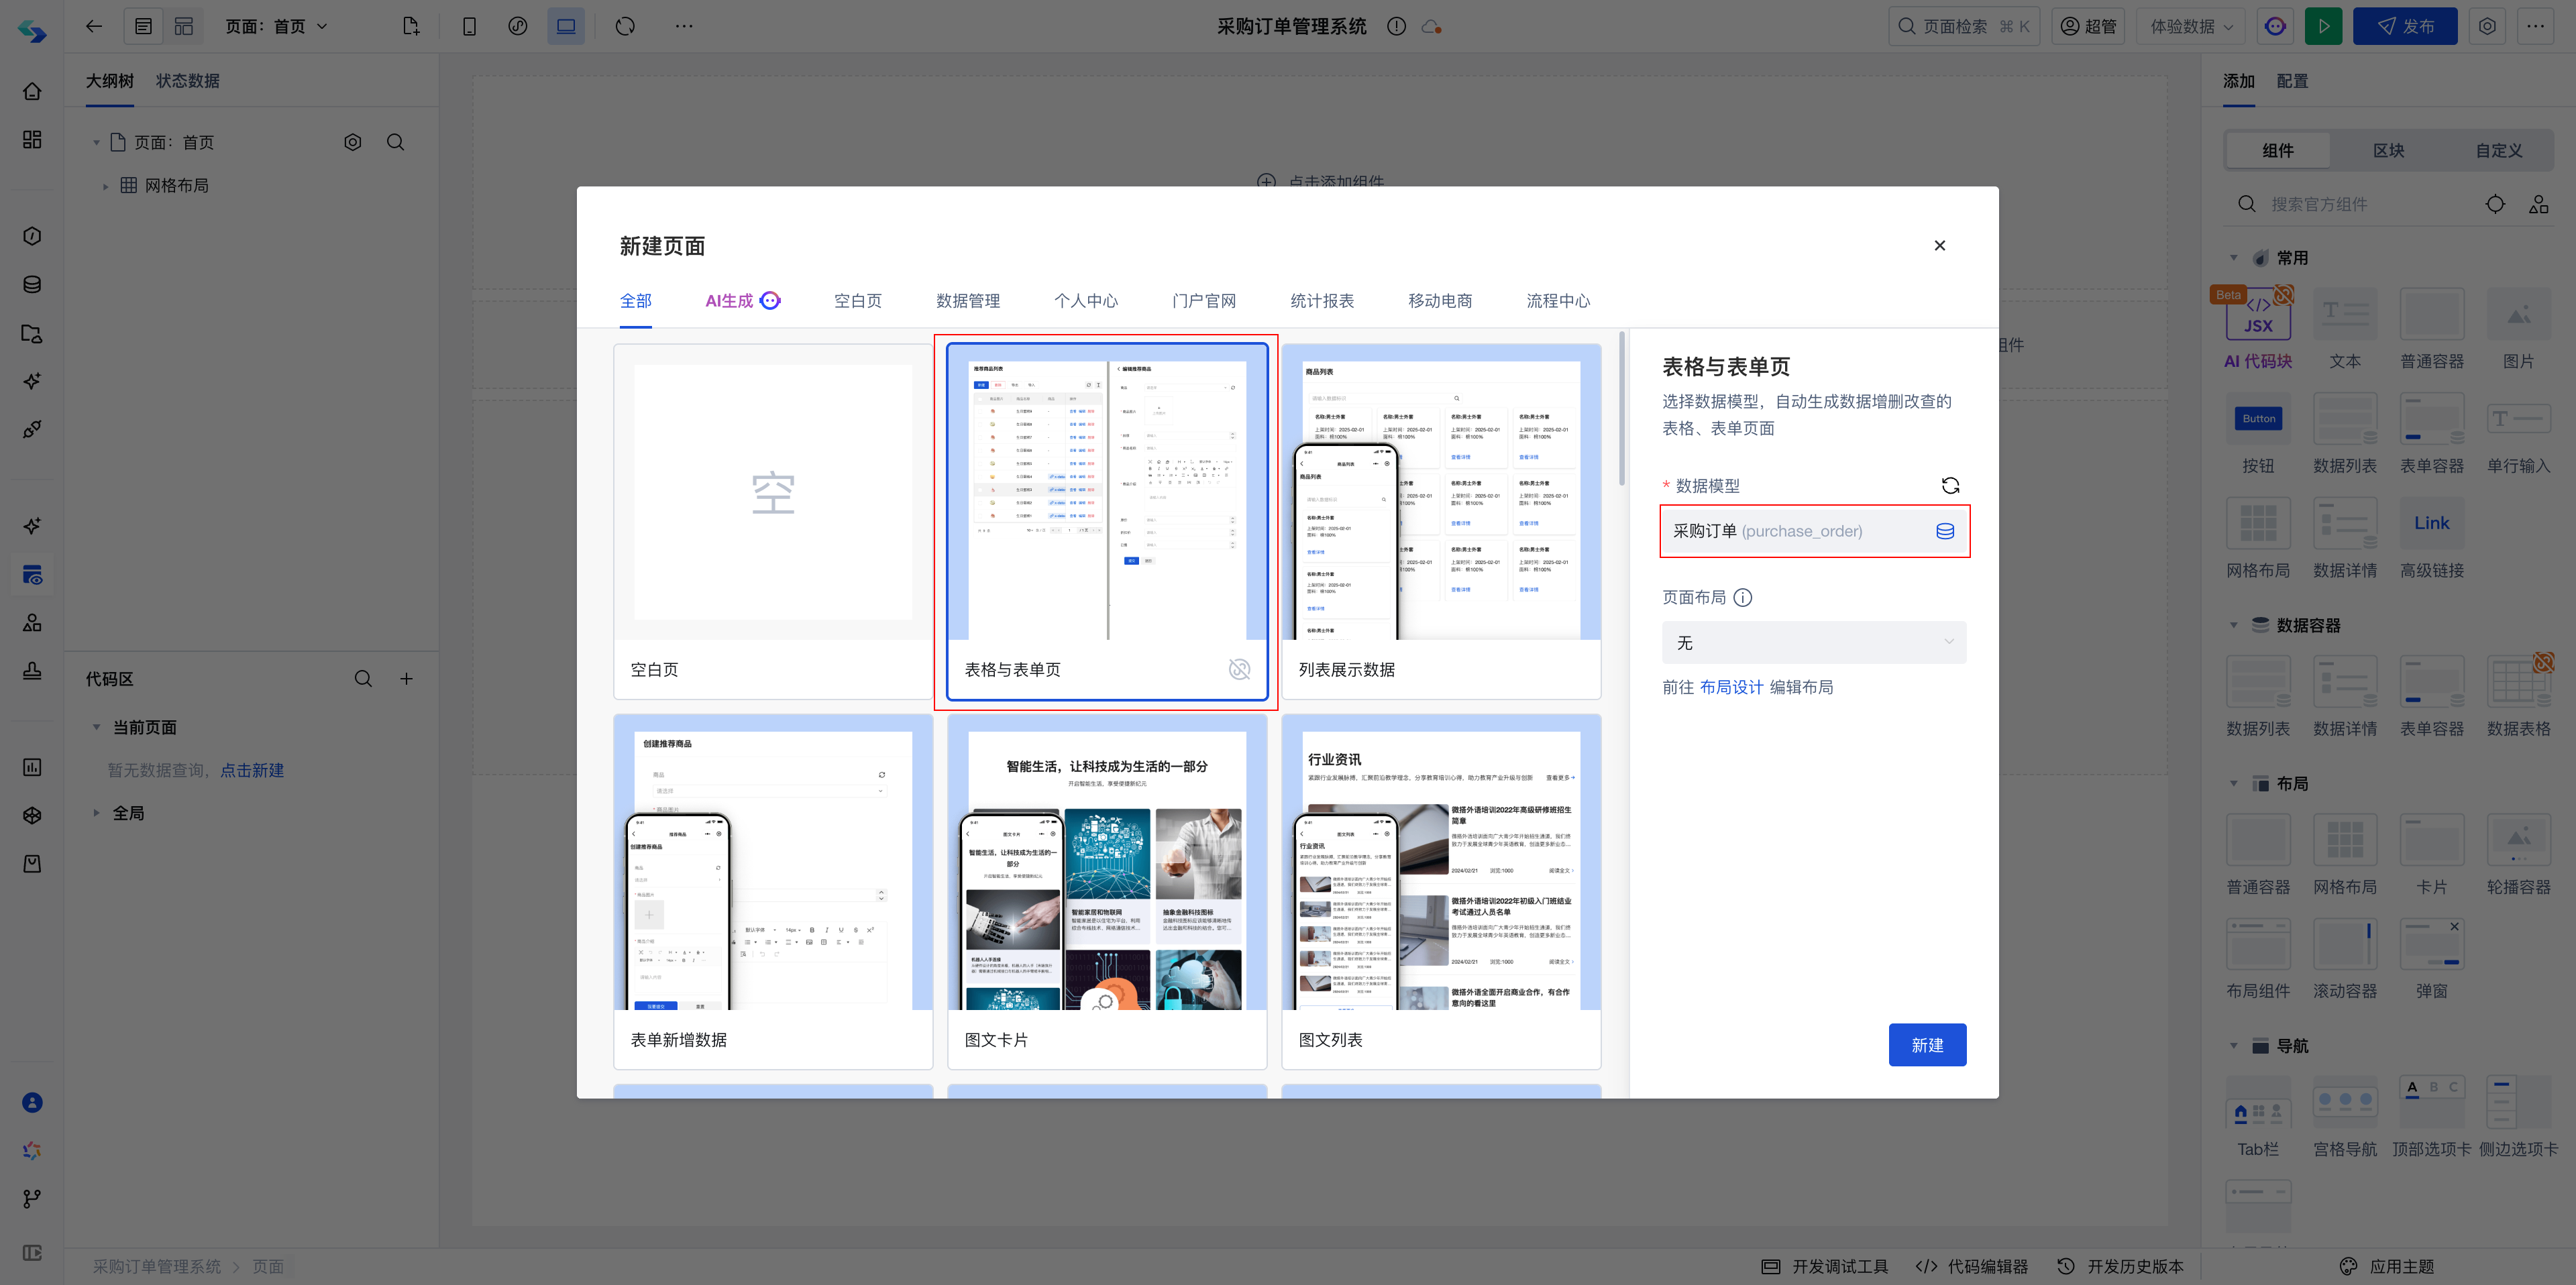
Create Application
Create a blank application, quickly generate "Table and Form Pages" through templates, and select the Purchase Order (purchase_order) data model.
Configure Edit Page
Step 1: Get Child Table Data
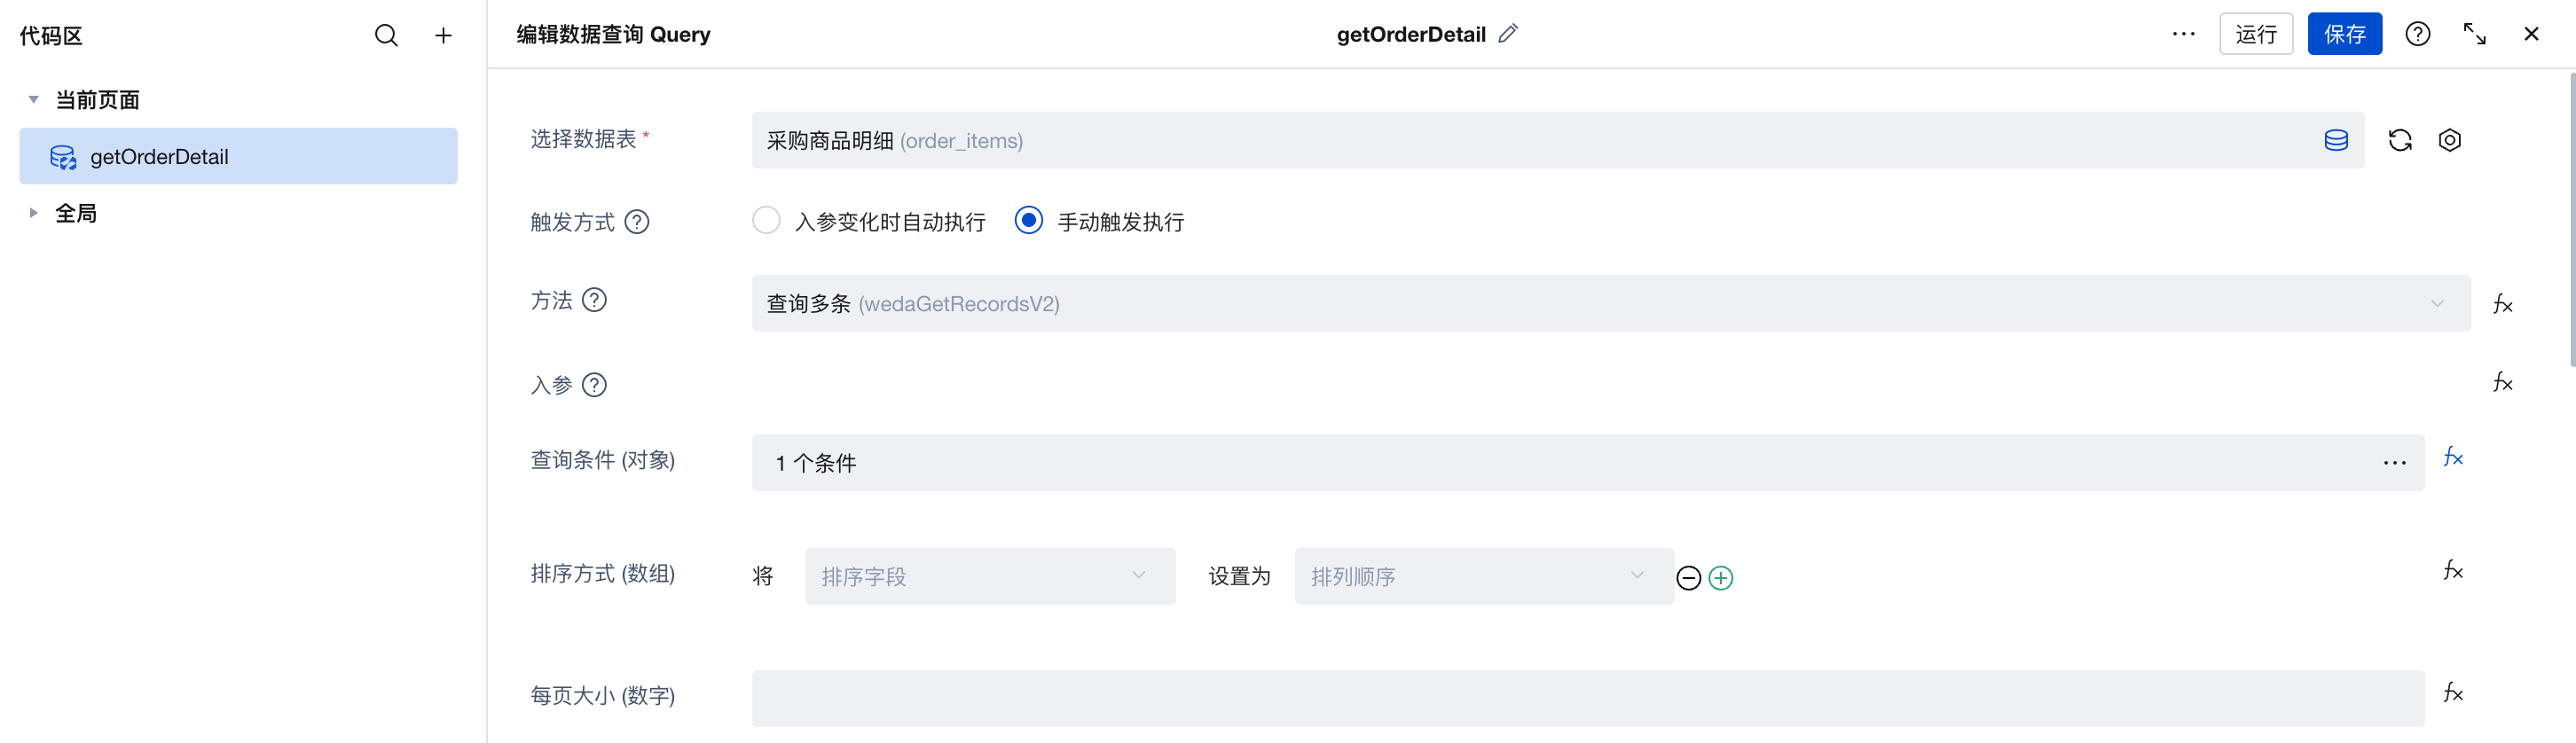
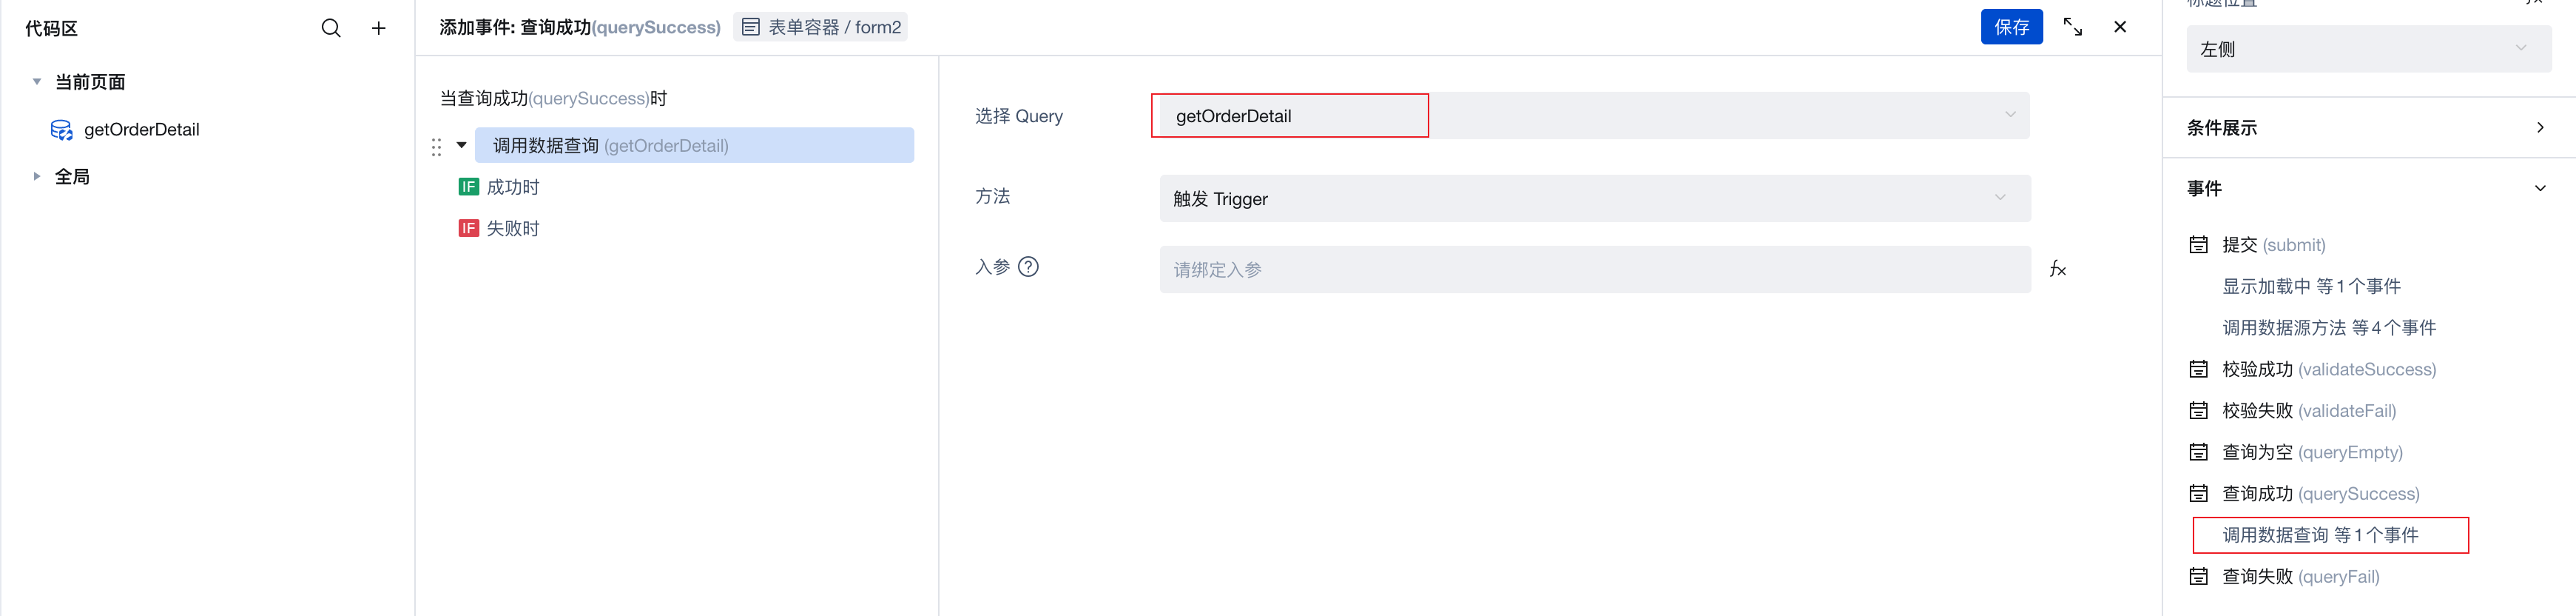
Enter the edit page. Since the form container is bound to the Purchase Order data source, child table data cannot be obtained directly. You need to manually call the "Built-in Data Table Query" method to get child table data.
Add a new "Built-in Data Table Query" method on the current page, named getOrderDetail:
- Configure data table: Select Purchase Product Details (order_items)
- Trigger method: Select Manual trigger execution
- Query condition: Set Associated order equals
$w.page.dataset.params._id(parent table_idpassed from URL)
- In the Query success event of the "Form Container" on the edit page, add execution of the
getOrderDetailmethod. This way, child table data will be automatically loaded after parent table form data is loaded.
Step 2: Configure Product List Component
Add an "Array Nested Form" component in the form as the product details list:
- Change Nested form template to Object array (table)
- Add child table fields:
- Product name (name) - Text field
- Purchase quantity (quantity) - Number input
- Product price (price) - Number input
- Set the value of the array nested form to get from
getOrderDetail:
$w.getOrderDetail.data?.records?.length ? $w.getOrderDetail.data?.records : [{}]

Step 3: Configure Submit Event
Modify the Submit event of the "Form Container" to call the cloud function to process child table data when parent table data is successfully updated:
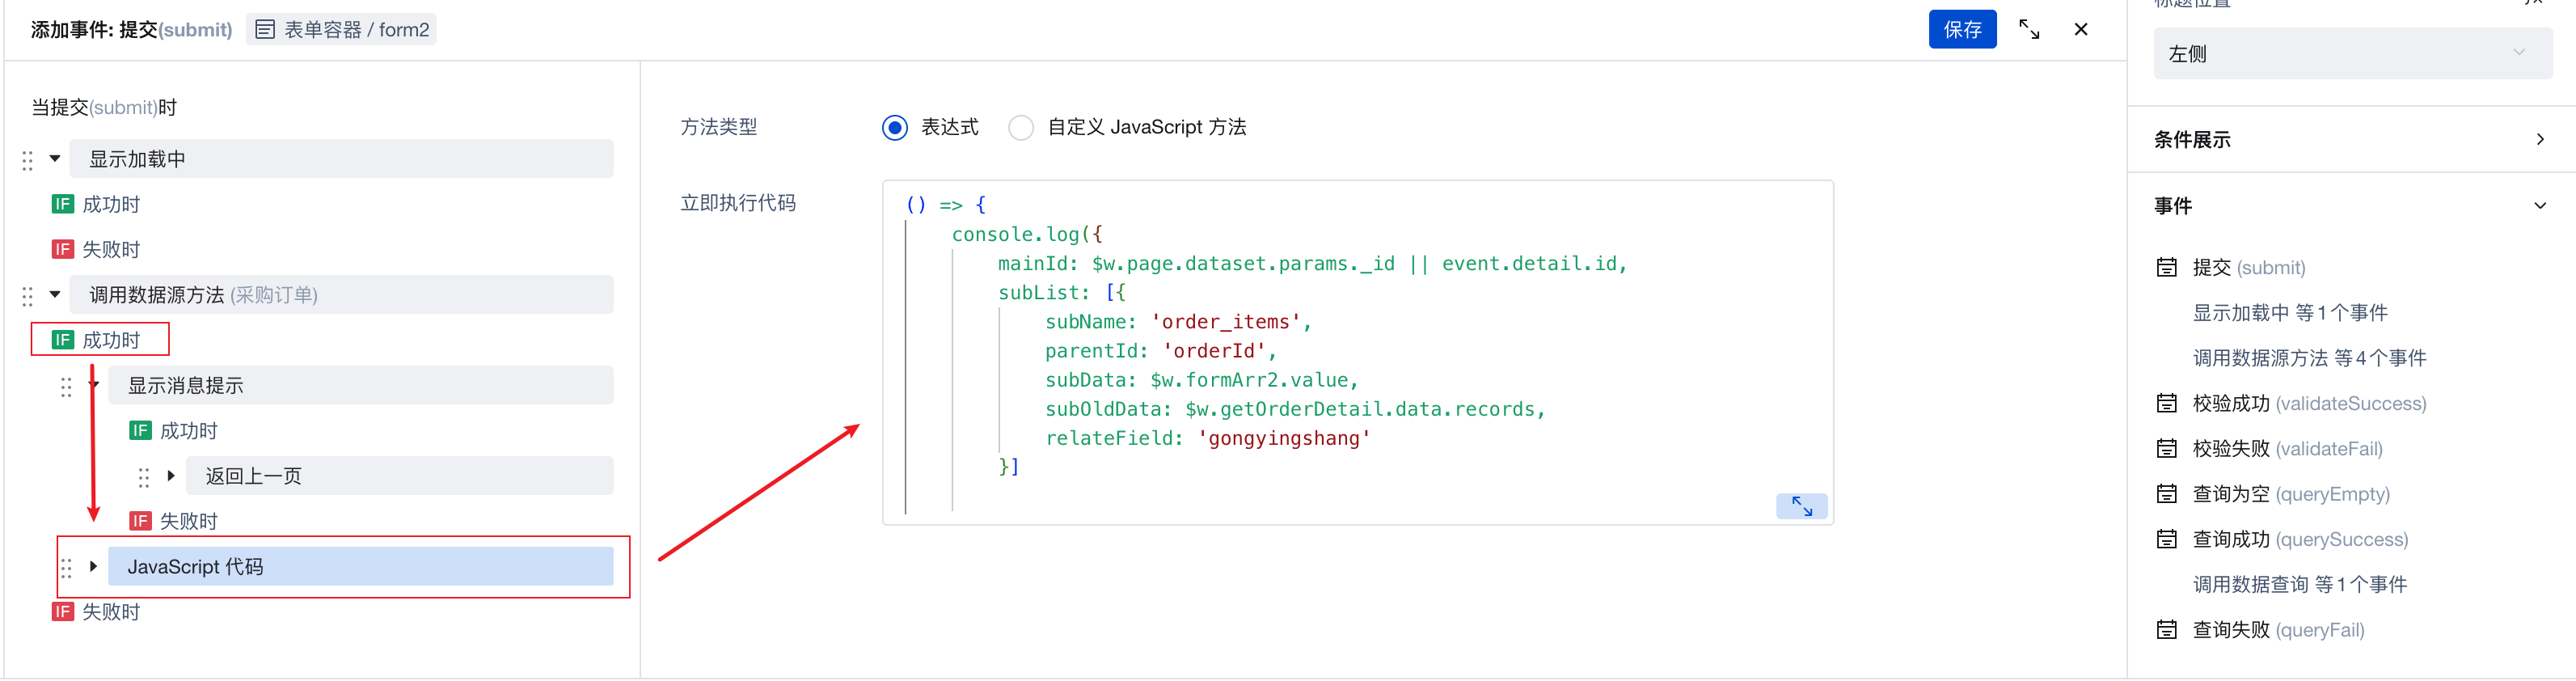
Cloud function call code:
() => {
    $w.cloud.callFunction({
        name: "subTable-management", // Cloud function name
        data: {
            mainId: $w.page.dataset.params._id || event.detail.id,
            subList: [{
                subName: 'order_items',
                parentId: 'orderId',
                subData: $w.formArr2.value,
                subOldData: $w.getOrderDetail.data.records,
                relateField: 'gongyingshang'
            }]
        },
    })
}
Parameter Description:
mainId: Parent table_id. If in edit mode, use$w.page.dataset.params._id; if in create mode, getevent.detail.idfrom the return value of the previous "Call data source method" stepsubList: Child table configuration arraysubName: Child table data model nameparentId: Field name in child table that associates with parent tablesubData: Current child table data array (formArr2is the child table component ID, get through$w.formArr2.value)subOldData: Original child table data array (for comparison)relateField: Association relationship field keys (optional, multiple separated by commas)
Advanced Usage
Multiple Child Tables Processing
If a parent table is associated with multiple child tables, you can add multiple child table configurations in subList:
await $w.cloud.callFunction({
    name: 'subTable-management',
    data: {
        mainId: mainId,
        subList: [
            {
                subName: 'order_items',
                parentId: 'order_id',
                subData: $w.form1.value?.order_items || [],
                subOldData: $w.form1.remoteValue?.order_items || [],
            },
            {
                subName: 'order_attachments', // Second child table
                parentId: 'order_id',
                subData: $w.form1.value?.attachments || [],
                subOldData: $w.form1.remoteValue?.attachments || [],
            }
        ],
        isProd: false
    },
});
Association Field Conversion
If the child table has other association fields (such as supplier, category, etc.), you need to use the relateField parameter:
{
    subName: 'order_items',
    parentId: 'order_id',
    subData: $w.form1.value?.order_items || [],
    subOldData: $w.form1.remoteValue?.order_items || [],
    relateField: 'supplier,category' // Fields to convert, multiple separated by commas
}
The cloud function will automatically convert these fields from simple values (e.g., "supplier_id_value") to association object format {_id: "supplier_id_value"}.
Complete Example Template
To help you get started quickly, we provide an example template with complete functionality.
Download and Installation
- Download template package: Click to download example template
- Import template: Go to the CloudBase Platform/WeDa Low-code/Custom Template Management page, click the "Import Template" button to upload the downloaded template package
Template Contents
- ✅ WeDa application (includes table page, edit page, detail page)
- ✅ Data models (purchase order, purchase product details)
- ✅ Page configurations (form layout, sub-table components, data binding)
Post-Installation Configuration Steps
After template installation, you need to manually create a cloud function for the sub-table functionality to work properly.
Create sub-table cloud function:
- Go to the CloudBase Platform/Cloud Functions page
- Click "Create Cloud Function", name it
subTable-management - Select Node.js 16.13 as the runtime
- Copy the complete code from the "Complete Code Example" above into the function editor
- Click "Save and Deploy"
After completing the above steps, you can use the sub-table create, update, and delete functionality in the application.
FAQ
1. Why doesn't the parent table need to maintain child table relationships?
Using a foreign key unidirectional association design, the child table points to the parent table through a foreign key, and the parent table does not need to maintain child table information. This allows you to:
- Simplify parent table data structure
- Avoid data redundancy
- Reduce data maintenance complexity
2. Is the delete operation a physical delete or logical delete?
This solution uses an "unlink association" approach, setting the child table's foreign key field to null, rather than physically deleting records. If physical deletion is needed, you can modify the delete handling part in the cloud function to use model.modelName.delete().