预约点餐小程序开发
概述
本文介绍如何用云开发相关能力,快速搭建预约点餐系统。
本实例教程所涉及到的相关源码材料,均已得到相应授权。
准备工作
操作流程
具体操作流程可分为以下 6 步。更多详情可参见 示例代码。
步骤1:搭建轮播图与公告
本文主要围绕主页的 index 页面、云开发内容管理 和 云开发数据库 进行讲解,更多 index 代码细节可参见 index 页面。
步骤 1:开通内容管理
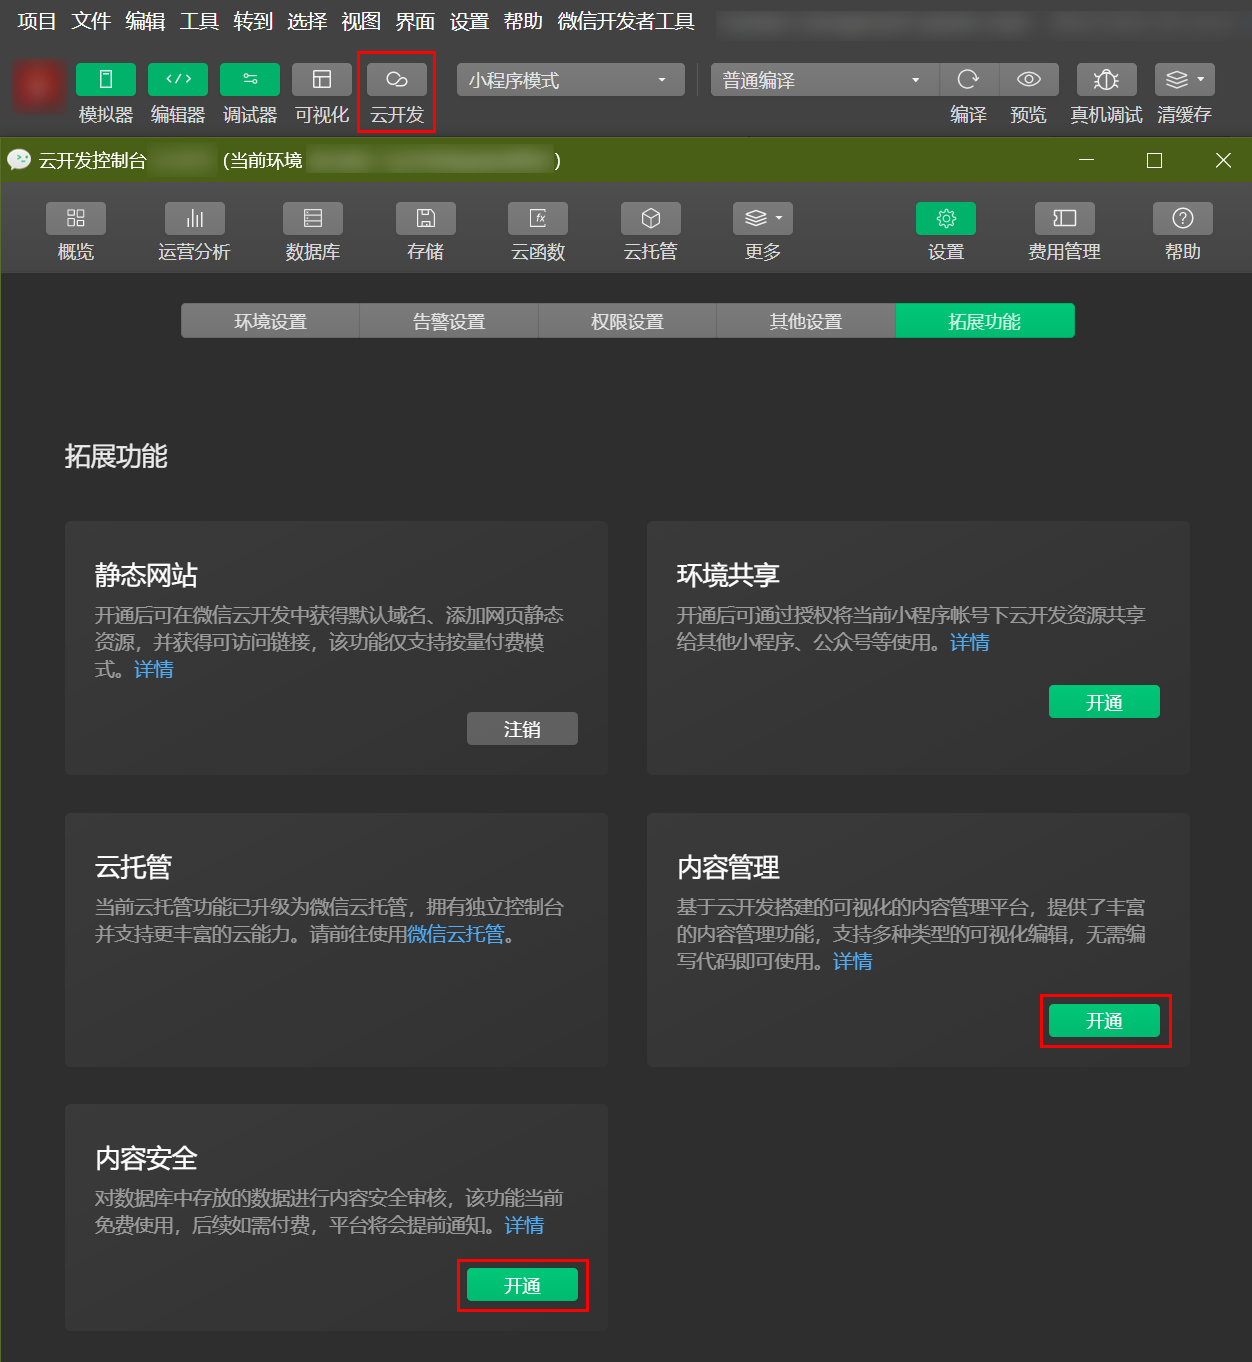
- 首先进入云开发控制台 > 内容管理页面,单击开通,并设置账号密码。内容管理创建需要一定的时间请安心等待。

- 在创建成功之后返回内容管理页面,单击访问地址即可访问内容管理平台。
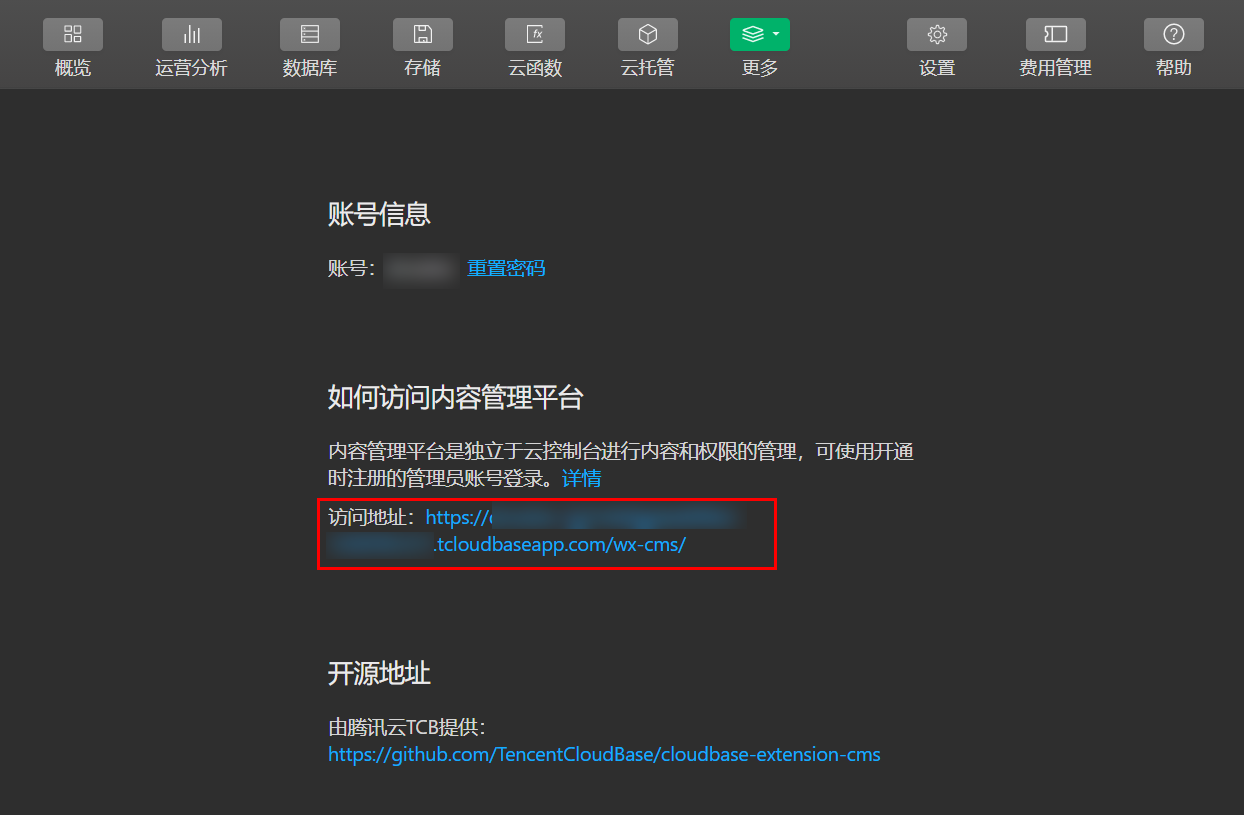
- 输入登录账号和密码,进入内容管理(CMS)后台,单击创建新项目这里我们起名为预约点餐管理系统。

步骤 2:搭建轮播图
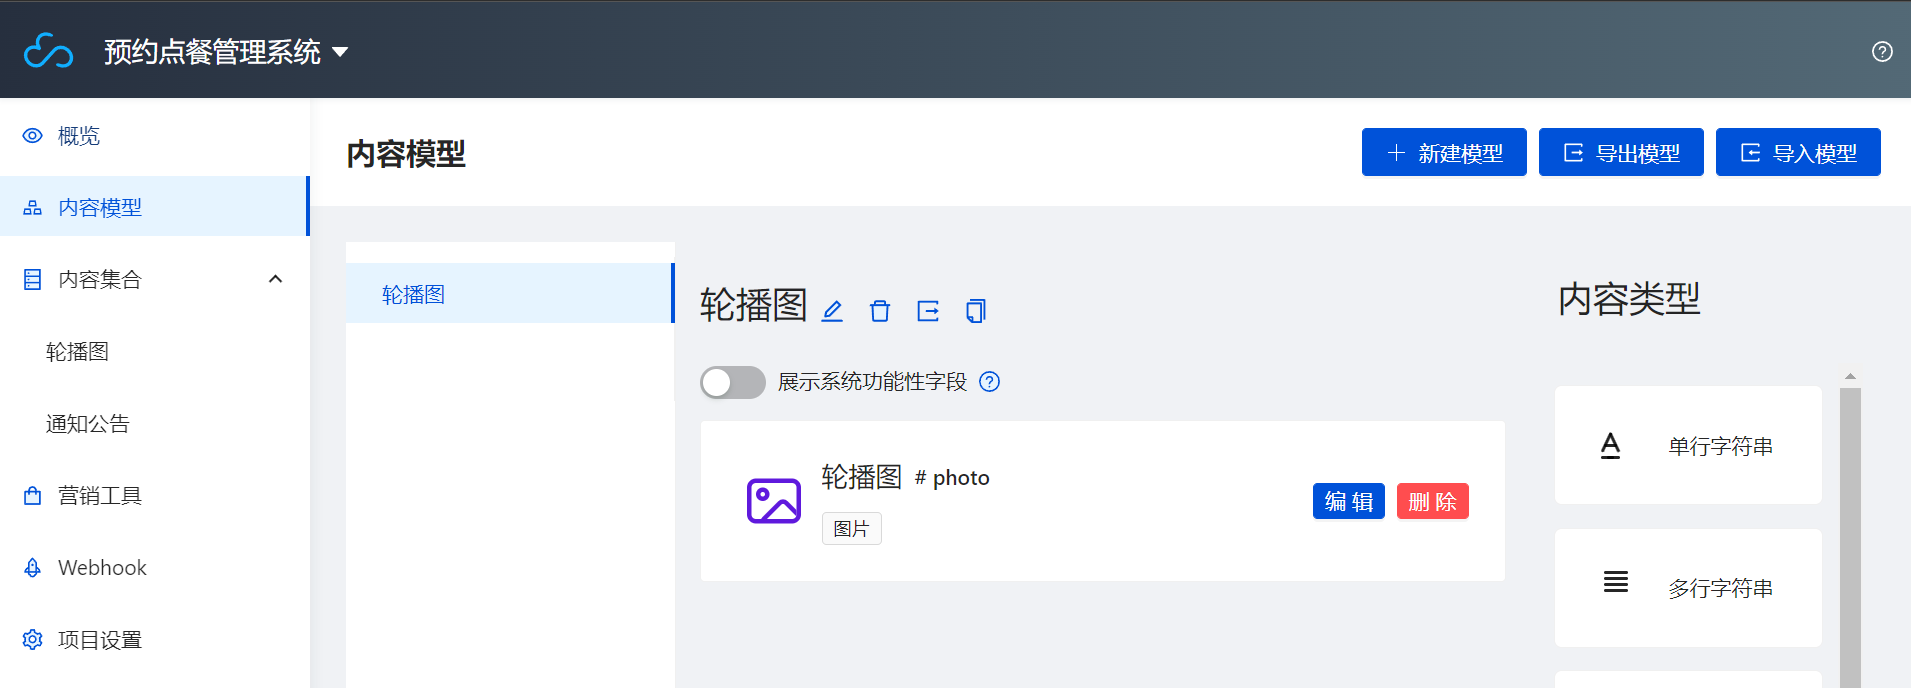
- 进入上述新建的预约点餐管理系统,进入内容模型页面,单击新建模型,这里我们设置展示名称为轮播图,数据库名为 banner。设置完成后单击创建。
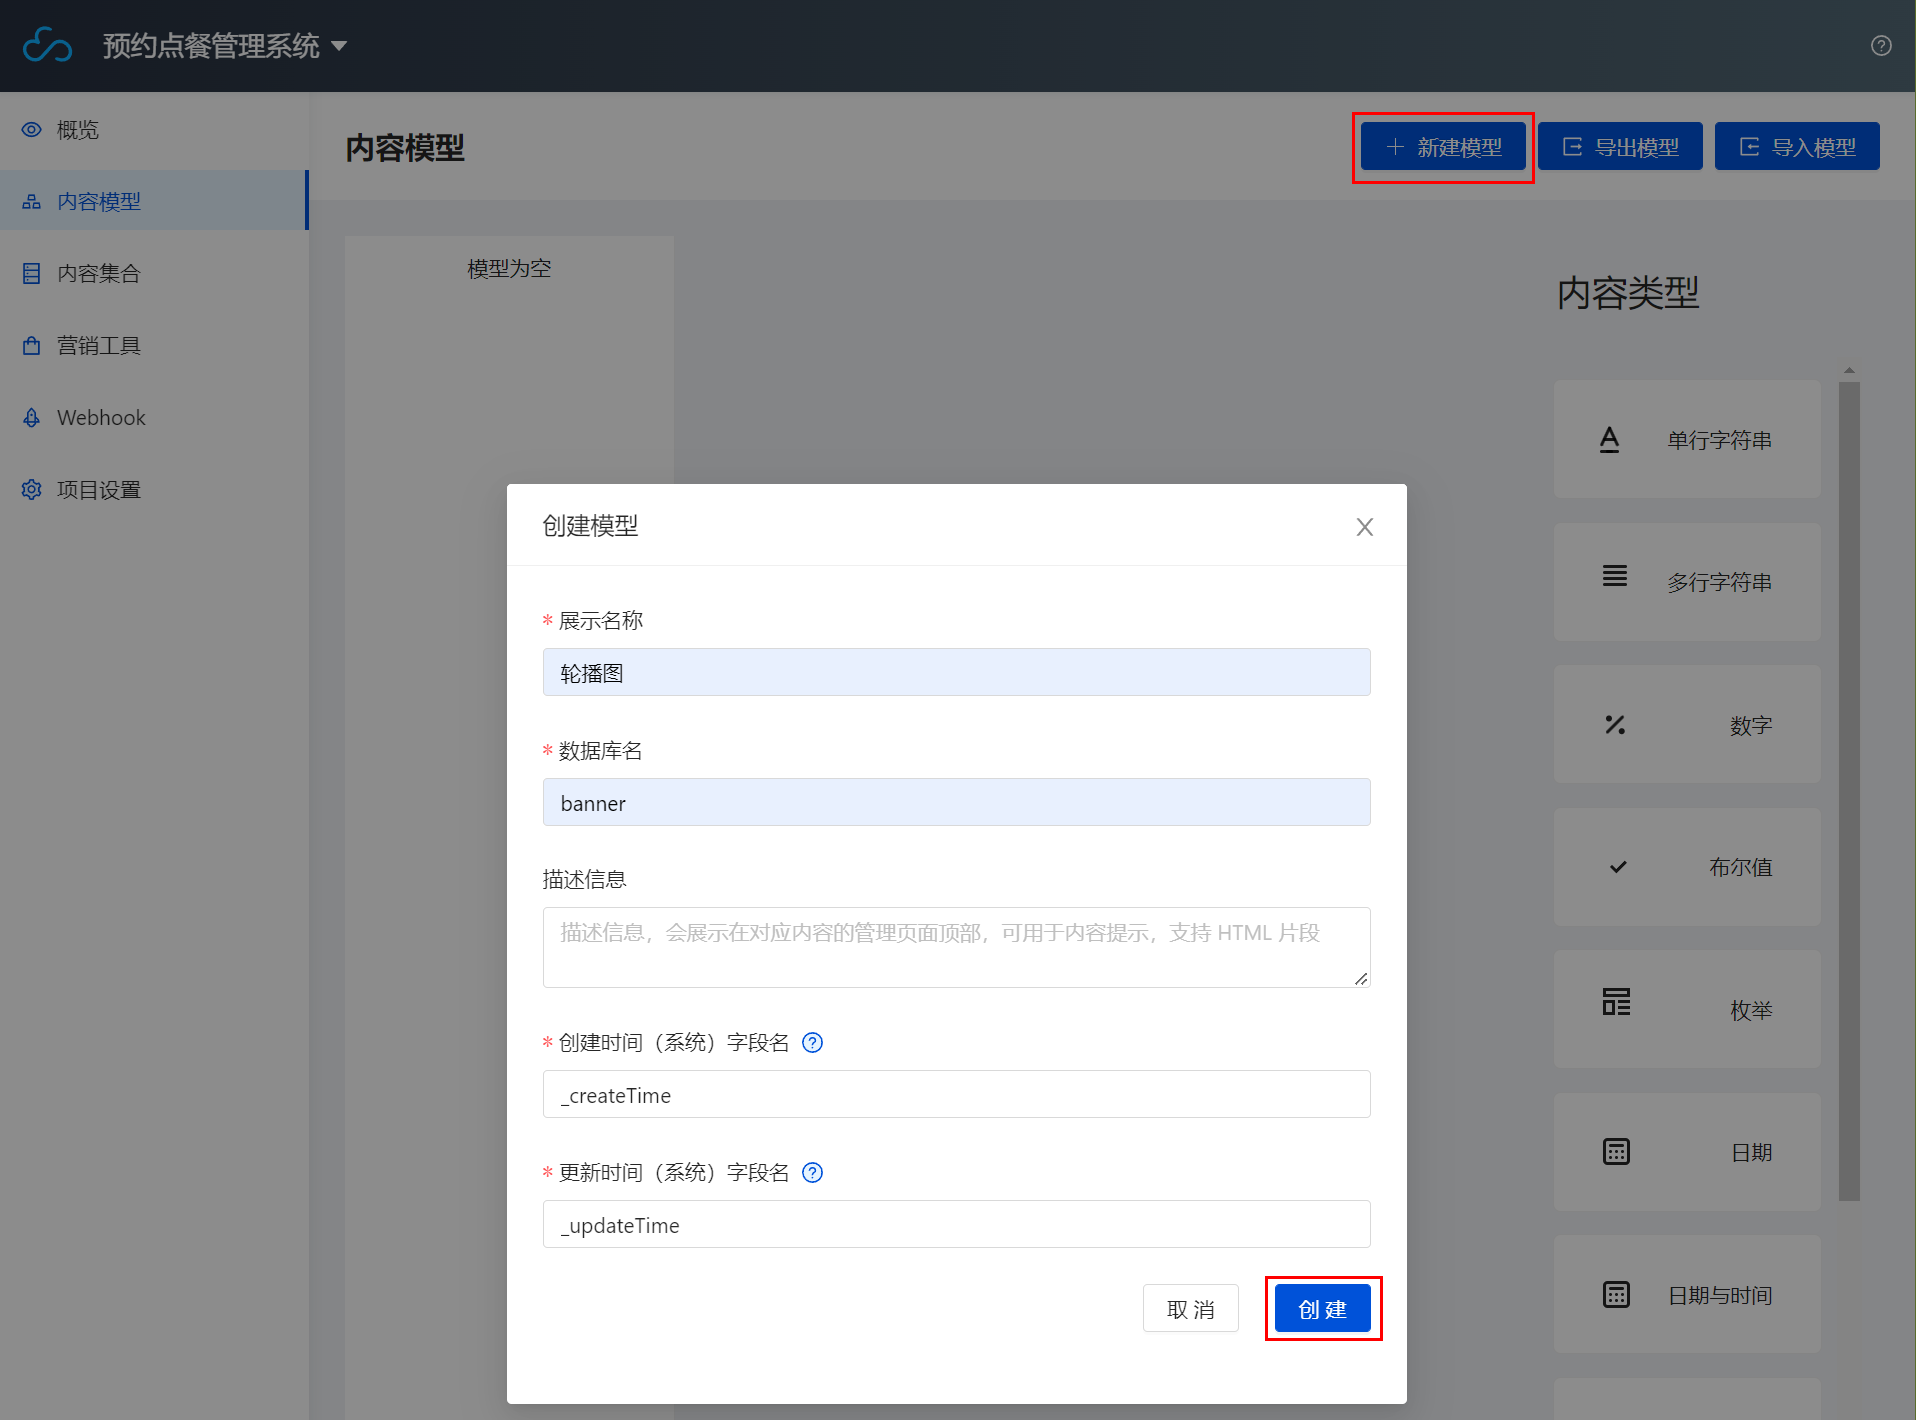
更改数据库名会自动重命名原数据库,请谨慎操作。
- 单击右侧内容类型 > 图片,进入添加图片字段页面,设置展示名称为轮播图,数据库字段名为 photo。
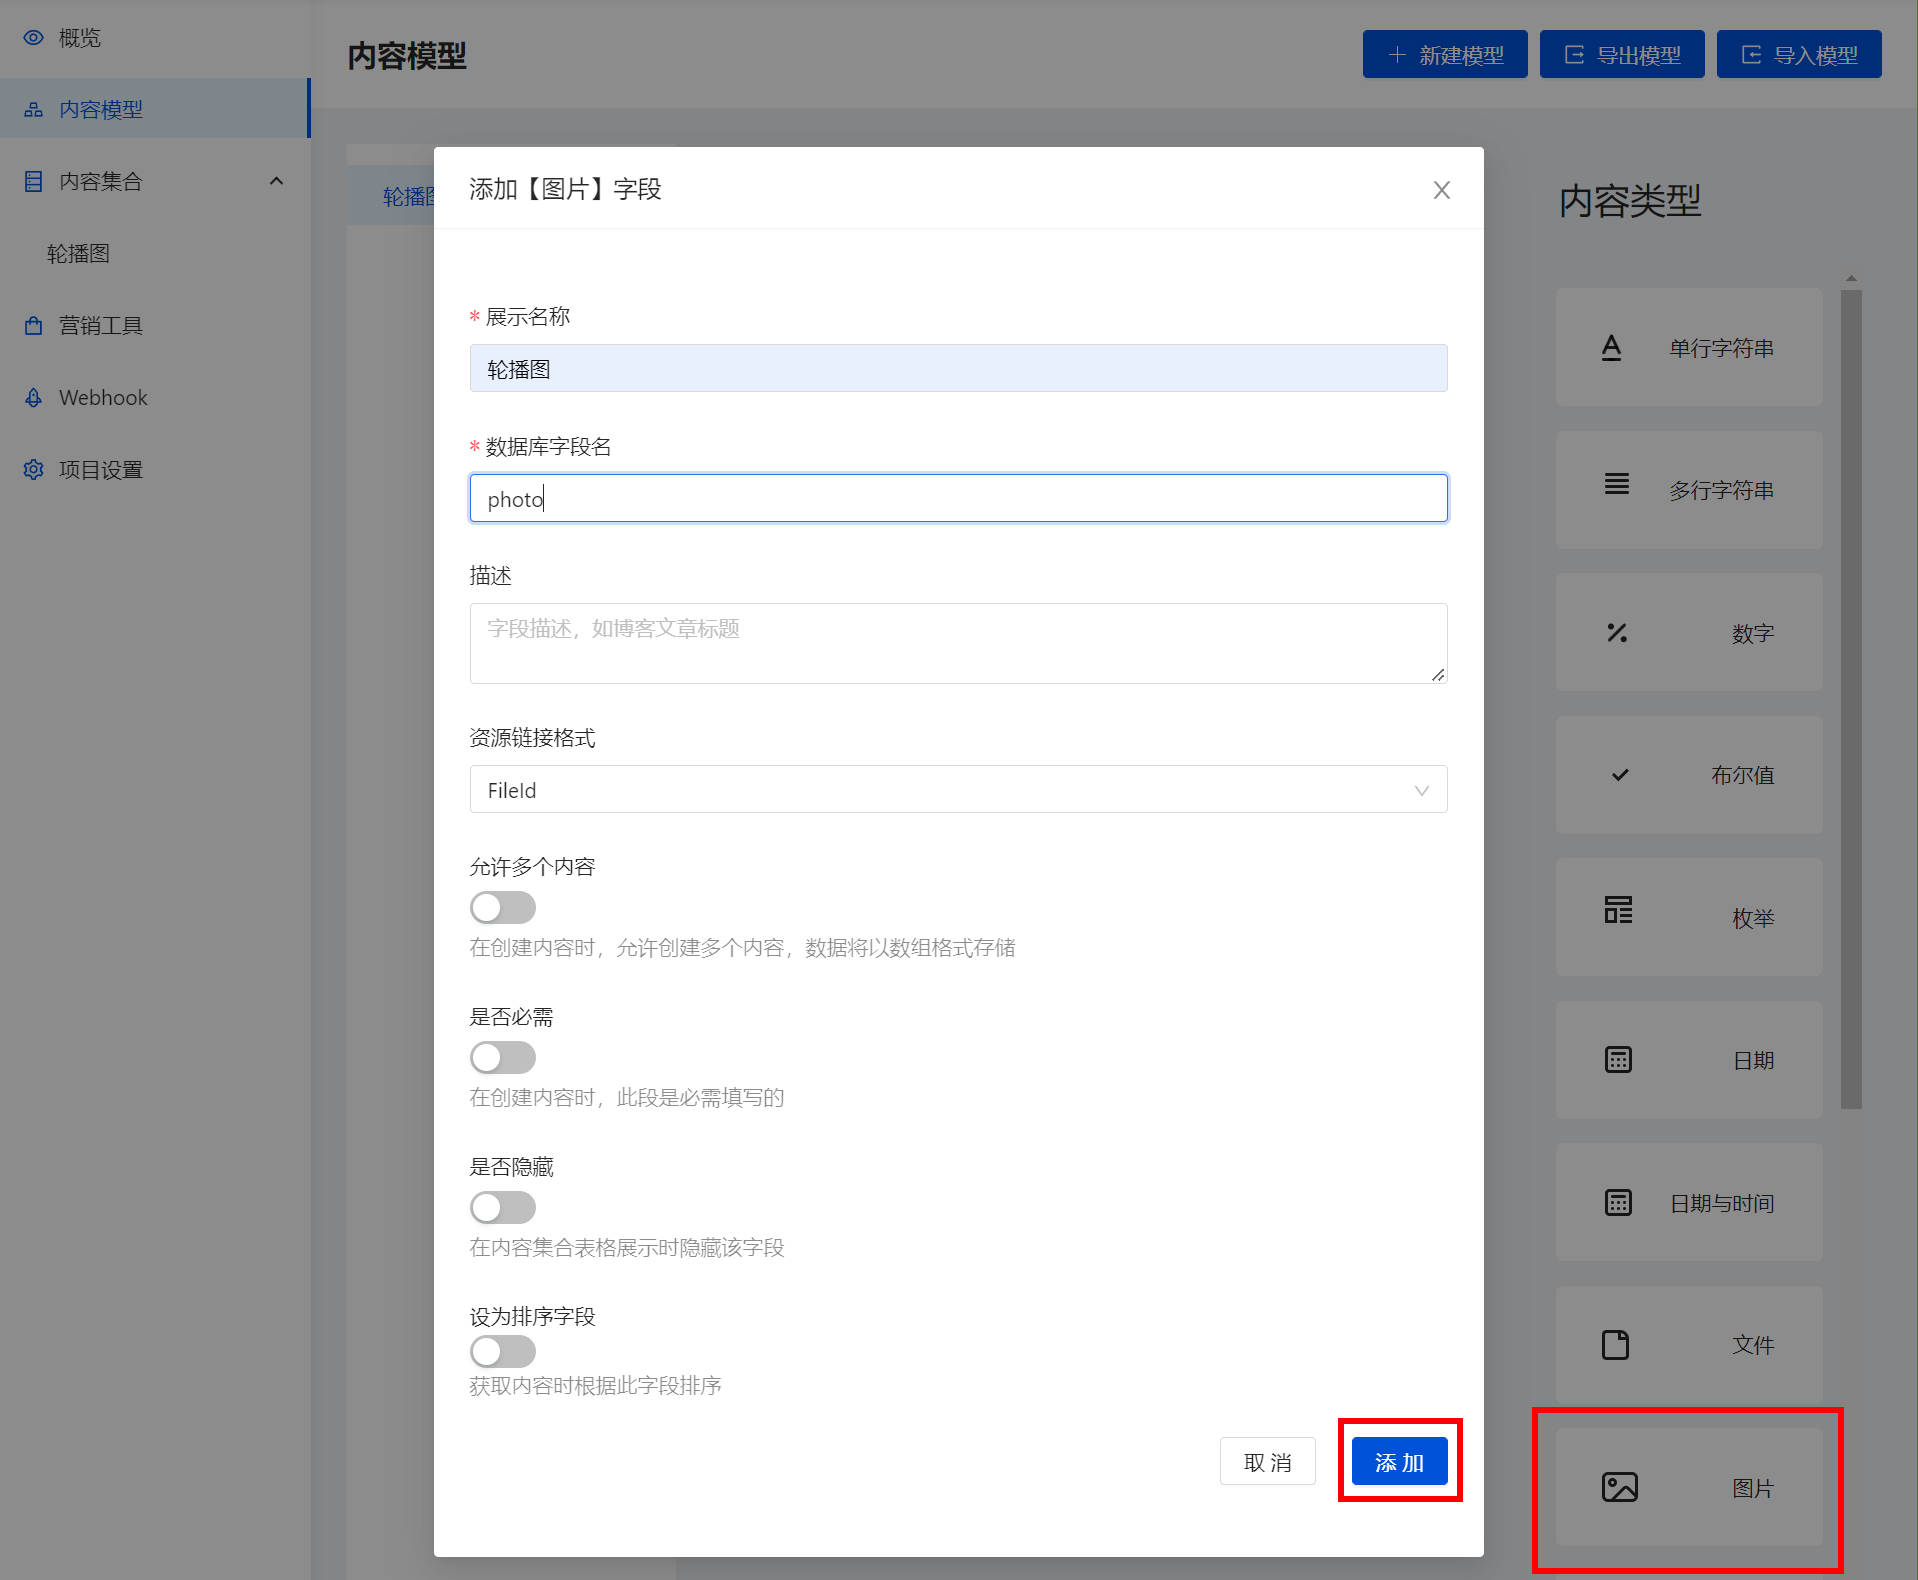
单击添加后完成内容模型的创建。
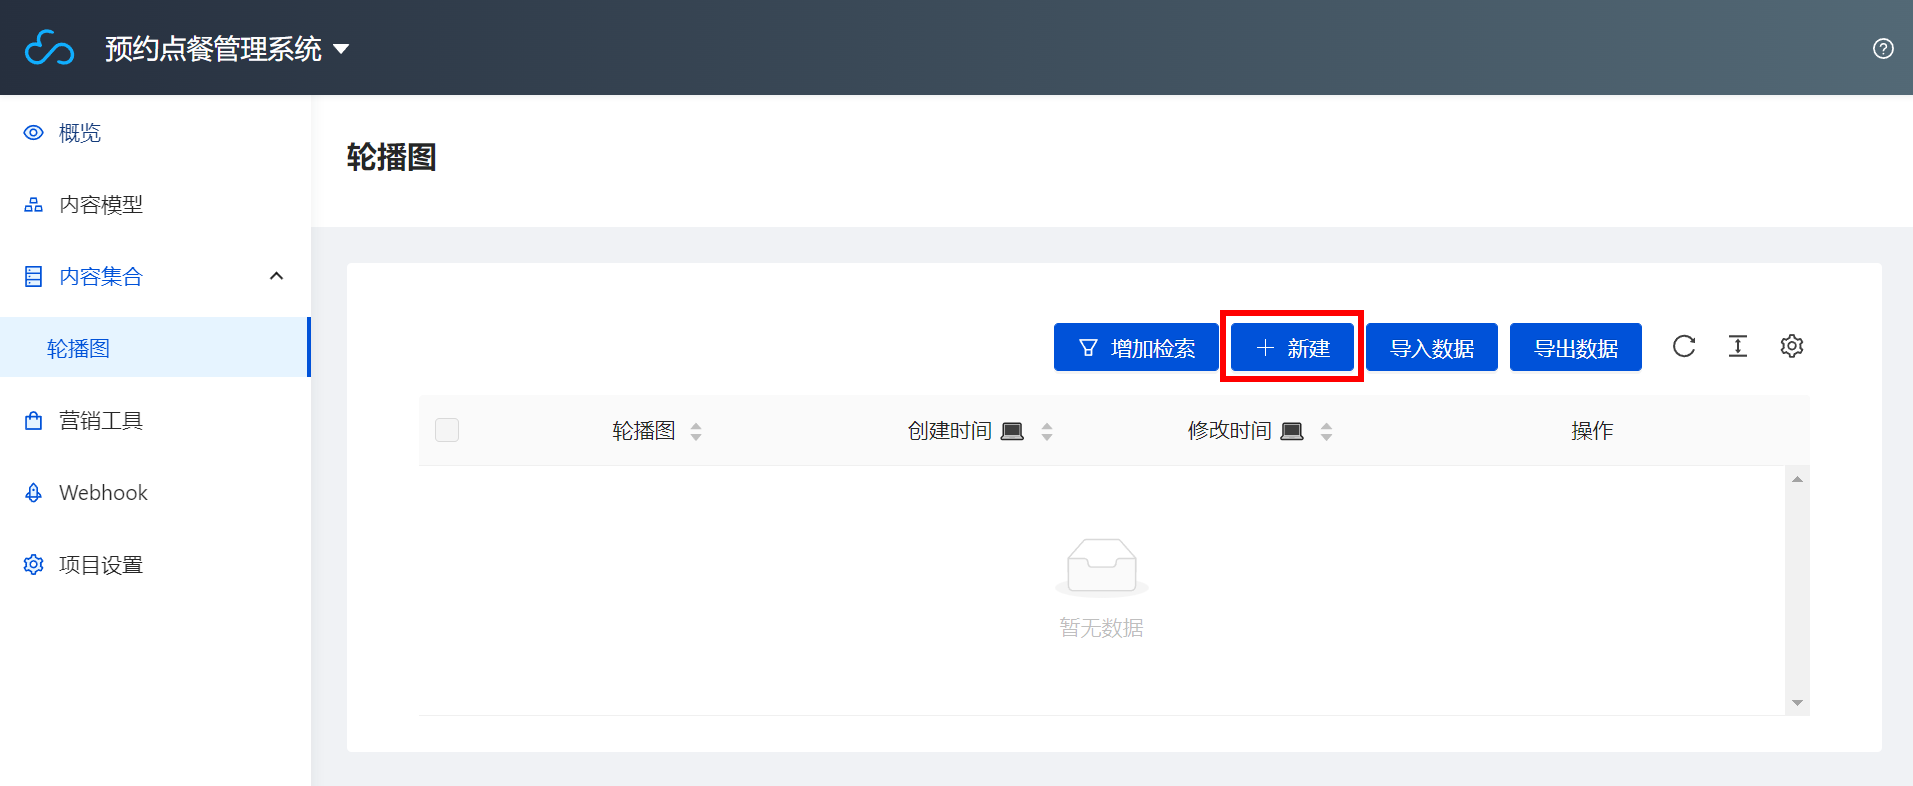
- 进入内容集合 > 轮播图页面,单击新建。
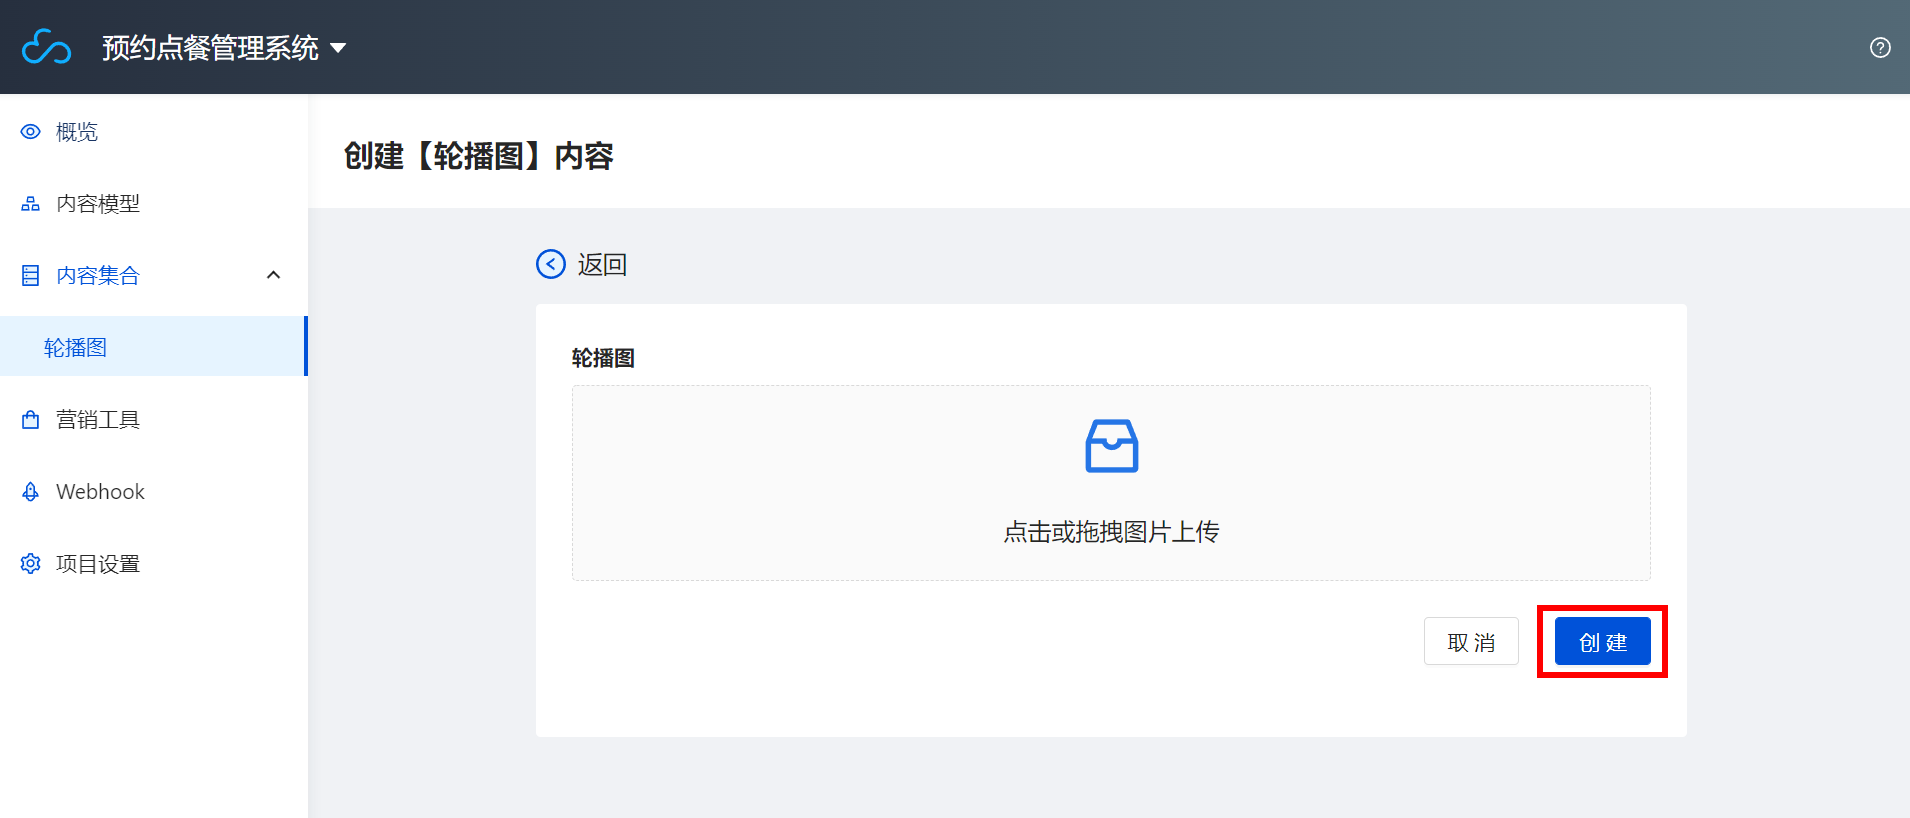
拖动图片并单击创建后完成轮播图片的上传,这样一个轮播图的内容模型我们就创建完成了。
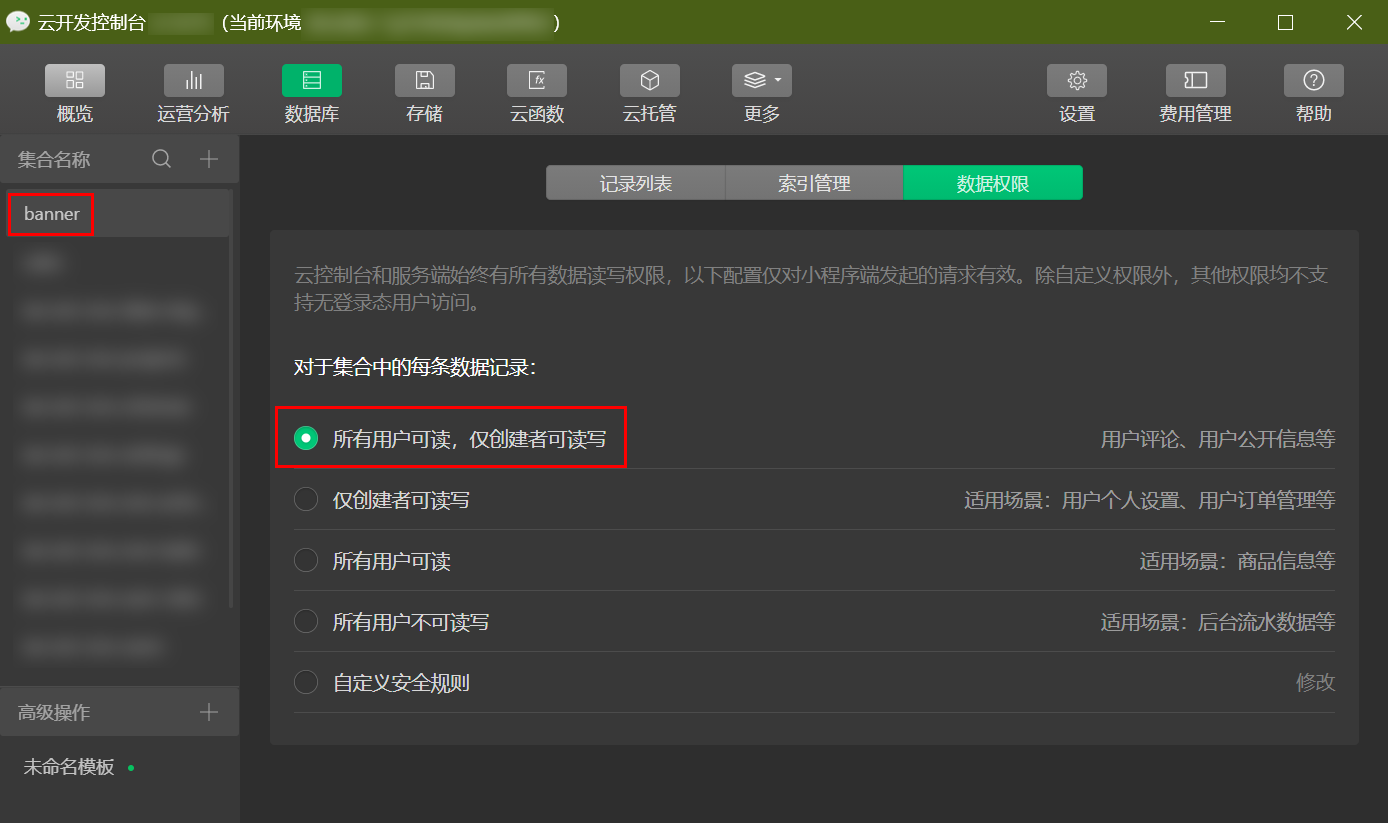
- 通过上面操作后,相应的会在云开发控制台生成 banner 数据库以及上述导入的图片数据。进入云开发控制台 > 数据库 > banner > 数据权限页面,将数据库数据权限改为所有用户可读,仅创建者可读写,这样所有用户就可以看到数据了。
接下来在 pages/index 中开始编写轮播图。这里我们可以参见 swiper 文档,帮助我们绑定数据,这样我们使用 wx:for 进行列表绑定。
参数 env 可以在微信开发者工具 > 云开发控制台里获取。
// pages/index/index.js
wx.cloud.init({
  env: '您的环境ID',
  traceUser: true,
})
const db = wx.cloud.database()
Page({
  /**
   * 页面的初始数据
   */
  data: {
    mgList: ''
  },
  /**
   * 生命周期函数--监听页面加载
   */
  onLoad: function (options) {
    //这里执行的是在页面首次加载时候在banner数据库获取数据,并将他们存在mgList里面
    db.collection("banner").get({
      success: res => {
        console.log(res)
        this.setData({
          mgList: res.data
        })
      }
    })
  }
})
- 在组件上使用
wx:for控制属性绑定一个数组,即可使用数组中各项的数据重复渲染该组件。- 默认数组的当前项的下标变量名默认为
index,数组当前项的变量名默认为item*- 使用
wx:for-item可以指定数组当前元素的变量名,
- 通过以下代码绑定 mgList 数据。
- index.wxml
- index.wxss
<!--pages/index/index.wxml-->
<view class="banner">
  <swiper class="swip_main" indicator-dots autoplay interval="6000" circular>
    <block wx:for="{{mgList}}">
      <swiper-item>
        <image src="{{item.photo}}" style="width: 100%;height: 100%;" mode="scaleToFill"></image>
      </swiper-item>
    </block>
  </swiper>
</view>
/* pages/index/index.wxss */
.banner {
  width: 100%;
  height: 350rpx;
}
.swip_main {
  width: 100%;
  height: 100%;
}
保存运行编译之后,可以看到轮播图。
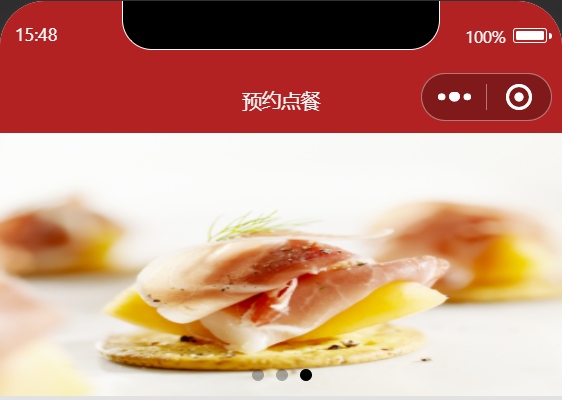
如果出现运行编译后无法加载轮播图,请在微信开发者工具单击右上角详情,进入本地设置页面,尝试切换调试基础库为较低版本即可。
步骤 3:搭建通知公告
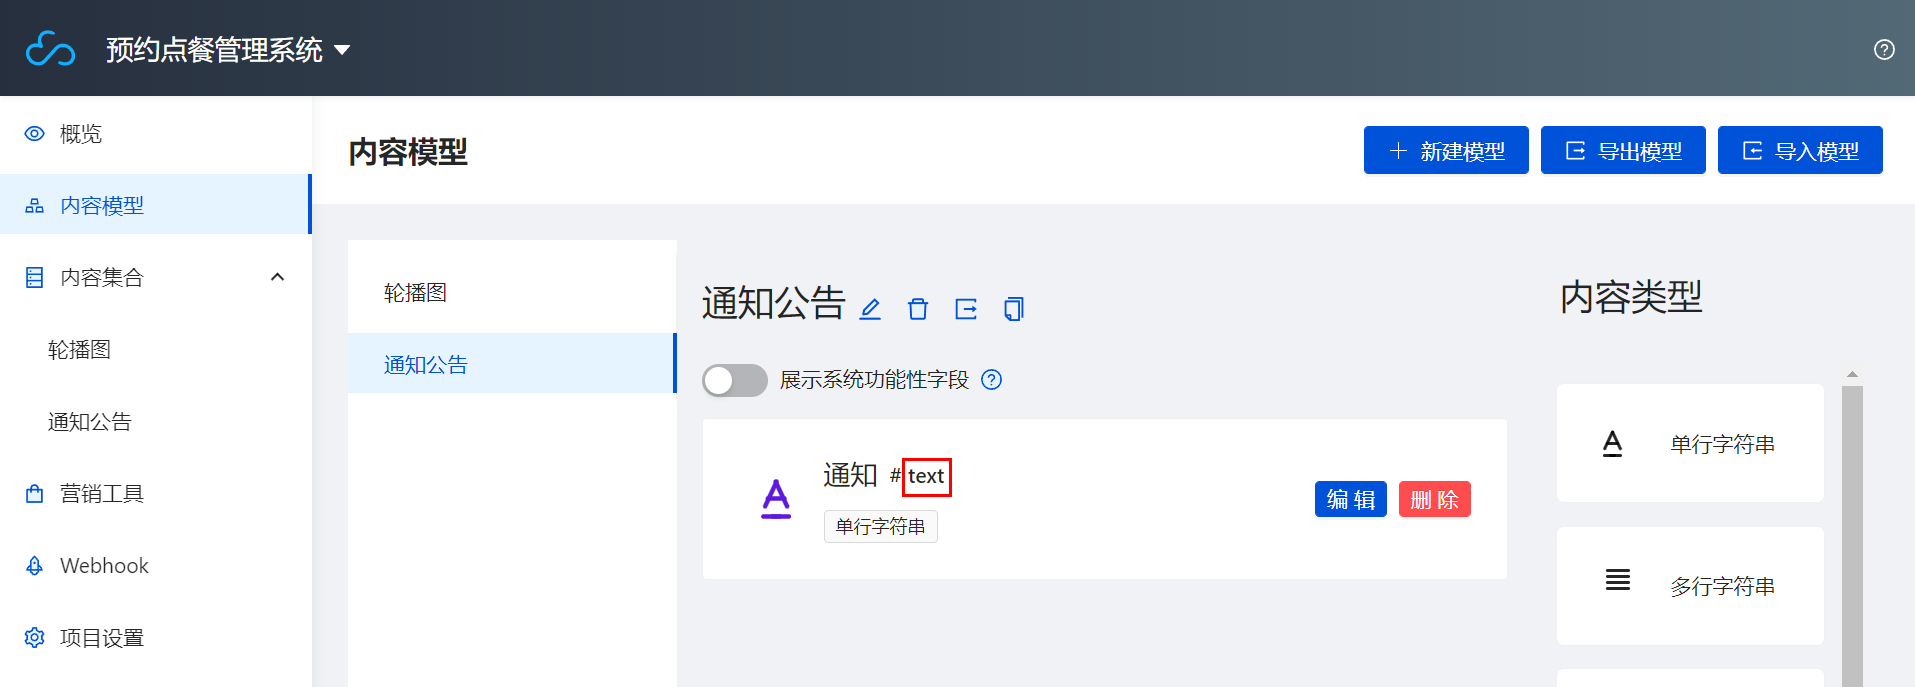
- 参照 步骤 2 创建通知公告内容模型。
- 其中通知公告内容模型数据库名设置为 tz。新增的内容类型 > 单行字符串数据库字段名设置为 text。
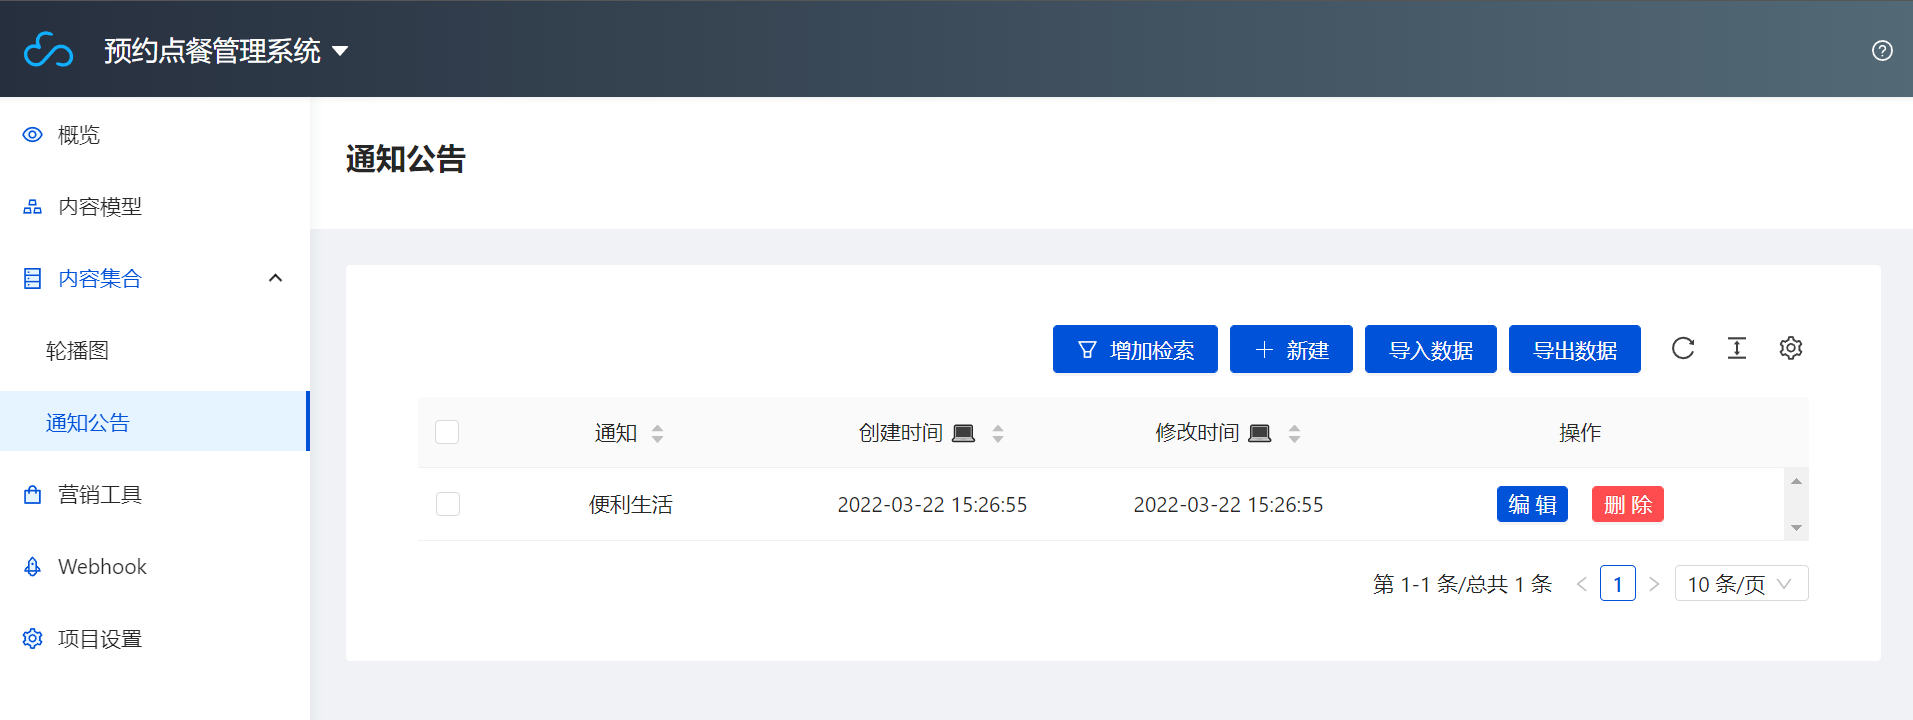
- 进入内容集合 > 通知公告单击新建创建公告内容。
- 通过以下代码绑定 mgList 数据。
- index.wxml
- index.wxss
- index.js
<!-- pages/index/index.wxml -->
<!--轮播图-->
<view class="banner">
  <swiper class="swip_main" indicator-dots autoplay interval="6000" circular>
    <block wx:for="{{mgList}}">
      <swiper-item>
        <image src="{{item.photo}}" style="width: 100%;height: 100%;" mode="scaleToFill"></image>
      </swiper-item>
    </block>
  </swiper>
</view>
<!--通知栏-->
<view class="tz">
    <view class="tz_zp">
      <image src="../../images/font-ui/zggg.png"></image>
    </view>
    <swiper class="swiper-news-top" vertical="true" autoplay="ture" circular="ture" interval="3000">
      <block wx:for="{{msgList}}">
        <navigator url="" open-type="navigate">
          <swiper-item>
            <view class="swiper_item">{{item.text}}</view>
          </swiper-item>
        </navigator>
      </block>
    </swiper>
</view>
/* pages/index/index.wxss */
.banner {
  width: 100%;
  height: 350rpx;
}
.swip_main {
  width: 100%;
  height: 100%;
}
.tz {
  width: 100%;
  height: 100rpx;
  background-color: rgb(224, 222, 213);
}
.tz_zp {
  width: 80rpx;
  height: 80rpx;
  margin-top: 10rpx;
  margin-left: 40rpx;
  float: left;
}
.tz_zp image {
  width: 100%;
  height: 100%;
}
.swiper-news-top {
  width: 600rpx;
  height: 80rpx;
  float: right;
  margin-top: 10rpx;
  margin-right: 30rpx;
}
.swiper_item {
  font-size: 28rpx;
  font-weight: 700;
  line-height: 80rpx;
  overflow: hidden;
  text-overflow: ellipsis;
  white-space: nowrap;
  letter-spacing: 2px;
  text-align: center;
}
// pages/index/index.js
wx.cloud.init({
  env: '您的环境ID',
  traceUser: true,
})
const db=wx.cloud.database()
Page({

  /**
   * 页面的初始数据
   */
  data: {
    mgList:'',
    msgList:''
  },

  /**
   * 生命周期函数--监听页面加载
   */
  onLoad: function (options) {
    db.collection("banner").get({
      success:res=>{
        console.log(res)
        this.setData({
          mgList:res.data
        })
      }
    })
    db.collection("tz").get({
      success:res=>{
        console.log(res)
        this.setData({
          msgList:res.data
        })
      }
    })
  },
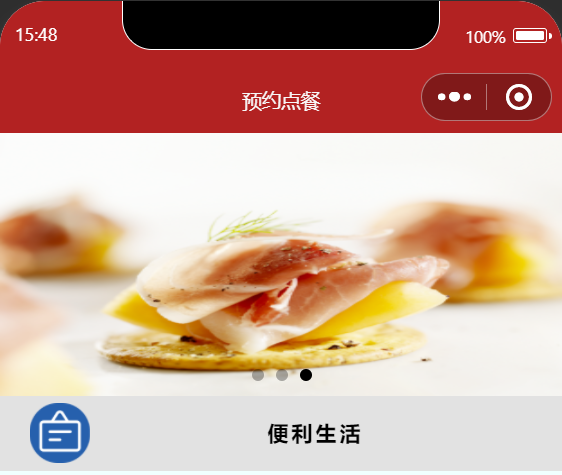
保存运行编译后即可。
步骤2:搭建首页热门栏目
本文主要围绕主页的 index 页面和配置文件 app.json 进行讲解,更多 index 代码细节可参见 index 页面 和配置文件 app.json。
步骤 1:搭建底部导航栏
- 在 app.json 的 pages 数组配置好相应页面。
- 然后在 app.json 页面。通过设置 tabBar 配置底部导航栏。
- app.json - pages
- app.json - tabBar
"pages": [
  "pages/index/index",
  "pages/my/my",
  "pages/dp/dp",
  "pages/gltl/gltl",
  "pages/grxx/grxx",
  "pages/xgxx/xgxx",
  "pages/gywm/gywm",
  "pages/buzx/buzx",
  "pages/glxq/glxq",
  "pages/xpl/xpl",
  "pages/fbgl/fbgl",
  "pages/xdym/xdym",
  "pages/jqqt/jqqd",
  "pages/dingdan/dingdan",
  "pages/xd/xd",
  "pages/gwx/gwx",
  "pages/ddgl/ddgl",
  "pages/qccg/qccg",
  "pages/sjgl/sjgl",
  "pages/fbpl/fbpl"
],
"tabBar": {
  "color": "#a9b7b7",
  "selectedColor": "#11cd6e",
  "borderStyle": "black",
  "list": [
    {
      "pagePath": "pages/index/index",
      "iconPath": "images/font-ui/shouye.png",
      "selectedIconPath": "images/font-ui/shouye.png",
      "text": "首页"
    },
    {
      "pagePath": "pages/dp/dp",
      "iconPath": "images/font-ui/dianpu.png",
      "selectedIconPath": "images/font-ui/dianpu.png",
      "text": "店铺"
    },
    {
      "pagePath": "pages/dingdan/dingdan",
      "iconPath": "images/font-ui/dingdan.png",
      "selectedIconPath": "images/font-ui/dingdan.png",
      "text": "订单"
    },
    {
      "pagePath": "pages/gltl/gltl",
      "iconPath": "images/font-ui/gonglve.png",
      "selectedIconPath": "images/font-ui/gonglve.png",
      "text": "攻略"
    },
    {
      "pagePath": "pages/my/my",
      "iconPath": "images/font-ui/wode.png",
      "selectedIconPath": "images/font-ui/wode.png",
      "text": "我"
    }
  ]
},

步骤 2:搭建中部导航栏
- 进入首页 index 目录,通过 index.wxml 和 index.wxss 编写前端页面首页导航栏。
- index.wxml
- index.wxss
<!-- pages/index/ -->
<view class="banner">
  <swiper class="swip_main" indicator-dots autoplay interval="6000" circular>
    <block wx:for="{{mglist}}">
      <swiper-item >
        <image style="width: 100%;height: 100%;" mode="scaleToFill" src="{{item.photo}}"></image>
      </swiper-item>
    </block>
  </swiper>
</view>
<view class="tz">
  <view class="tz_zp">
    <image src="../../images/font-ui/zggg.png"></image>
  </view>
  <swiper class="swiper-news-top" vertical="true" autoplay="true" circular="true" interval="3000">
    <block wx:for="{{msgList}}" >
      <navigator url="" open-type="navigate">
        <swiper-item>
          <view class="swiper_item" >{{item.text}}</view>
        </swiper-item>
      </navigator>
    </block>
  </swiper>
</view>
<view class="nav">
  <view class="nav-banner"  bindtap='showlist'>
    <view class="nav-banner-img">
      <image src="../../images/font-ui/bigmosque.png"></image>
    </view>
    <view class="nav-banner-text" >东区食堂</view>
  </view>
  <view class="nav-banner" bindtap='showzd'>
    <view class="nav-banner-img">
      <image src="../../images/font-ui/bigschool.png"></image>
    </view>
    <view class="nav-banner-text">西区食堂</view>
  </view>
  <view class="nav-banner" bindtap='showwd'>
    <view class="nav-banner-img">
      <image src="../../images/font-ui/moderncity.png"></image>
    </view>
    <view class="nav-banner-text">每日优惠</view>
  </view>
  <view class="nav-banner" bindtap='showwd'>
    <view class="nav-banner-img">
      <image src="../../images/font-ui/store.png"></image>
    </view>
    <view class="nav-banner-text">南湖食堂</view>
  </view>
  <view class="nav-banner"  bindtap='showtk'>
    <view class="nav-banner-img">
      <image src="../../images/font-ui/temple.png"></image>
    </view>
    <view class="nav-banner-text">美食分享</view>
  </view>
</view>
.nav {
  width: 100%;
  height: 150rpx;
}
.nav-banner {
  height: 100%;
  width: 20%;
  background-color: azure;
  float: left;
}
.nav-banner-img {
  width: 100%;
  height: 75%;
}
.nav-banner-img image {
  width: 70%;
  height: 80%;
  padding: 10% 15%;
}
.nav-banner-text {
  text-align: center;
  margin-top: -10rpx;
  font-size: 26rpx;
}
- 进入 index.js 页面,我们使用 wx.navigateTo(Object object) 跳转到应用内的某个页面,我们对导航栏给他点击事件,在用户在点击之后跳转到敬请期待页面。
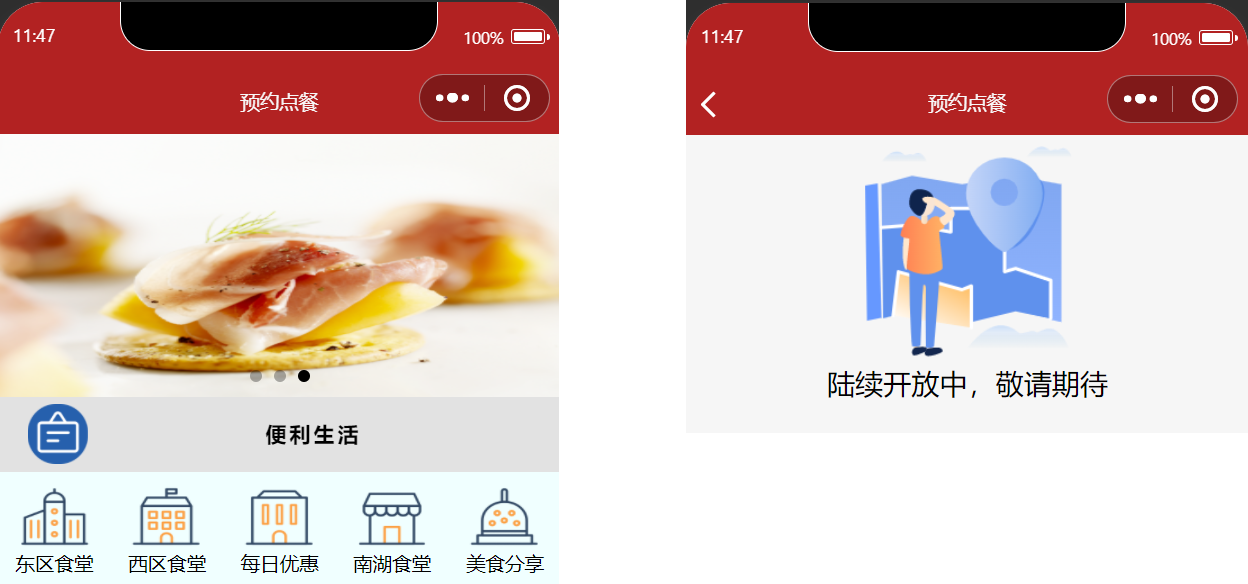
// index.js
showwd:function(){
wx.navigateTo({
  url: '../jqqd/jqqd',
})
},
showtk:function(){
wx.switchTab({
  url: '../gltl/gltl'
})
},
保留当前页面,跳转到应用内的某个页面。其中可使用 wx.navigateBack 返回到原页面。小程序中页面栈最多十层。
步骤 3:搭建首页热门美食栏目
- 进入 CMS 内容管理控制台,新建美食列表内容模型,数据库名称设置为 mslb。
- 进入新建的美食列表页面,如下设置内容集合:
| 内容类型 | 展示名称 | 数据库字段名 |
|---|---|---|
| 图片 | 附件照片 | src |
| 单行字符串 | 名称 | name |
| 单行字符串 | 简介 | jj |
| 单行字符串 | 地址 | dz |
| 单行字符串 | btn1 | btn1 |
| 单行字符串 | btn2 | btn2 |
| 单行字符串 | btn3 | btn3 |
更多 CMS 内容管理详细操作请参见 搭建轮播图。
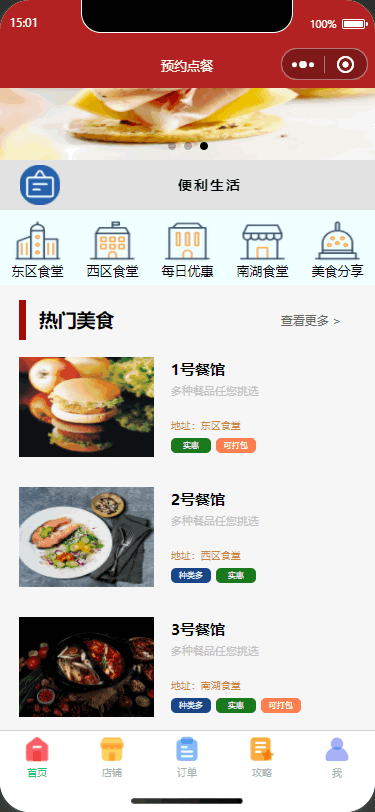
- 进入 index.wxml 页面,使用列表渲染 wx:for 进行列表展示。
<view class="rmbs">
  <view class="rmbs-title">
    <view class="rmbs-title-text">热门美食</view>
    <view class="rmbs-title-more" bindtap='showlist'>查看更多 ></view>
  </view>
  <view class="rmbs-list" wx:for="{{rmbs}}" wx:for-item="item" wx:key="_id"  bindtap='showbs' id="{{item._id}}" wx:if="{{index<10}}">
    <view class="rmbs-list-photo">
      <image src="{{item.src}}"></image>
    </view>
    <view class="rmbs-list-text">
      <view class="rmbs-list-text-tit1">{{item.name}}</view>
      <view class="rmbs-list-text-jj">{{item.jj}}</view>
      <view class="rmbs-list-text-tit2">地址:{{item.zd}}</view>
      <view class="rmbs-list-text-tit3">
        <view class="rmbs-list-text-btn" style="background-color: rgb(26, 69, 134);">{{item.btn1}}</view>
        <view class="rmbs-list-text-btn" style="background-color: rgb(24, 122, 29);">{{item.btn2}}</view>
        <view class="rmbs-list-text-btn" style="background-color: coral;">{{item.btn3}}</view>
        <view class="rmbs-list-text-btn">{{item.btn4}}</view>
      </view>
    </view>
  </view>
</view>
这里我们会发现有的时候 item.btn1 要是为空也会显示出来,我们可以改进一下,使用 wx:if 条件渲染。增加判断之后如果是空置就不显示这个按钮。
<view class="rmbs-list-text-btn" style="background-color: rgb(26, 69, 134);" wx:if="{{item.btn1!=''}}">{{item.btn1}}</view>
<view class="rmbs-list-text-btn" style="background-color: rgb(24, 122, 29);" wx:if="{{item.btn2!=''}}">{{item.btn2}}</view>
<view class="rmbs-list-text-btn" style="background-color: coral;" wx:if="{{item.btn3!=''}}">{{item.btn3}}</view>
最终效果如下:
步骤3:搭建我的页面
本文主要围绕我的页面 my 和 云函数 进行讲解,更多代码细节可参见 my 页面。
步骤1:配置云函数
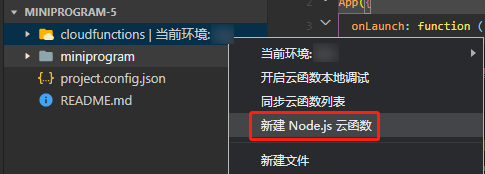
- 右击当前环境文件夹,单击新建 Node.js 云函数,并将文件命名为 open。
- 在 open 云函数下,index.js 文件下编写获取 openid 的代码。
// 云函数入口文件
const cloud = require('wx-server-sdk')

cloud.init()

// 云函数入口函数
exports.main = async (event, context) => {
  const wxContext = cloud.getWXContext()

  return {
    event,
    openid: wxContext.OPENID,
    appid: wxContext.APPID,
    unionid: wxContext.UNIONID,
  }
}
从小程序端调用云函数时,开发者可以在云函数内使用 wx-server-sdk 提供的 getWXContext 方法获取到每次调用的上下文(appid、openid 等),无需维护复杂的鉴权机制,即可获取天然可信任的用户登录态(openid)。
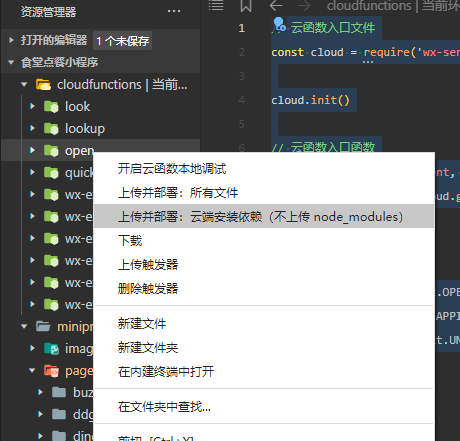
- 然后右击 open 文件夹,单击上传并部署:云端安装依赖,即完成了云函数的编写。
步骤2:搭建登录授权功能
- 进入 app.js 初始化云开发。
// app.js
App({
  onLaunch: function () {
    if (!wx.cloud) {
      console.error('请使用 2.2.3 或以上的基础库以使用云能力');
    } else {
      wx.cloud.init({
        // env 参数说明:
        //   env 参数决定接下来小程序发起的云开发调用(wx.cloud.xxx)会默认请求到哪个云环境的资源
        //   此处请填入环境 ID, 环境 ID 可打开云控制台查看
        //   如不填则使用默认环境(第一个创建的环境)
        env: '环境ID',
        traceUser: true,
      });
    }

    this.globalData = {};
  },
  globalData:{
    userid:''
  }
});
- 进入 my.js 在页面编写我的页面代码。在这里我们写一个点击事件,在用户点击我们绑定 getUserInfo 事件的按钮之后,我们调用获取用户信息。getopenid 是通过云函数获取用户 openid 方法。并将这个值存在 app.js 里面这样我们在其他页面可以直接进行调用。
const app = getApp();
Page({
  /**
  * 页面的初始数据
  */
  data: {
    username:"",
    openid: '',
  },
  /**
  * 生命周期函数--监听页面加载
  */
  onLoad: function (options) {
  },
  getUserInfo(e){
    console.log(e);
    this.setData({
      username:e.detail.userInfo.nickName
    })
  },
  getopenid(){
    var that=this;
    wx.cloud.callFunction({
      name: 'open',
      success:(res)=> {
        var usid = res.result.openid
        console.log(usid)
        this.setData({
          openid:res.result.openid,
        })
        getApp().globalData. userid=res.result.openid
      },
      fail(res) {
        console.log("获取失败", res);
      }
    })
  },
})
- 进入 my.wxml 页面,添加判断登录状态代码,我们可以进行判断如果没有获取到提醒用户登录,如果获取到的 openid 为空我们显示授权登录版块。
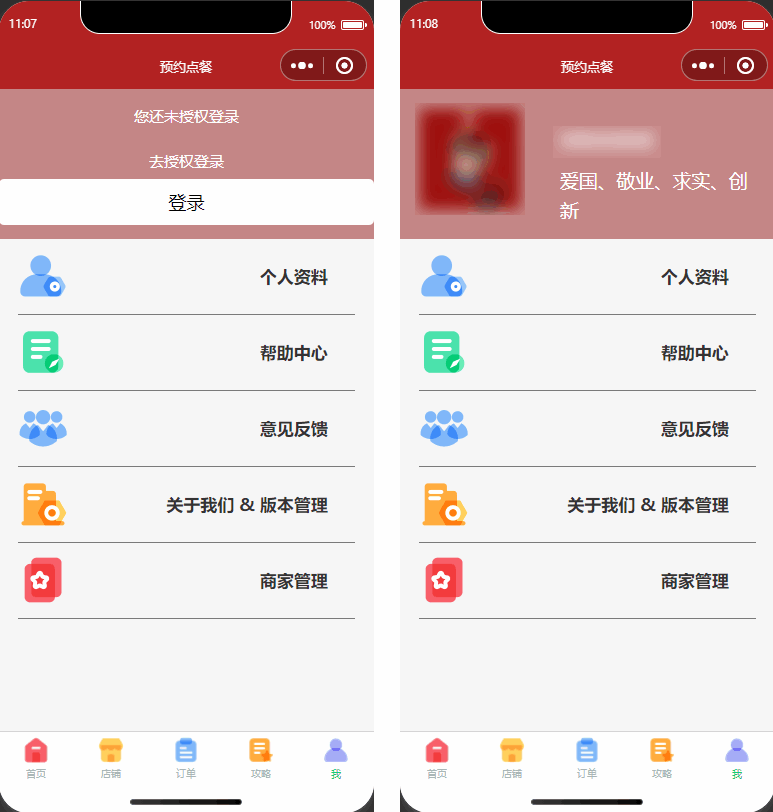
<view class="topbanner"  wx:if="{{openid!=''}}">
  <view class="toplogo">
    <open-data type="userAvatarUrl"></open-data>
  </view>
  <view class="toptext">
  <open-data type="userNickName" lang="zh_CN" class="user-name"></open-data>
  <view class="user-name2">爱国、敬业、求实、创新</view>
  </view>
</view>
<view class="topbanner" wx:if="{{openid==''}}">
  <view class="topban1">您还未授权登录</view>
  <view class="topban1">去授权登录</view>
  <button bindtap="getopenid" type="default">登录</button>
</view>
步骤4:搭建攻略页面
本文主要围绕攻略页面进行讲解,更多代码细节可参见 攻略列表、攻略详情 、 发布评论 和 发布攻略。
步骤1:搭建攻略展示页
- 进入 CMS 内容管理控制台,新建攻略内容模型,数据库名称设置为 glpj。
- 进入新建的攻略页面,如下设置内容集合:
内容类型 展示名称 数据库字段名 图片 照片 photo 单行字符串 标题 title 日期与时间 时间 time 单行字符串 作者 user 数字 浏览量 lll 富文本 简介 xq
更多 CMS 内容管理详细操作请参见 搭建轮播图。
- 这里我们依然通过 wx:for 渲染出列表,并给他点击跳转事件,并将当前文章 ID 编号进行传递。
- gltl.wxml
- gltl.js
<!--pages/gltl/gltl.wxml-->
<view class="banner">
  <image src="https://6363-ccntst-8gsp6zkw250f8e38-1305928500.tcb.qcloud.la/cloudbase-cms/upload/2021-11-25/5hbujycykft9vg9g82xcsw0f6z34v8o5_.jpg"></image>
</view>
<view class="miin_baer">
  <view class="title_pl">
    <view class="pl_bt">攻略评论</view>
    <view class="qpl" id="{{rmbs._id}}" bindtap='showtl'>发表</view>
    </view>
  <view class="mian_box"  wx:for="{{rmbs}}" wx:for-item="item" wx:key="_id"  bindtap='showbs' id="{{item._id}}">
    <view class="min_box_img">
      <image src="{{item.phpto}}"></image>
    </view>
    <view class="mian_text">
      <view class="miam_text_title">
        {{item.title}}
      </view>
      <view class="mian_user">
        <view class="user_logo">
          <image src="../../images/font-ui/nstx.png"></image>
        </view>
        <view class="user_name">
          {{item.user}}
        </view>
        <view class="taolun">
          <image src="../../images/font-ui/pinglun-08.png"></image>
        </view>
        <view class="liulanl">
          <view class="lll_zp">
            <image src="../../images/font-ui/liulan.png"></image>
          </view>
          <view class="lll_sz">
            {{item.lll}}+
          </view>
        </view>
      </view>
    </view>
  </view>
</view>
// pages/gltl/gltl.js
wx.cloud.init({
  env: '环境 ID',
  traceUser: true,
})
const db=wx.cloud.database()
Page({

  /**
   * 页面的初始数据
   */
  data: {
    rmbs:''
  },

  /**
   * 生命周期函数--监听页面加载
   */
  onLoad: function (options) {
    db.collection("glpj").get().then(res=>{
      console.log(res)
      this.setData({
        rmbs:res.data
      })
    })
  },
  showbs:function(e){
    console.log(e.currentTarget.id)
    wx.navigateTo({
      url:'/pages/glxq/glxq?list_id='+e.currentTarget.id,
    })
  },
  showtl:function(e){
    wx.navigateTo({
      url:'/pages/fbpl/fbpl',
    })
  },
})
步骤2:搭建攻略详情及发表评论功能
- 进入 CMS 内容管理控制台,新建攻略评论内容模型,数据库名称设置为 glplgl。
- 进入新建的攻略评论页面,如下设置内容集合:
| 内容类型 | 展示名称 | 数据库字段名 |
|---|---|---|
| 单行字符串 | 用户 | user |
| 单行字符串 | 文字 | text |
| 单行字符串 | 用户名字 | username |
| 日期与时间 | data | data |
| 单行字符串 | plwz | plwz |
更多 CMS 内容管理详细操作请参见 搭建轮播图。
- 攻略详情页面的逻辑及前端代码如下:
- glxq.js
- glxq.wxml
// pages/glxq/glxq.js
wx.cloud.init({
  env: '环境 ID',
  traceUser: true,
})
const db=wx.cloud.database()
Page({

  /**
   * 页面的初始数据
   */
  data: {
    list_id:"",
    rmb:""
  },

  /**
   * 生命周期函数--监听页面加载
   */
  onLoad: function (options) {
    this.setData({
      list_id:options.list_id
    })
    console.log( this.data.list_id),
    /**/
    db.collection("glpj").doc(this.data.list_id).get().then(res=>{
      console.log(res)
      this.setData({
        rmbs:res.data
      })
    })
    const _=db.command
    db.collection('glpj').doc(this.data.list_id).update({
      data:{
        lll:_.inc(1)
      }
    })
    db.collection("glplgl").where({plwz:this.data.list_id}).get().then(res=>{
      console.log(res)
      this.setData({
        rmb:res.data
      })
    })
  },

  /**
   * 生命周期函数--监听页面初次渲染完成
   */
  onReady: function () {
  },

  /**
   * 生命周期函数--监听页面显示
   */
  onShow: function () {
  },
  showbs:function(e){
    console.log(e.currentTarget.id)
    wx.navigateTo({
      url:'/pages/xpl/xpl?list_id='+e.currentTarget.id,
    })
  },
})
<!--pages/glxq/glxq.wxml-->
<view class="zpq" id="{{item._id}}">
  <image src="{{rmbs.phpto}}"></image>
</view>
<view class="dd">
  <rich-text class="rich" nodes="{{rmbs.xq}}"></rich-text>
</view>
<view class="fbsj">
  发布时间:{{rmbs.time}}
</view>
<view class="lll">
  <view class="liulanl">
    <view class="lll_zp">
      <image src="../../images/font-ui/liulan.png"></image>
    </view>
    <view class="lll_sz">
      {{rmbs.lll}}+
    </view>
  </view>
</view>
<view class="pl">
  <view class="title_pl">
    <view class="pl_bt">评论</view>
    <view class="qpl" id="{{rmbs._id}}" bindtap='showbs'>去评论</view>
    </view>
  <view class="pl_box" wx:for="{{rmb}}" wx:for-item="item" wx:key="_id"  >
    <view class="pl_xxl" >
      <view class="pl_tx">
        <image src="../../images/font-ui/nstx.png"></image>
      </view>
      <view class="pl_xx_us">
        <view class="pl_xx_user">
          {{item.username}}
        </view>
        <view class="pl_xx_time">
          {{item.data}}
        </view>
      </view>
      <view class="dz">
        <image src="../../images/font-ui/dzz.png"></image>
      </view>
    </view>
    <view class="plxx_xq">
        {{item.text}}
    </view>
  </view>
</view>
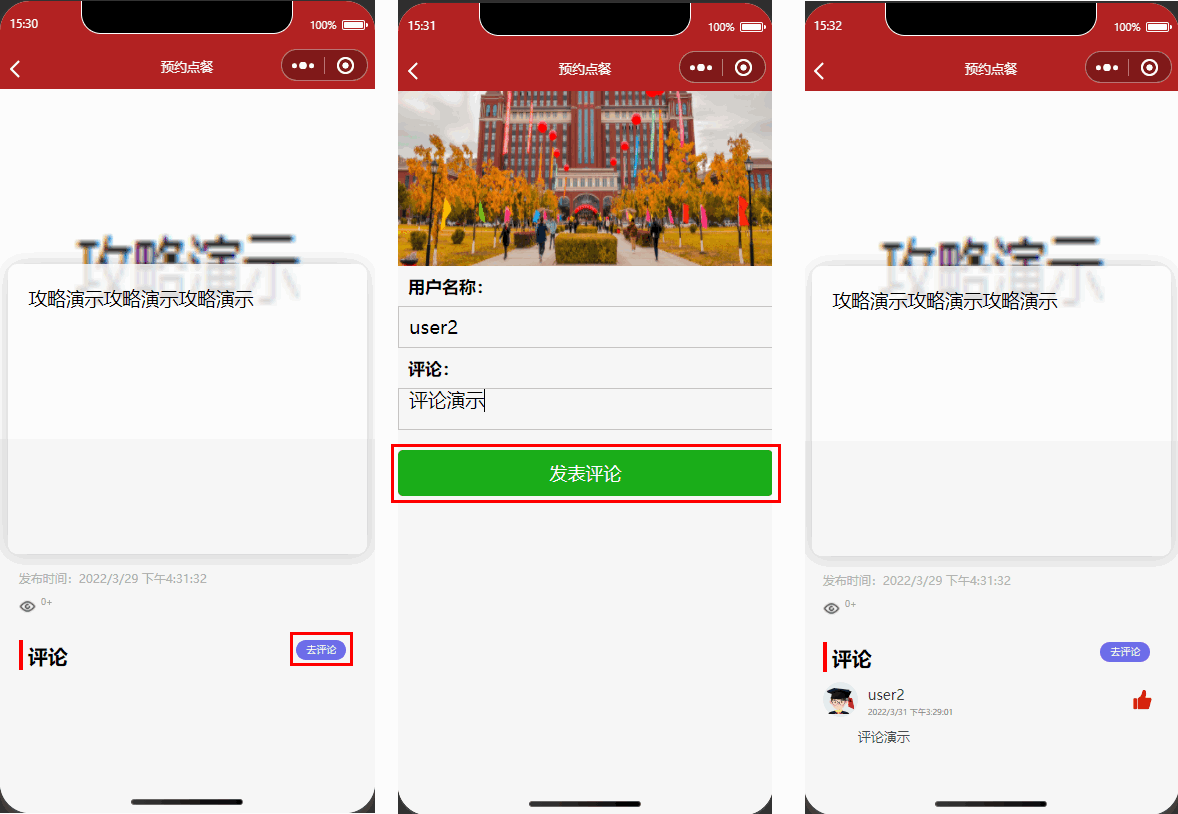
- 在对应的攻略详情页面,单击去评论的时候我们需要获取到用户的 openid 和当前要发布评论的文章 ID。去评论的逻辑及前端代码如下:
- xpl.js
- xpl.wxml
// pages/xpl/xpl.js
wx.cloud.init({
  env: '环境 ID',
  traceUser: true,
})
const db = wx.cloud.database()
var myDate = new Date();
Page({

  /**
   * 页面的初始数据
   */
  data: {
    list_id: "",
    userid: '',
  },

  /**
   * 生命周期函数--监听页面加载
   */
  onLoad: function (options) {
    this.setData({
      list_id: options.list_id
    })
    console.log(this.data.list_id)
    const app = getApp()
    var userid = app.globalData.userid
    this.setData({
      userid: userid,
    })
  },
  showsq: function () {
    wx.switchTab({
      url: '../my/my',
    })
  },
  /**
   * 生命周期函数--监听页面初次渲染完成
   */
  onReady: function () {
  },
  btnSub(res) {
    if (res.detail.value.text != '' && res.detail.value.username != '') {
      var {
        text,
        username
      } = res.detail.value;
      db.collection("glplgl").add({
        data: {
          user: this.data.userid,
          text: text,
          plwz: this.data.list_id,
          username: username,
          data: myDate.toLocaleString(),
          _createTime: Date.parse(new Date()),
        }
      }).then(res => {
        wx.showToast({
          title: '成功',
          icon: 'success',
          duration: 2000
        })
      })
    } else {
      wx.showToast({
        title: '请填写信息',
        icon: 'error',
        duration: 2000
      })
    }
  },
})
<!--pages/xpl/xpl.wxml-->
<view class="banner">
  <!----><image src="https://6363-ccntst-8gsp6zkw250f8e38-1305928500.tcb.qcloud.la/cloudbase-cms/upload/2021-11-25/5hbujycykft9vg9g82xcsw0f6z34v8o5_.jpg"></image>
</view>
<view class="wdl_ban" wx:if="{{userid==''}}">
  <view class="wdl">
    <image src="../../images/font-ui/wdl.png"></image>
  </view>
  <view class="text_main">您还未授权登录,请授权登录!</view>
  <button size="mini" type="primary" bindtap='showsq' class="btn_sq">去授权</button>
</view>
<view class="xpl" wx:if="{{userid!=''}}">
  <form bindsubmit="btnSub">
    <view class="top-s">
      <view class="top-text">用户名称:</view>
      <view class="weui-cell__bd">
        <input class="weui-input" name="username" placeholder="输入名称" />
      </view>
    </view>
    <view class="top-s">
      <view class="top-text">评论:</view>
      <view class="weui-cell__bd">
        <textarea bindblur="bindTextAreaBlur" name="text" class="weui-text" auto-height placeholder="自动变高" />
      </view>
    </view>
    <button style="margin: 0 aout;margin-top:40rpx;margin-bottom:40rpx;" type="primary" formType="submit">发表评论</button>
  </form>
</view>
针对内容安全,微信云开发提供内容安全功能,可对云开发数据库中存储的信息进行内容安全的规则设置,自动进行内容审核并对触发违规的内容进行处理。详情请参见 内容安全。
- 最终效果如下:
步骤3:搭建发表攻略功能
- 进入 app.json 页面,添加 weui 框架。
{
  "useExtendedLib": {
    "weui": true
  }
}
- 然后进入 fbpl.json 页面再次引入 weui 的框架并在 fbpl.wxml 中调用。相关代码如下:
- fbpl.json
- fbpl.wxml
- fbpl.js
{
  "usingComponents": {
    "mp-uploader": "weui-miniprogram/uploader/uploader",
    "mp-cells": "weui-miniprogram/cells/cells",
    "mp-cell": "weui-miniprogram/cell/cell",
    "mp-form-page": "weui-miniprogram/form-page/form-page",
    "mp-form": "weui-miniprogram/form/form",
    "mp-toptips": "weui-miniprogram/toptips/toptips",
    "mp-checkbox-group": "weui-miniprogram/checkbox-group/checkbox-group",
    "mp-half-screen-dialog": "weui-miniprogram/half-screen-dialog/half-screen-dialog"
  }
}
<view wx:if="{{userid!=''}}">
  <view class="weui-cells__title">发布攻略</view>
  <mp-cell prop="name" title="标题" ext-class="">
    <input bindinput="formInputChange" data-field="name" class="weui-input" placeholder="请输标题" />
  </mp-cell>
  <mp-cell prop="mobile" title="昵称" ext-class=" ">
    <input bindinput="formInputChange" data-field="mobile" class="weui-input" placeholder="请输入昵称" />
    <view slot="footer" class="weui-vcode-btn"></view>
  </mp-cell>
  <view class="weui-cells__title">攻略</view>
  <view class="weui-cells weui-cells_after-title">
    <view class="weui-cell">
      <view class="weui-cell__bd">
        <textarea class="weui-textarea" bindinput="formwtInputChange" placeholder="请输入攻略" name="wt" style="height: 3.3em" />
        <view class="weui-textarea-counter">200</view>
      </view>
    </view>
  </view>
  <view class="page">
    <view class="page__bd">
      <mp-cells>
        <mp-cell>
          <mp-uploader bindfail="uploadError" bindsuccess="uploadSuccess" select="{{selectFile}}" upload="{{uplaodFile}}" files="{{files}}" max-count="4" title="附件上传" tips="最多可上传4张照片"></mp-uploader>
        </mp-cell>
      </mp-cells>
    </view>
  </view>
  <view class="weui-btn-area">
    <button class="weui-btn" type="primary" formType="submit" bindtap="submitForm">确定</button>
  </view>
</view>
// pages/fbpl/fbpl.js
wx.cloud.init({
  env: '您的环境ID',
  traceUser: true,
})
const db=wx.cloud.database()
Page({

    /**
     * 页面的初始数据
     */
    data: {
        userid:'',
        files: []
    },

    /**
     * 生命周期函数--监听页面加载
     在这里我们在app.js里面的openid
     */
    onLoad: function (options) {
        const app = getApp()
        var  userid = app.globalData.userid
        this.setData({
          userid:userid,
        })
        wx.cloud.init({
            traceUser: true
          })

          this.setData({
            selectFile: this.selectFile.bind(this),
            uplaodFile: this.uplaodFile.bind(this)
        })
    },
    formInputChange(e) {
        const {
          field
        } = e.currentTarget.dataset
        this.setData({
          [`formData.${field}`]: e.detail.value
        })
      },
      formplInputChange(e) {
        console.log(e)
        this.setData({
          palce: e.detail.value
        })
      },
      formwtInputChange(e) {
        console.log(e)
        this.setData({
          wt: e.detail.value
        })
      },
      submitForm(e) {
            this.setData({
              name: this.data.formData.name,
              phone: this.data.formData.mobile,
              tsbm: this.data.tsbmun,
            })
            if(this.data.wt.length>10 && this.data.openid!='')
            {
              db.collection('glpj').add({
                // data 字段表示需新增的 JSON 数据
                data: {
                  title: this.data.name,
                  user: this.data.mobile,
                  xq: this.data.wt,
                  phpto:this.data.files,
                  userid: this.data.openid,
                  time: Date.parse(new Date()),
                  _createTime: Date.parse(new Date()),
                  lll:0,
                }
              })
              wx.reLaunch({
                  url: '../gltl/gltl',
                  success: (res)=> {
                    wx.showToast({
                      title: '完成',
                      success:(res)=>{
                        wx.navigateTo({
                          url: '../index/index',
                        })
                      }
                    })
                  }
                })
            }else{
              wx.showToast({
                title: '描述',
                icon: 'error',
                duration: 2000
              })
            }
      },
    /**
     * 生命周期函数--监听页面显示
     */
    showsq: function () {
      wx.switchTab({
          url: '../my/my',
      })
  },
    chooseImage: function (e) {
        var that = this;
        wx.chooseImage({
            sizeType: ['original', 'compressed'], // 可以指定是原图还是压缩图,默认二者都有
            sourceType: ['album', 'camera'], // 可以指定来源是相册还是相机,默认二者都有
            success: function (res) {
                // 返回选定照片的本地文件路径列表,tempFilePath可以作为img标签的src属性显示图片
                that.setData({
                    files: that.data.files.concat(res.tempFilePaths)
                });
            }
        })
    },
    previewImage: function(e){
        wx.previewImage({
            current: e.currentTarget.id, // 当前显示图片的http链接
            urls: this.data.files // 需要预览的图片http链接列表
        })
    },
    selectFile(files) {
        console.log('files', files)
        // 返回false可以阻止某次文件上传
    },
    uplaodFile(files) {
        console.log('upload files', files)
        console.log('upload files', files)
        // 文件上传的函数,返回一个promise
        return new Promise((resolve, reject) => {
          const tempFilePaths = files.tempFilePaths;
          //上传返回值
          const that = this;
          const object = {};
          for (var i = 0; i < tempFilePaths.length; i++) {
            let filePath = '',cloudPath = ''
            filePath = tempFilePaths[i]
            // 上传图片
            // cloudPath 最好按时间 遍历的index来排序,避免文件名重复
            cloudPath = 'blog-title-image-' + new Date().getTime() + '-' + i + filePath.match(/\.[^.]+?$/)[0]

            console.log(filePath)
            console.log(cloudPath)
            const upload_task = wx.cloud.uploadFile({
              filePath,
              cloudPath,
              success: function(res) {
                console.log(res)
                // 可能会有好几个200+的返回码,表示成功
                if (res.statusCode === 200  || res.statusCode === 204 || res.statusCode === 205) {
                  const url = res.fileID
                  that.data.files.push(url)
                  if (that.data.files.length === tempFilePaths.length) {
                    object.urls = that.data.files;
                    resolve(object)  //这就是判断是不是最后一张已经上传了,用来返回,
                  }
                } else {
                  reject('error')
                }
              },
              fail: function(err) {
                console.log(err)
              },
              conplete: () => {

              }
            })
          }
        })
        // 文件上传的函数,返回一个promise
    },
    uploadError(e) {
        console.log('upload error', e.detail)
    },
    uploadSuccess(e) {
        console.log('upload success', e.detail)
    }
});
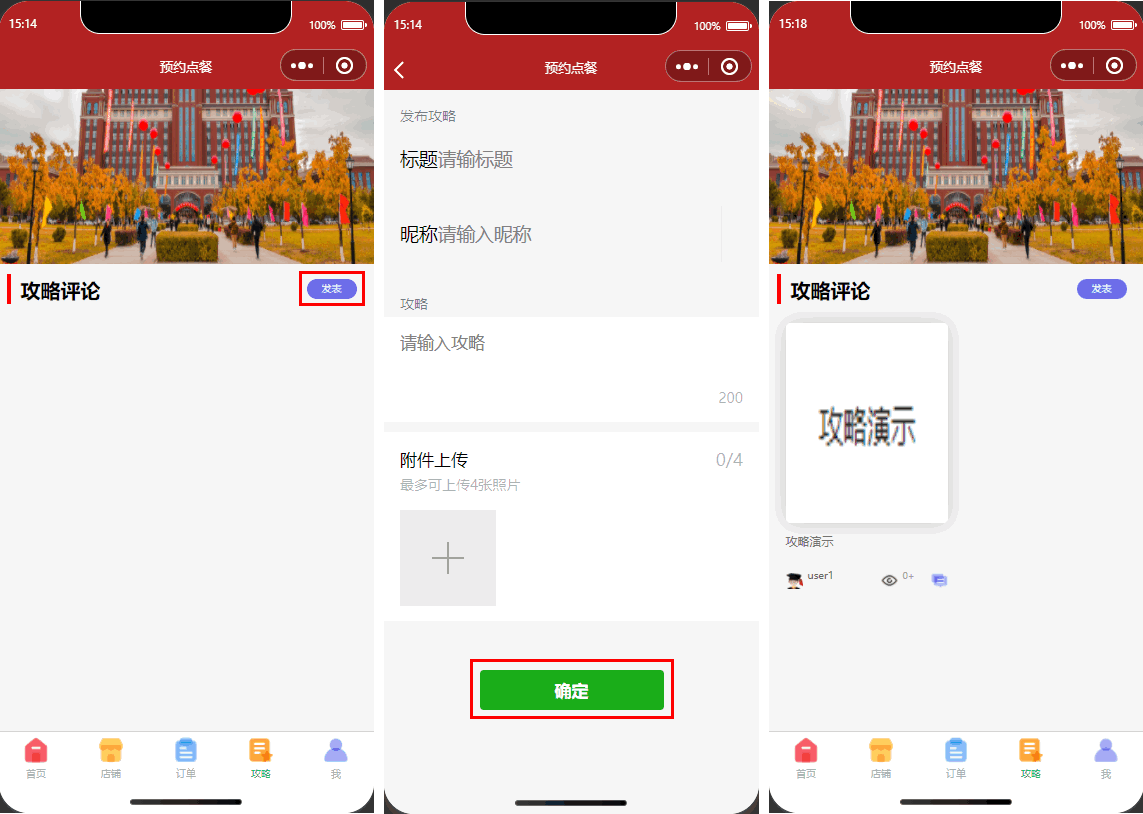
- 最终效果如下:
步骤5:搭建店铺页面
本文主要围绕店铺页面进行讲解,更多代码细节可参见 店铺 和 商家。
步骤1:搭建店铺页面
- 进入 CMS 内容管理控制台,新建店铺内容模型,数据库名称设置为 dp。
- 进入新建的店铺页面,如下设置内容集合:
| 内容类型 | 展示名称 | 数据库字段名 |
|---|---|---|
| 单行字符串 | 店铺名称 | name |
| 单行字符串 | 店铺地点 | dpdd |
| 日期与时间 | 时间 | time |
| 布尔值 | 是否营业 | sfyy |
| 图片 | 店铺照片 | dpzp |
| 单行字符串 | 简介 | jj |
更多 CMS 内容管理详细操作请参见 搭建轮播图。
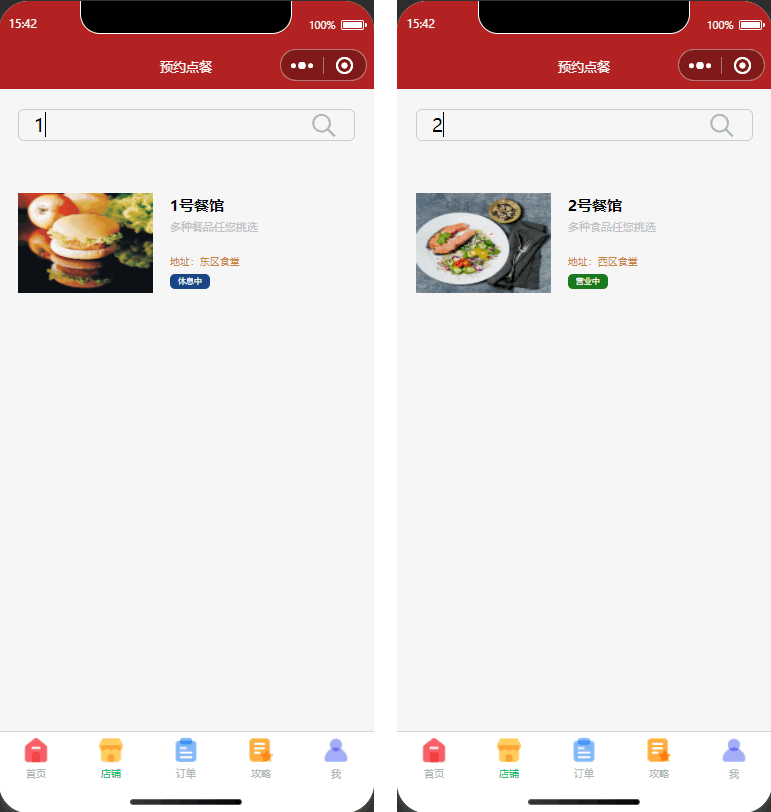
- 然后将它在小程序进行展示。
- dp.wxml
- dp.js
<!--pages/dp/dp.wxml-->
<view class='search'>
  <input type='text' placeholder='请输入您要搜索的内容' bindinput='input' bindconfirm='confirm' />
  <icon type='search' class='icons'></icon>
</view>
<view class="rmbs">
  <view class="rmbs-list" wx:for="{{list}}" wx:for-item="item" wx:key="_id"  bindtap='showbs' id="{{item._id}}" wx:if="{{item.show}}">
    <view class="rmbs-list-photo">
      <image src="{{item.dpzp}}"></image>
    </view>
    <view class="rmbs-list-text">
      <view class="rmbs-list-text-tit1">{{item.name}}</view>
      <view class="rmbs-list-text-jj">{{item.jj}}</view>
      <view class="rmbs-list-text-tit2">地址:{{item.dpdd}}</view>
      <view class="rmbs-list-text-tit3">
        <view class="rmbs-list-text-btn" style="background-color: rgb(24, 122, 29);" wx:if="{{item.sfyy!=false}}">营业中</view>
        <view class="rmbs-list-text-btn" style="background-color: rgb(26, 69, 134);" wx:else>休息中</view>
      </view>
    </view>
  </view>
</view>
// pages/dp/dp.js
wx.cloud.init({
  env: 'ccntst-8gsp6zkw250f8e38',
  traceUser: true,
})
const db=wx.cloud.database()
Page({
  /**
   * 页面的初始数据
   */
  data: {
    rmbs:"",
    list: [],
    list_id:''
  },
  bindPickerChange: function(e) {
    console.log('picker发送选择改变,携带值为', e.detail.value)
    this.setData({
      index: e.detail.value
    })
  },
  bindPickerChange1: function(e) {
    console.log('picker发送选择改变,携带值为', e.detail.value)
    this.setData({
      index1: e.detail.value
    })
  },
  input(e) {
    console.log(e)
    this.search(e.detail.value)
  },
  //点击完成按钮时触发
  confirm(e) {
    this.search(e.detail.value)
  },
  search(key) {
    var that = this;
    //从本地缓存中异步获取指定 key 的内容
    var list = wx.getStorage({
      key: 'list',
      //从Storage中取出存储的数据
      success: function (res) {
        // console.log(res)
        if (key == '') { //用户没有输入时全部显示
          that.setData({
            list: res.data
          })
          return;
        }
        var arr = []; //临时数组,用于存放匹配到的数组
        for (let i in res.data) {
          res.data[i].show = false; //所有数据隐藏
          if (res.data[i].name.indexOf(key) >= 0) {
            res.data[i].show = true; //让匹配到的数据显示
            arr.push(res.data[i])
          }
        }
        if (arr.length == 0) {
          that.setData({
            list: [{
              show: true,
              name: '没有相关数据!'
            }]
          })
        } else {
          that.setData({
            list: arr
          })
        }
      },
    })
  },
  bindPickerChange2: function(e) {
    console.log('picker发送选择改变,携带值为', e.detail.value)
    this.setData({
      index1: e.detail.value
    })
  },
  /**
   * 生命周期函数--监听页面加载
   */
  onLoad: function (options) {
    this.setData({
      list_id:options.list_id
    })
    console.log( this.data.list_id),
    db.collection("dp").get().then(res=>{
      wx.setStorage({
        key: 'list',
        data: res.data
      })
      this.setData({
        list: res.data,
      })
    })
  },
  showbs:function(e){
    console.log(e.currentTarget.id)
    wx.navigateTo({
      url:'/pages/fbgl/fbgl?list_id='+e.currentTarget.id,
    })
  },
})
- 效果如下:
步骤2:搭建商品页面
- 进入 CMS 内容管理控制台,新建商品内容模型,数据库名称设置为 sp。
- 进入新建的商品页面,如下设置内容集合:
其中,商家关联内容选择店铺,展示字段选择店铺名称。内容类型 展示名称 数据库字段名 单行字符串 名称 name 数字 价格 jg 数字 销量 xl 单行字符串 配料 pl 图片 照片 zp 关联 商家 sj
更多 CMS 内容管理详细操作请参见 搭建轮播图。
- 在用户点击商家跳转到商品页面,我们依然需要传递商家的 ID。
- fbgl.wxml
- fbgl.js
<!--pages/fbgl/fbgl.wxml-->
<view class="wdl_ban" wx:if="{{userid==''}}">
    <view class="wdl">
        <image src="../../images/font-ui/wdl.png"></image>
    </view>
    <view class="text_main">您还未授权登录,请授权登录!</view>
    <button size="mini" type="primary" bindtap='showsq' class="btn_sq">去授权</button>
</view>
<view class="contmian" wx:if="{{userid!=''}}">
    <view class="mian_box"  wx:for="{{rmb}}" wx:for-item="item" wx:key="_id"  bindtap='showbs' >
        <view class="main_box_left">
            <image src="{{item.zp}}" class="zszp"></image>
        </view>
        <view class="main_box_right">
            <view class="tit_zs">{{item.name}}</view>
            <view class="pl">配料:{{item.pl}}</view>
            <view class="pl">月售:{{item.xl}}</view>
            <view class="jg">¥ {{item.jg}}</view>
            <button size="mini" type="primary" bindtap="addCart" id="{{item._id}}"  class="btn_9">购买</button>
        </view>
    </view>
</view>
// pages/fbgl/fbgl.js
wx.cloud.init({
    env: 'ccntst-8gsp6zkw250f8e38',
    traceUser: true,
  })
  const db=wx.cloud.database()
  var myDate = new Date();
Page({

    /**
     * 页面的初始数据
     */
    data: {
        userid: '',
        list_id:'',
        rmb:''
    },

    /**
     * 生命周期函数--监听页面加载
     */
    onLoad: function (options) {
        this.setData({
            list_id:options.list_id
          })
          console.log( this.data.list_id)
        const app = getApp()
        var userid = app.globalData.userid
        this.setData({
            userid: userid,
        })
        db.collection("sp").where({sj:this.data.list_id}).get().then(res=>{
            console.log(res)
            this.setData({
              rmb:res.data
            })
        })
    },
    showsq: function () {
        wx.switchTab({
            url: '../my/my',
        })
    },

})
- 效果如下:
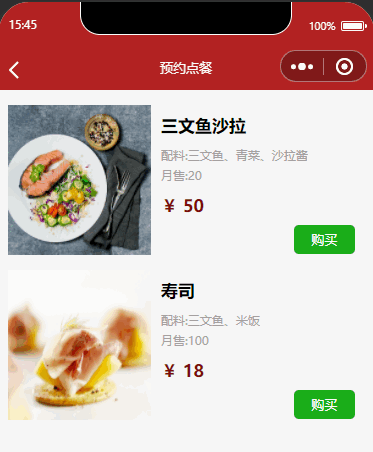
步骤3:搭建下单功能
- 进入 CMS 内容管理控制台,新建订单内容模型,数据库名称设置为 dd。
- 进入新建的订单页面,如下设置内容集合:
其中,商品关联内容选择店铺,展示字段选择店铺名内容类型 展示名称 数据库字段名 单行字符串 userid userid 关联 商品 sp 单行字符串 时间 time 布尔值 下单 xd 布尔值 是否取餐 qccg 单行字符串 取餐时间 qcsj
更多 CMS 内容管理详细操作请参见 搭建轮播图。
- 接下来进入 fbgl.js 页面配置下单事件。
 addCart(res) {
  console.log(res)
  const _=db.command
  db.collection('sp').doc(res.currentTarget.id).update({
    data:{
      xl:_.inc(1)
    }
  })
  db.collection("sp").get().then(res=>{
    console.log(res)
    this.setData({
      rmb:res.data
    })
  })
  db.collection("dd").add({
    data: {
      userid: this.data.userid,
      sp: res.currentTarget.id,
      _createTime: Date.parse(new Date()),
      time: myDate.toLocaleString(),
      xd:0,
      qccg:0,
    }
  }).then(res => {
    wx.showToast({
      title: '添加成功',
      icon: 'success',
      duration: 2000
    })
  })
},
我们思考可以知道,我们用户下单里面需要有用户openid,商品,时间等信息。
我们使用插入数据方法将数据存入数据库,新增记录,如果传入的记录对象没有 _id 字段,则由后台自动生成 _id;若指定了 _id,则不能与已有记录冲突
步骤6:搭建订单页面
本文主要围绕订单页面进行讲解,更多代码细节可参见 订单 和 订单管理。
步骤1:搭建云函数 look
- 右击当前环境文件夹,单击新建 Node.js 云函数,并将文件命名为 look。

- 在 look 云函数下,index.js 文件下编写聚合阶段联表查询代码。
// 云函数入口文件
const cloud = require('wx-server-sdk')

cloud.init({
  env: '环境 ID'}
)
const db = cloud.database()
// 云函数入口函数
exports.main = async (event, context) => {
  var text= event.userid
  return await db.collection('dd').aggregate()
  .lookup({
    from: 'sp',
    localField: 'sp',
    foreignField: '_id',
    as: 'bookList',
  })
  .end()
}
与同个数据库下的一个指定的集合做 left outer join(左外连接)。对该阶段的每一个输入记录,lookup 会在该记录中增加一个数组字段,该数组是被联表中满足匹配条件的记录列表。lookup 会将连接后的结果输出给下个阶段。
这里我们使用连表查询,使用 Aggregate.lookup(object: Object): Aggregate 方法。
lookup({
  from: <要连接的集合名>,
  localField: <输入记录的要进行相等匹配的字段>,
  foreignField: <被连接集合的要进行相等匹配的字段>,
  as: <输出的数组字段名>
})
| 参数字段 | 说明 |
|---|---|
| from | 要进行连接的另外一个集合的名字 |
| let | 可选。指定在 pipeline 中可以使用的变量,变量的值可以引用输入记录的字段,例如 let: userName: '$name' 就代表将输入记录的 name 字段作为变量 userName 的值。在 pipeline 中无法直接访问输入记录的字段,必须通过 let 定义之后才能访问,访问的方式是在 expr 操作符中用 $$变量名 的方式访问,例如 $$userName。 |
| pipeline | 指定要在被连接集合中运行的聚合操作。如果要返回整个集合,则该字段取值空数组 []。在 pipeline 中无法直接访问输入记录的字段,必须通过 let 定义之后才能访问,访问的方式是在 expr 操作符中用 $$变量名 的方式访问,例如 $$userName。 |
| as | 指定连接匹配出的记录列表要存放的字段名,这个数组包含的是匹配出的来自 from 集合的记录。如果输入记录中本来就已有该字段,则该字段会被覆写 |
该操作等价于以下伪 SQL 语句:
SELECT *, <output array field>
FROM collection
WHERE <output array field> IN (SELECT <documents as determined from the pipeline>
FROM <collection to join>
WHERE <pipeline> );
步骤2:搭建云函数 lookup
- 右击当前环境文件夹,单击新建 Node.js 云函数,并将文件命名为 lookup。

- 由于商品里面的 _id 与订单里面 sp 相同,在 lookup 云函数下,index.js 文件编写以下代码,实现两个表的关联。
// 云函数入口文件
const cloud = require('wx-server-sdk')

cloud.init({
  env: '环境 ID'}
)
const db = cloud.database()
// 云函数入口函数
exports.main = async (event, context) => {
  var text= event.userid
  return await db.collection('dd').aggregate()
  .lookup({
    from: 'sp',
    localField: 'sp',
    foreignField: '_id',
    as: 'bookList',
  })
  .end()
}
- 然后我们在 dingdan.js 页面传 openid 到云函数 look。
onLoad: function (options) {
  const app = getApp()
  var userid = app.globalData.userid
  this.setData({
    userid: userid,
  })
  wx.cloud.callFunction({
    name: 'lookup',
    data: {
      userid: app.globalData.userid
    },
    complete: res => {
      console.log(res.result.list)
      this.setData({
        rmb: res.result.list
      })
    }
  })
},
步骤3:搭建购物车页面
- 接下来我们搭建购物车页面。
- dingdan.wxml
- dingdan.js
<!--pages/dingdan/dingdan.wxml-->
<view class="qsy" wx:if="{{openid!=''&&rmb==''}}">
    <view class="mydd">
        <image src="../../images/font-ui/zwjl.png"></image>
    </view>
    <view class="text_wydd">暂未有订单,快去下单吧!</view>
</view>
<view class="qsy" wx:if="{{openid==''}}">
    <view class="wdl">
        <image src="../../images/font-ui/wdl.png"></image>
    </view>
    <view class="text_main">您还未授权登录,请授权登录!</view>
    <button bindtap="getopenid" size="default" class="btn_sq" type="primary">登录</button>
</view>
<view wx:if="{{openid!=''&&rmb!=''}}" class="text_main1" wx:for="{{rmb}}" wx:for-item="item" wx:key="_id" bindtap='showbs' id="{{item._id}}" wx:if="{{openid==item.userid&&item.xd==0}}">
    <view class="main_gwc">
        <view class="title">
            <view class="sjmc_1">
                {{item.bookList[0].name}}
            </view>
            <button size="mini" type="primary" class="sp_btn" id="{{item._id}}"  bindtap="binxd">下单</button>
            <button size="mini" type="warn" class="sp_btn" id="{{item._id}}" bindtap="binqc">清除商品</button>
        </view>
        <view class="zp_sp">
            <image src='{{item.bookList[0].zp}}'></image>
        </view>
        <view class="zp_nrl">
            <view class="title_zpnrl">
                配料:{{item.bookList[0].pl}}
            </view>
            <view class="title_zpnrl1">
                价格:{{item.bookList[0].jg}}
            </view>
            <view class="title_zpnrl">
                加入时间:{{item.time}}
            </view>
        </view>
    </view>
</view>
// pages/dingdan/dingdan.js
wx.cloud.init({
  env: '环境 ID',
  traceUser: true,
})
const db = wx.cloud.database()
const app = getApp();
Page({

  /**
   * 页面的初始数据
   */
  data: {
    msgList: "",
    userid: '',
    username: "",
    openid: '',
    rmb: ''
  },
  showsq: function () {
    wx.switchTab({
      url: '../my/my',
    })
  },
  /**
   * 生命周期函数--监听页面加载
   */
  onLoad: function (options) {
    const app = getApp()
    var userid = app.globalData.userid
    this.setData({
      openid: userid,
    })
    wx.cloud.callFunction({
      name: 'lookup',
      data: {
        userid: app.globalData.userid
      },
      complete: res => {
        console.log(res.result.list)
        this.setData({
          rmb: res.result.list
        })
      }
    })
  },
  binqc: function (e) {
    console.log(e.currentTarget.id)
    db.collection('dd').doc(e.currentTarget.id).remove({
      success: function (res) {

      }
    })
    wx.cloud.callFunction({
      name: 'lookup',
      data: {
        userid: app.globalData.userid
      },
      complete: res => {
        console.log(res.result.list)
        this.setData({
          rmb: res.result.list
        })
      }
    })
  },
  binxd: function (e) {
    db.collection('dd').doc(e.currentTarget.id).update({
      // data 传入需要局部更新的数据
      data: {
        // 表示将 done 字段置为 true在用户下单我们将xd状态变更成1
        xd: 1
      },
      success: function(res) {
        wx.showToast({
          title: '下单成功',
          icon: 'success',
          duration: 2000
      })
      }
    })
    wx.cloud.callFunction({
      name: 'lookup',
      data: {
        userid: app.globalData.userid
      },
      complete: res => {
        console.log(res.result.list)
        this.setData({
          rmb: res.result.list
        })
      }
    })
  },
  xd: function (e) {
    wx.navigateTo({
      url: '/pages/xd/xd',
    })
  },
sxxxx(e) {
  wx.cloud.callFunction({
    name: 'lookup',
    data: {
      userid: app.globalData.userid
    },
    complete: res => {
      console.log(res.result.list)
      this.setData({
        rmb: res.result.list
      })
    }
  })
},
})
- 效果如下:
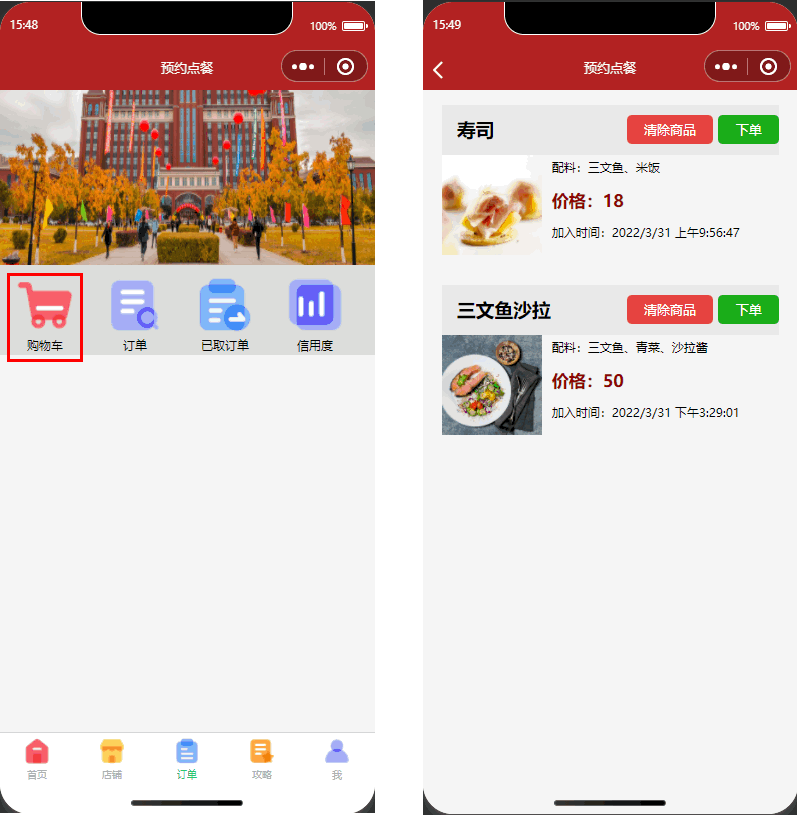
步骤4:搭建取餐功能
- 进入 ddgl.js 页面,增加以下方法实现取餐和取消商品功能。
binqc: function (e) {
    wx.showModal({
      title: '提示',
      content: '是否确认取消订单,会影响您的诚信度哦!',
      success(res) {
        if (res.confirm) {
          console.log('确定')
          console.log(e.currentTarget.id)
          db.collection('dd').doc(e.currentTarget.id).remove({
            success: function (res) {
              wx.navigateTo({
                url: '/pages/index/index',
              })
            }
          })
        } else if (res.cancel) {
          console.log('取消')
        }
      }
    })

  },
  binxd: function (e) {
    wx.showModal({
      title: '取餐',
      content: '取餐号为' + e.currentTarget.id,
      success(res) {
        if (res.confirm) {
          db.collection('dd').doc(e.currentTarget.id).update({
            // data 传入需要局部更新的数据
            data: {
              // 表示将 done 字段置为 true
              qccg: 1,
              qcsj: myDate.toLocaleString(),
            },
            success: res => {
              wx.showToast({
                title: '取餐成功',
                icon: 'success',
                duration: 2000
              })
            }

          })
        } else if (res.cancel) {
          console.log('用户点击取消')
        }
      }
    })
  },
- 最终效果如下:
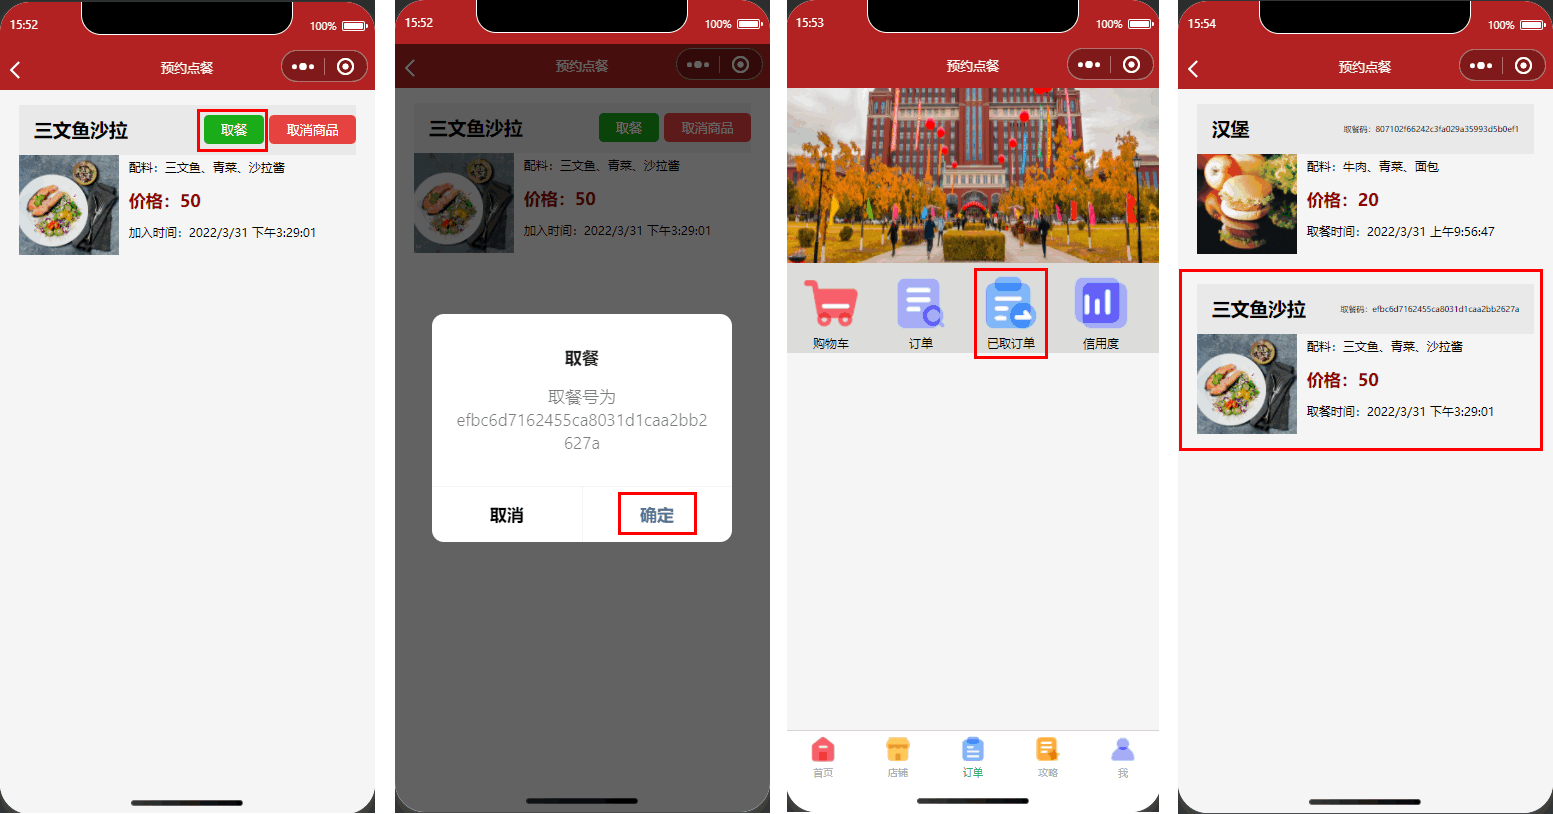
至此,该小程序的全部功能已实现完成。更多详情请参见 示例代码。
