Migrate Data to Cloud Storage
This document will guide you on how to migrate data from local storage or other cloud platforms to CloudBase Cloud Storage.
Migration Solutions Overview
Choose the appropriate migration solution based on your data source and migration needs:
| Data Source | Recommended Tool | Applicable Scenarios | Data Volume |
|---|---|---|---|
| Local Data | COSBrowser | Visual operation, small to medium data volumes | < 10GB |
| Local Data / Tencent Cloud COS | COSCLI | Command-line operation, batch processing | Any |
| Third-party Cloud Storage | Cloud Migration CMG, Scripts | Cross-cloud platform migration | Any |
I. Local Data Migration to Cloud Storage
Solution 1: COSBrowser (Recommended)
Tool Introduction
COSBrowser is a visual interface tool that supports users to perform data upload, download, generate access links and other functions through a simple interface.
Applicable Scenarios
- ✅ Small to medium data volume migration (< 10GB)
- ✅ Need visual operation interface
- ✅ Batch upload and download files
- ✅ Manage cloud storage files
Operation Steps
1. Download and Install COSBrowser
Visit COSBrowser Download Page to download and install the client.
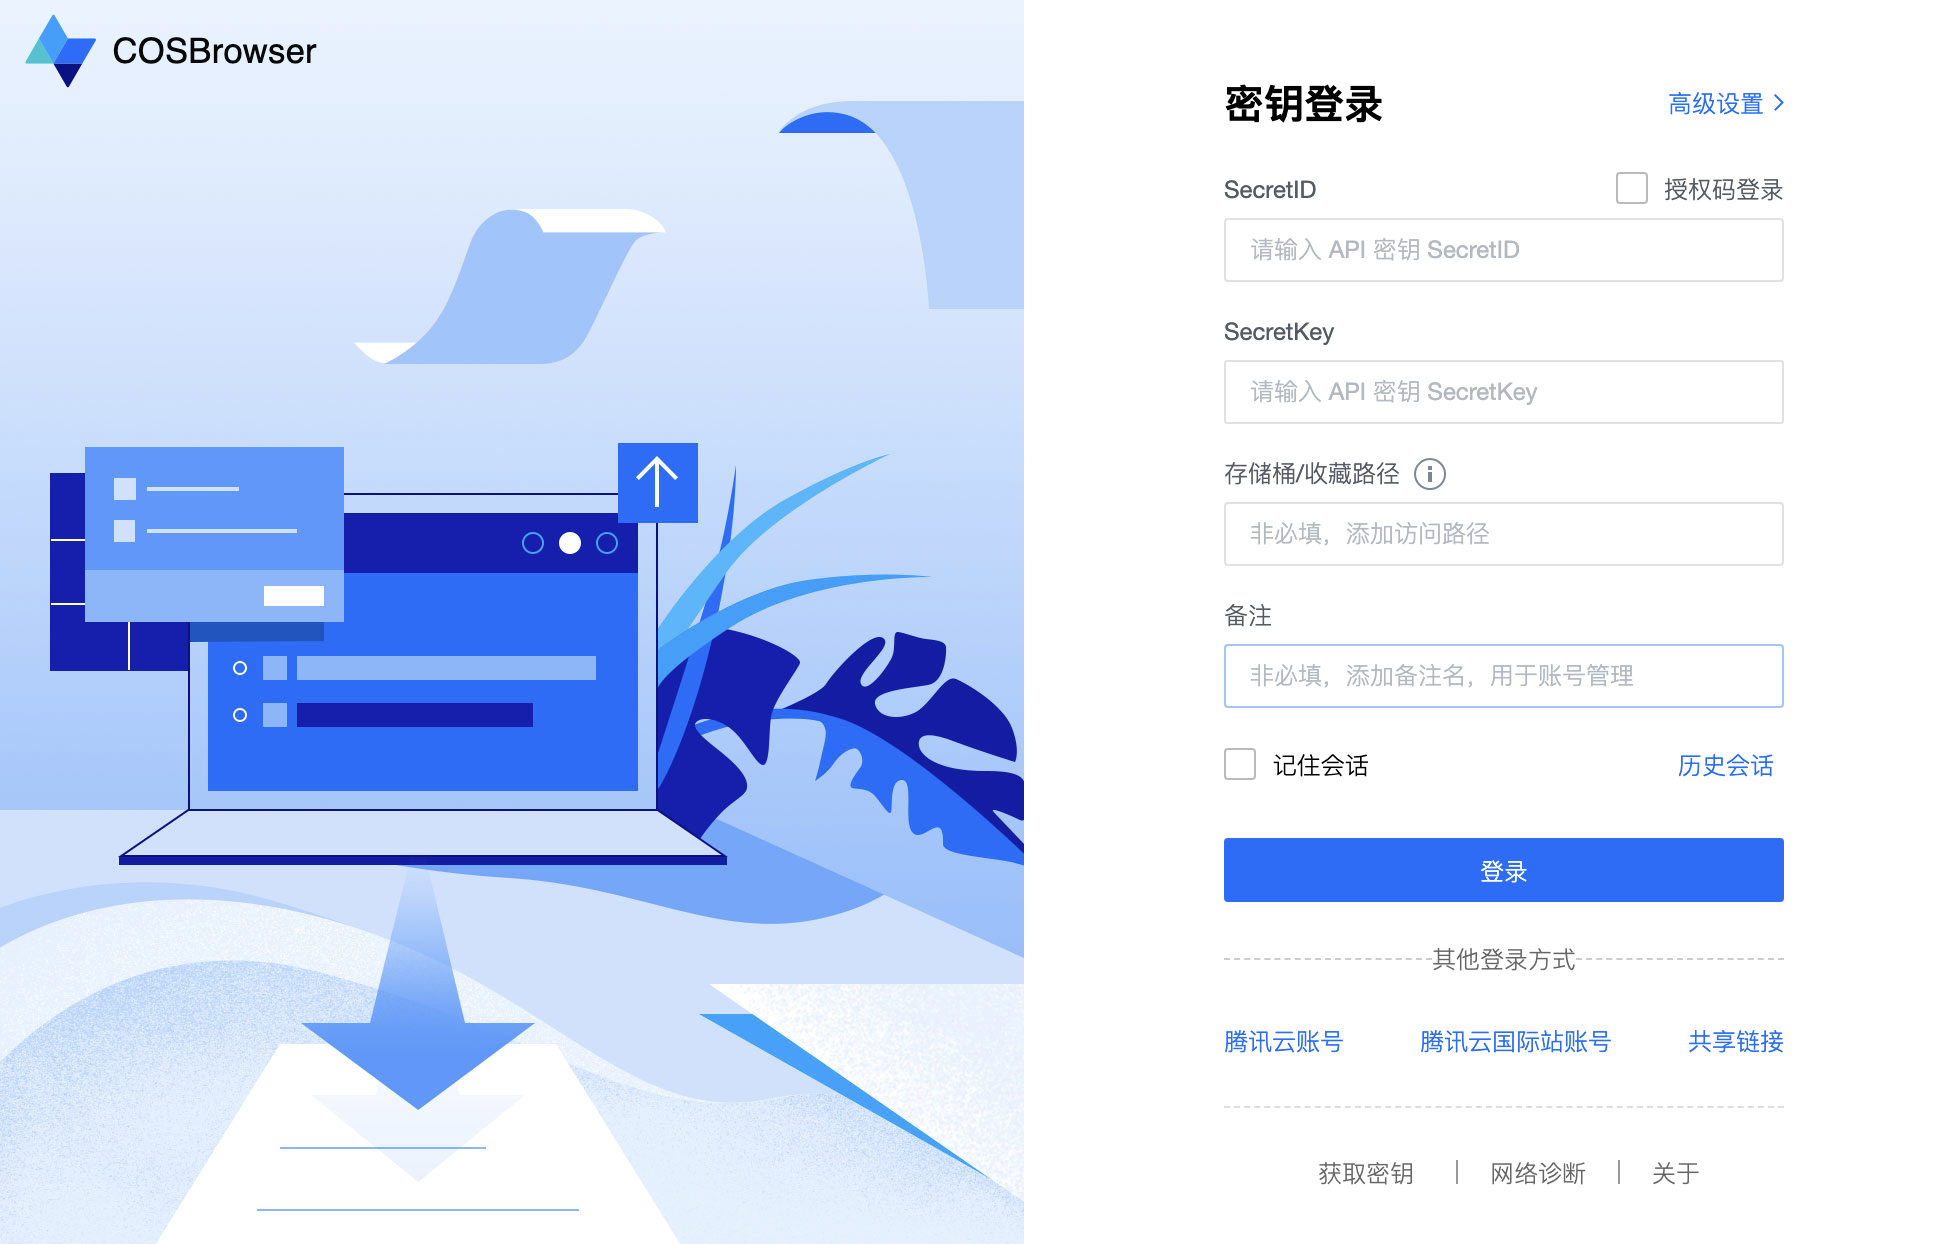
2. Login with Secret Key
You must use the Secret Key Login method and specify the bucket name and region. Logging in directly with a Tencent Cloud account cannot manage CloudBase cloud storage buckets.
Login steps:
- Open COSBrowser tool
- Select "Secret Key Login"
- Fill in the following information:
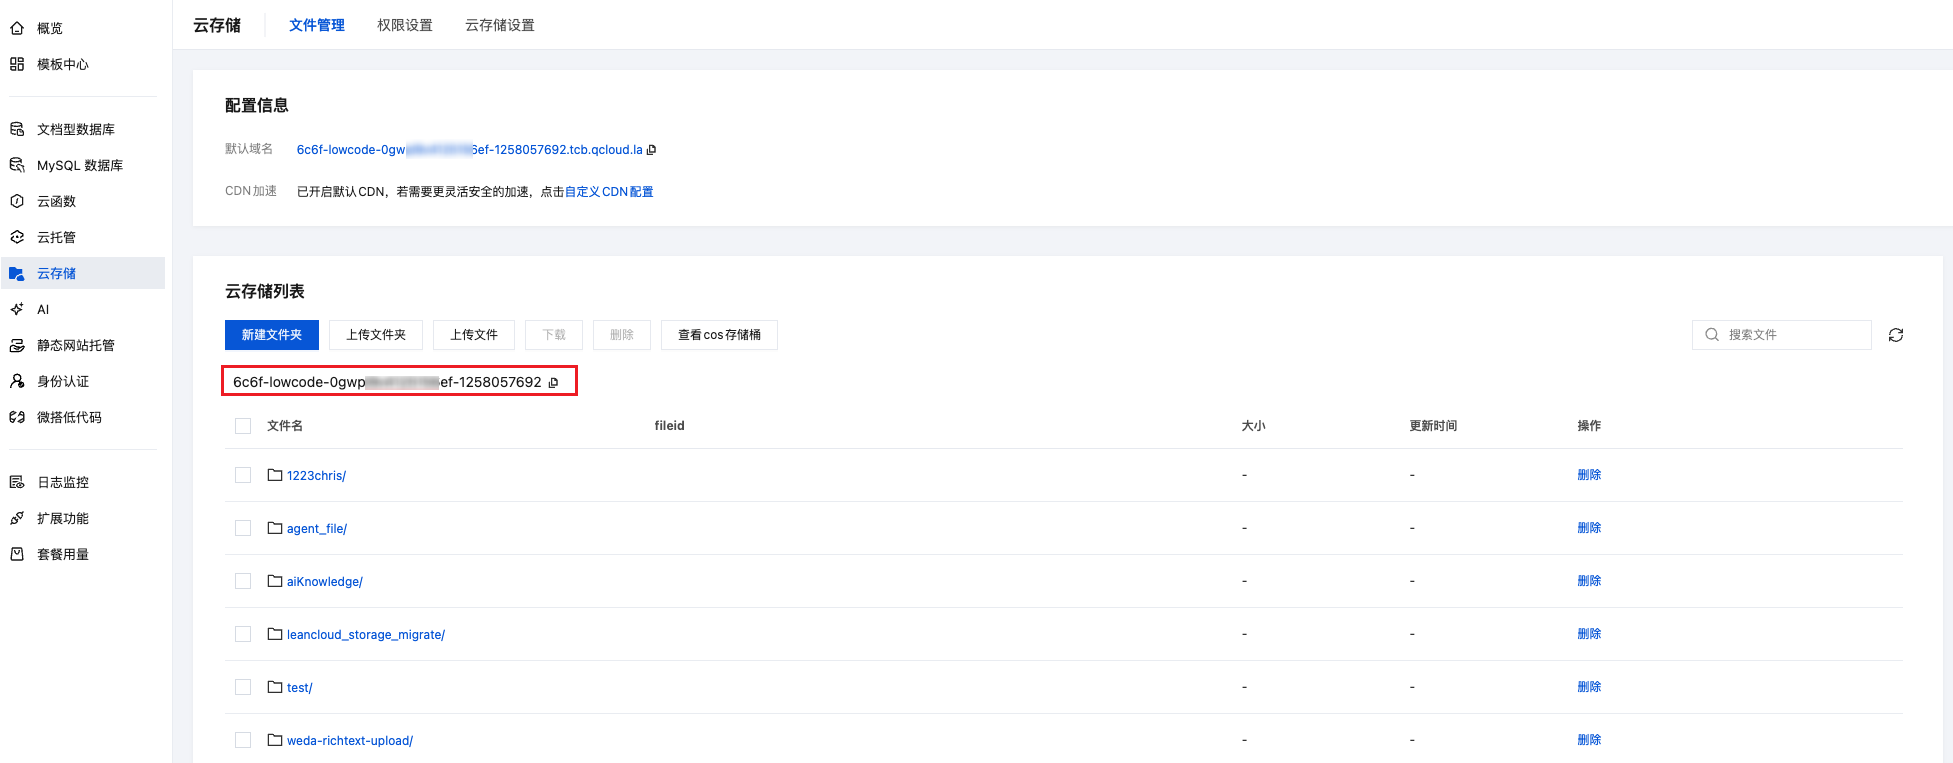
- SecretId / SecretKey: Obtain from Access Key Management
- Bucket Name: Obtain bucket name from CloudBase/Cloud Storage
- Region: Select the region where your environment is located (Cloud Storage is fixed to:
ap-shanghai)
3. Upload Local Files
After successful login:
- Select the file or folder to upload in the left local file system
- Drag and drop to the right cloud storage area, or right-click to select "Upload"
- Wait for upload to complete
For detailed usage, please refer to: COSBrowser Usage Documentation
Solution 2: COSCLI
Tool Introduction
COSCLI is a client command-line tool built with Golang, no need to install dependent environments, ready to use out of the box. You can perform batch upload, download, delete and other operations on objects in cloud storage through simple command-line instructions.
The COSCLI tool is maintained by the Tencent Cloud COS team. The CloudBase team does not provide technical support for this tool. Using this tool requires certain command-line operation and technical foundation. If you encounter tool-related issues, please refer to COSCLI Official Documentation or contact the COS team.
Applicable Scenarios
- ✅ Large number of files batch migration
- ✅ Automated script deployment
- ✅ Familiar with command-line operations
- ✅ Support cross-bucket operations
For detailed usage, please refer to: COSCLI Tool Documentation
II. Third-party Cloud Storage Migration to Cloud Storage
Solution: Cloud Migration CMG
Cloud Migration (CMG) is a migration tool integration and monitoring platform provided by Tencent Cloud. If your data is stored in third-party cloud platforms such as Alibaba Cloud OSS, AWS S3, etc., you can use the Cloud Migration CMG service to quickly migrate to CloudBase Cloud Storage.
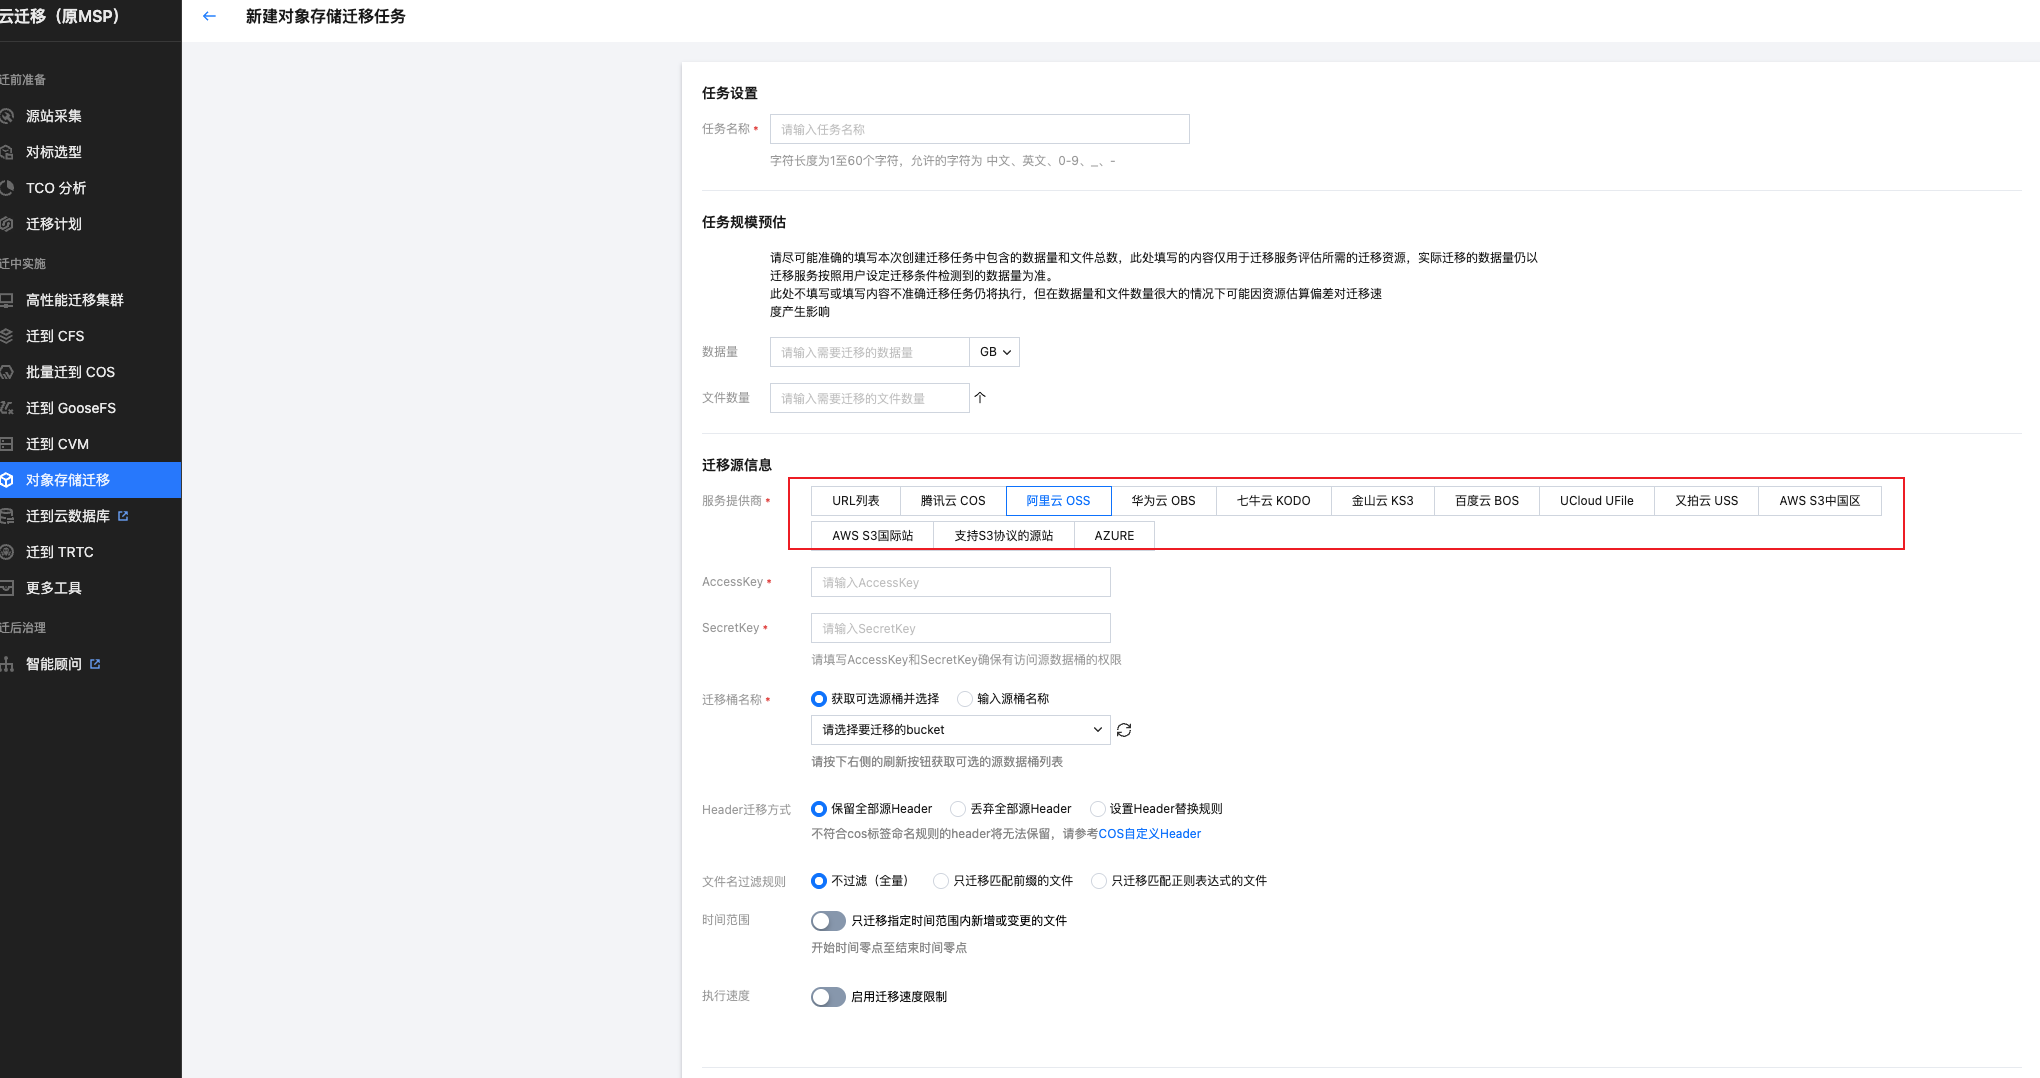
Supported Cloud Platforms
Cloud Migration CMG supports migrating data from the following cloud platforms:
| Cloud Platform | Migration Tutorial |
|---|---|
| Alibaba Cloud OSS | Alibaba Cloud OSS Migration Tutorial |
| AWS S3 | AWS S3 Migration Tutorial |
| Qiniu Cloud | Qiniu Cloud Migration Tutorial |
| Upyun | Upyun Migration Tutorial |
| Huawei Cloud OBS | Huawei Cloud OBS Migration Tutorial |
| Kingsoft Cloud KS3 | Kingsoft Cloud KS3 Migration Tutorial |
| Baidu Cloud BOS | Baidu Cloud BOS Migration Tutorial |
III. LeanCloud Storage Migration to CloudBase
Solution: Using Migration Script Tool
This migration solution requires the official migration script tool. Please download the script package first:
➡️ Download LeanCloud Migration Tool
🚀 After downloading and extracting to local, please carefully read the README.md document and follow the steps below for configuration and execution.
The migration script tool can help you batch migrate files stored in LeanCloud to CloudBase Cloud Storage.
Features
- ✅ Read all file metadata from LeanCloud
_Filetable - ✅ Automatically concatenate URLs and batch download files
- ✅ Batch upload to CloudBase Cloud Storage
- ✅ Support concurrency control to improve migration efficiency
- ✅ Automatically retry failed downloads
- ✅ Generate detailed migration reports
Project Structure
Original Structure (After Extraction)
This is the file structure you see after extracting the zip package:
leancloud_storage_migrate/
├── migrate.js              # Main migration script (core file)
├── package.json            # Project dependency configuration file
└── README.md               # Project documentation
These 3 files are the original project files and need to be manually configured before use.
Structure After Installing Dependencies and Running Script
leancloud_storage_migrate/
├── migrate.js              # Main migration script (core file)
├── package.json            # Project dependency configuration file
├── package-lock.json       # Dependency version lock file (auto-generated)
├── README.md               # Project documentation
├── .gitignore             # Git ignore file configuration
├── node_modules/          # Dependency package directory (generated after npm install)
├── temp_files/            # Temporary file storage directory (auto-created at runtime, auto-deleted after completion)
└── migration_report.json  # Migration report file (generated after completion)
Quick Start
Step 1: Install Node.js Dependencies
Run the following command in the project directory to install the required dependencies:
cd /path/to/leancloud_storage_migrate
npm install
This will automatically install the following dependency packages:
leancloud-storage- LeanCloud SDK@cloudbase/node-sdk- CloudBase Node.js SDK
Step 2: Configure Parameters
Open the migrate.js file, find the configuration area (around lines 17-32), and fill in your configuration information:
// LeanCloud configuration
const LEANCLOUD_CONFIG = {
  appId: 'YOUR_LEANCLOUD_APP_ID',        // 👈 Replace with your LeanCloud App ID
  appKey: 'YOUR_LEANCLOUD_APP_KEY',      // 👈 Replace with your LeanCloud App Key
  serverURL: 'https://YOUR_LEANCLOUD_SERVER_URL', // 👈 Replace with your API domain
  fileDomain: 'https://YOUR_FILE_DOMAIN' // 👈 Replace with your file domain
};

// CloudBase configuration
const CLOUDBASE_CONFIG = {
  env: 'YOUR_ENV_ID',              // CloudBase environment ID
  secretId: 'YOUR_SECRET_ID',       // Tencent Cloud API key SecretId
  secretKey: 'YOUR_SECRET_KEY'      // Tencent Cloud API key SecretKey
};
LeanCloud Configuration:
- Login to LeanCloud Console
- Select your application
- Go to "Settings" → "App Credentials" to get
App IDandApp Key - Go to "Settings" → "Domain Binding" to get API domain (
serverURL) and file domain (fileDomain)
CloudBase Configuration:
- Login to CloudBase Platform
- Select your environment to get the environment ID (
env) - Login to Tencent Cloud API Key Management
- Create or view keys to get
SecretIdandSecretKey
⚠️ Important: Configure Security Domains
- Login to CloudBase Platform
- Go to "Environment Management" → "Security Sources"
- Add your domain to the security domain list (to avoid CORS errors)
Step 3: Run Migration Script
After configuration is complete, execute the following command to start migration:
npm start
Or run directly with Node.js:
node migrate.js
Step 4: View Results
The script will display progress information in real-time during execution:
========================================
LeanCloud → CloudBase File Migration Tool
========================================

Starting to query _File table from LeanCloud...
Queried 50 files...
✓ Total 50 files queried

Starting file migration, concurrency: 5
----------------------------------------

[1] Processing file: example.jpg
  Download URL: https://xxx.com/xxx.jpg
  Downloading...
  ✓ Download complete
  Uploading to CloudBase: migrated/example.jpg
  ✓ Upload complete, fileID: cloud://xxx...

[2] Processing file: photo.png
  Download URL: https://xxx.com/yyy.png
  Downloading...
  ✓ Download complete
  Uploading to CloudBase: migrated/photo.png
  ✓ Upload complete, fileID: cloud://yyy...

...

========================================
Migration Complete!
----------------------------------------

Total: 50 files
Success: 48
Failed: 2

Migration report saved to: ./migration_report.json
After completion, a migration_report.json report file will be generated in the current directory.
Optional Configuration
You can adjust the following configuration to optimize migration performance:
const DOWNLOAD_CONFIG = {
  tempDir: './temp_files',  // Temporary file storage directory
  concurrency: 5,          // Concurrent download count (recommended 3-10)
  retryTimes: 3,           // Download failure retry times
  timeout: 30000           // Request timeout (milliseconds)
};
Migration Process
- Query File List: Query all files from LeanCloud
_Filetable - Download Files: Concatenate URLs based on
keyand download to local temporary directory - Upload Files: Upload files to CloudBase Cloud Storage
- Generate Report: Generate
migration_report.jsonreport file - Clean Temporary Files: Delete local temporary files
Output Results
After migration completion, a migration_report.json report file will be generated, containing:
{
  "timestamp": "2026-01-21T10:30:00.000Z",
  "summary": {
    "total": 100,
    "success": 98,
    "failed": 2
  },
  "successList": [
    {
      "objectId": "xxx",
      "name": "example.jpg",
      "fileID": "cloud://xxx.cloudbase.net/xxx",
      "cloudPath": "migrated/example.jpg"
    }
  ],
  "errorList": [
    {
      "objectId": "yyy",
      "name": "failed.png",
      "error": "Download timeout"
    }
  ]
}
Notes
- Network Stability: Ensure stable network connection, large file migration may take a long time
- Disk Space: Ensure sufficient disk space to store temporary files
- Concurrency Count: Adjust concurrency based on network bandwidth to avoid request failures due to excessive concurrency
- Retry Mechanism: Failed files will be automatically retried, final failures will be recorded in the report
- Cloud Path: All files will be uploaded to the
migrated/directory, can be modified as needed - fileID Preservation: The
fileIDafter upload will be recorded in the report, it is recommended to save for future use
Troubleshooting
Download Failed
- Check if
fileDomainconfiguration is correct - Check if network connection is normal
- Try increasing
timeouttimeout duration
Upload Failed
- Confirm CloudBase environment ID is correct
- Check if security domains are configured
- Confirm if cloud storage quota is sufficient
CORS Error
- Login to CloudBase Console
- Add your domain in "Security Configuration" → "Security Sources"
IV. Frequently Asked Questions
1. How to Improve Migration Speed?
- Use COSCLI tool's concurrent upload feature
- Choose the same region as the source data to reduce network latency
- Use high-bandwidth network for transmission
- For small files, you can package them before uploading and then extract
2. What Fees Will Migration Incur?
- Storage Fees: Charged based on actual storage volume
- Traffic Fees: CDN traffic fees
For details, see: CloudBase Billing Description