Custom Login
Developers can use custom login to issue "custom login credential Tickets" with custom identity IDs for users on their own servers or in cloud functions. Then the client-side SDK can use the "Ticket" to log in.
Applicable Scenarios
Custom login applies to the following scenarios:
- Developers want to establish a one-to-one association between their own account system and the CloudBase account
- Developers want to take over the authentication process themselves
Steps Overview
Custom login involves the following steps:
- Obtain the CloudBase custom login private key
- Use the CloudBase server-side SDK to issue a Ticket with the private key and return it to the client-side
- The client-side SDK uses the Ticket to log in to CloudBase
Prerequisites
Obtain Custom Login Private Key
- Go to CloudBase Console/Authentication/Login Methods
- In the login methods list, select Custom Login, click Enable, and then click Download Private Key.
The private key is a file containing JSON data. Please save the downloaded or copied private key file to your servers or cloud functions, with the assumed path being /path/to/your/tcb_custom_login.json.
- The private key file is a critical credential that verifies administrator identity. It must be securely stored to prevent leakage.
- Each time a private key file is generated, it invalidates the previously generated private key file after 2 hours.
Issue Ticket
Call the CloudBase server-side SDK, pass the custom login private key during initialization, then issue the Ticket and return it to the client-side.
const cloudbase = require("@cloudbase/node-sdk");

// 1. Initialize SDK
const app = cloudbase.init({
  env: "your-env-id",
  region: "ap-shanghai", // Default to Shanghai region if not specified
  // Pass custom login private key
  credentials: require("/path/to/your/tcb_custom_login.json"),
});

// 2. Developer-defined unique user identifier
const customUserId = "your-customUserId";

// 3. Create ticket
const ticket = app.auth().createTicket(customUserId);

// 4. Return ticket to client
return ticket;
The customUserId must meet the following requirements:
- 4-32 characters
- Characters can only be uppercase or lowercase English letters, digits, and characters from
_-#@(){}[]:.,<>+#~.
Developers can also write a cloud function to generate a Ticket and set up an HTTP access service for it. Then the client-side can obtain the Ticket via HTTP requests. For detailed instructions, please refer to Accessing Cloud Functions via HTTP.
Registration Flow
With custom login, user management is entirely handled by the developers. In CloudBase, custom login does not require a separate registration process. When users use custom login for the first time, the corresponding CloudBase user will be automatically created.
The registration process mainly includes:
- Create a user account in your user system
- Use the CloudBase server-side SDK to issue a Ticket for the user
- The client completes the initial login using the Ticket (at which point CloudBase automatically creates the corresponding user)
Login Flow
After the client-side application obtains the Ticket, it can then log in.
Auth.setCustomSignFunc is used to set the function for obtaining a custom login ticket.
Auth.signInWithCustomTicket is used for custom login.
import cloudbase from "@cloudbase/js-sdk";

const app = cloudbase.init({
  env: "your-env-id",
});

const auth = app.auth();

async function login() {
  const loginState = auth.hasLoginState();
  // 1. It is recommended to check whether you are already logged in before logging in
  if (!loginState) {
    // 2. Request developer's own service API to obtain ticket
    await auth.setCustomSignFunc(() => {
      // Call developer's own service API to obtain ticket
      const ticket = "xxx";
      // Get ticket and return Promise
      return Promise.resolve(ticket);
    });
    // 3. Log in to CloudBase
    await auth.signInWithCustomTicket();
  }
}

login();
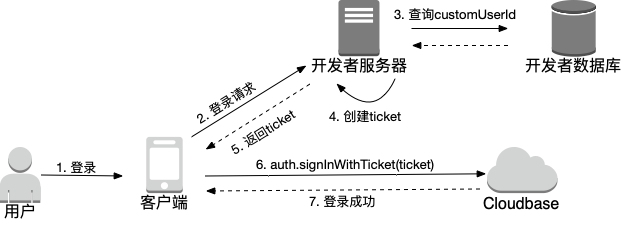
The overall process is as follows: