Execute WeDa AI+ Action
WeDa integrates execution actions with AI+ capabilities, helping developers quickly build low-code applications with AI+ capabilities. We provide the following execution actions:
- Invoke large models for conversation: Call large models to conduct dialogue, supporting streaming and non-streaming calls.
- Invoke Agent Conversation: Call Agent to conduct streaming dialogue.
Support one-click assignment of generated text to variables and provide the ability to handle complete SSE events.
Usage Example
Invoke Large Model Conversation
This section demonstrates how to use the "Invoke large models for conversation" execution action.
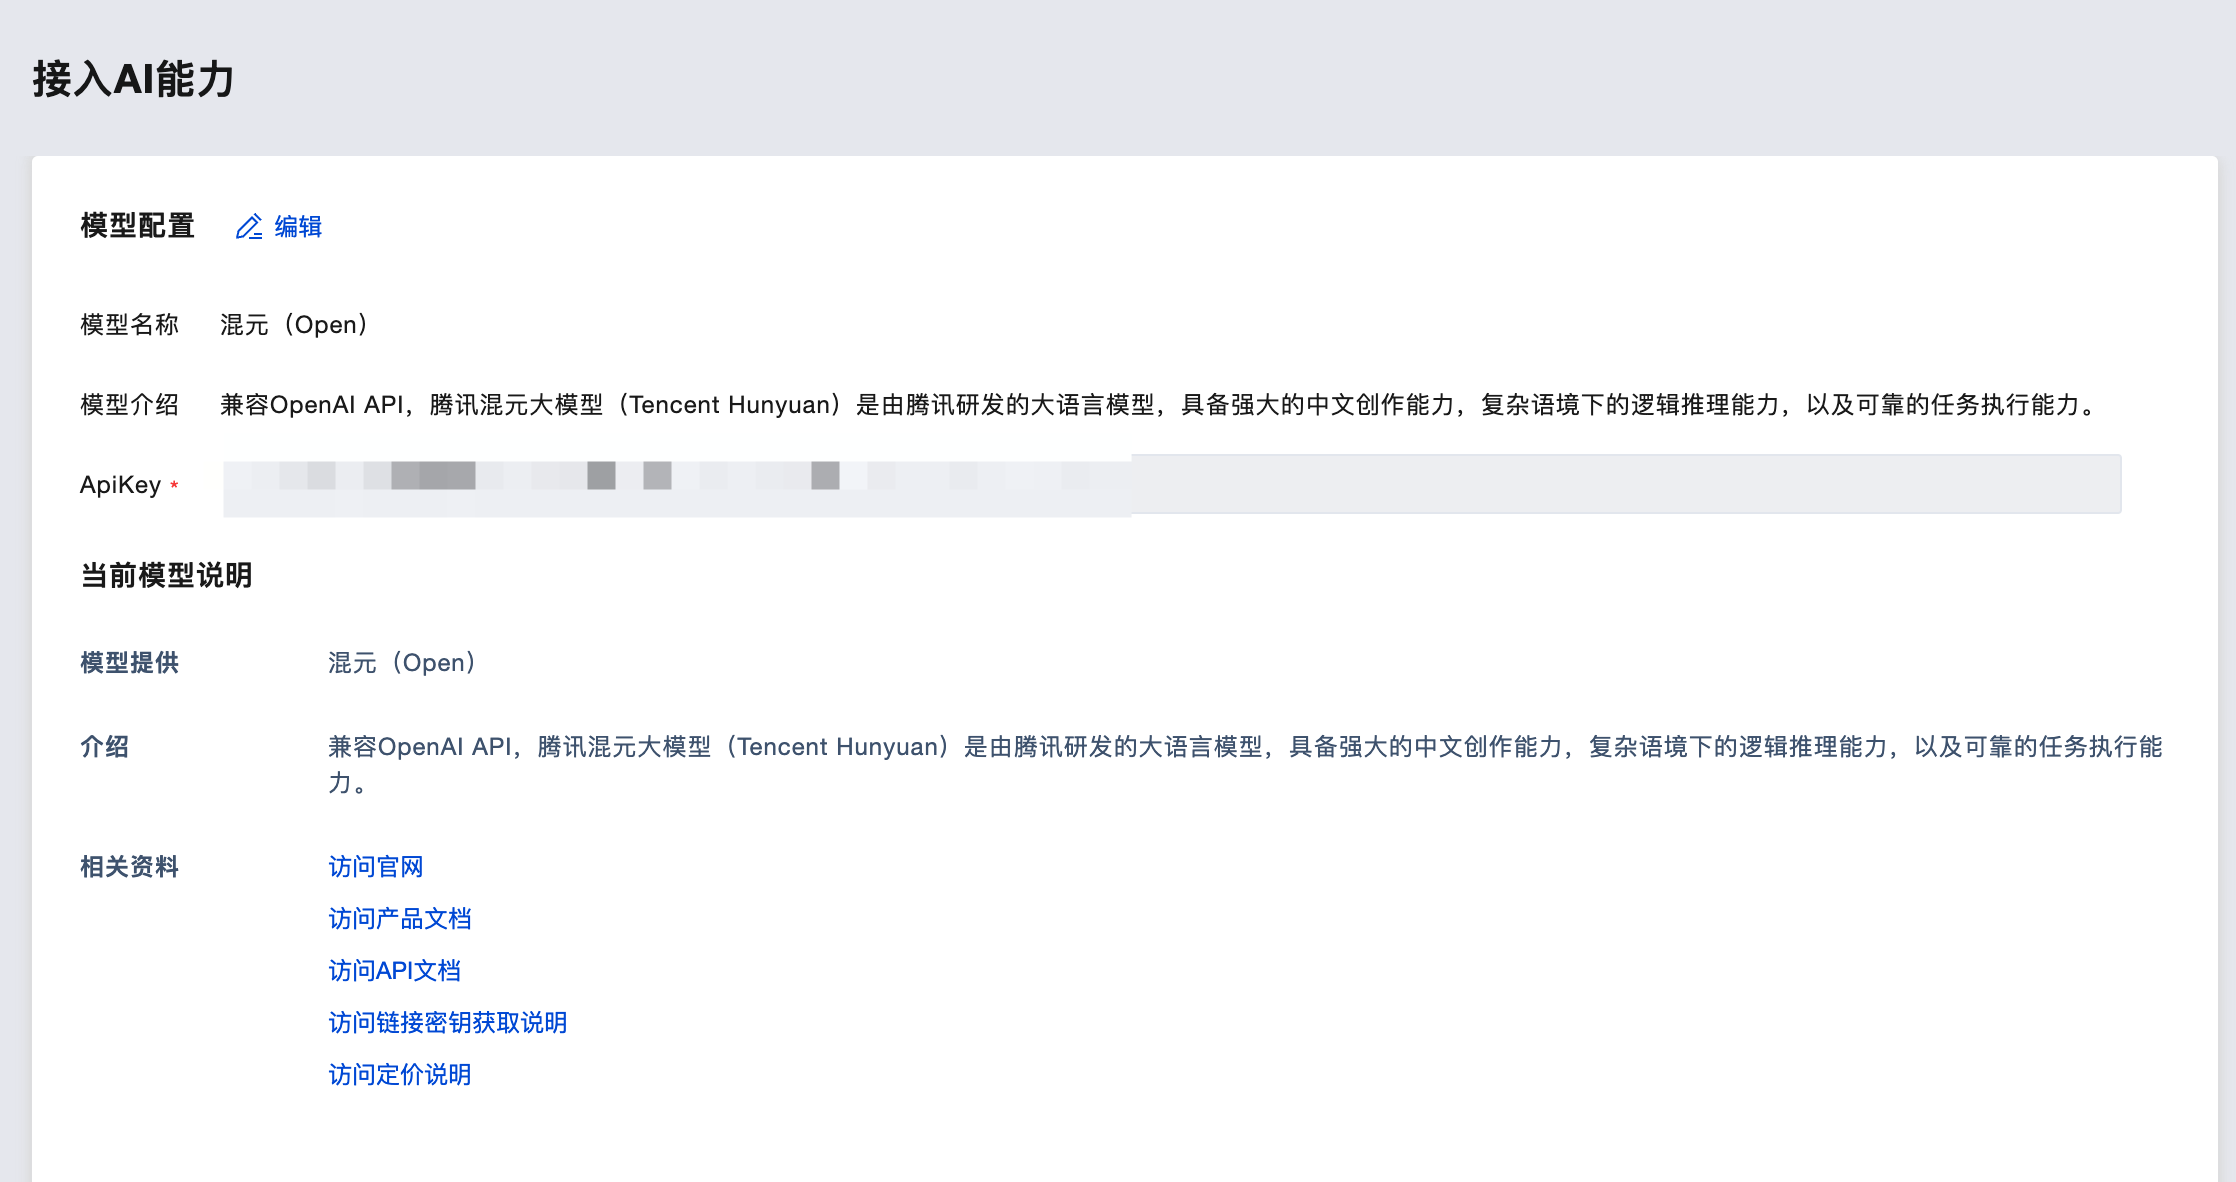
Configuring Large Model
First, go to Cloud Development AI+ Configuration to configure the large model we want to use. Here, we choose to configure Hunyuan (Open).
Build Page
Next, we enter the visual development page.
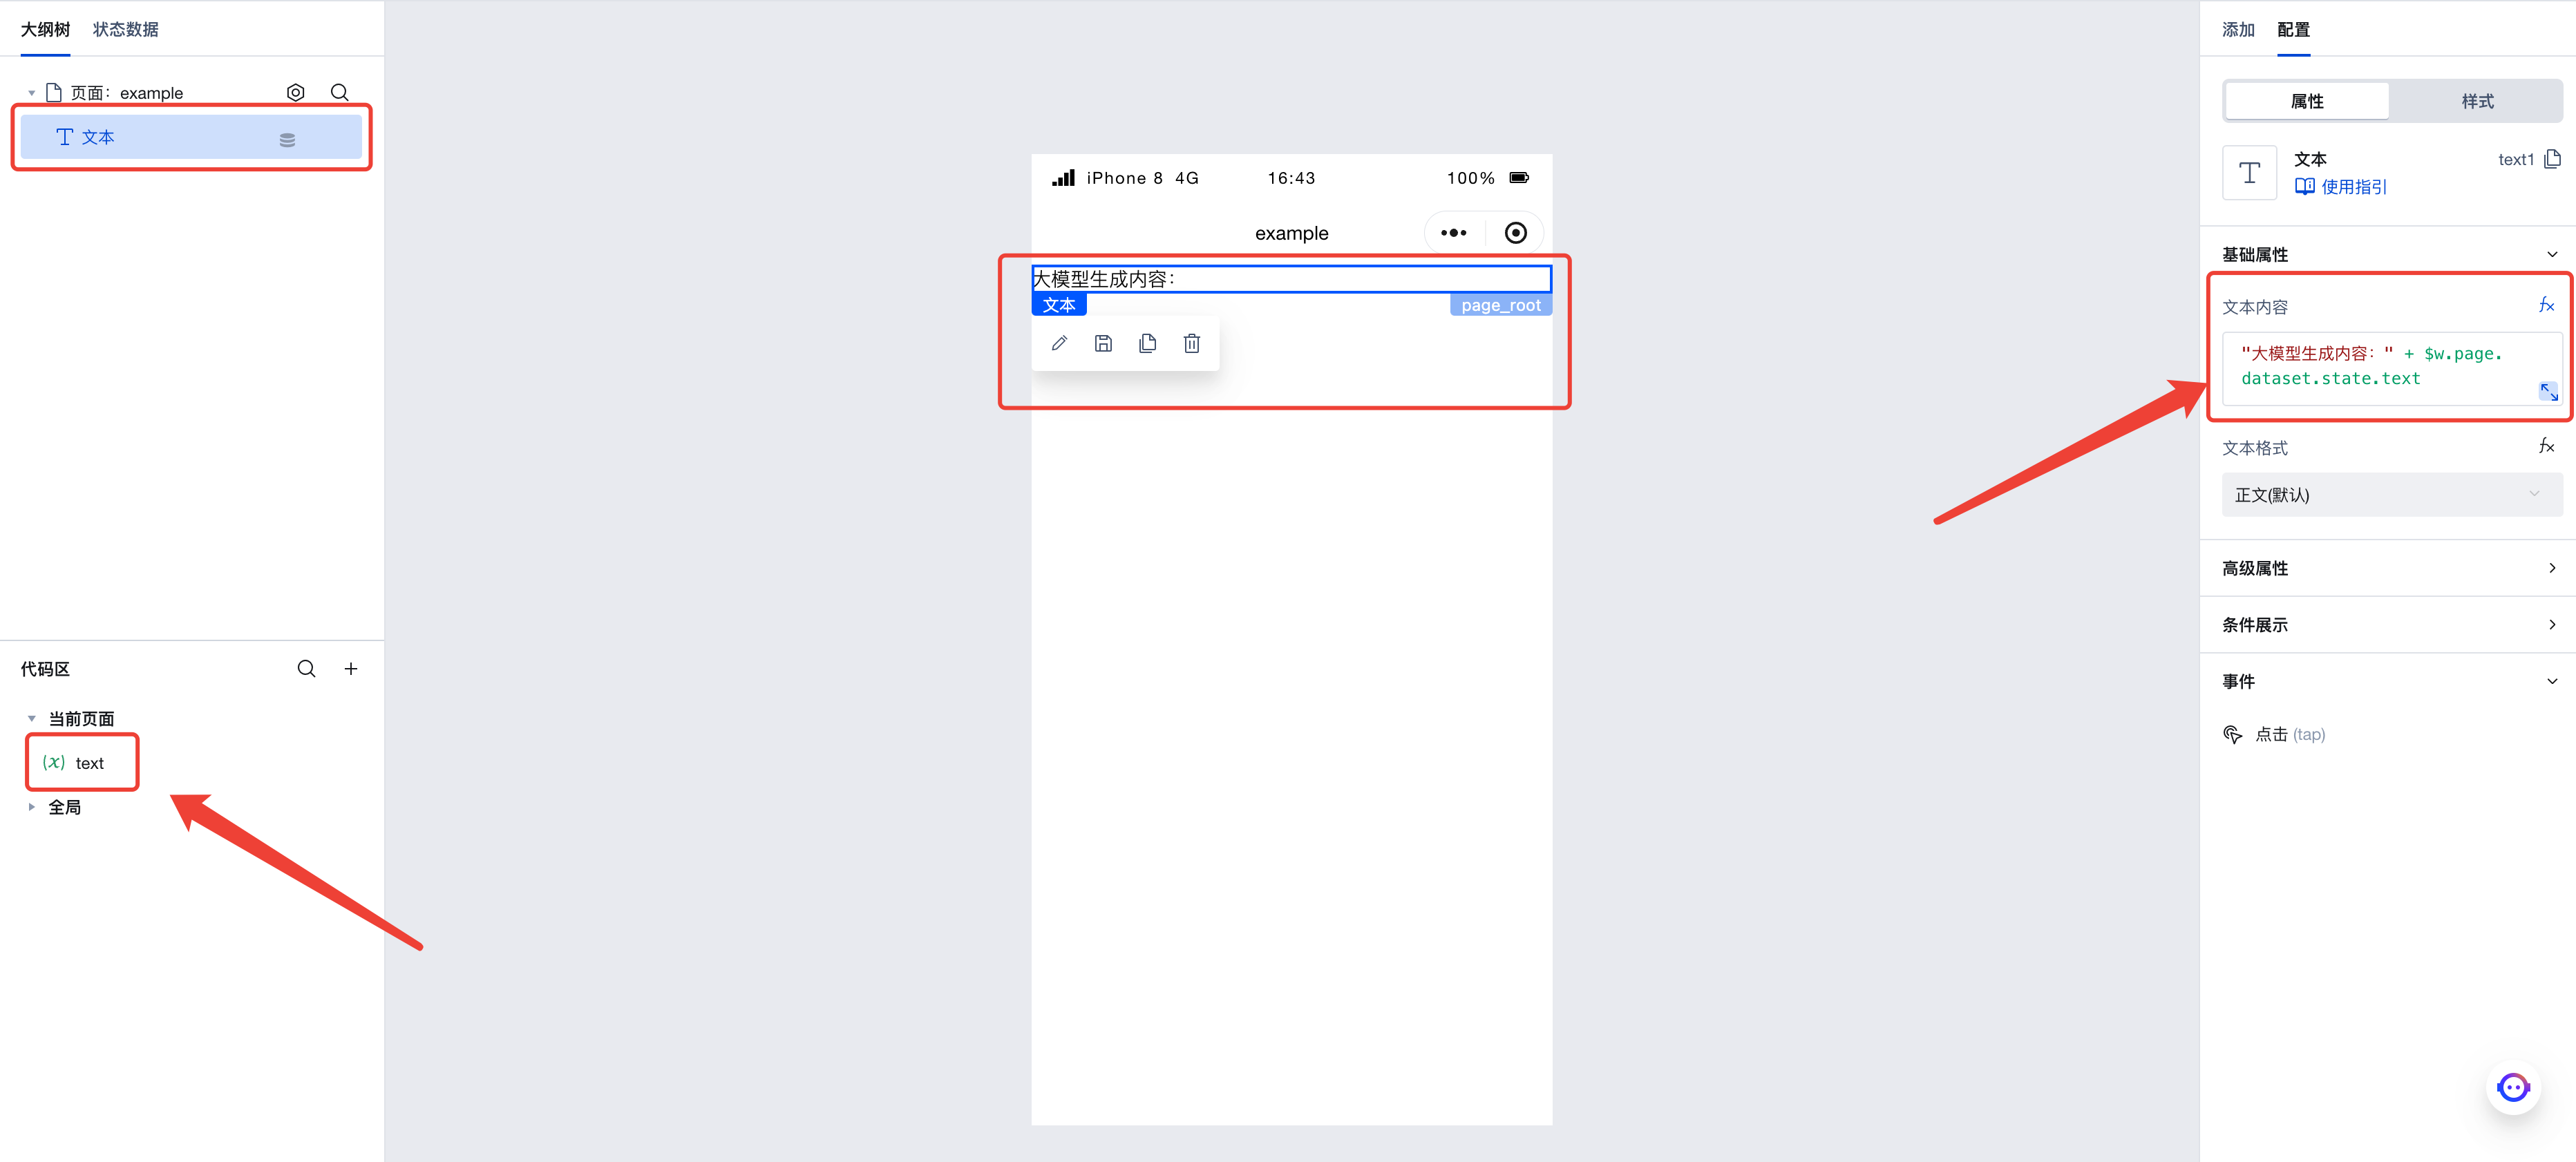
First, create a string variable text on this page, and create a text component. Set the content of the text component to "Content generated by large model: " + $w.page.dataset.state.text. We will save the output of the large model to this variable so that it can be displayed in the application.
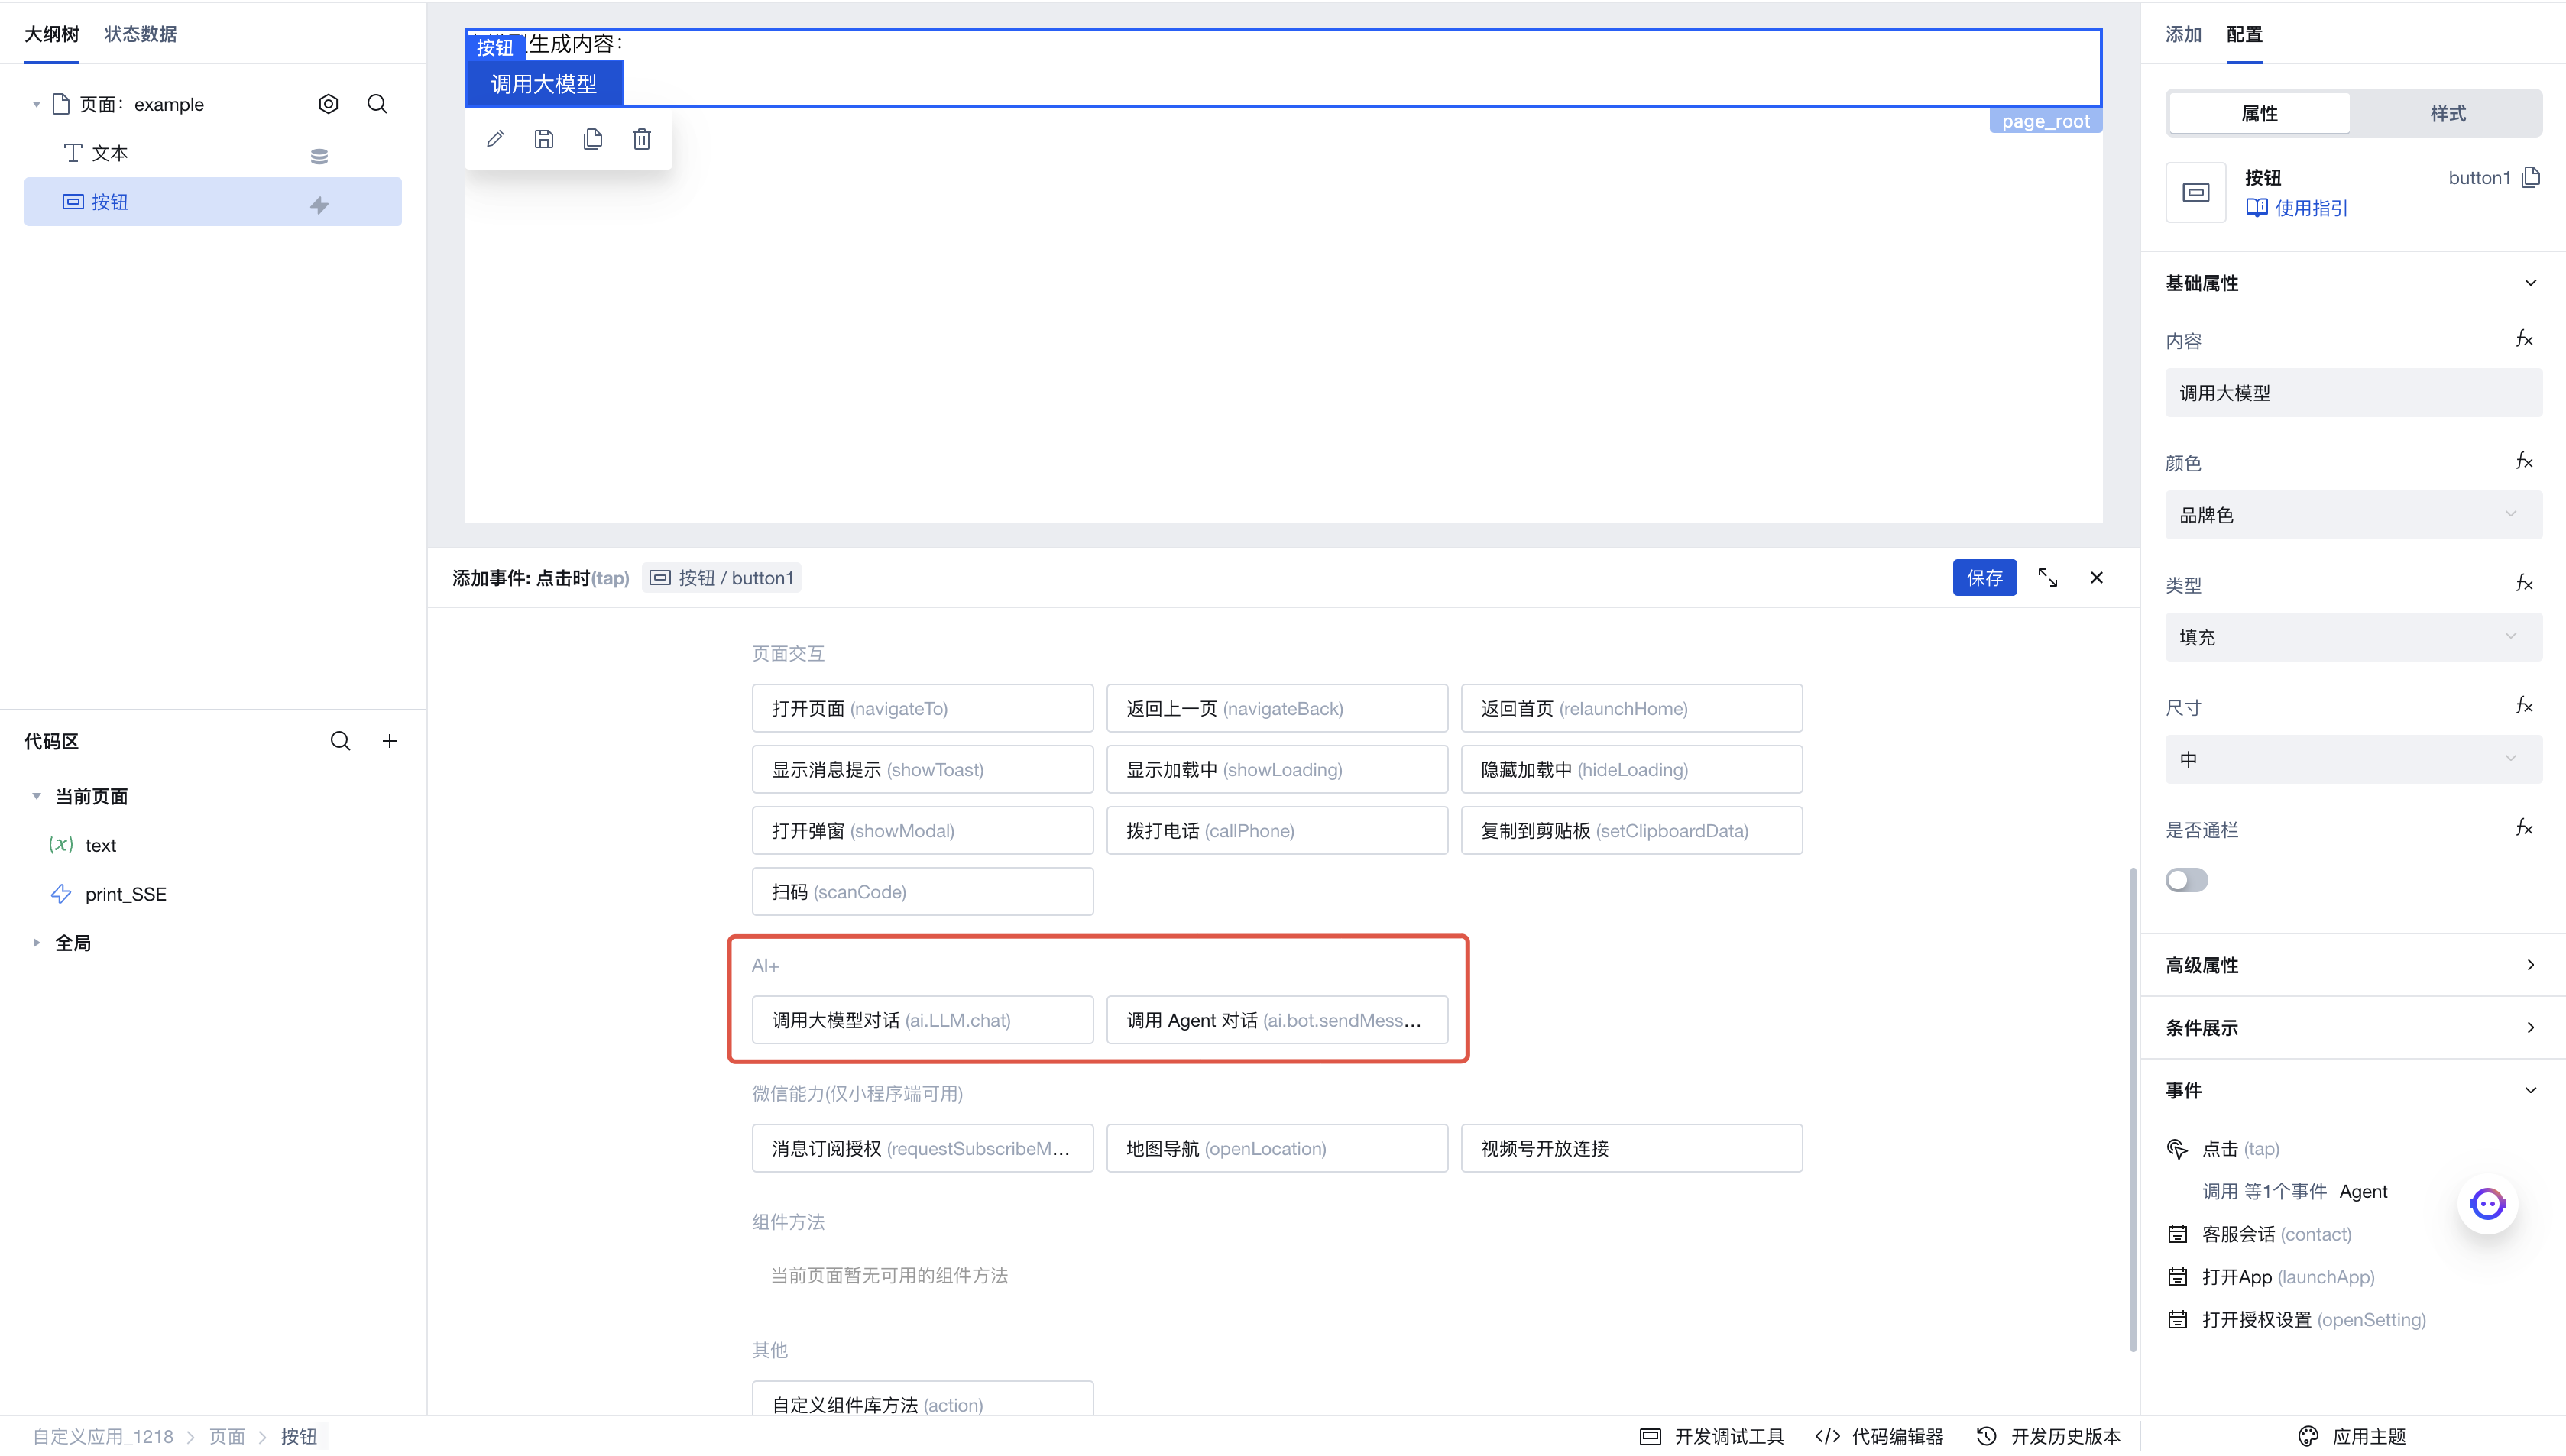
Next, add a button to the page. Click the click event in the right-side menu to invoke the execution action panel. Here, select the execution action to be triggered when this button is clicked.
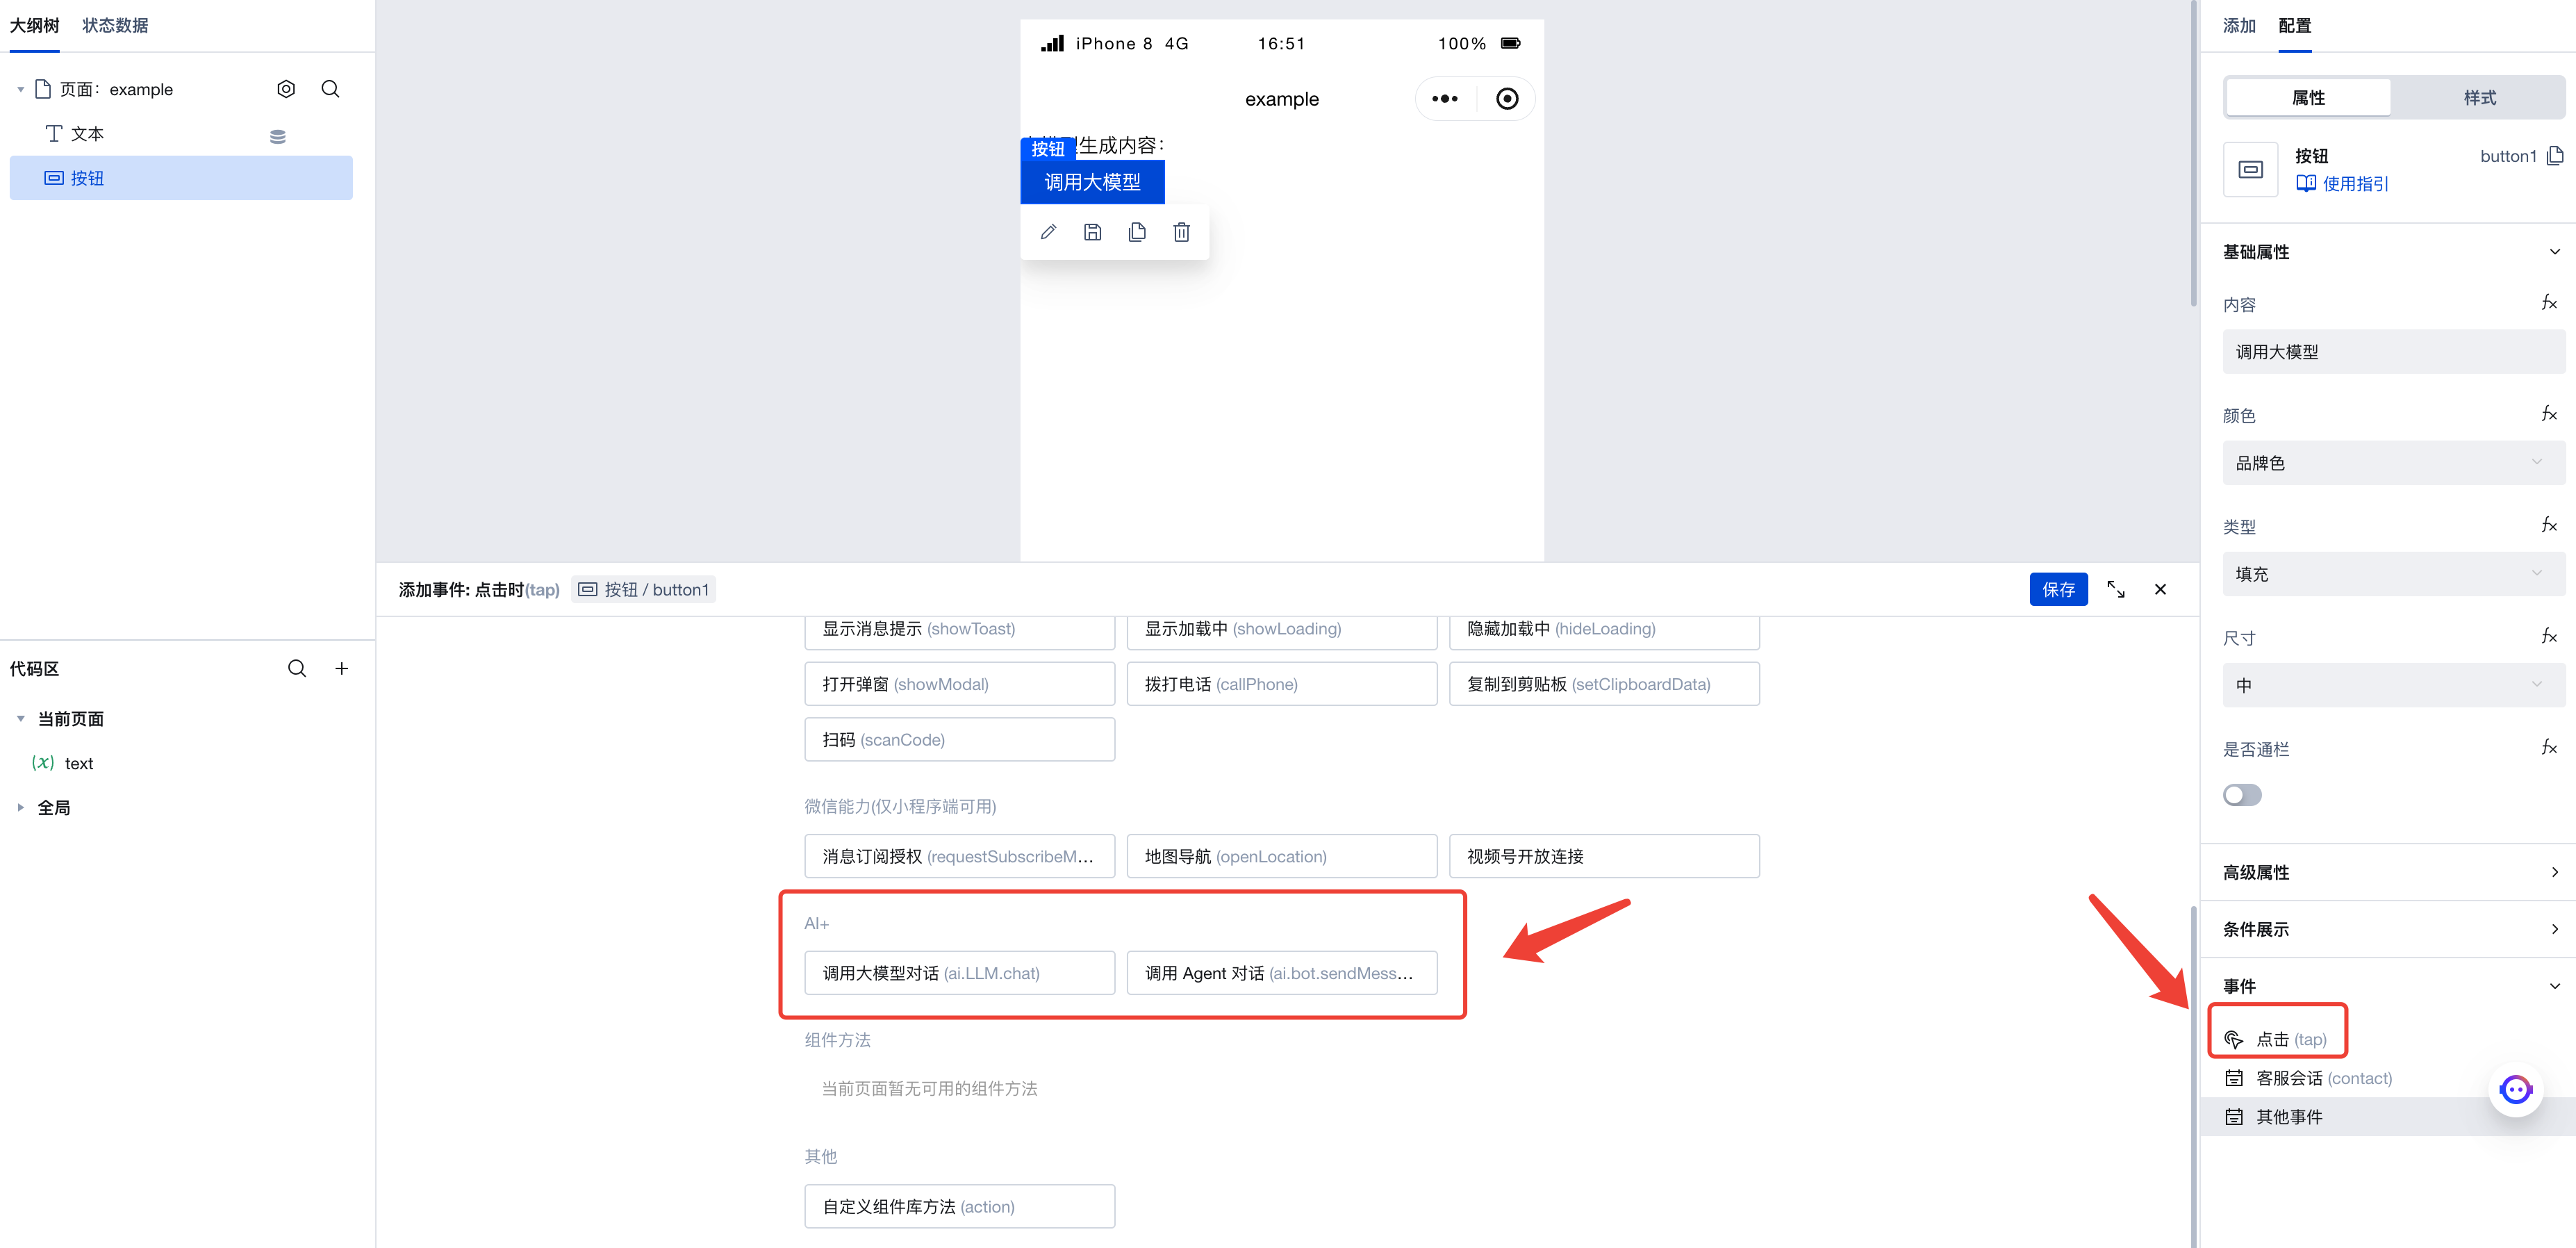
Click "Invoke Large Model Conversation" to enter the execution action's parameter configuration panel. Here are the parameters we configured:
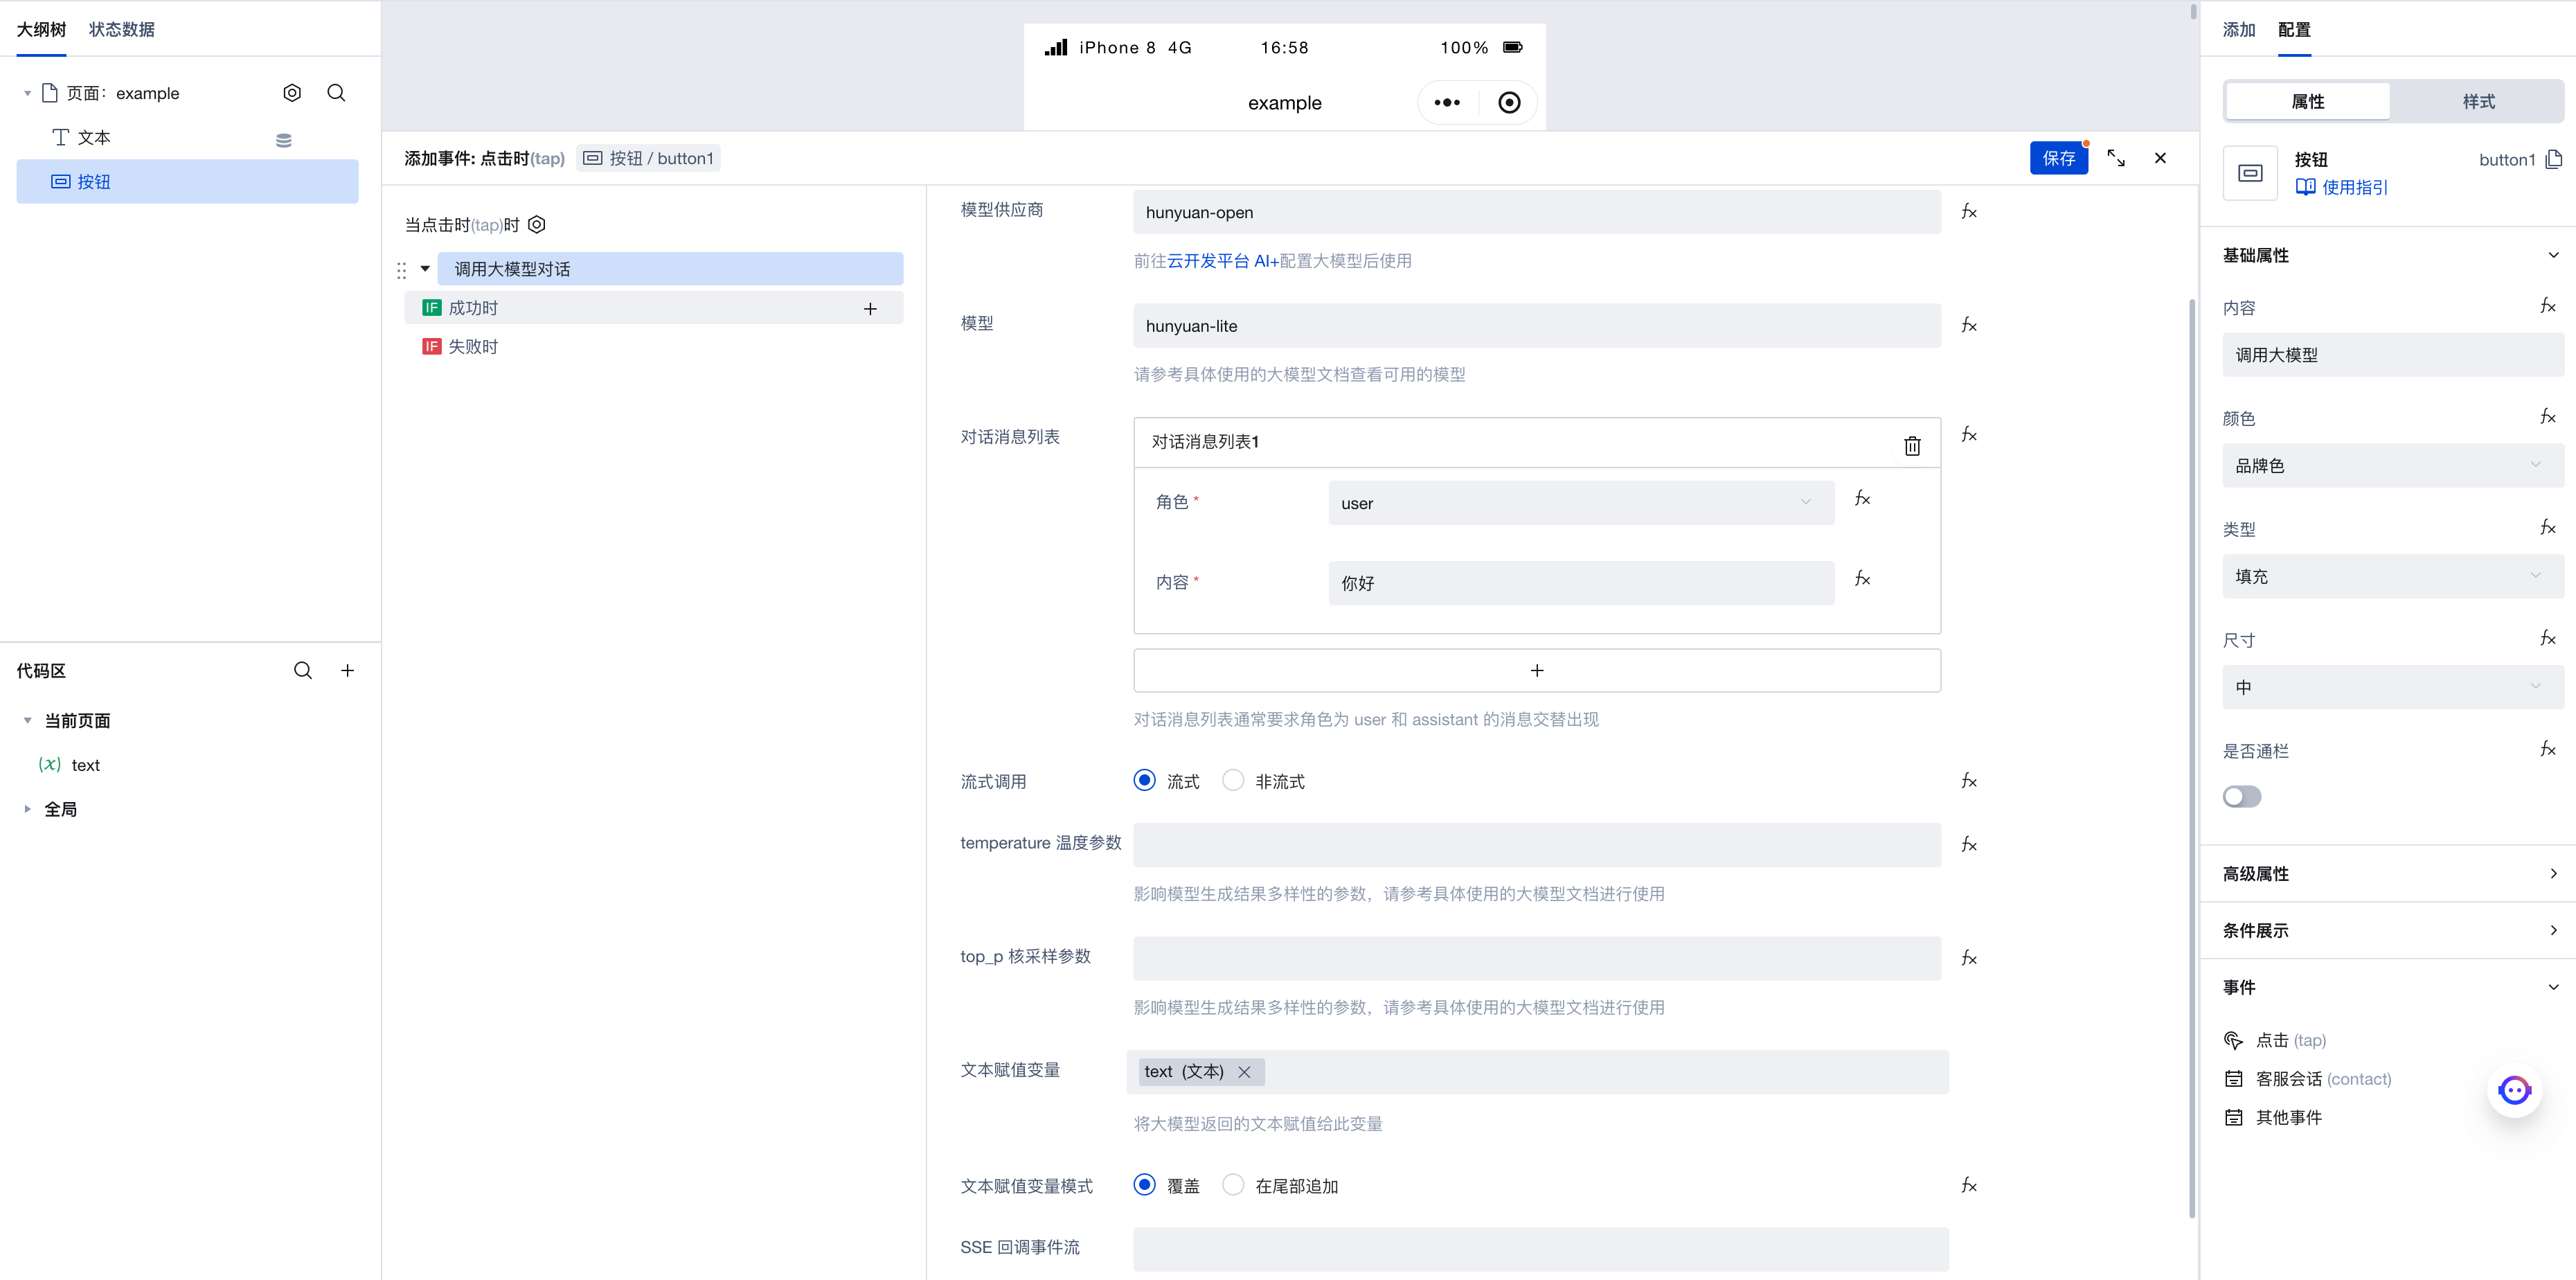
- Model provider: set to
cloudbase, corresponding to the large model we just configured - Model: set to
deepseek-v4-flash - Conversation message list: Add a message with the role as
user, indicating that this is the message we send to the large model. - Streaming invocation: Select 'Streaming' to enable streaming invocation. When subsequently invoking the large model, we can receive responses whenever new content is generated. There is no need to wait for the entire text processing to complete; results can be obtained while the text is being generated. If needed, streaming invocation can be disabled to obtain the complete generated result from the large model at once.
- temperature parameter: This parameter controls the diversity of text generated by the large model. It is recommended to refer to the documentation of the specific large model used for detailed understanding before applying as needed. Here, we will not set this parameter for now.
- top_p nucleus sampling parameter: Similar to the temperature parameter, we will not set this here for now.
- Text assignment variable: Here we select the newly created
textvariable. When we obtain the generated text from the large model, it will be saved to this variable. Since we previously created a text component bound to this variable, the expected effect is that when the large model generates text, the content of the text component will automatically update. - SSE callback event stream: This event stream is triggered when receiving SSE streaming invocation. We will not configure this parameter for now, as its usage will be detailed in later sections.
After configuration is complete, click Save. Then click the button on the page to invoke the large model, and you will see the text generated by the large model printed on the page.
Advanced: Configuring the SSE Callback Event Stream
Remember the 'SSE callback event stream' parameter we didn't configure in the previous section? In this section, we will detail how to use this parameter.
The streaming invocation of large models and Agents is implemented based on SSE. When the large model generates new content, it returns an SSE event. In the SSE event, it contains detailed information about this generation, including generated content, time, ID, etc. Developers with advanced needs may wish to fully parse the information conveyed in SSE events; at this point, they can configure the 'SSE callback event stream' parameter to achieve this.
In the left code area, create a new event stream named print_SSE, set it as a Javascript code event, and fill in this code:
// This code prints out the received SSE events.
({event}) => {
  console.log(event.detail);
}

Once configured, reopen the 'Invoke Large Model Dialogue' parameter configuration panel, and add the newly created print_SSE event stream in the 'SSE Callback Event Stream' parameter.
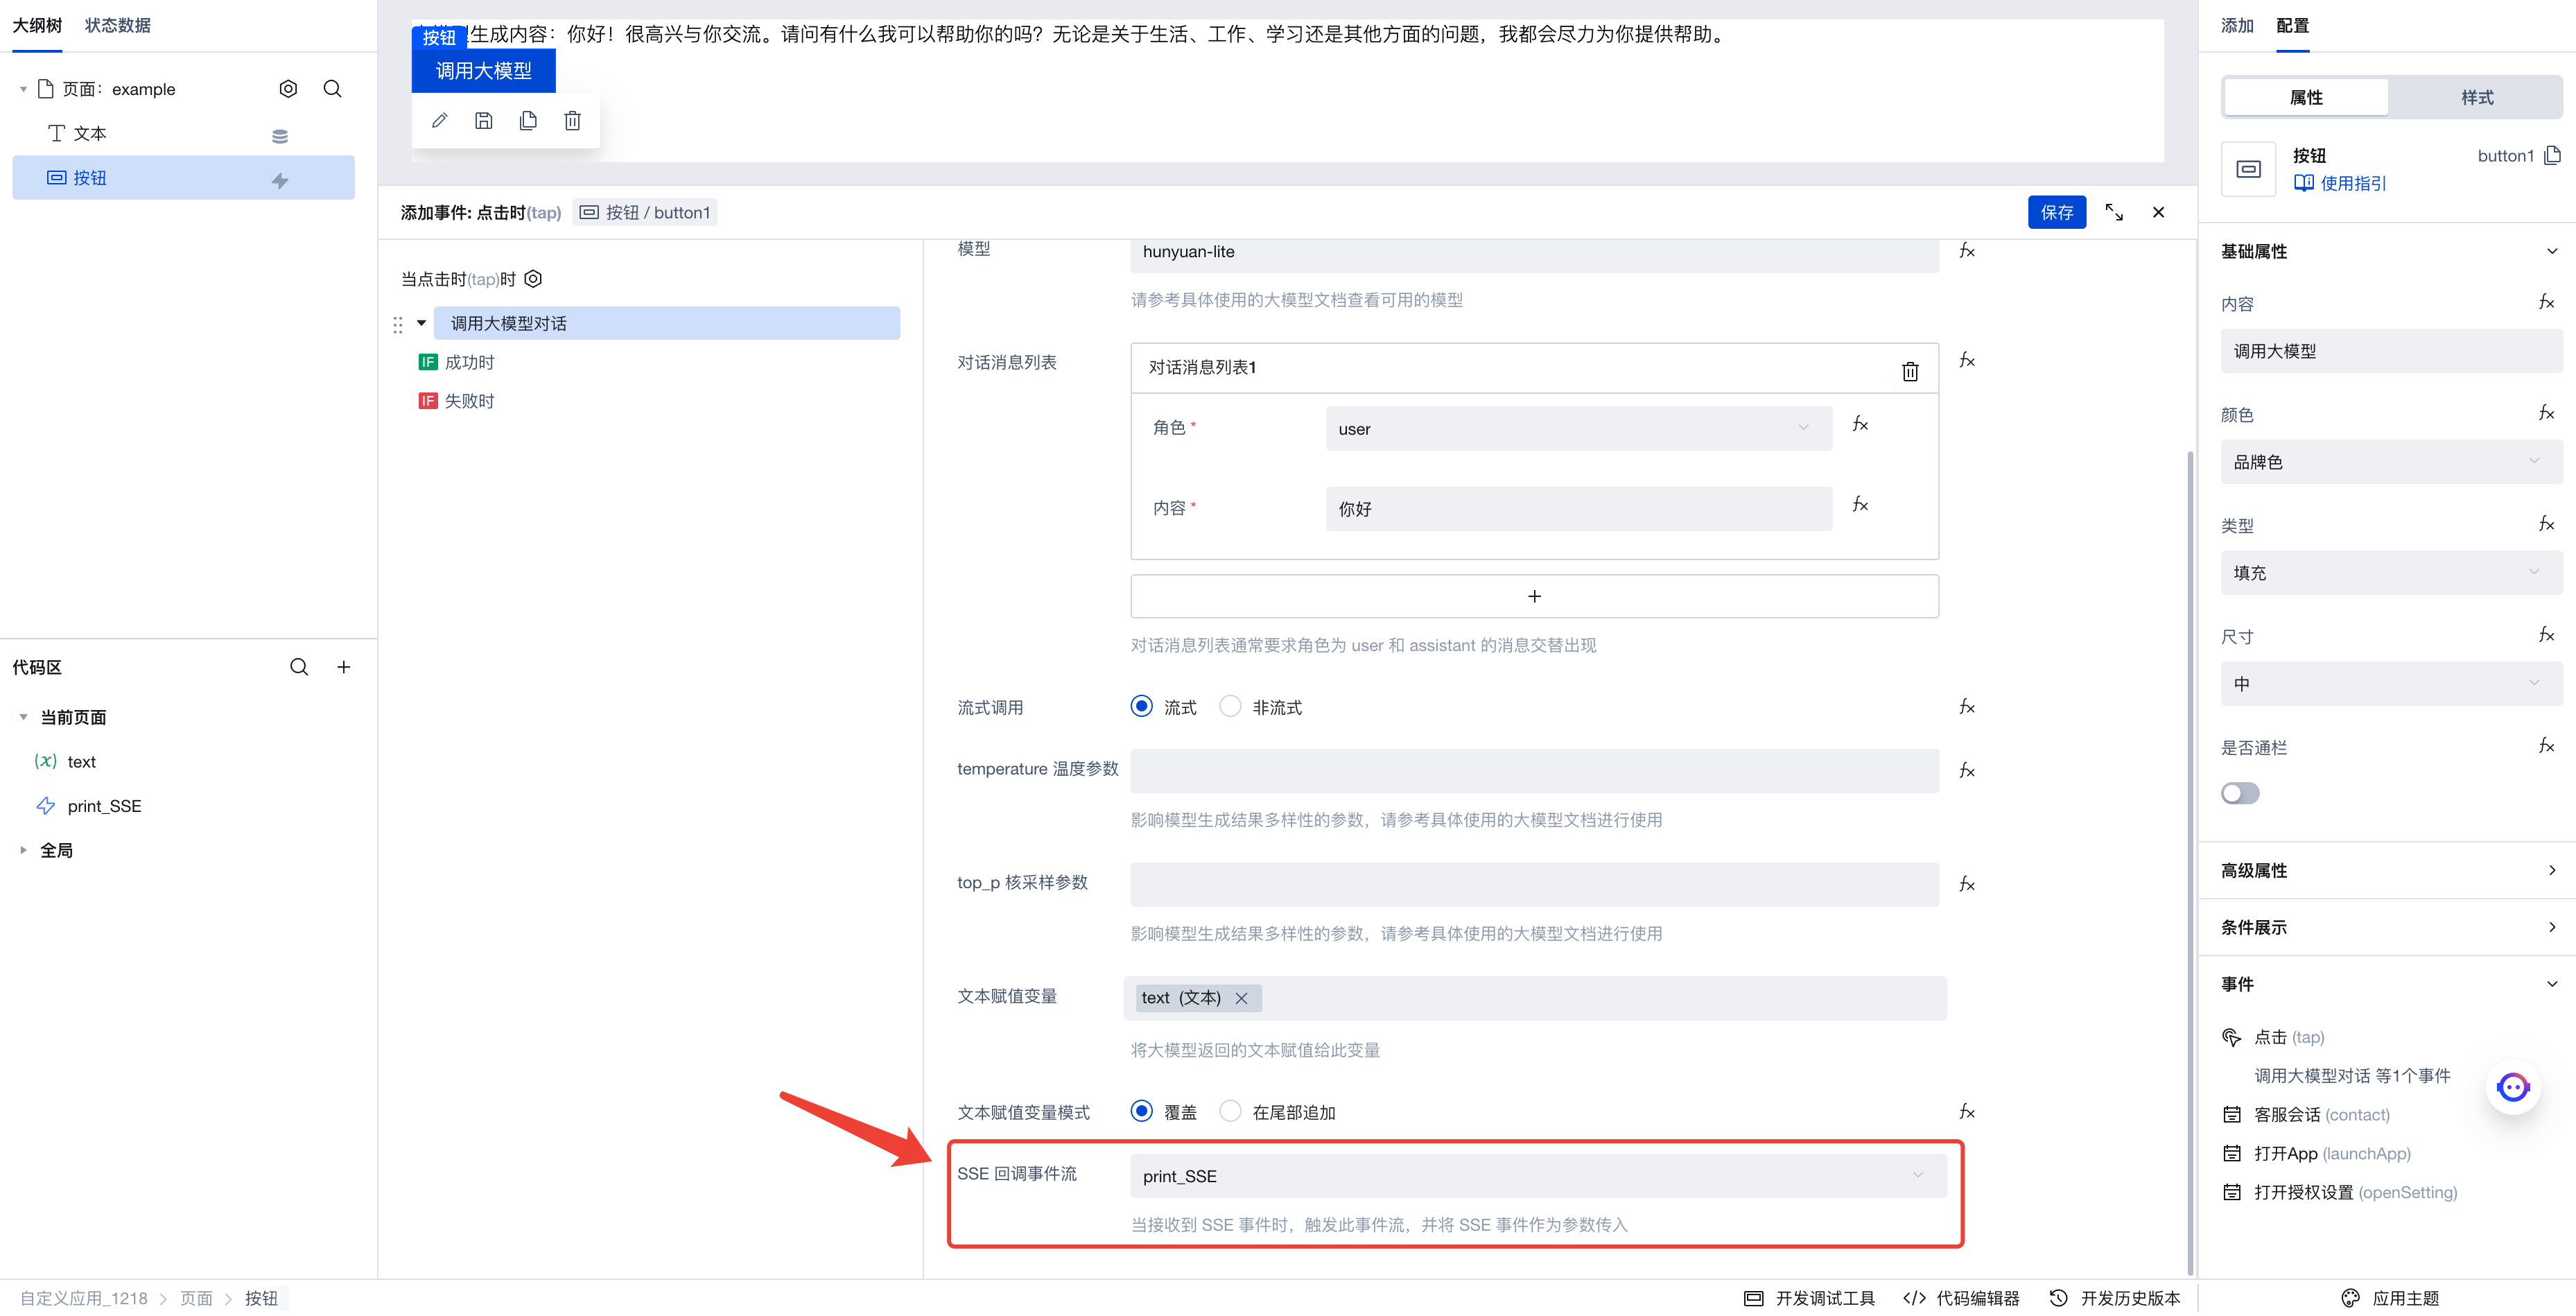
After clicking Save, the program will start running. Open the browser's developer console, then click the button again to invoke the large model. The generated text will be displayed on the application interface, while the console will also print a series of received SSE events.
Invoke Agent Conversation
In this section, we will demonstrate how to use "Invoke Agent Conversation" to perform an action.
Configuring Agent
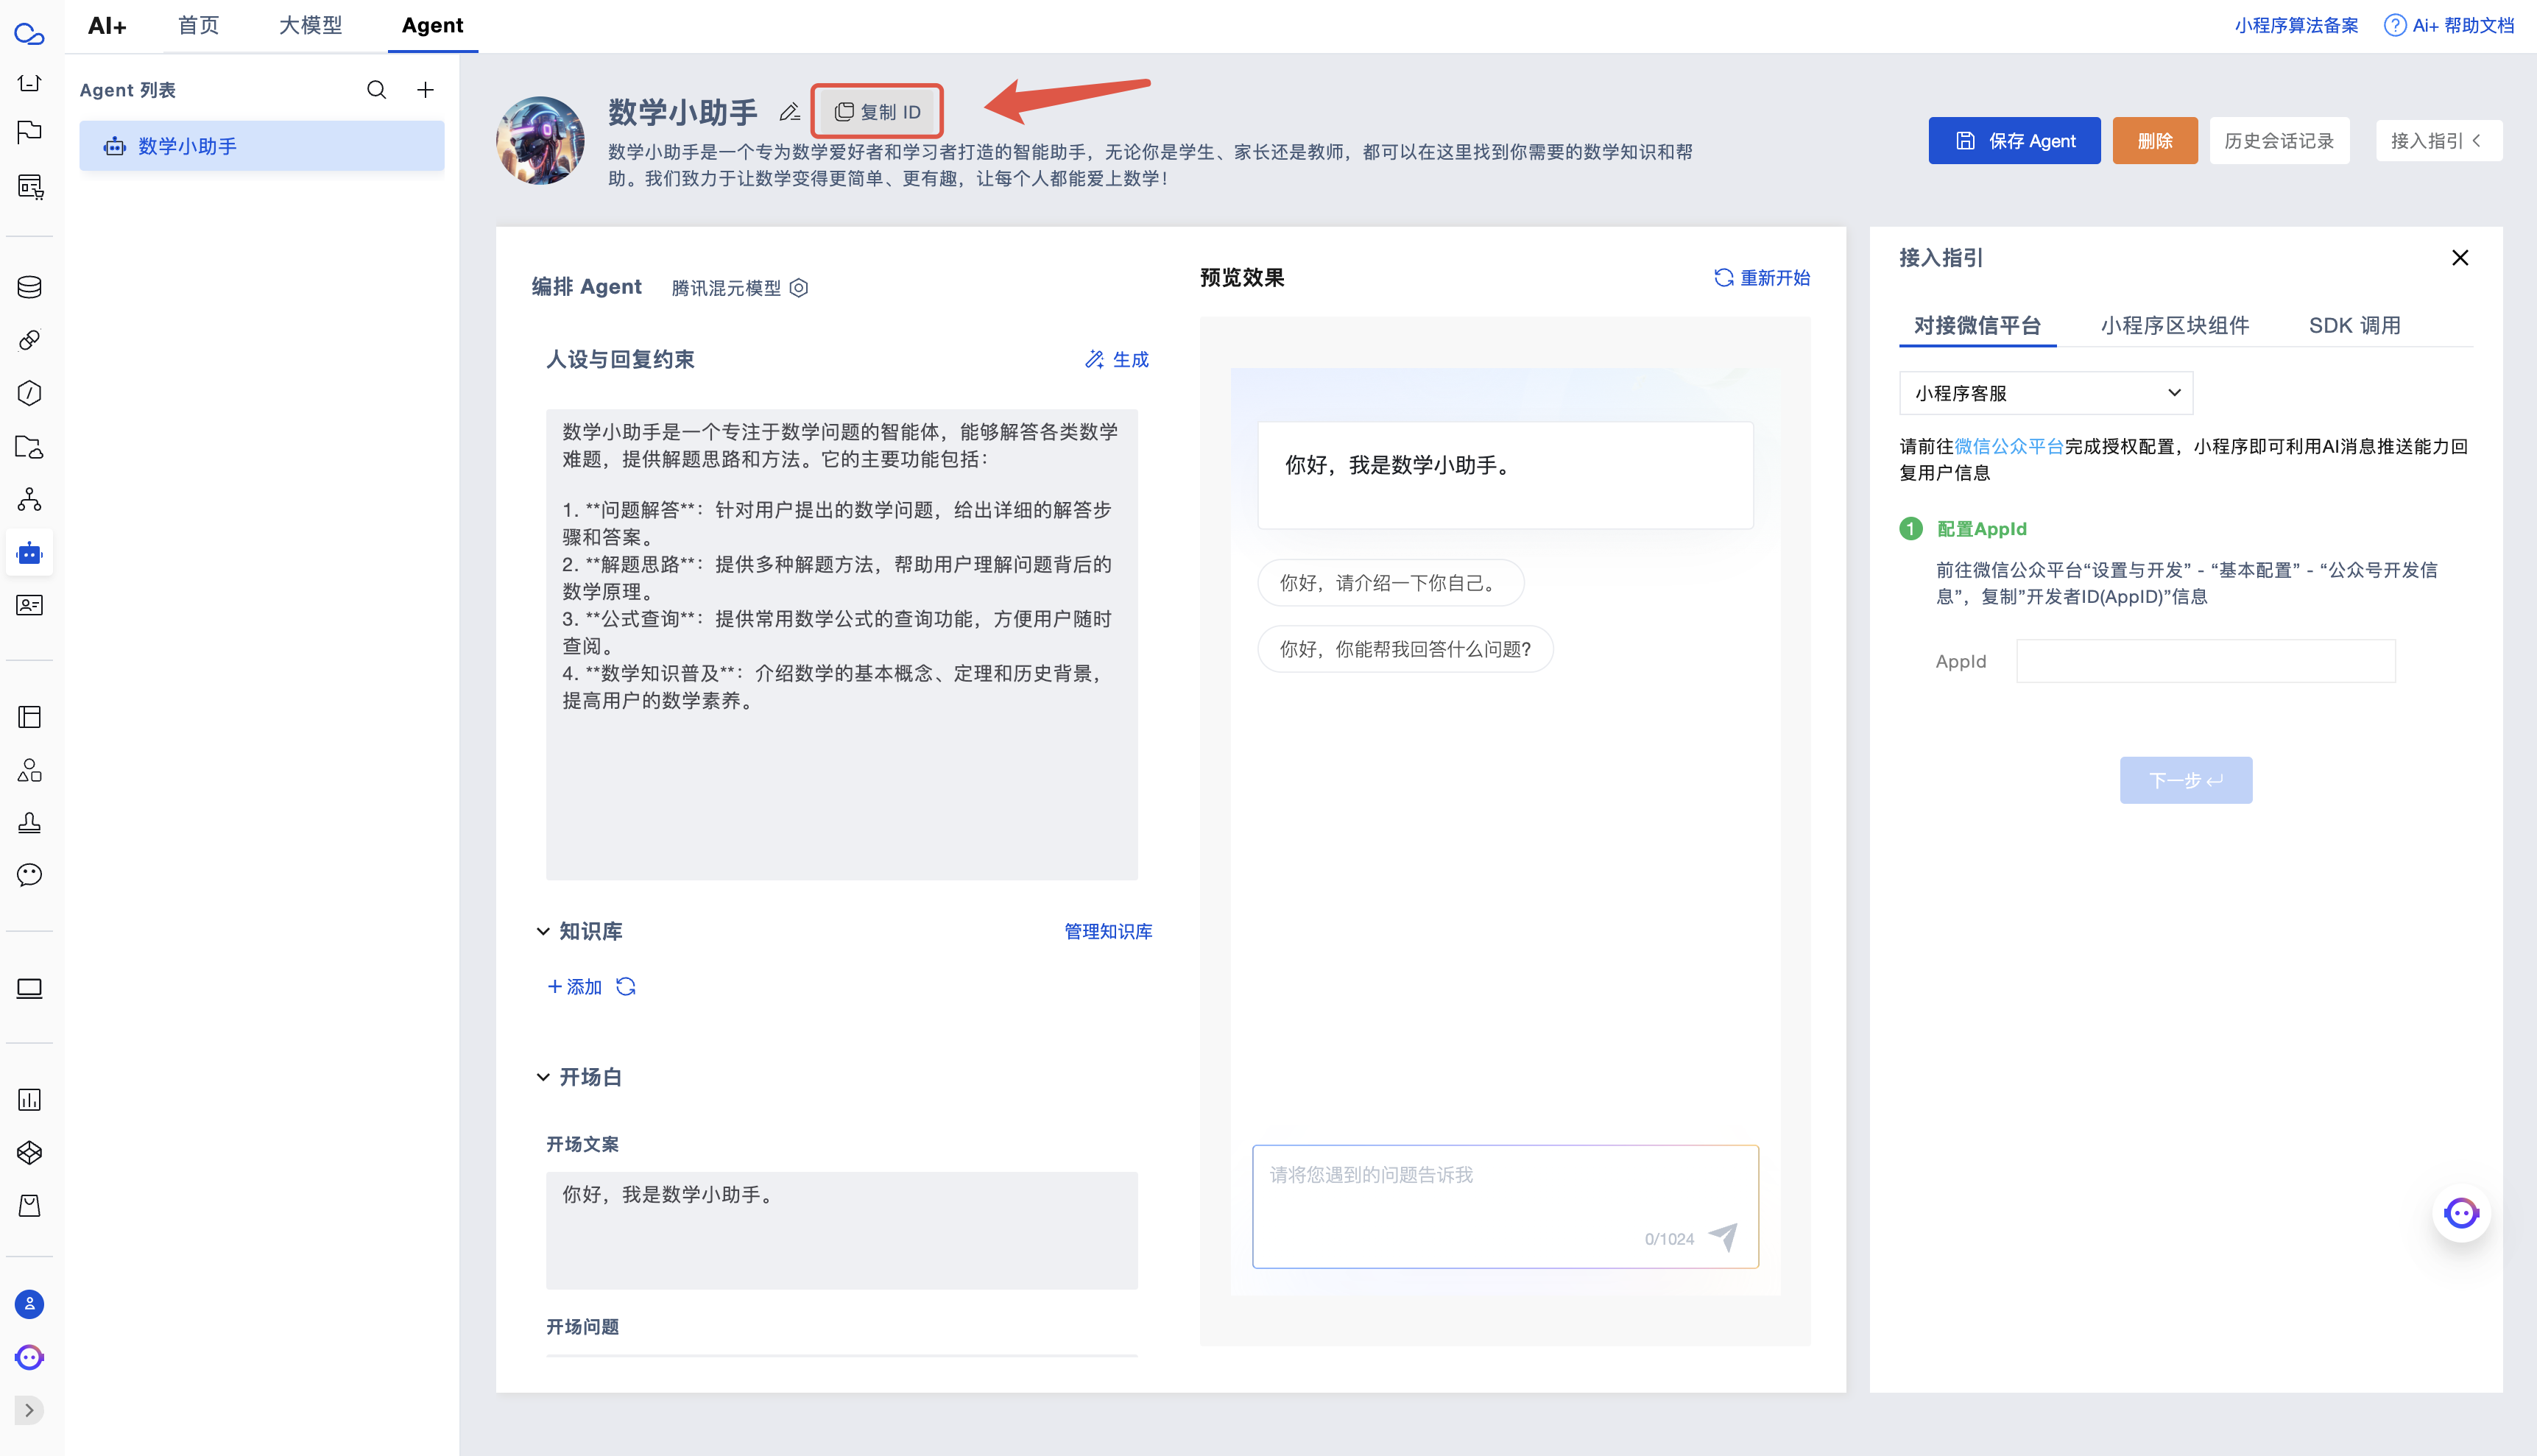
First, go to Cloud Development AI+ Configuration to configure the desired Agent, then click the Copy ID button to record the Agent's ID.
Build Page
Next, we enter the visual development page.
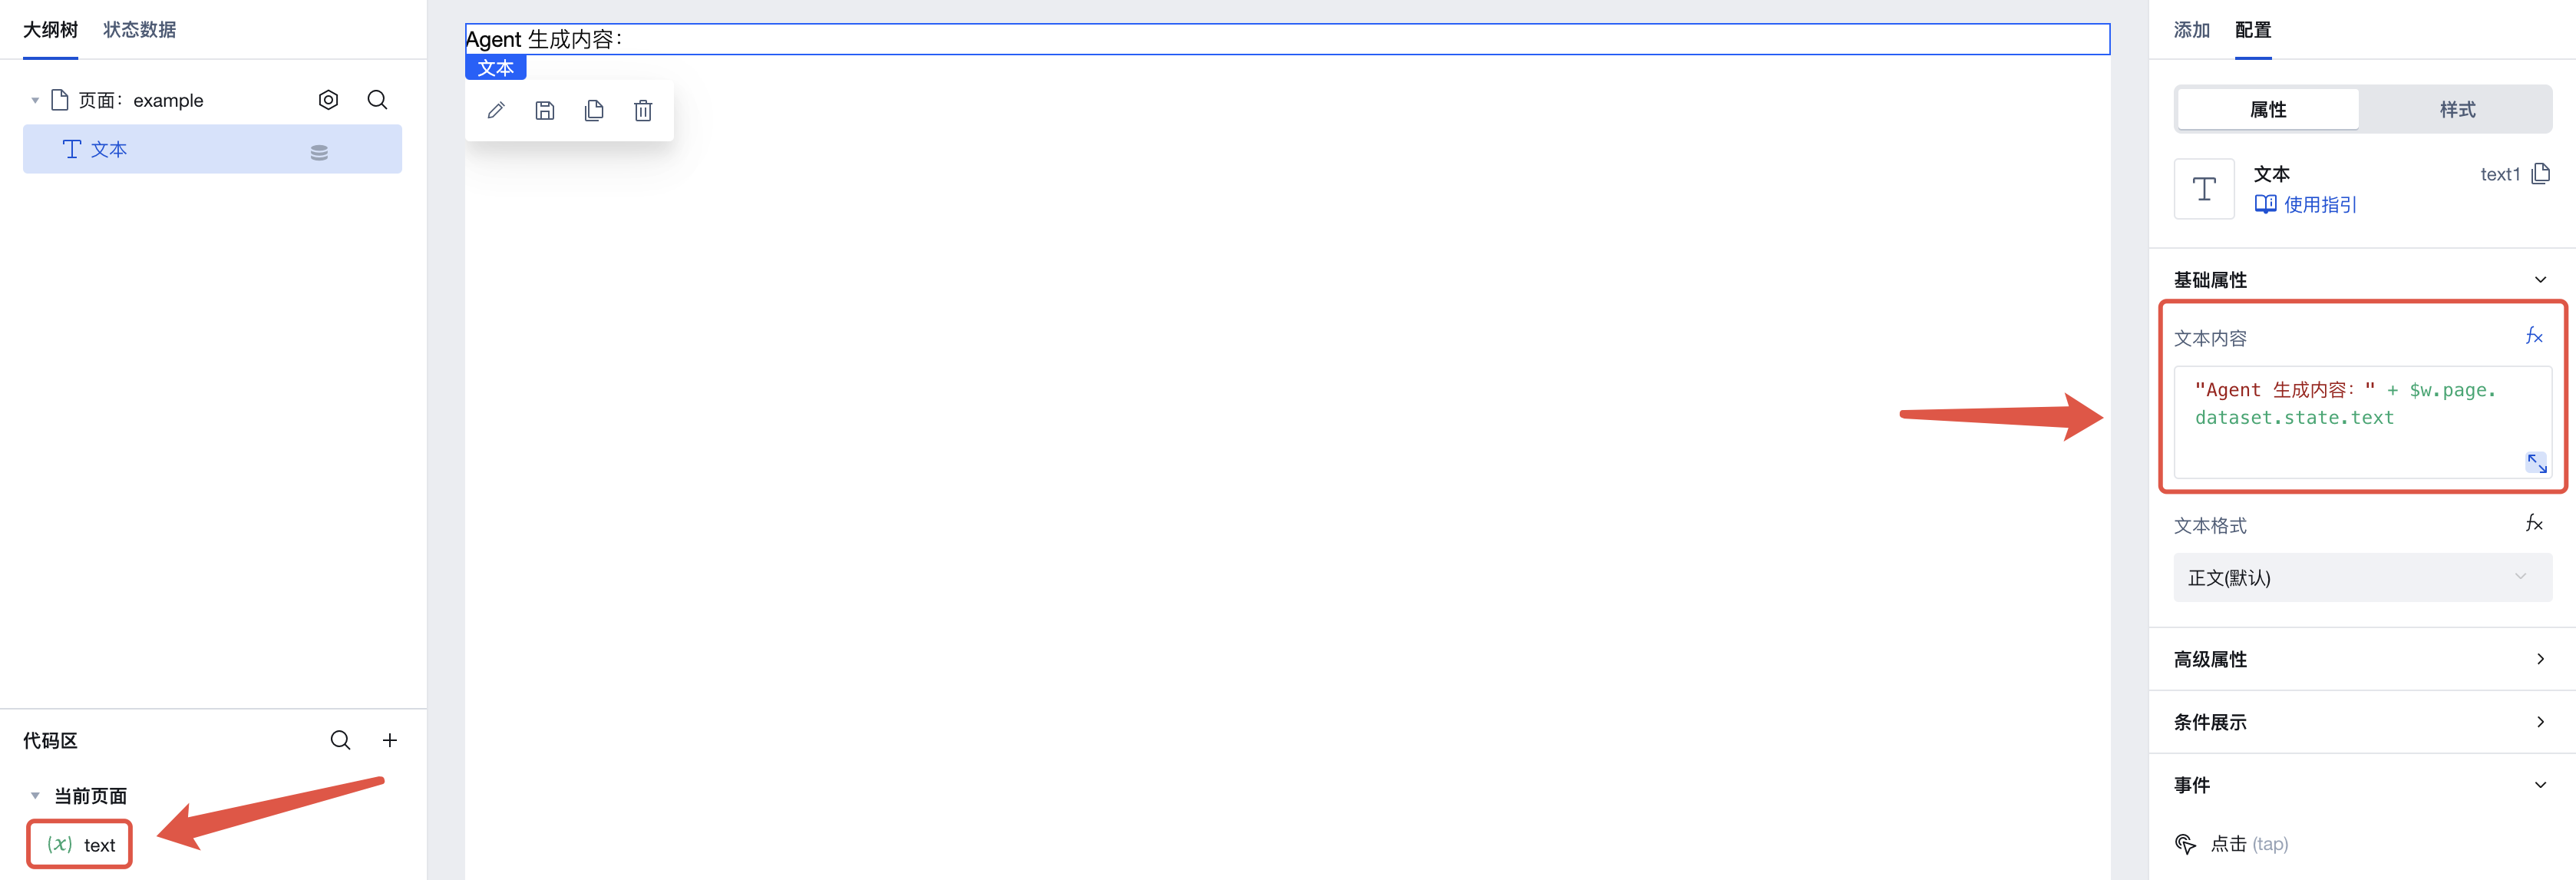
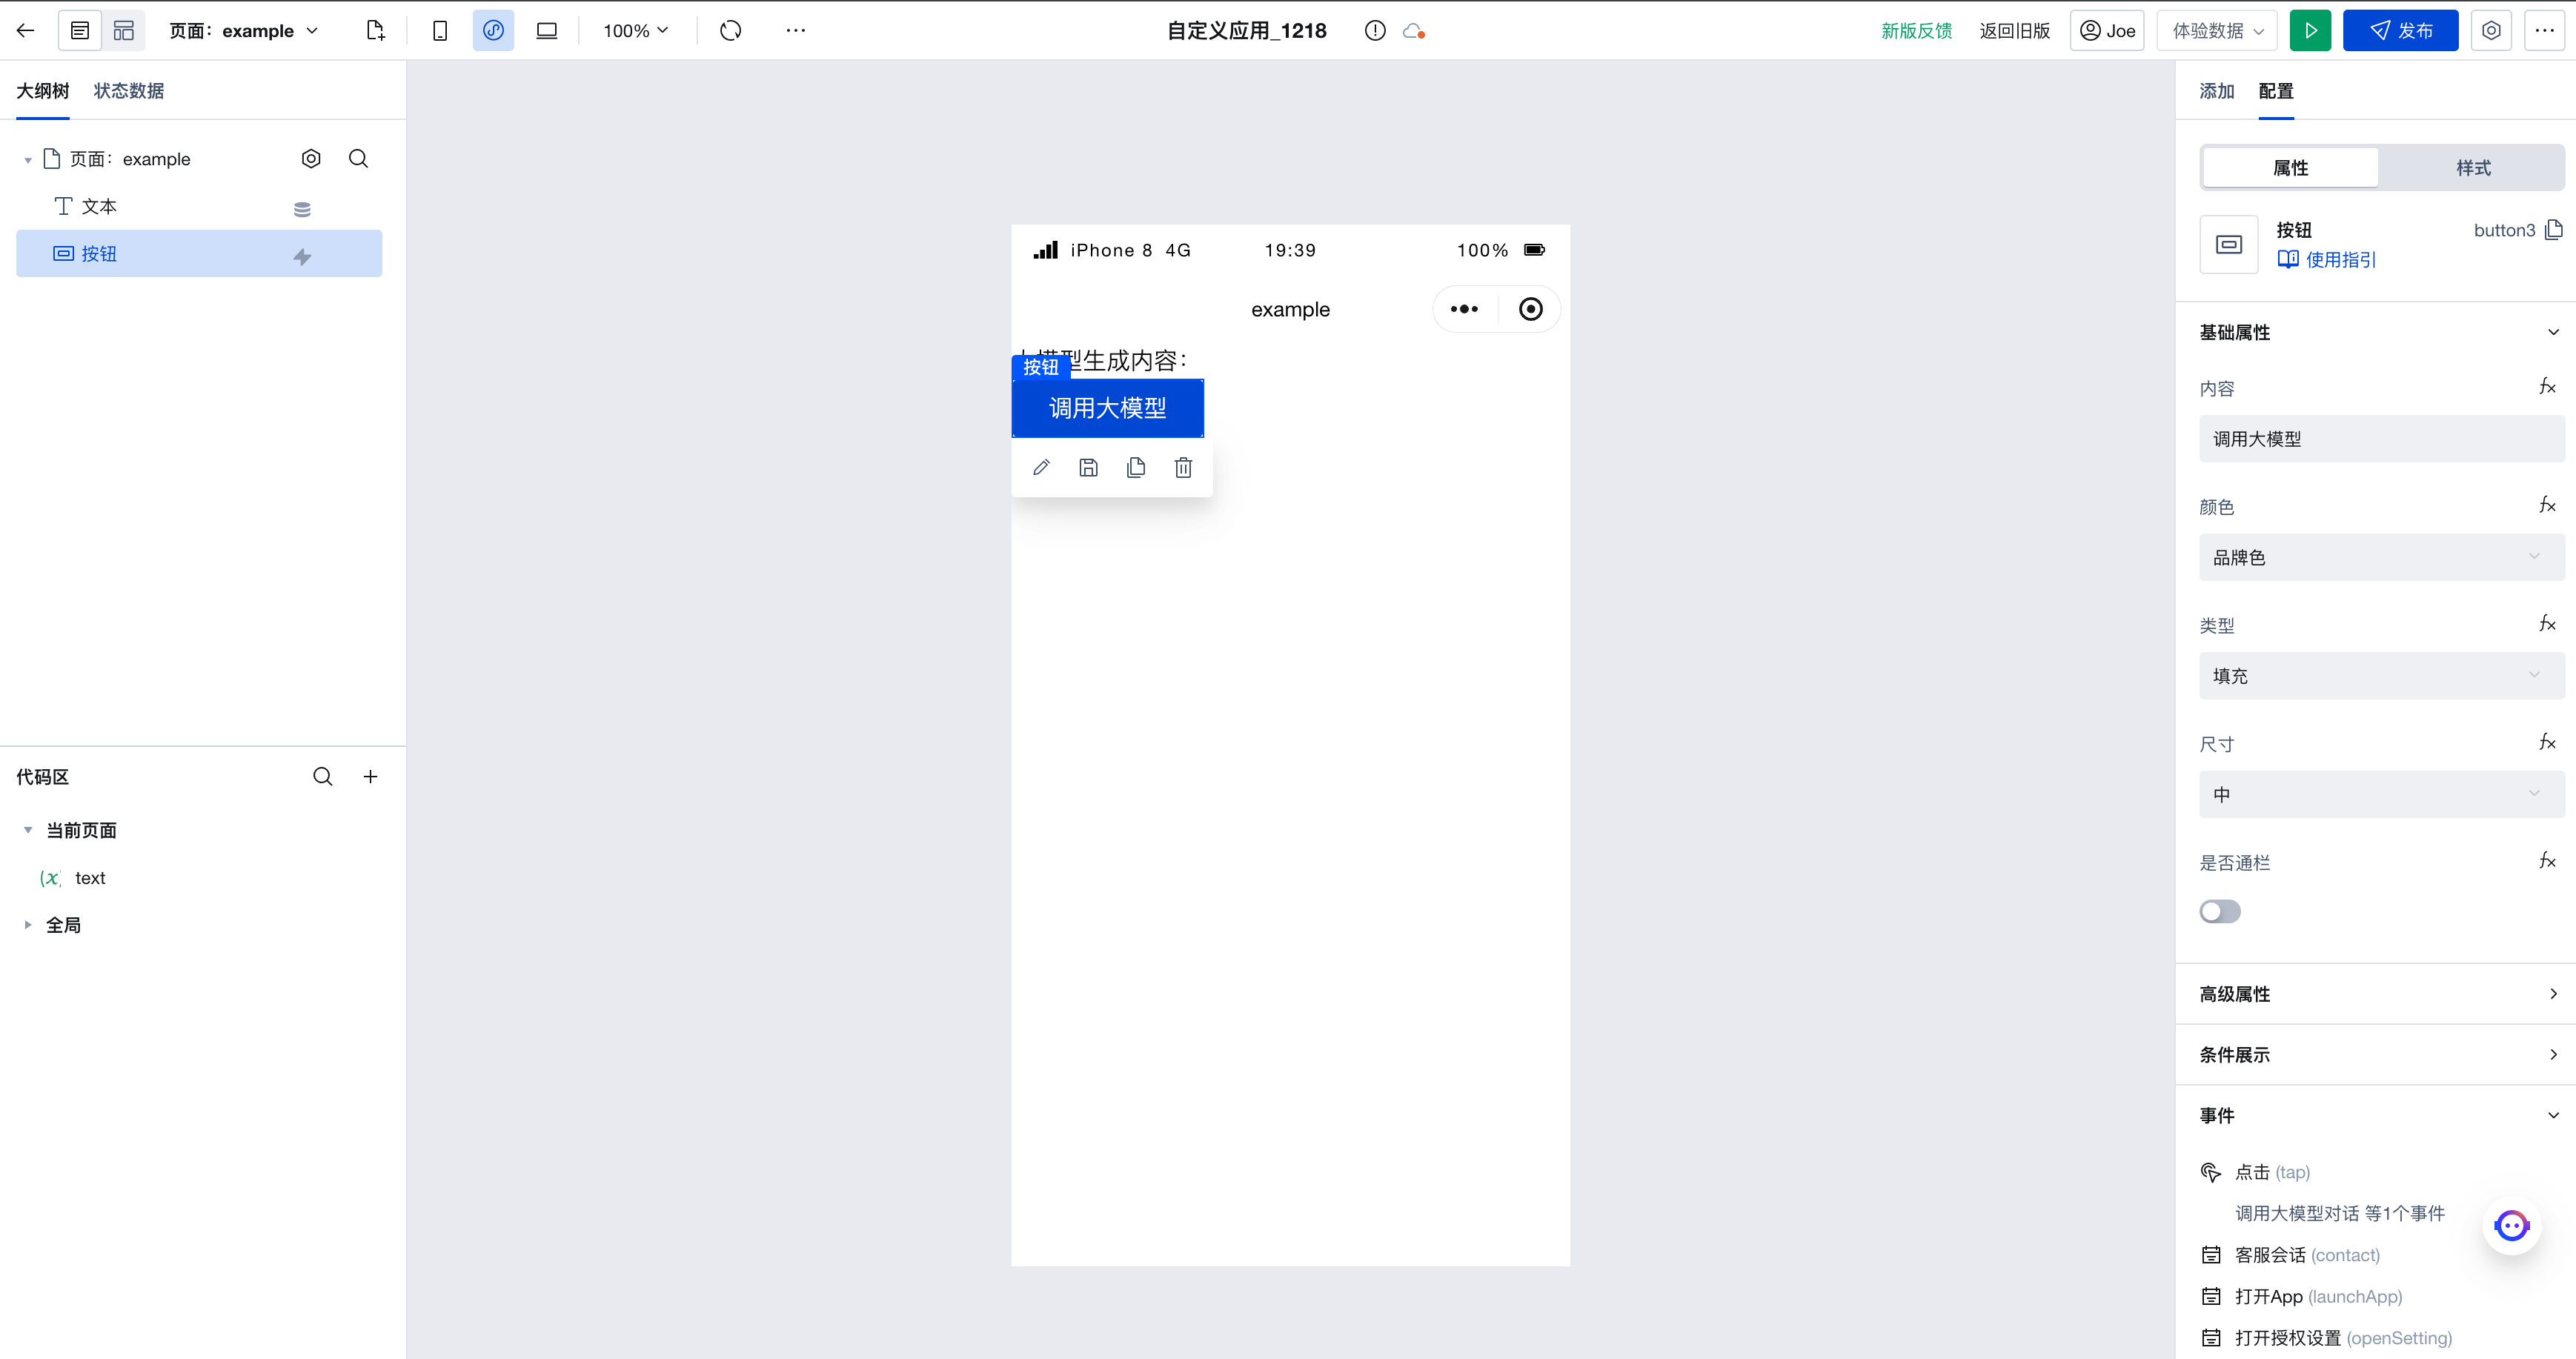
First, create a string variable text on this page, and create a text component. Set the content of the text component to "Agent generated content: " + $w.page.dataset.state.text. We will save the output of the Agent to this variable so that it can be displayed in the application.
Next, add a button to the page. Click the click event in the right-side menu to invoke the execution action panel. Here, select the execution action to be triggered when this button is clicked.
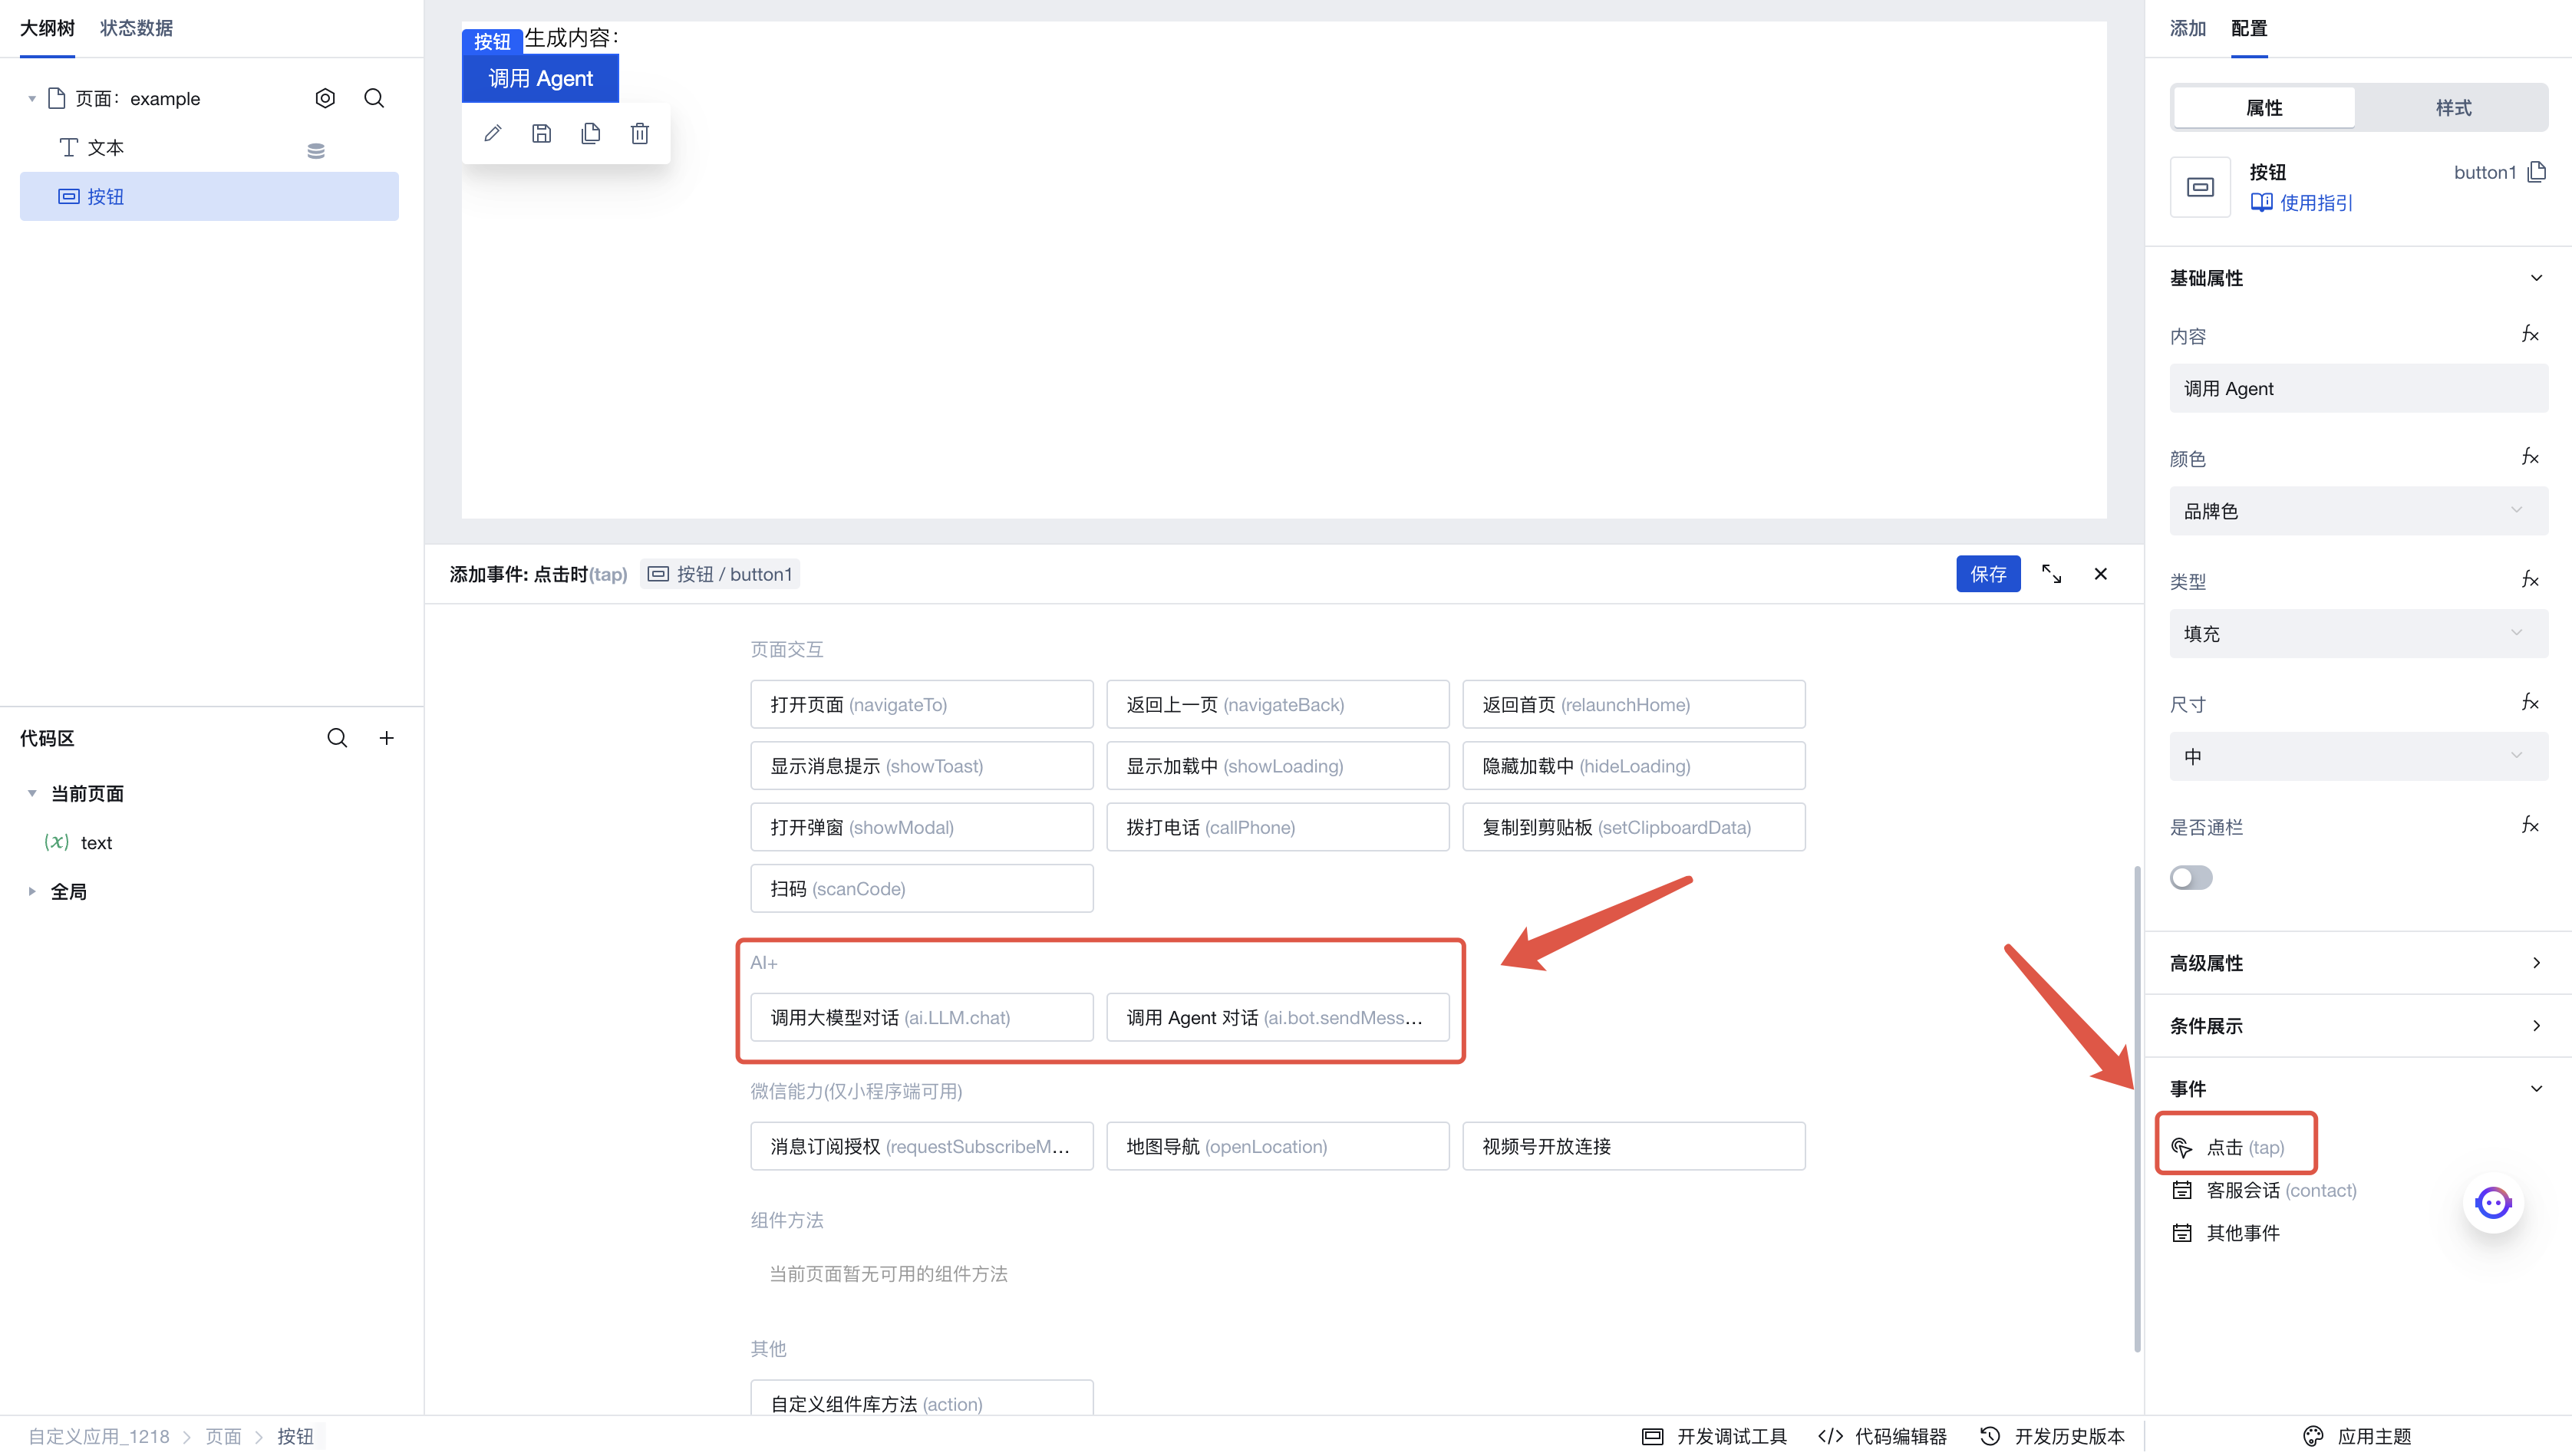
Click "Invoke Agent Conversation" to enter the execution action's parameter configuration panel. Here are the parameters we configured:
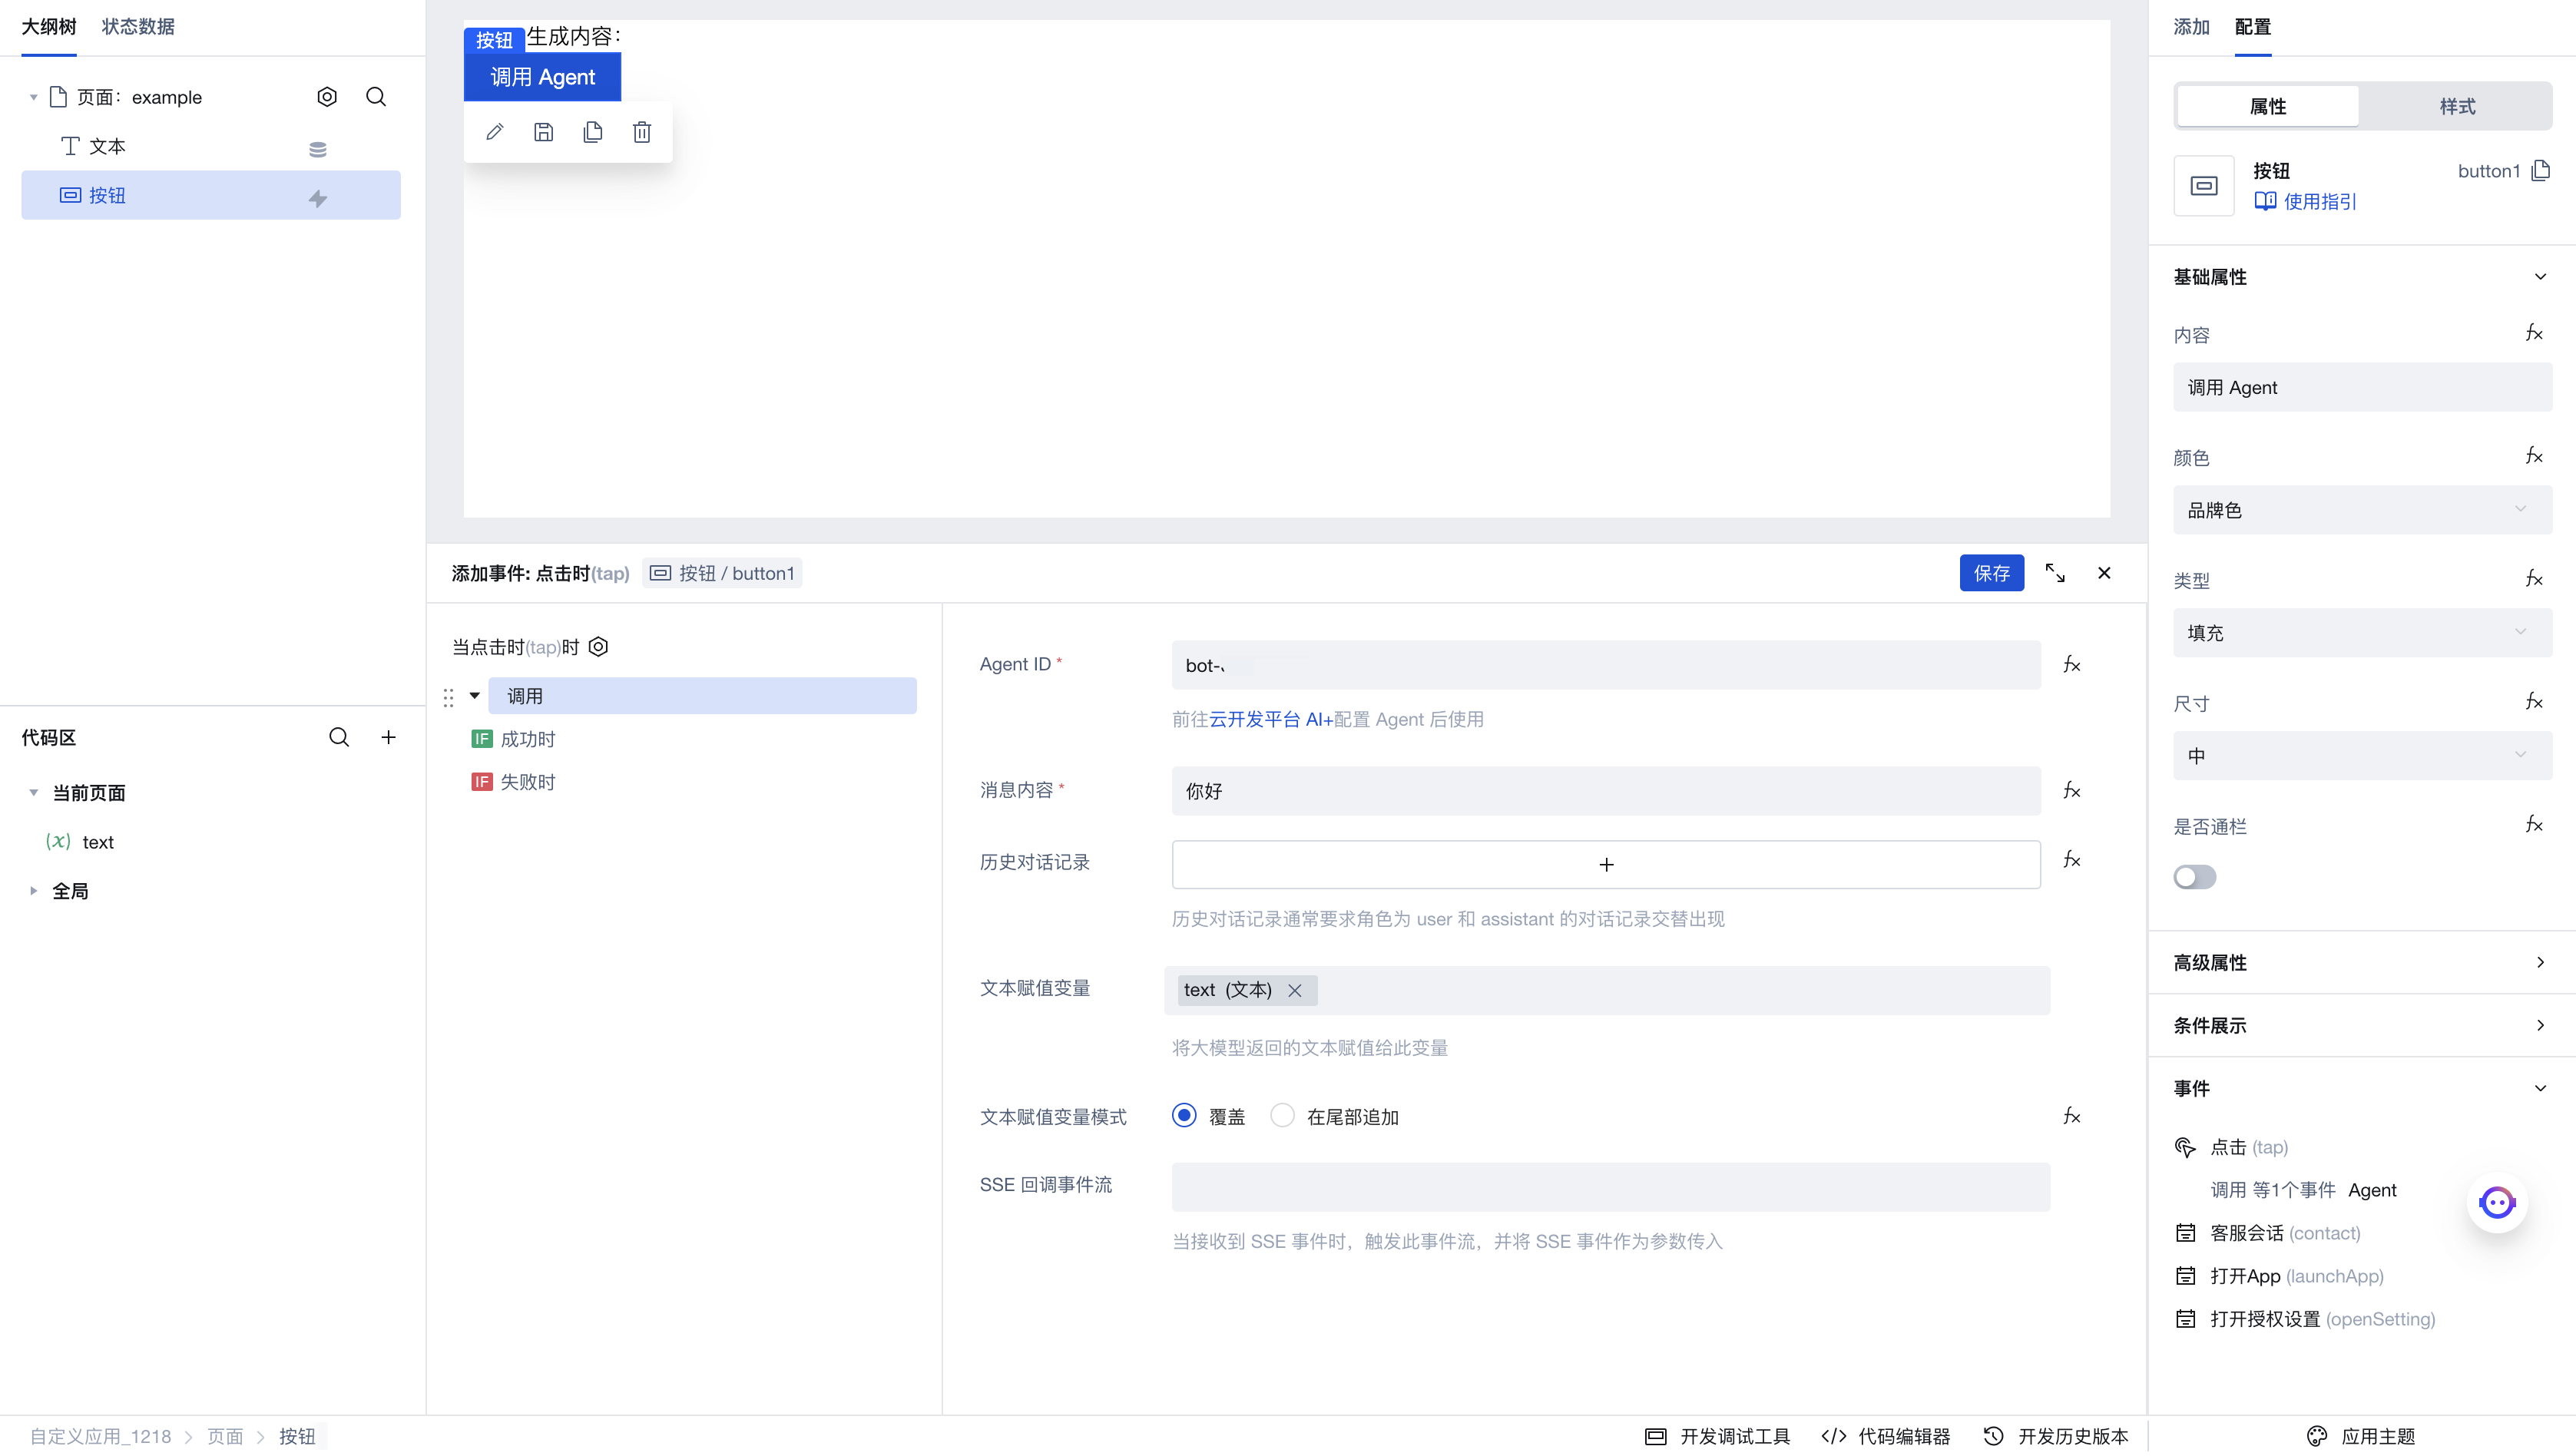
- Agent ID: Enter the Agent ID configured previously in the AI+ page.
- Message content: Enter the dialog content to be sent to the Agent
- Historical conversation records: If you need to add context, enter your historical dialog list with the Agent here.
- Text assignment variable: Here we select the newly created
textvariable. When we obtain the generated text from the Agent, it will be saved to this variable. Since we previously created a text component bound to this variable, the expected effect is that when the Agent generates text, the content of the text component will automatically update. - SSE callback event stream: This event stream is triggered when receiving SSE streaming invocation. You can refer to the usage example in the large model dialog invocation for implementation.
After configuration is complete, click Save. Then click the button on the page to invoke the Agent, and you will see the text generated by the Agent printed on the page.
Best Practices
Reflect the "Loading" Status in the Application
When invoking large models or Agent dialogs, it takes some time to see the response. To make users aware that the application is waiting for the invocation to complete and prevent issues like assignment conflicts caused by multiple invocations, we can reflect the "Loading" status in the application.
First, following the Usage example for large model dialog invocation, build an application capable of invoking large models. Expectedly, at this point, the page will have:
- A text component
- A button component
- A
texttext variable
The button component is bound to the action of invoking the large model; the value of the text component is bound to "Content generated by large model: " + $w.page.dataset.state.text. When the button is clicked, the large model is invoked, and the content generated by the large model appears on the page.
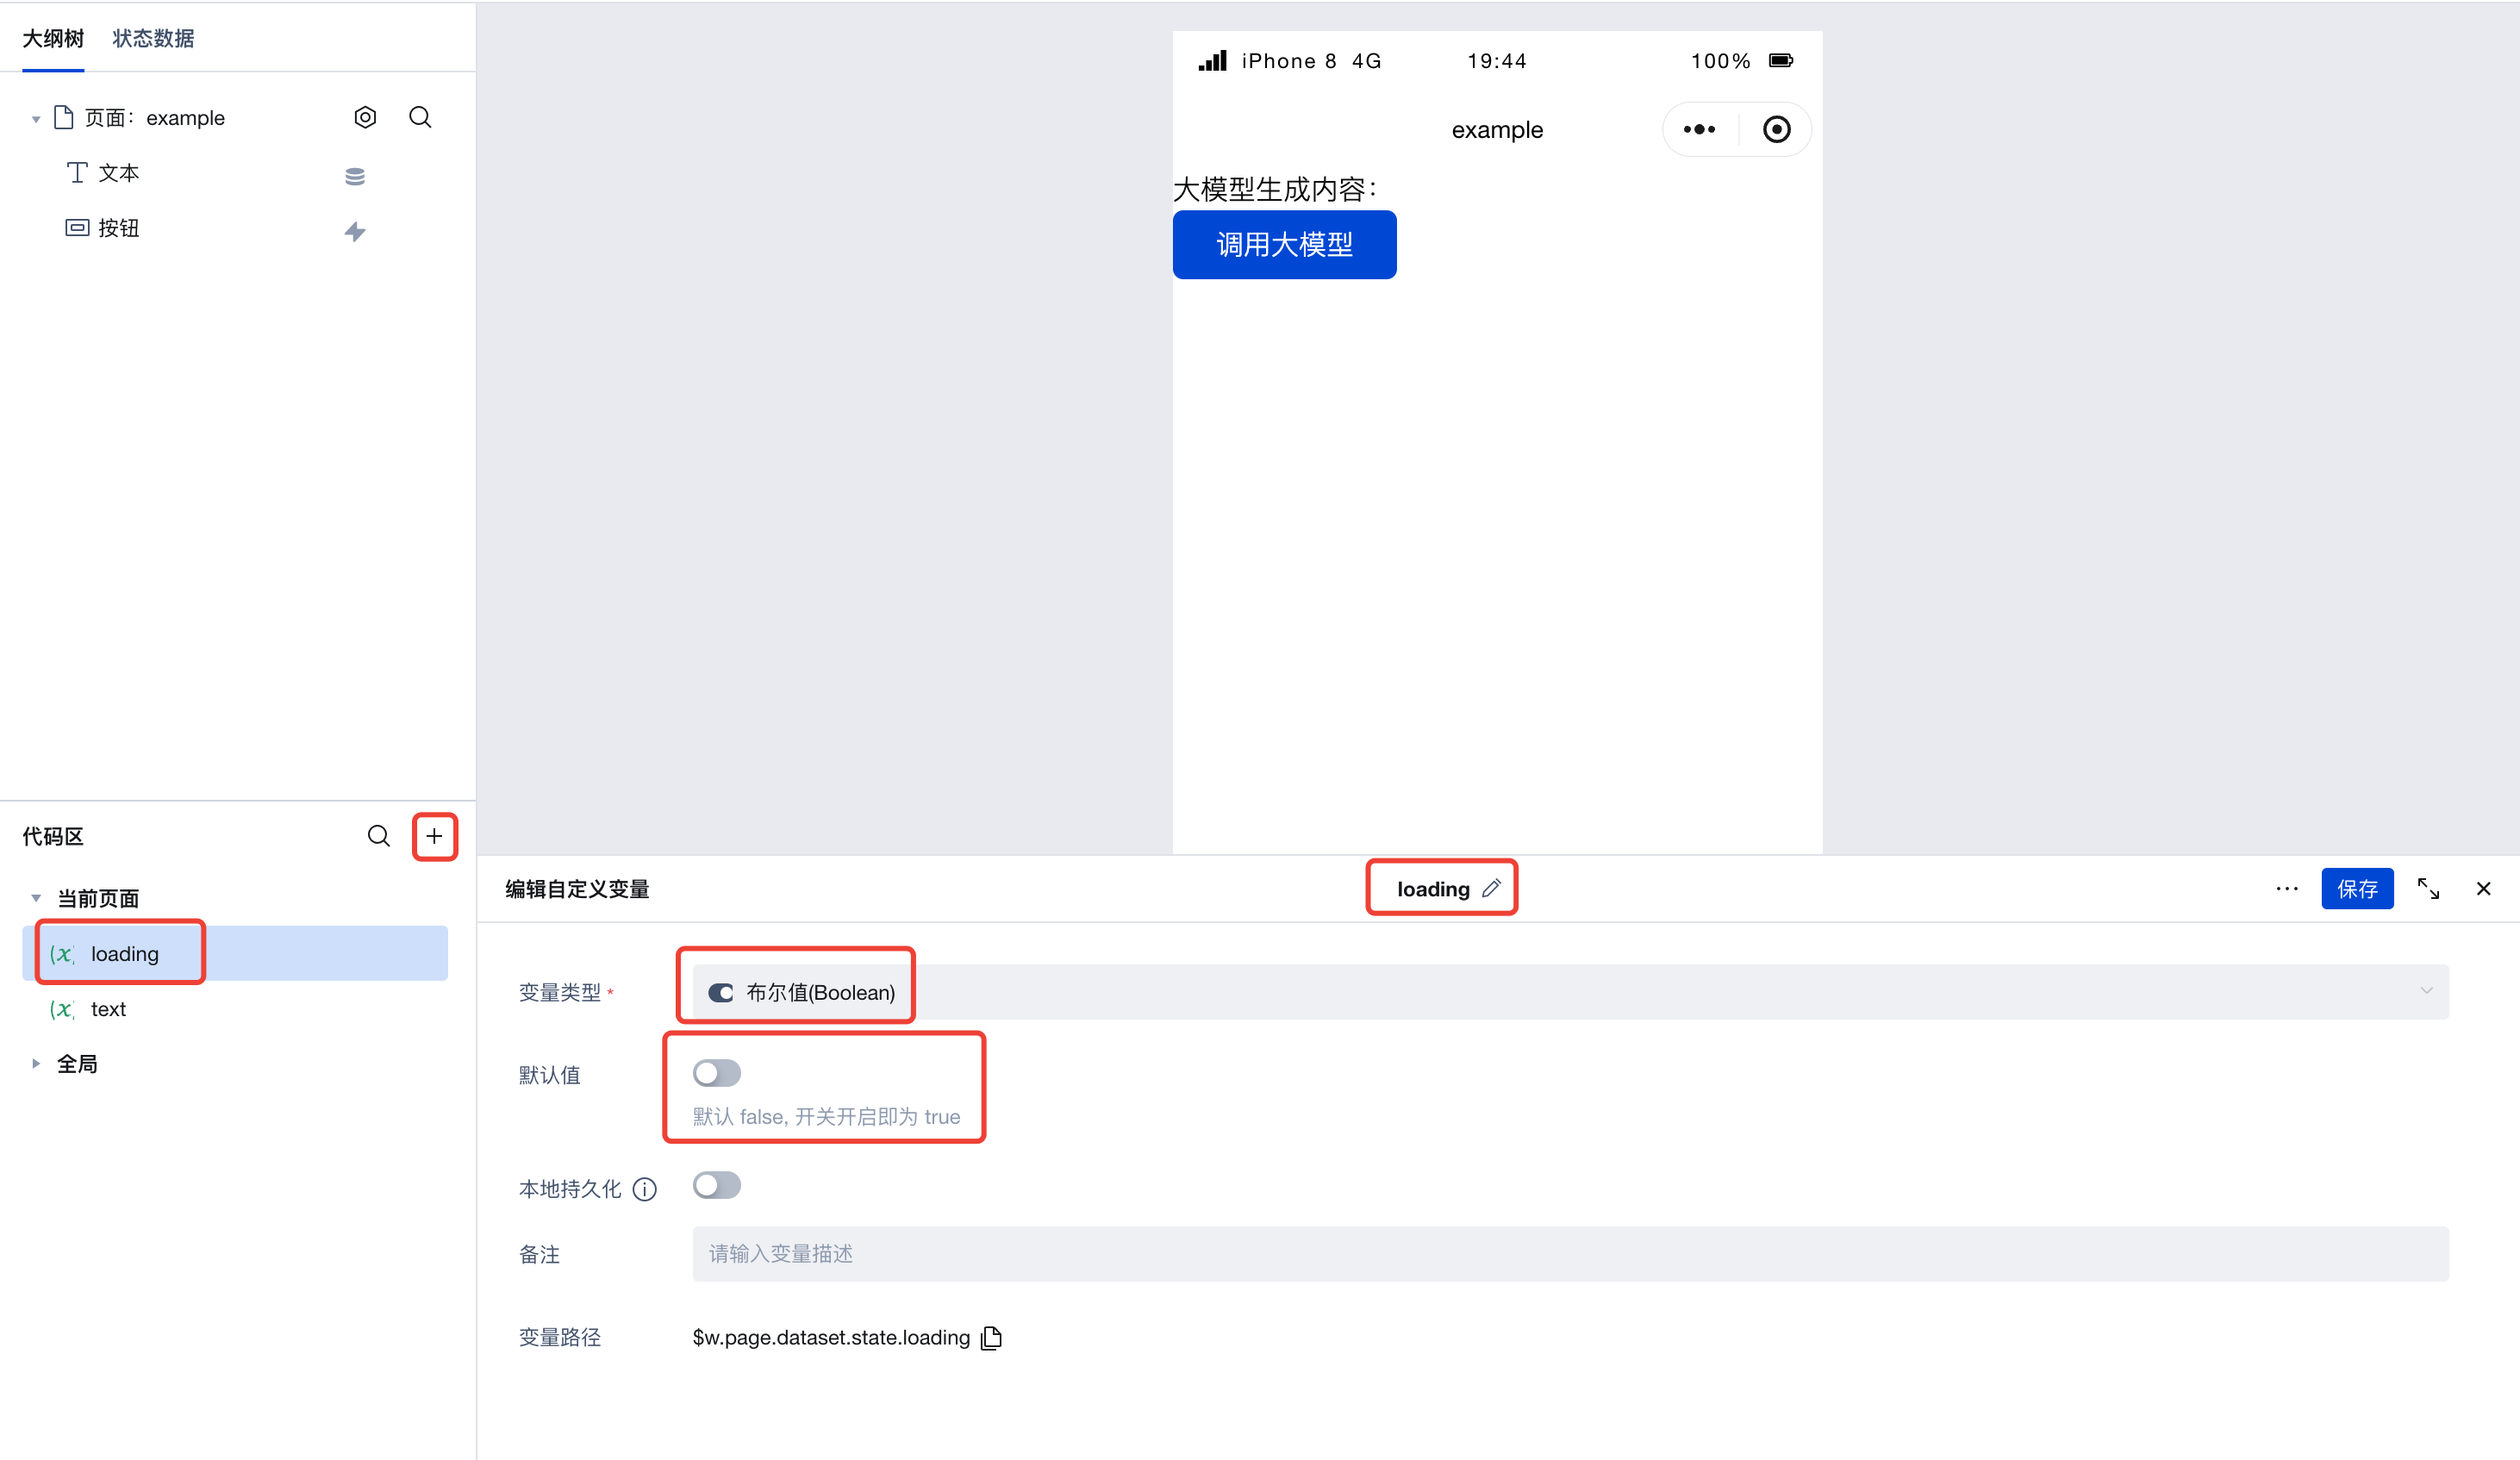
Next, create a loading variable of type boolean with the default value set to false. This value will be used to represent our "Loading" status.
Next, configure the button component. In the Advanced Properties section on the right, locate the 'Loading' and 'Disabled' properties, switch to expression mode, and bind them to the loading variable we just created.

Finally, simply assign different values to the loading variable before and after invoking the large model.
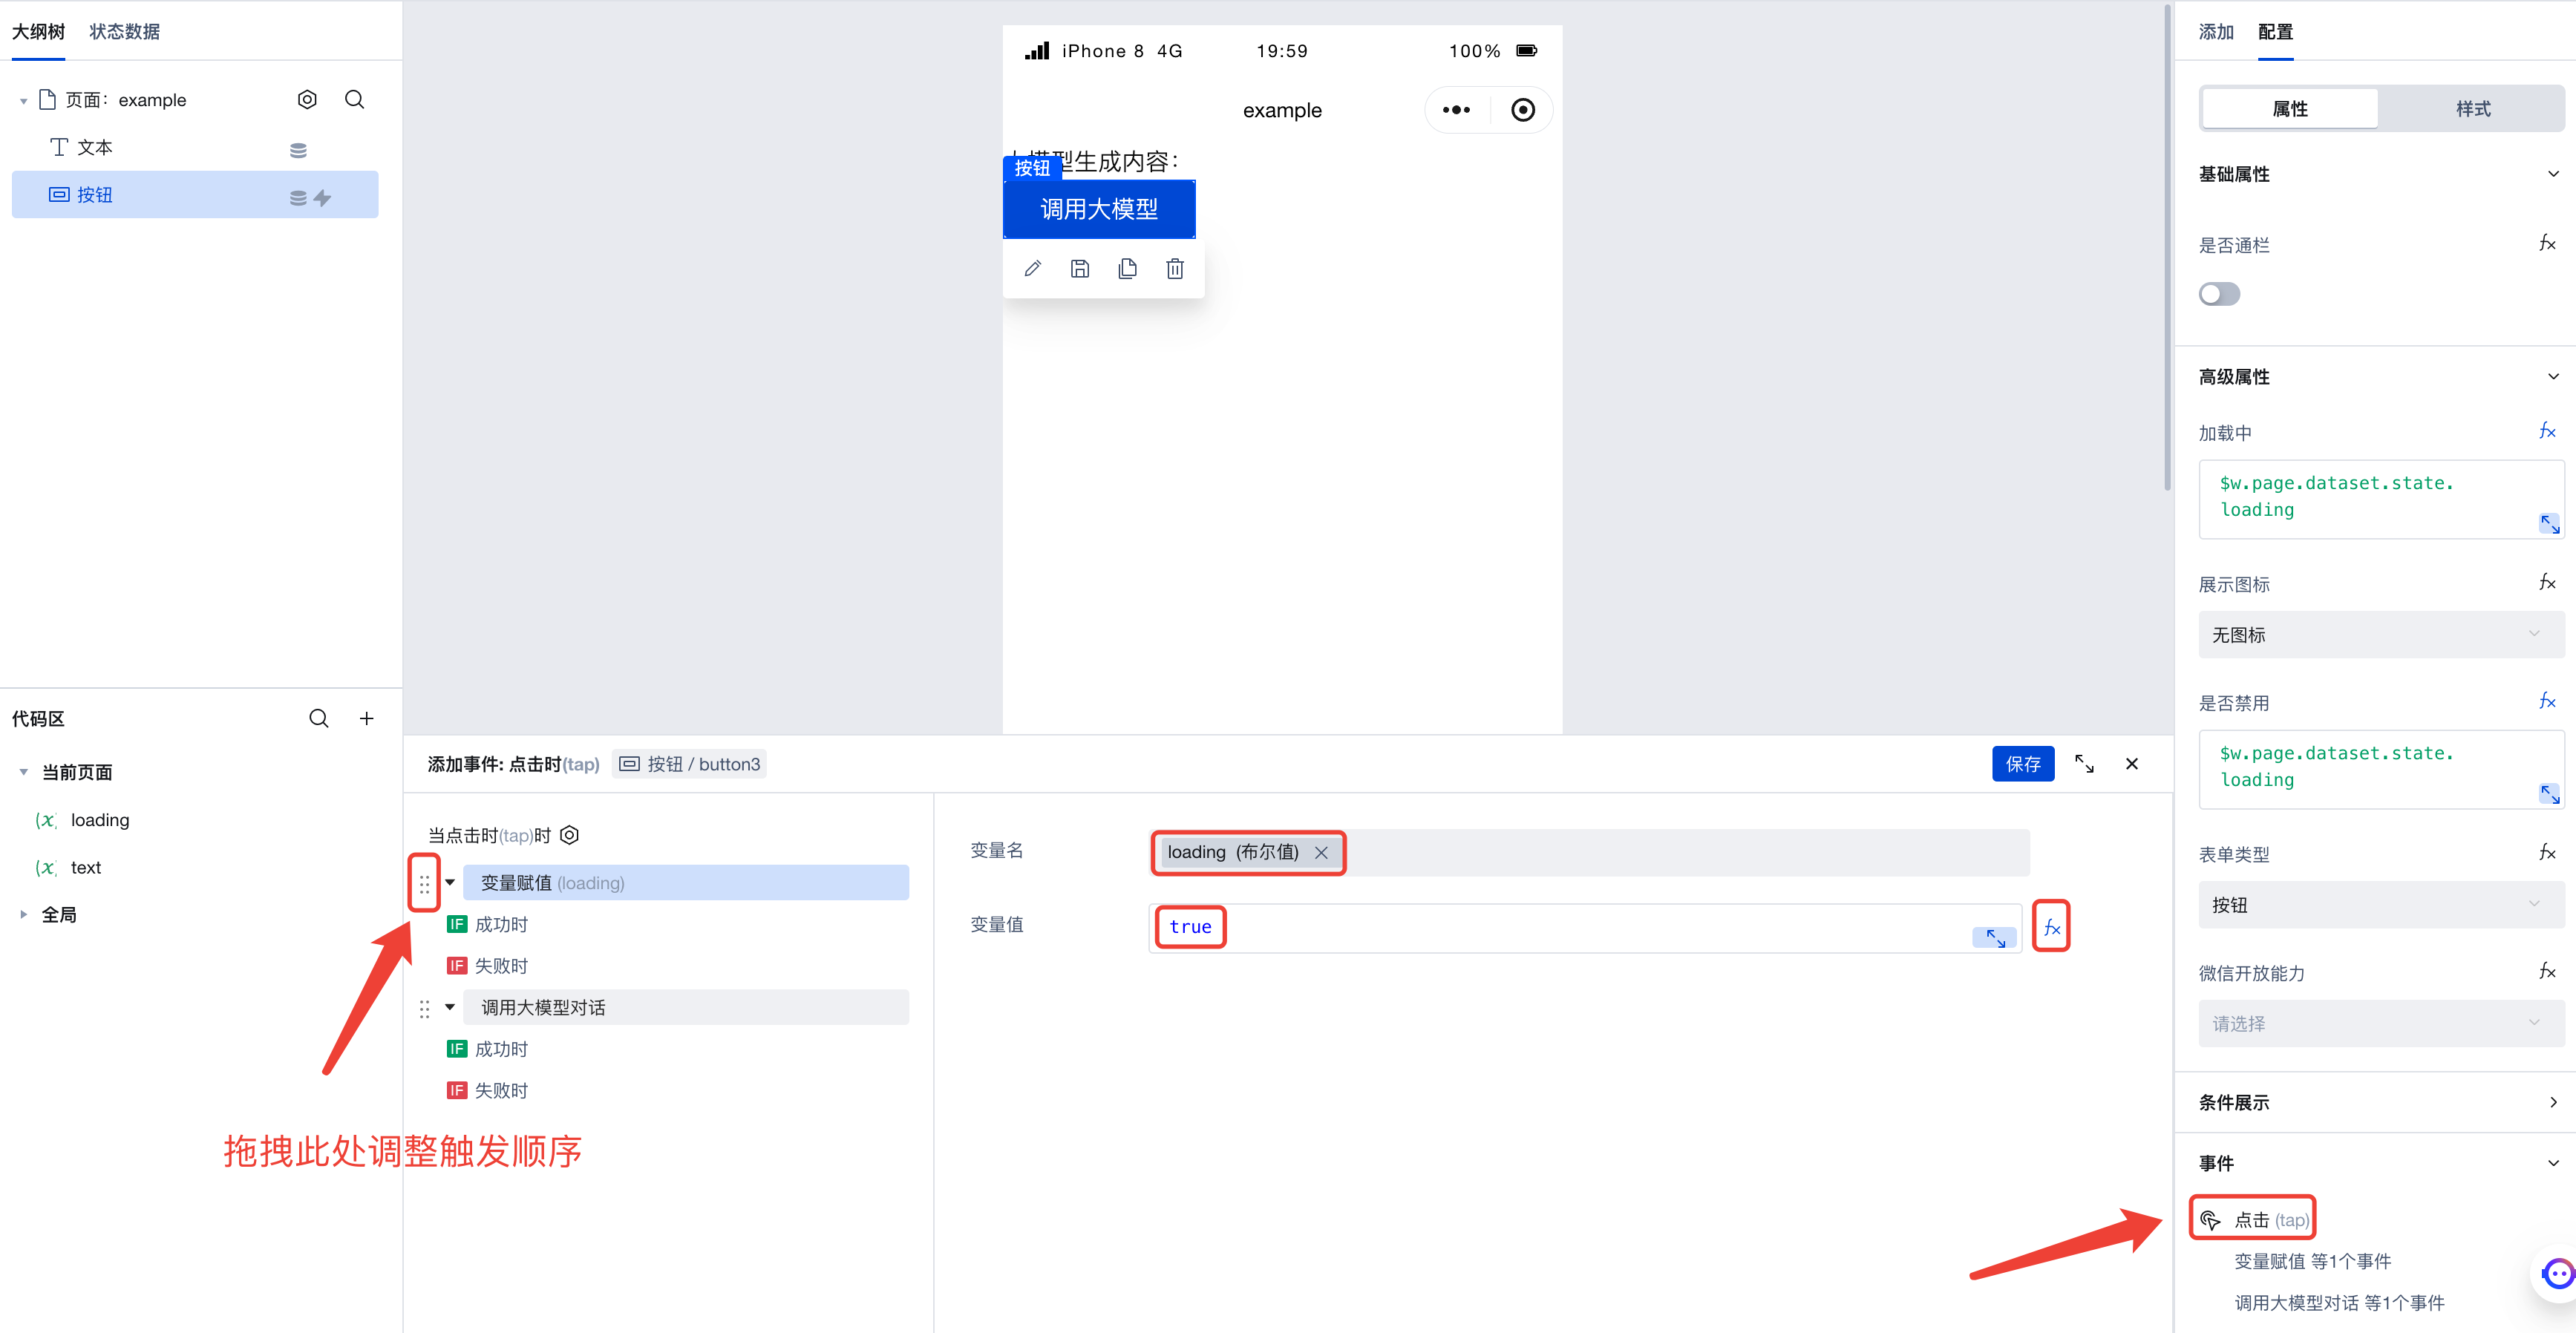
First, assign the value true to the loading variable before invoking the large model. Since invoking the large model is triggered by a click, simply add the variable assignment action to the click event:
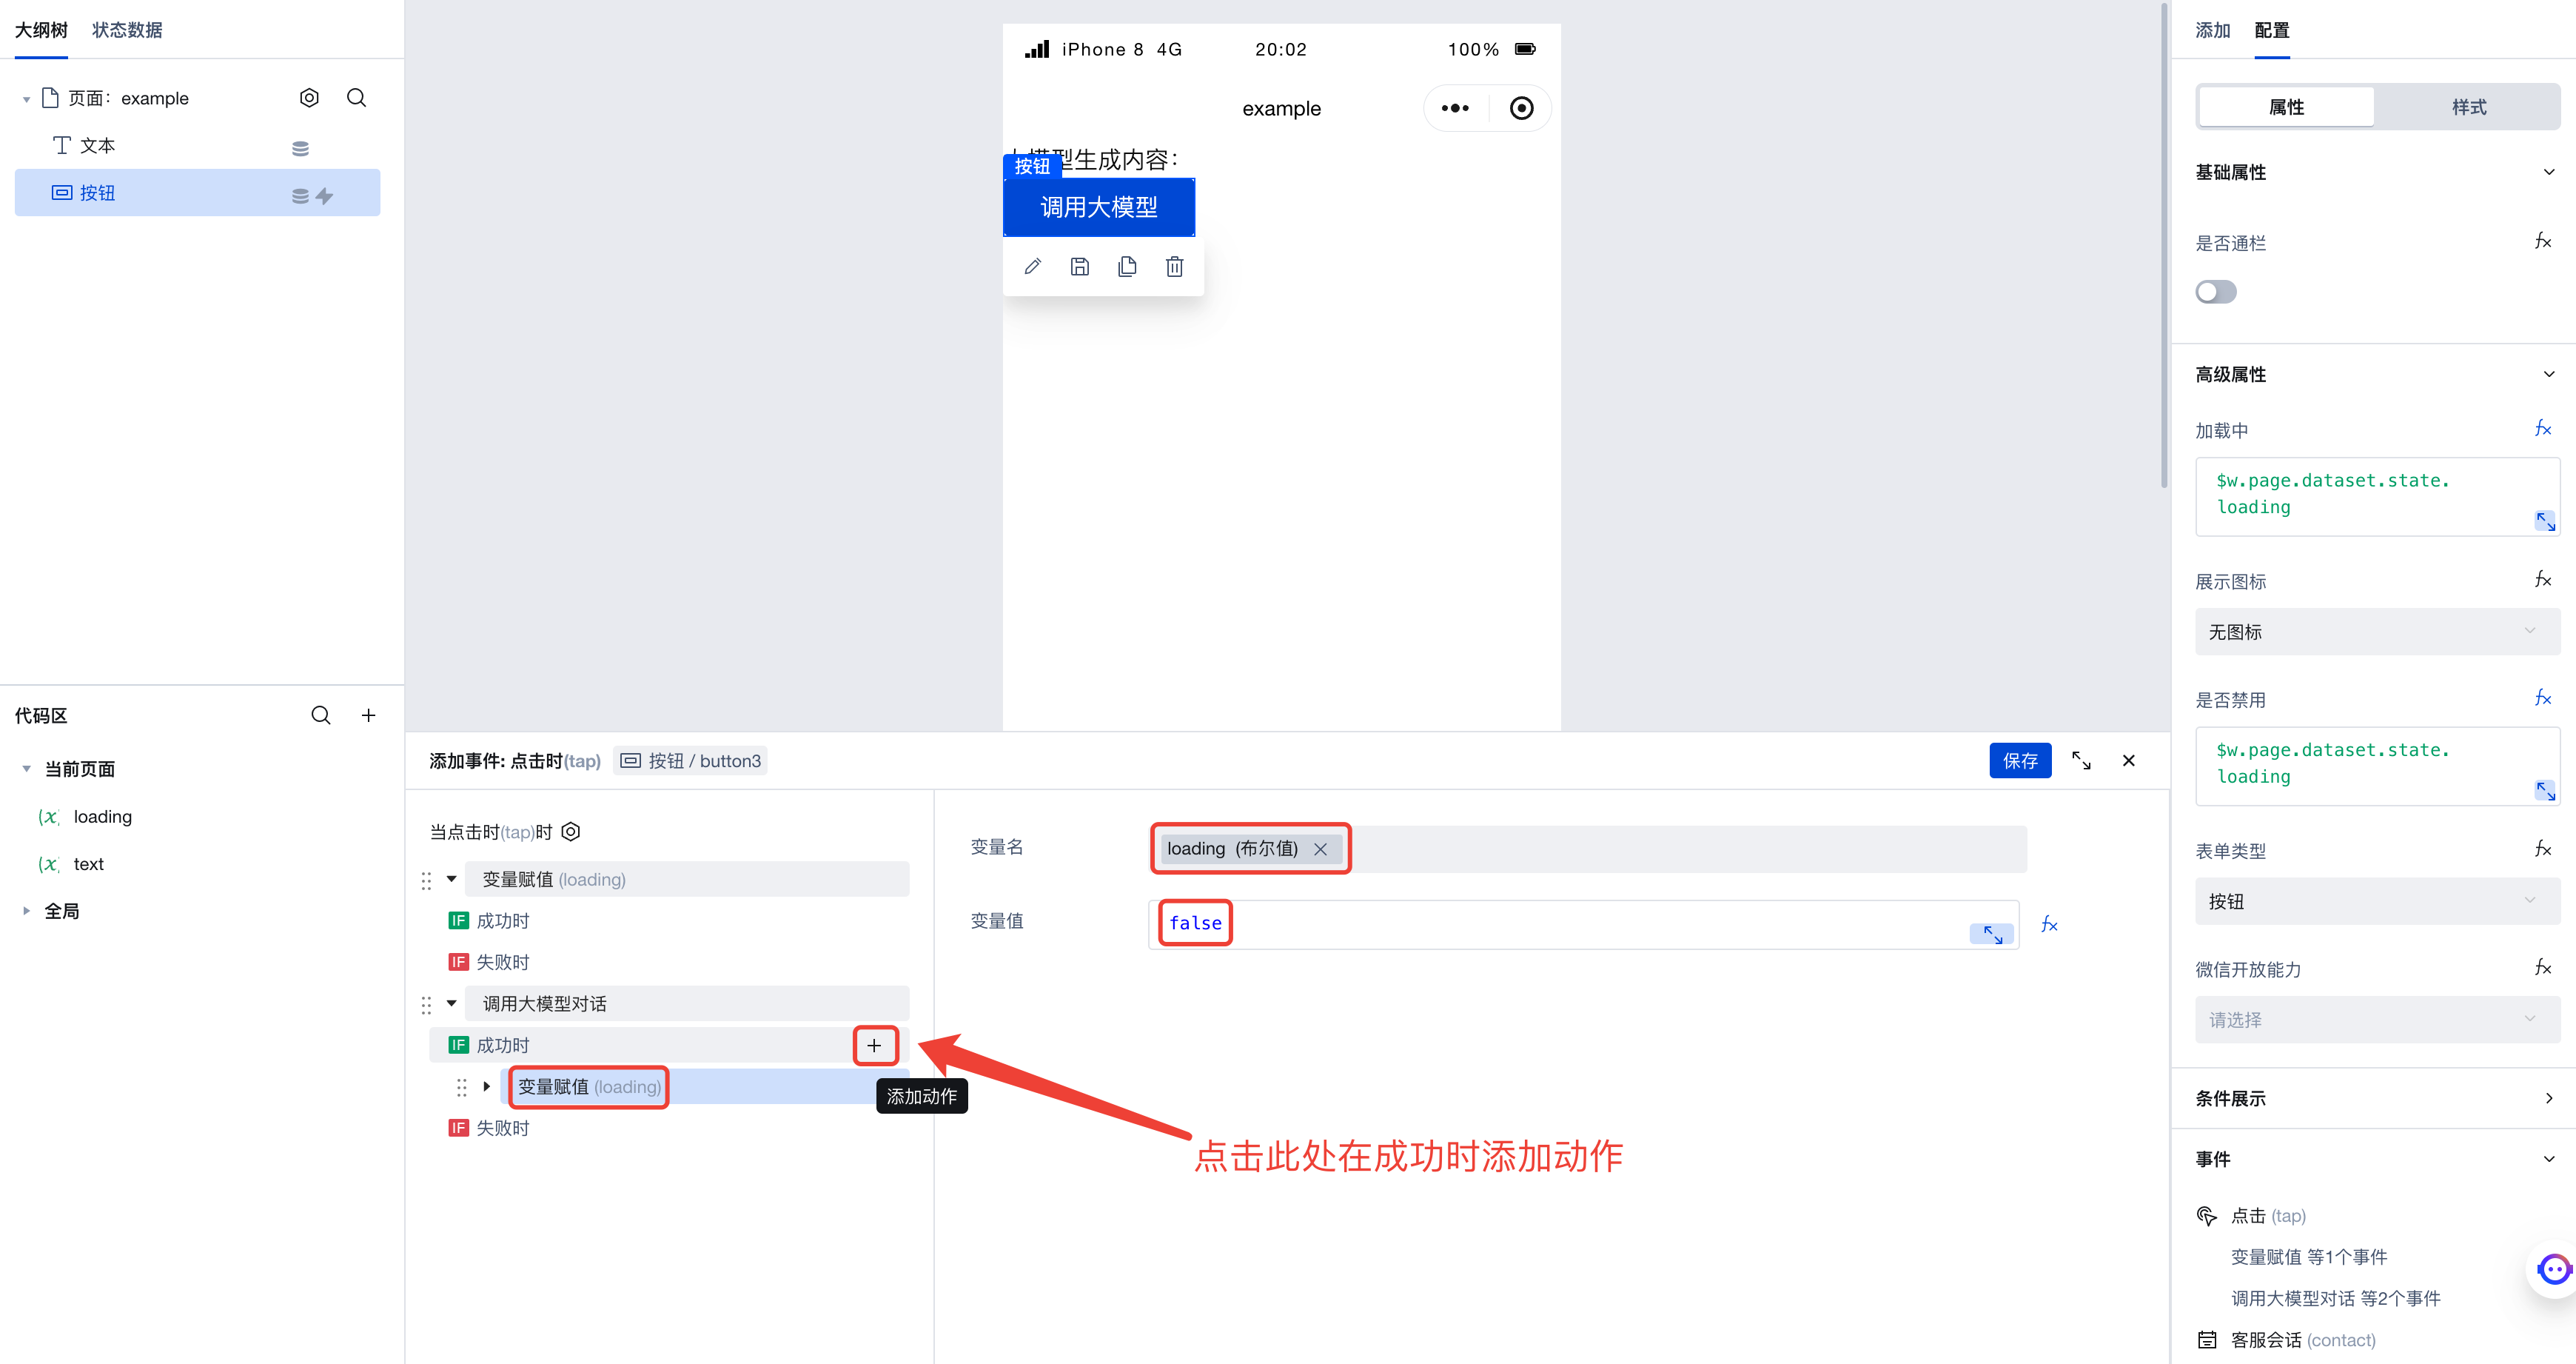
Next, when the large model is successfully invoked, add the variable assignment action. Here, we assign the value false to the loading variable:
Run the code to see that when invoking the large model, the button status becomes loading and disabled. This not only makes users aware of the request status but also prevents repeated triggering from multiple clicks. After the large model invocation completes, the button status returns to normal and becomes clickable again.

Invoking the Hunyuan Image-to-Text Capability
The Hunyuan large model possesses image-to-text capability. In the execution action of invoking the large model in WeDa, you can also pass image-related parameters to enable the large model to read images.
First, following the Usage example for large model dialog invocation, build an application capable of invoking large models. Expectedly, at this point, the page will have:
- A text component
- A button component
- A
texttext variable
The button component is bound to the action of invoking the large model; the value of the text component is bound to "Content generated by large model: " + $w.page.dataset.state.text. When the button is clicked, the large model is invoked, and the content generated by the large model appears on the page.
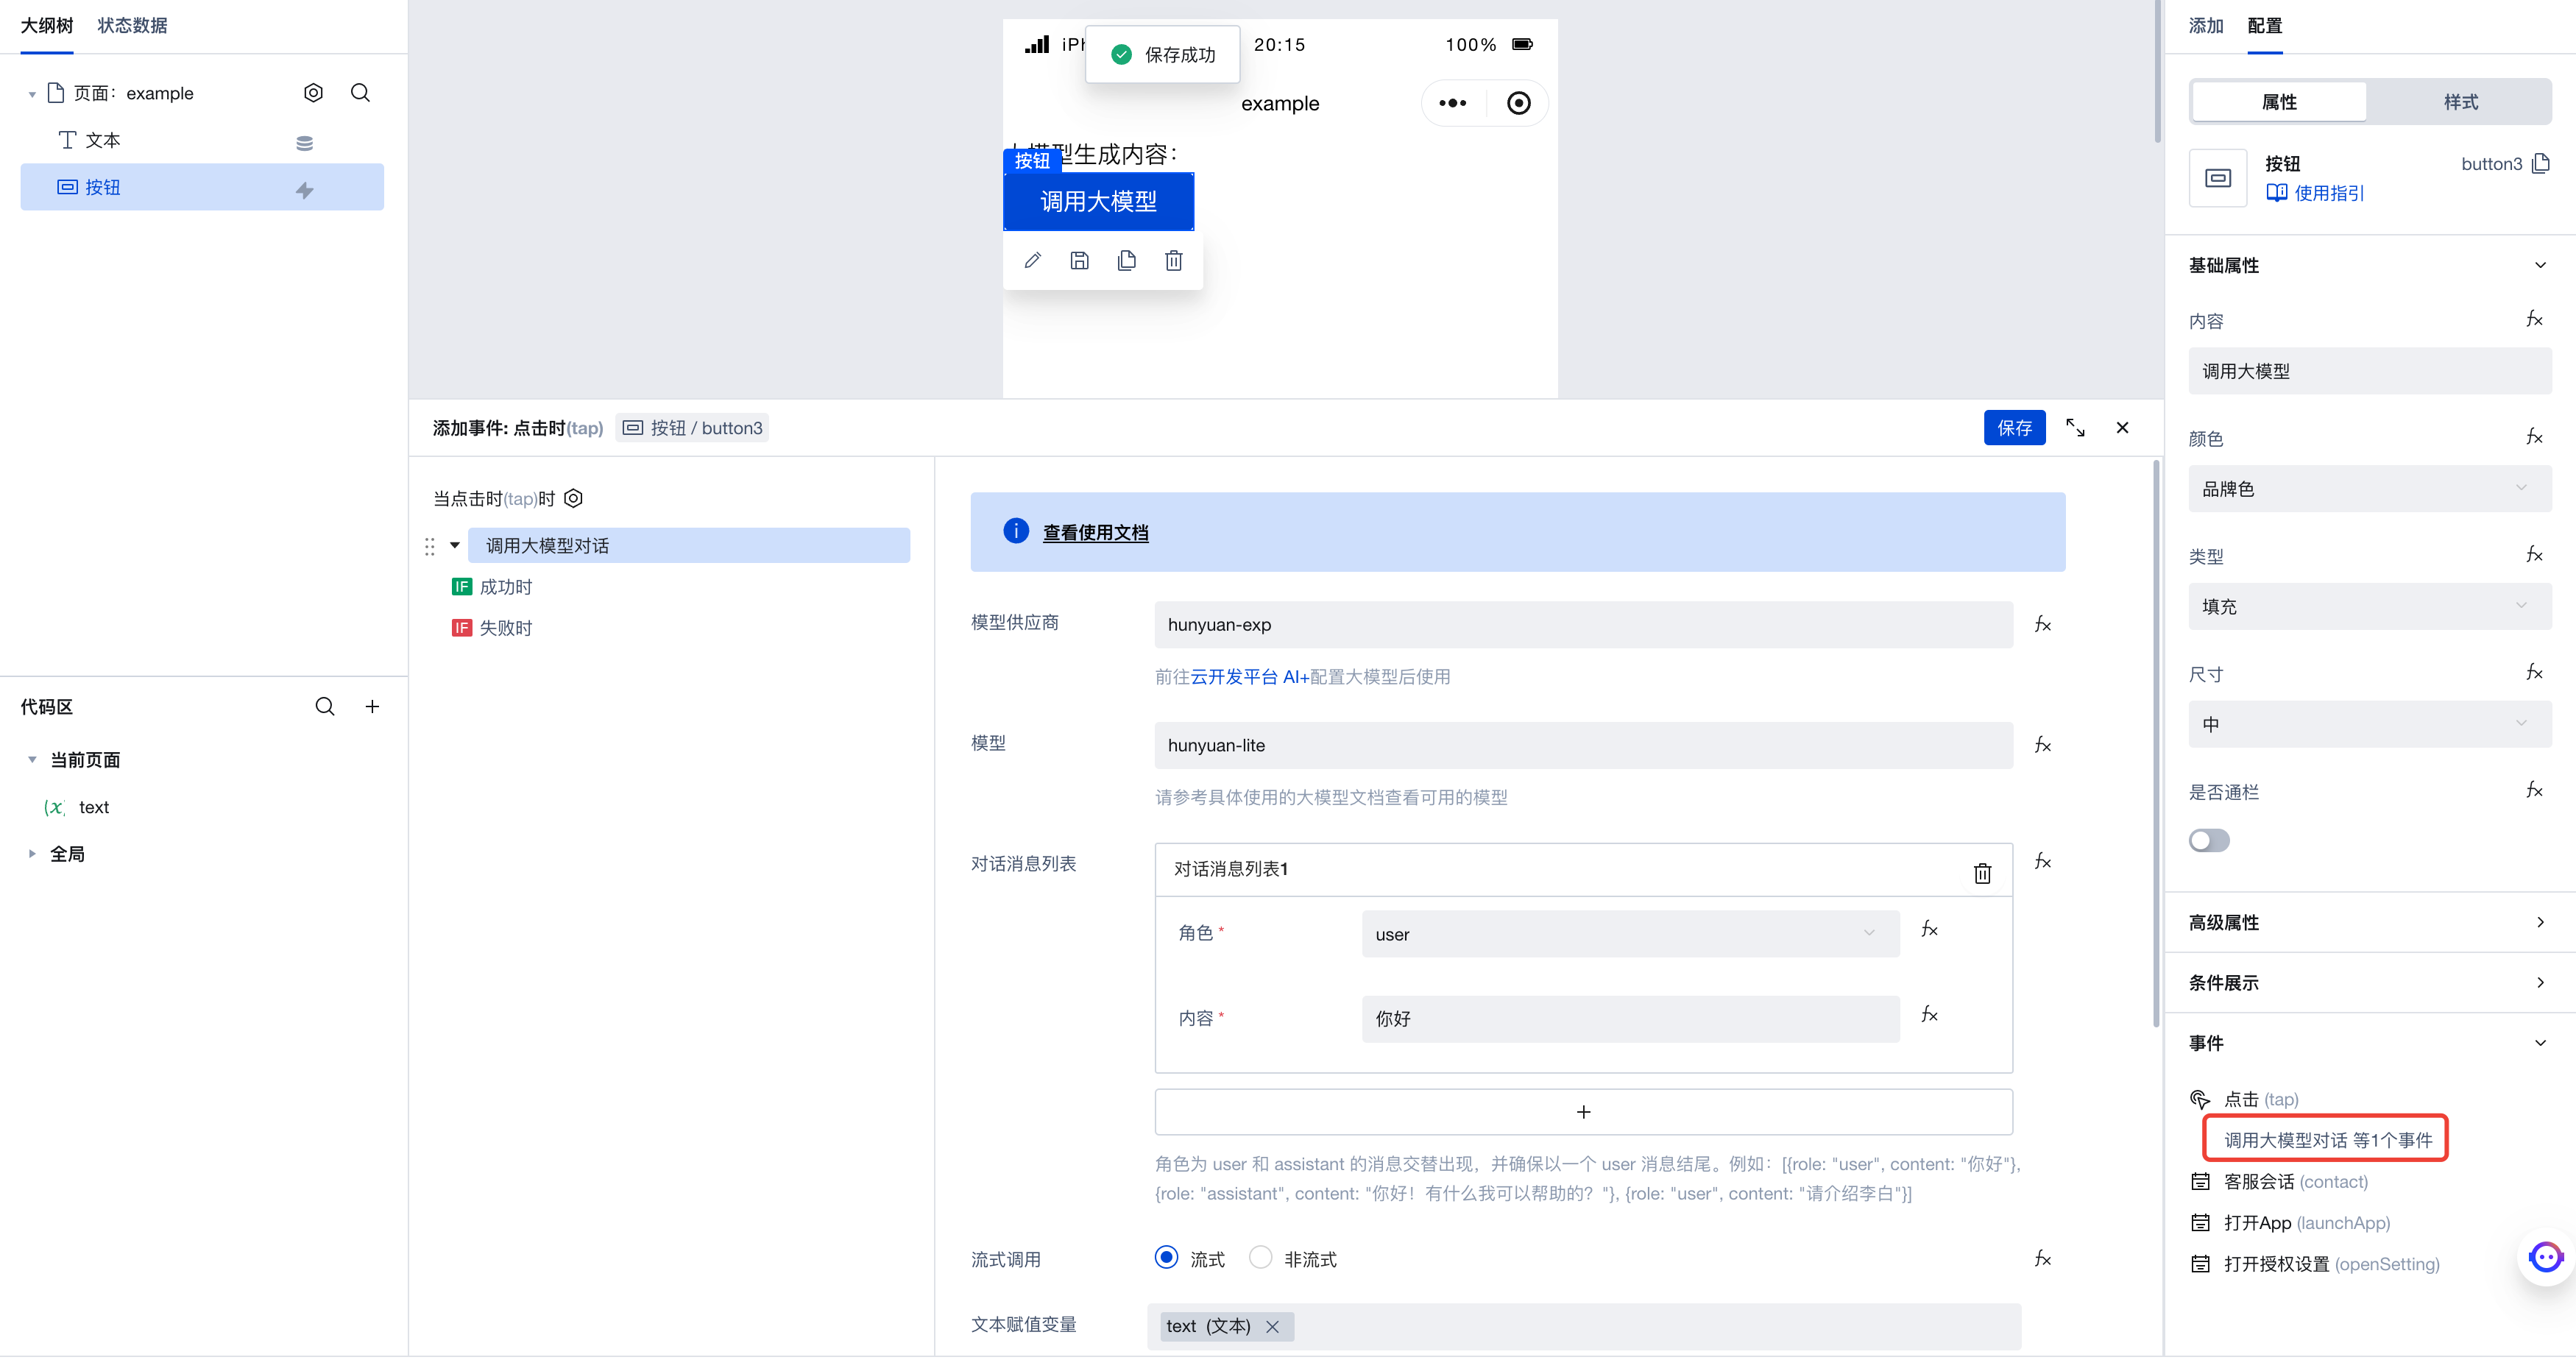
Next, let's modify the configuration of the "Invoke Large Model" action. This is the action configuration before our modification:
You can see there is no field in the form to input image content. Click the fx icon next to the "Dialog Message List" form, and you'll notice the corresponding form changes to a code expression. This is because WeDa provides a visual form that replaces code expressions. When users interact with the form, they actually modify the corresponding code expression. To leverage the large model's image-to-text capability, we need to directly enter the code expression here.
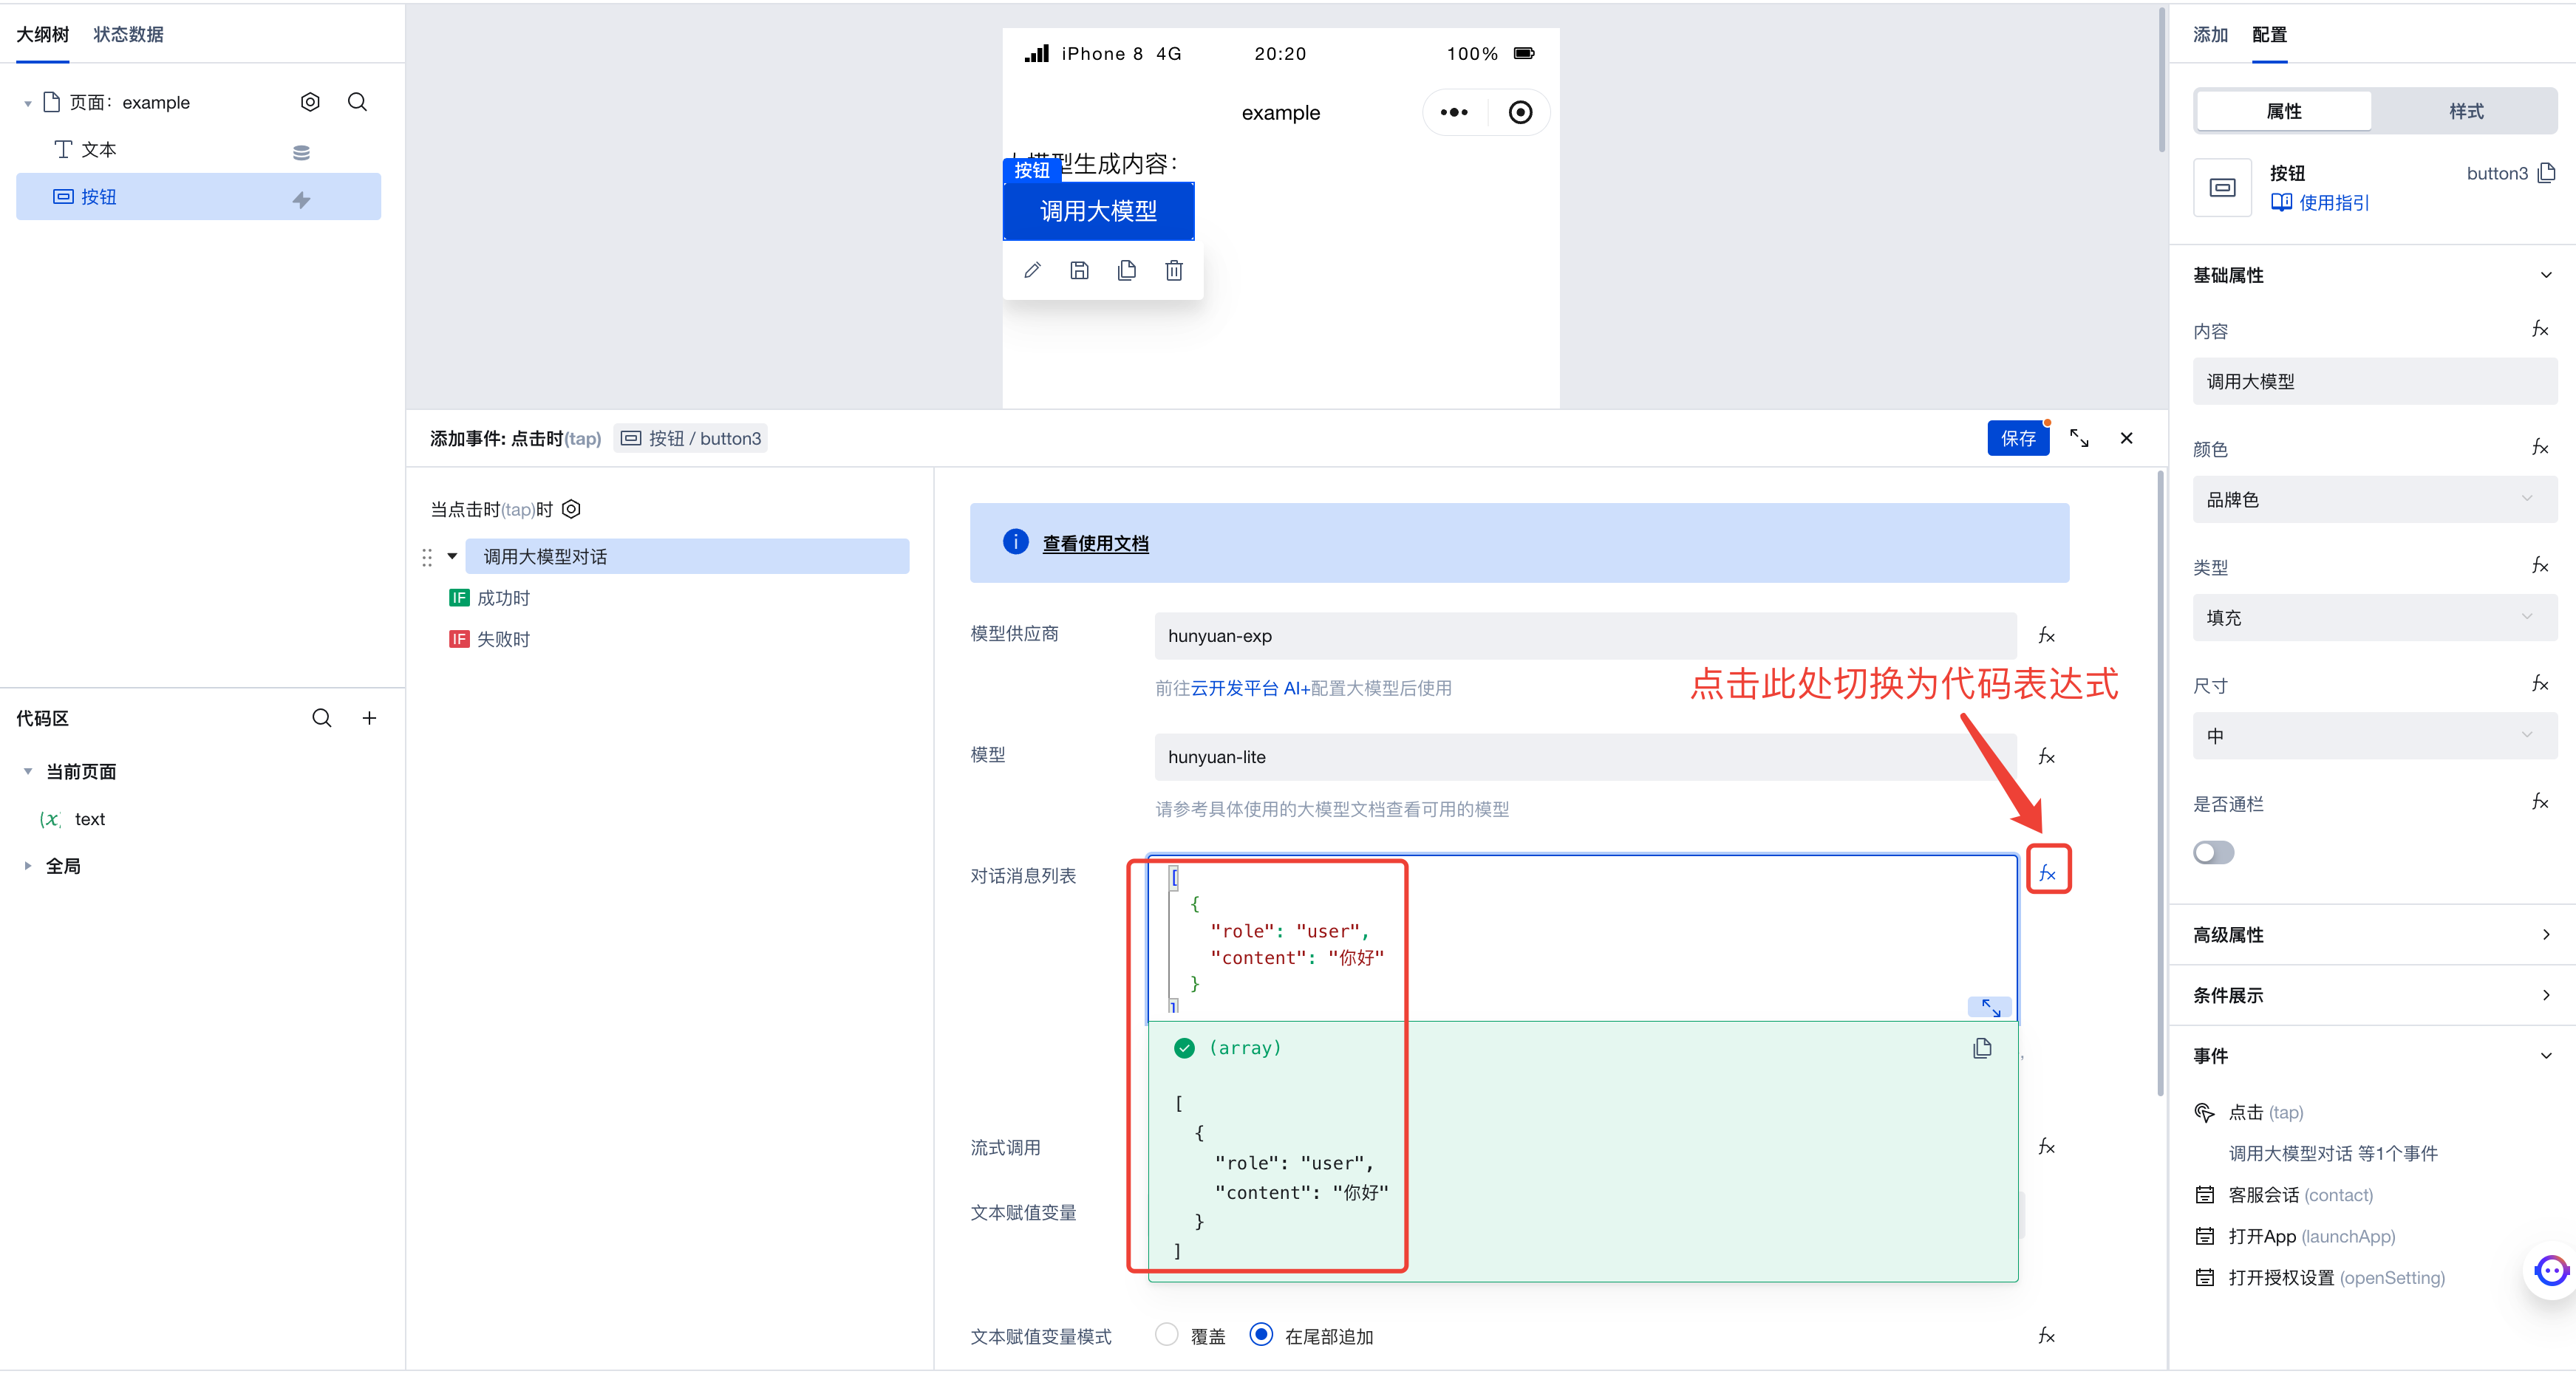
As shown in the figure, the code expression here is:
[
  {
    "role": "user",
    "content": "Hello"
  }
]
This indicates the conversation message list sent to the large model, containing only one user message with the content "Hello".
When invoking Image-to-Text Generation, the code format requires some changes. The above code should be written as:
[
  {
    "role": "user",
    "content": [
      {
        "type": "text",
        "text": "What is the content of this image?"
      }
    ]
  }
]
As can be seen, the string "Hello" originally written in the content field has now become an array containing an object element with two fields:
typeis set to"text", indicating that this element is a text-type message.textis set to"What is the content of this image?", which represents the textual content of this message.
The above describes the method for passing text messages when invoking Image-to-Text Generation. Next, we'll pass an image message by appending an object element representing an image message to the array in the content field:
[
  {
    "role": "user",
    "content": [
      {
        "type": "text",
        "text": "What is the content of this image?"
      },
      {
        "type": "image_url",
        "image_url": {
          "url": "https://cloudcache.tencent-cloud.com/qcloud/ui/portal-set/build/About/images/bg-product-series_87d.png"
        }
      }
    ]
  }
]
This object element also has two fields:
typeis set to"image_url", indicating that this element is an image URL.image_urlis set to an object containing aurlfield, which represents the image URL for this message.
At this point, the setup is complete. By using this format, you can pass images and invoke the large model's image-to-text capability.
Finally, simply select a model with image-to-text capabilities; here we choose hunyuan-vision.

Run the code to see the large model's interpretation of the image we passed.