Guide to Accessing TCB AI Capabilities for Mini Programs
TCB AI provides access capabilities for large models and Agents, helping developers quickly integrate AI capabilities in scenarios such as mini programs, web, WeChat official accounts, and WeChat Customer Service.
Limited-time offer: Claim 100 million Hunyuan Tokens. Check the AI Mini Program Growth Plan
This article introduces how Mini Programs can quickly access TCB AI capabilities.
Preparations
- Register a WeChat Mini Program account and create a local Mini Program project
- The Mini Program core library requires version 3.7.1 or later, which includes the
wx.cloud.extend.AIobject. - The Mini Program needs to activate TCB.
- Limited-time offer: Claim a 6-month TCB individual edition package and 100 million Hunyuan Tokens for free. Check the AI Mini Program Growth Plan
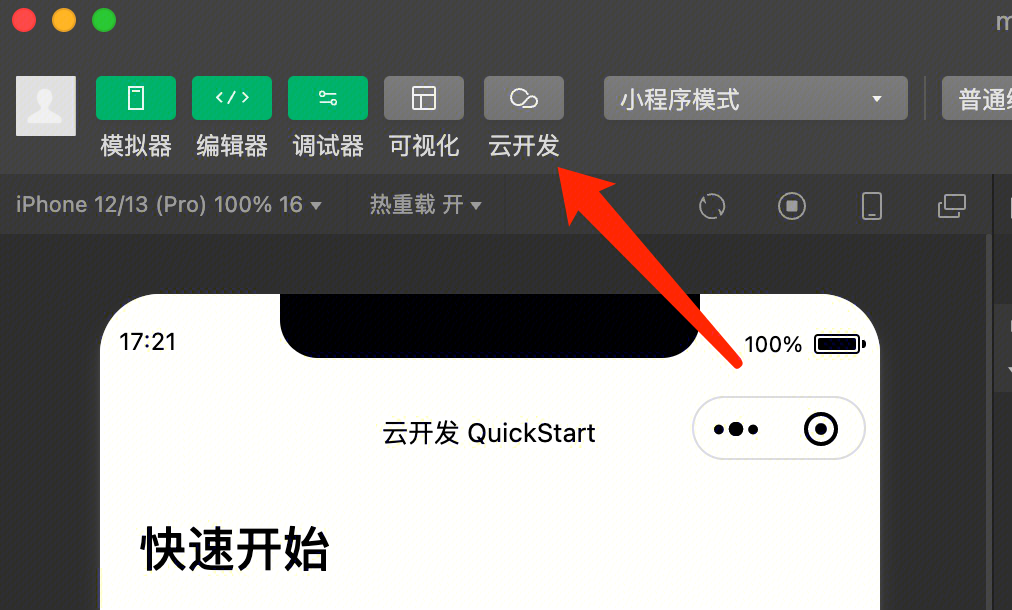
- If you are not eligible for the campaign, click the "TCB" button in the toolbar of the Mini Program development tools to activate and create an environment (PS: For first-time TCB users, we offer a Free Trial Campaign):
Guide 1: Calling Large Models for Text Generation
In Mini Programs, directly call the large model text generation capabilities to achieve the simplest text generation. Here we take a simple Demo of a "Qiyan Jueju" generator as an example:
Step 1: Initialize the TCB Environment
In the Mini Program code, initialize the TCB environment with the following code:
wx.cloud.init({
  env: "<TCB Environment ID>",
});
Replace "<TCB Environment ID>" with your actual TCB environment ID. After successful initialization, you can invoke AI capabilities using wx.cloud.extend.AI.
Step 2: Create an AI Model and Invoke Text Generation
In the Mini Program core library version 3.7.1 and above, taking the invocation of the hunyuan-turbos-latest model as an example, the code on the Mini Program side is as follows:
// Create a model instance, here we use the DeepSeek large model
const model = wx.cloud.extend.AI.createModel("hunyuan-exp");

// First, we set up the AI system prompt, using Qiyan Jueju generation as an example
const systemPrompt =
  "Please strictly adhere to the metrical requirements of heptasyllabic quatrains or heptasyllabic regulated verses. Tonal patterns must conform to the rules, rhymes should be harmonious and natural, and rhyming words must belong to the same rhyme group. Create content centered around the user-given theme. A heptasyllabic quatrain consists of four lines with seven characters each; a heptasyllabic regulated verse has eight lines of seven characters each, with the third and fourth couplets requiring strict parallelism. Simultaneously, incorporate vivid imagery, rich emotions, and elegant artistic conception to showcase the charm and beauty of classical poetry.";

// User's natural language input, such as 'Help me write a poem praising the Jade Dragon Snow Mountain'
const userInput = "Help me write a poem praising the Jade Dragon Snow Mountain";

// Pass the system prompt and user input to the large model
const res = await model.streamText({
  data: {
    model: "hunyuan-turbos-latest", // Specify the specific model
    messages: [
      { role: "system", content: systemPrompt },
      { role: "user", content: userInput },
    ],
  },
});

// Receive the large model's response
// Since the large model's response is streamed, we need to loop to receive the complete response text here.
for await (let str of res.textStream) {
  console.log(str);
}
// Output result:
// "# Ode to the Jade Dragon Snow Mountain\n"
// "Snow-capped peaks pierce the clouded skies;\nJade bones and icy skin, proud in heaven's eyes.\n"
// "Snow shadows and mountain haze enhance the fine scene;\nThe divine mountain's sacred realm, its rhyme flows endlessly.\n"
It is evident that only a few lines of Mini Program code are needed to directly call the text generation capabilities of large models via TCB.
Guidance II: Implementing Intelligent Conversations via Agent (Intelligent Agent)
By calling the large model's text generation interface, simple Q&A scenarios can be quickly implemented. However, for a complete conversational feature, merely having the large model's input and output is insufficient. The large model needs to be transformed into a complete Agent to better engage in dialogue with users.
TCB's AI capabilities not only provide access to raw large models but also offer Agent integration. Developers can define their own Agents on TCB and then invoke the Agent for conversation directly via mini programs.
Step 1: Initialize the TCB Environment
In the Mini Program code, initialize the TCB environment with the following code:
wx.cloud.init({
  env: "<TCB Environment ID>",
});
Replace "<TCB Environment ID>" with your actual TCB environment ID. After successful initialization, you can invoke AI capabilities using wx.cloud.extend.AI.
Step 2: Create an Agent
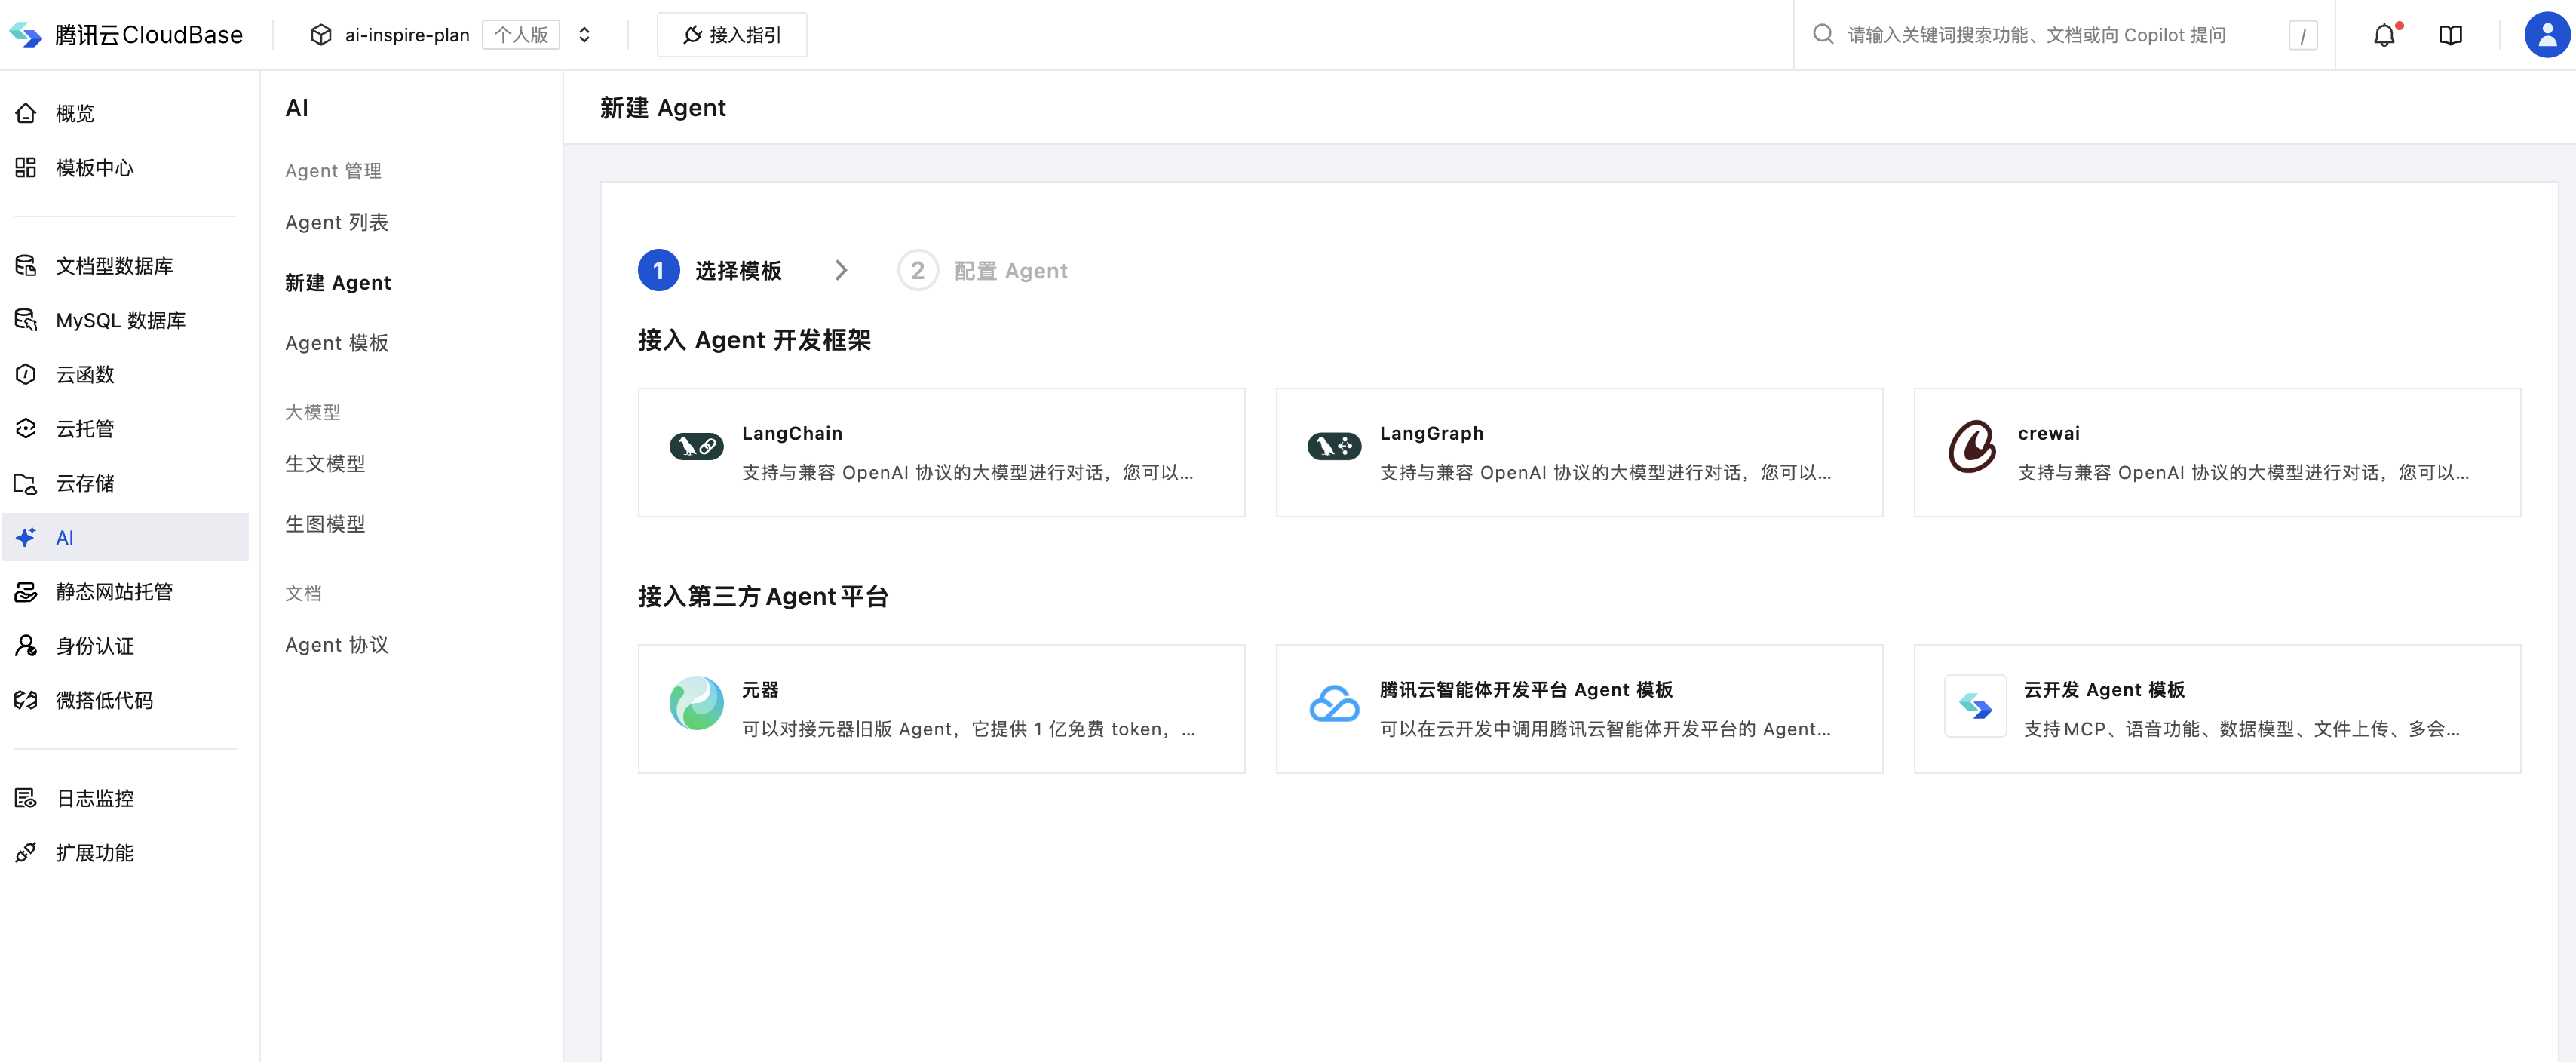
Go to TCB - AI, select a template and create an Agent.
You can create Agents using open-source frameworks such as LangChain and LangGraph, or integrate with third-party Agents like Yuanqi, Intelligent Agent Development Platform, and Dify.
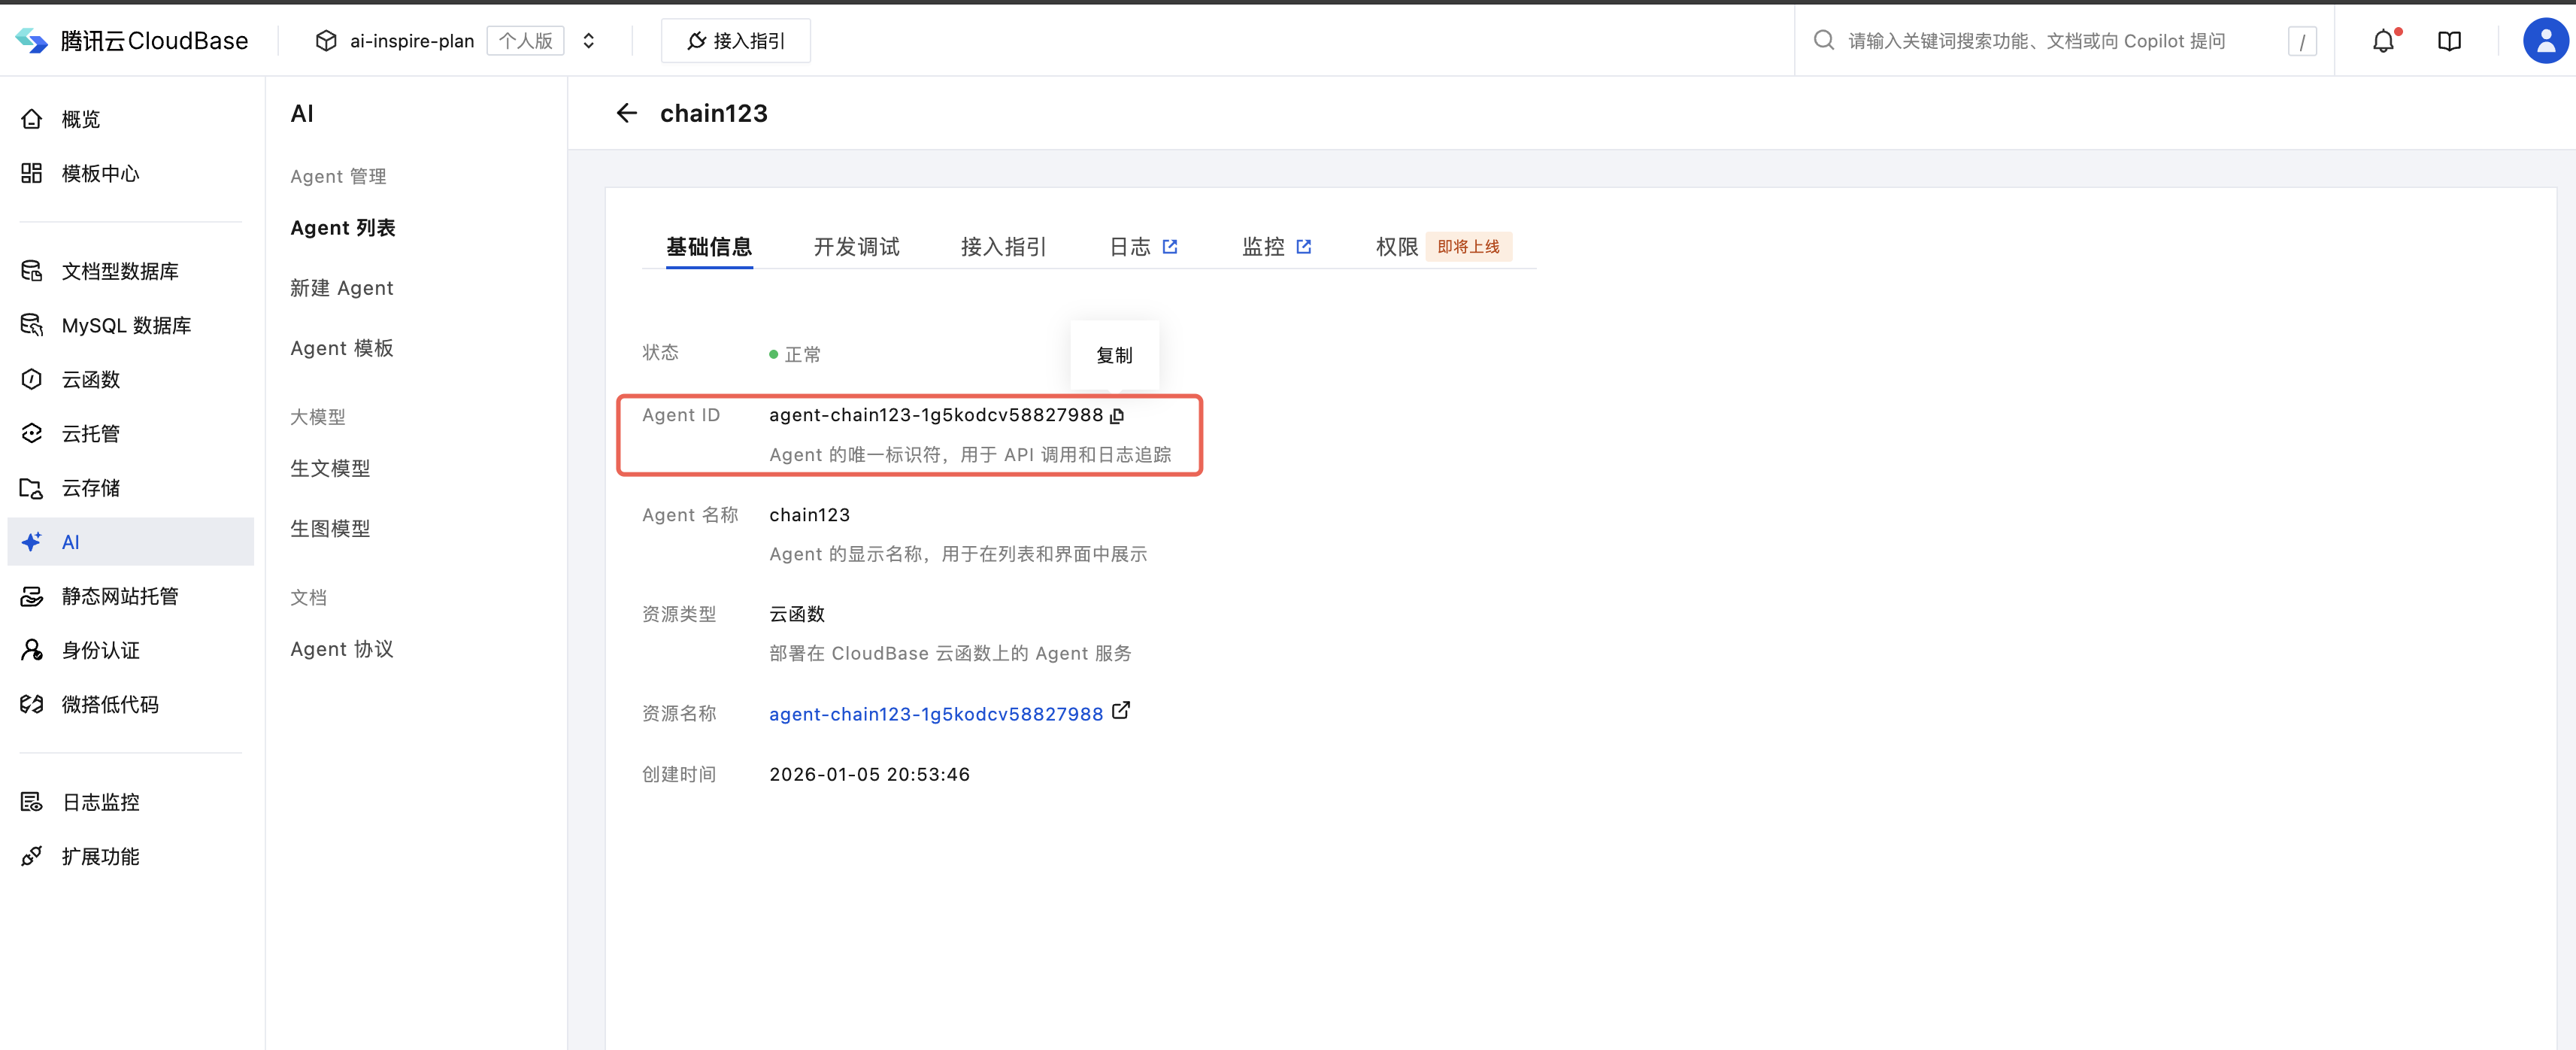
Copy the AgentID from the page, which is the unique identifier of the Agent, to be used in the following code.
Step 3: Implement Conversation with the Agent in the Mini Program
We just created a "Mini Program Development Expert" Agent. Let's try having a conversation with it to see if it can handle common TCB error issues. In the Mini Program, use the following code to directly invoke the Agent we just created for conversation:
// Initialize
wx.cloud.init({
  env: "<TCB Environment ID>",
});

// User input, here we take a specific error message as an example.
const userInput =
  "What does this error in my mini-program mean: FunctionName parameter could not be found";

const res = await wx.cloud.extend.AI.bot.sendMessage({
  data: {
    "botId": "<AgentID>", // Agent unique identifier obtained in Step 2
    "threadId": "550e8400-e29b-41d4-a716-446655440000",
    "runId": "run_001",
    "messages": [
      { "id": "msg-1", "role": "user", "content": "Hello" }
    ],
    "tools": [],
    "context": [],
    "state": {}
  },
});
for await (let x of res.textStream) {
  console.log(x);
}
// Output result:
// "### Error Explanation\n"
// "**Error Message:** `FunctionName \n"
// "parameter could not be found` \n
// "This error usually indicates that when calling a certain function,\n"
// "The specified function name parameter was not found. Specifically,\n"
// "It may be one of the following situations:\n"
// ...
We can also record the conversation content and place it in the message array, repeatedly calling the Agent's interface to enable multi-turn conversations.
const res = await wx.cloud.extend.AI.bot.sendMessage({
  data: {
    "botId": "<AgentID>", // Agent unique identifier obtained in Step 2
    "threadId": "550e8400-e29b-41d4-a716-446655440000",
    "runId": "run_001",
    "messages": [
      { "id": "msg-1", "role": "user", "content": "Hello" },
      { "id": "msg-1", "role": "user", "content": "Okay, how can I help you?" }
    ],
    "tools": [],
    "context": [],
    "state": {}
  },
});
Guide 3: Using the TCB AI Chat Component to Quickly Access AI Chat
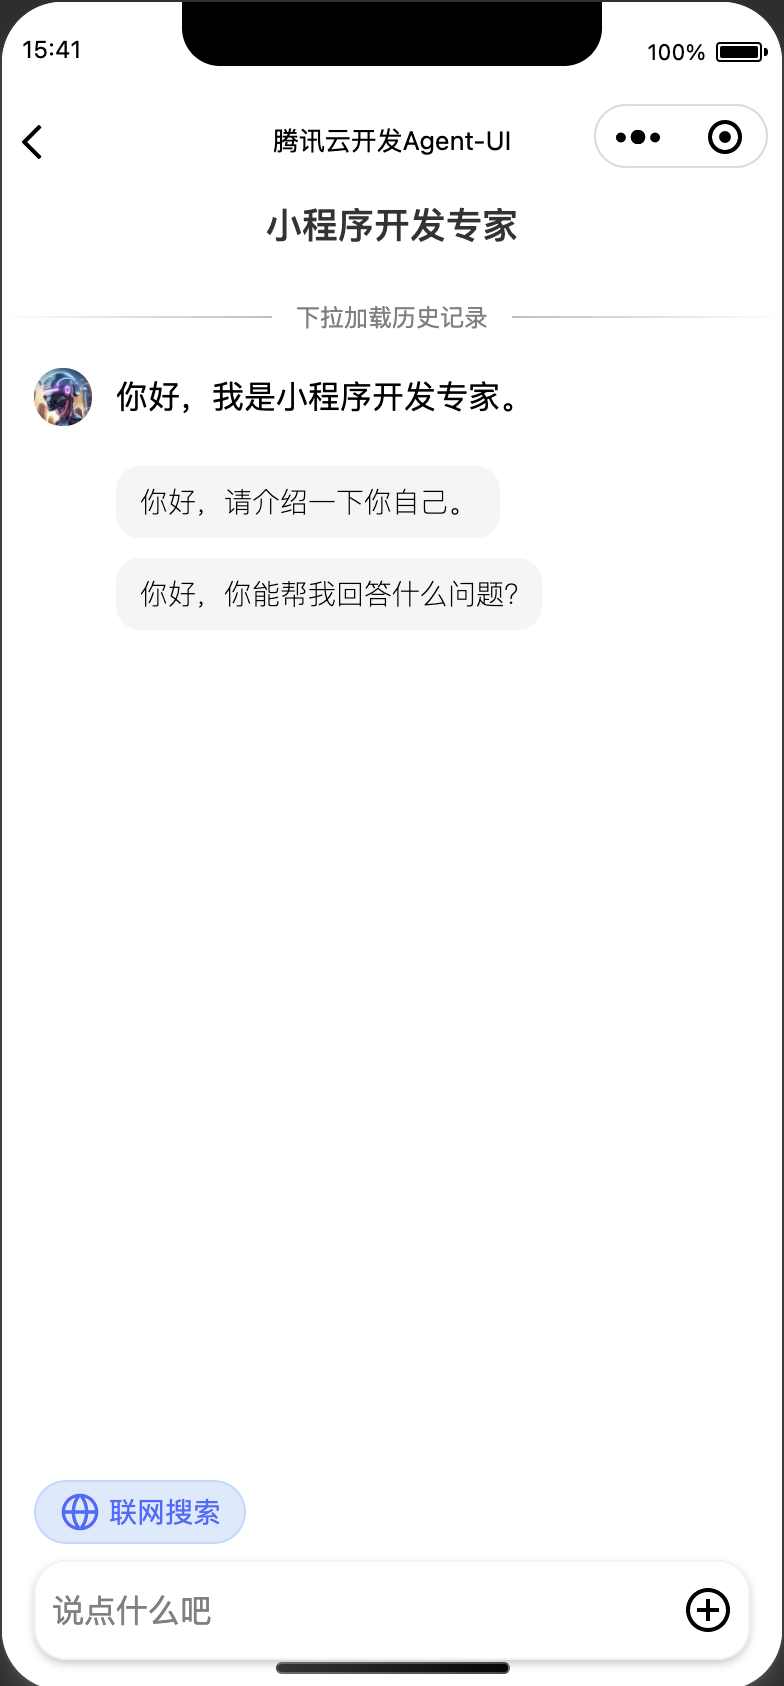
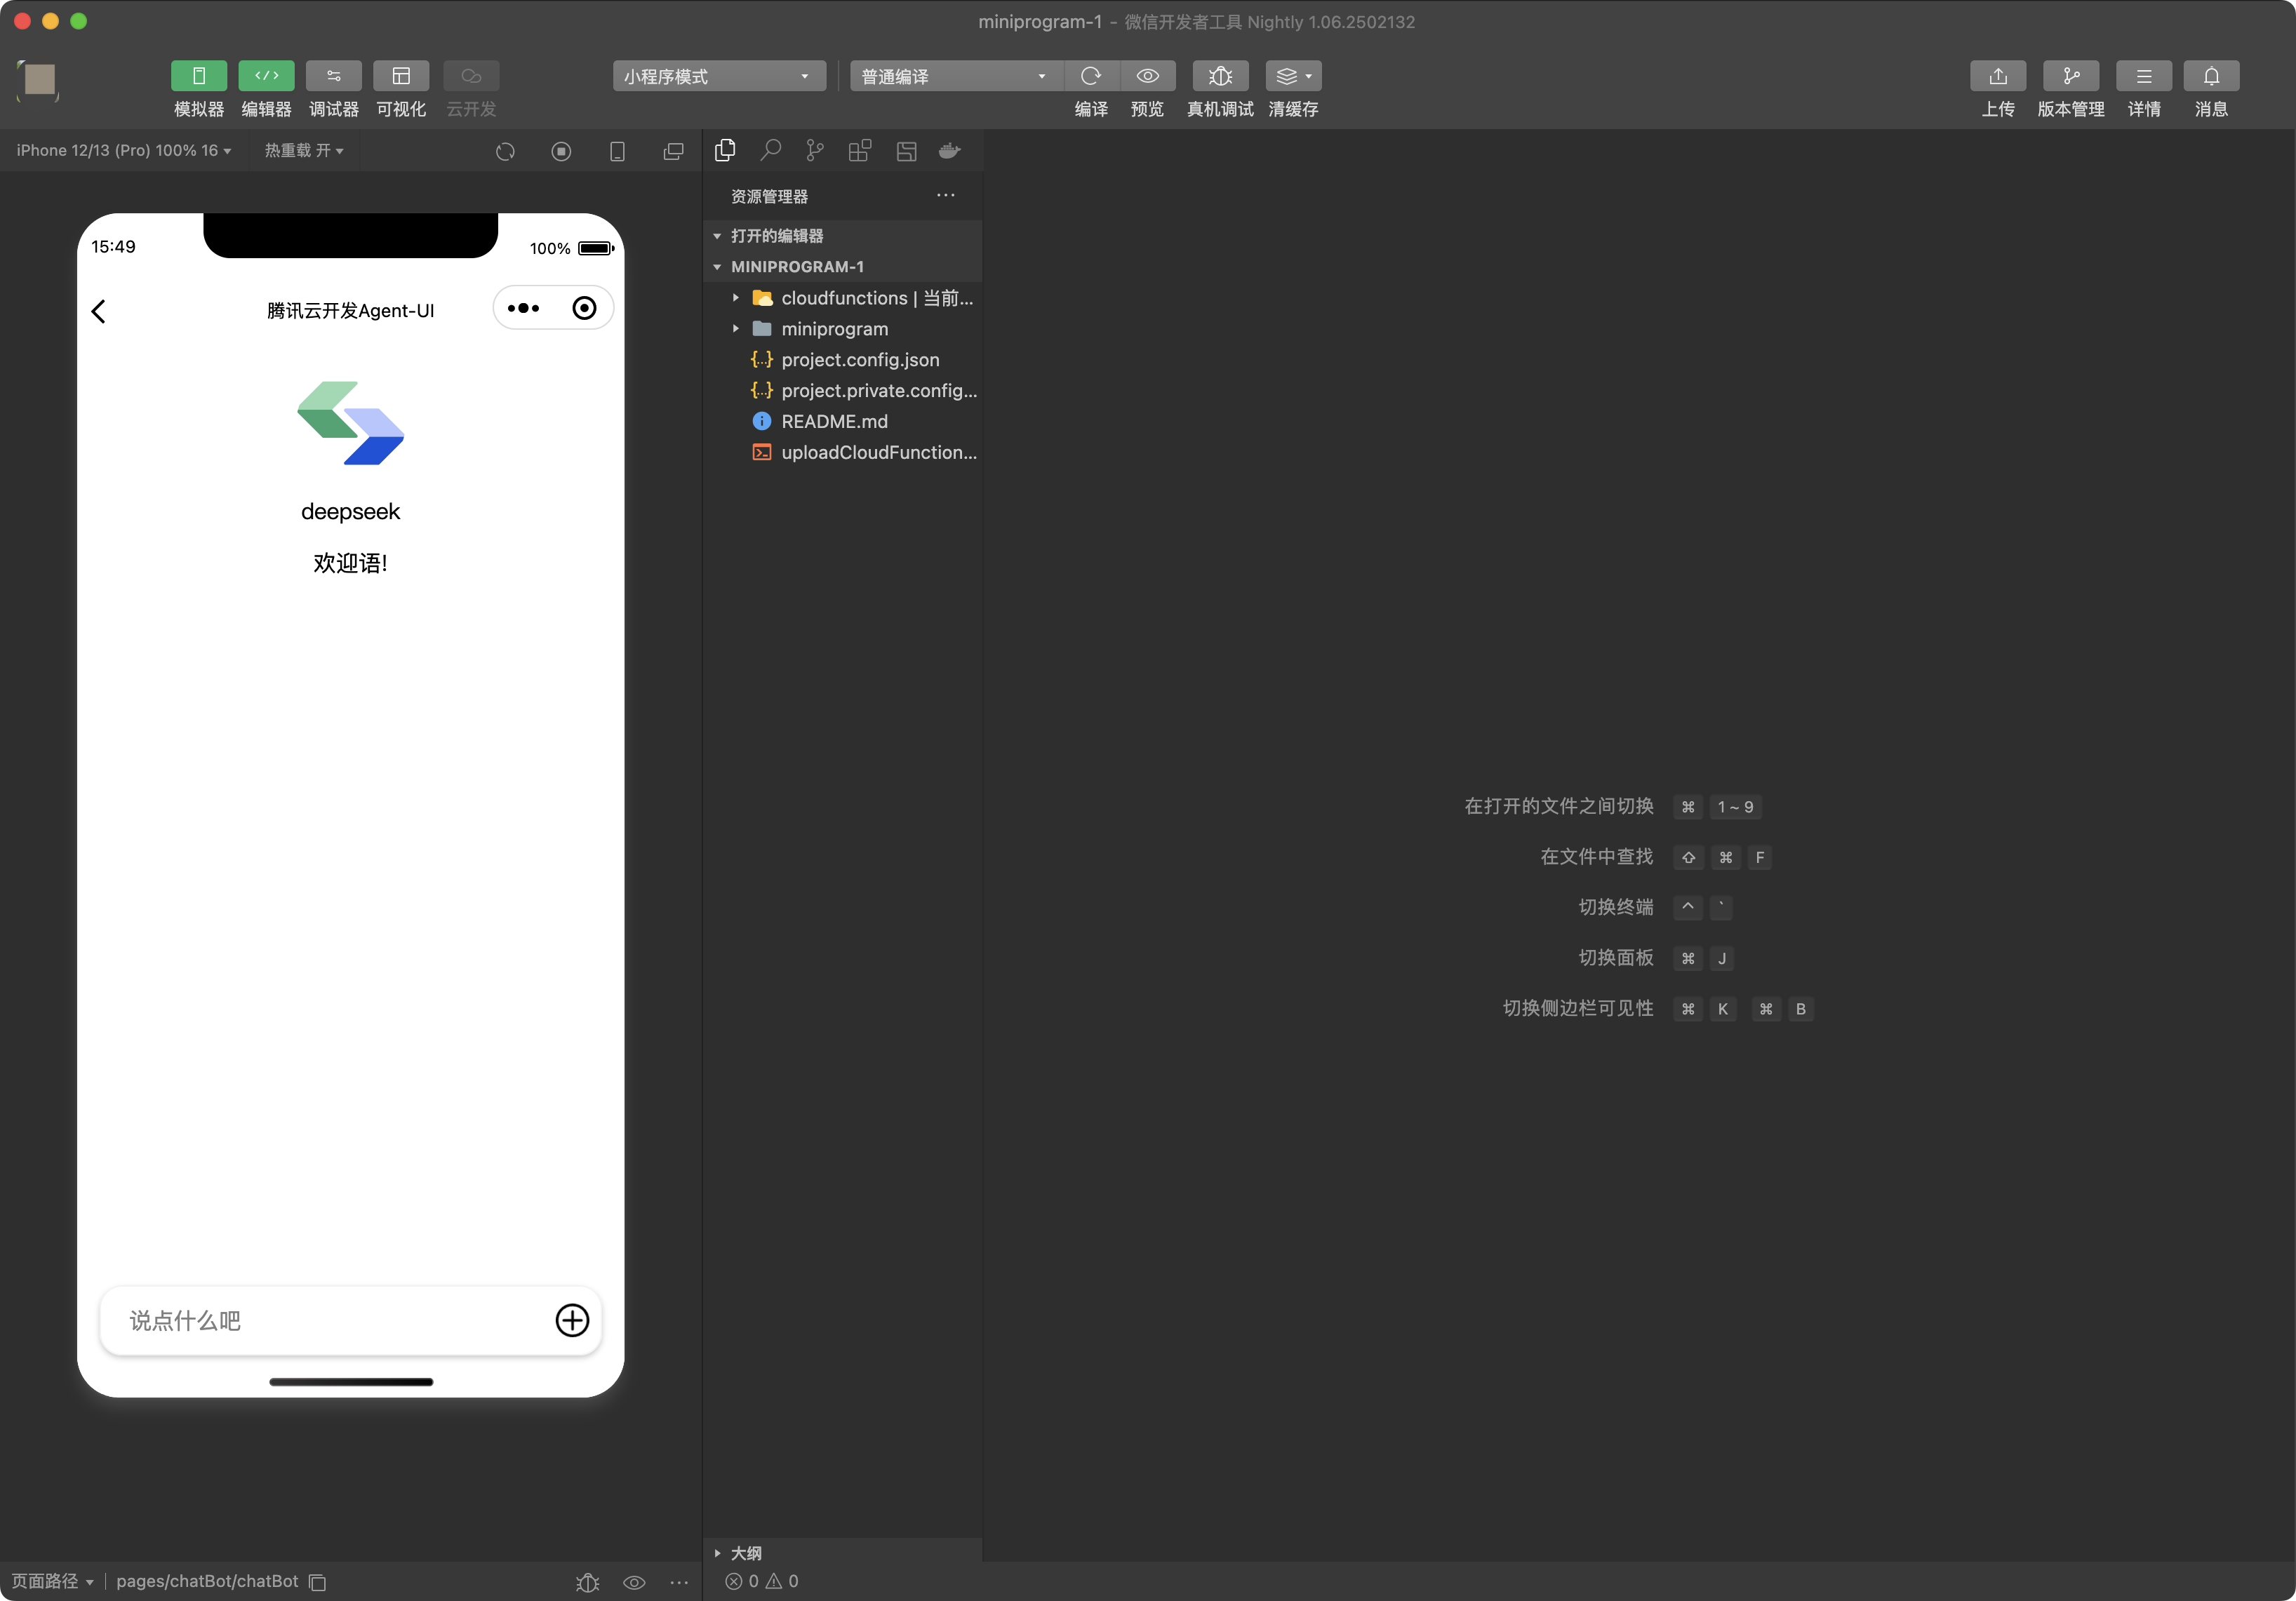
To help developers quickly implement the AI chat feature in their Mini Programs, TCB provides a source code component for AI chat that developers can use directly, as shown in the figure below:
Step 1: Download the Component Package
Method 1: Directly download the component sample package, which includes the agent-ui source code component and usage instructions
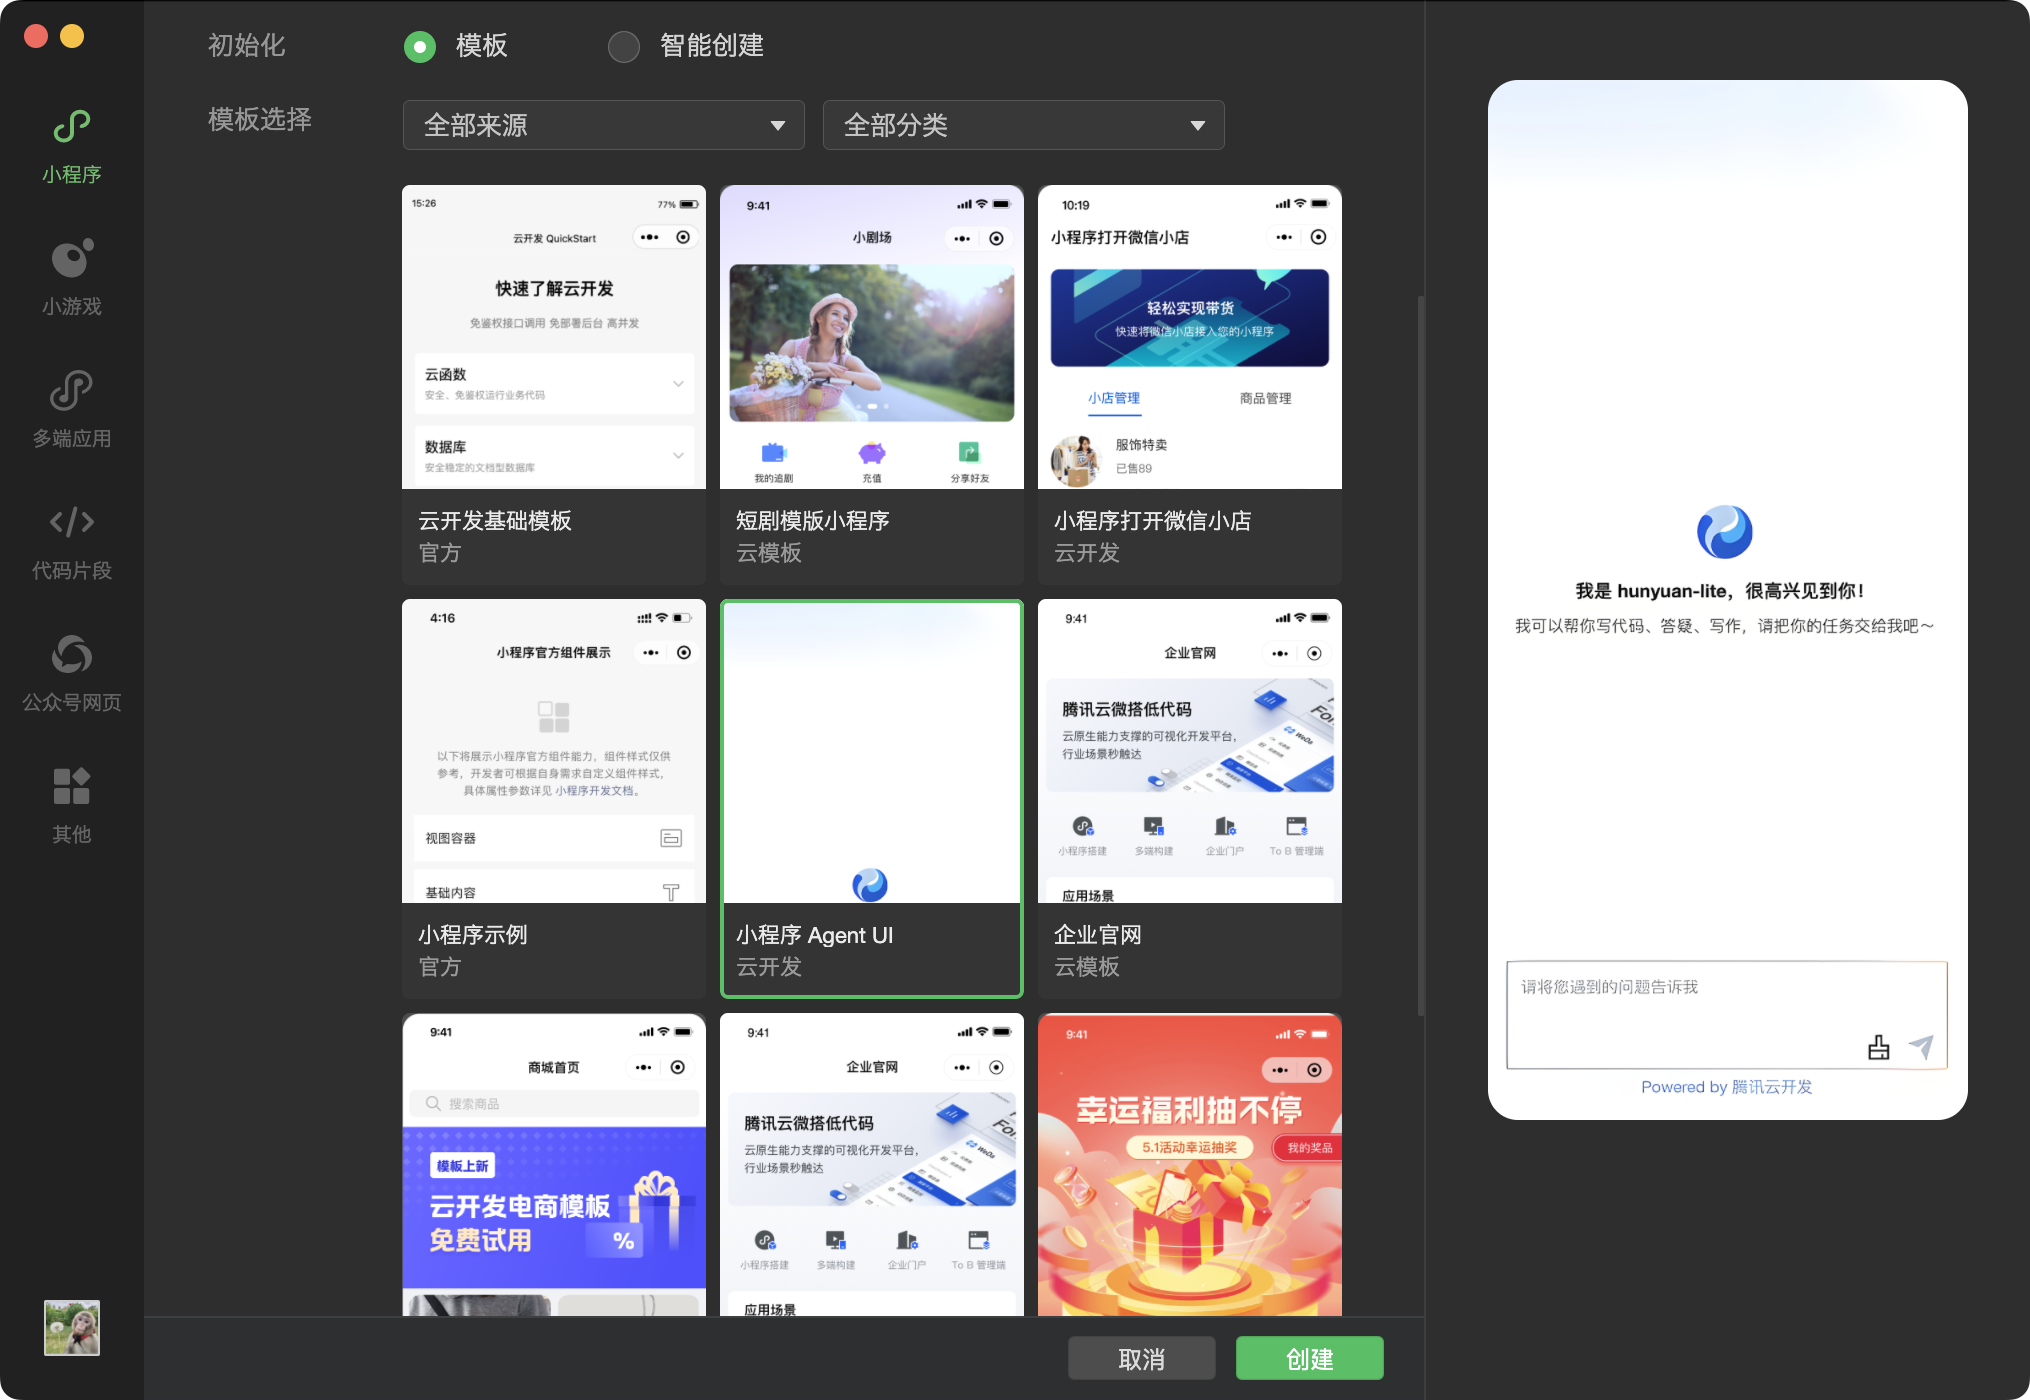
Method 2: Create an agent-ui component template via WeChat Developer Tools and configure it according to the instructions for use
Step 2: Import the Component into Your Mini Program Project
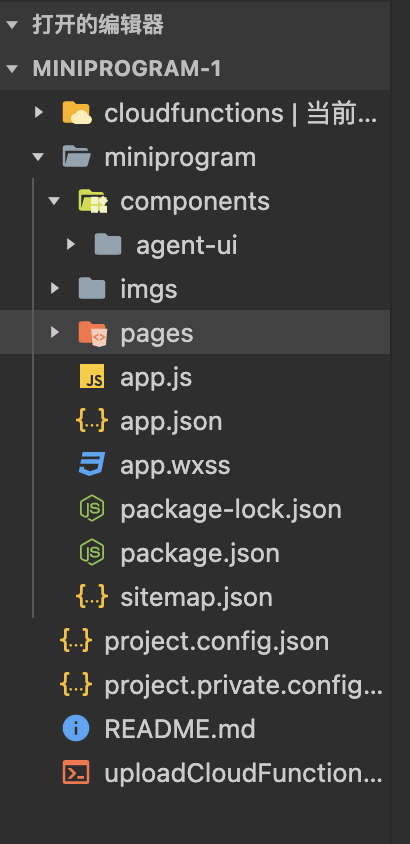
- Copy the miniprogram/components/agent-ui component into the Mini Program
- Register the component in the page index.json configuration file
{
  "usingComponents": {
    "agent-ui":"/components/agent-ui/index"
  },
}
- Use the component in the page index.wxml file
<view>
  <agent-ui agentConfig="{{agentConfig}}" showBotAvatar="{{showBotAvatar}}" chatMode="{{chatMode}}" modelConfig="{{modelConfig}}"></agent-ui>
</view>
- Write the configuration in the page index.js file
Connect Agent:
 data: {
    chatMode: "bot", // "bot" indicates using the agent, "model" indicates using the large model
    showBotAvatar: true, // whether to display the avatar on the left side of the dialog box
    agentConfig: {
      botId: "bot-e7d1e736", // agent id,
      allowWebSearch: true, // allow the client to enable web search
      allowUploadFile: true, // allow file upload
      allowPullRefresh: true, // allow pull-to-refresh
      allowUploadImage: true // allow image upload
      showToolCallDetail: true, // whether to show tool call details
      allowMultiConversation: true, // whether to display the conversation list and show the create conversation button
    }
  }
Integrate with large models:
  data: {
    chatMode: "model", // "bot" indicates using the agent, "model" indicates using the large model
    showBotAvatar: true, // whether to display the avatar on the left side of the dialog box
    modelConfig: {
      modelProvider: "hunyuan-open", // large model service provider
      quickResponseModel: "hunyuan-lite", // large model name
      logo: "", // model avatar
      welcomeMsg: "Welcome message", // model's welcome message
    },
  }
Step 3: Initialize the TCB Environment
In app.js, initialize the sdk within the onLaunch lifecycle.
   // app.js
   App({
     onLaunch: function () {
       wx.cloud.init({
         env: "<TCB Environment ID>",
       });
     },
   });
Then, you can directly use the AI chat component on the page:
Summary
This article introduces the following three approaches to integrating large models via TCB, each applicable to different scenarios:
- Directly call the large model via SDK: Suitable for general non-conversational scenarios such as text generation, intelligent completion, intelligent translation, etc.
- Call the Agent (intelligent agent) conversation capability via SDK: This approach is suitable for dedicated AI conversation scenarios, supporting the configuration of welcome messages, prompts, knowledge bases, and other capabilities required in conversations.
- Use the AI chat component: This approach is more friendly to professional frontend developers, allowing rapid integration of AI conversation capabilities into Mini Programs based on UI components provided by TCB.
The above three approaches for Mini Programs to access AI capabilities are provided by TCB with complete code samples in the code repository for reference:
- Gitee:https://gitee.com/TencentCloudBase/cloudbase-ai-example
- Github:https://github.com/TencentCloudBase/cloudbase-ai-example
Of course, not only Mini Programs, but TCB's AI capabilities also support invoking large models via Web applications, Node.js, and HTTP APIs. You can refer to the following documentation:
- Web application integration: https://docs.cloudbase.net/ai/sdk-reference/init
- Node.js integration: https://docs.cloudbase.net/ai/sdk-reference/init
- HTTP API integration: https://docs.cloudbase.net/http-api/ai-bot/ai-agent-%E6%8E%A5%E5%85%A5
Unlock more AI core capabilities of TCB. Click to view the Quick Guide
In the future, TCB plans to launch more AI capabilities such as Tool Calling (tool invocation), multi-Agent chaining, workflow orchestration, etc. Stay tuned for updates. You can visit the following content to obtain more information:
- Tencent Cloud TCB homepage: https://tcb.cloud.tencent.com/
- TCB official documentation: https://docs.cloudbase.net/
- TCB Agent Capabilities User Communication Group:
