Developing with OpenClaw
OpenClaw (formerly known as Clawdbot/Moltbot) is a free, open-source autonomous AI assistant that runs on users' own devices, interacting with users through messaging applications to perform various automated tasks. CloudBase provides the @cloudbase/agent-adapter-llm adapter, enabling OpenClaw Agents to seamlessly connect with the AG-UI protocol through an OpenAI-compatible interface.
Prerequisites
- Node.js 20+
- An active CloudBase environment
- A running Linux server (for deploying the OpenClaw service)
- OpenClaw configuration information (Gateway Token, Base URL, Agent ID)
Install Dependencies
npm install @cloudbase/agent-adapter-llm @cloudbase/agent-server openai express
Quick Start
1. Prepare OpenClaw Server
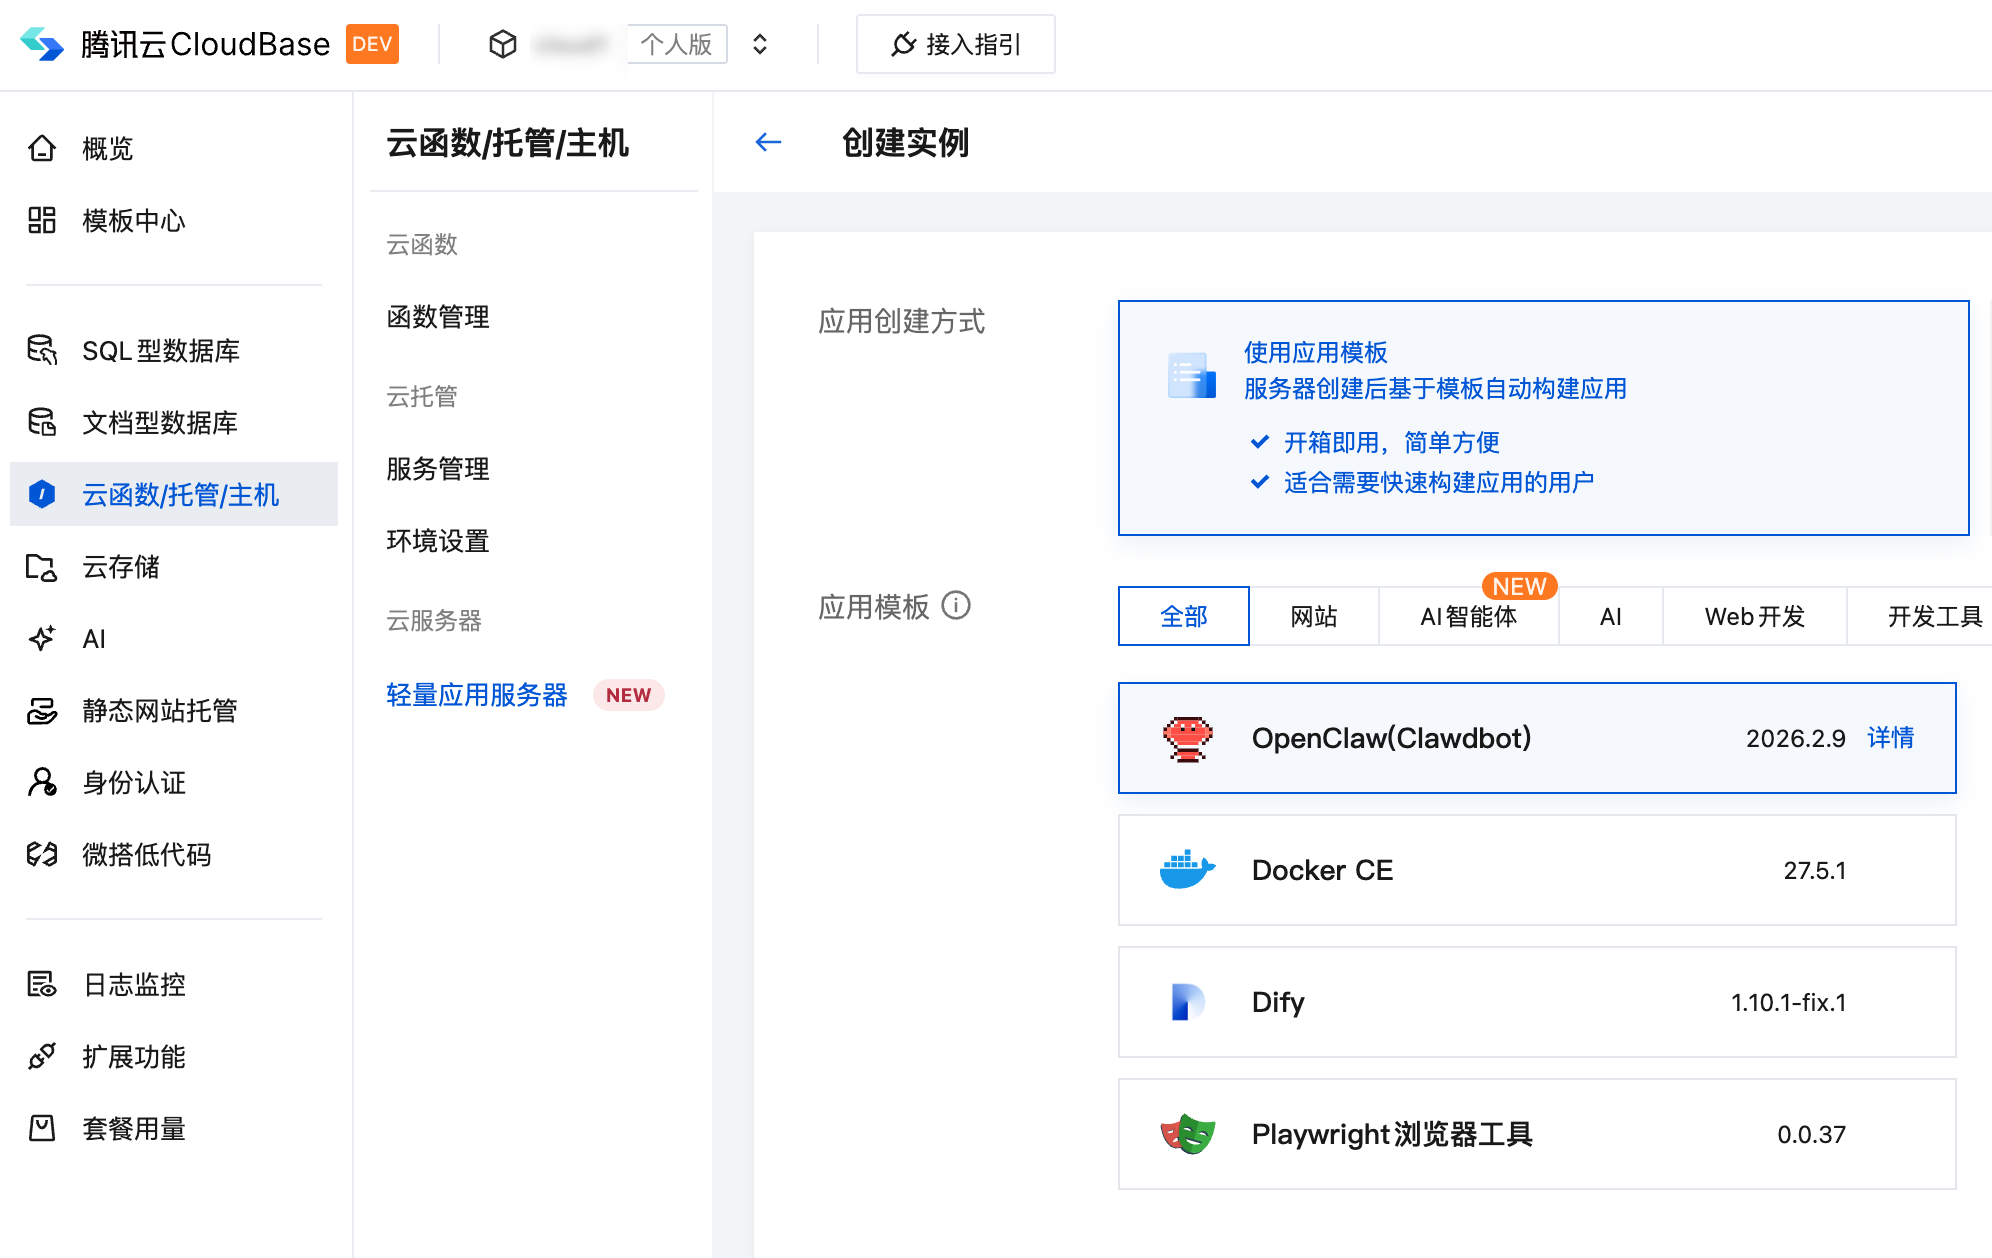
Before creating an OpenClaw Agent, you need to prepare a server running the OpenClaw service. If you don't have an existing server, you can quickly create one using CloudBase's Lightweight Application Server module.
Using CloudBase Lightweight Application Server
- Log in to the CloudBase Console and navigate to the Lightweight Application Server page
- Create a new server instance, selecting the OpenClaw application image
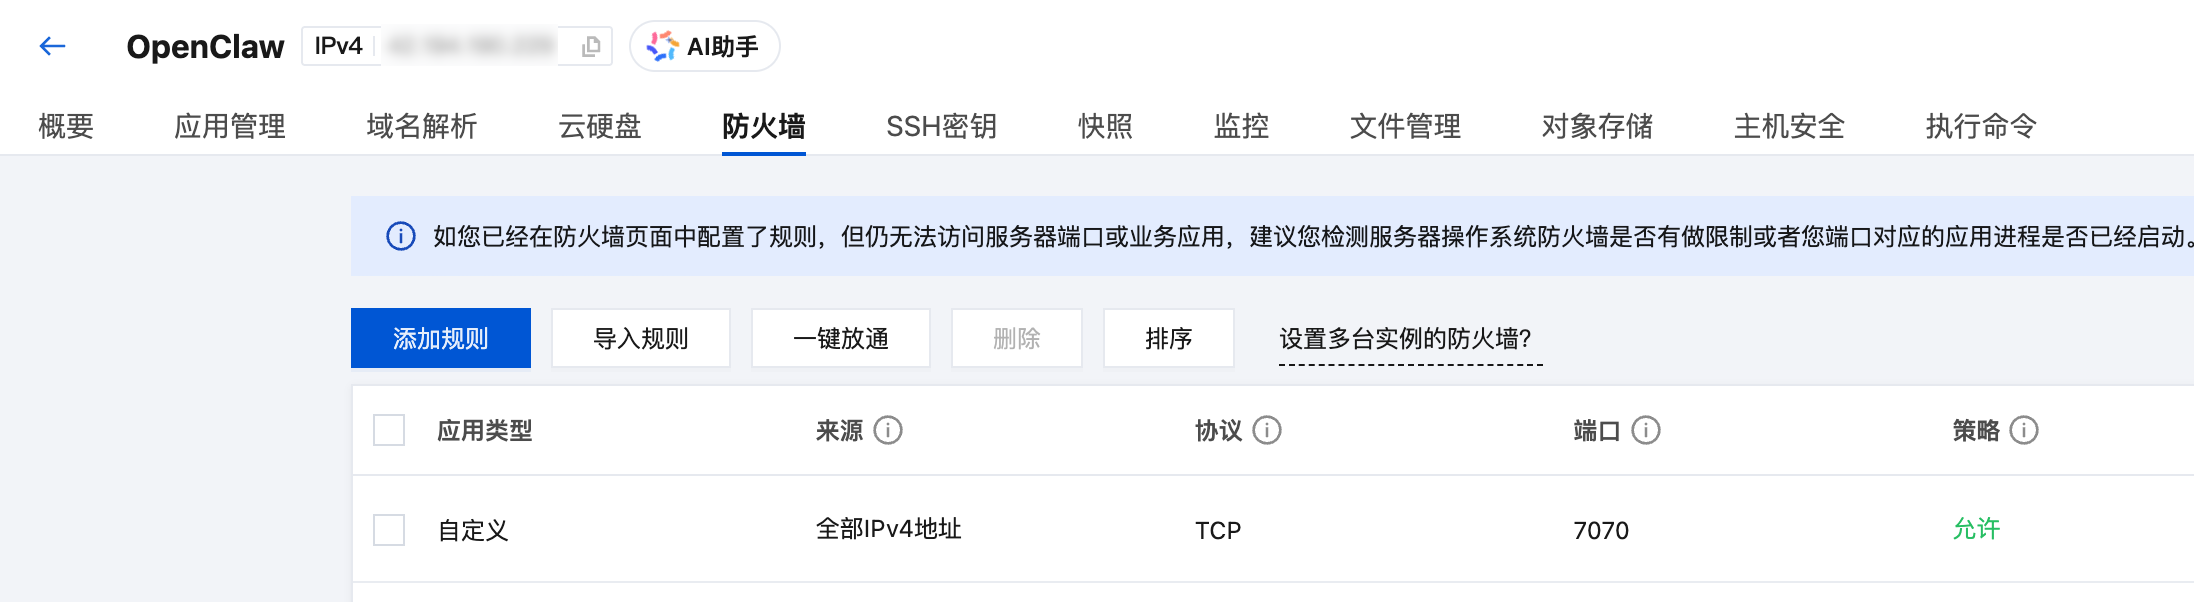
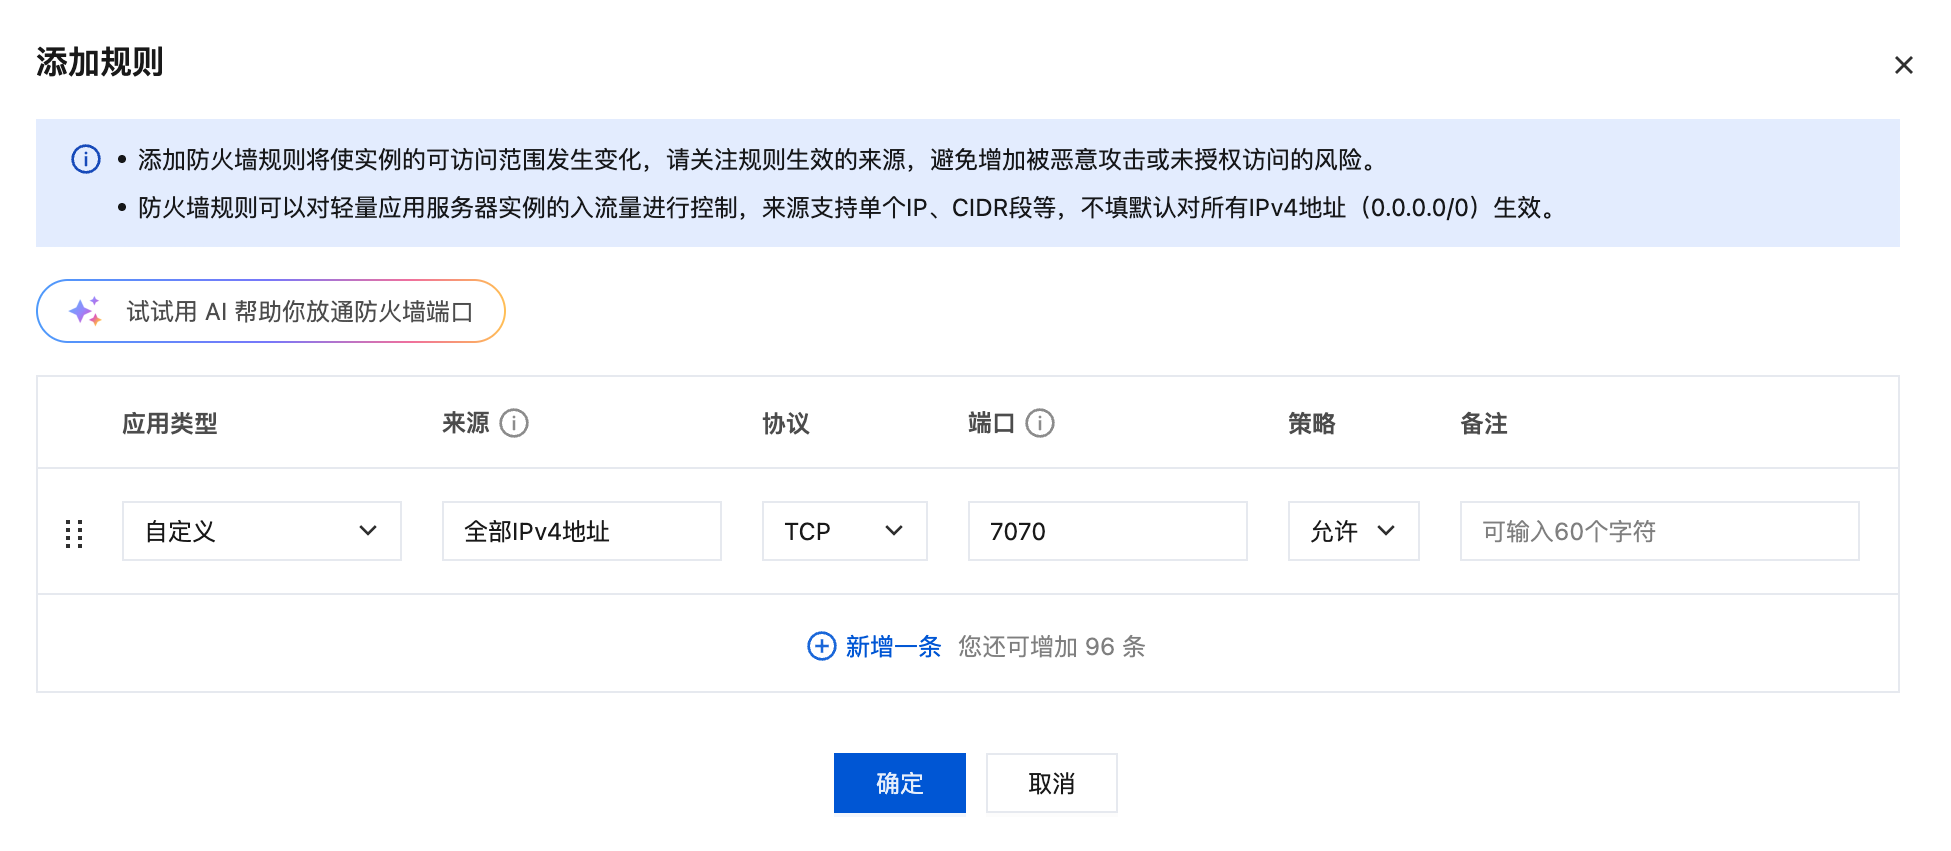
- After the instance is created, go to the instance details page, and in the Firewall tab, add a rule: Source: All IPv4 addresses, Port: 7070, Protocol: TCP, Policy: Allow
Configure the Model for OpenClaw
First, you need to configure a model for OpenClaw. If you've already configured one, you can skip this step. You can configure it through the Lightweight Application Server console, or follow the OpenClaw Onboarding Guide for a quick start.
When using the Lightweight Application Server console, navigate to the "Application Management" tab to quickly configure the model.
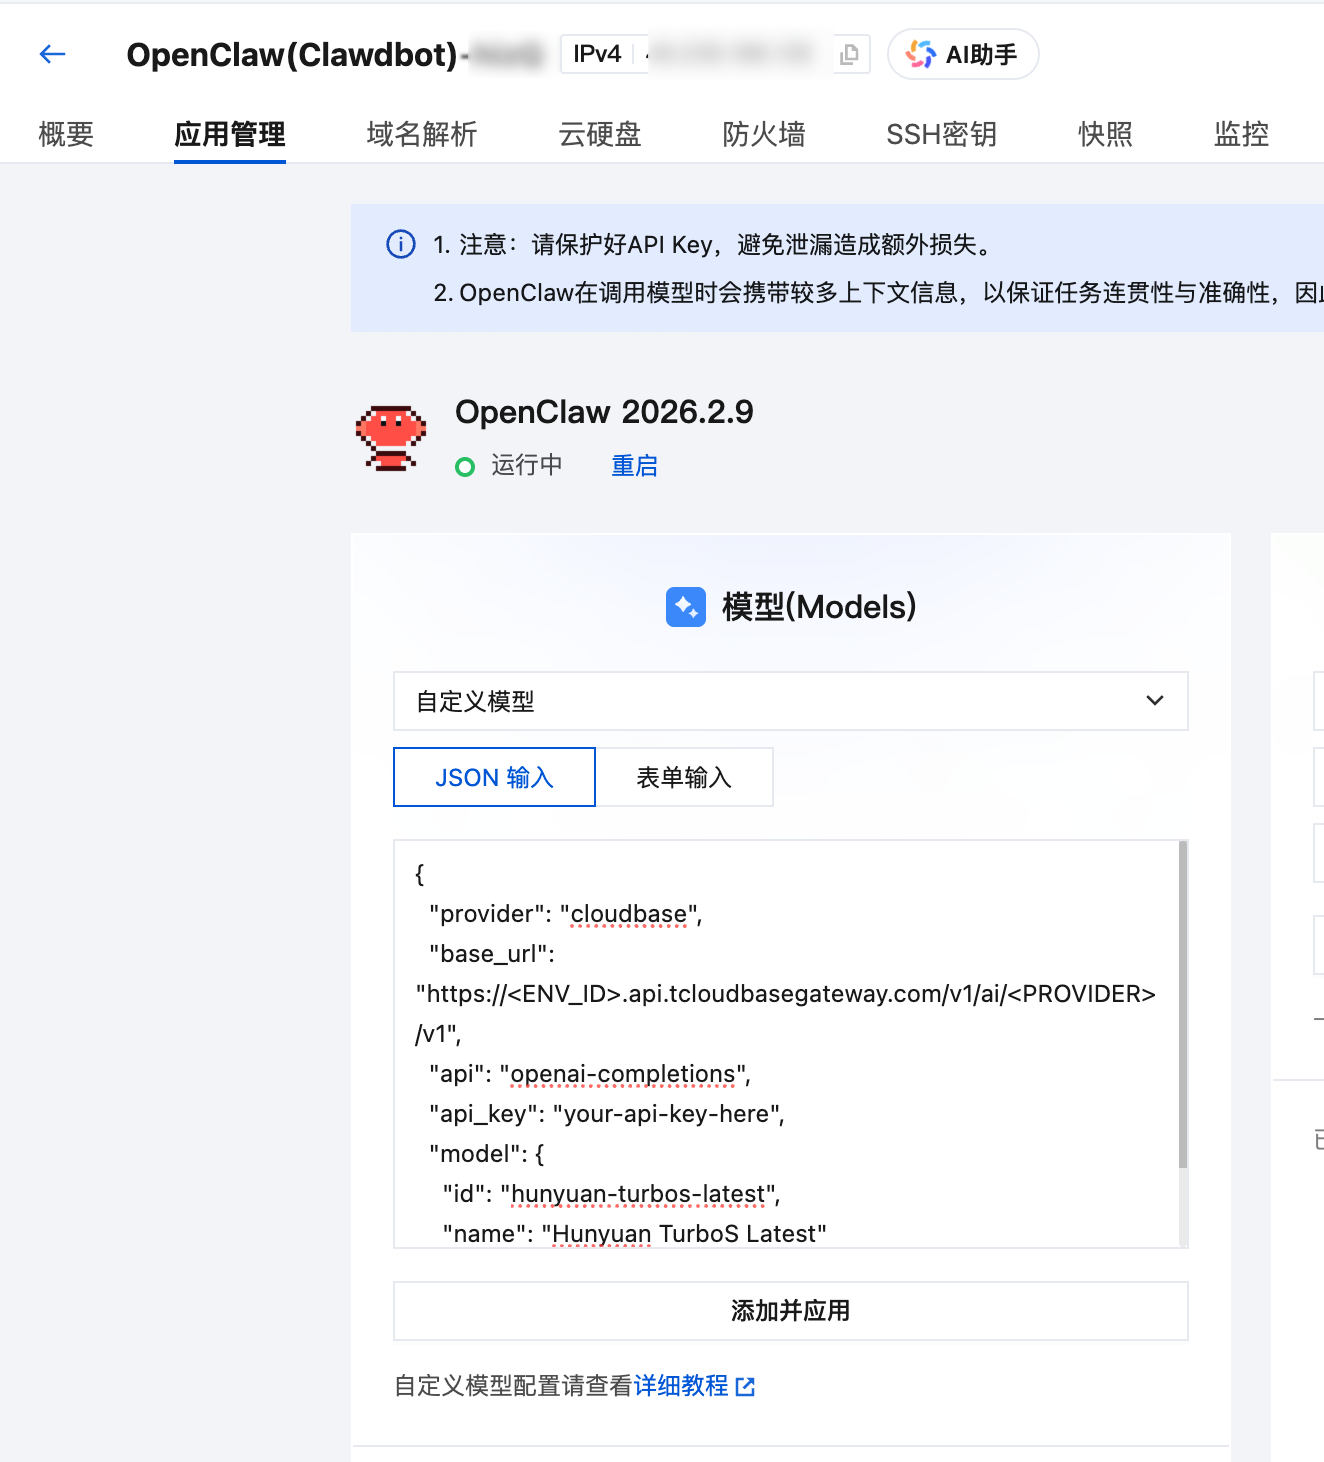
Custom model JSON configuration example:
{
  "provider": "cloudbase",
  "base_url": "https://<ENV_ID>.api.tcloudbasegateway.com/v1/ai/<PROVIDER>/v1",
  "api": "openai-completions",
  "api_key": "your-api-key-here",
  "model": {
    "id": "deepseek-v4-flash",
    "name": "Hunyuan TurboS Latest"
  }
}
CloudBase provides a unified LLM HTTP endpoint supporting models like Tencent Hunyuan and DeepSeek. The endpoint format is:
https://<ENV_ID>.api.tcloudbasegateway.com/v1/ai/<PROVIDER>/v1
Where ENV_ID is your CloudBase environment ID, and PROVIDER can be cloudbase. See the LLM Configuration Guide for details.
Get OpenClaw Configuration and Enable OpenAI API Access
After connecting to the server via SSH, run the following command to download and execute the configuration script:
curl -fsSL https://tcb.cloud.tencent.com/ai/agent/templates/openclaw_setup.sh | bash
After the script completes, it will output the OpenClaw configuration information. Please record the following for later environment variable configuration:
┌─────────────────────────────────────────────────────────────┐
│                    OpenClaw Configuration                    │
├─────────────────────────────────────────────────────────────┤
│ Gateway Token       : <Your Gateway Token>                   │
│ Agent ID            : main                                   │
│ OpenAI BaseURL      : http://<Public IP>:7070               │
└─────────────────────────────────────────────────────────────┘
2. Create OpenClaw Agent
// index.ts
import express from "express";
import { createExpressRoutes } from "@cloudbase/agent-server";
import { LLMAgent } from "@cloudbase/agent-adapter-llm";
import OpenAI from "openai";

function createAgent({ request }: { request: Request }) {
  const agent = new LLMAgent({
    model: new OpenAI({
      apiKey: process.env.OPENCLAW_GATEWAY_TOKEN || "",
      baseURL: process.env.OPENCLAW_BASE_URL || "",
    }),
    modelName: `openclaw:${process.env.OPENCLAW_AGENT_ID || "main"}`,
  });
  return { agent };
}

const app = express();

createExpressRoutes({
  createAgent,
  express: app,
});

app.listen(9000, () => console.log("Listening on 9000!"));
3. Configure Environment Variables
Create a .env file and fill in the configuration information from the installation script output:
# OpenClaw Gateway Token (corresponds to "Gateway Token" in script output)
OPENCLAW_GATEWAY_TOKEN=your_gateway_token_here

# OpenClaw API Base URL (corresponds to "OpenAI BaseURL" in script output)
OPENCLAW_BASE_URL=http://<Public IP>:7070

# OpenClaw Agent ID (corresponds to "Agent ID" in script output, defaults to main)
OPENCLAW_AGENT_ID=main
4. Start the Service
npx tsx src/index.ts
The service will start at http://localhost:9000, automatically creating the following routes:
POST /send-message- AG-UI protocol message endpointPOST /chat/completions- OpenAI-compatible chat endpoint
Core API
LLMAgent
Wraps OpenClaw as an AG-UI compatible Agent:
import { LLMAgent } from "@cloudbase/agent-adapter-llm";
import OpenAI from "openai";

const agent = new LLMAgent({
  model: new OpenAI({
    apiKey: process.env.OPENCLAW_GATEWAY_TOKEN,
    baseURL: process.env.OPENCLAW_BASE_URL,
  }),
  modelName: `openclaw:${process.env.OPENCLAW_AGENT_ID}`,
});
Constructor Parameters:
| Parameter | Type | Description |
|---|---|---|
model | OpenAI | OpenAI SDK instance configured with OpenClaw's API key and base URL |
modelName | string | Model name in the format openclaw:<agent_id> |
Middleware
Extend Agent functionality using the middleware mechanism:
agent.use(middleware);
Advanced Usage
User Authentication Middleware
Using AG-UI's Middleware mechanism, you can inject user information before the Agent processes requests:
import {
  Middleware,
  RunAgentInput,
  BaseEvent,
  AbstractAgent,
} from "@ag-ui/client";
import { jwtDecode, JwtPayload } from "jwt-decode";
import { Observable } from "rxjs";

export class DetectCloudbaseUserMiddleware extends Middleware {
  _req: Request;
  constructor(req: Request) {
    super();
    this._req = req;
  }
  run(input: RunAgentInput, next: AbstractAgent): Observable<BaseEvent> {
    let jwtToken: JwtPayload = {};
    try {
      const user =
        (this._req.headers as any).Authorization ||
        this._req.headers.get?.("Authorization");
      if (user) {
        const jwt = user.split(" ")[1];
        if (!jwt) throw new Error("invalid jwt");
        const decoded = jwtDecode(jwt);
        if (!decoded || !decoded.sub) throw new Error("invalid jwt");
        jwtToken = decoded;
      }
    } catch (e) {
      // Ignore errors and continue processing the request
    }
    if (jwtToken?.sub) {
      return next.run({
        ...input,
        state: {
          ...input.state,
          __request_context__: {
            user: { id: jwtToken.sub, jwt: jwtToken },
            request: this._req,
          },
        },
      });
    } else {
      return next.run(input);
    }
  }
}
Using the middleware:
function createAgent({ request }: { request: Request }) {
  const agent = new LLMAgent({
    model: new OpenAI({
      apiKey: process.env.OPENCLAW_GATEWAY_TOKEN || "",
      baseURL: process.env.OPENCLAW_BASE_URL || "",
    }),
    modelName: `openclaw:${process.env.OPENCLAW_AGENT_ID || "main"}`,
  });
  // Use middleware to extract user information from JWT
  agent.use(new DetectCloudbaseUserMiddleware(request));
  return { agent };
}
The DetectCloudbaseUserMiddleware middleware automatically extracts the JWT Token from the HTTP request's Authorization header, parses out the user ID (sub field), and injects it into input.state.__request_context__.
Streaming Output
LLMAgent supports streaming output by default, requiring no additional configuration. Clients will receive streaming TEXT_MESSAGE_CONTENT events.
Local Debugging
Testing with cURL
# Send message (streaming response)
curl -X POST http://localhost:9000/send-message \
  -H "Content-Type: application/json" \
  -H "Accept: text/event-stream" \
  -d '{
    "threadId": "test-thread-123",
    "runId": "test-run-001",
    "messages": [
      {
        "id": "msg-1",
        "role": "user",
        "content": "Hello, please introduce yourself"
      }
    ],
    "tools": [],
    "context": [],
    "state": {},
    "forwardedProps": {}
  }'
Request with User Authentication
curl -X POST http://localhost:9000/send-message \
  -H "Content-Type: application/json" \
  -H "Authorization: Bearer YOUR_JWT_TOKEN" \
  -H "Accept: text/event-stream" \
  -d '{
    "threadId": "test-thread-123",
    "runId": "test-run-002",
    "messages": [
      {
        "id": "msg-1",
        "role": "user",
        "content": "Hello"
      }
    ],
    "tools": [],
    "context": [],
    "state": {},
    "forwardedProps": {}
  }'
Using OpenAI-Compatible Interface
curl -X POST http://localhost:9000/chat/completions \
  -H "Content-Type: application/json" \
  -d '{
    "model": "openclaw:main",
    "messages": [
      {
        "role": "user",
        "content": "Hello"
      }
    ],
    "stream": true
  }'
Deployment
Cloud Function Deployment
Refer to HTTP Cloud Function Deployment
CloudRun Deployment
Refer to CloudRun Deployment
Dockerfile example:
FROM node:20-alpine

WORKDIR /app

COPY package*.json ./
RUN npm install --production

COPY . .
RUN npm run build

ENV PORT=9000
EXPOSE 9000

CMD ["node", "dist/index.js"]
Project Structure
openclaw-ts/
├── src/
│   ├── index.ts              # Main entry file
│   └── utils.ts              # Utility functions and middleware
├── dist/                     # Compiled output directory
├── .env.example              # Environment variables example
├── package.json              # Project configuration
├── tsconfig.json             # TypeScript configuration
├── scf_bootstrap             # Cloud function startup script
├── Dockerfile                # Docker image configuration
└── README.md                 # Project documentation
Best Practices
1. Use Environment Variables
const agent = new LLMAgent({
  model: new OpenAI({
    apiKey: process.env.OPENCLAW_GATEWAY_TOKEN || "",
    baseURL: process.env.OPENCLAW_BASE_URL || "",
  }),
  modelName: `openclaw:${process.env.OPENCLAW_AGENT_ID || "main"}`,
});
2. Error Handling
Handle errors properly in middleware to avoid request interruption due to authentication failures:
try {
  // Parse JWT
} catch (e) {
  // Ignore errors and continue processing the request
}
3. CORS Configuration
If you encounter cross-origin issues, enable CORS middleware:
import cors from "cors";

app.use(
  cors({
    origin: true,
  }),
);