FAQ
What is CloudBase MCP?
CloudBase is an AI-native backend platform built for AI Coding. Through the MCP protocol, you can get one-stop backend integration and deployment capabilities inside your AI IDE—database, authentication, cloud functions, container hosting, static website hosting, and more.
In other words, MCP turns “CloudBase” into a backend platform that AI can call directly, so your AI can do more than write code: it can help complete the full loop from data storage and business logic all the way to deployment.
CloudBase MCP works with many AI IDEs (e.g. OpenClaw, Cursor, WindSurf, CodeBuddy, Claude Code, GitHub Copilot). After a one-time MCP setup, you can use natural language in these IDEs to:
- Design and create database tables/collections
- Manage file storage, website hosting, and static assets
- Develop and deploy cloud functions and CloudRun services
- Build and deploy full-stack projects end to end
Why CloudBase
Why choose CloudBase?
- Fast deployment: Domestic nodes (in Mainland China) often provide faster access for users in China
- Stable and reliable: A Serverless platform trusted by millions of developers
- Developer-friendly: A full-stack platform designed for the AI era, with automated environment setup
- Cost-efficient: Elastic Serverless architecture; new users can start with free quotas during development
Getting Started
I’m new—how do I get started quickly?
- Install a supported AI development tool (e.g. OpenClaw, Cursor, WindSurf)
- Create a CloudBase environment in the Tencent CloudBase Console (free for new users)
- Download a project template, or configure MCP in an existing project
- Tell your AI “Log in to CloudBase” to start developing
What AI development tools are supported?
CloudBase AI CLI, OpenClaw, Cursor, WindSurf, CodeBuddy, Cline, GitHub Copilot, Claude Code, Gemini CLI, OpenAI Codex CLI, OpenCode, Trae, Tongyi Lingma, RooCode, Wenxin Kuaima (Baidu Comate), Augment Code, Qwen Code, iFlow CLI, and more mainstream AI development tools.
Technical Questions
How do I integrate these templates and rules into an existing project?
If you already have your own project, after configuring MCP, just tell your AI:
"Download CloudBase AI rules in the current project"
It will download and complete the AI editor rule configuration into your project directory automatically.
If you only want rules/config for a specific IDE to avoid clutter, you can specify the IDE type:
Download CloudBase AI rules in the current project, cursor only
Download CloudBase AI rules in the current project, windsurf only
Download CloudBase AI rules in the current project, claude-code only
How do I get the CloudBase environment ID?
- Go to the Tencent CloudBase Console and create an environment (free for new users)
- On the Overview page, find the Environment ID on the right side
How do I update CloudBase AI ToolKit?
Update AI rules
To update to the latest CloudBase AI rules in an existing project, just tell your AI:
Download CloudBase AI rules and update rules in the current project
Your AI will download and update the latest rule configuration into your project directory.
Update MCP tools
When a new MCP version is released, you can update it in these ways:
- Auto update (recommended): In your AI tool’s MCP list, find
cloudbaseand re-enable it (or refresh the MCP list) to install the latest version - Manual update: If auto update fails, disable and re-enable
cloudbase, or restart your AI IDE
Notes:
- MCP configs often use the
@latesttag, which typically pulls the newest version automatically - If you hit caching issues, fully restart your AI IDE and re-enable MCP
- Check for updates regularly to get new features and fixes
MCP shows 0 tools—what should I do?
If your AI tool’s MCP list shows cloudbase-mcp with 0 tools, try:
1) Check your environment
-
Ensure Node.js is v18.15.0 or newer
-
On macOS with
nvm, make sure your default Node version is v18.15.0+ to avoid mismatch across terminals -
Check network connectivity, and consider using Tencent’s npm mirror:
npm config set registry https://mirrors.cloud.tencent.com/npm/
2) Re-enable MCP
- Disable
cloudbase-mcpin the MCP list - Re-enable
cloudbaseor refresh the MCP list - If still failing, fully restart your AI IDE and retry
3) Reinstall manually
Usually, re-enabling or refreshing in the MCP list is enough. If not, follow the steps in How to install CloudBase MCP globally? below.
MCP error -32001: Request timed out after configuration
If you see MCP error -32001: Request timed out while configuring MCP, follow the steps in How to install CloudBase MCP globally? below.
How to install CloudBase MCP globally?
Problems you might have
Have you run into any of these when using CloudBase MCP?
- Slow installs -
npxdownloads every time and takes too long - Complex environment setup - npm registry, Node.js version, etc.
- Repeated setup - configure MCP multiple times for different AI IDEs
- Network issues - npm timeouts or download failures
Solution: Quick install via CloudBase AI CLI
We recommend using CloudBase AI CLI to solve these in one go:
- Fast install: a one-click install script usually completes in seconds
- Unified management: one command manages multiple AI coding CLI tools, including the built-in CloudBase AI ToolKit MCP
- Works in more environments: WeChat DevTools, VS Code, GitHub Actions, and more
- Out of the box: automatically sets up MCP after installation
Quick install steps
1) Install with npm
npm install @cloudbase/cli@latest -g
2) Verify installation
After installation, CloudBase AI CLI installs CloudBase AI ToolKit MCP and provides a global command cloudbase-mcp.
3) Configure MCP
Restart your AI IDE and update your MCP config:
{
  "mcpServers": {
    "cloudbase": {
      "command": "cloudbase-mcp"
    }
  }
}
4) Verify MCP
You should see CloudBase MCP start successfully.
Supported AI IDEs
This installation method works for any AI IDE that supports MCP (Model Context Protocol), including but not limited to:
- Cursor - AI assistant based on VS Code
- WindSurf - AI coding tool by Tencent Cloud
- CodeBuddy - Intelligent coding assistant
- Visual Studio Code - via the CodeBuddy extension
- Claude Code - Anthropic’s AI coding environment
- GitHub Copilot - versions that support MCP
- Other MCP-compatible AI IDEs
With this unified setup, you can switch between different AI IDEs without repeating MCP setup.
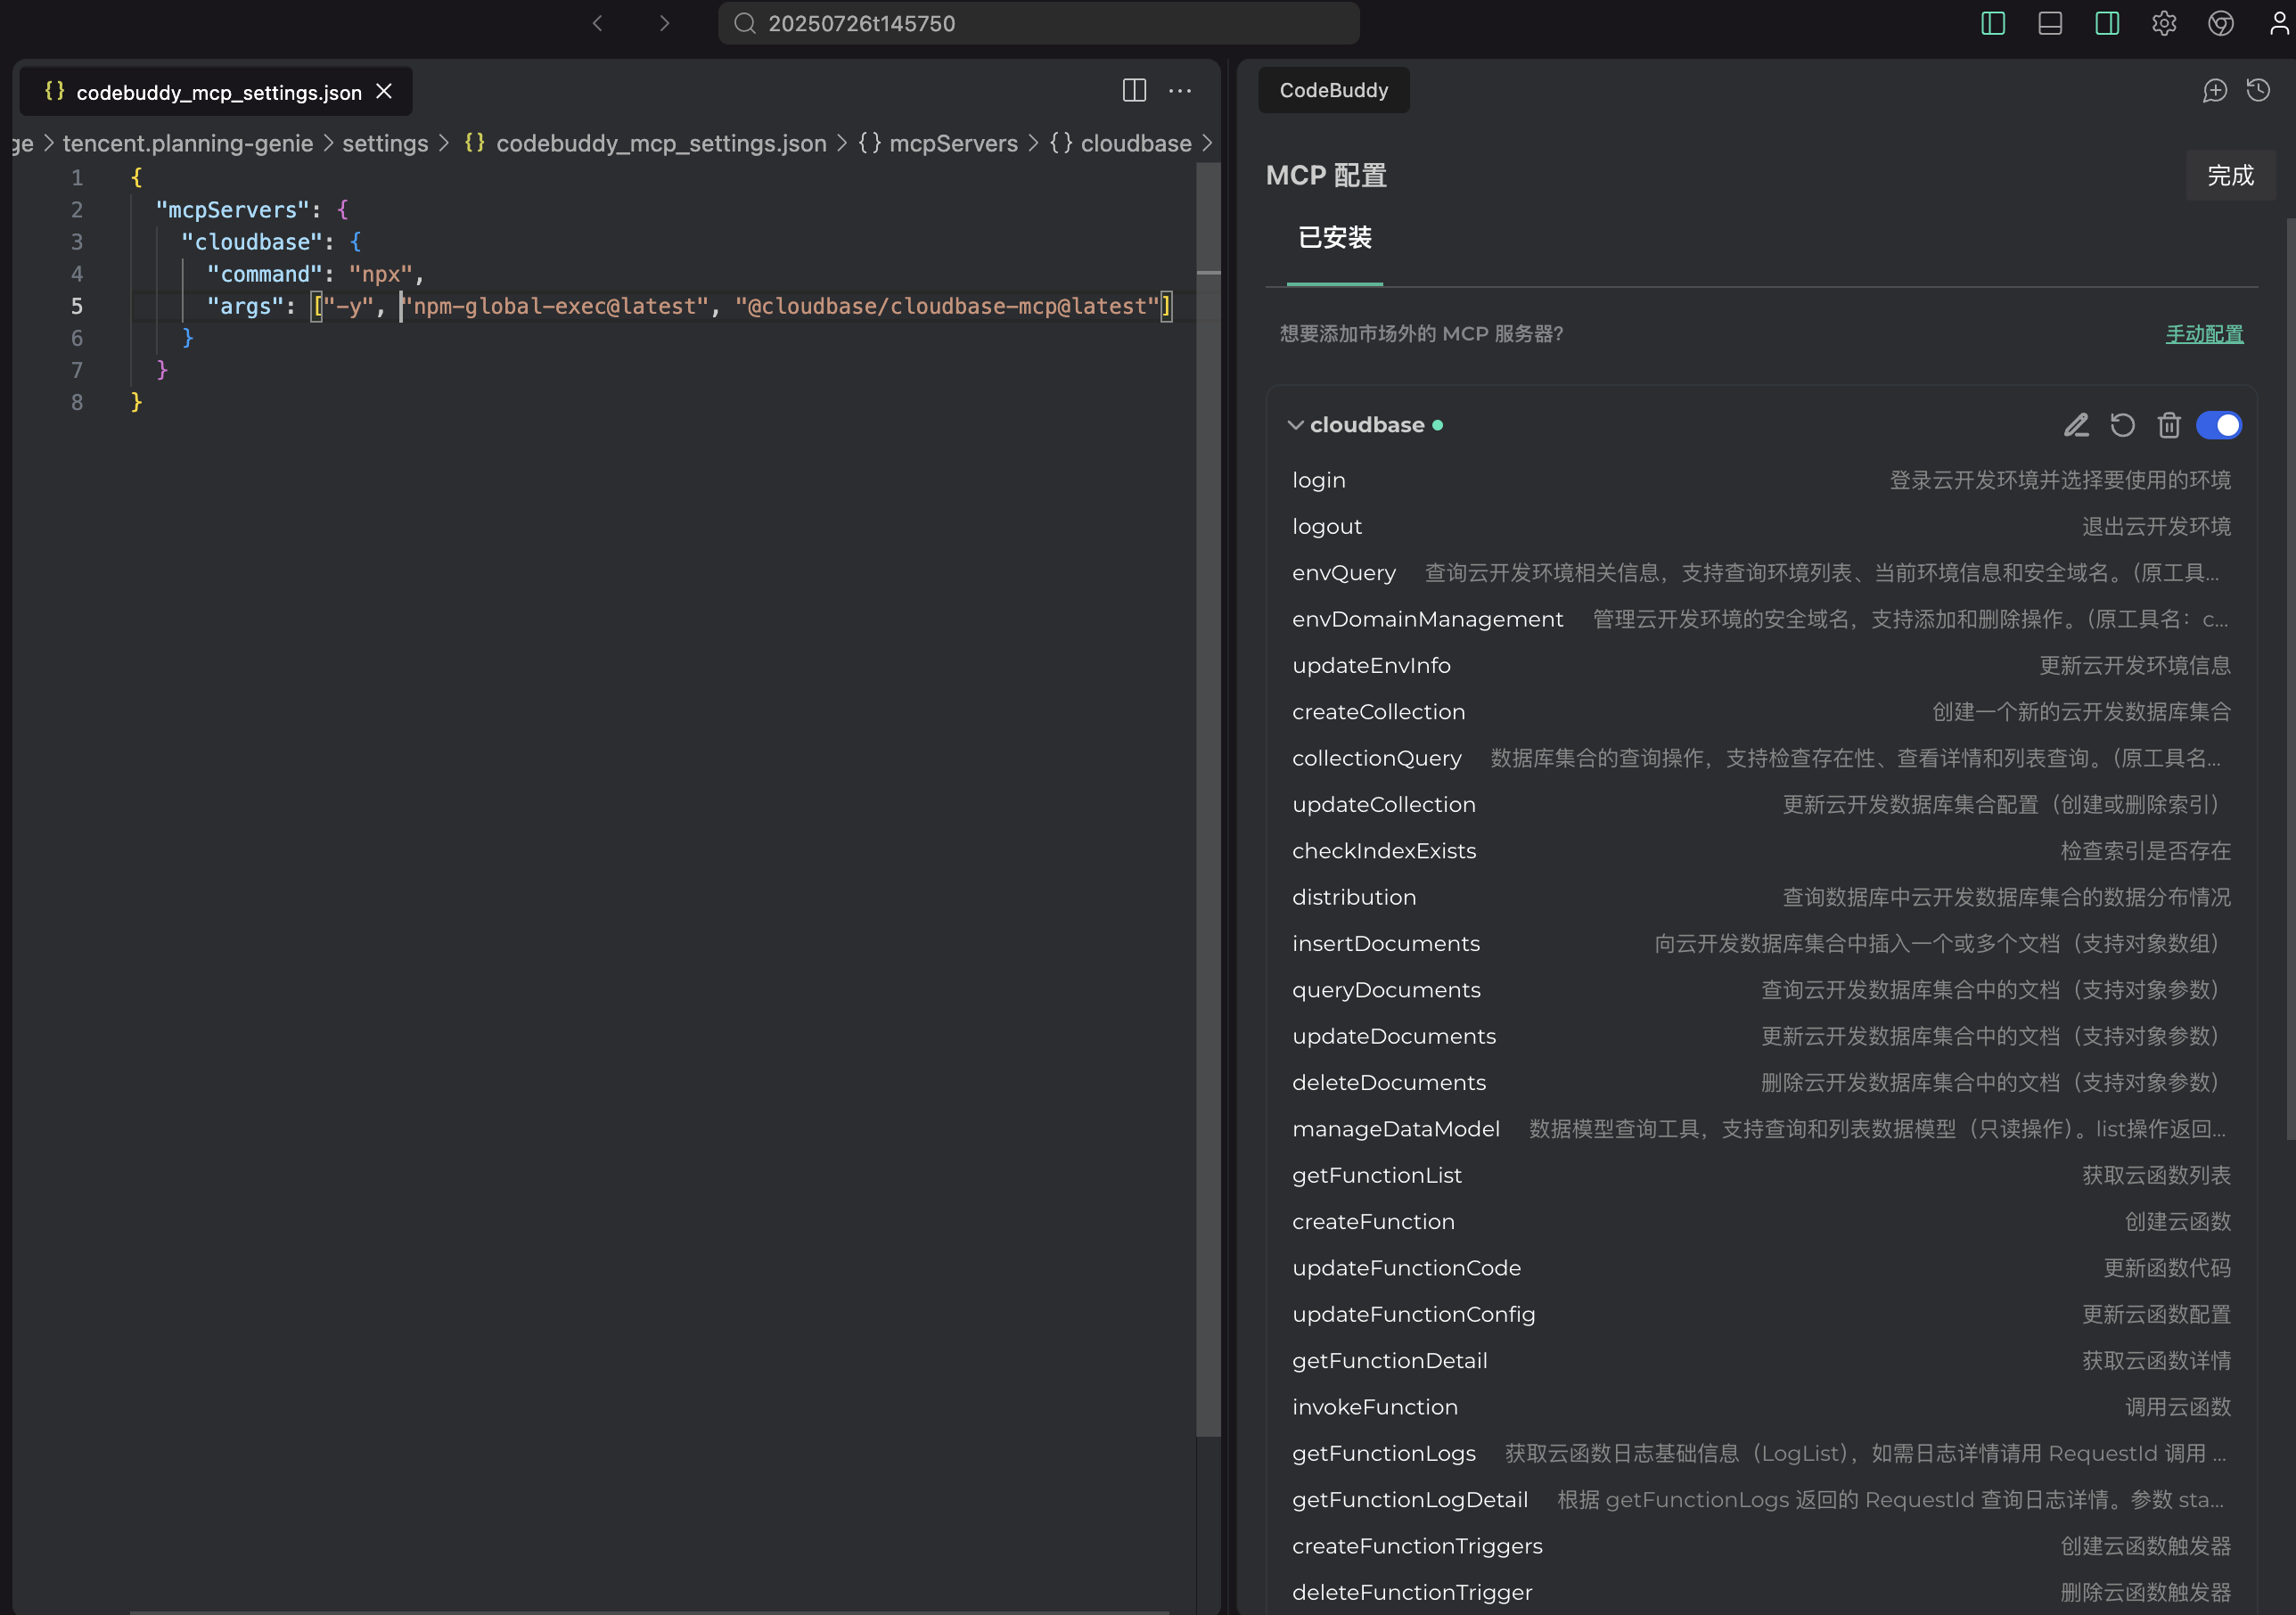
- Example: CloudBase MCP configured in CodeBuddy
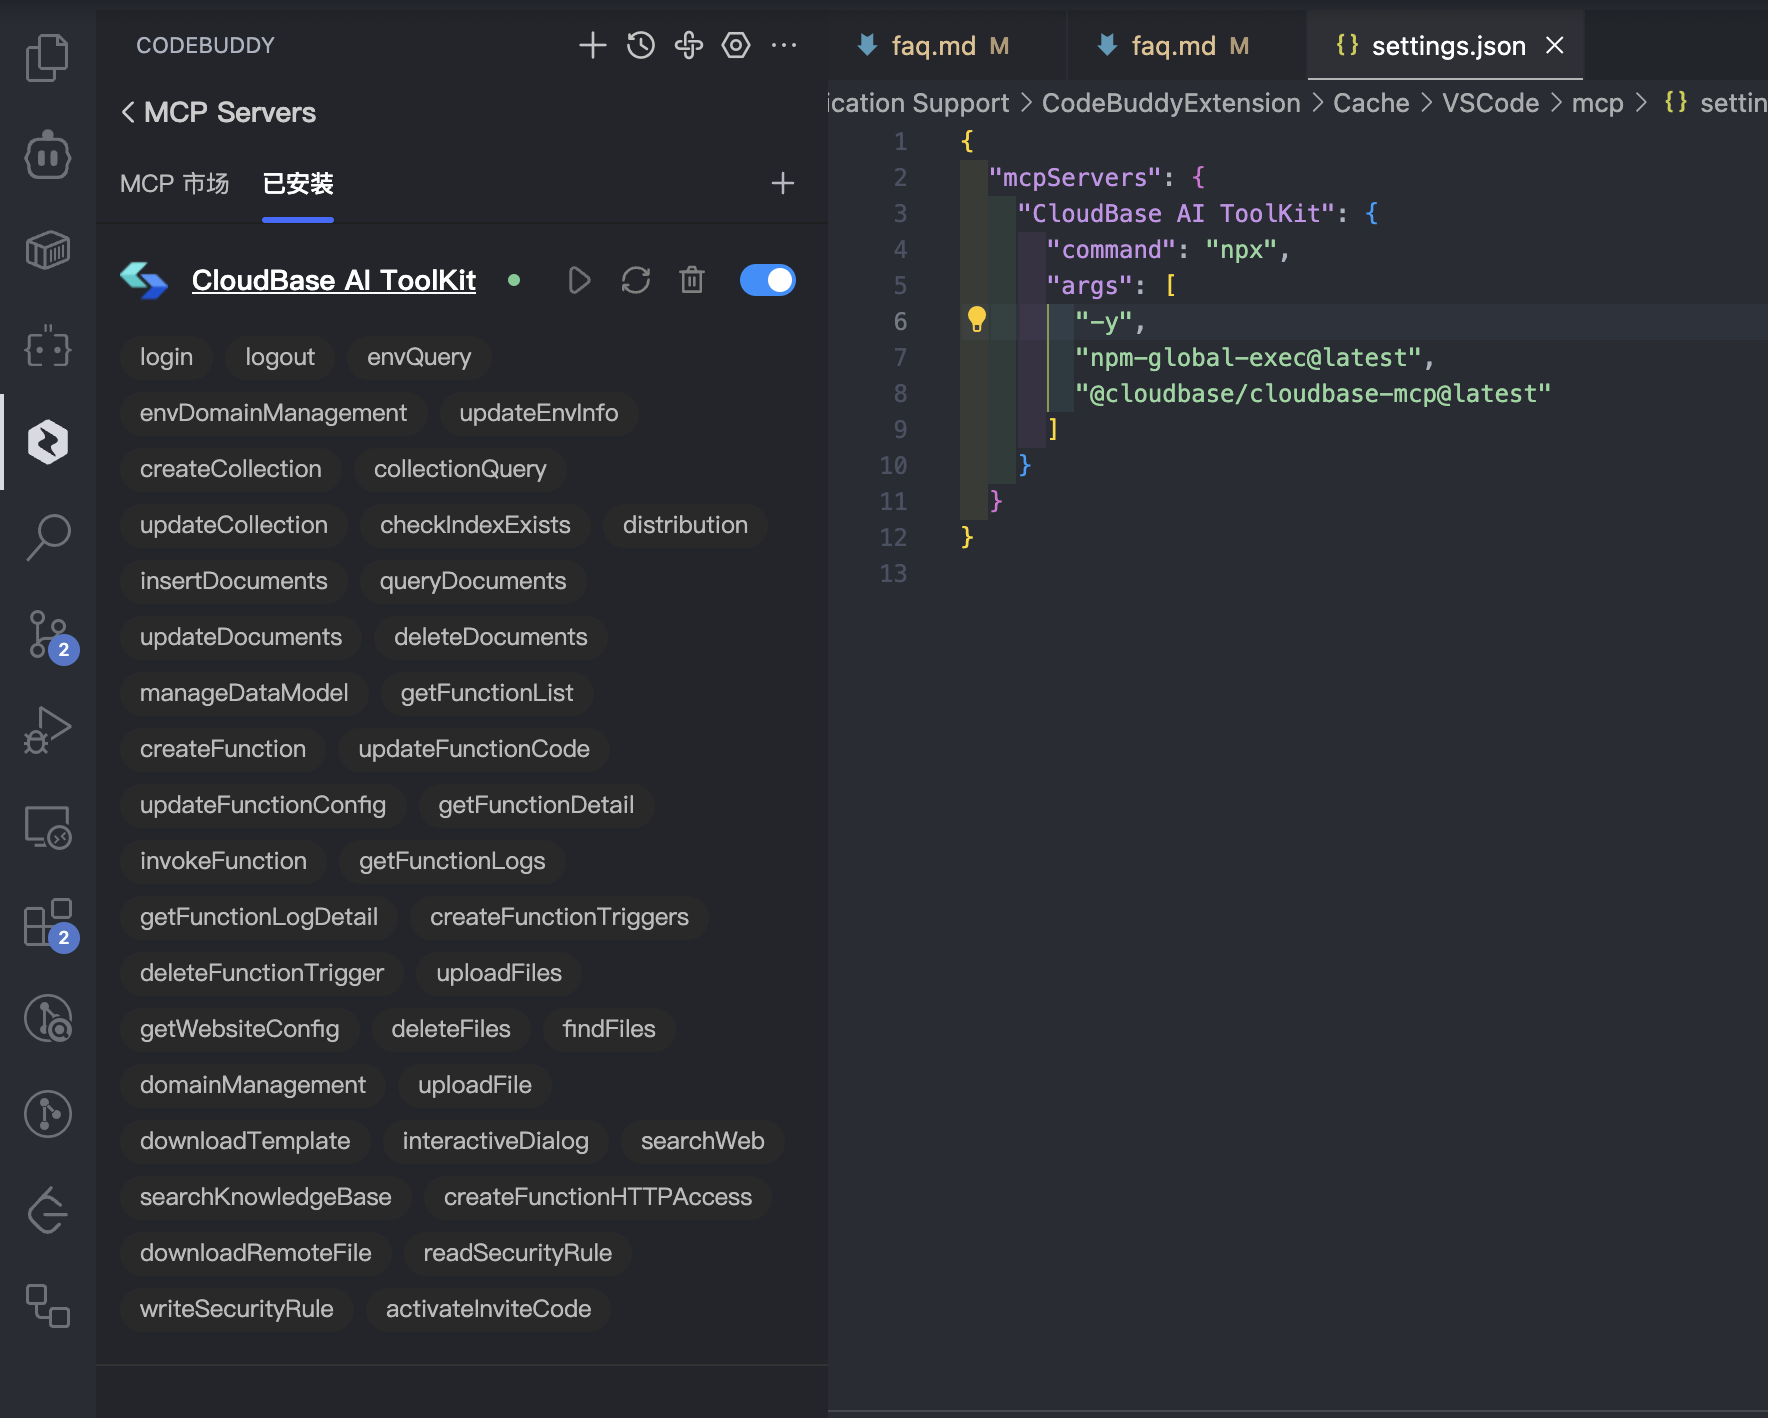
- Example: CloudBase MCP configured in VS Code via CodeBuddy
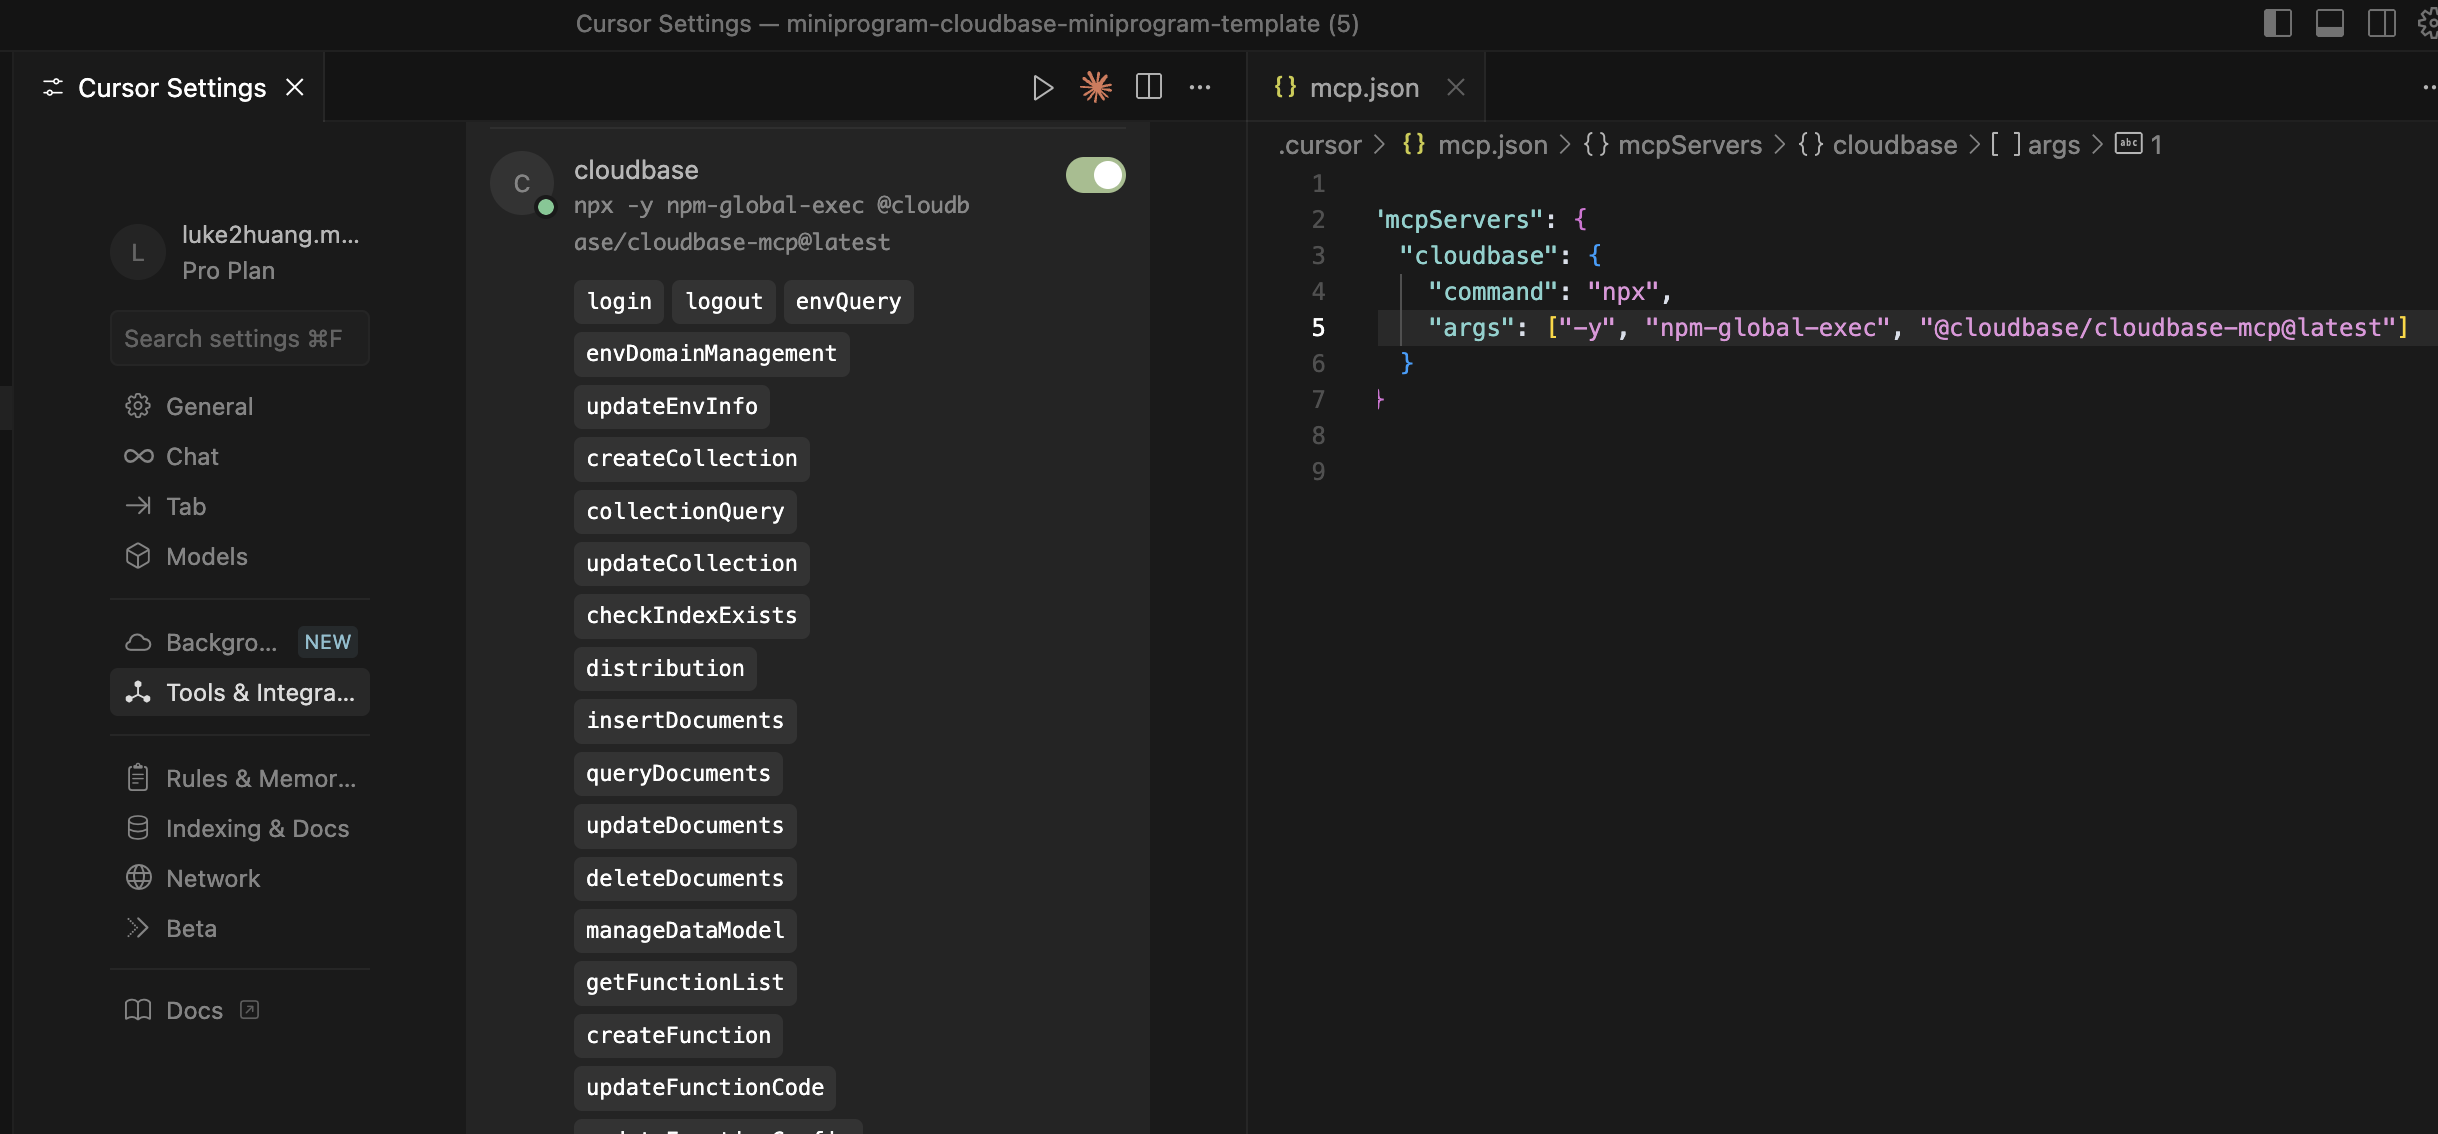
- Example: CloudBase MCP configured in Cursor
Learn more
CloudBase AI CLI includes CloudBase AI ToolKit MCP and also supports other popular AI coding tools:
- Claude Code
- OpenAI Codex
- aider
- Qwen Code
See: CloudBase AI CLI documentation
MCP config doesn’t take effect—what should I do?
- Check that your configuration format is correct
- Restart your AI IDE
- Confirm the MCP server is enabled
Safari can’t complete the authorization login—what should I do?
If you run into authorization issues in Safari, switch to Chrome for login.
Safari may have compatibility issues in some cases that affect the authorization flow, while Chrome tends to work better for CloudBase authorization.
How do I use MCP in a remote dev environment or on a server?
Problems you might have
When using CloudBase AI ToolKit in remote environments, you may hit:
- No browser login - servers often have no GUI
- Environment isolation - remote environments can’t open your local browser for auth
- Automation needs - CI/CD requires non-interactive configuration
- Permission control - need precise access control for CloudBase resources
Solution: environment variable configuration
CloudBase AI CLI supports non-browser authentication via environment variables, which is ideal for remote environments.
Install CloudBase AI CLI
npm install @cloudbase/cli@latest -g
After installation, you'll have the global command cloudbase-mcp.
Option 1: CloudBase API Key (Recommended)
API Key is an environment-level long-lived credential. MCP automatically exchanges it for temporary keys and refreshes them on expiry:
{
  "mcpServers": {
    "cloudbase": {
      "command": "cloudbase-mcp",
      "env": {
        "CLOUDBASE_API_KEY": "Your CloudBase API Key",
        "CLOUDBASE_ENV_ID": "CloudBase environment ID"
      }
    }
  }
}
💡 API Keys can be created and managed in the CloudBase Console environment settings.
Option 2: Tencent Cloud API Key
{
  "mcpServers": {
    "cloudbase": {
      "command": "cloudbase-mcp",
      "args": ["--integration-ide", "YOUR_IDE"],
      "env": {
        "TENCENTCLOUD_SECRETID": "Tencent Cloud SecretId",
        "TENCENTCLOUD_SECRETKEY": "Tencent Cloud SecretKey",
        "TENCENTCLOUD_SESSIONTOKEN": "Tencent Cloud temporary token (only needed for temporary credentials)",
        "CLOUDBASE_ENV_ID": "CloudBase environment ID"
      }
    }
  }
}
Where to get credentials:
- SecretId / SecretKey: Tencent Cloud CAM Console
- CloudBase environment ID: Tencent CloudBase Console → Overview
This approach is especially useful for:
- Remote dev environments (e.g. GitHub Codespaces, cloud IDEs)
- Server-side automation scripts
- CI/CD pipelines
Security Note: If you need to deploy MCP on a remote server and expose an HTTP interface (rather than just using it locally), be sure to set
CLOUDBASE_MCP_CLOUD_MODE=true. This automatically disables tools likedownloadRemoteFile,manageCloudRun(local run),manageApps(local code upload), etc., that involve local file read/write and process launches, preventing remote callers from accessing server local resources. See Connection Modes for details.
What application types are supported?
- Web apps: modern frontend + static hosting
- WeChat Mini Programs: CloudBase Mini Program solution
- Backend services: cloud database + serverless functions + CloudRun
Any special recommendations for WeChat Mini Program development?
Recommended workflow:
-
Enable CloudBase inside WeChat DevTools
- Enable it directly in WeChat DevTools so the Mini Program and CloudBase environment are properly bound
-
Choose “Mini Program / Official Account” login in your AI IDE
- When redirected to Tencent CloudBase login, select Mini Program / Official Account login
- Use your Mini Program identity, not the main Tencent Cloud account
This helps keep permissions consistent and avoids environment configuration issues.
How to use CloudBase AI ToolKit with WeChat DevTools?
CloudBase AI ToolKit works well together with WeChat DevTools to provide a more efficient development experience.
Option 1: Start development in an AI IDE
If you already started a Mini Program project in an AI IDE (Cursor, WindSurf, CodeBuddy, etc.):
- Develop in AI IDE: write code and manage CloudBase resources with CloudBase AI ToolKit
- Import into WeChat DevTools: open the entire project folder in WeChat DevTools
- Real-time sync: file changes in the AI IDE are synced to WeChat DevTools
- Build & preview: build and preview in WeChat DevTools
- Debug errors: copy build/runtime errors back into your AI IDE for AI-assisted troubleshooting
Benefits:
- AI-assisted coding productivity
- Native debugging capabilities in WeChat DevTools
- Real-time preview and on-device debugging
- A complete toolchain
Option 2: Start from an existing WeChat DevTools project
If you already have a Mini Program project in WeChat DevTools:
- Open the project: open the existing project folder in your AI IDE
- Configure MCP: follow the docs to set up CloudBase MCP
- Download AI rules: tell your AI “Download CloudBase AI rules”
- Develop with AI: use AI for coding and CloudBase resource management
- Preview in WeChat DevTools: preview and debug in WeChat DevTools
How it works:
- AI IDE: code editing, cloud functions, database design, etc.
- WeChat DevTools: preview, on-device debugging, performance analysis, etc.
- Use both tools together to get the best of each
Notes:
- Make sure both tools open the exact same project folder
- Saved files sync automatically
- Do most development in the AI IDE, and do final verification in WeChat DevTools
Environment Management
How do I switch CloudBase environments?
Log out of CloudBase
Log in to CloudBase
How do I switch Tencent Cloud accounts?
To switch to a different Tencent Cloud account:
- Clear local login state: tell your AI
Log out - Log out in the browser: log out of the current Tencent Cloud account in your browser
- Log in again: tell your AI
Log in to CloudBase
How do I confirm the current environment?
Query current CloudBase environment info
Troubleshooting
What if deployment fails?
Send the complete error message to your AI:
I got an error: xxxx
How do I debug abnormal cloud function behavior?
Ask your AI to check logs and fix it:
The cloud function behavior doesn't match the requirement: xxx. Please check logs and data, debug it, and fix it.
Community
Want help or want to share experiences? Join our developer community.
WeChat Group

Scan to join the WeChat developer group
Support
How do I get help when I run into issues?
- Read this FAQ
- File an issue on GitHub Issues
- Join the WeChat developer group for community support
How can I participate in the community?
- Join the WeChat group to share projects and experiences
- Star the project on GitHub and submit issues or PRs
- Follow the official docs for the latest updates