Git Mode
Git collaborative development capability is currently only available for WeDa Enterprise Edition and above plans.
Enabling Git Mode allows you to connect your application to Git hosting providers (such as GitHub) to provide version control functionality for your application, making it easier to track changes, roll back changes, or collaborate using Git branches.
Usage
The version control in Git Mode is similar to the traditional Git workflow. In WeDa, the basic workflow of Git Mode includes the following steps:
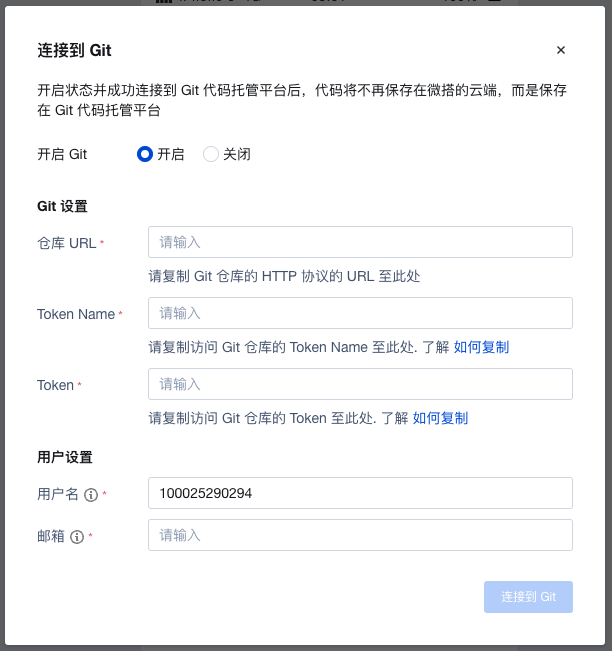
1. Connect to Git Repository
Click the icon in the bottom-left corner to open the Git Mode pop-up window, as illustrated.
Fill in the relevant information as required. For specific fields, please refer to the instructions below.
-
Repository URL
Copy the HTTP URL of the Git repository directly (example: https://github.com/daniel-dx/for-weda-git-app.git)
If you are using Bitbucket, some modifications are required. For details, please refer to the section below: How to Apply for a token - Notes for Bitbucket
-
Token Name
Generally, it will be automatically generated and no modification is required.
If you are using Bitbucket, some modifications are required. For details, please refer to the section below: How to Apply for a token - Notes for Bitbucket
-
Token
Copy the token applied from your Git hosting provider. For how to apply, please refer to the section below: How to Apply for a token
-
Username
Used to record the author information of commits. Defaults to your Tencent Cloud account UIN and can be modified according to actual needs.
-
Email
Used to record the author information of commits. Please fill in according to your actual situation.
2. Branch Management
View Branches
Click the branch icon in the lower-left corner to open the branch management panel, where you can view all branches including local and remote ones.
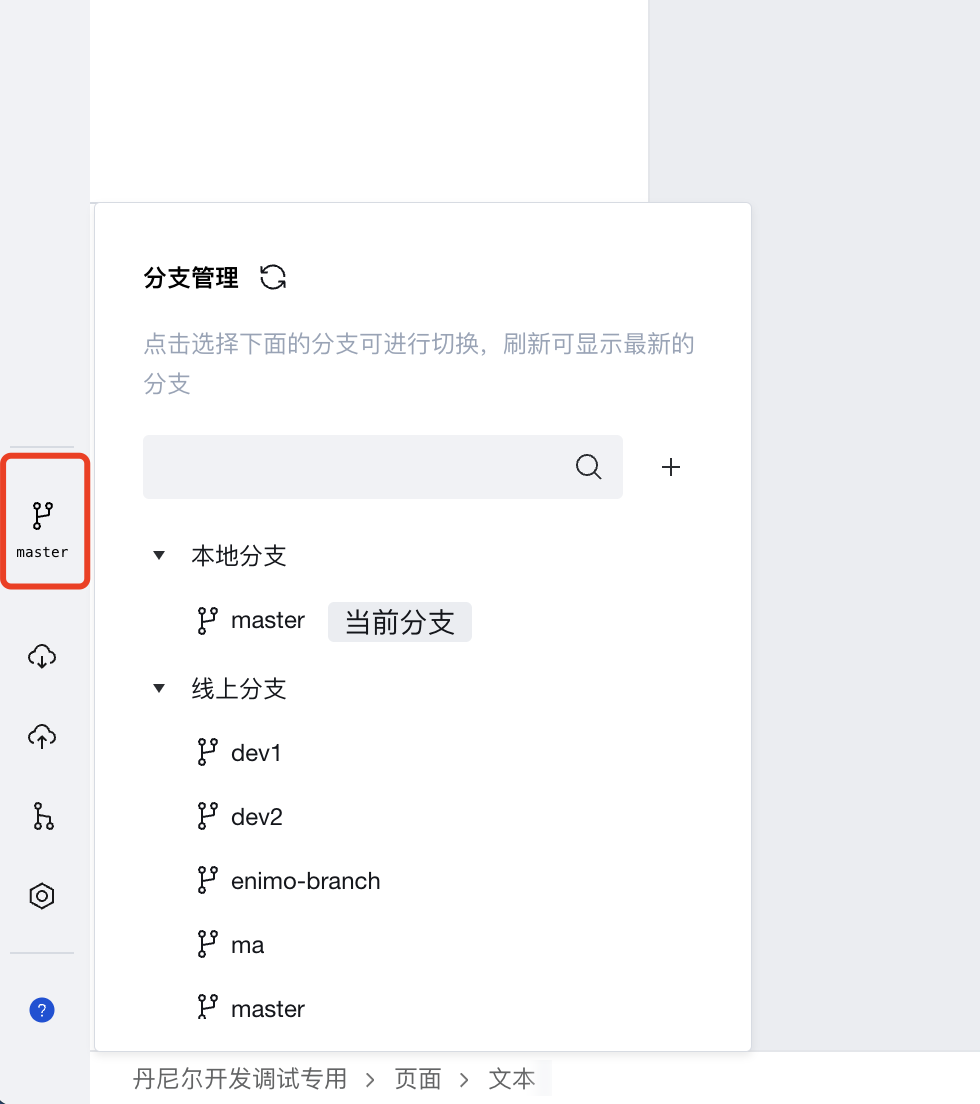
Create Branch
Click the plus (+) icon to display the pop-up window for creating a branch. Fill in a valid branch name to create a new branch.

Switch Branch
Click on any branch in the branch tree to directly switch to that branch.

3. Commit Changes
Modify the application, then click [Save] or use the shortcut (ctrl+S for Windows; Command+S for Mac) to save changes to the staging area of the local repository (this action is equivalent to running the git add . command).
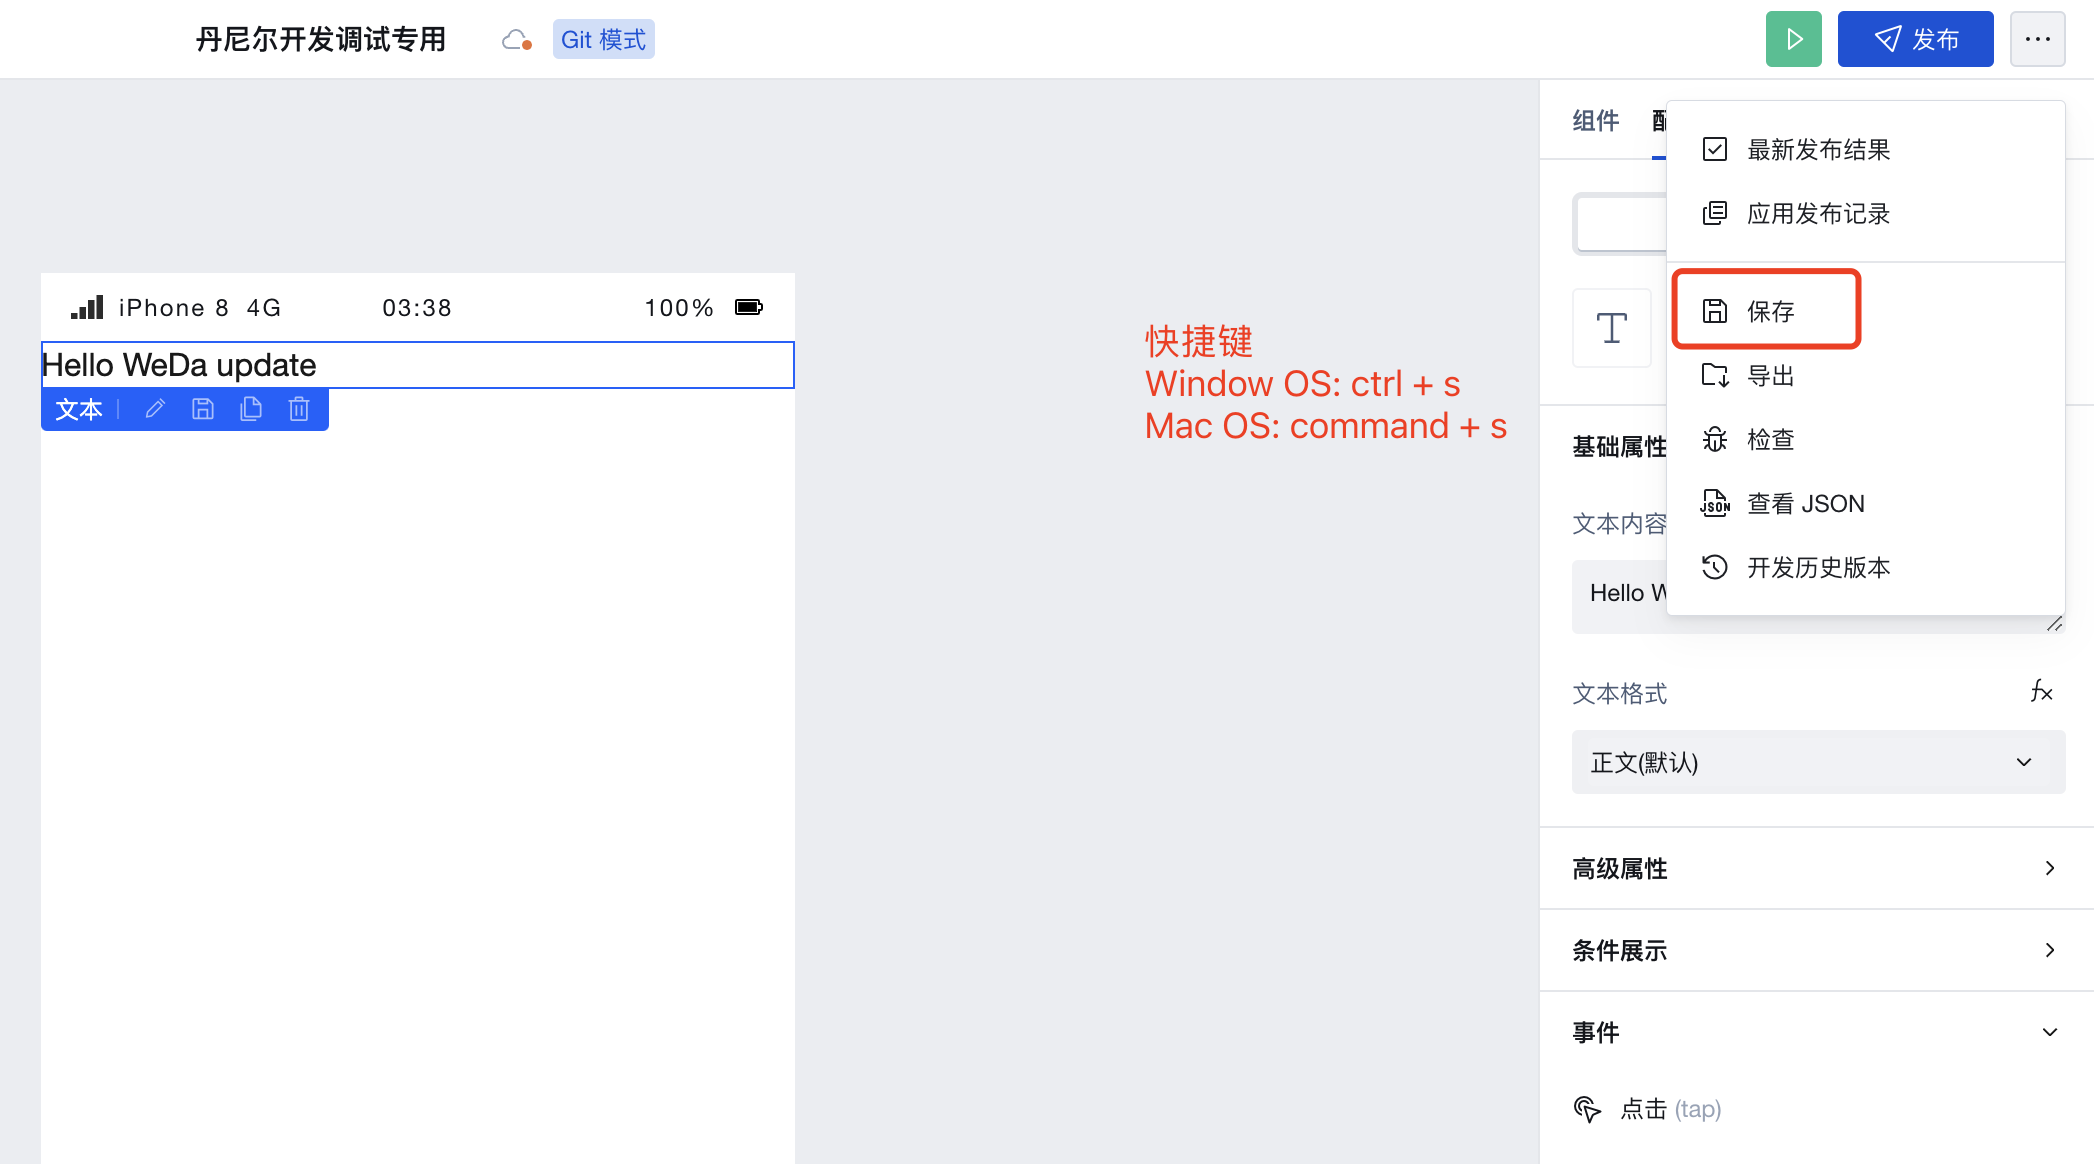
Then click the commit icon in the lower-left corner to open the code commit panel.

Click [Commit & Push] to submit the code to the remote repository.
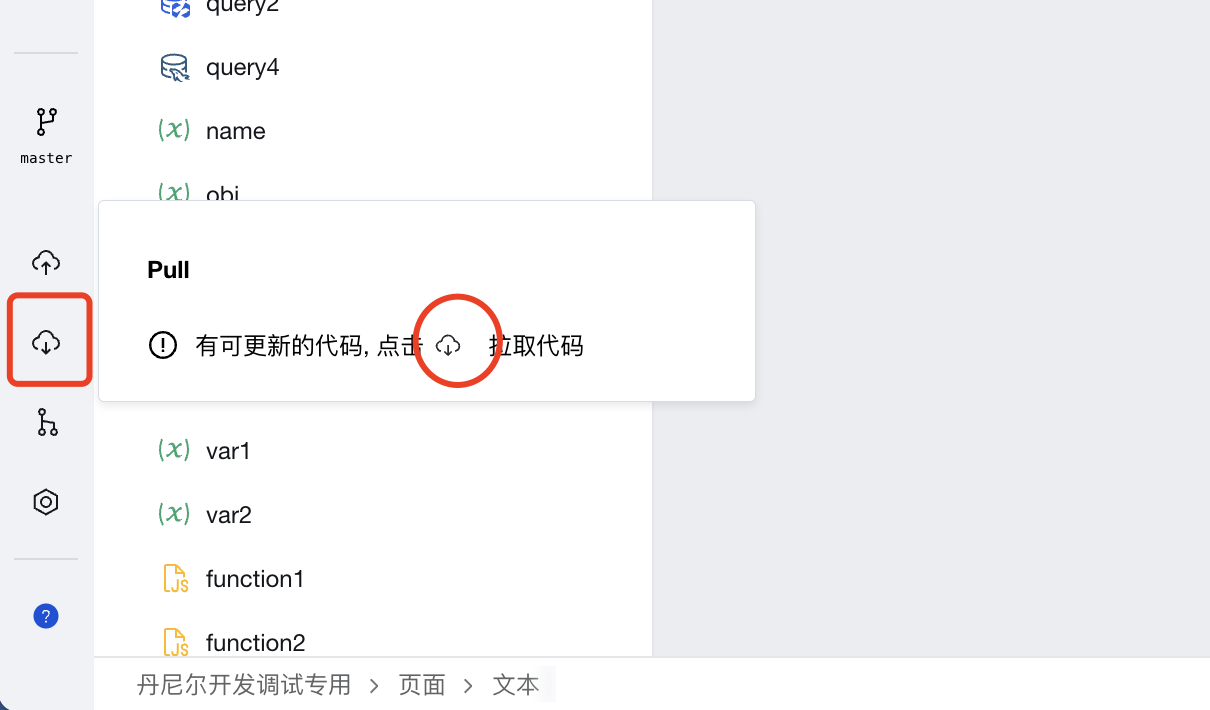
4. Pull Updates
Click the pull icon in the lower-left corner to open the code pull panel. If the remote repository has updatable code, click the icon button below to pull the code.
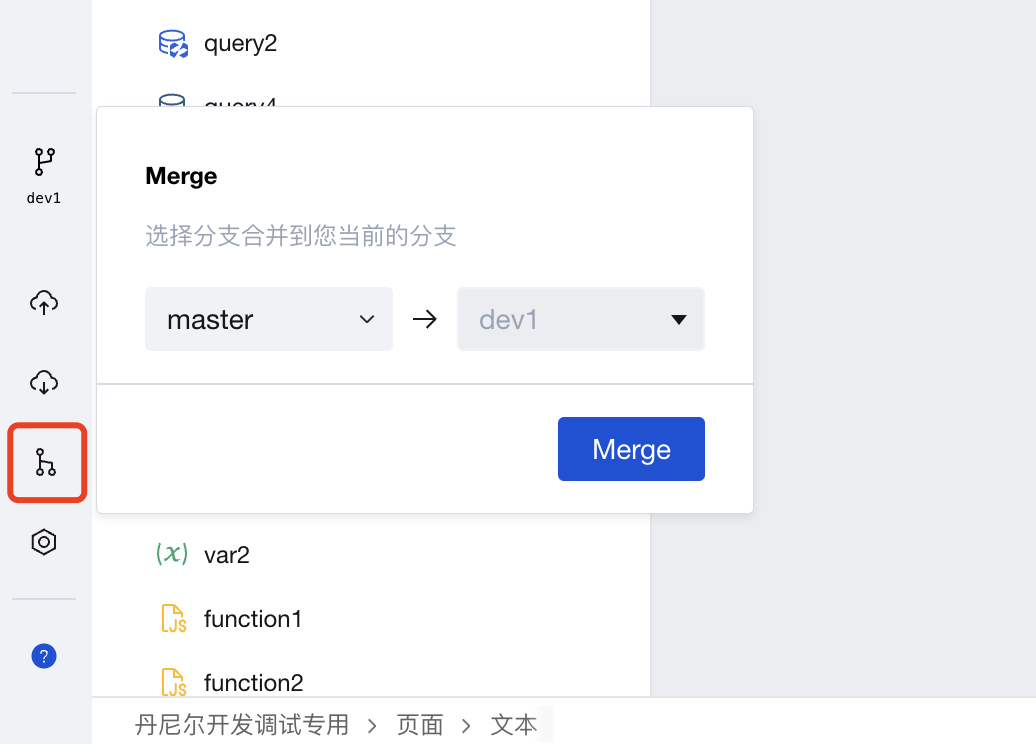
5. Merge Branch
Click the merge icon in the lower-left corner to open the branch merge panel. On the left, select other local branches to merge into the current branch, then click [Merge] to complete.
How to Create a Repository
GitHub
Please refer to the official documentation: Create a repo
GitLab
Please refer to the official documentation: Create a project
Bitbucket
Please refer to the official documentation: Step 1: Put your code in Bitbucket
Gitee
Please refer to the official documentation: Create a Repository
Codeup
Please refer to the official documentation: Step 1: Create Your First Code Repository
How to Apply for a token
GitHub
GitHub: https://github.com/
-
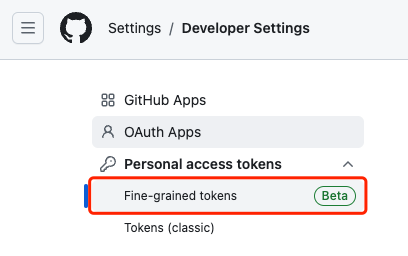
Access Fine-grained tokens
The access path is: Settings / Developer Settings / Personal access tokens / Fine-grained tokens
-
Click [Generate new token] and fill in according to the image below
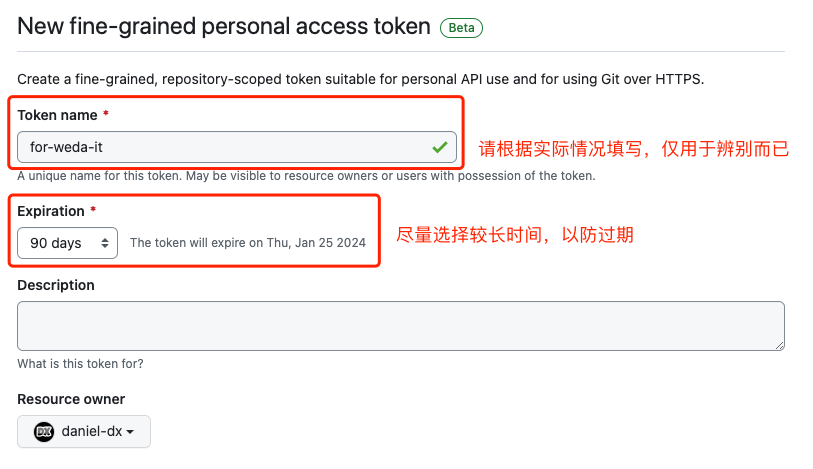


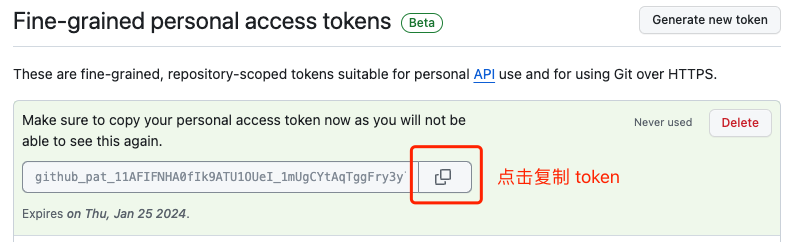
Click [Generate token] to generate a token and copy it
GitLab
GitLab: https://gitlab.com/
-
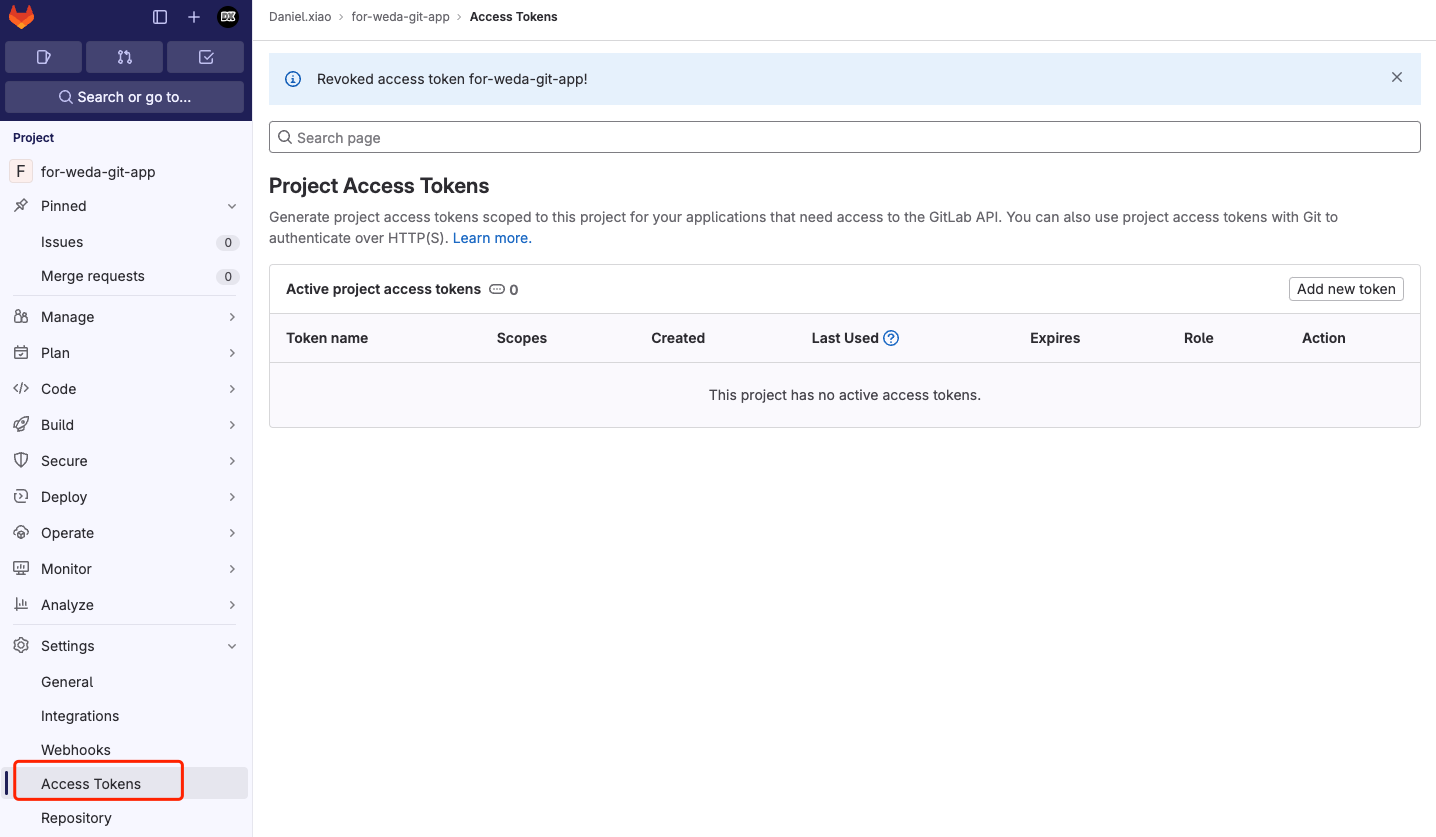
Select your repository and access [Access Tokens]
The access path is: Settings / Access Tokens
-
Click [Add new token] and fill in according to the image below
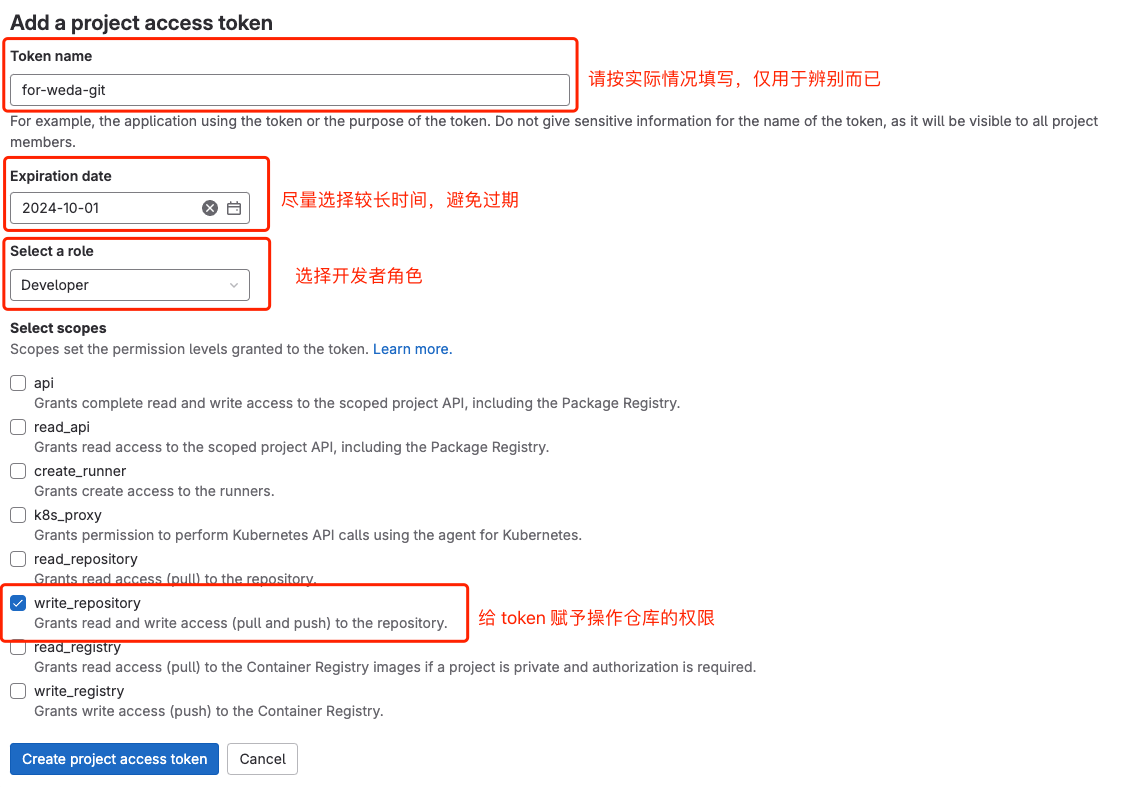
Click [Create project access token] to generate a token and copy it

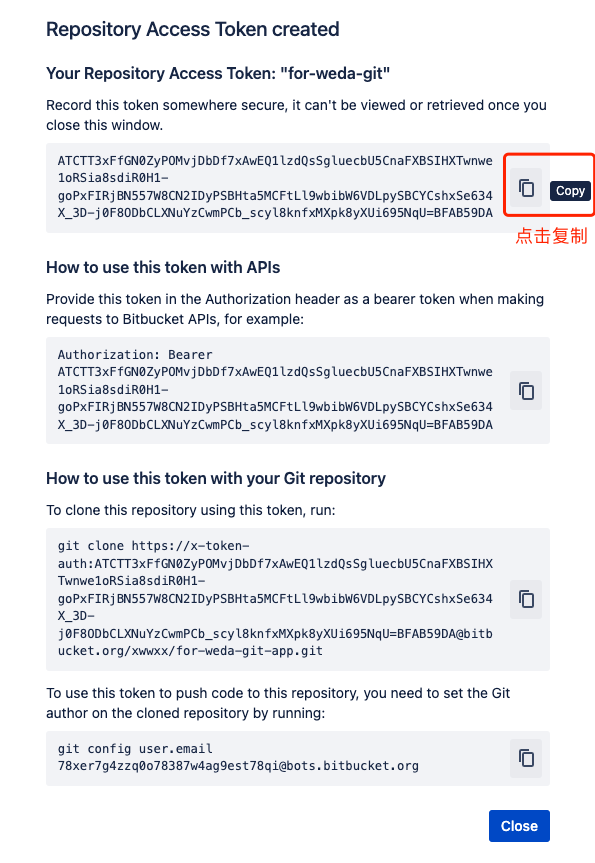
Bitbucket
Bitbucket: https://bitbucket.org/
-
Select your repository and access [Access Tokens]
Access path: Repository settings / Access tokens

-
Click [Create Repository Access Token] and fill in according to the image below

Click [Create] to generate a token and copy it
Notes
- Enter the repository URL
You need to remove the xxx@ section from the repository URL (for example, if the repository URL is https://xwwxx@bitbucket.org/xwwxx/for-weda-git-app.git, then enter https://bitbucket.org/xwwxx/for-weda-git-app.git)- Enter Token Name
Enter the fixed value "x-token-auth"
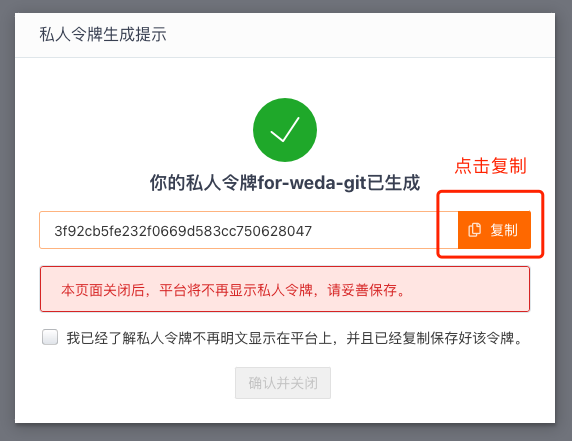
Gitee
Gitee: https://gitee.com/
Gitee does not support creating repository-level tokens; it only supports creating global tokens.
-
Access Personal Access Token

-
Click [Generate New Token] and fill in according to the image below
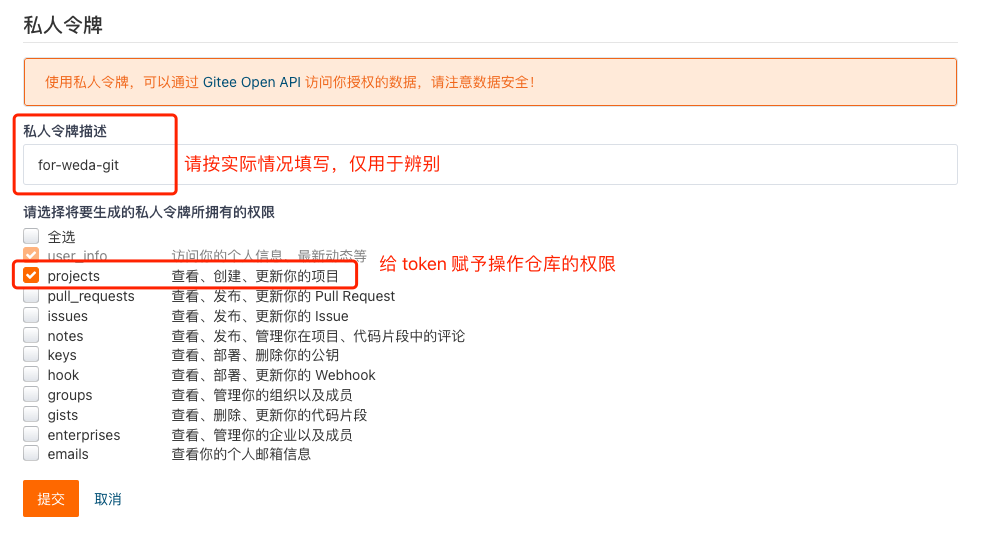
Click [Submit] to generate a token and copy it
Codeup
Codeup: https://codeup.aliyun.com/
Codeup does not support creating repository-level tokens; it only supports creating global tokens.
-
Access [Personal Access Token]

-
Click [Generate Access Token] and fill in according to the image below
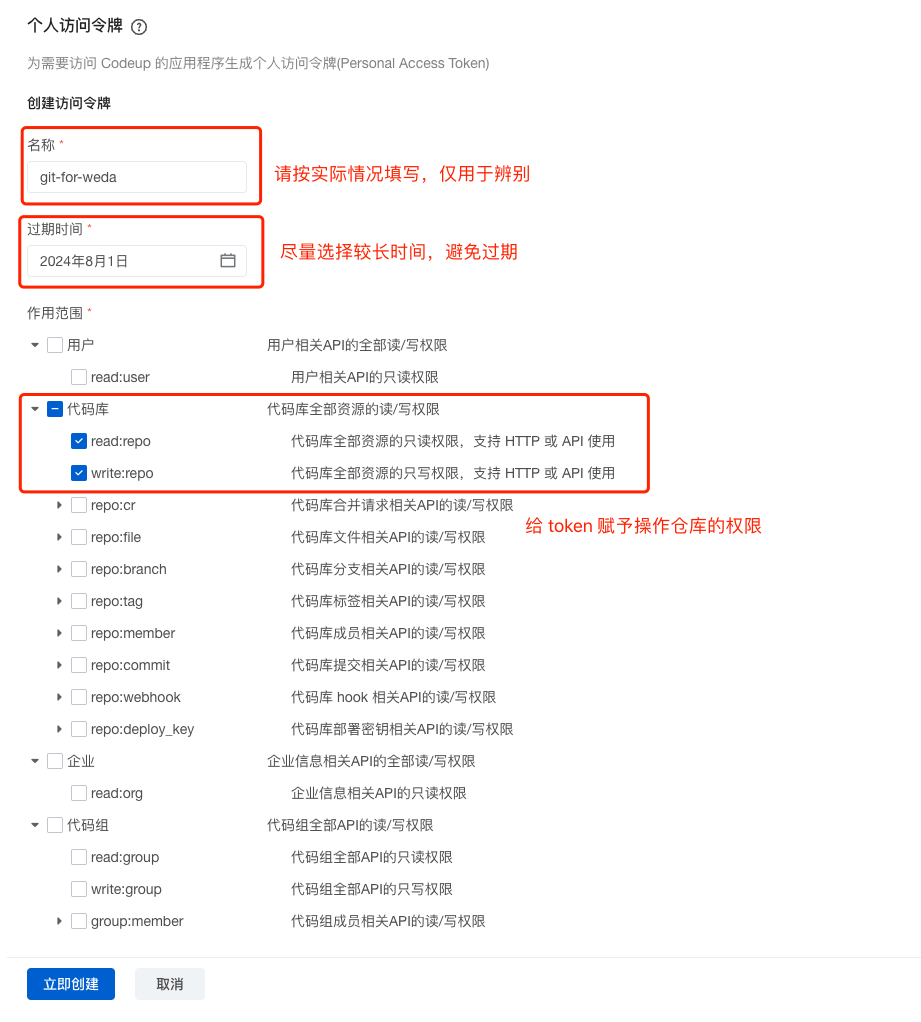
Click [Create Now] to generate a token and copy it

Online Development Git Configuration Synchronization
After enabling Git mode, when using online development (such as Cloud Function and FaaS Cloud Hosting), the system will automatically synchronize Git configurations to the online editor. Once synchronization is complete, you can utilize the Git features in the online editor to manage code for resources like Cloud Function.
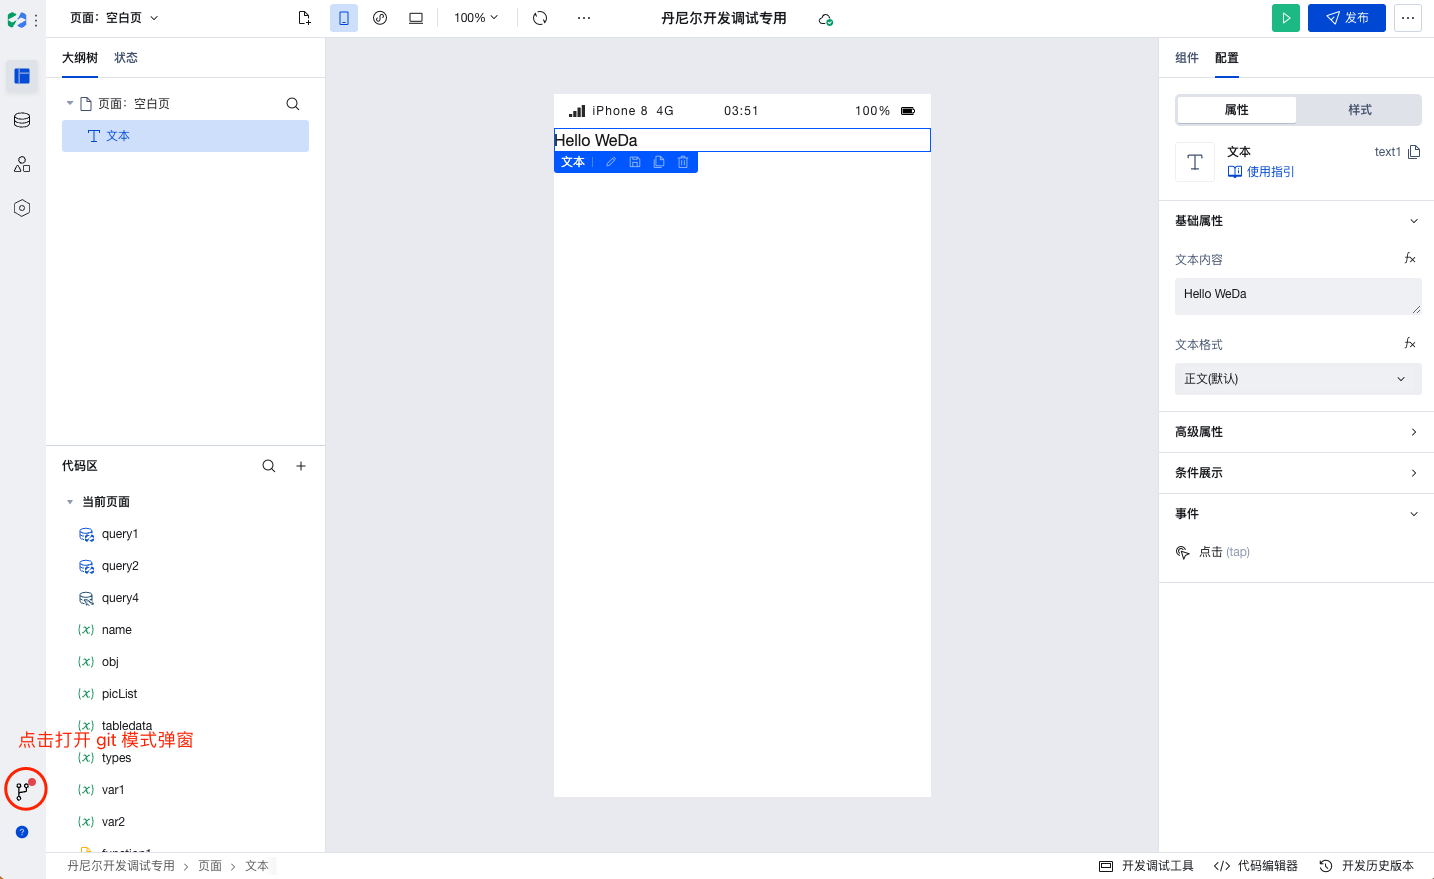
Automatic Git Configuration Synchronization
When the online editor has not yet synchronized Git configurations, the following prompt will appear. Click the [Click to Continue] button to synchronize Git configurations.
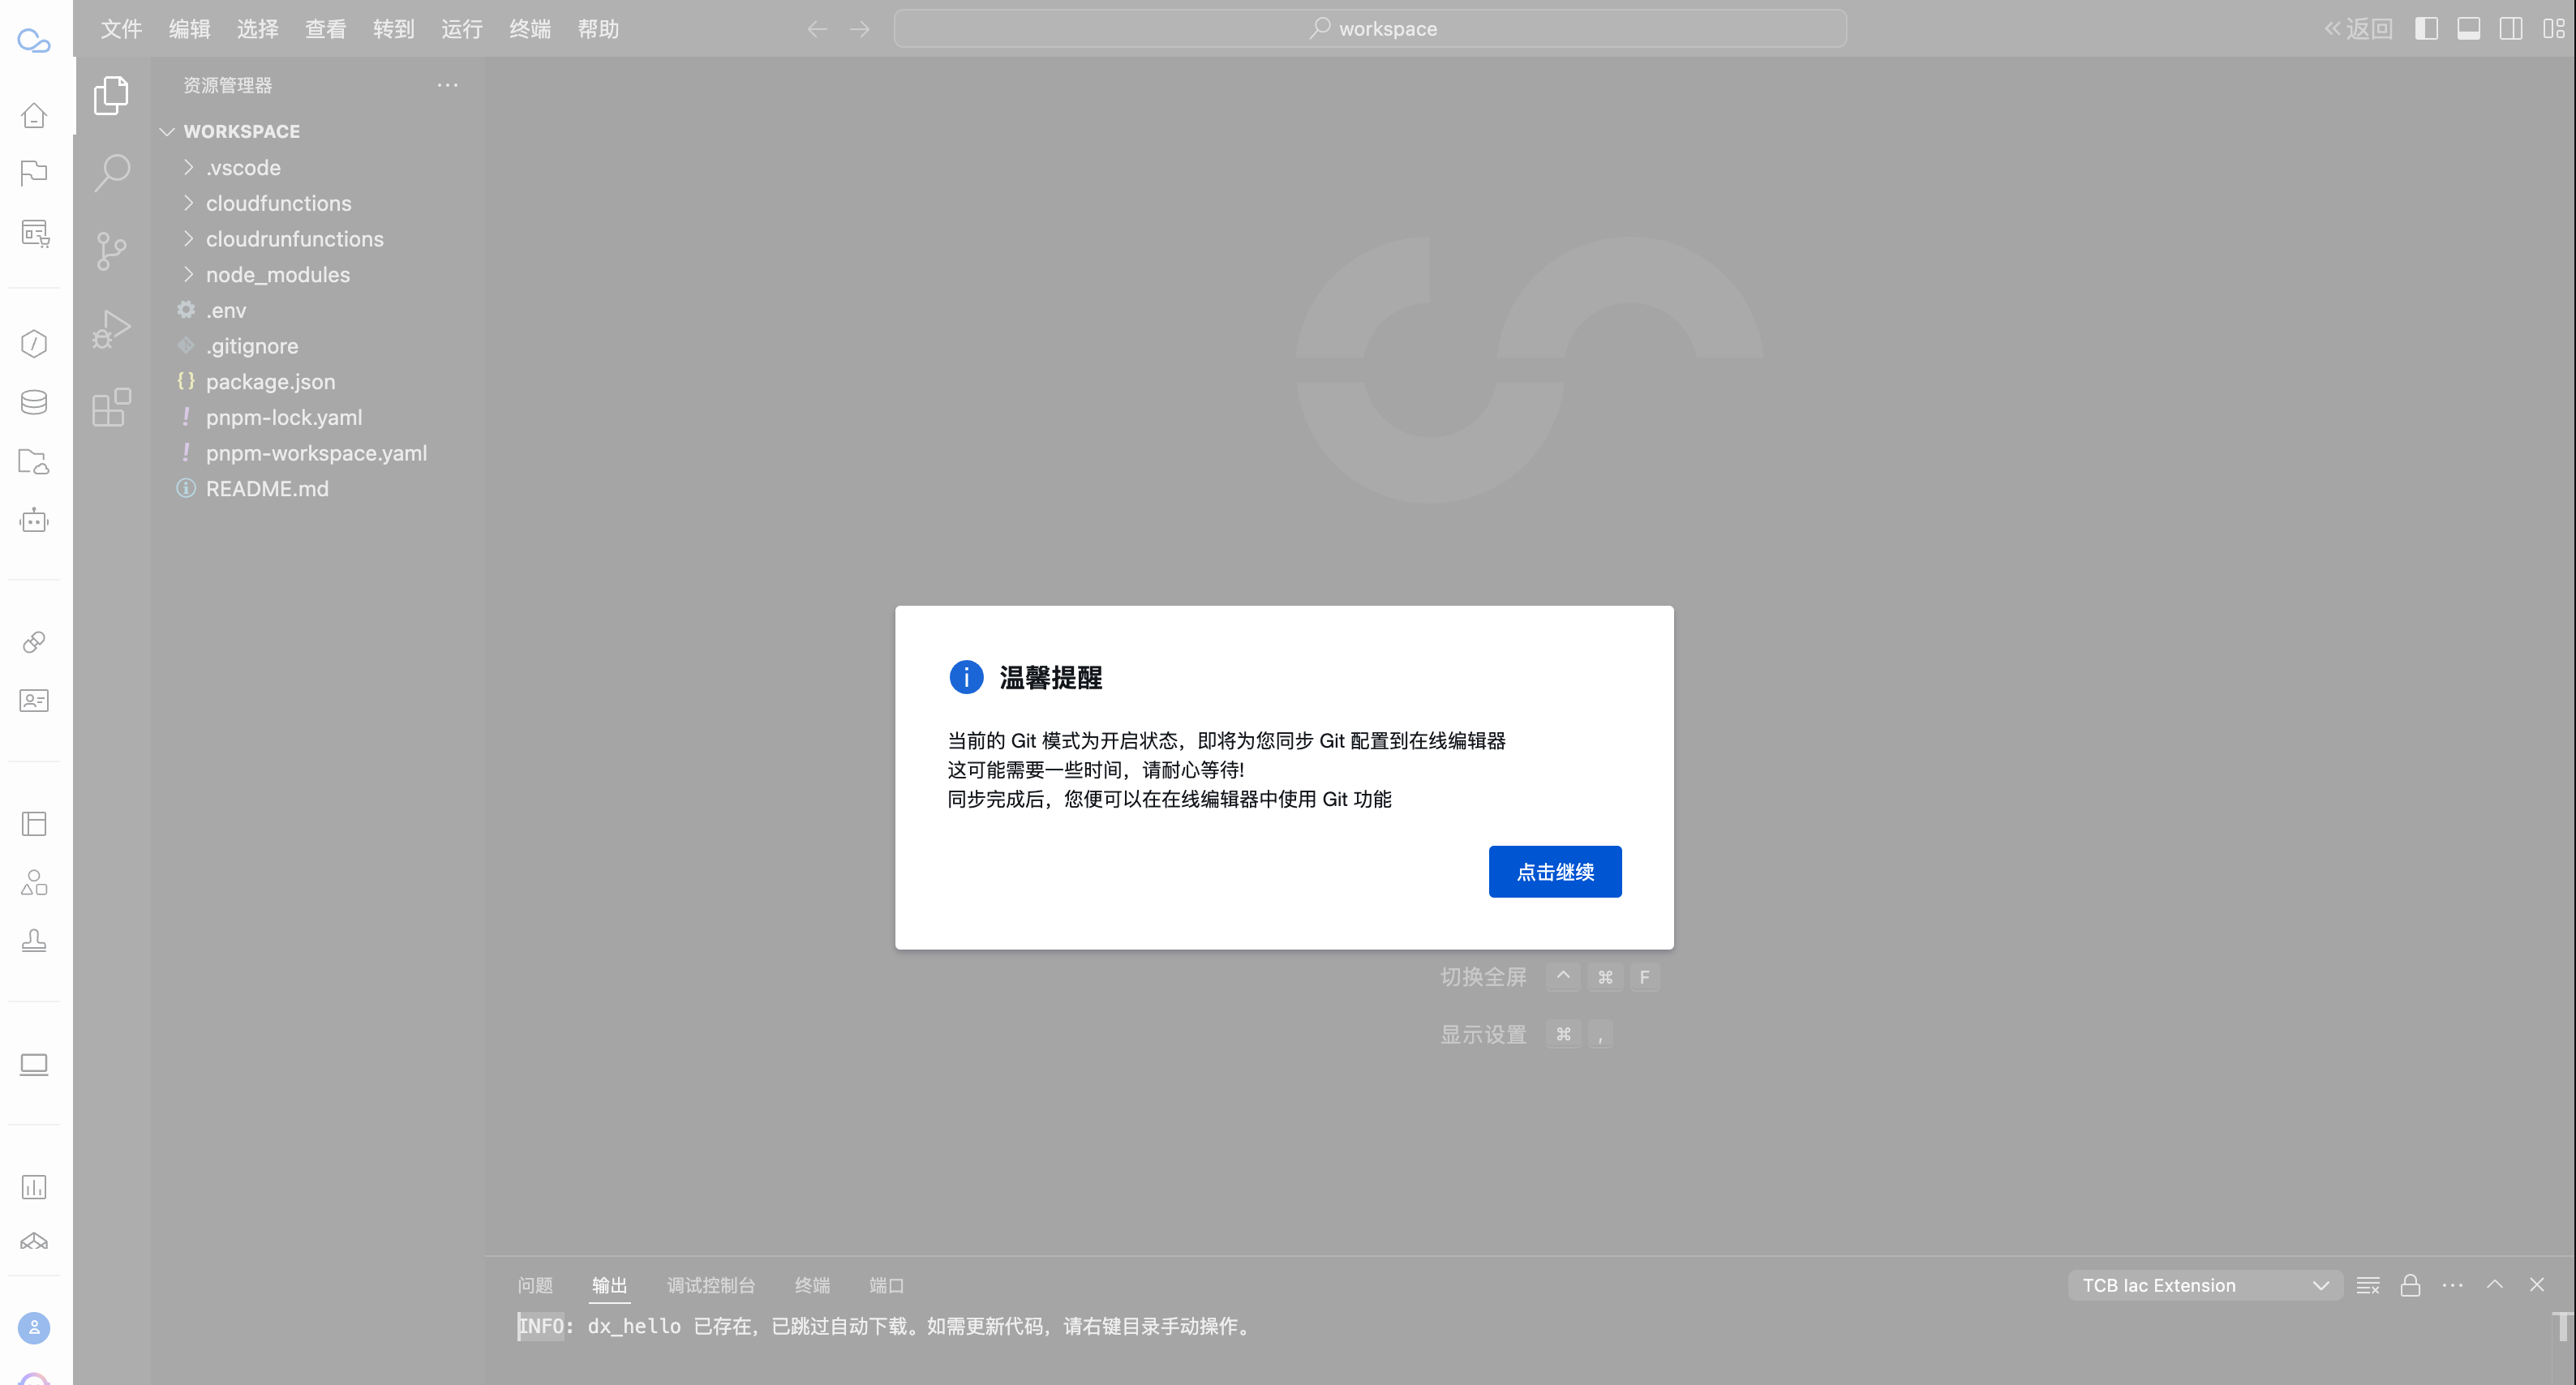
During synchronization, a progress indicator will be displayed. Upon success, the system will pop up an operation success prompt. Click [OK] to complete the operation.
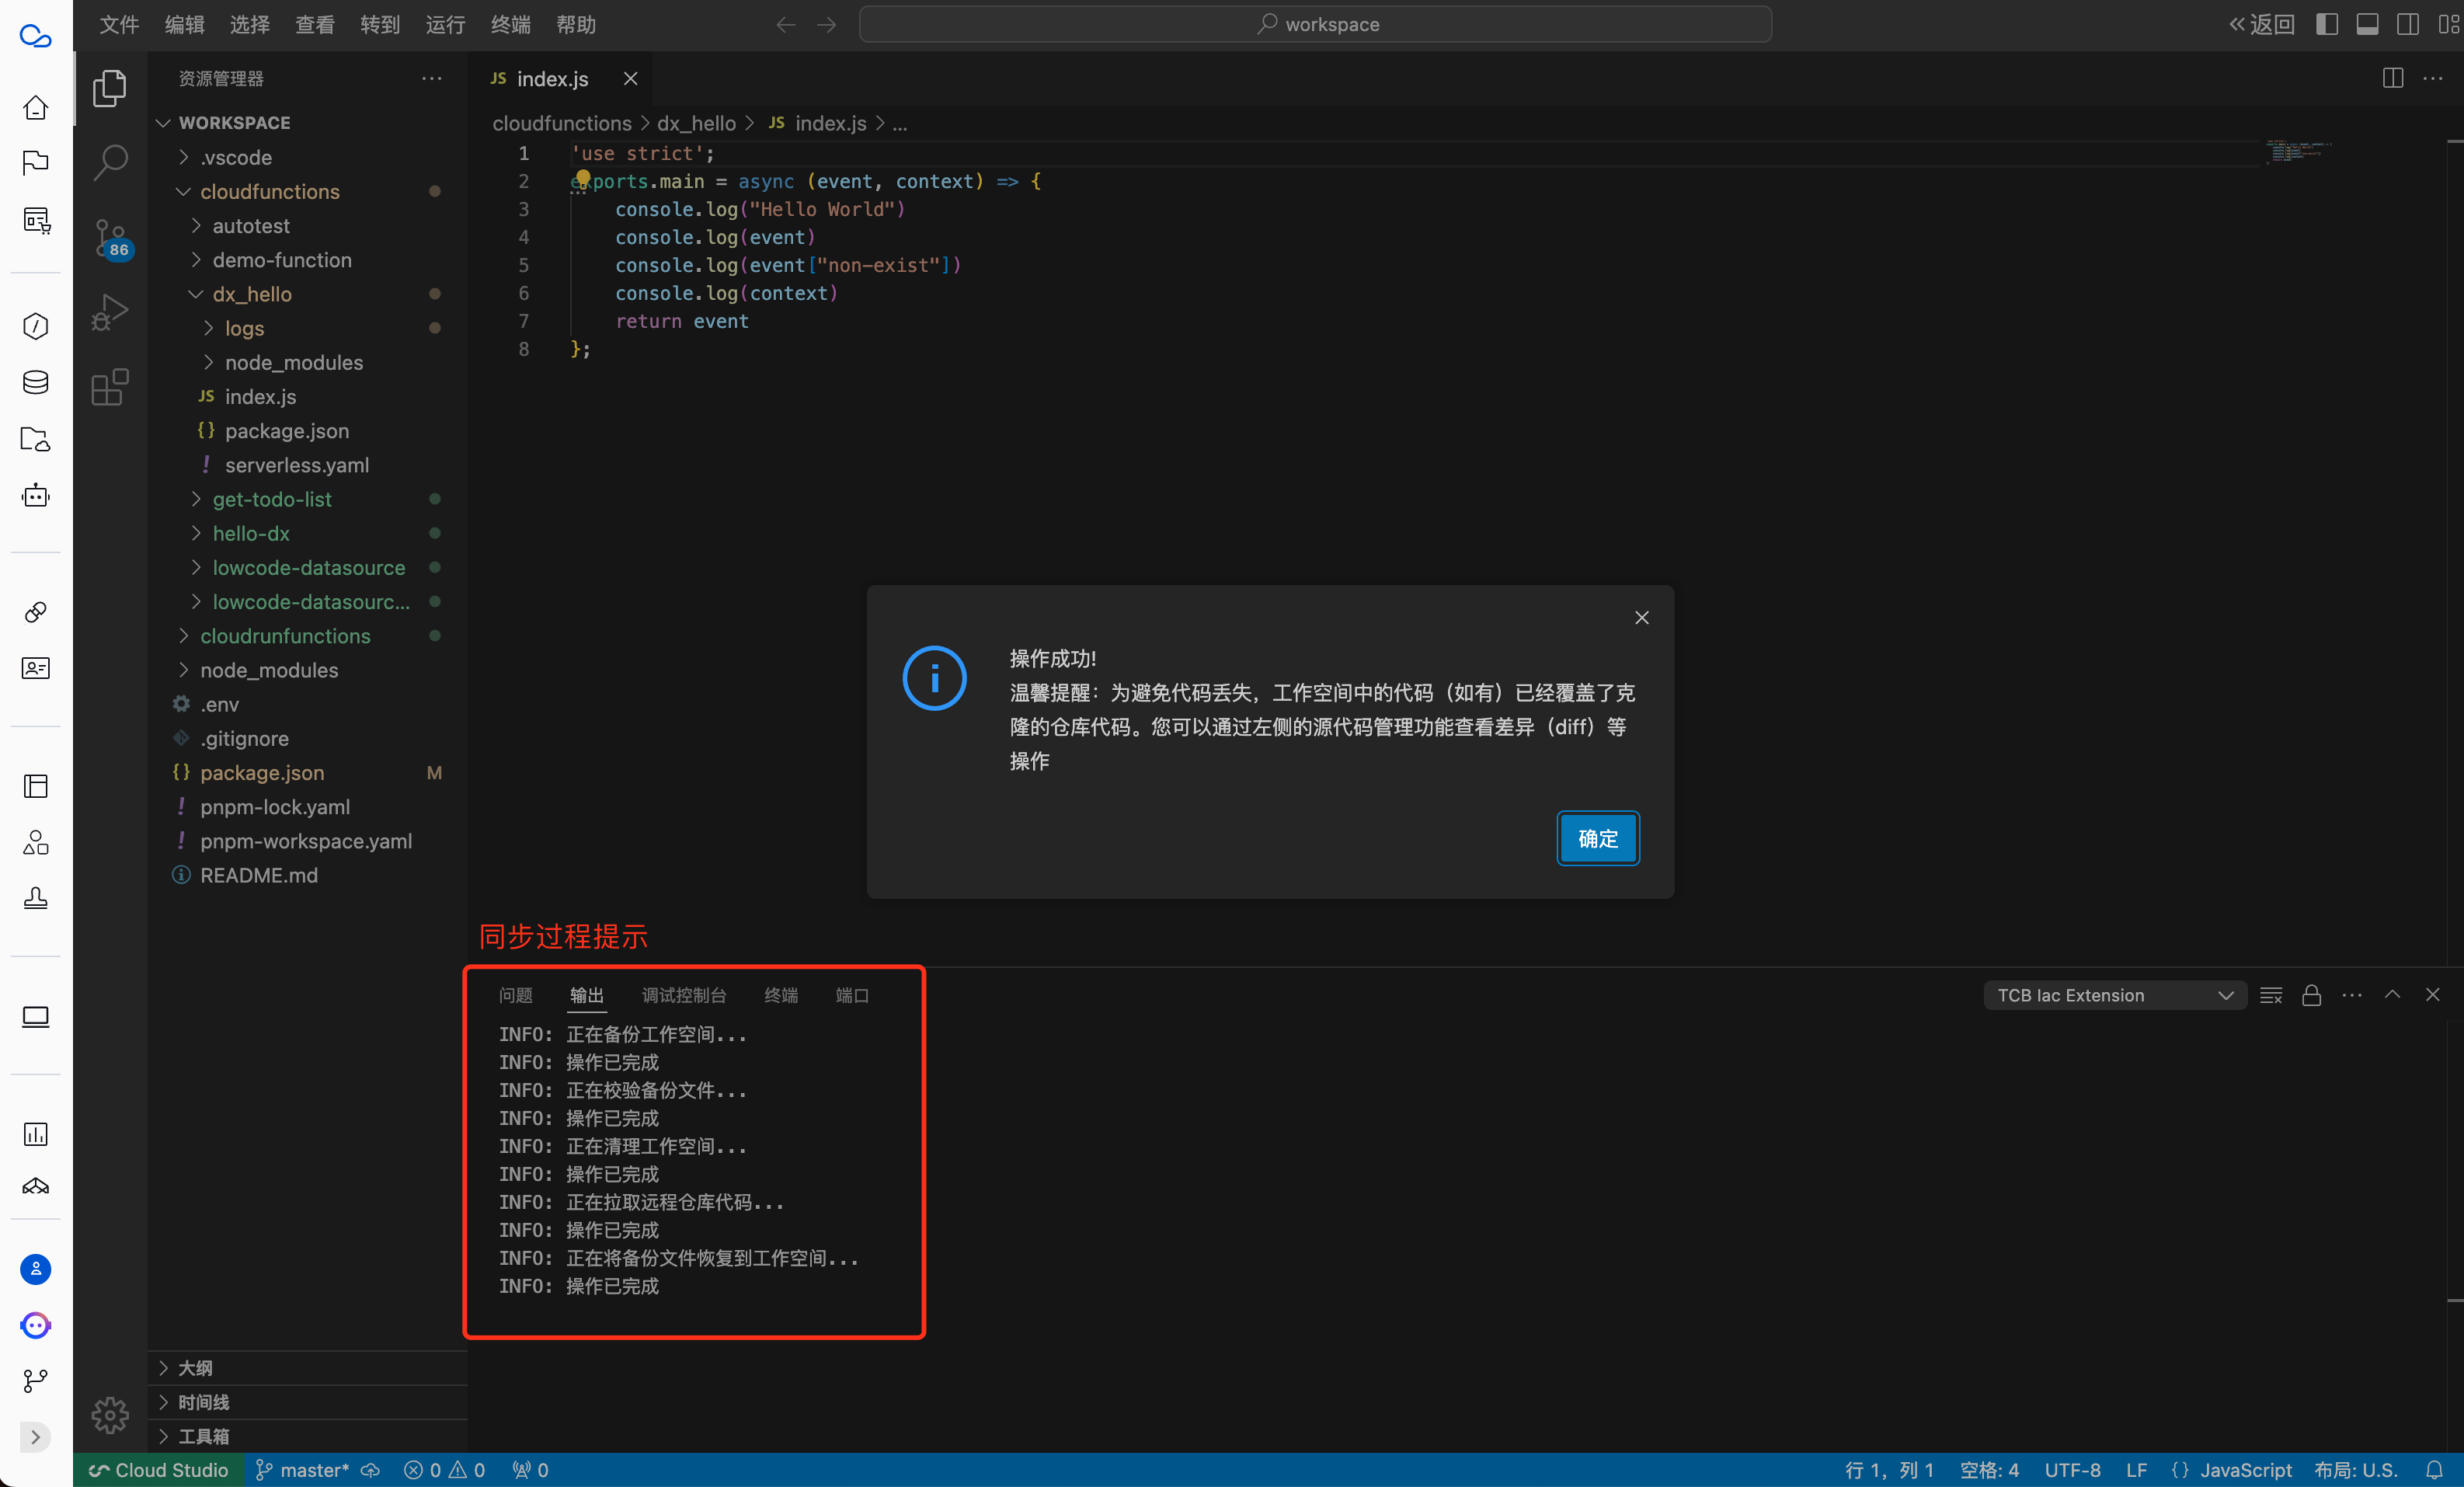
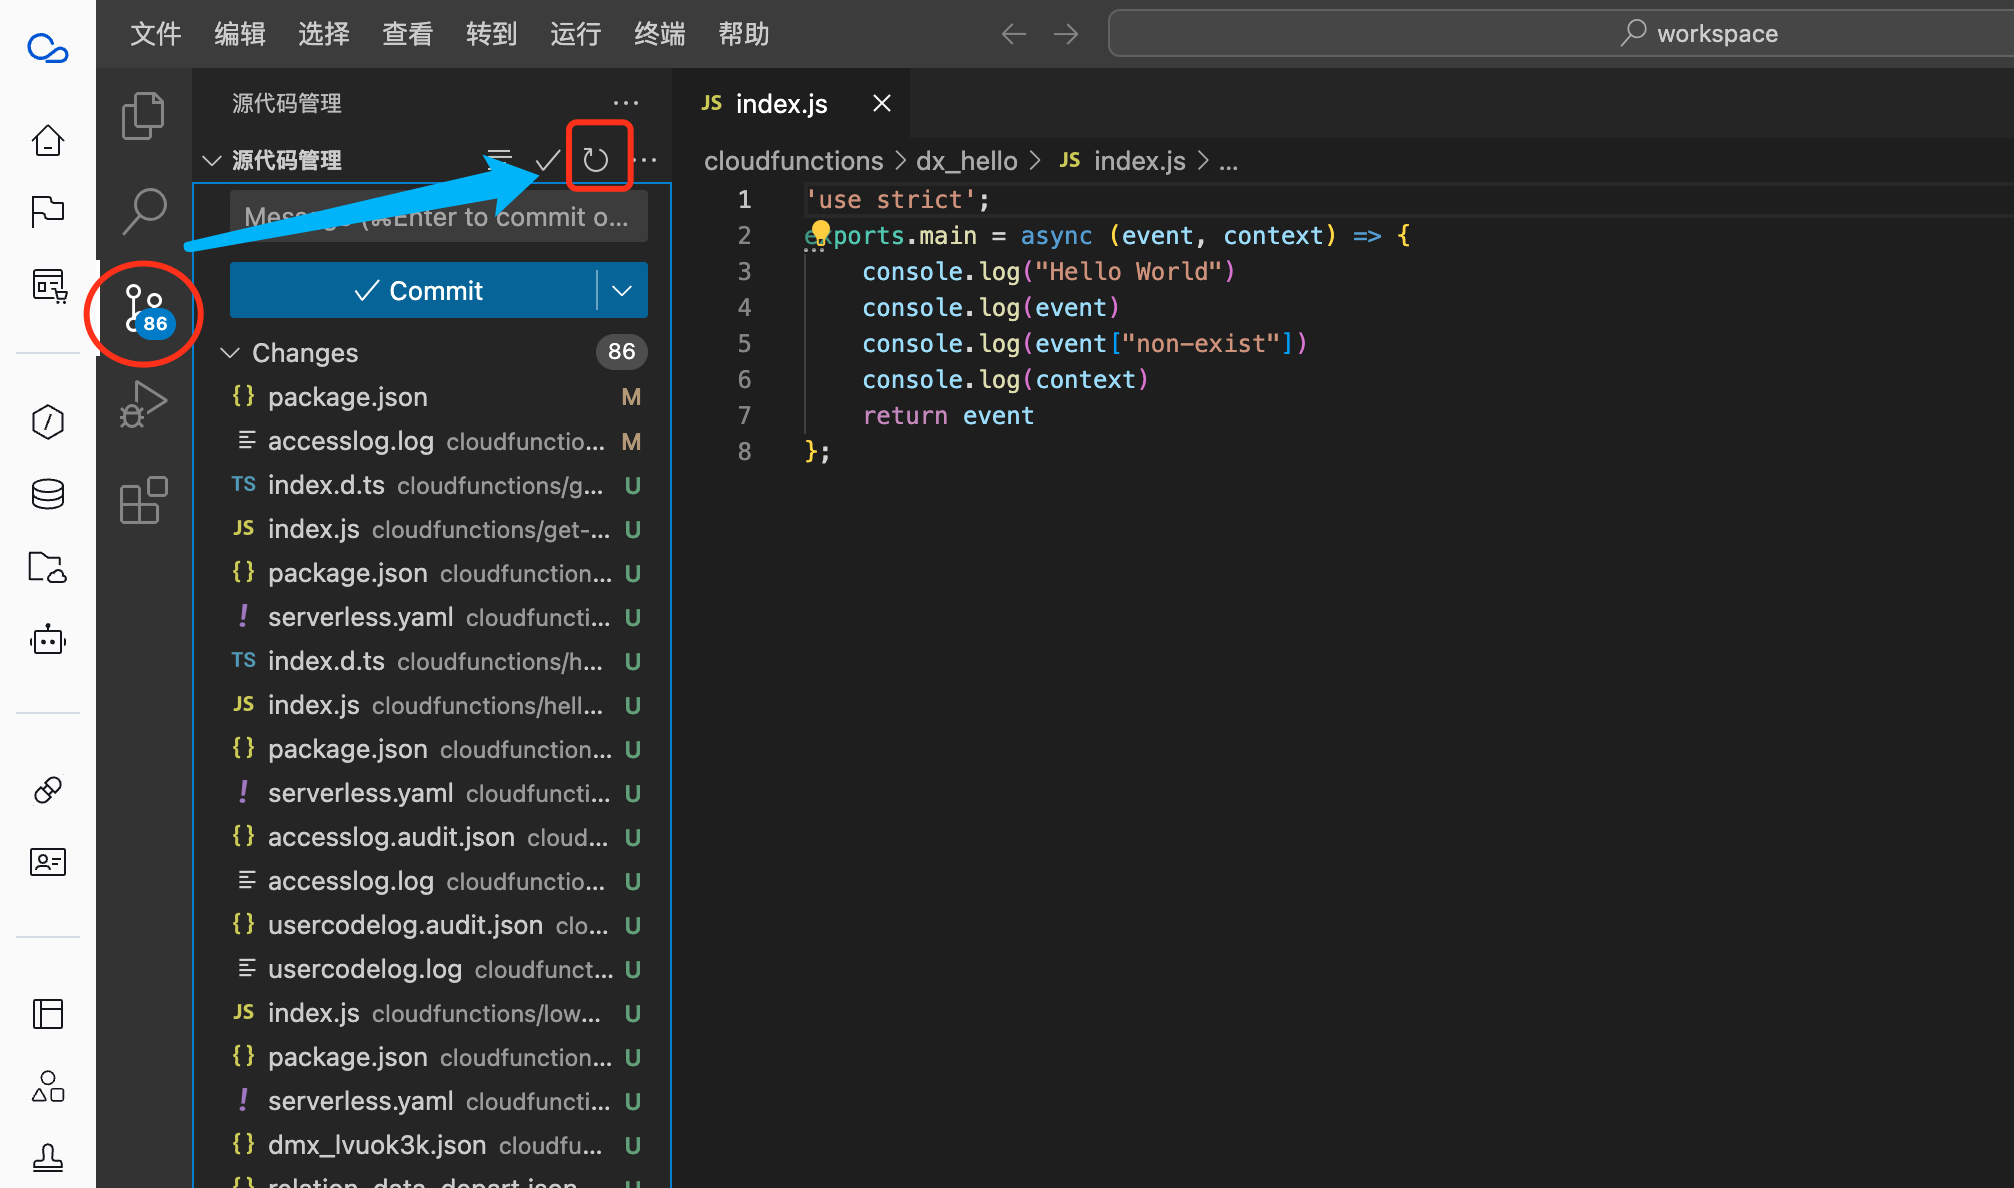
After synchronization is complete, you can view the modified code in the Git function menu of the left navigation bar. This code is the original code in your workspace. Please delete or commit it as needed.
Frequently Asked Questions
-
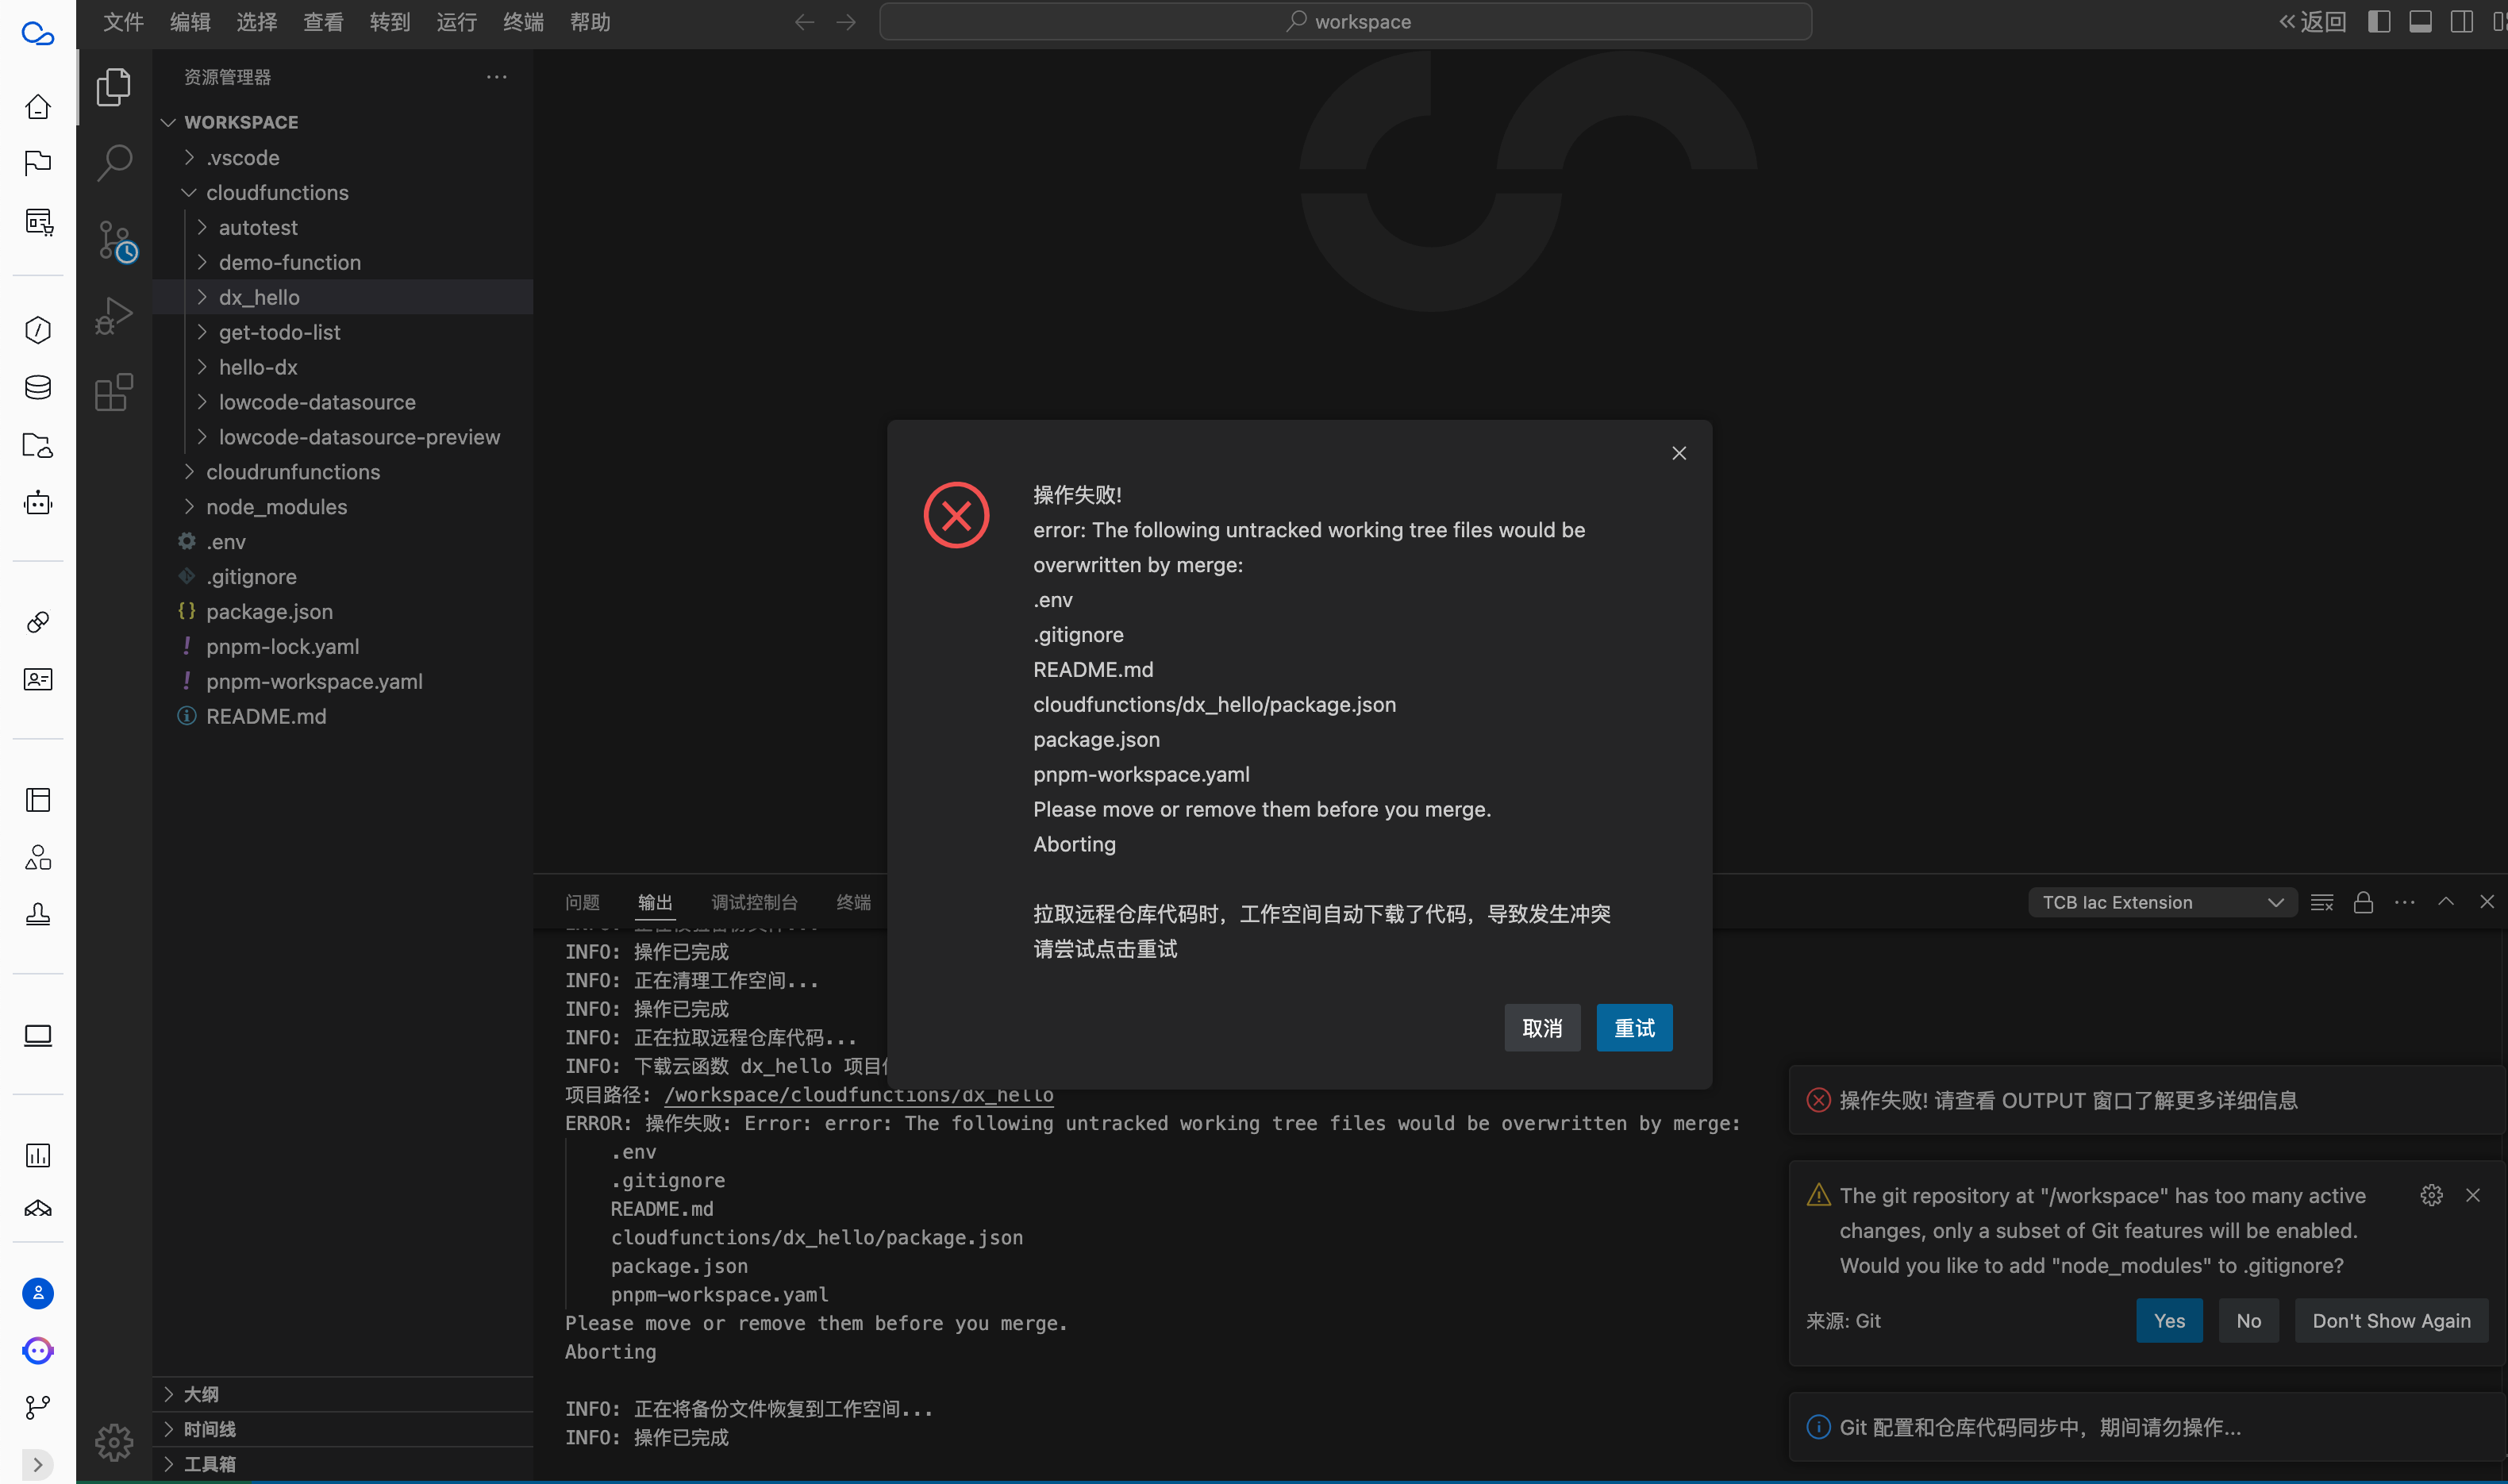
Synchronization failure due to conflict
When opening a cloud function that does not exist in the workspace, the editor will automatically download it while simultaneously pulling code from the repository, which may cause conflicts and lead to synchronization failure. In this case, click [Retry] to resolve the issue.
-
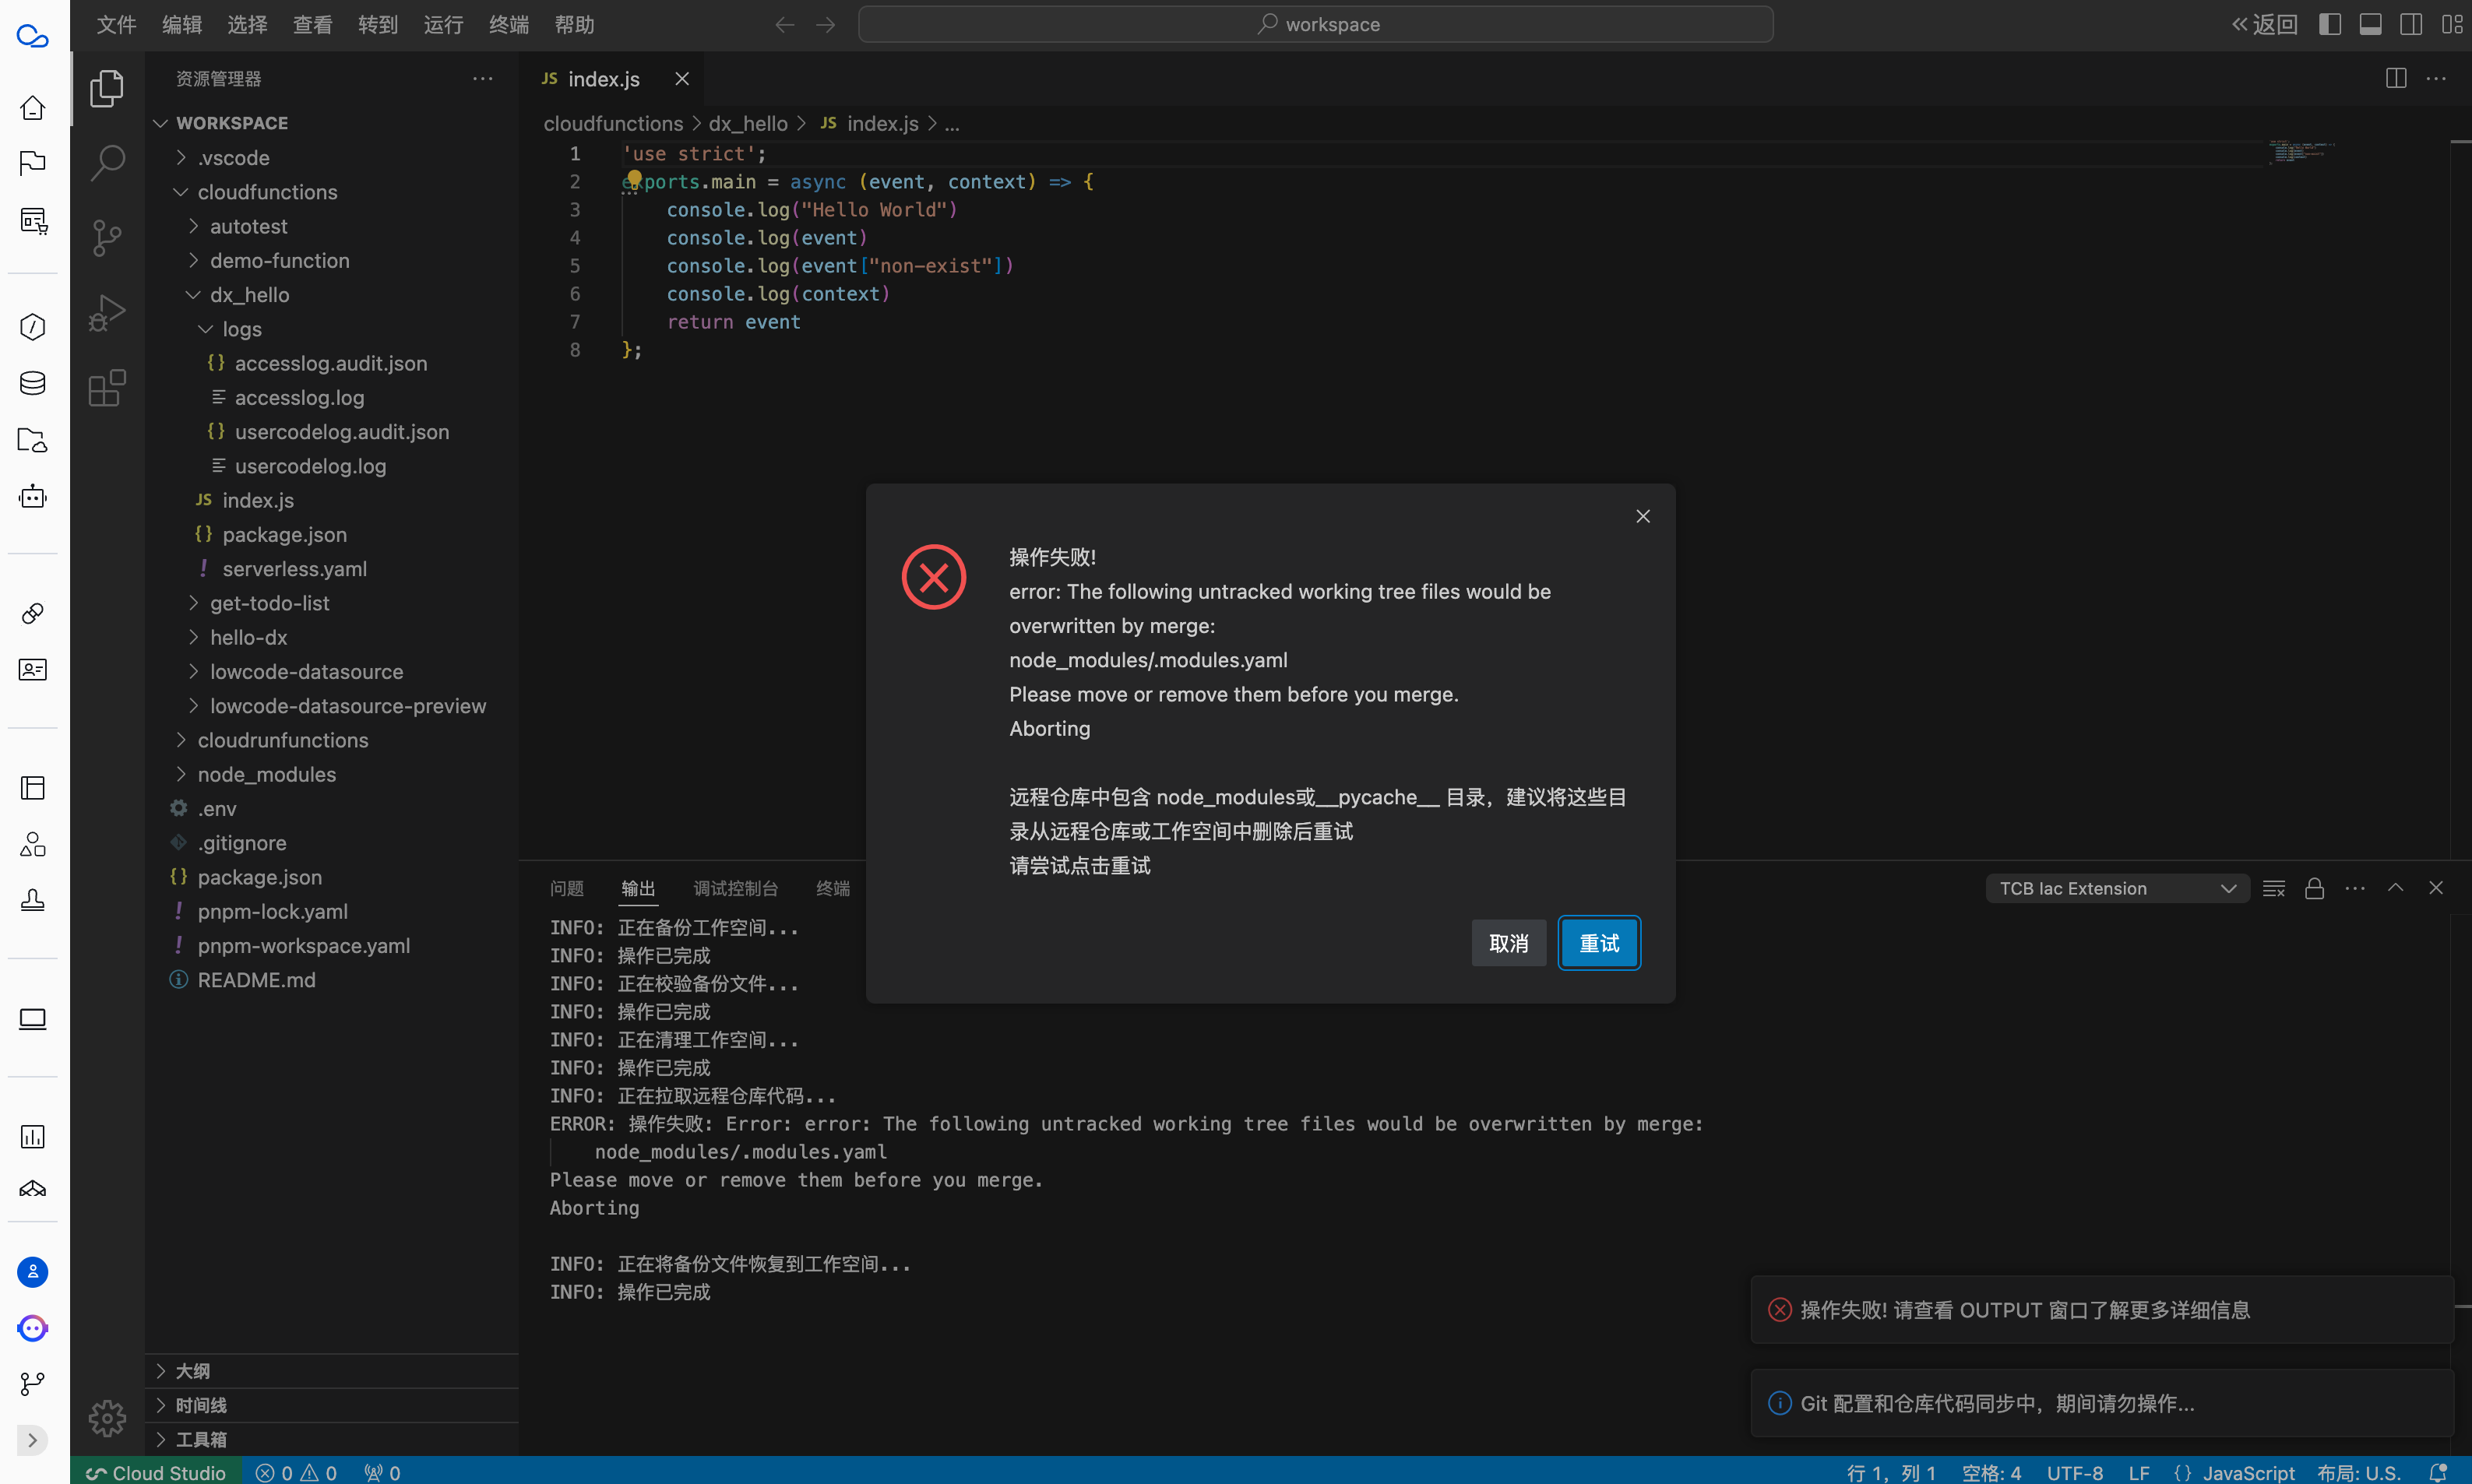
Synchronization failure due to remote repository containing node_modules directory
Generally, it is not recommended to commit node_modules to the repository. If your remote repository contains a node_modules directory, it may cause synchronization failure.
You can choose to delete the node_modules directory in the remote repository or delete the node_modules directory in the workspace, then click [Retry] to resolve the issue.
-
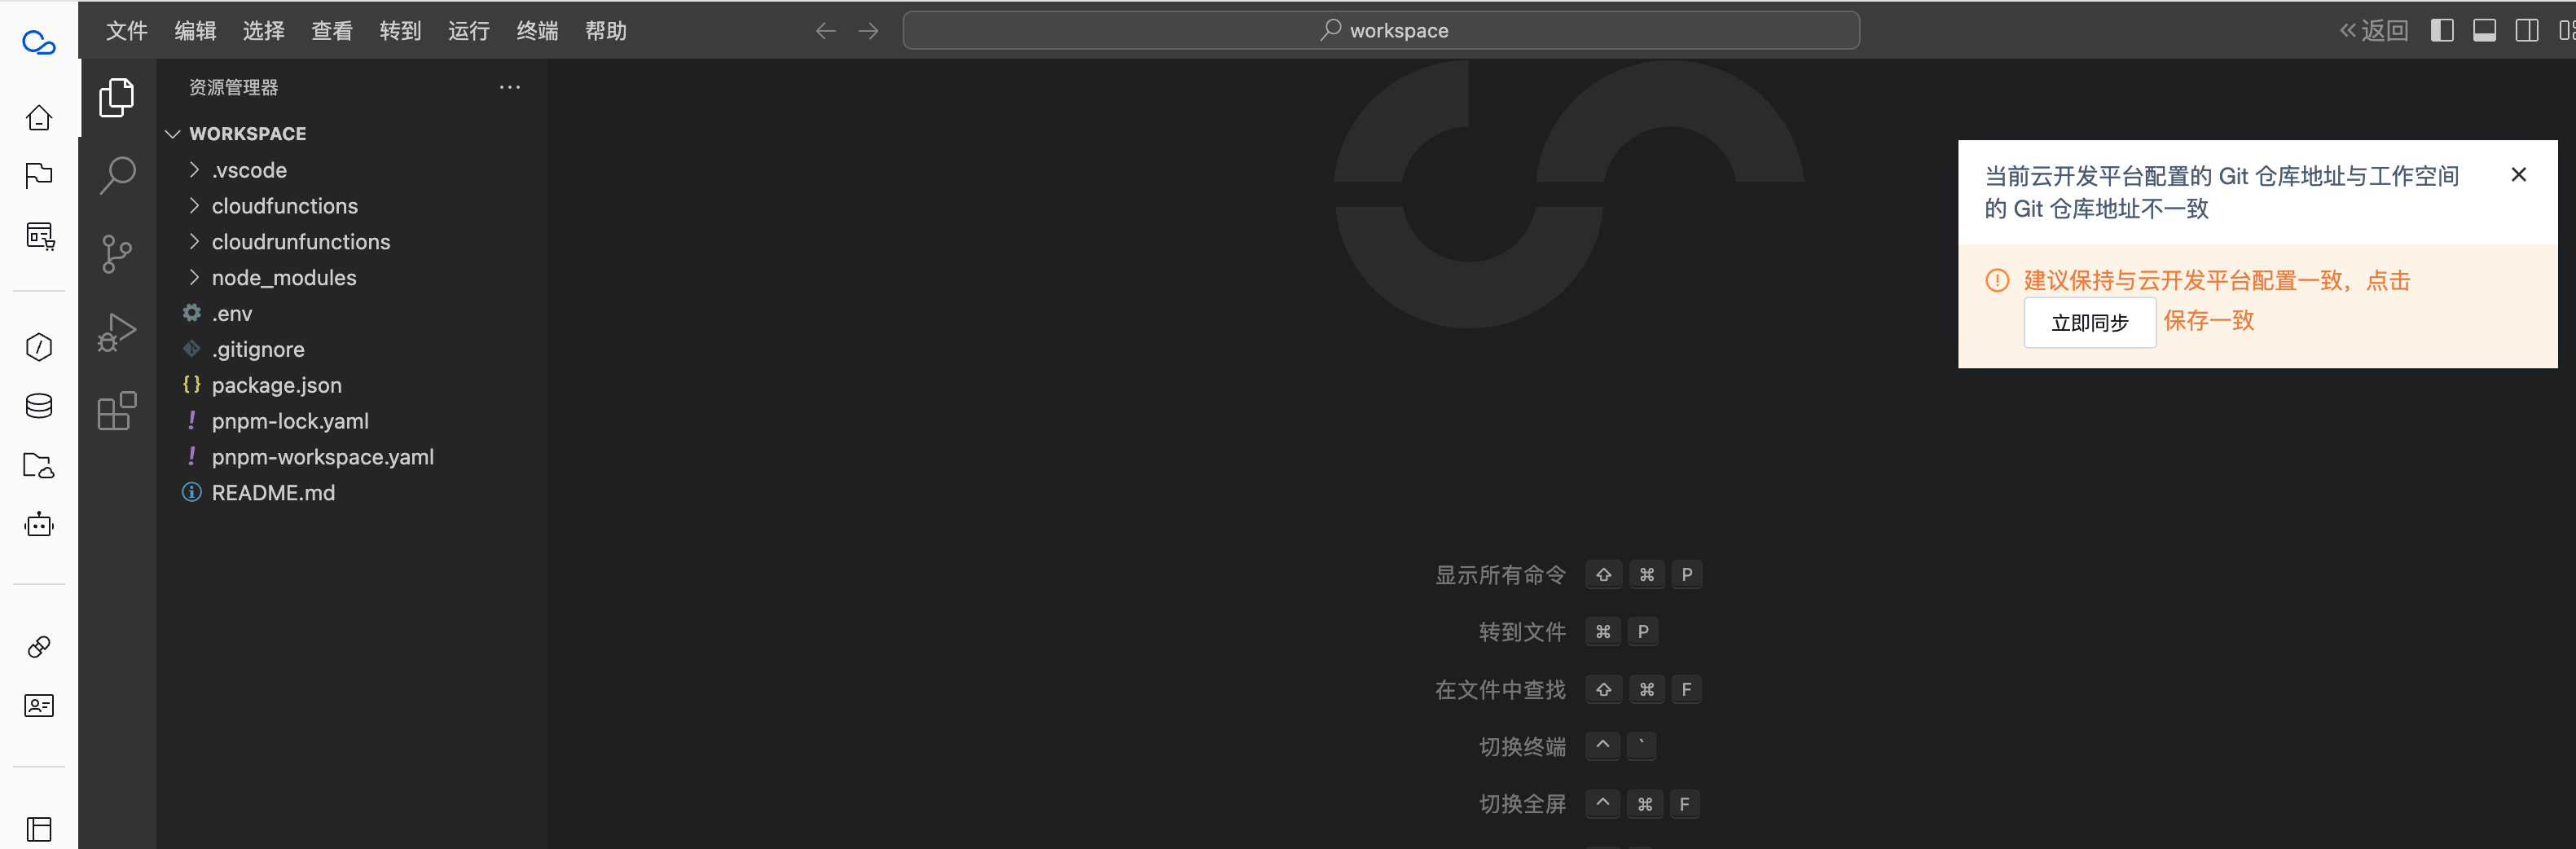
Prompt about repository address inconsistency
When the repository address in the workspace is inconsistent with the configuration in the cloud development platform, the following prompt will appear. Although you can ignore this prompt, it is recommended to keep the repository addresses consistent. Click [Sync Now] to do so.