Adapter Development Guide
@cloudbase/js-sdk only supports the development of conventional Web applications (i.e., browser environments) and is not compatible with other Web-like platforms, such as WeChat Mini Programs, Quick Apps, Cocos, etc. Although most of these platforms support a JavaScript runtime environment, they exhibit significant differences from browser environments in features like network requests, local storage, and platform identifiers. To address these differences, @cloudbase/js-sdk provides a complete adaptation extension solution. By following this solution's specifications, developers can create adapters for corresponding platforms, and then integrate @cloudbase/js-sdk with the adapters to achieve platform compatibility.
Adaptation Specifications
Before developing an adapter, you need to install the officially provided interface declaration module @cloudbase/adapter-interface:
# npm
npm i @cloudbase/adapter-interface
# yarn
yarn add @cloudbase/adapter-interface
The adapter module needs to export an adapter object:
const adapter = {
  genAdapter,
  isMatch,
  // runtime marks the uniqueness of the platform
  runtime: 'platform name'
};

export adapter;
export default adapter;
Must include the following three fields:
runtime:string, the name of the platform, used to uniquely identify the platform;isMatch:Function, determines whether the current runtime environment is the platform and returns abooleanvalue;genAdapter:Function, creates anadapterentity.
runtime
The runtimeis used to uniquely identify the platform. It is recommended to name it using the platform's English name or abbreviation, such asbaidu_miniappfor Baidu Mini Program,qq_miniapp` for QQ Mini Program, etc.
isMatch
The isMatch` function is used to determine whether the current runtime environment matches the adapter, typically by checking platform-specific global variables, APIs, etc. For example, the following code checks whether the runtime environment is the Cocos native platform:
function isMatch(): boolean {
  if (typeof cc === "undefined") {
    return false;
  }
  if (typeof WebSocket === "undefined") {
    return false;
  }
  if (typeof XMLHttpRequest === "undefined") {
    return false;
  }

  if (!cc.game) {
    return false;
  }
  if (typeof cc.game.on !== "function") {
    return false;
  }
  if (!cc.game.EVENT_HIDE) {
    return false;
  }
  if (!cc.game.EVENT_SHOW) {
    return false;
  }

  if (!cc.sys) {
    return false;
  }
  if (!cc.sys.isNative) {
    return false;
  }

  return true;
}
genAdapter
The genAdapter` function returns the entity object of the adapter, with the following structure:
interface SDKAdapterInterface {
  // Global root variable, in the browser environment, it is window
  root: any;
  // WebSocket class
  wsClass: WebSocketContructor;
  // request class
  reqClass: SDKRequestConstructor;
  // When localstorage is unavailable, persistence=local falls back to none
  localStorage?: StorageInterface;
  // When sessionStorage is unavailable, persistence=session falls back to none
  sessionStorage?: StorageInterface;
  // storage mode is preferred and takes precedence over persistence
  primaryStorage?: StorageType;
  // Captcha configuration
  captchaOptions?: {
    // Open a web page and obtain the CaptchaToken via URL callback; this function can be customized for different platforms
    openURIWithCallback?: (url: string) => Promise<CaptchaToken>;
  };
  // api to obtain the unique application identifier for the platform
  getAppSign?(): string;
}
Example
import {
  AbstractSDKRequest,
  IRequestOptions,
  IUploadRequestOptions,
  StorageInterface,
  WebSocketInterface,
  WebSocketContructor,
  SDKAdapterInterface,
  StorageType,
  formatUrl,
} from "@cloudbase/adapter-interface";

// The isMatch function determines whether the current platform matches
function isMatch(): boolean {
  // ...
  return true;
}

// The Request class is a platform-specific network request that must implement three public interfaces: post/upload/download
export class Request extends AbstractSDKRequest {
  // Implement the post interface
  public post(options: IRequestOptions) {
    return new Promise((resolve) => {
      // ...
      resolve();
    });
  }
  // Implement the upload interface
  public upload(options: IUploadRequestOptions) {
    return new Promise((resolve) => {
      // ...
      resolve();
    });
  }
  // Implement the download interface
  public download(options: IRequestOptions) {
    return new Promise((resolve) => {
      // ...
      resolve();
    });
  }
}
// Storage is a platform-specific local storage that must implement four interfaces: setItem/getItem/removeItem/clear
export const Storage: StorageInterface = {
  setItem(key: string, value: any) {
    // ...
  },
  getItem(key: string): any {
    // ...
  },
  removeItem(key: string) {
    // ...
  },
  clear() {
    // ...
  },
};
// WebSocket is a platform-specific WebSocket that conforms to the HTML5 standard specification
export class WebSocket {
  constructor(url: string, options: object = {}) {
    const socketTask: WebSocketInterface = {
      set onopen(cb) {
        // ...
      },
      set onmessage(cb) {
        // ...
      },
      set onclose(cb) {
        // ...
      },
      set onerror(cb) {
        // ...
      },
      send: (data) => {
        // ...
      },
      close: (code?: number, reason?: string) => {
        // ...
      },
      get readyState() {
        // ...
        return readyState;
      },
      CONNECTING: 0,
      OPEN: 1,
      CLOSING: 2,
      CLOSED: 3,
    };
    return socketTask;
  }
}

// The genAdapter function creates an adapter entity
// options are the parameters passed when cloudbase.useAdapters(adapter, options) is called
function genAdapter(options) {
  const adapter: SDKAdapterInterface = {
    // root is the global root object; initialize as an empty object {} if not present
    root: window,
    reqClass: Request,
    wsClass: WebSocket as WebSocketContructor,
    localStorage: Storage,
    // First, for the cache storage strategy, it is recommended to always use localstorage
    primaryStorage: StorageType.local,
    // sessionStorage is optional and can be omitted if the platform does not support it
    sessionStorage: sessionStorage,
  };
  return adapter;
}

// All three are indispensable
const adapter = {
  genAdapter,
  isMatch,
  // runtime marks the uniqueness of the platform
  runtime: "platform name",
};

export default adapter;
Access Process
Step 1: Install and import the adapter
Install @cloudbase/js-sdk and the adapter for the required platform, such as the QQ mini-game platform:
# Install @cloudbase/js-sdk
npm i @cloudbase/js-sdk
# Install the QQ Mini-Game Adapter
npm i cloudbase-adapter-qq_game
Then, introduce the adapter in the business code:
import cloudbase from "@cloudbase/js-sdk";
import adapter from "cloudbase-adapter-qq_game";

// After options are passed in, they can be accessed in the adapter's genAdapter function
cloudbase.useAdapters(adapter, options);
Step 2: Configure Security Application Source
CloudBase requires verification of request source legitimacy. Conventional Web environments use secure domains for verification, but as mentioned above, many Web-like environments lack the concept of domains. Therefore, secure application credentials are needed to distinguish legitimate request sources.
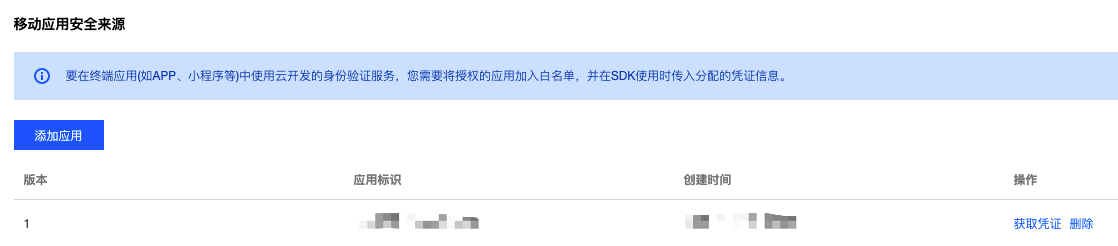
Log in to the CloudBase console, navigate to the Security Sources page, and in the Mobile Application Security Sources section, click the "Add Application" button to enter the application identifier.
The application identifier must be information that uniquely identifies the application, such as the appId for WeChat Mini Programs, the package name for mobile applications, etc.
Upon successful addition, a security application record will be created, as shown in the figure below:
Step 3: Initialize CloudBase
When initializing CloudBase in the business code, pass the security application information configured in Step 2 as a parameter to the init method:
import cloudbase from '@cloudbase/js-sdk';
import adapter from 'cloudbase-adapter-qq_game';

cloudbase.useAdapters(adapter);

cloudbase.init({
  env: 'Environment ID',
  appSign: 'Application Identifier',
  appSecret: {
    appAccessKeyId: 'Application Credential Version Number'
    appAccessKey: 'Application Credential'
  }
})
appSign:string, Application Identifier, corresponding to the "Application Identifier" field in the above figure;appSecret:Object, application credential information, including the following fields:appAccessKeyId:string, corresponding to the "Version" field in the above figure. The same application identifier can have up to two versions of credential information to distinguish between development and production environments;appAccessKey:string, corresponds to the information obtained after clicking "Get Credentials" in the "Operations" column of the above figure.
The appAccessKeyandappAccessKeyId` must correspond one-to-one.
Step 4: Write Business Code
After completing the above preparations, you can proceed to write your business code.
A Single Codebase for Multi-end Adaptation
@cloudbase/js-sdk has built-in adapters for Web and Mini Programs, requiring no configuration for these two platforms.
If you need to make a single codebase compatible with multiple platforms, @cloudbase/js-sdk can incorporate multiple adapters simultaneously. During runtime, it uses each adapter's isMatch function to determine the platform type and then loads the corresponding compatibility logic. For example, the following code can simultaneously support three platforms: QQ Mini Games, Cocos native, and Baidu Mini Games:
import cloudbase from '@cloudbase/js-sdk';
import adapter as adapterOfQQGame from 'cloudbase-adapter-qq_game';
import adapter as adapterOfCocosNative from 'cloudbase-adapter-cocos_native';
import adapter as adapterOfBDGame from 'cloudbase-adapter-bd_game';

cloudbase.useAdapters([
  adapterOfQQGame,
  adapterOfCocosNative,
  adapterOfBDGame
]);
Captcha Handling Guide
1. Overview
It details the complete process of handling captchas, including captcha trigger scenarios, adapter modifications, event handling, and user interaction.
2. Captcha Trigger Scenarios
A captcha will be required to be entered in the following situations:
- After 5 failed username and password login attempts
- When the frequency limit for sending mobile phone number or email verification codes is reached.
When a captcha is required, the interface returns the following error information
{
  // ...
  data: {
    error: "captcha_required",
    error_code: 4001,
    error_description: "captcha_token required"
  }
}
3. Complete Processing Flow
Adapter Modification
// options are passed in via the second parameter of useAdapters
// For example: cloudbase.useAdapters(adapter, options);
function genAdapter(options) {
  const adapter: SDKAdapterInterface = {
    // Other adapter configurations...

    captchaOptions: {
      // When it is detected that a captcha is required, this function is automatically triggered.
      // url is a string containing parameters such as the captcha image, token, state, etc.
      openURIWithCallback: async (url: string) => {
        // Parse the captcha parameters in the URL
        const { captchaData, state, token } = cloudbase.parseCaptcha(url);

        // Send captcha data via the event bus for frontend caching and display.
        options.EVENT_BUS.emit("CAPTCHA_DATA_CHANGE", {
          captchaData, // Base64-encoded captcha image
          state, // Captcha state identifier
          token, // captcha token
        });

        // Listen for the captcha verification result
        return new Promise((resolve) => {
          console.log("Waiting for captcha verification result...");
          options.EVENT_BUS.once("RESOLVE_CAPTCHA_DATA", (res) => {
            // Verification result of auth.verifyCaptchaData
            resolve(res);
          });
        });
      },
    },
  };
  return adapter;
}
Initialization and Adapter Configuration
// Create an event bus instance
const EVENT_BUS = new EventBus();

// Configure and use the adapter, inject EVENT_BUS into genAdapter
cloudbase.useAdapters(adapter, { EVENT_BUS });
const app = cloudbase.init({
  env: 'Environment ID',
  appSign: 'Application Identifier',
  appSecret: {
    appAccessKeyId: 'Application Credential Version Number'
    appAccessKey: 'Application Credential'
  }
});
const auth = app.auth();
Captcha Interface Implementation
// Store the current captcha state
let captchaState = {
  captchaData: "", // Base64-encoded captcha image
  state: "", // Captcha state identifier
  token: "", // captcha token
};

// Listen for captcha data changes
EVENT_BUS.on("CAPTCHA_DATA_CHANGE", ({ captchaData, state, token }) => {
  console.log("Received captcha data", { captchaData, state, token });

  // Update the local captcha state
  captchaState = { captchaData, state, token };

  // Display the captcha image in the page, for example in web using img tag as shown below
  document.getElementById('captcha-image').src = captchaData;
});

// User clicks refresh captcha to trigger this function.
const refreshCaptcha = async () => {
  try {
    // Get the latest captcha information
    const result = await auth.createCaptchaData({ state: captchaState.state });

    // Update the local captcha state
    captchaState = {
      ...captchaState
      captchaData: result.data,
      token: result.token,
    };

    // Update the displayed captcha, for example in web using img tag as shown below
    document.getElementById('captcha-image').src = result.data;
  } catch (error) {
    console.error("Refresh captcha failed", error);
  }
};

// User submits the captcha to trigger this function.
const verifyCaptchaData = async (userCaptcha) => {
  try {
    // Verify the Captcha.
    const verifyResult = await auth.verifyCaptchaData({
      token: captchaState.token,
      key: userCaptcha
    });

    // Notify the adapter of the verification result
    EVENT_BUS.emit("RESOLVE_CAPTCHA_DATA", verifyResult);

    // Verification successful, proceed with login process
    console.log("Captcha verification successful");
  } catch (error) {
    console.error("Captcha verification failed", error);
    // Can choose to refresh the captcha
    await refreshCaptcha()
  }
};
Complete Flow
- User attempts to log in or send the verification code
- If a captcha requirement is triggered, the SDK throws a captcha_required error
- The adapter captures the error and calls openURIWithCallback
- The system parses the captcha parameters and sends them via EVENT_BUS.
- The front-end displays the captcha image and waits for user input
- User enters the captcha and submits
- The system validates and returns the result
- The system determines whether to retry the original operation based on the verification result
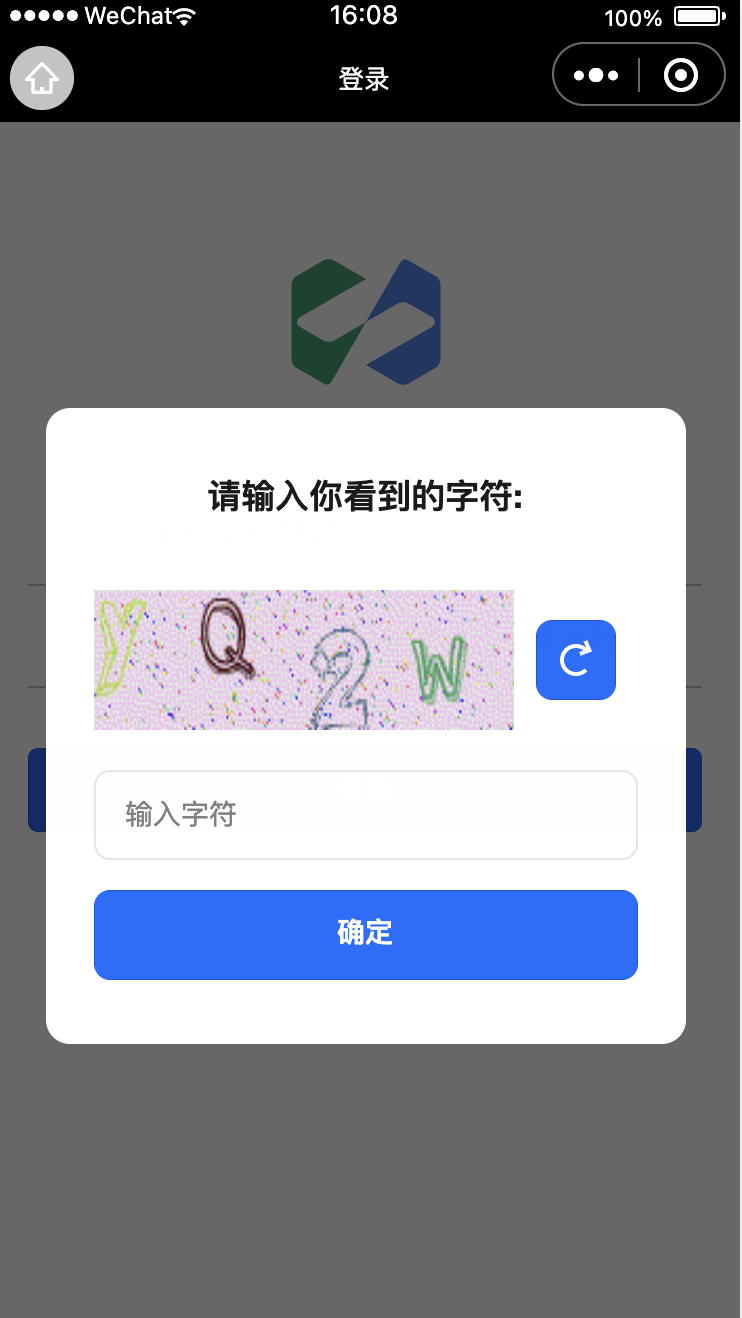
Captcha Display Effect