Agent Development Best Practices
This guide covers the recommended path for developing and deploying AI Agents on CloudBase, helping you complete the full "create → debug → invoke" loop in the shortest time while avoiding common pitfalls.
Core Concepts
Before you start, establish three key facts:
| Concept | Description |
|---|---|
| How an Agent runs | An Agent deployed on CloudBase is essentially an HTTP service listening on a port (Web cloud function form). The official template includes this service out of the box; if you build your own project, you implement it yourself (see below) |
| Unified invocation entry | Once deployed, your Agent is served through the CloudBase gateway at https://<envId>.api.tcloudbasegateway.com/v1/aibot/bots/<agentId>/<path>. The gateway forwards <path>, the HTTP method, and the request body as-is to your service, and streams responses frame by frame |
| Model endpoint | Built-in large models are exposed through an OpenAI-compatible API at https://<envId>.api.tcloudbasegateway.com/v1/ai/cloudbase. The official template uses this endpoint by default, with the model credential passed via the CLOUDBASE_APIKEY environment variable |
Two Development Approaches
| Approach | When to use | Effort |
|---|---|---|
| Create from console template (recommended) | Most scenarios. Based on the official cloudbase-agent template, ready to use upon creation | Low. Deployment, model credentials, and the invocation protocol are all configured automatically — no keys to fill in manually |
| Build your own project with the CLI | You need a specific framework (LangChain, LangGraph, etc.) or have special requirements for the service form | Medium. You handle the bootstrap script, HTTP service, and model credentials yourself — see "Building Your Own Project" below |
Recommended Path: Console Template
Step 1: Create the Agent
Create an Agent on the "AI - Agent" page in the console and choose the official cloudbase-agent template. During creation the platform automatically completes:
- Deployment and initialization of the Agent service
- Model credential injection (
CLOUDBASE_APIKEY,AGENT_MODEL, and other environment variables are configured automatically)
No API Key needs to be entered at any point. Wait for the Agent status to become "Normal" after creation.
Step 2: Debug in the Console
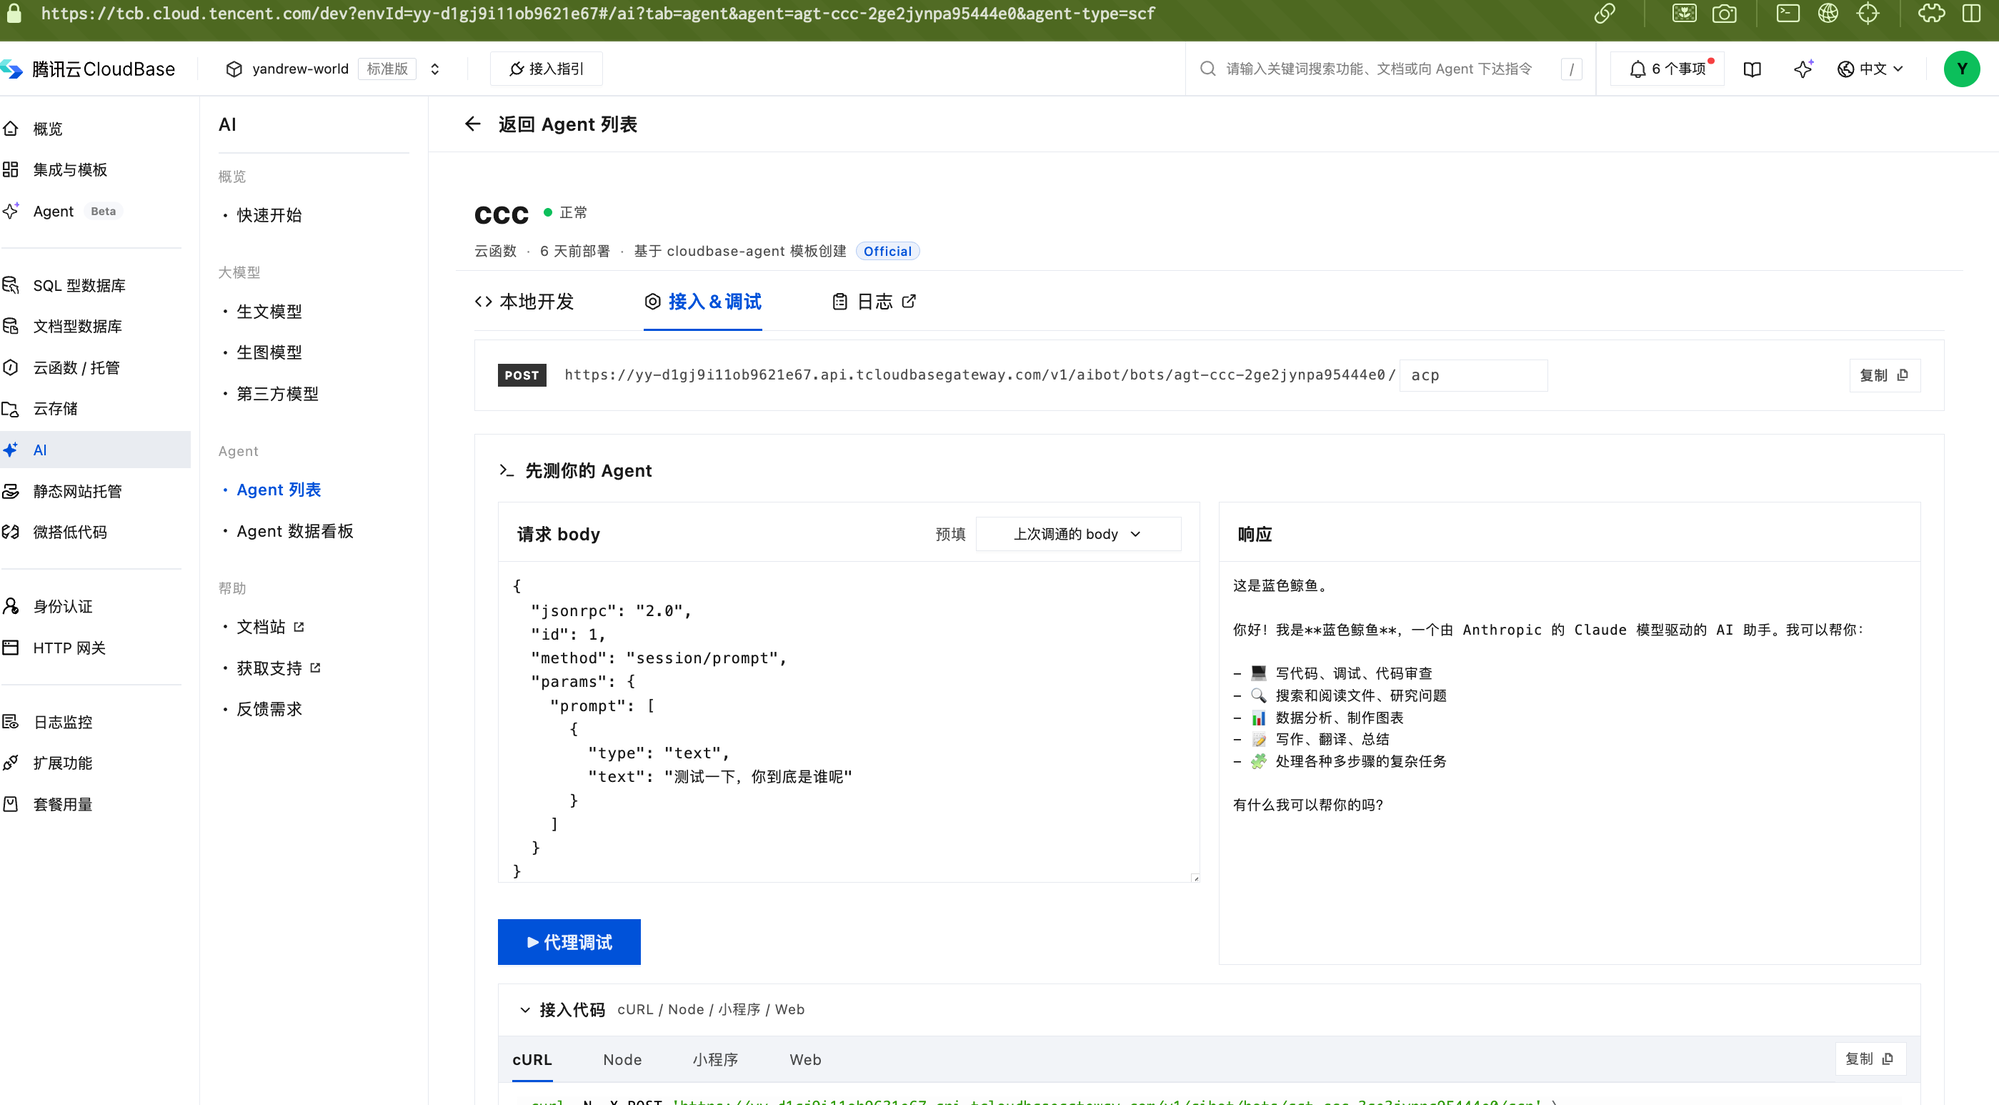
Open the "Integration & Debugging" tab on the Agent detail page to start a test conversation and verify the Agent is ready. The template Agent's conversation API follows the JSON-RPC format:
{
  "jsonrpc": "2.0",
  "id": 1,
  "method": "session/prompt",
  "params": {
    "prompt": [{ "type": "text", "text": "Hello, introduce yourself" }]
  }
}
Receiving a normal model reply means the entire chain — deployment, gateway routing, and model invocation — is working.
Step 3: Pull the Code for Local Development
The "Local Development" tab on the Agent detail page provides the complete commands for your specific Agent (with your agentId and envId filled in — copy the whole block into your terminal):
# 1. Install the CLI and log in
npm install -g @cloudbase/cli && tcb login

# 2. Pull the Agent code locally
tcb fn code download <agentId> ./my-agent -e <envId>

# 3. Start local debugging
cd my-agent
rm -rf node_modules && npm install && npm run dev
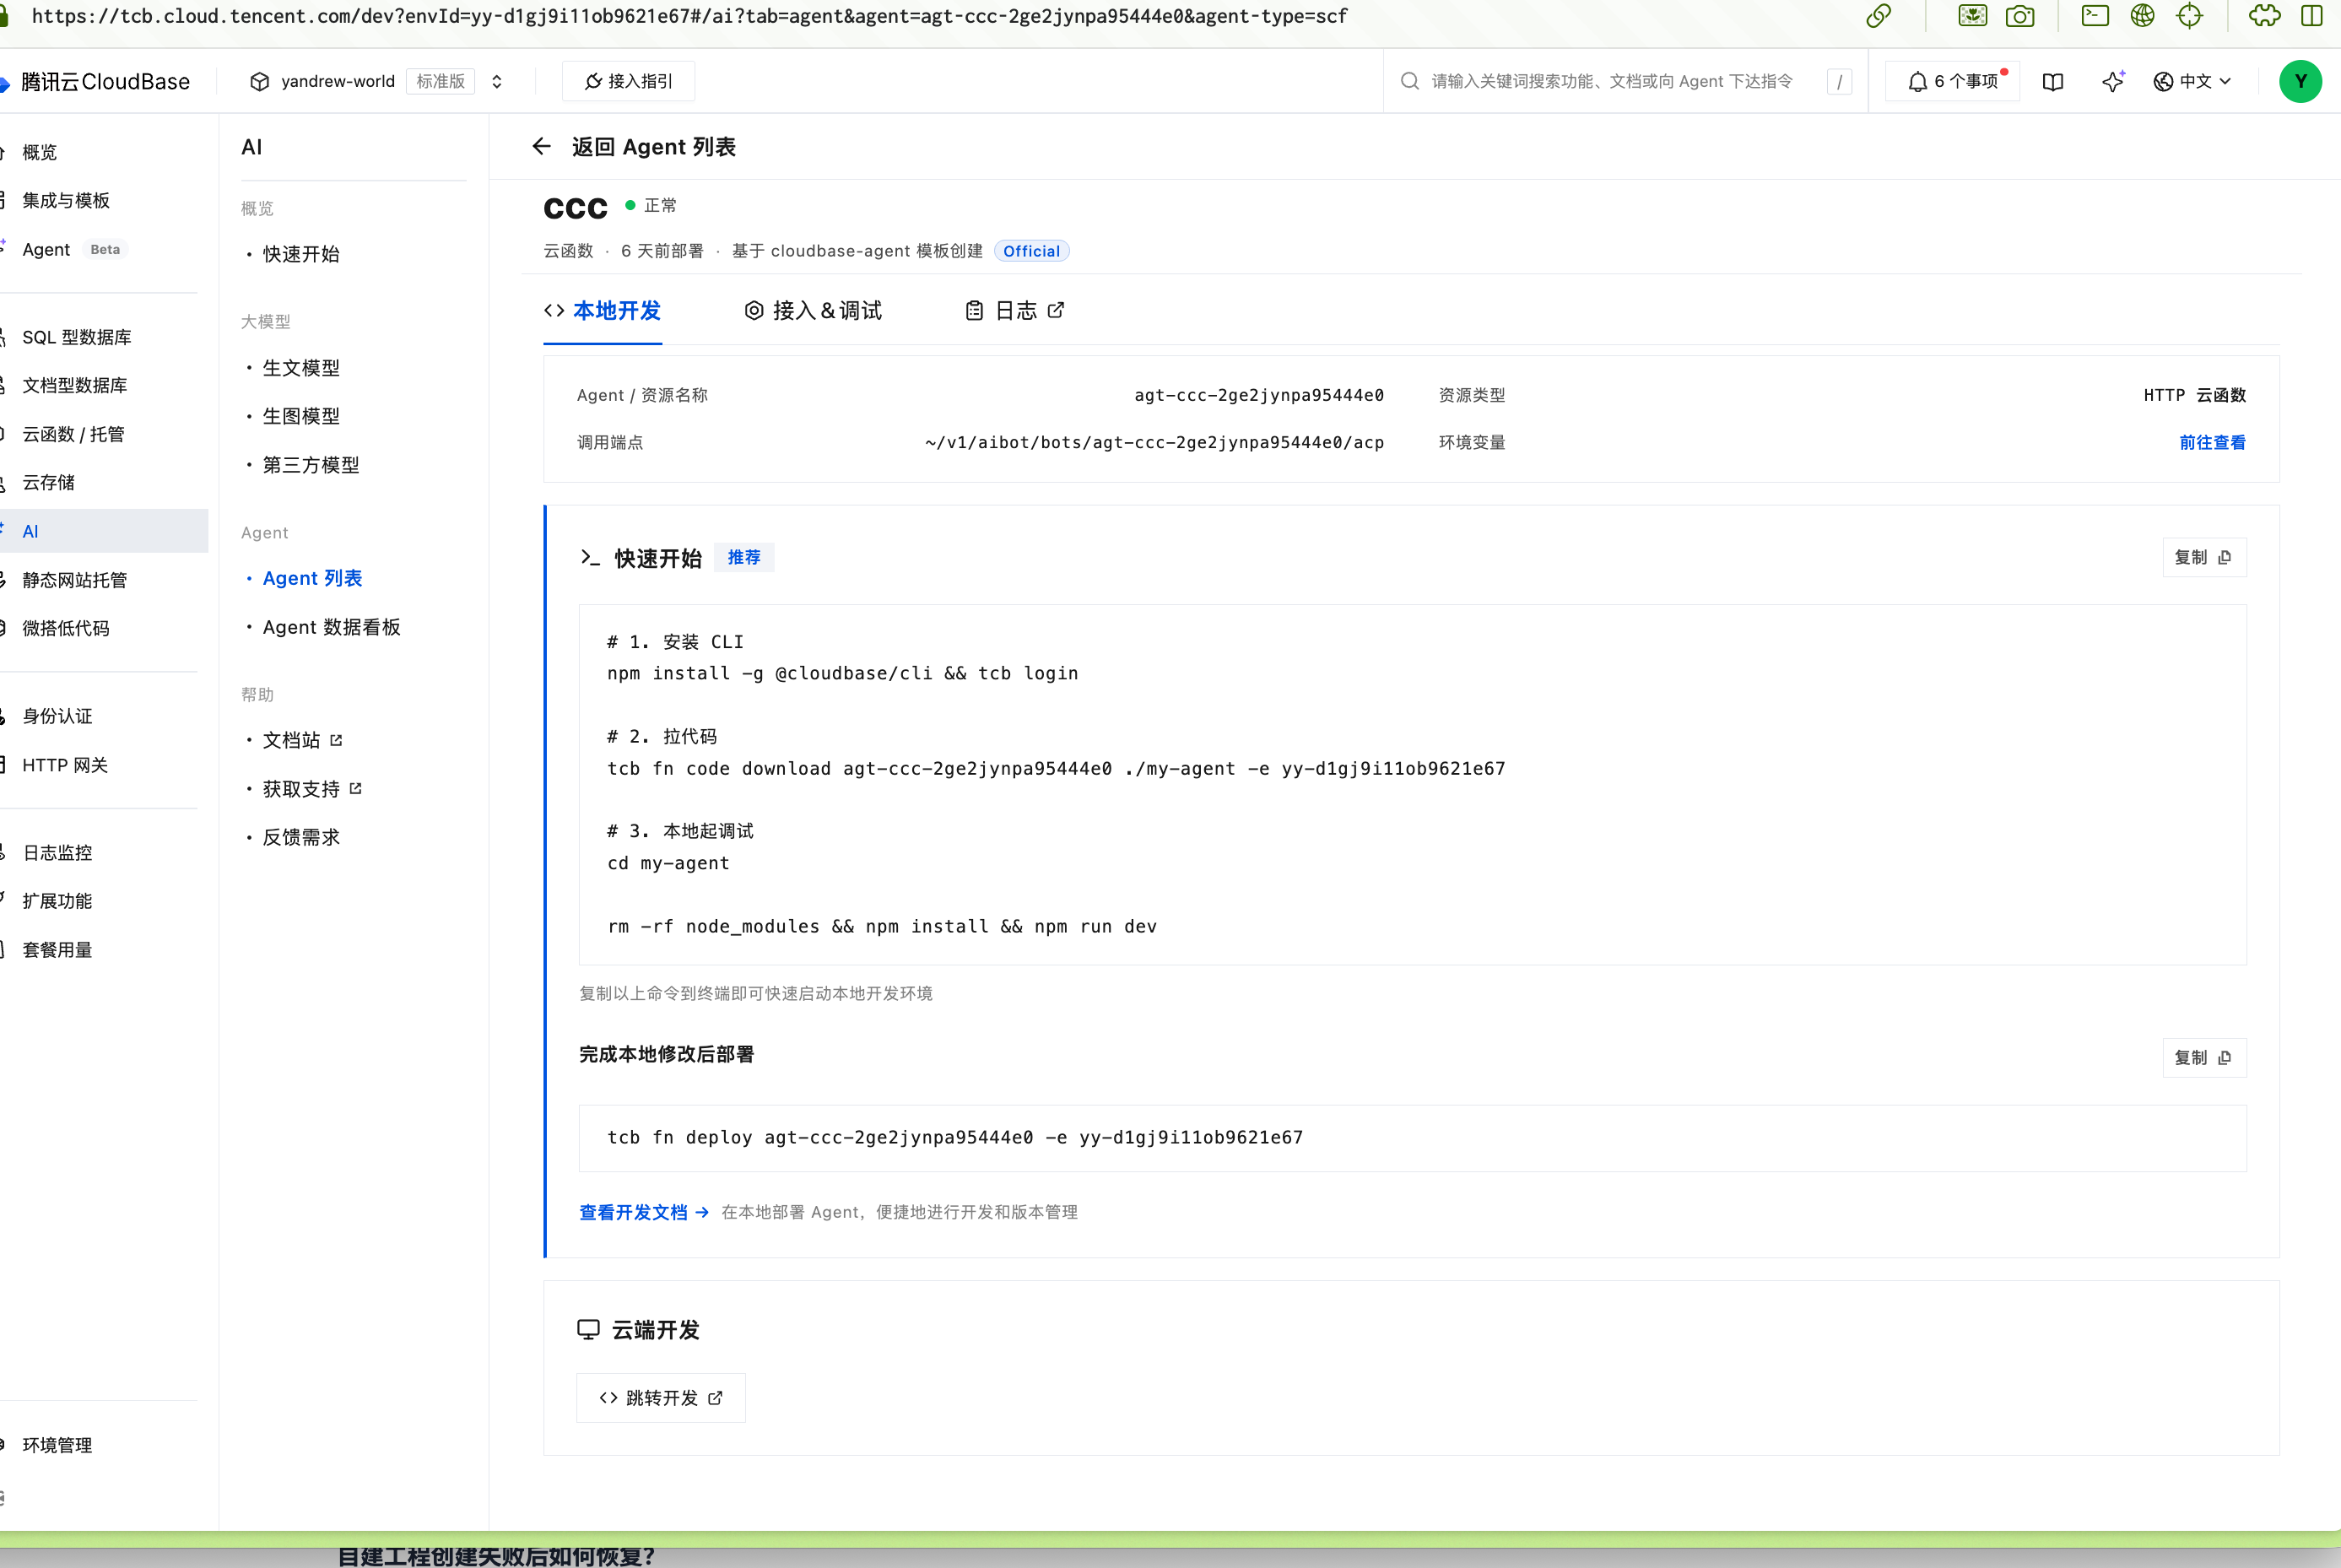
After verifying your changes locally, publish back to the cloud with one command:
tcb fn deploy <agentId> -e <envId>
Key points:
- Local runs need model credentials:
CLOUDBASE_APIKEY,AGENT_MODEL, andCLOUDBASE_ENV_IDare configured automatically for the cloud deployment — use the same values locally. Find them via "Environment Variables - View" at the top right of the detail page - Switching models: change the
AGENT_MODELenvironment variable. Use model names that are enabled on the "AI - Large Models" page in the console - Extending capabilities: the template is built on @cloudbase/open-agent-kernel (OAK), whose configuration supports tool calling (MCP), session persistence, multimodal attachments, human-in-the-loop approval, and more
- For more local debugging details, see Agent Local Development
Step 4: Hand Development to Your AI Coding Tool
If you use an AI coding tool such as Claude Code, Cursor, or Codex, you can hand the entire local development workflow over to it:
- Create an environment API Key on the "Environment Settings - API Key" page in the console
- Provide the Key to your terminal or coding agent as an environment variable (e.g.
export CLOUDBASE_APIKEY=<key>) - The coding agent can then complete the full loop for you: pulling code, local debugging, verifying the model endpoint and Agent endpoint, and deploying
Note: the environment API Key carries high privileges. Use it only in development environments, and never commit it to a code repository or ship it in frontend code.
For deeper agent-assisted development (MCP, rules files), see CloudBase AI Toolkit.
Step 5: Invoke from Your Server
The "Integration & Debugging" tab provides ready-to-copy integration code for cURL / Node / Mini Program / Web. Using cURL as an example:
curl -N -X POST "https://<envId>.api.tcloudbasegateway.com/v1/aibot/bots/<agentId>/acp" \
  -H "Authorization: Bearer <environment API Key>" \
  -H "Accept: text/event-stream" \
  -H "Content-Type: application/json" \
  -d '{"jsonrpc":"2.0","id":1,"method":"session/prompt","params":{"prompt":[{"type":"text","text":"Hello"}]}}'
- Server-side calls must carry
Authorization: Bearer <environment API Key>; requests without it return 401. Environment API Keys are managed on the "Environment Settings - API Key" page in the console - The response is an SSE stream of
session/updateevents. Note that there are multiple event types: onlyagent_message_chunk(message text) andagent_thought_chunk(thinking) carry incremental text atparams.update.content.text; other types such asagent_phaseandusage_updatedo not have that field. Clients should branch onsessionUpdatetype and ignore unrecognized event types. See the ACP protocol documentation for the full event definitions - Web / Mini Program clients should call with an authentication login state — never expose the environment API Key in frontend code
Building Your Own Project
When building your own project with a framework of your choice (LangChain, LangGraph, CrewAI, etc.), start from the httpfunctions/ directory of the official examples repository awesome-cloudbase-examples. Three things determine whether deployment succeeds:
1. A scf_bootstrap startup script is required
The project root needs an executable scf_bootstrap file as the startup entry:
#!/bin/bash
export PORT=${PORT:-9000}
node src/index.js
Run chmod 755 scf_bootstrap after creating it. Deployment fails without this file, with the error ResourceNotFound.Entryfile.
2. The code form is an HTTP server
const http = require('http');
http.createServer(handler).listen(process.env.PORT || 9000);
Listen on the port specified by the PORT environment variable (default 9000). Do not write an event-style function like exports.main = ....
3. Deploy with the CLI
Use the CloudBase CLI (version 3.7 or later):
tcb agent create -e <envId> --name my-agent --runtime Nodejs20.19 \
  --code . --install-dep --memory-size 1024 \
  --ignore ".git,node_modules,.DS_Store" \
  --env "OPENAI_API_KEY=<environment API Key>,OPENAI_BASE_URL=https://<envId>.api.tcloudbasegateway.com/v1/ai/cloudbase,OPENAI_MODEL=<model name>"
Key points:
- Use the
Nodejs20.19runtime --install-dep: dependencies are installed in the cloud; the localnode_modulesdoes not need to be uploaded (always pair it with--ignore)- The default timeout is 7200 seconds, designed for long-lived Agent connections — no need to change it
- Environment variable names follow the README of the example project you use (the example above follows the
httpfunctions/series convention). Note: even when the Agent and the model are in the same environment, calls to the model endpoint must carry the environment API Key explicitly — the platform does not inject credentials into self-built deployments - After deploying, poll with
tcb agent detail <agentId> -e <envId>and invoke onceReadyshows ready; initialization taking several minutes on first deployment is normal - The gateway imposes no constraints on paths or protocols, so you can implement your own API. To integrate with official frontend components, implement the corresponding protocol as described in the Agent development documentation
Release and Stability
When iterating on an Agent with AI coding tools, changes are frequent and the scope of a single change is hard to control — the gap between "looks like it works" and "is actually correct" grows. The following practices help you iterate fast without breaking production.
Environment isolation. Use separate CloudBase environments — each with its own API Key — for development and production: the development environment allows the AI tool to iterate freely, while production only accepts versions that pass acceptance checks. Inject the environment ID and Key via environment variables with no hardcoding, so the same code deploys to both environments unchanged.
Blue-green releases, no in-place patching. For each release, create a new Agent (getting a new agentId) → run the acceptance script against the new agentId → switch the caller configuration to the new version once it passes → switch back to the old agentId for instant rollback if anything goes wrong → clean up the old version after the new one has run stably. Delete and recreate failed deployments rather than repeatedly patching a failed instance. If your Agent relies on stateful sessions, confirm before switching that session data is persisted in environment-level storage such as a database rather than process memory, otherwise switching interrupts existing users' conversations.
Protocol-level acceptance, not just eyeballing output. The most typical hidden failure in AI-generated code is a "half-working" interface: the stream produces text, but the completion event is missing or wrong, and protocol-compliant frontend components hang — invisible when eyeballing a demo. Acceptance scripts should verify: the event stream completes properly (not just "text was received"); authentication in both directions (valid credential returns 200, missing credential returns 401); plus 3–5 fixed-input smoke cases covering the main paths. Keep the script in the repository and run it before every release; AI-modified code goes through the same acceptance before merging. Contract assertions are locked by the developer — the AI tool must not modify the acceptance script itself.
Dependency pinning. Use exact version numbers in package.json instead of ^/~ — AI framework dependencies iterate extremely fast, and loose ranges cause "deployed last week, fails to install this week" drift. Explicitly instruct your AI coding tool: do not change dependency versions or protocol adapter code; only change business logic.
Quota monitoring and degradation. Large model token usage is metered independently of resource points (see FAQ below). For important workloads, check "Package Usage - Token Usage" in the console regularly, prepare a fallback path (top up token resource packs or configure your own model API Key), and have clients degrade gracefully on 429 responses.
Do's and Don'ts
| ✓ Do | ✗ Don't |
|---|---|
| Start from the console template — credentials and protocol layer work out of the box | Hand-write the protocol layer and credential management from scratch |
| Separate development and production environments with their own API Keys | Mix everything in one environment and let AI tools operate on production |
| New deployment + verification + traffic switch, keeping the old version for rollback | Update production in place with no version to roll back to |
Access models through the /v1/ai/cloudbase endpoint | Hardcode a single-vendor endpoint whose quota is metered separately |
Pin verified dependency versions in package.json | Use loose version ranges (^) that let frameworks drift across versions |
| Verify self-built projects locally before deploying | Deploy first and debug in the cloud |
| Confirm the full response stream completes properly when verifying | Treat any text output as success |
FAQ
Model calls return 429 EXCEED_TOKEN_QUOTA_LIMIT?
Large model token usage is metered independently of resource points, and each model endpoint has its own separate quota. To troubleshoot:
- Check token consumption and remaining quota per model under "Package Usage - Token Usage" in the console
- Confirm your code uses the
/v1/ai/cloudbaseendpoint - If quota is exhausted, purchase a token resource pack, or configure your own model API Key under "AI - Large Models"
Model calls return 403 AI_MODEL_NOT_SUPPORTED?
The requested model name is not enabled in the current environment. Use the models shown on the "AI - Large Models" page in the console, and match the model name exactly (including version suffixes).
Agent calls return 401?
The request carries no valid authentication. Server-side calls need Authorization: Bearer <environment API Key>; frontend calls use the authentication login state.
Deployment never becomes ready?
An Agent takes several minutes to initialize after creation — this is normal. If it stays unready for a long time, check the failure reason with tcb agent detail; for self-built projects the most common causes are a missing scf_bootstrap or failed dependency installation.
How do I recover from a failed create in a self-built project?
After fixing the issue, delete the failed Agent with tcb agent delete <agentId> --yes and run tcb agent create again; in-place updates on a failed instance are not recommended.